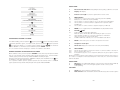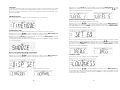
1
1
2
4
5
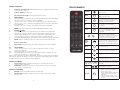
MENU/SELECT
MODE
DOWN
7
6
3
BT PAIR /
SCAN
BACK
UP
VOL /
MIN
MAX
AUX
10
8
1
9
11
2
MODE
INFO
SCAN
EQ
MENU
1
BACK
ENTER
2
1/6
2/7
3/8
4/9
5 / 10
SHIFT
SNOOZE
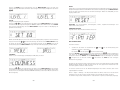
1
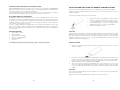
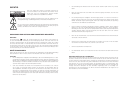
Indicatore stato Bluetooth: lampeggiante durante l’accoppiamento del dispositivo,
acceso quando connesso.
Premere questo pulsante per accendere o
spegnere la radio
STANDBY
2
Schermo display: schermo LCD
3
Ricevitore Infrarossi (IR): riceve il segnale dal telecomando
4
4.1
4.2
4.3
4.4
4.5
MENU/SELECT:
Pressione lunga per accedere alle varie voci riguardanti il Menu globale della radio (MENU)
Pressione veloce per confermare la selezione (ENTER)
Ruotare in senso orario o antiorario per accedere alle varie voci del Menu globale
Ruotare in senso orario o antiorario per regolare la stazione successiva o precedente
in modalità DAB
Ruotare in senso orario o antiorario per regolare la frequenza in modalità FM
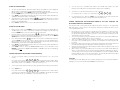
5
MODE: premere per navigare tra le modalità DAB/FM/Bluetooth (BT) e AUX
6
6.1
6.3
BT PAIR/ /SCAN
in modalità BT, premere e tenere premuto per l’accoppiamento del dispositivo
Bluetooth fino a quando il led blu comincia a lampeggiare in rapida successione
quando il dispositivo Bluetooth è connesso, una pressione rapida del pulsante
permette di mettere in pausa o riavviare la riproduzione del dispositivo BT.
in modalità DAB e FM permette di eseguire la scansione delle stazioni radio disponibili
7
BACK: all’interno del Menu, premere per tornare al precedente livello del menu
8
Ingresso audio cuffie
9
Barra volume: visualizza il livello del volume dell’unità (spento quanto in MUTE).
6.2
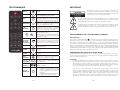
MODE
MODE
INFO
INFO
EQ
SCAN
PAIR
PLAY/
PAUSE/
PAIR
PAIR
MENU
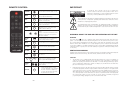
10
10.1
2
VOLUME -
Premere per decrementare il volume di
ascolto.
MUTE
Premere questo pulsante per selezionare o
deselezionare la funzione muto.
2/7
ALARM
1&2
3/8
4/9
5/10
1
PANNELLO SUPERIORE
1
2
Maniglia: estrarre la maniglia per il trasporto della radio
Antenna radio: allungare e piegare l’antenna per ottenere la posizione migliore
per la ricezione
4
Premere questo pulsante per accedere alle
impostazioni del menu.
Premere per aumentare il volume di ascolto.
1/6
Ingresso DC: utilizzare l’adattatore CA fornito per connetterlo alla presa di
corrente elettrica (12VDC 2A)
R-SPR OUT: utilizzare per connettere lo speaker destro per ottenere un sistema
stereo (venduto separatamente)
Durante la riproduzione Bluetooth, premere
per avviare o mettere in pausa l’ascolto del
dispositivo associato. Tenere premuto per
l’accoppiamento di un dispositivo Bluetooth.
VOLUME +
PANNELLO FRONTALE
1
Permette di eseguire una scansione completa
delle radio in modalità DAB. Premere per
cercare la successiva stazione radio in
modalità FM
Pulsanti per la navigazione all’interno del
menu nelle varie modalità disponibili.
Incrementa o decrementa la frequenza nella
modalità FM o seleziona la successiva o la
precedente stazione DAB disponibile.
MENU
VOL/STANDBY:
ruotare questa manopola in senso orario per aumentare il volume o in senso
antiorario per diminuirlo
10.2
premere per spegnere o accendere la radio
10.3
in modalità allarme, premendolo una volta permette di ripetere l’allarme (Snooze),
premendolo nuovamente ne spegne la ripetizione.
N.B: Se l’unità è alimentata unicamente dalle batterie, la pressione di questo pulsante spegnerà
l’alimentazione di modo da ridurne il consumo e aumentare la durata delle batterie. In questa
modalità la funzione orologio e l’allarme verranno disabilitate.
In modalità DAB, FM, mentre si sta ricevendo
un segnale di trasmissione, premere questo
pulsante per visualizzare informazioni
riguardanti la stazione selezionata
Premere per accedere alle equalizzazioni
pre-imposate o per creare la propria
personalizzata.
EQ
SCAN
premere per navigare tra le Modalità DAB/
FM/Bluetooth (BT) e AUX.
SNOOZE
SNOOZE
5
Pulsanti per memorizzare o per richiamare le
stazioni radio impostate (solo nella modalità
DAB e FM)
Premere questo pulsante per impostare
l’allarme (allarme 1 / allarme 2)
Questo pulsante ha tre diverse funzionalità:
1.
arresta la riproduzione dell’allarme
quando questo è attivo.
2.
imposta la dimmabilità del display LCD
quando l’unità è spenta (4 livelli di
luminosità).
3.
imposta l’intervallo di tempo per la
ripetizione dell’allarme quando l’unità
è accesa
ITALIANO
TELECOMANDO
PANNELLO FRONTALE
Per evitare il rischio di scosse elettriche, non rimuovere le viti
poste nel retro del prodotto. Non ci sono parti interne la cui
manutenzione possa essere effettuata dall’utente. In caso di
necessità, rivolgersi esclusivamente a personale di servizio
qualificato.
Il punto esclamativo in un triangolo equilatero serve ad avvisare l’utilizzatore
della presenza di importanti istruzioni di funzionamento e manutenzione nel
libretto allegato al prodotto.
Il simbolo del lampo con terminale a forma di freccia situato all’interno di
un triangolo equilatero serve ad avvisare l’utilizzatore della presenza di una
“tensione pericolosa” non isolata nella struttura del prodotto che potrebbe
essere di un’intensità tale da provocare scosse elettriche all’utilizzatore.
AVVERTENZE RIGUARDANTI L’UTILIZZO E L’IMPIEGO DELL’UNITA’
la vecchia spina tagliata dal cavo di alimentazione, deve essere adeguatamente eliminata per
evitare possibili scosse o folgorazioni dovute all’accidentale inserimento della spina stessa
in una presa di corrente sotto tensione. Se si pensa di non utilizzare l’apparecchio per un
periodo relativamente lungo (ad esempio durante una vacanza), staccare la spina del cavo di
alimentazione dalla presa di corrente alternata di rete.
•
Per evitare il pericolo di incendi, non posizionare sull’apparecchio dispositivi con fiamme
vive (ad esempio una candela accesa, o simili)
•
Prima di collegare per la prima volta l’apparecchio alla sorgente di alimentazione leggere
attentamente la sezione che segue.
•
La tensione della sorgente di elettricità differisce da Nazione a Nazione e da regione a
regione. Verificare che la corrente elettrica di rete della zona dove verrà utilizzata questa
unità sia del voltaggio richiesto (ad esempio 240 V o 110 V), valore riportato sull’etichetta
dell’adattatore CA.
•
Questo prodotto è destinato esclusivamente all’uso domestico. Eventuali disfunzioni
dovute ad usi diversi (quali uso prolungato a scopi commerciali, in ristoranti, o uso in auto
o su navi) e che richiedano particolare riparazioni, saranno a carico dell’utente, anche se
nel corso del periodo di garanzia.
•
Prima di usare questo prodotto, leggere sempre le informazioni riguardanti la sicurezza
poste sul retro di questa unità e sull’etichetta dell’adattatore CA.
•
Tenere il prodotto ed i suoi accessori fuori della portata dei bambini e lattanti. Se inghiottiti
accidentalmente, contattare immediatamente un medico.
•
Conservare l’adattatore CA lontano dalla portata di bambini e lattanti.
•
Il cavo dell’adattatore CA potrebbe accidentalmente avvolgersi attorno al collo e causare
soffocamenti.
AVVERTENZA:
non stacca completamente il flusso di corrente
L’interruttore principale dell’apparecchio
elettrica dalla presa di corrente alternata di rete. Dal momento che il cavo di alimentazione
costituisce l’unico dispositivo di distacco dell’apparecchio dalla sorgente di alimentazione,
il cavo stesso deve essere staccato dalla presa di corrente alternata di rete per sospendere
completamente qualsiasi flusso di corrente. Verificare quindi che l’apparecchio sia stato installato
in modo da poter procedere con facilità al distacco del cavo di alimentazione dalla presa di
corrente, in caso di necessità. Per prevenire pericoli di incendi, inoltre, il cavo di alimentazione
deve essere staccato dalla presa di corrente alternata di rete se si pensa di non utilizzare
l’apparecchio per periodi di tempo relativamente lunghi (ad esempio, durante una vacanza).
AVVERTENZA PER LA VENTILAZIONE
Installare l’apparecchio avendo cura di lasciare un certo spazio attorno allo stesso per
consentire una adeguata circolazione dell’aria e migliorare la dispersione del calore (almeno
10 cm sulla parte superiore, 10 cm sul retro e 10 cm su ciascuno dei lati).
ATTENZIONE
•
La scocca del prodotto è dotata di piccole aperture che servono anche per la ventilazione
dello stesso, allo scopo di garantirne un funzionamento affidabile, e per proteggerlo dal
surriscaldamento. Per prevenire possibili pericoli di incendi le aperture non devono mai
venire bloccate o coperte con oggetti vari durante il funzionamento (quali giornali, tovaglie,
tende o tendaggi, ecc.), e l’apparecchio non deve essere utilizzato appoggiandolo su
tappeti spessi o sul letto.
•
Se la spina del cavo di alimentazione di questo apparecchio non si adatta alla presa di
corrente alternata di rete nella quale si intende inserire la spina stessa, questa deve essere
sostituita con una adatta allo scopo. La sostituzione della spina del cavo di alimentazione
deve essere effettuata solamente da personale di servizio qualificato. Dopo la sostituzione,
6
AVVERTIMENTO RIGUARDANTE IL FILO DI ALIMENTAZIONE
Prendete sempre il filo di alimentazione per la spina. Non tiratelo mai agendo per il filo stesso
e non toccate mai il filo con le mani bagnate, perché questo potrebbe causare cortocircuiti
o scosse elettriche. Non collocate l’unità, oppure altri oggetti sopra al filo di alimentazione
e controllate che lo stesso non sia schiacciato. Non annodate mai il filo di alimentazione ne
collegatelo con altri fili. I fili di alimentazione devono essere collocati in tal modo che non possano
essere calpestati. Un filo di alimentazione danneggiato potrebbe causare incendi o scosse
elettriche. Controllare il filo di alimentazione regolarmente. Quando localizzate un eventuale
danno, rivolgetevi al più vicino centro assistenza autorizzato BV Srl oppure al vostro rivenditore
per la sostituzione del filo di alimentazione.
7
ITALIANO
IMPORTANTE
AVVERTENZA SULLE ONDE RADIO
Questa unità usa frequenze radio da 2,4 GHz di frequenza, una banda usata anche da altri
sistemi wireless (ad esempio forni a microonde e telefoni senza fili).
Se sullo schermo del televisore appare del rumore, è possibile che questa unità (o unità da
essa supportata) stia causando interferenze con i segnali provenienti dal connettore di ingresso
dell’antenna del televisore, apparecchio video, sintonizzatore satellitare, ecc.
In tal caso, aumentare la distanza fra il connettore di ingresso dell’antenna e questa unità
(compresi i prodotti da essa supportati).
BV Srl non è responsabile di malfunzionamenti del prodotto dovuto ad errori/malfunzionamenti
associati alla propria connessione e/o alle attrezzature cui si è collegati. Contattare il fabbricante
del prodotto che si vuole associare.
ATTENZIONE ALL’ADATTATORE CA
Prestate attenzione ad afferrare saldamente l’involucro dell’adattatore CA se dovete rimuoverlo
dalla presa di correte. Se tirate il cavo della corrente, lo stesso potrebbe danneggiarsi provocando
un incendio e/o folgorazione. Non cercate di rimuovere l’adattatore CA tirandolo con le mani
nude. Ciò potrebbe causare folgorazione.
Non lasciare la spina del cavo di alimentazione dell’adattatore CA nella presa di corrente se il
collegamento rimane poco affidabile anche a spina del tutto inserita nella presa. Si potrebbe
generare del calore che potrebbe provocare un incendio. Rivolgetevi a un rivenditore o a un
elettricista per sostituire la presa di corrente.
ATTENZIONE
Questo apparecchio non è impermeabile. Per prevenire pericoli di incendi o folgorazioni, non
posizionare nelle vicinanze di questo apparecchio contenitori pieni di liquidi (quali vasi da fiori, o
simili), e non esporre l’apparecchio a sgocciolii, schizzi, pioggia o umidità.
AMBIENTE E SMALTIMENTO
Questo prodotto potrebbe contenere sostanze ritenute pericolose per l’ambiente e per la
salute. Al fine di prevenire il rilascio nell’ambiente di sostanze nocive, BV Srl fornisce le seguenti
informazioni relative allo smaltimento e al riciclaggio dei materiali a seguito della dismissione del
prodotto.
I rifiuti dei dispositivi elettrici ed elettronici (WEEE) non dovrebbero mai essere
depositati nei comuni raccoglitori di rifiuti urbani (raccolta rifiuti residenziale).
Questo simbolo sui prodotti, confezioni, e/o documenti allegati significa
che vecchi prodotti elettrici ed elettronici devono essere collocati in maniera
appropriata al termine del proprio periodo di vita utile.
Per l’appropriato trattamento, recupero e riciclaggio di vecchi prodotti, fate
riferimento ai punti di raccolta autorizzati in conformità alla vostra legislazione
nazionale.
Puoi dare il tuo contributo all’ambiente seguendo le seguenti semplici norme:
Quando il tuo dispositivo elettrico o elettronico non ti è più utile portalo presso il gestore locale
dello smaltimento dei rifiuti affinché il prodotto possa essere riciclato.
Il tuo prodotto può essere reso gratuitamente al tuo rivenditore acquistando un apparecchio di
tipo equivalente o che svolga le stesse funzioni della nuova apparecchiatura fornita.
Contatta BV Srl per informarti sul rivenditore più vicino.
Se avete bisogno di ulteriore assistenza riguardante il riciclaggio, riuso o il cambio del prodotto,
potete contattarci presso l’assistenza clienti, al numero telefonico riportato nel manuale utente
e saremo lieti di aiutarVi.
Suggeriamo infine alcune precauzioni ulteriori per la tutela dell’ambiente quali, il riciclaggio
dell’imballo interno ed esterno (incluso quello utilizzato per la spedizione) con il quale questo
prodotto è stato consegnato.
Con il vostro aiuto, potremo ridurre la quantità di risorse ambientali richieste per la costruzione
di dispositivi elettrici ed elettronici, ridurre l’uso di discariche per collocare i prodotti usati e, in
generale, migliorare la nostra qualità di vita assicurando che sostanze potenzialmente dannose
non siano disperse nell’ambiente ma smaltite correttamente.
La gestione non corretta del prodotto a fine vita e lo smaltimento non conforme a quanto sopra
esposto rende l’utente passibile delle sanzioni previste a tale scopo dalla normativa nazionale
vigente nel suo paese.
8
9
ITALIANO
CONDIZIONI AMBIENTALI DI FUNZIONAMENTO
Gamma ideale della temperatura ed umidità dell’ambiente di funzionamento:
da +5°C a +35°C, umidità relativa inferiore all’85% (prodotto non coperto).
Non installare l’apparecchio in luoghi poco ventilati, o in luoghi esposti ad alte umidità o alla
diretta luce del sole (o a sorgenti di luce artificiale molto forti).
PERICOLO
Seguire le istruzioni date.
Non gettare il dispositivo nel fuoco e non esporlo al calore.
Non lanciare il dispositivo, non colpirlo con un martello o altro oggetto e non conficcarvi chiodi.
Non usare o lasciare questo dispositivo vicino a luoghi a temperatura molto elevata, ad esempio
vicino a stufe, in automobili chiuse o alla luce diretta del sole.
Non lasciare che il prodotto venga bagnato da sostanze liquide.
AVVERTENZA
Non usare il dispositivo se emette odori insoliti, si riscalda, cambia colore o forma o si nota
qualsiasi altra anomalia durante l’uso, la ricarica o lo stoccaggio.
ATTENZIONE - USO IN AMBIENTI UMIDI
La TS522D+ non è un dispositivo impermeabilizzato.
Nell’usarlo, proteggerlo dall’acqua e non utilizzarlo in ambienti umidi.
Se dovesse venire a contatto con qualsiasi tipo di liquido togliere immediatamente l’umidità con
un panno asciutto. Installare questa unità solo su superfici stabili ed in piano. Non usare questa
unità rovesciata o inclinata.
Installare questa unità in un luogo dove l’acqua non possa penetrarvi.
Non ribaltare questa unità o tenerla inclinata quanto è stata esposta ad acqua o gocce di acqua.
Dato che l’acqua potrebbe entrare nell’unità, non inclinarla se è bagnata
Dell’acqua potrebbe essere entrata nel dispositivo. Non trasportare questa unità se è bagnata.
Non usare l’adattatore CA in vicinanza dell’acqua.
Tenere la batteria del telecomando lontana dai bambini.
Essa può causare incendi o ustioni da sostanze chimiche se maneggiata in modo scorretto.
Non ricaricare, smontare o surriscaldare oltre i 100°C.
Sostituirla solamente con una batteria dello stesso tipo e modello (CR2025).
ISTALLAZIONE DELL’UNITÀ
Quando si installa l’unità, avere cura di collocarla su una superficie piana e stabile.
Evitare di installare l’apparecchio nei seguenti luoghi:
•
su un televisore a colori (potrebbero verificarsi distorsioni dello schermo a causa della
connessione Bluetooth);
•
in prossimità di una piastra a cassette (o ad un dispositivo che emette un campo
magnetico). Ciò potrebbe interferire con il suono;
•
sotto la luce solare diretta;
•
in ambienti estremamente caldi o freddi;
•
in luoghi soggetti a vibrazioni o altri movimenti;
•
in luoghi estremamente polverosi;
•
in luoghi in cui vi siano fumi o oli caldi (ad esempio ad una cucina economica)
10
ATTENZIONE
•
Se è in uso, non appoggiare il dispositivo su di un lato, non appoggiarlo e non appenderlo
a nulla.
•
Non sedere e non stare in piedi sul prodotto
•
Non applicare questa unità ad un muro o al soffitto. Esso potrebbe altrimenti cadere e
causare ferimenti.
•
Alcuni elementi degli altoparlanti sono magnetici. Gli oggetti metallici potrebbero essere
attratti dagli altoparlanti. Non lasciare carte di credito o altri supporti di memorizzazione
magnetici vicino agli altoparlanti in quanto le informazioni memorizzate potrebbero venire
cancellate.
VI RINGRAZIAMO PER AVERE ACQUISTATO QUESTO PRODOTTO CUBO.
Con la Radio FM/DAB/DAB+ Bluetooth TS522D+ sarà possibile ascoltare la musica trasmessa
dalle frequenze FM/DAB/DAB+, quella che si trova sul vostro dispositivo audio o sul telefono
cellulare compatibile mediante la connessione Bluetooth, e quella collegata all’ingresso AUX.
Prima di utilizzare il prodotto leggere attentamente queste istruzioni per l’uso in modo da
imparare come utilizzare correttamente il dispositivo. Finito di leggerlo conservarlo in un luogo
sicuro per poterlo riutilizzare in futuro.
TECNOLOGIA SENZA FILI BLUETOOTH
La tecnologia senza fili Bluetooth consente di collegare dispositivi compatibili senza usare cavi.
Per stabilire una connessione tramite tecnologia senza fili Bluetooth non è necessario che l’unità
e l’altro dispositivo si trovino uno di fronte all’altro, ma è sufficiente che i due dispositivi si trovino
ad una distanza massima di 10 metri l’uno dall’altro. La connessione potrebbe essere soggetta
ad interferenze dovute ad ostacoli quali pareti o altri dispositivi elettronici.
L’unità è conforme alla specifica Bluetooth v2.1. Rivolgersi ai produttori degli altri dispositivi
da associare per accertarne la compatibilità con questo dispositivo. Potrebbero esserci delle
limitazioni relative all’uso della tecnologia senza fili Bluetooth in alcuni Paesi. Rivolgersi alle
autorità locali o al proprio operatore.
CONTENUTO DELLA CONFEZIONE
•
La confezione contiene:
•
Radio TS522D+
•
Alimentatore Esterno CA
•
Telecomando con batteria
•
Manuale d’istruzioni
•
Sacchetto porta radio
Se nella vostra confezione mancasse qualche elemento contattate il vostro rivenditore.
11
ITALIANO
NORME DI SICUREZZA
ASCOLTARE LA RADIO DAB
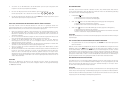
Il telecomando viene fornito con una batteria di tipo “CR2025” che deve essere installata.
Quando la portata del telecomando risulta inferiore o se cessa di funzionare correttamente, è il
momento di sostituire la batteria.
1.
2.
Per eseguire questa semplice operazione procedere come di seguito descritto:
1.
2.
3.
Estrarre il vano batteria come indicato nelle istruzioni
stampate nel retro del telecomando
Nel caso di sostituzione, rimuovere la batteria, inserire
la nuova batteria CR2025 come indicato nell’immagine
sottoriporata (facendo attenzione che il lato con il
simbolo “+” sia rivolto verso l’alto)
Reinserire il vano batteria all’interno dell’apposito
alloggiamento.
ATTENZIONE:
Le batterie al litio possono esplodere o provocare ustioni se smontate, cortocircuitate, ricaricate,
esposte all’acqua, al fuoco, o ad alte temperature. Non lasciare batterie in tasca, in borsa o in
un altro contenitore contenente oggetti metallici, mescolarle con batterie esauste di altro tipo, o
stoccarle con materiali pericolosi o combustibili. Conservare in luogo fresco, asciutto e ventilato.
Seguire le leggi e le normative applicabili per il trasporto e lo smaltimento.
3.
4.
5.
1.
Utilizzando il telecomando, mediante il pulsante MODE selezionare la modalità FM. Il
display mostrerà una frequenza FM, ad esempio “102.5”. L’icona FM si accenderà nel
display. Dall’unità principale premere la manopola MODE per entrare nelle varie modalità
e selezionare FM.
2.
Mediante il telecomando premere i pulsanti
per navigare all’interno delle frequenze
FM: una pressione incrementa o decrementa la frequenza di 50 kHz. Dall’unità principale
utilizzare la manopola MENU/SELECT per incrementare o decrementare la frequenza FM.
3.
Tenere premuto uno dei due pulsanti
per trovare la successiva o precedente
frequenza radio disponibile oppure premere il pulsante SCAN da telecomando per cercare
direttamente la successiva stazione. Quando una stazione radio viene trovata, la ricerca
automatica si ferma. Dall’unità principale utilizzare la manopola BT PAIR/SCAN per trovare
la successiva frequenza radio disponibile.
Premere il pulsante INFO per visualizzare sul display le informazioni relative alla stazione
radio selezionata (dipendente dalla disponibilità offerta dell’emittente)
Premere 4 volte il pulsante INFO per poter accedere alla funzione MONO/STEREO della
stazione FM. Premere il pulsante ENTER per passare da MONO a STEREO o viceversa.
In modalità STEREO questa icona si accenderà sul display
.
Rimuovere la plastica di protezione dal vano batteria del telecomando come mostrato in figura.
4.
5.
2.
3.
4.
Connettere l’alimentatore in dotazione all’ingresso DC posto nel pannello posteriore
della radio. Connettere l’altra estremità dell’alimentatore ad una presa AC. Se si desidera
alimentare la radio con le batterie, inserire 6 pezzi di batteria tipo “C” all’interno del vano
batterie posto nella parte inferiore della radio.
Alla prima accensione il display mostrerà il messaggio “00:00”
Accendere il dispositivo premendo il pulsante di standby nell’unità principale oppure sul
telecomando. La radio entrerà in modalità DAB e inizierà la scansione delle stazioni. A fine
scansione, l’unità automaticamente utilizzerà le informazioni di data e orologio raccolte
dalle emittenti DAB
ATTENZIONE:
Se l’unità viene alimentata dalle batterie (quindi l’alimentatore non è connesso), utilizzare il
pulsante di standby posto nell’unità principale.
Con la radio alimentata dalle batterie il telecomando non ha alcuna funzione.
12
per navigare all’interno dell’elenco delle
Mediante il telecomando premere i pulsanti
stazioni DAB scansionate. Dall’unità principale utilizzare la manopola MENU/SELECT per
ascoltare la stazione DAB successiva o precedente scansionata.
Premere il pulsante SCAN per eseguire una scansione completa delle stazioni radio in
modalità DAB.
ASCOLTARE LA RADIO FM
PER INIZIARE
1.
L’operazione di scansione deve essere eseguita alla prima accensione. L’icona DAB sul
display si accenderà e la procedura di scansione inizierà (questa operazione potrebbe
durare qualche minuto)
Utilizzando il telecomando, mediante il pulsante MODE selezionare la modalità DAB.
Dall’unità principale premere la manopola MODE per entrare nelle varie modalità e
selezionare DAB.
Premere il pulsante INFO per visualizzare sul display le informazioni relative alla stazione
radio selezionata (dipendente dalla disponibilità offerta dell’emittente - broadcaster)
MEMORIZZARE E RICHIAMARE UNA STAZIONE RADIO (PRESETS)
1.
Per memorizzare le vostre stazioni preferite nelle locazioni di memoria (Presets) da 1 a 5
procedere come di seguito descritto:
1/6
2/7
3/8
4/9
5/10
Tenere premuto il pulsante
del numero della memoria dove
si vuole memorizzare tale stazione fino a che il display non mostra
l’indicazione “STORED #” (# sta ad indicare il numero della memoria nella quale
verrà memorizzato, ad esempio “STORED 3” – memorizzato nel preset nr. 3)
2.
Per memorizzare le vostre stazioni preferite nelle locazioni di memoria (Presets) da 6 a 10
procedere come di seguito descritto:
13
ITALIANO
INSTALLAZIONE E SOSTITUZIONE DELLA BATTERIA DEL TELECOMANDO
Premere il pulsante SHIFT una volta;
1/6
4.
5.
2/7
RIPRODUZIONE DELLA MUSICA
3/8
4/9
5/10
del numero della memoria dove
Tenere premuto il pulsante
si vuole memorizzare tale stazione fino a che il display non mostra l’indicazione
“STORED #” (# sta ad indicare il numero della memoria nella quale verrà
memorizzato, ad esempio “STORED 6” – memorizzato nel preset nr. 6)
Il dispositivo che intendete associare a TS522D+ deve supportare il profilo AVRCP (Audio
Video Remote Control Profile) al fine di poter controllare la riproduzione attraverso esso. Fare
riferimento al manuale utente del vostro dispositivo. Quando la musica è in riproduzione:
E’ possibile memorizzare fino a 10 stazioni radio DAB e 10 stazioni radio FM (la frequenza
radio della stazione FM salvata di default su tutti i preset è 87.50 MHz).
1.
Pulsante PLAY/PAUSE
a. Premere una volta per mettere in pausa la riproduzione
b. Premere un’altra volta per far riprendere la riproduzione
2.
Pulsante VOL –
(dall’unità principale ruotare in senso antiorario la manopola VOL/STB)
a. Premere una volta per diminuire il volume di uno step
b. Tenerlo premuto per diminuire il volume in modo costante
3.
(dall’unità principale ruotare in senso antiorario la manopola VOL/STB)
Pulsante VOL +
a. Premere una volta per aumentare il volume di uno step
b. Tenerlo premuto per aumentare il volume in modo costante (quando verrà
raggiunto il livello massimo il display mostrerà l’etichetta VOL MAX)
Per richiamare uno dei 10 preset memorizzati procedere come di seguito riportato:
Per i preset memorizzati da 1 a 5 premere uno dei pulsanti
6.
1/6
2/7
3/8
4/9
5/10
Per i preset memorizzati da 6 a 10 premere una volta il pulsante SHIFT (il display
dell’unità principale visualizzerà la dicitura “SHIFT”) e successivamente il pulsante
relativo al preset desiderato.
MODALITÀ DI ACCOPPIAMENTO, COLLEGAMENTO E FUNZIONAMENTO DELL’UNITÀ
ATTRAVERSO LA TECNOLOGIA SENZA FILI BLUETOOTH
La radio TS522D+ può essere accoppiata con la maggior parte dei dispositivi Bluetooth 2.0 e
2.1. L’accoppiamento può differire da dispositivo a dispositivo. Fare riferimento al manuale di
istruzioni del proprio dispositivo Bluetooth per il corretto accoppiamento all’unità.
1.
2.
3.
4.
5.
6.
Al primo accesso a tale modalità l’unità andrà nello stato di “attesa di connessione”, il led
lampeggerà lentamente ed in questa condizione sarà possibile associare un dispositivo
che è già stato accoppiato. Se il dispositivo che si vuole collegare ha Bluetooth acceso,
esso si connetterà automaticamente alla radio.
Per collegare un nuovo dispositivo premere il pulsante PAIR per circa 4 secondi fintanto
che il LED lampeggerà velocemente (condizione dello stato di attesa di accoppiamento).
Accendere il proprio dispositivo Bluetooth (per esempio uno SmartPhone), entrare nel
menu di impostazione Bluetooth ed eseguire una scansione dei dispositivi disponibili. Nella
lista dei dispositivi trovati verrà mostrata l’etichetta TS522D+.
Connettere il dispositivo all’unità TS522D+, il dispositivo mostrerà lo stato di “Connesso” e il
LED della radio passerà dallo stato di lampeggiante a quello di acceso (se l’accoppiamento
è avvenuto con successo).
A questo punto sarà possibile mediante la radio TS522D+ riprodurre senza fili la musica
contenuta all’interno del dispositivo associato.
Mentre un dispositivo è connesso mediante la tecnologia Bluetooth, se si desidera
accoppiare un altro dispositivo Bluetooth, è necessario disconnettere la connessione
corrente tenendo premuto per circa 3 secondi il pulsante PAIR fintanto che non si avverte
un suono tipo “beep”, oppure disabilitando la connessione stabilita direttamente dal
menu Bluetooth del dispositivo associato. L’unità passera direttamente in modalità di
accoppiamento e a questo punto sarà possibile connettere un altro dispositivo.
ATTENZIONE:
Per i telefoni cellulari con Bluetooth 2.0, verrà richiesto di inserire una password durante
l’accoppiamento. Premere la seguente stringa: 0000 (zerozerozerozero)
ATTENZIONE:
ascoltare la musica a un volume moderato. L’esposizione continua ad un volume elevato
potrebbe danneggiare l’udito.
CONNETTERE L’ULTIMO DISPOSITIVO BLUETOOTH ACCOPPIATO
4.
Di seguito viene riportato un metodo veloce per connettere TS522D+ all’ultimo dispositivo
accoppiato.
Quando il prodotto è in modalità standby, premere il pulsante STANDBY ed entrare nella modalità
BT mediante il pulsante MODE (se l’unità è accesa, ma in una modalità diversa, premere il
pulsante MODE fino a visualizzare BT). Accendere il dispositivo Bluetooth da associare.
Esso si connetterà automaticamente. Il LED della modalità Bluetooth si accenderà quando la
connessione sarà avvenuta con successo. Se il prodotto non riesce a trovare l’ultimo dispositivo
accoppiato, esso andrà in modalità di attesa di connessione. In questo stato altri dispositivi
accoppiati precedentemente potranno essere collegati all’unità.
RIPRISTINO DELLA MEMORIA DELL’UNITÀ
L’unità può memorizzare fino a 8 dispositivi Bluetooth diversi. Per cancellare la memoria
manualmente bisogna essere all’interno della modalità BT, nello stato di accoppiamento (LED
lampeggia velocemente), premere il pulsante PAIR due volte (con un intervallo di circa un secondo tra
le pressioni) fintanto che non viene riprodotto un suono tipo “beep”. A questo punto il LED indicativo
dello stato del Bluetooth da lampeggiante passa a spento per poi ricominciare a lampeggiare.
ATTENZIONE:
Dopo aver cancellato completamente la memoria l’unità entrerà subito nella modalità di
accoppiamento e sarà necessario seguire nuovamente la procedura di accoppiamento e
collegamento di un nuovo dispositivo Bluetooth.
Ricordarsi di eliminare il nome della radio anche dal dispositivo al quale la si desidera connettere
nuovamente, questo per ripristinare completamente l’accoppiamento tra i due dispositivi
14
15
ITALIANO
3.
1.
Collegare all’ingresso AUX IN il jack del cavo (non fornito) proveniente dal dispositivo
esterno (per esempio un riproduttore MP3)
2.
Utilizzare il pulsante MODE sul telecomando per accedere alla modalità AUX IN oppure
premendo la manopola MODE nell’unità principale fino a visualizzare la sorgente AUX IN.
Nel display verrà visualizzata l’etichetta AUX IN.
3.
ITALIANO
RIPRODUZIONE DI UN DISPOSITIVO CONNESSO ALL’INGRESSO AUX
Il display mostrerà la potenza del segnale della frequenza impostata manualmente per la
sintonizzazione.
Utilizzare il proprio dispositivo per controllare la riproduzione, il livello del volume può essere
controllato sia dal dispositivo collegato che dall’unità principale. Mediante il pulsante MUTE
del telecomando è possibile silenziare la riproduzione e riavviarla premendo nuovamente
lo stesso pulsante.
IMPOSTARE L’UNITÀ
Premere il pulsante MENU sul telecomando o tener premuto la manopola MENU/SELECT
nell’unità principale per entrare all’interno del menu delle varie modalità.
sul telecomando, oppure ruotare la manopola MENU/SELECT
Premere i pulsanti
nell’unità principale per selezionare la voce del menu desiderata e premere ENTER sul
telecomando o premere la manopola MENU/SELECT per entrare nel sottomenu oppure per
salvare le impostazioni. Premere il pulsante BACK per ritornare al livello precedente, oppure
premere MENU nuovamente per uscire.
Il simbolo > è un indicatore che segnala la potenza del segnale; significa che la potenza del
segnale di tale stazione è abbastanza forte per permettere la sintonizzazione di tale stazione
DAB. Il simbolo --- è un indicatore che segnala la mancanza di segnale.
Premere il pulsante MENU due volte per ritornare alla modalità DAB, oppure premere BACK tre
volte per riprodurre la stazione DAB sintonizzata.
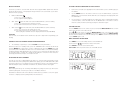
MENU DISPONILI IN MODALITÀ DAB
DRC (DYNAMIC RANGE COMPRESSION)
Permette di impostare il livello DRC in High, Low o Off.
Premere il pulsante MENU per accedere alle molteplici funzioni della modalità DAB.
Per selezionare uno delle tre possibilità sopramenzionate premere i pulsanti
.
Mediante i pulsanti
è possibile navigare attraverso le varie voci del menu.
Premere il pulsante ENTER per entrare all’interno della voce del menu selezionata.
FULL SCAN: permette di compiere la scansione completa dei canali DAB
MENU DISPONIBILE IN MODALITÀ FM
Premere il pulsante MENU per accedere alle molteplici funzioni della modalità FM.
Mediante i pulsanti
è possibile navigare attraverso le varie voci del menu.
Premere il pulsante ENTER per entrare all’interno della voce del menu selezionata.
MANUAL TUNE: permette di impostare la frequenza DAB da sintonizzare
Premere i pulsanti
174.928 MHz)
SCAN
Permette di impostare la qualità della ricezione delle stazioni FM per la scansione.
STRONG: verranno scansionate solo le stazioni radio ricevute con segnale forte.
ALL: verranno scansionate le stazioni radio ricevute sia con segnale forte che con segnale debole.
per regolare la frequenza e premere ENTER per confermare (p.e.
16
17
ATTENZIONE:
Se l’unità è alimentata dalle batterie, quando la radio è spenta, le informazioni riguardanti la data e
l’orologio verranno perse. Quando la radio viene riaccesa, andando in modalità DAB, essa eseguirà
una scansione automatica e riceverà le informazioni di data e orologio dall’emittente DAB.
TIME MODE
Permette di impostare il formato dell’orologio in 12 o 24 ore.
MENU DISPONIBILE IN TUTTE LE MODALITÀ
Premere il pulsante MENU per accedere alle funzioni comuni a tutte le modalità della TS522D+.
è possibile navigare attraverso le varie voci del menu.
Mediante i pulsanti
Premere il pulsante ENTER per entrare all’interno della voce del menu selezionata.
DATE/TIME
Permette di impostare manualmente la data e l’orologio oppure attraverso il segnale ricevuto
dalle emittenti delle stazioni DAB.
SNOOZE
Permette di impostare l’intervallo di tempo per la ripetizione dell’allarme (snooze).
sul telecomando o ruotare la manopola MENU/SELECT sull’unità
Premere i pulsanti
principale per regolare l’intervallo da 5 minuti a 15 minuti con passi da un minuto.
Premere il pulsante ENTER sul telecomando o la manopola MENU/SELECT sull’unità principale
per salvare il valore scelto.
Per disabilitare la funzione Snooze premere il pulsante STANDBY nel telecomando oppure
dall’unità principale
MANUAL
Premere i pulsanti
sul telecomando, ruotare la manopola MENU/SELECT posta sull’unità
principale, per regolare l’orologio e la data, premere il pulsante ENTER sul telecomando oppure la
manopola MENU/SELECT sull’unità principale per confermare e salvare le informazioni inserite.
AUTO
Selezionando questa opzione, la radio utilizzerà le informazioni di data e orologio fornite
dall’emittente.
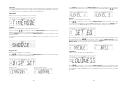
DISPLAY SET
Permette di impostare la luminosità del display.
sul telecomando o ruotare la manopola MENU/SELECT sull’unità
Premere i pulsanti
principale per regolare la luminosità per la modalità normale e/o per la modalità standby.
Modalità standby
Normale modalità operativa
Premere il pulsante ENTER sul telecomando o la manopola MENU/SELECT sull’unità
principale per accedere alle due modalità operative e mediante i pulsanti
o decrementare la luminosità del display.
18
19
incrementare
ITALIANO
AUDIO
Permette di impostare l’ascolto MONO o STEREO in modalità FM.
sul telecomando oppure ruotare la manopola MENU/SELECT
Premere i pulsanti
sull’unità principale per selezionare uno dei preset di equalizzazione memorizzato: NORMAL,
ROCK, POP JAZZ. Premere il pulsante ENTER sul telecomando o la manopola MENU/
SELECT sull’unità principale per confermare il preset selezionato.
ITALIANO
SET EQ
Permette di impostare l’equalizzazione della radio.
ATTENZIONE: tutte le impostazioni riguardanti data, orologio, allarme, equalizzatore e preset
delle stazioni radio verranno perse.
FIRMWARE VERSION
Permette di visualizzare la versione firmware installata nell’unità.
Mediante l’opzione MY EQ, è possibile impostare il valore delle frequenze alte (treble) e basse
(bass) in modo personalizzato. Premere i pulsanti
sul telecomando oppure ruotare la
manopola MENU/SELECT sull’unità principale per incrementarne o decrementarne il valore.
Premere il pulsante ENTER sul telecomando o la manopola MENU/SELECT sull’unità
principale per confermare i valori impostati.
UTILIZZARE L’ALLARME
Impostazione dell’allarme
1.
Accendere la radio, premere il pulsante
selezionare l’allarme 1 oppure l’allarme 2.
L’icona
LOUDNESS
Permette di impostare il valore loudness tra ON e OFF.
1
oppure l’icona
1
oppure il pulsante
sul telecomando per
inizierà a lampeggiare sul display.
sul
Premere il pulsante ENTER per entrare nel menu dell’allarme, premere i pulsanti
telecomando o ruotare la manopola MENU/SELECT sull’unità principale per regolare l’orario
desiderato per l’allarme. Premere il pulsante ENTER o la manopola MENU/SELECT per
confermare la scelta 1 e per passare alla successiva funzione
BACK per tornare alla precedente voce di menu.
, oppure premere il pulsante
Successivamente all’impostazione dell’orario dell’allarme è possibile selezionare la sorgente di
allarme (DAB/FM/Buzzer). Impostando DAB o FM è possibile impostare una radio memorizzata
nei preset da associare all’allarme oppure l’ultima stazione radio ascoltata.
Premere i pulsanti
sul telecomando o ruotare la manopola MENU/SELECT sull’unità
principale per selezionare uno dei due possibili stati. La selezione tra ON e OFF del loudness è
possibile solo nell’equalizzazione NORMAL (le altre equalizzazioni hanno il loudness impostato
su ON di default).
RESET
Permette di cancellare tutte le impostazioni e ripristinare la configurazione di fabbrica. Scegliere
l’opzione YES e premere il pulsante ENTER sul telecomando oppure la manopola MENU/
SELECT sull’unità principale per avviare il reset alle impostazioni di fabbrica, oppure NO per
cancellare l’operazione.
20
L’opzione successiva è quella della frequenza di ripetizione dell’allarme che può avere le seguenti
opzioni:
Once (una volta) – Daily (giornaliera) – Weekdays (Giorni lavorativi) – Weekends (Fine settimana).
Selezionando l’opzione Once è necessario confermare la data dell’allarme prima di passare al
passo successivo. Impostare il volume di riproduzione dell’allarme.
Quando l’allarme è stato impostato su ON e salvato l’icona relativa all’allarme 1 e/o 2 verrà
mostrata sul display ad indicare lo stato attivo.
21
1
Bluetooth status indicator: flashing during the device pairing, solid when connected.
2
Display: LCD display
3
Infrared receiver (IR): receives the signal from the remote control
4
4.1
4.2
4.3
4.4
4.5
MENU/SELECT:
Long press to access the various entries of the radio global menu (MENU)
Quick press to confirm the selection (ENTER)
Turn clockwise or counter-clockwise to access the items in the global Menu
Turn clockwise or counter-clockwise to adjust the next or previous station
in DAB mode
Turn clockwise or counter-clockwise to adjust the frequency in FM mode
5
MODE: press to toggle between the DAB/FM/Bluetooth (BT) and AUX modes
6
6.1
6.3
BT PAIR/ /SCAN
in BT mode, press and hold for pairing the
Bluetooth device until the blue LED starts flashing in quick succession
when the Bluetooth device is connected, a quick press of the button
allows you to pause or resume the BT device.
in DAB and FM mode it allows you to scan for available radio stations
7
BACK: from the menu, press to return to the previous menu level
oppure il pulsante
8
Headphones audio input
per selezionare l’allarme 1 o 2, premere sul telecomando i pulsanti
per selezionare
l’opzione ON/OFF e confermare la scelta mediante il pulsante ENTER.
Le icone verranno mostrare sul display a conferma che l’allarme è stato attivato.
9
Volume bar: displays the volume level of the unit (off when MUTE)
6.2
ATTIVARE O DISATTIVARE L’ALLARME
In modalità standby, premere il pulsante
1
oppure il pulsante
PAIR
sul telecomando per attivare
o disattivare gli allarmi; oppure, accendere la radio, premere il pulsante
1
OPZIONE SNOOZE E SOSPENSIONE DELL’ALLARME
Mentre l’allarme è attivo, premere il pulsante SNOOZE nel telecomando per far ripetere l’allarme
dopo un certo intervallo (in base alle impostazioni inserite nel relativo menu - valore di default è
5 minuti) oppure premendo la manopola VOL/STANDBY sull’unità principale.
Durante il funzionamento della funzione SNOOZE sul display verrà visualizzata l’icona Zz che
ne identifica lo stato attivo di funzionamento.
Per sospendere l’allarme premere qualsiasi pulsante del telecomando tranne lo SNOOZE
oppure qualsiasi manopola dell’unità principale tranne quella di VOL/STANDBY.
10
10.1
10.2
10.3
VOL/STANDBY:
turn this knob clockwise to increase the volume or counter-clockwise to decrease it
press to turn the radio off or on
in the alarm mode, press once to repeat the alarm (Snooze), press again to stop the
repetition.
NOTE: If the unit is powered solely by batteries, pressing this button will turn off the power so
as to reduce consumption and increase battery life. In this mode, the clock function and the
alarm are disabled.
FRONT PANEL
1
2
DC input: use the supplied AC adapter to connect it to the electrical outlet (12VDC 2A)
R-SPR OUT: use it to connect the right speaker to obtain a stereo system
(sold separately)
TOP PANEL
1
2
22
Handle: pull out the handle for carrying the radio
Radio antenna: stretch and bend the antenna to find the best position for the reception
23
ENGLISH
FRONT PANEL
IMPORTANT
MODE
MODE
INFO
INFO
EQ
EQ
SCAN
SCAN
press to toggle between the DAB/FM/
Bluetooth (BT) and AUX modes
In DAB FM mode, while receiving a broadcast
signal, press this button to display information
about the selected station
PLAY/
PAUSE/
PAIR
PAIR
MENU
MENU
During playback via Bluetooth, press to start
or pause listening to the associated device.
Hold for pairing a Bluetooth device.
Press this button to access the menu settings
Press to increase the listening volume.
VOLUME -
Press to decrease the listening volume.
MUTE
Press this button to select or deselect the
mute function.
3/8
4/9
5/10
ALARM
1&2
SNOOZE
1
SNOOZE
24
The lightning bolt arrow located within an equilateral triangle is intended to
alert the user of the presence of non-insulated "dangerous voltage" within the
product that may be of sufficient magnitude to cause electric shock to the user.
Allows you to run a full scan of the radio in
DAB mode. Press to search for the next
available station in FM mode
VOLUME +
2/7
The exclamation point within an equilateral triangle is intended to alert the user
of the presence of important operating and maintenance instructions in the
literature accompanying the product.
Press to access the preset equalization or to
create a customized one.
Buttons to browse the menu in the various
modes.
Increases or decreases the frequency in the
FM mode, or selects the next or previous
DAB station available.
1/6
To avoid the risk of electric shock, do not remove the
screws located on the back of the product. There are no
parts whose maintenance can be performed by the user. If
necessary, contact qualified service personnel.
Press this button to turn the radio on or off
STANDBY
Buttons to store or retrieve the set radio
stations (only in DAB and FM modes)
Press this button to set the alarm
(Alarm 1/Alarm 2)
This button has three different functions:
1.
it stops the alarm when it is active.
2.
it sets the dimmability of the LCD when
the unit is off (4 levels of brightness).
3.
it sets the time interval for repeating
the alarm when the unit is on
WARNINGS ABOUT THE USE AND THE OPERATION OF THE UNIT
WARNING:
does not completely shut off all power from the AC outlet. Since the
The main switch
power cord serves as the main disconnecting device for the unit from the power source,
the cord should be unplugged from the AC outlet to shut down all current flow. Then, verify
that the unit has been installed so as to easily unplug the power cord from the wall outlet, if
necessary. In addition, to avoid fire hazard, the power cord should be unplugged from the AC
outlet if the unit is not going to be used for relatively long periods of time (for example, when
on vacation).
VENTILATION WARNING
Install the unit ensuring to leave room around it for proper air circulation and for improving heat
radiation (at least 10 cm from top, 10 cm from rear, and 10 cm from each side).
CAUTION
•
The product case is equipped with small openings which also serve for ventilation, in
order to ensure reliable operation and to protect it from overheating. To prevent fire
hazard, the openings should never be blocked or covered during operation (by objects
such as newspapers, tablecloths, curtains, or drapes, etc.) and the device should not be
placed on thick carpet or on the bed.
•
If the plug of the power cord of this unit does not match the AC outlet into which you want
to insert the plug itself, it must be replaced with one fit for the purpose. The replacement
of the plug of the power cord must be performed only by qualified service personnel.
After replacement, the old plug cut off from the power cord must be properly disposed
of, to avoid possible severe electrical shock due to accidental insertion of the plug itself
into a live power outlet. If you do not plan to use the unit for a relatively long period
(e.g. during a holiday), unplug the power cord from the AC outlet.
25
ENGLISH
REMOTE CONTROL
To avoid fire hazard, do not place any naked flame sources (e.g. lighted candles or similar)
on the unit
•
Before plugging in the device to a power source for the first time, carefully read the section
below.
•
The voltage of the available power supply differs from country to country and from region to
region. Check that the mains power supply in the area where this unit will be used provides
the required voltage (e.g. 240 V or 110 V); the value is on the label of the AC adapter.
•
This product is intended for household use only. Any failure due to different uses (such
as long-term use for business purposes, in a restaurant, or use in a car, or ship), which
requires particular repair shall be charged to the user, even if occurred during the warranty
period.
•
Before using the product, always read the safety information on the back of this unit and
the AC adapter label.
•
Keep the product and its accessories out of the reach of children and infants. If accidentally
swallowed, contact a doctor immediately.
•
Keep the AC adapter away from the reach of children and infants.
•
The AC adapter cord may accidentally wrap around the neck and cause choking.
AIRWAVE WARNINGS
This unit uses 2.4 GHz radio frequencies, also used by other wireless systems (such as
microwave ovens and cordless telephones).
If there is noise on the TV screen, it is possible that this unit (or units supported by it) is causing
interference with the signals from the input connector of your TV, VCR, satellite tuner, etc.
In this case, increase the distance between the antenna input connector and this unit (including
the products it supports).
BV Srl is not responsible for any malfunction of the product due to errors/malfunctions
associated with its connection and/or equipment it is connected to. Contact the manufacturer
of the product you want to pair.
ATTENTION TO THE AC ADAPTER
Ensure to firmly grasp the case of the AC adapter if you need to unplug it from the outlet. If you
pull the power cord, it may get damaged, causing a fire and/or electric shock. Do not try to
unplug the AC adapter with your bare hands. This may cause electric shock.
Do not leave the power cord of the AC adapter into the socket if the connection is unreliable,
also when the plug is completely inserted into the socket. This may generate enough heat to
cause a fire. Consult a dealer or an electrician to replace the outlet.
WARNING REGARDING THE POWER CORD
Always hold the power cord by the plug. Do not pull the cord by the cable and never touch the
power cord when your hands are wet, as this could cause short circuit or electric shock. Do not
place the unit, or other objects, on the power cord and check that it is not pinched. Never tie a
knot in the cord or tie it with other cords. The power cords should be routed so that they cannot
be stepped on. A damaged power cord can cause fire or electric shock. Check the power cord
regularly. If it is damaged, ask your nearest BV Srl authorized service center or your dealer for a
replacement power cord.
ENVIRONMENTAL OPERATING CONDITIONS
Ideal range of operating temperature and humidity:
from +5°C to +35°C, relative humidity less than 85% (uncovered product).
Do not install the unit in a poorly ventilated area, or in locations exposed to high humidity or
direct sunlight (or strong artificial light sources).
26
27
ENGLISH
•
ENVIRONMENT AND DISPOSAL
It may contain materials which constitute a health and environmental hazard. To prevent harmful
materials from being released into the environment, BV Srl provides the following information
regarding the disposal and recycling, following the decommissioning of the product.
Waste electrical and electronic materials (WEEE) should never be disposed
of in normal urban waste disposal facilities (residential garbage collection).
SAFETY REGULATIONS
DANGER
Follow the instructions provided.
Do not throw the unit into fire or expose it to heat.
Do not throw the device, hit it with a hammer or other object, and do not pierce it.
Do not use or store this device near places at very high temperature, such as a heater, or a
closed car in direct sunlight.
Do not allow the product to be splashed with liquids.
WARNING
Do not use the device if it emits unusual odors, heats up, changes color or shape, or if you
notice any other abnormal circumstances during use, recharging or storage.
You can give your contribution to the environment by following these simple steps:
When you no longer wish to use your electrical and electronic equipment, take it to your local
waste disposal facility for recycling.
You may return your old equipment to your dealer free of charge when you buy a new product
which is equivalent to or has the same functions as the old one.
Contact BV Srl to find your local dealer.
CAUTION - USAGE IN HUMID ENVIRONMENTS
TS522D+ is not a waterproofed device.
When using it, protect it from water and do not use in humid environments.
If it should come into contact with any type of liquid, immediately remove the moisture with a
dry cloth. Install the unit only on stable and level surfaces. Do not operate the unit upside down
or in tilted position.
Install the unit in a place where water cannot penetrate.
Do not tilt the unit or keep it tilted after it has been exposed to water or drops of water.
Since water may enter the unit, do not tilt it when it is wet
Water may enter the device. Do not transport the unit if it is wet.
Do not use the AC adapter near water.
Keep the remote control battery away from children.
It may cause a fire or chemical burn if mishandled.
Do not recharge, disassemble, or heat above 100°C.
Replace only with a battery of the same type and model (CR2025).
If you need more information regarding recycling, reuse, and product exchanges, please contact
our customer service at the number provided in the manual.
INSTALLATION OF THE UNIT
When installing the unit, be sure to place it on a flat, stable surface.
Lastly, we suggest further measures to safeguard the environment, such as recycling of internal
and external packaging (including the one used for shipping) the product was delivered in.
Avoid installing the unit in the following places:
•
on a color TV (the screen may be distorted because of the Bluetooth connection);
•
near a cassette deck (or a device that emits a magnetic field). This could interfere with the
sound;
•
under the direct sunlight;
•
in an extremely hot or cold environment;
•
in places subject to vibration or other movement;
•
in extremely dusty places;
•
in places where there are fumes or hot oils (e.g. a stove)
This symbol on the products, packaging, and/or accompanying documents,
means that used electrical and electronic equipment should be disposed of
in an appropriate manner at the end of useful life.
For proper treatment, recovery, and recycling of used products, please
refer to the applicable collection points, in accordance with your national
legislation.
With your help, we can reduce the amount of environmental resources required to manufacture
electric and electronic equipment, reduce the use of waste landfills for used equipment and, in
general, improve our quality of life by ensuring that hazardous materials are correctly disposed of.
Incorrect treatment of the product at the end of life and failure to follow the above disposal
instructions are punishable under local legislation.
CAUTION
•
If it is in use, do not place the unit on its side, do not lean it against anything, and do not
hang it.
•
Do not sit or stand on the product
•
Do not fix the unit to a wall or ceiling. It may fall and cause harm.
•
Some elements of the speakers are magnetic. The metallic materials may be attracted
by the speakers. Do not place credit cards or other magnetic storage media near the
speakers, because the stored information may be erased.
28
29
ENGLISH
CAUTION
This unit is not waterproof. To prevent fire or shock hazards, do not place this unit near waterfilled containers (such as flower pots, or similar), and do not expose it to dripping, splashing,
rain, or moisture.
THANK YOU FOR PURCHASING THIS PRODUCT CUBO.
With FM/DAB/DAB+ Bluetooth TS522D+ you can listen to music played at FM/DAB/DAB+
frequencies: the music stored on your audio device or compatible mobile phone using Bluetooth
connectivity, and the one connected to the AUX input.
Before using the product, please read these instructions for use, in order to learn how to properly
use the device. After reading, keep the instructions in a safe place for later use.
INSTALLING AND REPLACING THE REMOTE CONTROL BATTERY
The remote control is supplied with a battery of the "CR2025" type that must be installed.
When the remote controllable distance is lower, or if it ceases to function properly, it is time to
replace the battery.
To perform this simple operation, proceed as follows:
1.
2.
3.
Remove the battery compartment as indicated in the
instructions printed on the back of the remote control
In case of replacement, remove the battery, insert the
new CR2025 battery as shown in the figure below
(making sure that the "+" side is facing upwards)
Replace the battery in the slot.
PACKAGE CONTENTS
•
The package contains:
•
Radio TS522D+
•
External AC Power Supply
•
Remote control with battery
•
Instruction Manual
•
Soft case
CAUTION:
Lithium batteries can explode or cause burns if disassembled, shorted, recharged, exposed to
water, fire, or high temperatures. Do not leave batteries in your pocket, purse, or other container
with metal objects, do not mix them with other types of batteries, and do not store them with
hazardous materials or fuels. Store in a cool, dry and ventilated place. Follow the laws and
regulations for transport and disposal.
If something is missing from your package, please contact your dealer.
GETTING STARTED
1.
Remove the protective plastic from the battery compartment of the remote control as
shown in the figure.
2.
Connect the supplied power adapter to the DC input on the rear panel of the radio. Connect
the other end of the power supply to an AC outlet. If you want to power the radio with the
battery, insert 6 "C" batteries inside the battery compartment on the bottom of the radio.
When you first turn it on, the display will show “00:00”
Turn on the device by pressing the standby button on the main unit or on the remote
control. The radio will enter DAB mode and start scanning for stations. At the end of the
scan, the unit will automatically use the date and clock information gathered from the DAB
stations
3.
4.
CAUTION:
If the unit is powered by batteries (the power adapter is not connected), use the standby button
placed on the main unit.
When the radio is powered by batteries, the remote control has no function.
30
31
ENGLISH
BLUETOOTH WIRELESS TECHNOLOGY
The Bluetooth wireless technology allows you to connect compatible devices with no cable.
To establish a connection via Bluetooth wireless technology the unit and the other device do
not need to be in line of sight, but it is sufficient that the two devices are at a maximum distance
of 10 meters from each other. The connection can be subject to interference from obstructions
such as walls or other electronic devices.
The unit is compliant with Bluetooth Specification v2.1. Contact the manufacturers of the other
devices to be paired, in order to determine their compatibility with this device. There may be
restrictions on using Bluetooth technology in some countries. Contact your local authorities or
service provider.
1.
2.
3.
4.
5.
The scan operation must be performed at first start-up. The DAB icon on the display will
light up and the scanning process will start (this might take a few minutes)
On the remote control, use the MODE button to select the DAB mode. From the main unit,
press the MODE knob to enter the various modes and select DAB.
Press INFO to visually display information about the selected radio station (depending on
availability offered by the station - broadcaster)
to navigate through the list of scanned
Using the remote control, press the buttons
DAB stations. From the main unit, use the MENU/SELECT knob to listen to the next or
previous scanned DAB station.
Press SCAN to perform a full scan of the radio stations in DAB mode.
LISTEN TO THE FM RADIO
1.
On the remote control, use the MODE button to select the FM mode. The display will show
an FM frequency, e.g. "102.5". The FM icon will light on the display. From the main unit,
press the MODE knob to enter the various modes and select FM.
2.
Using the remote control, press the buttons
to browse the FM frequencies: one
press increases or decreases the frequency by 50 kHz. From the main unit, use the MENU/
SELECT knob to increase or decrease the FM frequency.
3.
Press and hold either button
to find the next or previous available radio frequency,
or press SCAN from the remote control to directly search for the next available station.
When a station is found, the search stops automatically. From the main unit, use the BT
PAIR/SCAN knob to find the next available FM frequency.
Press INFO to visually display information about the selected radio station (depending on
availability offered by the station)
Press INFO 4 times to access the MONO/STEREO function of the FM station. Press
ENTER to toggle between MONO and STEREO. In STEREO mode, this icon will light up
on the display
.
4.
5.
STORING AND RECALLING A RADIO STATION (PRESETS)
1.
To store your favorite stations to memory locations (presets) from 1 to 5, proceed as
follows:
1/6
2/7
3/8
4/9
5/10
Press and hold the button
corresponding to the number where
you want to store that station until the display shows “STORED #” (# indicates the number
where will be stored, e.g. “STORED 3” – stored in the preset no. 3)
2.
To store your favorite stations in memory locations (presets) from 6 to 10, proceed as follows:
3.
Press SHIFT once;
1/6
2/7
3/8
4/9
4.
You can store up to 10 DAB radio stations and 10 FM radio stations (the radio
frequency of the FM station saved by default on all presets is 87.50 MHz).
5.
To retrieve one of the 10 stored presets, proceed as follows:
For stored presets 1 to 5 press one of the buttons
6.
2/7
3/8
4/9
5/10
For stored presets 6 to 10 press SHIFT once (the display of the main unit will show
“SHIFT”) and then the button corresponding to the desired preset.
PAIRING, CONNECTION AND OPERATION MODE OF THE UNIT THROUGH THE
BLUETOOTH WIRELESS TECHNOLOGY
The TS522D+ radio can be paired with most Bluetooth devices 2.0 and 2.1. The pairing may
differ from device to device. Refer to the instruction manual of your Bluetooth device for the
correct pairing with the unit.
1.
2.
3.
4.
5.
6.
On the first access to this mode, the unit will go into the "waiting for connection" status,
the LED will flash slowly, and in this condition it will be possible to associate a device that
has already been paired. If the device you want to connect has Bluetooth turned on, it will
automatically connect to the radio.
To connect a new device, press the PAIR button for about 4 seconds until the LED flashes
quickly ("waiting for pairing" status). Turn on your device.
Turn on your Bluetooth device (for example a SmartPhone), enter the Bluetooth setup
menu and scan for available devices. In the list of found devices the label TS522D+ will
be shown.
Connect the device to the TS522D+ unit, the device will show the "Connected" status and
the radio LED will change from flashing to solid (if the pairing was successful).
At this point, with the TS522D+ radio it will be possible to wirelessly play the music stored
inside the associated device.
While a device is connected via Bluetooth, if you want to pair it with another Bluetooth
device, you must first disconnect it by pressing and holding the PAIR button for about 3
seconds until you hear a "beep" sound, or by disabling the connection established directly
from the Bluetooth menu of the associated device. The unit will switch directly to pairing
mode and, at this point, you can connect another device.
CAUTION:
For mobile phones with Bluetooth 2.0, you will be prompted to enter a password during the
pairing process. Press the following string: 0000 (zerozerozerozero)
5/10
Press and hold the button
corresponding to the number where
you want to store that station until the display shows “STORED #” (# indicates the number
where it will be stored, e.g. “STORED 6” – stored in the preset no. 6)
32
1/6
33
ENGLISH
LISTEN TO THE DAB RADIO
MUSIC PLAYBACK
PLAYING A DEVICE CONNECTED TO THE AUX INPUT
The device you wish to associate with TS522D+ must support AVRCP (Audio Video Remote
Control Profile) in order to control playback through it. Refer to the user manual of your device.
When the music is playing:
1.
Connect the jack cable (not supplied) from the external device (such as an MP3 player) to
the AUX IN
2.
Use the MODE button on the remote control to access the AUX IN mode, or press the
MODE knob on the main unit until the AUX IN source is displayed. The display will show
the AUX IN label.
3.
Use your device to control the playback, the volume level can be controlled either from the
connected device, or from the main unit. Use the MUTE button on the remote control to
mute the sound, and then restart it by pressing the same button again.
1.
Button PLAY/PAUSE
a. Press once to pause playback
b. Press again to resume playback
2.
(from the main unit, rotate the VOL/STB knob counter-clockwise)
VOL - button
a. Press once to decrease the volume by one step
b. Press and hold to decrease the volume in a consistent manner
3.
VOL + button
(from the main unit, rotate the VOL/STB knob counter-clockwise)
a. Press once to increase the volume by one step
b. Press and hold to increase the volume in a consistent manner
after reaching the maximum level, the display will show the label VOL MAX)
CAUTION:
listen to music at a moderate volume. Continuous exposure to high volume may damage your
hearing.
Press the MENU button on the remote or press and hold the MENU/SELECT knob on main
unit to enter the menu of the various modes.
on the remote, or rotate the MENU/SELECT knob on the main unit to select
Press
the desired menu item and press ENTER on the remote control or press the MENU/SELECT
knob to enter the submenu or to save the settings. Press BACK to return to the previous level,
or press MENU again to exit.
MENU AVAILABLE IN DAB MODE
CONNECT THE LAST PAIRED BLUETOOTH ENABLED DEVICE
Press MENU to access the multiple functions of the DAB mode.
4.
Use the buttons
to browse the various menu items.
Press ENTER to enter the selected menu item.
The following is a quick way to connect TS522D+ to the last paired device.
When the product is in standby mode, press the STANDBY button and enter the BT mode
using the MODE button (if the unit is on, but in a different mode, press the MODE button until
you see BT). Turn on the Bluetooth device to be associated. It will be connected automatically.
The Bluetooth Mode LED will light when the connection is successful. If the product fails to find
the last paired device, it will go into standby mode waiting for connection. In this status, the
previously paired devices may be connected to the unit.
FULL SCAN: allows to perform a full scan of the DAB channels
RESETTING THE UNIT'S MEMORY
The unit can store up to 8 different Bluetooth devices. To clear the memory manually you must
be in the BT mode, in the pairing status (LED flashes quickly), press the PAIR button twice (with
an interval of about one second between presses) until it plays a "beep" sound. At this point, the
LED indicating the status of the Bluetooth switches off, and then it starts to flash again.
MANUAL TUNE: allows to set the DAB frequency to be tuned
CAUTION:
After erasing all memory, the unit will go immediately into pairing mode and you will need to
follow the pairing and connection procedure of a new Bluetooth device.
Remember to delete the name of the radio also from the device you want to connect it to again,
in order to completely reset the pairing between the two devices.
34
35
ENGLISH
SETTING THE UNIT
Press buttons
to adjust the frequency and press ENTER to confirm (e.g. 174.928 MHz)
The display will show the signal strength of the frequency set manually for the tuning.
AUDIO
Allows you to set the listening to MONO or STEREO in FM mode.
MENU AVAILABLE IN ALL MODES
Press MENU to access features common to all modes of TS522D+.
The > symbol indicates the power of the signal; it means that the signal of that station is strong
enough to allow the tuning of such DAB station. The --- symbol indicates the absence of signal.
DATE/TIME
Allows you to set the date and time manually or through the signal received from the DAB
stations.
Press MENU twice to return to the DAB mode, or press BACK three times to play the tuned
DAB station.
DRC (DYNAMIC RANGE COMPRESSION)
Allows you to set the DRC level to High, Low, or Off.
To select one of the three options mentioned above press the buttons
.
MANUAL
Press
on the remote control, turn the MENU/SELECT knob on the main unit, to set the
time and date, press the ENTER button on the remote control or the MENU/SELECT knob on
the main unit to confirm and save the entered information.
MENU AVAILABLE IN FM MODE
Press MENU to access the multiple functions of the FM mode.
Use the buttons
to browse the various menu items.
Press ENTER to enter the selected menu item.
SCAN
Allows you to set the quality of the reception of FM stations for the scanning.
STRONG: only the stations with a strong signal will be scanned.
ALL: the stations with both strong and weak signal will be scanned.
36
AUTO
By selecting this option, the radio will automatically use the date and clock information gathered
from the station.
37
ENGLISH
Use the buttons
to browse the various menu items.
Press ENTER to enter the selected menu item.
CAUTION:
If the unit is battery-powered, when the radio is turned off all information regarding the date and
clock will be lost. When the radio is turned back on, going in DAB mode, it will perform an automatic
scan and receive the clock and date information from the DAB station.
Press ENTER on the remote or the MENU/SELECT knob on the main unit to access the two
operating modes and increase or decrease the brightness of the display with the
buttons.
TIME MODE
Allows you to set the clock format to 12 or 24 hours.
SET EQ
Allows to set the equalization of the radio.
Press
on the remote control or turn the MENU/SELECT knob on the main unit to select
one of the stored equalization presets: NORMAL, ROCK, POP, JAZZ. Press the ENTER button
on the remote or the MENU/SELECT knob on the main unit to confirm the chosen preset.
on the remote or turn the MENU/SELECT knob on the main unit to
Press the buttons
adjust the time interval from 5 to 15 minutes with 1-minute routers.
Press the ENTER button on the remote or the MENU/SELECT knob on the main unit to save
the chosen value.
To disable the Snooze function, press the STANDBY button on the remote control or on the
main unit.
ENGLISH
SNOOZE
Allows to set the time interval to repeat the alarm (snooze).
By the MY EQ option, you can set the value of the high (treble) and low (bass) frequencies in a
on the remote control or turn the MENU/SELECT knob on
personalized way. Press
the main unit to increase or decrease the value. Press the ENTER button on the remote or the
MENU/SELECT knob on the main unit to confirm the set values.
DISPLAY SET
Allows to set the brightness of the display.
LOUDNESS
Allows to set the loudness level to ON and OFF.
Press
on the remote control or turn the MENU/SELECT knob on the main unit to adjust
the brightness for normal and/or standby-mode.
Standby mode
Normal operating mode
38
Press
on the remote control or turn the MENU/SELECT knob on the main unit to select
one of two possible statuses. The loudness can be toggled between ON and OFF only when
the equalization mode is NORMAL (the other equalization modes have the loudness set to ON
by default).
39
RESET
Allows you to clear all settings and restore the factory configuration. Select the option YES and
press the ENTER button on the remote control or the MENU/SELECT knob on the main unit to
start the reset to factory settings or NO to cancel the operation.
CAUTION: all the date, clock, alarm, equalizer presets, and radio stations settings will be lost.
ENGLISH
FIRMWARE VERSION
Allows to view the firmware version installed in the unit.
USING THE ALARM
ENABLING OR DISABLING THE ALARM
Setting the alarm
In standby mode, press
1.
Turn the radio on, press
The icon
1
or the icon
1
or
on the remote control to select alarm 1 or alarm 2.
will flash on the display.
1
and move to the next function
1
or
or
on the remote control to enable or disable the alarm, or turn
to select alarm 1 or 2, on the remote control press the buttons
to select ON/OFF and confirm with ENTER.
The icons are shown on the display to confirm that the alarm has been activated.
on the remote or turn the MENU/
Press ENTER to enter the Alarm menu, press
SELECT knob on the main unit to adjust the desired time for the alarm. Press ENTER or the
MENU/SELECT knob to confirm your choice
BACK to return to the previous menu item.
on the radio, press
1
, or press
After setting of the alarm time, you can select the alarm source (DAB/FM/Buzzer). By setting
DAB or FM you can set a radio station stored in the preset, to be associated to the alarm or the
last radio station listened to.
SNOOZE OPTION AND ALARM SLEEP MODE
While the alarm is enabled, press SNOOZE on the remote control to repeat the alarm after a
certain interval (according to the settings entered in the relevant menu - the default value is 5
minutes) or by pressing the VOL/STANDBY knob on the main unit.
When the SNOOZE mode is active, the display shows the Zz icon that identifies its active status
of operation.
To stop the alarm, press any button on the remote control except for SNOOZE, or any knob on
the main unit except for VOL/STANDBY.
The next option is the repetition frequency of the alarm that may have the following options:
Once – Daily – Weekdays – Weekends. When selecting the option Once you need to confirm
the date of the alarm before moving on to the next step. Set the playback volume of the alarm.
When the alarm is set to ON and saved, the icon for alarm 1 and/or 2 will be shown on the
display to indicate the active status.
40
41
FERNBEDIENUNG
1
Bluetooth-Statusanzeige: blinkt während des Verbindungsvorgangs, leuchtet dauerhaft,
wenn verbunden.
2
Display: LCD-Display
3
Infrarotempfänger (IR): empfängt das Signal der Fernbedienung
4
4.1
4.2
4.3
4.4
4.5
MENU/SELECT:
Lange gedrückt halten zum Anzeigen der verschiedenen Hauptmenüeinträge (MENU)
Kurz drücken, um die Auswahl zu bestätigen (ENTER)
Mit oder gegen den Uhrzeigersinn drehen, um verschiedene Auswahlen zu treffen
Mit oder gegen den Uhrzeigersinn drehen, um den nächsten oder den vorherigen
Radiosender im DAB-Modus einzustellen
Mit oder gegen den Uhrzeigersinn drehen, um die Frequenz im FM-Modus einzustellen
5
MODE: drücken, um zwischen DAB/FM/Bluetooth (BT) und AUX-Modus zu wechseln
Drücken Sie diesen Knops, um das Radio einund auszuschalten
STANDBY
MODE
6
6.1
6.2
6.3
7
BT PAIR/ /SCAN
wenn Sie sich im BT-Modus befinden, drücken und halten, um die
Bluetooth-Geräte zu verbinden, bis die blaue LED schnell hintereinander blinkt
wenn das Bluetooth-Gerät verbunden ist, können Sie durch kurzes Drücken der Taste
das BT-Gerät pausieren oder weiterlaufen lassen.
im DAB- und FM-Modus können Sie auf diese Weise nach verfügbaren Radiosendern suchen
MODE
drücken, um zwischen DAB/FM/Bluetooth
(BT) und AUX-Modus zu wechseln
INFO
Drücken Sie diese Taste, um während des
DAB- und des FM-Modus Informationen über
den ausgewählten Radiosender anzuzeigen
EQ
Drücken, um Zugriff auf den voreingestellten
Equalizer zu erhalten oder einen eigenen zu
erstellen.
SCAN
Startet im DAB-Modus einen kompletten
Sendersuchlauf. Im FM-Modus wird der
nächste verfügbare Sender gesucht
INFO
EQ
SCAN
PAIR
BACK: wenn Sie sich im Menü befinden, kommen Sie über diese Taste zurück zur vorherigen
Menüebene
8
Kopfhöreranschluss
9
Lautstärkeanzeige: zeigt die Lautstärke des Geräts an (nicht bei Stummschaltung/MUTE)
10
10.1
VOL/STANDBY:
drehen Sie diesen Regler mit dem Uhrzeigersinn oder gegen den Uhrzeigersinn,
um die Lautstärke zu erhöhen oder sie zu verringern
10.2
drücken, um das Radio ein- oder auszuschalten
10.3
Im Alarm-Modus einmal drücken zum Wiederholen des Alarms (Snooze), noch einmal drücken,
um den Alarm auszuschalten.
HINWEIS: Wird das Gerät allein über Batterien mit Strom versorgt, schaltet es sich bei Drücken auf
diese Taste aus, um Energie zu sparen und die Laufzeit der Batterien zu erhöhen. In diesem Modus
sind sowohl die Uhr-Funktion als auch der Alarm ausgeschaltet.
Tasten zum Durchsuchen der Menüs in den
verschiedenen Modi.
Erhöht oder verringert im FM-Modus die
Frequenz oder wählt im DAB-Modus den
nächsten oder den vorherigen verfügbaren
Sender aus.
PLAY/
PAUSE/
PAIR
PAIR
Während des Abspielens via Bluetooth,
drücken Sie diese Taste, um das Abspielen
auf dem verbundenen Gerät zu starten
oder zu pausieren. Gedrückt halten, um ein
Bluetooth-Gerät zu verbinden.
MENU
MENU
Drücken Sie diese Taste, um zu den
Menüeinstellungen zu gelangen
VOLUME +
Drücken, um die Lautstärke zu erhöhen.
VOLUME -
Drücken, um die Lautstärke zu verringern.
MUTE
Drücken Sie diese Taste zum ein- und
ausschalten der Stummschaltung.
VORDERSEITE
1
2
Stromanschluss: verbinden Sie das Gerät über das mitgelieferte Netzteil mit der Steckdose
(12VDC 2A)
R-SPR OUT: verbinden Sie den rechten Lautsprecher, um ein Stereo-System zu erhalten
(separat erhältlich)
1/6
2/7
ALARM
1&2
3/8
4/9
1
5/10
Tasten zum Speichern und Abrufen der
eingestellten Radiosender (nur im DAB- und
im FM-Modus)
2
Drücken Sie diese Taste zum Einstellen des
Alarms (Alarm 1/Alarm 2)
OBERSEITE
1
2
Griff: ziehen Sie zum Tragen des Radios den Griff heraus
Radioantenne: ziehen und biegen Sie die Antenne, um die beste Position für den Empfang
zu finden
42
SNOOZE
SNOOZE
43
Diese Taste hat drei verschiedene Funktionen:
1.
er beendet einen aktiven Alarm.
2.
er dient der Dimmbarkeit des LCDDisplays, wenn das Gerät ausgeschaltet
ist (4 Helligkeitsstufen)
3.
er dient der Einstellung des Intervalls bis
zum nächsten Alarm, wenn das Gerät
eingeschaltet ist
DEUTSCH
VORDERSEITE
Um einen elektrischen Schlag zu vermeiden, entfernen Sie
nicht die Schrauben auf der Rückseite des Geräts. Dieses
Gerät kann nicht vom Endverbraucher gewartet werden.
Falls nötig, kontaktieren Sie qualifizierte Fachkräfte.
Das von einem Dreieck umgebene Ausrufezeichen weist den Verbraucher auf
wichtige Bedienungs- und Wartungshinweise innerhalb des Handbuchs hin.
Der von einem Dreieck umgebene Blitz weist den Verbraucher auf innerhalb des
Produkts vorhandene nicht isolierte Spannungsquellen hin, die stark genug sein
könnten, dem Nutzer einen elektrischen Schlag zu verpassen.
WARNUNGEN ZUR NUTZUNG UND ZUM BETRIEB DES GERÄTS
•
Zur Vermeidung eines Brands stellen Sie keine offenen Flammen (z.B. Kerzen o.Ä.) auf das
Gerät.
•
Bevor Sie das Gerät zum ersten Mal an die Stromversorgung anschließen, lesen Sie den
Abschnitt unten.
•
Die Stromspannung der verfügbaren Stromversorgung variiert von Land zu Land und von
Region zu Region. Stellen Sie sicher, dass die Stromspannung in Ihrer Region mit der für den
Betrieb des Geräts nötigen Spannung (z.B. 240 V oder 110 V) übereinstimmt; die Spannung
entnehmen Sie dem Aufkleber auf dem Netzteil.
•
Dieses Produkt ist nur für den Hausgebrauch geeignet. Jedweder Schaden, der aus anderem
Gebrauch (so wie eine Langzeitverwendung für geschäftliche Zwecke, in einem Restaurant,
Benutzung in einem Auto oder auf einem Schiff) herrührt und besondere Reparaturmaßnahmen
erfordert, wird dem Nutzer in Rechnung gestellt, und das auch dann, wenn der Schaden
während der Garantiedauer eingetreten ist.
•
Bevor Sie das Produkt nutzen, lesen Sie immer die Sicherheitsinformationen auf der Rückseite
des Geräts sowie des Netzteils.
•
Halten Sie das Produkt und seine Zubehörteile von Kindern fern. Sollte ein Teil des Geräts
versehentlich verschluckt worden sein, rufen Sie sofort einen Arzt.
•
Halten Sie das Netzteil von Kindern fern.
•
Das Netzteilkabel könnte sich versehentlich um den Hals wickeln und damit zum Ersticken
führen.
WARNUNG:
schaltet die Stromversorgung von der Steckdose nicht komplett ab.
Der Hauptschalter
Da das Stromkabel die Verbindung zur Stromversorgung herstellt, sollte das Kabel aus der
Steckdose gezogen werden, um den Stromfluss komplett zu unterbrechen. Stellen Sie in jedem
Fall sicher, dass das Gerät so verwendet wird, dass Sie das Stromkabel schnell und einfach aus
der Steckdosen ziehen können, wenn dies nötig sein sollte. Sie sollten das Stromkabel außerdem
von der Steckdose trennen, wenn Sie das Gerät für längere Zeit nicht nutzen (zum Beispiel, wenn
Sie im Urlaub sind), um einen Brand zu verhindern.
BELÜFTUNGSHINWEIS
Stellen Sie das Gerät so auf, dass genug Platz für die Luftzirkulation und die Wärmeabstrahlung
bleibt (mindestens 10 cm von oben, 10 cm an der Rückseite und 10 cm auf jeder Seite).
ACHTUNG
•
Das Produktgehäuse verfügt über kleine Öffnungen, die auch der Belüftung dienen, so dass
ein Überhitzen verhindert und die Funktionsfähigkeit erhalten wird. Zur Verhinderung eines
Brands sollten die Öffnungen während des Betriebs nicht abgedeckt werden (zum Beispiel
durch Zeitungen, Tischdecken, Gardinen, Handtücher usw.). Das Gerät sollte außerdem nicht
auf einem dicken Teppich oder dem Bett platziert werden.
•
Sollte das Stromkabel des Geräts nicht kompatibel mit Ihrer Steckdose sein, müssen
Sie es durch ein passendes Kabel ersetzen. Der Anschluss des Stromkabels darf nur
durch qualifizierte Fachkräfte erfolgen. Nach dem Austauschen des Kabels muss der alte
Stromstecker ordnungsgemäß entsorgt werden, um mögliche ernsthafte Verletzungen zu
verhindern, die auftreten könnten, wenn der Stromstecker in eine Steckdose gesteckt wird.
Sollten Sie das Gerät längere Zeit nicht nutzen (z.B. während des Urlaubs), trennen Sie das
Netzteil von der Steckdose.
44
WARNUNG BEZÜGLICH DES STROMKABELS
Halten Sie das Stromkabel immer am Stecker fest. Ziehen Sie das Kabel immer am Stecker aus der
Steckdose und fassen Sie das Kabel nicht mit nassen Händen an, da dies zum Kurzschluss oder
zu einem elektrischen Schlag führen könnte. Platzieren Sie das Gerät nicht auf dem Stromkabel und
stellen Sie sicher, dass das Kabel nicht geknickt wird. Machen Sie keinen Knoten in das Stromkabel
und verknoten Sie es nicht mit anderen Kabeln. Die Stromkabel sollten so verlegt werden, dass
niemand auf sie drauf tritt. Ein beschädigtes Stromkabel kann Brände auslösen und elektrische
Schläge verursachen. Überprüfen Sie das Stromkabel regelmäßig. Sollte es beschädigt sein,
konsultieren Sie den nächstgelegenen von BV srl autorisierten Kundendienst oder fragen Sie bei
Ihrem Händler nach einem Ersatzkabel.
45
DEUTSCH
WICHTIG
RADIOWELLEN-WARNUNGEN
Dieses Gerät nutzt 2,4 GHz-Radiofrequenzen, die auch von anderen drahtlosen Systemen genutzt
werden (wie Mikrowelleherde und schnurlose Telefone).
Sollte der Bildschirm Ihres Fernsehgeräts rauschen, könnte es sein, dass dieses Gerät (oder von ihm
unterstützte Geräte) Interferenzen mit den Signalen Ihres TV-Systems verursacht.
Vergrößern Sie in einem solchen Fall die Entfernung zwischen dem TV-Empfangssystem und diesem
Gerät (inklsive der Geräte, die es unterstützt).
BV srl ist nicht verantwortlich für Störungen, die durch Fehlfunktionen im Zusammenhang mit
Verbindungen hervorgerufen werden. Kontaktieren Sie den Hersteller des Geräts, das Sie verbinden
möchten.
NETZTEIL-HINWEISE
Halten Sie das Netzteilgehäuse fest, wenn Sie es von der Steckdose trennen. Wenn Sie das
Stromkabel abziehen, könnte es beschädigt werden und einen Brand und/oder einen elektrischen
Schlag verursachen. Versuchen Sie nicht, das Netzteil mit bloßen Händen vom Stromnetz zu trennen.
Dies könnte zu einem elektrischen Schlag führen.
Lassen Sie das Netzteilkabel nicht in der Steckdose, wenn die Verbindung unsicher ist, auch dann
nicht, wenn der Stecker komplett in der Steckdose steckt. Dadurch könnte soviel Hitze entstehen,
dass ein Brand ausbricht. Kontaktieren Sie einen Händler oder einen Elektriker, um die Steckdose
auszutauschen.
ACHTUNG
Dieses Gerät ist nicht wasserdicht. Zum Verhindern von Bränden und elektrischen Schlägen,
platzieren Sie dieses Gerät nicht in der Nähe mit Wasser gefüllter Behälter (wie Blumentöpfe usw.).
Setzen Sie das Gerät außerdem weder tropfendem oder spritzendem Wasser noch Regen oder
Feuchtigkeit aus.
UMWELT UND ENTSORGUNG
Das Gerät könnte gesundheits- und umweltgefährdende Materialien enthalten. BV, Srl stellt die
folgenden Informationen zur Entsorgung sowie zum Recycling des Geräts bereit, um das Freisetzen
gefährdender Materialien in die Umwelt zu verhindern.
Elektronische Materialien (WEEE) dürfen nicht mit dem normalen Haushaltsmüll
entsorgt werden.
Dieses auf dem Produkt, der Verpackung und/oder mitgelieferten Dokumenten
abgebildete Symbol weist darauf hin, dass elektronische Geräte ordnungsgemäß
entsorgt werden müssen.
Zur ordnungsgemäßen Entsorgung wenden Sie sich an die nach Ihrer nationalen
Gesetzgebung zuständige Abgabestelle.
Schützen Sie unsere Umwelt, indem Sie die folgenden Punkte beachten:
Möchten Sie das Gerät nicht länger nutzen, bringen Sie es zu Ihrem örtlichen Wertstoffhof.
Sie können das alte Gerät kostenfrei an Ihren Händler zurückgeben, wenn Sie ein neues Gerät
kaufen, dass dieselben oder ähnliche Funktionen wie das alte besitzt.
Kontaktieren Sie BV, Srl, um Ihren örtlichen Händler zu finden.
Benötigen Sie weitere Informationen zu Recycling, Wiederverwendung oder dem Geräteumtausch,
kontaktieren Sie unseren Kundendienst unter der in dieser Bedienungsanleitung angegebenen
Telefonnummer.
Zum Schutz der Umwelt empfehlen wir außerdem, dass Sie das Verpackungsmaterial (inklusive des
Versandmaterials) recyceln.
Mit Ihrer Hilfe können wir die Menge der zur Herstellung von Elektrogeräten benötigten Ressourcen
sowie die Menge zur Entsorgung alter Geräte benötigter Mülldeponien reduzieren und die
Lebensqualität verbessern, indem wir dafür sorgen, dass gefährliche Materialien ordnungsgemäß
entsorgt werden.
Unsachgemäße Entsorgung des Geräts und das Zuwiderhandeln gegen die oben genannten
Bestimmungen sind nach der örtlichen Gesetzgebung mit Strafe bedroht.
46
47
DEUTSCH
UMGEBUNGSBEDINGUNGEN
Optimaler Temperaturbereich und Luftfeuchtigkeit:
von +5°C bis +35°C, relative Luftfeuchtigkeit geringer als 85% (nicht abgedecktes Produkt)
Stellen Sie das Gerät nicht in einem schlecht belüfteten Bereich oder an einem Ort mit hoher
Luftfeuchtigkeit oder direkter Sonneneinstrahlung (oder starken künstlichen Lichtquellen) auf.
SICHERHEITSBESTIMMUNGEN
GEFAHR
Folgen Sie den bereitgestellten Anweisungen.
Werfen Sie das Gerät nicht in offenes Feuer und setzen Sie keiner großen Hitze aus.
Werfen Sie das Gerät nicht, schlagen Sie nicht mit einem Hammer oder einem anderen Objekt darauf
und öffnen Sie es nicht gewaltsam.
Nutzen Sie das Gerät nicht an Orten mit sehr hohen Temperaturen, wie nah an einem Heizgerät oder
in einem geschlossenen Auto bei direkter Sonneneinstrahlung.
Stellen Sie sicher, dass das Gerät nicht mit Flüssigkeiten übergossen wird.
WARNUNG
Nutzen Sie das Gerät nicht, wenn es ungewöhnliche Gerüche verbreitet, sich erhitzt, die Farbe
oder Form verändert oder wenn während der Nutzung oder des Aufladens sonstige ungewöhnliche
Umstände eintreten.
ACHTUNG
•
Wenn Sie das Gerät verwenden, stellen Sie es nicht auf die Seite, lehnen Sie es nirgends an
und hängen Sie es nicht auf.
•
Setzen oder stellen Sie sich nicht auf das Produkt
•
Befestigen Sie das Gerät nicht an der Wand oder der Decke. Es könnte herunterfallen und
Schäden verursachen.
•
Einige Teile der Lautsprecher sind magnetisch. Metallische Materialien könnten von den
Lautsprechern angezogen werden. Platzieren Sie keine Kreditkarten oder andere magnetische
Speichermedien nahe des Geräts, da die gespeicherten Daten gelöscht werden könnten.
VIELEN DANK FÜR DEN KAUF DES PRODUKTES CUBO.
Mit dem FM/DAB/DAB+ Bluetooth TS522D+ können Sie Musik über FM/DAB/DAB+-Frequenzen
anhören: die auf Ihrem Audiogerät oder Ihrem per Bluetooth verbundenen Mobiltelefon gespeicherte
Musik sowie Musik, die über den AUX-Eingang eingespeist wird.
Bitte lesen Sie diese Hinweise vor der Benutzung des Produkts aufmerksam durch, um sich mit
seiner Funktionsweise vertraut zu machen. Bewahren Sie die Bedienungsanleitung nach dem Lesen
für späteres Nachschlagen an einem sicheren Ort auf.
ACHTUNG - BENUTZUNG IN FEUCHTER UMGEBUNG
Das TS522D+ ist nicht wasserdicht.
Schützen Sie es während der Nutzung vor Wasser und verwenden Sie es nicht in feuchten
Umgebungen.
Sollte es dennoch mit Flüssigkeiten in Berührung kommen, entfernen Sie diese unverzüglich mit
einem trockenen Tuch. Stellen Sie das Gerät immer auf einen stabilen und ebenen Untergrund.
Verwenden Sie das Gerät nicht auf dem Kopf stehend oder in schräger Position.
Stellen Sie das Gerät an einem Ort auf, an dem kein Wasser eindringen kann.
Kippen Sie das Gerät nicht, wenn es Wasser oder Wassertropfen ausgesetzt war.
Kippen Sie das Gerät nicht, wenn es feucht ist, da sonst Wasser eindringen könnte
Wasser könnte in das Gerät eindringen. Transportieren Sie das Gerät nicht, wenn es feucht ist.
Nutzen Sie das Netzteil nicht in der Nähe von Wasser.
Halten Sie die Batterie der Fernbedienung von Kindern fern.
Sie könnte bei falscher Handhabung Brände oder chemische Verbrennungen auslösen.
Die Batterie nicht wieder aufladen, demontieren oder über 100°C erhitzen.
Ersetzen Sie die Batterie nur durch eine Batterie gleichen Typs (CR2025).
BLUETOOTH-TECHNOLOGIE
Über die Bluetooth-Technologie können Sie kompatible Geräte kabellos verbinden. Zur Herstellung
einer Bluetooth-Verbindung müssen sich die Geräte nicht in gegenseitiger Sichtweite befinden.
Es muss allerdings sichergestellt sein, dass sie Geräte nicht weiter als 10 Meter voneinander entfernt
sind. Wände oder andere Elektrogeräte können die Funkverbindung stören.
Das Gerät entspricht der Bluetooth-Spezifikation v2.1. Kontaktieren Sie die Hersteller der zur
Verbindung vorgesehenen Geräte, um herauszufinden, ob diese mit dem Gerät kompatibel sind. In
einigen Ländern ist die Verwendung von Bluetooth Einschränkungen unterworfen. Kontaktieren Sie
Ihre lokalen Behörden oder Ihren Dienstanbieter.
INBETRIEBNAHME DES GERÄTS
Stellen Sie das Gerät auf einen flachen und stabilen Untergrund.
Sollte etwas fehlen, kontaktieren Sie bitte Ihren Händler.
DEUTSCH
PACKUNGSINHALT
•
Die Packung enthält:
•
Radio TS522D+
•
Externes Netzteil
•
Fernbedienung inklusive Batterie
•
Bedienungsanleitung
•
Tasche
Stellen Sie das Gerät nicht an den folgenden Orten auf:
•
auf einem Farbfernseher (die Anzeige könnte durch die Bluetooth-Funktion gestört werden);
•
nahe eines Kassettenrekorders (oder eines anderen Geräts, das von einem Magnetfeld
umgeben ist). Dies könnte den Klang beeinträchtigen;
•
in direktem Sonnenlicht;
•
in einer extrem heißen oder kalten Umgebung;
•
an vibrierenden oder sich in anderer Form bewegenden Orten;
•
an extrem staubigen Orten;
•
an Orten, wo Rauch entsteht oder sich heiße Öle befinden (z.B. einem Herd)
48
49
INBETRIEBNAHME UND ERSETZEN DER BATTERIE DER FERNBEDIENUNG
DAB-RADIO IN BETRIEB NEHMEN
Die Fernbedienung wird inklusive einer Batterie vom Typ "CR2025" geliefert, die eingesetzt werden muss.
Nimmt die funktionsfähige Entfernung der Fernbedienung ab oder funktioniert sie nicht mehr korrekt,
sollte die Batterie ausgetauscht werden.
1.
Gehen Sie dazu wie folgt vor:
3.
2.
3.
Entfernen Sie die Batterieabdeckung, wie in den
Anweisungen auf der Rückseite der Fernbedienung
angegeben.
Zum Ersetzen der Batterie entfernen Sie sie und legen Sie
eine neue Batterie vom Typ CR2025 ein, wie in der unten
abgebildeten Darstellung gezeigt (stellen Sie dabei sicher,
dass der "+"-Pol nach oben zeigt).
Legen Sie die Batterie in das Fach ein.
ACHTUNG:
Lithium-Batterien können explodieren und Verbrennungen verursachen, wenn Sie demontiert,
kurzgeschlossen, wieder aufgeladen, Wasser, Feuer oder hohen Temperaturen ausgesetzt werden.
Bewahren Sie Batterien nicht in Ihrer Tasche, Geldbörse oder einem anderen Behältnis auf, das
metallische Objekte enthält; bewahren Sie sie nicht zusammen mit Batterien anderen Typs oder
gefährlichen Materialien oder Treibstoffen auf. An einem kühlen, trockenen und belüfteten Ort
aufbewahren. Beachten Sie die Gesetze und Verordnungen zu Transport und Entsorgung.
4.
5.
FM-RADIO IN BETRIEB NEHMEN
1.
Verwenden Sie die MODE Taste zum Auswählen des FM-Modus. Auf dem Display wird
nun eine FM-Frequenz, z.B. "102.5", angezeigt. DAs FM-Symbol leuchtet auf dem Display.
Verwenden Sie den MODE Knopf des Geräts, um zu den Menüeinträgen zu gelangen und den
FM-Modus auszuwählen.
2.
Verwenden Sie die Tasten
auf der Fernbedienung zum Durchsuchen der FMFrequenzen: einmal Drücken erhöht oder verringert die Frequenz um 50 kHz. Verwenden Sie
den MENU/SELECT Knopf zum Erhöhen oder Verringern der FM-Frequenz.
3.
Drücken und halten Sie eine der Taste
zum Suchen der nächsten oder der vorherigen
Radiofrequenz oder drücken Sie SCAN auf der Fernbedienung, um direkt nach dem
nächsten verfügbaren Sender zu suchen. Sobald ein Sender gefunden wurde, stoppt die
Suche automatisch. Verwenden Sie den BT PAIR/SCANT Knopf zum Suchen der nächsten
verfügbaren FM-Frequenz.
Drücken Sie INFO um visuelle Informationen zum gewählten Radiosender anzuzeigen (abhängig
von den vom Sender zur Verfügung gestellten Informationen)
Betätigen Sie INFO 4 Mal, um zur MONO/STEREo-Funktion des FM-Senders zu gelangen.
Drücken Sie ENTER um zwischen MONO und STEREO umzuschalten. Befinden Sie sich im
STEREO-Modus, wird dieses Symbol im Display angezeigt
.
ERSTE SCHRITTE
1.
Entfernen Sie den schützenden Plastikstreifen aus dem Batteriefach der Fernbedienung wie in
der Abbildung gezeigt.
auf der Fernbedienung, um durch die Liste der gefundenen
Verwenden Sie die Tasten
DAB-Sender zu navigieren. Verwenden Sie den MENU/SELECT Knopf, um den nächsten oder
den vorherigen gefundenen DAB-Sender auszuwählen.
Drücken Sie SCAN um im DAB-Modus einen kompletten Sendersuchlauf zu starten.
4.
5.
EINEN SENDER SPEICHERN UND ABRUFEN (VOREINSTELLUNGEN)
2.
3.
4.
Verbinden Sie das mitgelieferte Netzteil mit dem Stromanschluss an der Rückseite des Radios.
Verbinden Sie die andere Seite des Netzteils mit einer Steckdose. Möchten Sie das Radio mit
Batterien betreiben, legen Sie 6 "C"-Batterien in das Batteriefach an der Unterseite des Radios ein.
Wenn Sie das Gerät zum ersten Mal einschalten, zeigt es "00:00" an.
Schalten Sie das Gerät ein, indem Sie die Standby-Taste auf dem Gerät oder auf der
Fernbedienung drücken. Das Radio schaltet in den DAB-Modus und beginnt mit der
Sendersuche. Nach dem Ende der Suche verwendet das Gerät automatisch das von den DABSendern bereitgestellte Datum und die Uhrzeit.
ACHTUNG:
Wird das Gerät über Batterien mit Strom versorgt (das Netzteil ist nicht angeschlossen), verwenden
Sie die Standby-Taste am Gerät.
Wird das Gerät über Batterien mit Strom versorgt, kann die Fernbedienung nicht verwendet werden.
50
1.
Zum Speichern Ihrer favorisierten Sender auf den Speicherplätzen 1 bis 5, gehen Sie wie folgt vor:
2/7
1/6
3/8
4/9
5/10
die dem Speicherplatz entspricht,
Halten Sie die Taste gedrückt
auf dem der Sender gespeichert werden soll, bis auf dem Display "STORED #" (# steht für die
Nummer des Speicherplatzes, z.B. "STORED 3" für den dritten Speicherplatz) angezeigt wird.
2.
Zum Speichern Ihrer favorisierten Sender auf den Speicherplätzen 6 bis 10, gehen Sie wie folgt vor:
3.
Betätigen Sie SHIFT einmal;
1/6
2/7
3/8
4/9
5/10
Halten Sie die Taste gedrückt
die dem Speicherplatz entspricht, auf dem
der Sender gespeichert werden soll, bis auf dem Display "STORED #" (# steht für die Nummer
des Speicherplatzes, z.B. "STORED 6" für den sechsten Speicherplatz) angezeigt wird.
51
DEUTSCH
1.
2.
Beim ersten Start muss der Suchvorgang ausgeführt werden. DAs DAB-Symbol wird angezeigt
und der Suchvorgang beginnt (dies kann einige Minuten dauern).
Verwenden Sie die MODE Taste zum Auswählen des DAB-Modus. Verwenden Sie den MODE
Knopf des Geräts, um zu den Menüeinträgen zu gelangen und den DAB-Modus auszuwählen.
Drücken Sie INFO um visuelle Informationen zum gewählten Radiosender anzuzeigen (abhängig
von den vom Sender zur Verfügung gestellten Informationen)
Sie können bis zu 10 DAB-Sender und 10 FM-Sender speichern (die voreingestellte FMFrequenz ist bei allen Speicherplätzen 87,50 MHz).
5.
Um einen der 10 gespeicherten Sender abzurufen, gehen Sie wie folgt vor:
Für die Speicherplätze 1 bis 5 drücken Sie eine der Tasten
6.
1/6
2/7
3/8
4/9
5/10
Für die Speicherplätze 6 bis 10 drücken Sie einmal SHIFT (das Display zeigt "SHIFT" an) und
dann die dem Speicherplatz entsprechende Taste.
MUSIKWIEDERGABE
Das Gerät, das Sie mit dem TS522D+ verbinden möchten, muss AVRCP (Audio Video Remote
Control Profile) unterstützen, damit das Abspielen funktioniert. Ziehen Sie die Bedienungsanleitung
Ihres Geräts zu Rate. Wenn Musik abgespielt wird:
1.
Taste
PLAY/PAUSE
a. Einmal drücken zum Pausieren der Wiedergabe
b. Erneut drücken zum Fortsetzen der Wiedergabe
2.
(drehen Sie den VOL/STB-Regler am Gerät gegen den Uhrzeigersinn)
VOL - Taste
a. Einmal drücken zum Verringern der Lautstärke
b. Gedrückt halten zum konstanten Verringern der Lautstärke
3.
VOL + Taste
(drehen Sie den VOL/STB-Regler am Gerät gegen den Uhrzeigersinn)
a. Einmal drücken zum Erhöhen der Lautstärke
b. Gedrückt halten zum konstanten Erhöhen der Lautstärke wenn die maximale Lautstärke
erreicht ist, wird auf dem Display VOL MAX angezeigt)
KOPPLUNG, VERBINDUNG UND BETRIEB DES GERÄTS ÜBER BLUETOOTH
Das Radio TS522D+ kann mit Bluetooth-Geräten mit v2.0 oder v2.1 gekoppelt werden. Der
Koppelungsvorgang kann von Gerät zu Gerät variieren. Ziehen Sie die Bedienungsanleitung Ihres
Bluetooth-Geräts zu Rate, um zu erfahren, wie Sie das Gerät richtig koppeln.
1.
2.
3.
4.
5.
6.
Beim ersten Aufruf dieses Modus schaltet das Gerät in den "Auf Verbindung Warten"-Status,
die LED blinkt langsam und es ist möglich, ein bereits gekoppeltes Gerät zu verbinden. Ist
Bluetooth bei dem Gerät, das Sie verbinden möchten, eingeschaltet, wird es automatisch mit
dem Radio verbunden.
Um ein neues Gerät zu verbinden, betätigen Sie etwa 4 Sekunden lang die PAIR-Taste, bis die
LED schnell blinkt ("Auf Kopplung warten"-Status). Schalten Sie Ihr Gerät ein.
Schalten Sie Ihr Bluetooth-Gerät (z.B. ein Smartphone) ein, rufen Sie das BluetoothEinrichtungsmenü auf und suchen Sie nach verfügbaren Geräten. Nun wird in der Liste
gefundener Geräte TS522D+ angezeigt.
Verbinden Sie das Gerät mit dem TS522D+; das Gerät zeigt nun "Verbunden" an und die LED
des Radios leuchtet dauerhaft (wenn die Kopplung erfolgreich war).
Nun ist es möglich, die auf dem verbundenen Gerät gespeicherte Musik kabellos auf dem
TS522D+ abzuspielen.
Möchten Sie ein Gerät mit einem anderen Bluetooth-Gerät koppeln, während es über Bluetooth
bereits mit einem Gerät verbunden ist, müssen Sie die Verbindung zunächst abbrechen,
indem Sie etwa 3 Sekunden lang die PAIR-Taste gedrückt halten, bis ein Piepton ertönt.
Alternativ können Sie die Verbindung auch über das Bluetooth-Menü des verbundenen Geräts
unterbrechen. Das Gerät schaltet dann sofort in den Koppelungsmodus und Sie können ein
anderes Gerät verbinden.
ACHTUNG:
wählen Sie zum Musikhören eine mittlere Lautstärke Langfristig hohe Lautstärke kann Ihr Hörvermögen
beeinträchtigen.
DAS ZULETZT ÜBER BLUETOOTH GEKOPPELTE GERÄT VERBINDEN
4.
Im folgenden finden Sie eine einfache Möglichkeit, das TS522D+ mit dem zuletzt gekoppelten
Gerät zu verbinden.
Befindet sich das Produkt im Standby-Modus, drücken Sie die STANDBY-Taste und gehen Sie in den
BT-Modus, indem Sie die MODE Taste betätigen (ist das Gerät eingeschaltet, befindet sich aber in
einem anderen Modus, drücken Sie die MODE Taste, bis auf dem Display BT erscheint). Schalten
Sie daS Gerät ein, das Sie verbinden möchten. Es wird nun automatisch verbunden. Die BluetoothLED leuchtet auf, wenn die Verbindung erfolgreich aufgebaut wurde. Findet das Gerät kein zuletzt
gekoppeltes anderes Gerät, schaltet es in den Standby-Modus und wartet auf eine Verbindung. In
diesem Zustand können die zuvor gekoppelten Geräte mit dem Radio verbunden werden.
DEN GERÄTESPEICHER ZURÜCKSETZEN
ACHTUNG:
Wenn Sie ein Mobiltelefon mit Bluetooth 2.0 verbinden möchten, werden Sie während des
Koppelungsvorgangs aufgefordert, ein Passwort einzugeben. Geben Sie die folgende Zahlenfolge
ein: 0000 (nullnullnullnull)
Das Gerät kann bis zu 8 verschiedene Bluetooth-Geräte speichern. Zum manuellen löschen des
Speichers müssen Sie sich im BT-Modus befinden. Betätigen Sie im Koppelungsstatus (die LED
blinkt schnell) zweimal die PAIR-Taste (mit etwa einer Sekunde Abstand), bis ein Piepton ertönt.
Die LED erlischt und beginnt dann wieder zu blinken.
ACHTUNG:
Nachdem der komplette Speicher gelöscht wurde, schaltet das Gerät sofort in den Koppleungsmodus
und Sie müssen den Koppelungs- und Verbindungsvorgang für ein neues Bluetooth-Gerät ausführen.
Denken Sie daran, die Bezeichnung des Radios aus dem Speicher Ihres Geräts zu löschen, damit die
Koppleung sowie die Verbindung vollständig zurückgesetzt wird.
52
53
DEUTSCH
4.
EIN GERÄT ÜBER DEN AUX-EINGANG ABSPIELEN
1.
Verbinden Sie das Kabel (nicht enthalten) des externen Geräts (z.B. ein MP3-Player) mit der
Buchse AUX IN.
2.
Betätigen Sie die MODE Taste auf der Fernbedienung, um in den AUX IN-Modus zu gelangen
oder drücken Sie den MODE-Knopf auf dem Gerät, bis die AUX IN-Quelle angezeigt wird. Auf
dem Display wird nun AUX IN angezeigt.
3.
Auf dem Display wird die Signalstärke der manuell gewählten Frequenz angezeigt.
Steuern Sie die Wiedergabe über Ihr verbundenes Gerät; die Lautstärke können Sie entweder
über das verbundene Gerät oder über das Radio regeln. Betätigen Sie die MUTE-Taste auf der
Fernbedienung, um das Radio stumm zu schalten; drücken Sie die Taste erneut, um den Ton
wieder einzuschalten.
DAS GERÄT EINRICHTEN
Drücken Sie die MENU Taste auf der Fernbedienung oder drücken und halten Sie den MENU/
SELECT Knopf am Radio, um das Modusmenü aufzurufen.
auf der Fernbedienung oder drehen Sie den MENU/SELECT Knopf am Radio,
Drücken Sie
um das gewünschte Menüelement auszuwählen. Drücken Sie ENTER auf der Fernbedienung oder
den MENU/SELECT Knopf am Radio, um in das Untermenü zu gelangen oder die Einstellungen zu
speichern. Drücken Sie BACK um zur vorherigen Ebene zu gelangen oder drücken Sie MENU noch
einmal, um das Menü zu verlassen.
MENÜ IM DAB-MODUS
Das >-Symbol zeigt die Signalstärke an; es bedeutet, dass das Signal des DAB-Senders stark genug
zum Empfang ist. Das Symbol --- zeigt an, dass kein Signal vorhanden ist.
Drücken Sie zweimal MENU um zum DAB-Modus zurückzukehren oder drücken Sie dreimal BACK
um den gewählten DAB-Sender abzuspielen.
DRC (DYNAMIC RANGE COMPRESSION)
Hiermit setzen Sie den DRC-Grad auf Hoch, Niedrig oder Aus.
Zum Auswählen einer der oben genannten Optionen, drücken Sie die Tasten
.
Drücken Sie MENU um Zugriff auf die verschiedenen Funktionen des DAB-Modus zu erhalten.
FULL SCAN: startet einen vollständigen DAB-Sendersuchlauf
MENÜ IM FM-MODUS
Drücken Sie MENU um Zugriff auf die verschiedenen Funktionen des FM-Modus zu erhalten.
Verwenden Sie die Tasten
zum Durchsuchen der Menüeinträge.
Drücken Sie ENTER um den ausgewählten Menüeintrag aufzurufen.
MANUAL TUNE: erlaubt das manuelle Einstellen der DAB-Frequenz
Betätigen Sie die Tasten
Bestätigen (z.B. 174,928 MHz)
SCAN
Ermöglicht die Einstellung der Empfangsqualität für FM-Sender während der Sendersuche.
STRONG: nur die Sender mit einem starken Signal werden gesucht.
ALL: sowohl Sender mit einem starken Signal als auch solche mit einem schwachen Signal werden
gesucht.
zum Einstellen der Frequenz und drücken Sie ENTER zum
54
55
DEUTSCH
zum Durchsuchen der Menüeinträge.
Verwenden Sie die Tasten
Drücken Sie ENTER um den ausgewählten Menüeintrag aufzurufen.
AUDIO
Ermöglicht im FM-Modus die Einstellung des Hörmodus auf MONO oder STEREO.
ACHTUNG:
Wird das Gerät per Batterie betrieben, gehen alle Informationen zu Uhrzeit und Datum verloren,
wenn Sie es ausschalten. Schalten Sie das Gerät erneut im DAB-Modus ein, sucht und empfängt es
automatisch die Informationen zu Datum und Uhrzeit vom DAB-Sender.
TIME MODE
Ermöglicht das Einstellen des Uhrenformats auf 12 Stunden oder 24 Stunden.
MENÜ IN ALLEN MODI
Drücken Sie MENU zum Zugriff auf Funktionen, die in allen Modi des TS522D+ zur Verfügung stehen.
Verwenden Sie die Tasten
zum Durchsuchen der Menüeinträge.
Drücken Sie ENTER um den ausgewählten Menüeintrag aufzurufen.
DATE/TIME
Ermöglicht das Einstellen des Datums und der Uhrzeit, entweder manuell oder über das Signal eines
DAB-Senders.
SNOOZE
Ermöglicht das Einstellen des Intervalls bis zum Wiederholen des Alarms (schlumern).
Drücken Sie die Tasten
auf der Fernbedienung oder drehen Sie den MENU/SELECT Knopf
am Radio zum Einstellen des Zeitabstands von 5 bis 15 Minuten in Schritten von einer Minute.
Drücken Sie die ENTER Taste auf der Fernbedienung oder den MENU/SELECT Knopf am Radio
zum Speichern des gewählten Werts.
Um die Schlummer-Funktion auszuschalten, drücken Sie die STANDBY-Taste auf der Fernbedienung
oder auf dem Gerät.
Drücken Sie
auf der Fernbedienung oder drehen Sie den MENU/SELECT Knopf des Radios,
um die Uhrueit und das Datum einzustellen; drücken Sie die ENTER-Taste auf der Fernbedienung
oder den MENU/SELECT-Knopf am Radio, um die Angaben zu speichern.
DISPLAY SET
Ermöglicht die Einstellung der Display-Helligkeit.
Drücken Sie
auf der Fernbedienung oder drehen Sie den MENU/SELECT Knopf am Radio
zum Einstellen der Display-Helligkeit während des Betriebs und/oder im Standby-Modus.
AUTO
Bei Auswahl dieser Option verwendet das Gerät automatisch das vom Sender bereitgestellte Datum
und die Uhrzeit.
Standby-Modus
56
Normaler Betriebsmodus
57
DEUTSCH
MANUAL
Drücken Sie ENTER auf der Fernbedienung oder den MENU/SELECT Knopf am Radio zum
Aufrufen der beiden Betriebsmodi. Erhöhen oder verringern Sie die Display-Helligkeit mit den Tasten
.
RESET
Erlaubt das Löschen aller Einstellungen und das Zurücksetzen auf die Werkseinstellungen. Wählen Sie
die Option YES (JA) und drücken Sie die ENTER-Taste auf der Fernbedienung oder den MENU/SELECT
Knopf am Radio zum Zurücksetzen auf die Werkseinstellungen. Wählen Sie NO (NEIN), um den
Vorgang abzubrechen.
SET EQ
Ermöglicht die Einstellung des Equalizers.
Drücken Sie
auf der Fernbedienung oder drehen Sie den MENU/SELECT Knopf am Radio
zur Auswahl eines voreingestellten Equalizers. NORMAL, ROCK, POP, JAZZ. Drücken Sie die ENTER
Taste auf der Fernbedienung oder den MENU/SELECT Knopf am Radio zur Bestätigung der
gewählten Voreinstellung.
ACHTUNG: alle Datumsangaben, Uhrzeitangaben, Alarme, Equalizer-Voreinstellungen und
Radiosender werden gelöscht.
FIRMWARE VERSION
Zeigt die auf dem Gerät installierte Firmware-Version an.
Mithilfe der MY EQ-Option können Sie die hohen und niedrigen (Bass) Frequenzen an Ihre Vorlieben
DEN ALARM NUTZEN
Den Alarm einstellen
1.
Schalten Sie das Radio ein und drücken Sie
Auswählen von Alarm 1 oder Alarm 2.
Das Symbol
LOUDNESS
Erlaubt es, den Lautstärkepegel auf ON (AN) und OFF (AUS) zu stellen.
1
oder das Symbol
1
oder
auf der Fernbedienung zum
leuchtet auf dem Display.
Drücken Sie ENTER um ins Alarm-Menü zu gelangen und drücken Sie
auf der Fernbedienung
oder drehen Sie den MENU/SELECT Knopf am Radio, um die gewünschte Zeit für den Alarm
einzustellen. Drücken Sie ENTER oder den MENU/SELECT Knopf zum Bestätigen der Auswahl
1
und gehen Sie zur nächsten Funktion
Menüelement zu gelangen.
oder drücken Sie BACK um zum vorherigen
Nachdem Sie die Zeit für den Alarm eingestellt haben, können Sie die Alarm-Quelle auswählen (DAB/
FM/Weckerklingel). Wählen Sie DAB oder FM, können Sie einen gespeicherten Radiosender oder
den zuletzt gehörten Sender als Alarm einstellen.
Drücken Sie
auf der Fernbedienung oder drehen Sie den MENU/SELECT Knopf am Radio
zur Auswahl einer der beiden möglichen Zustände. Es kann nur zwischen ON und OFF umgeschaltet
werden, wenn sich der Equalizer im Modus NORMAL befindet (bei den anderen Modi ist automatisch
ON voreingestellt).
58
Im nächsten Schritt können Sie die Wiederholungsfrequent des Alarms einstellen; dazu stehen
folgende Optionen zur Wahl:
Einmal – Täglich – Werktags – Am Wochenende Wählen Sie Einmal, müssen Sie nun das Datum
bestätigen, bevor Sie zum nächsten Schritt gelangen. Die Lautstärke des Alarms einstellen.
Ist der Alarm eiingeschaltet, wird das Alarm 1- und/oder Alarm 2-Symbol auf dem Display angezeigt.
59
DEUTSCH
anpassen. Drücken Sie
auf der Fernbedienung oder drehen Sie den MENU/SELECT Knopf
am Radio, um den Wert zu erhöhen oder zu verringern. Drücken Sie die ENTER Taste auf der
Fernbedienung oder den MENU/SELECT Knopf am Radio zur Bestätigung der gewählten Werte.
PANNEAU FRONTAL
1
Indicateur d'état Bluetooth : clignote durant la connexion du du dispositif, allumé
si connecté.
2
Écran d'affichage : écran LCD
3
Récepteur infrarouge (IR) : reçoit le signal provenant de la télécommande.
4
4.1
4.2
4.3
MENU/SELECT :
Appuyer longuement pour accéder aux différentes options du menu général de la radio (MENU).
Appuyer brièvement pour confirmer la sélection (ENTER).
Tourner dans le sens horaire ou antihoraire pour accéder aux différentes options du
menu général.
Tourner dans le sens horaire ou antihoraire pour régler la station successive ou précédente
en mode DAB.
Tourner dans le sens horaire ou antihoraire pour régler la fréquence en mode FM.
4.5
5
MODE : appuyer sur cette touche pour naviguer entre les modes DAB/FM/Bluetooth (BT)
et AUX.
6
6.1
BT PAIR/ /SCAN
En mode BT, maintenir cette touche enfoncée pour connecter le dispositif
Bluetooth jusqu'à ce que le voyant bleu commence à clignoter rapidement.
Lorsque le dispositif Bluetooth est connecté, appuyer brièvement sur cette touche
pour activer la pause ou reprendre la lecture à partir du dispositif BT.
En mode DAB et FM, cette touche permet d'exécuter un balayage des stations de radio
disponibles.
6.2
6.3
DEN ALARM EIN- UND AUSSCHALTEN.
Drücken Sie im Standby-Modus
1
oder
auf der Fernbedienung, um den Alarm ein- bzw.
auszuschalten oder schalten Sie das Radio ein, drücken Sie
1
oder
zum Auswählen von
Alarm 1 oder Alarm 2 und drücken Sie die Tasten
auf der Fernbedienung, um ON/OFF
auszuwählen; bestätigen Sie die Wahl mit einem Druck auf ENTER.
Auf dem Display werden die Symbole angezeigt, die bestätigen, dass der Alarm aktiviert wurde.
SNOOZE-OPTION UND SLEEP-MODUS
Drücken Sie während des Alarms SNOOZE auf der Fernbedienung, um den Alarm nach einer
bestimmten Zeitspanne zu wiederholen (entsprechend der Einstellungen im Menü - der voreingestellte
Wert liegt bei 5 Minuten) oder indem Sie den VOL/STANDBY-Knopf am Radio drücken.
Ist der SNOOZE-Modus aktik, wird auf dem Display das Zz Symbol angezeigt.
Um den Alarm zu beenden, drücken Sie irgendeine Taste auf der Fernbedienung außer SNOOZE
oder irgendeinen Knopf am Radio außer VOL/STANDBY.
PAIR
7
BACK : dans le menu, appuyer sur cette touche pour revenir au niveau précédent du menu.
8
Entrée pour casque audio
9
Barre de volume : indique le niveau du volume de l'appareil (éteinte en mode sourdine MUTE).
10
10.1
VOL/STANDBY :
Tourner cette molette vers la droite pour augmenter le volume, ou vers la gauche pour
le diminuer.
10.2
Appuyer sur cette molette pour éteindre ou allumer la radio.
10.3
En mode alarme, appuyer une fois sur la touche permet de répéter l’alarme (Snooze),
tandisqu’une seconde pression désactive la répétition.
NOTE : Si l'appareil est alimenté uniquement par des piles, appuyer sur ce bouton permet de couper
l'alimentation de façon à réduire la consommation et rallonger l'autonomie des piles. Dans ce mode,
la fonction horloge et alarme seront désactivées.
PANNEAU FRONTAL
1
2
Entrée DC : utiliser l'adaptateur secteur fourni pour brancher l'appareil à la prise de
courant électrique (12VCC 2A).
R SPR-OUT : utiliser cette sortie pour connecter le haut-parleur droit dans le cadre
d'un système stéréo (vendu séparément).
PANNEAU SUPÉRIEUR
1
2
60
Poignée : sortir la poignée pour transporter la radio.
Antenne radio : déployer et plier l'antenne de façon à obtenir la meilleure position de
réception.
61
DEUTSCH
4.4
TÉLÉCOMMANDE
IMPORTANT
STANDBY
(VEILLE)
Afin d'éviter tout risque de choc électrique, ne pas retirer les
vis situées à l'arrière de l'appareil. L'appareil ne contient pas
de parties internes susceptibles d'être réparées par l'utilisateur.
Si nécessaire, contacter un technicien qualifié.
Appuyer sur ce bouton pour allumer ou éteindre
la radio.
MODE
MODE
appuyer sur cette touche pour naviguer entre les
modes DAB/FM/Bluetooth (BT) et AUX.
INFOS
INFO
En mode DAB et FM, avec réception d'un signal de
transmission, appuyer sur ce bouton pour afficher
les informations relatives à la station sélectionnée.
EQ
Appuyer sur ce bouton pour accéder aux
paramètres d'égalisation préconfigurés ou pour
créer une configuration personnalisée.
SCAN
Cette touche permet d'exécuter un balayage
complet des stations de radio en mode DAB.
Appuyer sur cette touche pour rechercher la
prochaine station disponible en mode FM.
EQ
(ÉGALISATEUR)
SCAN
(BALAYAGE)
Boutons permettant de naviguer dans les menus,
dans les différents modes.
Permet d'augmenter ou de diminuer la fréquence
en mode FM ou de sélectionner la station DAB
précédente ou suivante.
Le point d'exclamation dans un triangle équilatéral est un symbole d'alerte
destiné à l'utilisateur en présence d'instructions importantes de fonctionnement et
d'entretien figurant dans la documentation accompagnant le produit.
Le symbole d'éclair se terminant par une flèche situé dans un triangle est destiné
à avertir l'utilisateur en présence de « tension dangereuse » non isolée dans la
structure de l'appareil et suffisante à provoquer l'électrocution de l'utilisateur.
AVERTISSEMENTS SUR L'UTILISATION DE L'APPAREIL
MISE EN GARDE :
MENU
En mode de lecture Bluetooth, appuyer sur cette
touche pour activer ou mettre en pause la lecture
du dispositif associé. Maintenir cette touche
enfoncée pour connecter un dispositif Bluetooth.
PAIR
MENU
Appuyer sur ce bouton pour accéder aux
paramètres du menu.
VOLUME +
Appuyer sur ce bouton pour augmenter le volume
d'écoute.
VOLUME -
Appuyer sur ce bouton pour diminuer le volume
d'écoute.
MUTE
(SOURDINE)
Appuyer sur ce bouton pour sélectionner ou
désélectionner la fonction de sourdine.
1/6
2/7
3/8
ALARM
(ALARME) 1 & 2
SNOOZE
(RÉPÉTITION)
4/9
5/10
Boutons permettant de mémoriser ou de rappeler
les stations de radio configurées (uniquement en
mode DAB et FM).
1
2
Appuyer sur ce bouton pour configurer l'alarme
(Alarme 1 / Alarme 2)
SNOOZE
62
Cette touche a trois fonctions différentes :
1.
interrompre la lecture lorsque l'alarme est activée.
2.
configurer la luminosité de l'écran LCD
lorsque l'appareil est éteint (4 niveaux de
luminosité).
3.
configurer l'intervalle de temps pour la répétition
de l'alarme lorsque l'appareil est allumé.
ne permet pas de couper complètement le flux d'électricité
L'interrupteur principal de l'appareil
alimenté par la prise. Dans la mesure où le cordon d'alimentation constitue l'unique dispositif de
déconnexion de l'appareil de la source d'alimentation, ce cordon doit être débranché de la prise
secteur afin de couper tout flux de courant alternatif en direction de l'appareil. Vérifier ensuite que
l'appareil est installé de façon à pouvoir facilement débrancher le cordon d'alimentation de la prise
murale, si nécessaire. De plus, afin d'éviter tout risque d'incendie, le cordon d'alimentation doit
être débranché de l'alimentation secteur en absence d'utilisation de l'appareil pendant une période
relativement longue (par exemple, pendant les vacances).
PRÉCAUTIONS RELATIVES À LA VENTILATION
Installer l'appareil en prenant soin de laisser un espace tout autour pour permettre la circulation
de l'air et favoriser la dissipation de la chaleur (au moins 10 cm pour la partie supérieure, 10 cm à
l'arrière et 10 cm de chaque côté).
ATTENTION
•
La coque de l'appareil présente de petites ouvertures servant à la ventilation de ce dernier.
Elles permettent d'assurer un fonctionnement correct et à le protéger contre la surchauffe.
Afin d'éviter tout risque d'incendie, ces ouvertures ne doivent jamais être obstruées ou
recouvertes durant le fonctionnement de l'appareil (par exemple, journaux, serviettes, rideaux,
etc.). De plus, l'appareil ne doit pas être installé sur un tapis épais ou sur un lit.
•
Si la prise du cordon d'alimentation de l'appareil ne correspond pas au type de prise
murale à laquelle l'appareil doit être branché, celle-ci devra être remplacée par une autre
de type approprié. Le remplacement de la prise du cordon d'alimentation doit être effectué
uniquement par un technicien qualifié. Après le remplacement, l'ancienne prise coupée
du cordon d'alimentation doit être correctement éliminée afin d'éviter tout risque de choc
électrique ou électrocution dus à l'insertion accidentelle de cette prise dans une prise de
63
FRANCAIS
PLAY/
PAUSE/PAIR
(LECTURE/
PAUSE/PAIRE)
courant murale sous tension. Si l'appareil ne doit pas être utilisé pendant une période de temps
relativement longue (par exemple durant les vacances), débrancher le cordon d'alimentation
de la prise murale.
•
CONDITIONS AMBIANTES DE FONCTIONNEMENT
Plage idéale de température et d'humidité de l'environnement de fonctionnement :
de +5°C à 35°C, humidité relative inférieure à 85% (appareil non couvert).
Ne pas installer l'appareil dans un lieu mal ventilé ou soumis à une forte humidité ou encore en plein
soleil (ou sources de lumière artificielle intense).
Afin d'éviter tout risque d'incendie, ne placer aucune source de flamme nue (par exemple,
bougies allumées ou similaires) sur l'appareil.
•
Avant de brancher l'appareil à une source d'alimentation pour la première fois, lire attentivement
la section ci-après.
•
La tension de la source d'alimentation électrique varie de pays à pays et de région à région.
Vérifier que la tension électrique de secteur de la zone d'utilisation de l'appareil corresponde à la
tension requise (par exemple, 240 V ou 110 V). Cette valeur figure sur l'étiquette de l'adaptateur
CA.
•
Ce produit est destiné à un usage domestique uniquement. Toute panne due à des usages
autres que ceux prescrits ici (tels que l'utilisation à long terme à des fins commerciales dans un
restaurant, en voiture ou sur un bateau), et nécessitant un type de réparation particulier, sera à
la charge de l'utilisateur même si l'appareil est encore sous garantie.
•
Avant d'utiliser ce produit, toujours lire les consignes de sécurité figurant à l'arrière de l'appareil
et sur l'étiquette de l'adaptateur CA.
•
Tenir l'appareil et ses accessoires hors de la portée des enfants et des nourrissons. En cas
d'ingestion accidentelle, consulter immédiatement un médecin.
•
Tenir l'adaptateur CA hors de la portée des enfants et des nourrissons.
•
Le cordon de l'adaptateur CA peut s'enrouler accidentellement autour du cou et provoquer
l'étouffement.
AVERTISSEMENT RELATIFS AUX ONDES
Cet appareil utilise des fréquences radio de fréquence 2,4 GHz, bande également utilisée par d'autres
systèmes sans fil (tels que les fours à micro-ondes et les téléphones sans fil).
Si un bruit est transmis sur l'écran de télévision, cela peut signifier que l'appareil (ou appareil relié à
lui) provoque des interférences avec les signaux provenant du connecteur d'entrée de l'antenne du
téléviseur, magnétoscope, récepteur satellite, etc.
Le cas échéant, éloigner le connecteur d'entrée d'antenne et l'appareil (appareils reliés à lui inclus).
BV Srl n'est pas responsable des dysfonctionnements de l'appareil dus à des erreurs/
dysfonctionnements associés au branchement et/ou à d'autres dispositifs éventuellement reliés à
lui.. Contacter le fabricant de l'appareil à brancher à la radio.
ATTENTION À L'ADAPTATEUR CA
S'assurer de saisir fermement la coquille de l'adaptateur CA lors du débranchement de l'appareil.
Tirer directement sur le cordon d'alimentation pourrait endommager ce-dernier et/ou être source
d'incendie et/ou d'électrocution. Ne pas tenter de débrancher l'adaptateur CA à mains nues. Ceci
peut être source d'électrocution.
Ne pas laisser la prise du cordon d'alimentation de l'adaptateur CA dans la prise murale si la
connexion n'est pas fiable, même si la prise est complètement insérée dans la prise murale. Cela
peut générer de la chaleur et provoquer un incendie. Contacter un revendeur agréé ou un électricien
pour remplacer la prise.
64
FRANCAIS
AVERTISSEMENT CONCERNANT LE CORDON D'ALIMENTATION
Toujours prendre le cordon d'alimentation par la prise. Ne pas débrancher l'appareil en tirant
directement sur le cordon et ne jamais toucher le cordon d'alimentation avec les mains humides,
ceci pourrait provoquer un court-circuit ou une électrocution. Ne pas positionner l'appareil ou
d'autres objets au-dessus du cordon d'alimentation et vérifier que rien ne l'écrase. Ne jamais faire
de nœud avec le cordon ou le connecter à d'autres câbles. Les cordons d'alimentation doivent être
positionnés de façon à ne pas être piétinés. Un cordon d'alimentation endommagé peut être source
d'incendie ou de choc électrique. Vérifier régulièrement l'état du cordon d'alimentation. Si le cordon
d'alimentation est endommagé, contacter un centre technique BV agréé ou votre revendeur pour
obtenir un cordon d'alimentation de remplacement.
65
ENVIRONNEMENT ET MISE AU REBUT DE L'APPAREIL
Ce produit pourrait contenir des substances considérées dangereuses pour la santé humaine et
l'environnement. Afin de prévenir la dispersion de substances nocives dans la nature, BV Srl fournit
les informations suivantes concernant l'élimination et le recyclage des matériaux en fin de vie de
l'appareil.
Les déchets d'équipements électriques et électroniques (DEEE) ne doivent pas
être jetés parmi les déchets ménagers (tri sélectif).
Ce symbole, figurant sur les produits, l'emballage et/ou les documents joints
fournis avec l'appareil, signifie que les équipements électriques et électroniques
usagés doivent être correctement colletés en fin de vie utile.
Concernant le traitement, la récupération et le recyclage des appareils usagés,
se référer aux points de collecte conformément à la législation nationale.
Vous pouvez contribuer à la sauvegarde de l'environnement en respectant les simples règles
suivantes :
En fin de vie du dispositif électrique et/ou électronique, remettre le produit à un centre de collecte des
déchets afin que le produit puisse être recyclé.
Le produit peut être repris gratuitement par le vendeur en cas d'achat d'un nouvel appareil équivalent
ou ayant les mêmes fonctions.
Contacter BV Srl pour des informations sur le distributeur le plus proche.
Pour plus d'informations sur le recyclage, la réutilisation ou le remplacement du produit, contacter le
service clientèle au numéro de téléphone figurant sur le manuel de l'utilisateur. Nous serons ravis de
fournir une assistance.
Finalement, nous recommandons de recycler tous les éléments d'emballage du produit afin de
protéger l'environnement (y compris l'emballage utilisé pour l'expédition).
Votre aide est précieuse pour réduire la quantité des ressources naturelles utilisées pour la fabrication
des équipements électriques et électroniques, réduire le nombre des déchets, et plus en général,
pour améliorer la qualité de la vie en garantissant que les substances potentiellement nocives ne
puissent être rejetées dans l'environnement mais éliminées correctement.
Une élimination non conforme du produit usagé expose l'utilisateur aux sanctions prévues par la
législation en vigueur dans son pays.
66
CONSIGNES DE SÉCURITÉ
DANGER
Suivre les instructions fournies.
Ne pas jeter l'appareil au feu ou l'exposer à la chaleur.
Ne pas lancer l'appareil, ne pas appliquer de coups avec un marteau ou autre objet et ne pas y
enfoncer de clous.
Ne pas utiliser ni laisser l'appareil à proximité de lieux présentant de très hautes températures, par
exemple près d'un radiateur ou dans une voiture fermée en plein soleil.
Éviter que l'appareil ne se mouille ou n'entre en contact avec des substances liquides.
AVERTISSEMENT
Ne pas utiliser l'appareil s'il émet des odeurs inhabituelles, s'il se réchauffe, s'il change de couleur ou
de forme, ou en présence d'anomalie durant l'utilisation, la recharge ou le stockage.
AVERTISSEMENT - UTILISATION EN ENVIRONNEMENTS HUMIDES
Le TS522D+ n'est pas un étanche.
Durant l'utilisation, le protéger de l'eau et ne pas l'utiliser en environnements humides.
En cas de contact avec tout liquide, éliminer immédiatement l'humidité avec un chiffon sec.
Installer l'appareil uniquement sur des surfaces stables et à niveau. Ne pas utiliser cet appareil à
l'envers ou incliné.
Installer l'appareil dans un endroit où l'eau ne peut pas pénétrer.
Ne pas incliner l'appareil ou le maintenir incliné si celui-ci a été exposé à de l'eau ou gouttes d'eau.
Dans la mesure où l'eau peut pénétrer dans l'appareil, ne pas l'incliner lorsqu'il est mouillé.
L'eau pourrait entrer dans l'appareil. Ne pas déplacer l'appareil lorsqu'il est mouillé.
Ne pas utiliser l'adaptateur CA à proximité de sources d'eau.
Tenir la pile de la télécommande hors de la portée des enfants.
Celle-ci peut être source d'incendie ou de brûlure chimique si manipulée de façon incorrecte.
Ne pas recharger, démonter ou surchauffer la pile à des températures supérieures à 100°C.
Remplacer la pile uniquement par une autre de type et modèle identiques (CR2025).
INSTALLATION DE L'APPAREIL
Toujours installer l'appareil sur une surface plane et stable.
Éviter d'installer l'appareil dans les lieux suivants :
•
sur un téléviseur couleurs (l'image pourrait être déformée en raison de la connexion Bluetooth)
•
près d'une platine cassette (ou appareil émettant un champ magnétique) ceci pourrait interférer
avec le son.
•
à la lumière directe du soleil
•
dans un lieu extrêmement chaud ou froid
•
dans un lieu soumis à des vibrations ou autres mouvements
•
dans un lieu extrêmement poussiéreux
•
dans un lieu présentant des fumées ou des huiles chaudes (par exemple, une cuisinière).
67
FRANCAIS
ATTENTION
Cet appareil n'est pas étanche. Pour éviter tout risque d'incendie ou d'électrocution, ne pas placer
l'appareil à proximité de récipients remplis d'eau (tels que des pots de fleurs ou similaire), et ne pas
l'exposer à égouttement, éclaboussures, pluie ou humidité.
INSTALLATION ET REMPLACEMENT DE LA PILE DE LA TÉLÉCOMMANDE
La télécommande est fournie avec une batterie de type « CR2025 », laquelle doit être installée.
Lorsque la portée de la télécommande diminue ou si elle cesse de fonctionner correctement, la pile
doit alors être remplacée.
Pour effectuer cette opération simple, procéder comme suit :
1.
2.
NOUS VOUS REMERCIONS D'AVOIR ACHETÉ UN PRODUIT CUBE.
Avec la radio FM/DAB/DAB+ Bluetooth TS522D+, vous pourrez écouter la musique diffusée par
les fréquences FM/DAB/DAB+, celle contenu dans votre baladeur numérique et sur un téléphone
portable compatible par connexion Bluetooth, et celle raccordée à l'entrée AUX.
Avant d'utiliser le produit, merci de lire attentivement ces instructions sur l'usage correct de l'appareil.
Une fois la lecture terminée, conserver cette notice en lieu sûr pour toute consultation ultérieure.
TECHNOLOGIE SANS FIL BLUETOOTH
La technologie sans fil Bluetooth permet de connecter des appareils compatibles sans utiliser de
câbles. Pour établir une connexion avec la technologie sans fil Bluetooth, il n'est pas nécessaire que
l'appareil et autre dispositif se trouvent face à face. Il suffit que la distance entre les deux appareils ne
dépasse pas 10 mètres. La connexion peut subir des interférences provoquées par des obstacles
tels que les murs ou autres appareils électroniques.
L'appareil est conforme à la spécification Bluetooth v2.1. Contacter les fabricants des autres
dispositifs à relier afin de déterminer leur compatibilité avec cet appareil. Certaines restrictions sont
possibles quant à l'utilisation de la technologie Bluetooth dans certains pays. Contacter les autorités
locales ou votre prestataire de service.
3.
ATTENTION :
Les piles au lithium peuvent exploser ou causer des brûlures si elles sont démontées, courtcircuitées, rechargées, exposées à l'eau, au feu ou à des températures élevées. Ne pas conserver
de piles dans les poches, sacs ou autre récipient contenant des objets métalliques, ne pas les
mélanger avec d'autres types de piles usagées, ou les stocker à proximité de matières dangereuses
ou combustibles. Conserver les piles dans un lieu frais, sec et aéré. Respecter les lois et règlements
applicables en matière de transport et de mise au rebut.
DÉMARRAGE
1.
Retirer le film de protection du compartiment à pile de la télécommande comme indiqué sur
la figure.
2.
Brancher le bloc d'alimentation fourni à l'entrée sur l'entrée CC située à l'arrière de la radio.
Brancher l'autre extrémité du bloc d'alimentation à une prise CA. S'il est souhaité utiliser la
radio avec des piles, insérer 6 piles de type « C » dans le compartiment à piles situé au bas de
la radio.
Le message « 00:00 » s'affiche lors de l'allumage de l'écran.
Allumer l'appareil en appuyant sur le bouton de veille situé sur l'unité principale ou sur la
télécommande. La radio passera en mode DAB et procèdera au balayage des stations de
radio. Une fois le balayage terminé, l'appareil utilisera automatiquement les informations de
date et heure collectées à partir des stations de radio DAB trouvées.
CONTENU DU COFFRET
•
L'emballage contient :
•
Radio TS522D+
•
Secteur externe CA
•
Télécommande avec pile
•
Notice d'instructions
•
Sac porte-radio
En absence d'un de ces éléments, contacter votre distributeur.
Sortir le compartiment à piles comme indiqué dans les
instructions imprimées à l'arrière de la télécommande.
En cas de remplacement, retirer la batterie, insérer une
nouvelle pile CR2025 comme indiqué sur l'image cidessous (en s'assurant que le côté avec le symbole « + »
soit orienté vers le haut).
Réinsérer le compartiment à pile dans son logement.
3.
4.
ATTENTION :
Si l'appareil est alimenté par des piles (par conséquent le groupe d'alimentation n'est pas branché),
utiliser le bouton de veille situé sur l'unité principale.
Lorsque la radio est alimentée par des piles, la télécommande n'a aucune fonction.
68
69
FRANCAIS
ATTENTION
•
Lorsque l'appareil fonctionne, ne pas le placer sur le côté, ne pas l'appuyer et ne pas le suspendre
à quoi que ce soit.
•
Ne pas s'asseoir et ne pas monter sur l'appareil.
•
Ne pas installer l'appareil au mur ou au plafond. Il pourrait tomber et causer des dommages.
•
Certains éléments des haut-parleurs sont magnétiques. Les objets métalliques peuvent être
attirés par les haut-parleurs. Ne placer de cartes de crédit ou autres supports de stockage
magnétiques à proximité des enceintes car les informations qu'ils contiennent pourraient être
effacées.
3.
Appuyer une fois sur la touche SHIFT.
1/6
1.
2.
3.
4.
5.
L'opération de balayage doit être effectuée lors du premier allumage. L'icône DAB sur l'écran
s'allumera et le processus de balayage commencera (cette opération pourrait prendre quelques
minutes).
Avec la télécommande, appuyer sur la touche MODE pour sélectionner le mode DAB. Sur
l'unité principale, appuyer sur la molette MODE pour accéder aux différents modes, puis
sélectionner DAB.
Appuyer sur la touche INFO pour afficher les informations relatives à la station de radio
sélectionnée (en fonction des disponibilités offertes par la station émettrice - diffuseur)
pour naviguer dans la liste des stations
Sur la télécommande, appuyer sur les touches
DAB trouvées. Sur l'unité principale, utiliser la molette MENU/SELECT pour écouter la station
DAB suivante ou précédente détectée.
Appuyer sur la touche SCAN pour effectuer un balayage des stations de radio disponibles en
mode DAB.
2.
Avec la télécommande, appuyer sur les touches
pour naviguer dans les fréquences FM :
une pression de la touche permet d'augmenter ou de diminuer la fréquence de 50 kHz. Sur l'unité
principale, utiliser la molette MENU / SELECT pour augmenter ou diminuer la fréquence FM.
3.
Maintenir une des touches
enfoncée pour trouver la fréquence radio disponible
suivante ou précédente, ou appuyer sur la touche SCAN de la télécommande pour rechercher
directement la station suivante. Lorsqu'une station de radio est trouvée, la recherche s'arrête
automatiquement. Sur l'unité principale, utiliser la molette BT PAIR/SCAN pour trouver la
fréquence radio FM disponible successive.
Appuyer sur la touche INFO pour afficher les informations relatives à la station de radio
sélectionnée (en fonction des disponibilités offertes par la station émettrice).
Appuyer 4 fois sur le bouton INFO pour accéder à la fonction MONO/STEREO de la station
FM. Appuyer sur la touche ENTER pour passer du mode MONO à STEREO ou vice et versa.
En mode STEREO, cette icône s'allumera sur l'écran
.
4.
5.
Pour rappeler une des 10 radios présélectionnées, procéder comme suit :
Pour les présélections mémorisées de 1 à 5, appuyer sur une des touches
1.
2.
3.
1.
6.
2/7
3/8
4/9
5/10
2.
Pour mémoriser les stations de radio préférées dans les cases de mémoire prévues à cet effet
(présélections) numérotées de 6 à 10, procéder comme suit :
70
2/7
3/8
4/9
5/10
.
Pour accéder aux présélections mémorisées de 6 à 10, appuyer une fois sur la touche SHIFT
(l'indication « SHIFT » s'affichera sur l'écran de l'appareil), puis sur la touche correspondant à
la radio mémorisée souhaitée.
La radio TS522D+ peut se connecter à la plupart des dispositifs Bluetooth 2.0 et 2.1. La procédure
de connexion peut varier d'un appareil à l'autre. Consulter le manuel d'instructions de votre dispositif
Bluetooth pour connaître la procédure de connexion à l'appareil.
5.
1/6
1/6
MODE DE CONNEXION ET DE FONCTIONNEMENT DE L'APPAREIL AVEC LA TECHNOLOGIE
SANS FIL BLUETOOTH.
MÉMORISER ET RAPPELER UNE STATION DE RADIO (PRÉSÉLECTIONS)
Appuyer et maintenir la touche numérotée
enfoncée, correspondant
à la case de mémoire dans laquelle mémoriser la station actuellement affichée à l'écran, jusqu'à
ce que le message « STORED# » indiquant que la radio est mémorisée s'affiche à l'écran
(# indique le numéro de la case mémoire dans laquelle la radio est mémorisée ex :
« STORED3 » - radio mémorisée dans la case de mémoire 3).
5/10
5.
4.
Pour mémoriser les stations de radio préférées dans les cases de mémoire prévues à cet effet
(présélections) numérotées de 1 à 5, procéder comme suit :
4/9
Il est possible de mémoriser jusqu'à 10 stations de radio DAB et 10 stations de radio FM
(la fréquence de station FM mémorisée par défaut sur toutes les touches de présélection est
87,50 MHz).
6.
Avec la télécommande, appuyer sur la touche MODE pour sélectionner le mode FM. L'écran
affichera une fréquence FM, par exemple, « 102,5 ». L'icône FM s'allumera sur l'écran. Sur
l'unité principale, appuyer sur la molette MODE pour accéder aux différents modes, puis
sélectionner FM.
3/8
4.
ÉCOUTER LA RADIO FM
1.
2/7
enfoncée, correspondant à
Appuyer et maintenir la touche numérotée
la case de mémoire dans laquelle mémoriser la station actuellement affichée à l'écran, jusqu'à
ce que le message « STORED# » indiquant que la radio est mémorisée s'affiche à l'écran
(# indique le numéro de la case mémoire dans laquelle la radio est mémorisée ex :
« STORED3 » - radio mémorisée dans la case de mémoire radio mémorisée dans la case de
mémoire 6).
Lors du premier accès à ce mode, l'appareil se mettra en « attende de connexion ». Le voyant
clignotera lentement et il sera alors possible d'associer un dispositif déjà relié. Si le dispositif à
connecter dispose d'un mode Bluetooth activé, il se connectera automatiquement à la radio.
Pour connecter un nouveau dispositif, appuyer sur la touche PAIR pendant environ 4
secondes jusqu'à ce que le voyant clignote rapidement (indiquant que l'appareil est en attente
d'association). Allumer le dispositif à relier.
Allumer le dispositif Bluetooth (par exemple un SmartPhone), entrer dans le menu de configuration
du mode Bluetooth et lancer la procédure de balayage des dispositifs disponibles. L'indication
TS522D+ s'affichera dans la liste des dispositifs détectés.
Connecter le dispositif à la radio TS522D+. L'indication « Connecté » s'affichera sur le dispositif et le
voyant de la radio s'arrêtera de clignoter et rester allumé en permanence (si l'association a réussi).
La radio TS522D+ sera alors en mesure de lire les fichiers musicaux contenus dans le dispositif
associé.
Même si un dispositif est connecté par Bluetooth, il est toujours possible de connecter un autre
dispositif Bluetooth. Il suffit de déconnecter le dispositif actuellement connecté en appuyant
sur la touche PAIR pendant environ 3 secondes jusqu'à l'émission d'un « bip » sonore. Il est
également possible de déconnecter le dispositif directement à partir du menu Bluetooth du
périphérique associé. L'appareil passera directement en mode d'association et il ne restera
plus qu'à associer l'autre dispositif.
ATTENTION :
Concernant les téléphones portables avec Bluetooth 2.0, un mode de passer sera demandé pour
procéder à l'association. Saisir la chaîne suivante : 0000 (zérozérozérozéro).
71
FRANCAIS
ÉCOUTER LA RADIO DAB.
LECTURE DE MUSIQUE
LECTURE D'UN DISPOSITIF CONNECTÉ À L'ENTRÉE AUX
L'appareil à associer à la radio TS522D+ doit supporter le profil AVRCP (Audio Video Remote Control
Profile) afin de pouvoir contrôler la lecture. Consulter le manuel d'utilisation de l'appareil. Duran la
lecture de la musique :
1.
Brancher la prise du câble (non fourni) à l'entrée AUX IN du dispositif externe (ex : lecteur MP3)
2.
Utiliser la touche MODE sur la télécommande pour accéder au mode AUX IN ou en appuyant
sur la molette MODE de la radio jusqu'à affichage de la source AUX IN. L'indication AUX IN
s'affichera sur l'écran.
3.
Utiliser le dispositif pour gérer la lecture. Le niveau de volume peut être contrôlé soit par
l'appareil connecté soit par la radio. En utilisant le bouton MUTE de la télécommande, il est
possible de couper le son. Appuyer sur ce même bouton pour le réactiver.
1.
2.
3.
Touche PLAY/PAUSE
a. Appuyer une fois sur cette touche pour mettre la lecture en pause.
b. Appuyer à nouveau sur cette touche pour reprendre la lecture.
(sur l'unité principale, tourner la molette VOL/STB vers la gauche)
Touche VOLa. Appuyer une fois pour diminuer le volume d'un cran.
b. Appuyer et maintenir la touche enfoncée pour diminuer le volume en continu.
Touche VOL+
(sur l'unité principale, tourner la molette VOL/STB vers la gauche)
a. Appuyer une fois pour augmenter le volume d'un cran.
b. Appuyer et maintenir cette touche pour augmenter le volume de façon continue
(une fois atteint le niveau maximum, l'écran indiquera VOL MAX).
ATTENTION :
écouter la musique à un volume modéré. L'exposition continue à un volume élevé peut endommager
l'appareil auditif.
CONFIGURER L'APPAREIL
Appuyer sur la touche MENU de la télécommande ou appuyer et maintenir enfoncée la touche
MENU/SELECT de l'unité principale pour accéder au menu des différents modes.
de la télécommande ou tourner la molette MENU/SELECT
Appuyer sur les touches
de la radio pour sélectionner l'option de menu désirée et appuyer sur la touche ENTER de la
télécommande ou sur la molette MENU/SELECT de la radio pour accéder au sous-menu ou pour
enregistrer les paramètres. Appuyer sur la touche RETOUR pour revenir au niveau précédent, ou
appuyer sur la touche MENU pour quitter.
MENUS DISPONIBLES EN MODE DAB
CONNECTER LE DERNIER APPAREIL BLUETOOTH ASSOCIÉ.
Appuyer sur la touche MENU pour accéder aux diverses fonctions du mode DAB.
4.
Les touches
permettent de naviguer parmi les différentes rubriques du menu.
Appuyer sur la touche ENTER pour accéder à l'élément de menu sélectionné.
Une méthode de connexion rapide de la radio TS522D+ au dernier dispositif associé est proposée
ci-après.
Lorsque l'appareil est en mode veille, appuyer sur la touche STANDBY et entrer dans le mode BT en
utilisant le bouton MODE (si l'appareil est allumé mais dans un autre mode, appuyer sur la touche
MODE jusqu'à l'apparition de l'inscription BT). Allumer le dispositif Bluetooth à associer. Celui-ci
se connectera automatiquement. Le voyant correspondant au mode Bluetooth s'allumera lorsque
la connexion sera effectuée. Si l'appareil ne parvient pas à trouver le dernier dispositif associé, il
passera en mode d'attente de connexion. Ce mode permet de connecter les autres dispositifs
précédemment associés à l'appareil.
FULL SCAN : cette option permet d'effectuer un balayage complet des canaux DAB.
RÉINITIALISATION DE LA MÉMOIRE DE LA RADIO
MANUAL TUNE : cette option permet de régler la fréquence DAB à syntoniser.
ATTENTION :
Après avoir complètement effacé la mémoire, l'appareil entrera immédiatement en mode d'association
et il sera nécessaire de réassocier et connecter un nouveau dispositif Bluetooth.
Ne pas oublier de supprimer le nom de la radio également sur le dispositif auquel il est souhaité se
reconnecter. Ceci permettra de réinitialiser complètement l’association entre les deux dispositifs.
72
Appuyer sur les touches
(ex : 174.928 MHz)
pour régler la fréquence et appuyer sur ENTER pour confirmer
73
FRANCAIS
L'appareil peut mémoriser jusqu'à 8 dispositifs Bluetooth différents. Pour effacer la mémoire
manuellement, activer le mode de BT. En mode d'association (voyant à clignotement rapide), appuyer
deux fois sur la touche PAIR (avec un intervalle d'environ une seconde entre chaque pression) jusqu'à
l'émission d'un « bip » sonore. Le voyant indiquant l'état du mode Bluetooth s'arrêtera de clignoter
et s'éteindra, puis se remettra à clignoter.
AUDIO
Cette fonction permet de configurer le mode d'écoute sur MONO ou STEREO en mode FM.
La puissance du signal de la fréquence configurée manuellement s'affichera sur l'écran pour la
syntonisation.
MENU DISPONIBLE DANS TOUS LES MODES
Appuyer sur la touche MENU pour accéder aux fonctions communes à tous les modes de la radio
TS522D+.
Le symbole > est un indicateur indiquant la puissance du signal. Cela signifie que le signal de cette
station DAB est suffisamment fort pour en permettre la syntonisation. Le symbole --- indique quant
à lui l'absence de signal.
Appuyer deux fois sur la touche MENU pour revenir en mode DAB, ou appuyer trois fois sur BACK
pour écouter la station DAB syntonisée.
permettent de naviguer parmi les différentes rubriques du menu.
Les touches
Appuyer sur la touche ENTER pour accéder à l'élément de menu sélectionné.
DATE/TIME (DATE/HEURE)
Cette fonction permet de régler manuellement la date et l'heure de l'horloge. Il est également possible
de procéder à ce réglage en utilisant le signal reçu de l'émetteur de la station DAB.
DRC (DYNAMIC RANGE COMPRESSION)
Permet de configurer le niveau DRC sur High, Low ou Off (Haut, Bas ou Éteint)
Pour sélectionner une des trois options proposées, appuyer sur les touches
.
MANUAL (MANUEL)
Appuyer sur les touches
de la télécommande ou tourner la molette MENU/SELECT de l'unité
principale pour régler l'heure et la date. Appuyer sur la touche ENTER de la télécommande ou sur la
touche MENU/SELECT sur l'appareil pour confirmer et enregistrer les informations.
MENU DISPONIBLE EN MODE FM
Appuyer sur la touche MENU pour accéder aux diverses fonctions du mode FM.
Les touches
permettent de naviguer parmi les différentes rubriques du menu.
Appuyer sur la touche ENTER pour accéder à l'élément de menu sélectionné.
AUTO
En sélectionnant cette option, la radio utilisera les informations de date et heure fournies par
l'émetteur de la radio.
74
75
FRANCAIS
SCAN (BALAYAGE)
Cette fonction permet de configurer la qualité de la réception des stations FM pour le balayage.
STRONG (FORT) : seules les stations avec fort signal de réception seront recherchées.
ALL (TOUTES) : toutes les stations de radio disponibles seront recherchées, sans tenir compte de
la force du signal.
ATTENTION :
Si l'appareil est alimenté par des piles, lorsque la radio est éteinte, toutes les informations concernant
la date et l'heure seront perdues. Lors du rallumage de la radio, en activant le mode DAB, celle-ci
effectuera un balayage automatique et recevra les informations de date et heure diffusées par la
station de radio DAB.
Appuyer sur la touche ENTER de la télécommande ou sur la molette MENU/SELECT de l'unité
principale pour accéder aux deux modes de fonctionnement. Puis utiliser les touches
augmenter ou diminuer la luminosité de l'écran.
pour
TIME MODE (HEURE)
Cette fonction permet de configurer le format de l'heure sur 12 ou 24 heures.
SET EQ (CONFIGURATION DE L'ÉGALISATION)
Cette fonction permet de configurer l'égalisation de la radio.
de la télécommande ou tourner la molette MENU/SELECT de
Appuyer sur les touches
l'unité principale pour sélectionner une des options d'égalisation mémorisée : NORMAL, ROCK,
POP JAZZ. Appuyer sur la touche ENTER de la télécommande ou sur la molette MENU/SELECT
de l'unité principale pour confirmer le choix.
SNOOZE (RÉPÉTITION)
Cette fonction permet de définir l'intervalle de temps pour la répétition de l'alarme (Snooze).
de la télécommande ou tourner la molette MENU/SELECT de
Appuyer sur les touches
l'unité principale pour régler l'intervalle de 5 à 15 minutes par pas d'une minute.
Appuyer sur la touche ENTER de la télécommande ou sur la molette MENU/SELECT de l'unité
principale pour enregistrer la valeur sélectionnée.
Pour désactiver la fonction de répétition Snooze, appuyer sur la touche STANDBY de la télécommande
ou de l'unité principale.
Grâce à la fonction MY EQ, il est possible de configurer la valeur des fréquences fréquences (aigus)
de la télécommande
et basses (graves) de façon personnalisée. Appuyer sur les touches
ou tourner la molette MENU/SELECT de l'unité principale pour augmenter ou diminuer la valeur.
Appuyer sur la touche ENTER de la télécommande ou sur la molette MENU/SELECT de l'unité
principale pour confirmer les réglages.
DISPLAY SET (CONFIGURATION DE L'AFFICHAGE)
Cette fonction permet de régler la luminosité de l'écran.
Mode veille
Mode normal de fonctionnement
76
LOUDNESS (SONIE)
Cette fonction permet de configurer la sonie sur ON ou OFF.
Appuyer sur les touches
de la télécommande ou tourner la molette MENU/SELECT de
l'unité principale pour sélectionner une des deux options proposées. La sélection entre ON et OFF de
la sonie est possible uniquement en mode d'égalisation NORMAL (les autres égalisations ont toutes
la sonie activée - ON - par défaut).
77
FRANCAIS
Appuyer sur les touches
de la télécommande ou tourner la molette MENU/SELECT de
l'unité principale pour régler la luminosité pour le mode normal et/ou pour le mode veille.
RESET (RÉINITIALISATION)
Cette fonction permet de supprimer tous les réglages et de restaurer la configuration usine.
Sélectionner l'option YES (OUI) et appuyer sur la touche ENTER de la télécommande ou sur la
molette MENU / SELECT de l'unité principale pour restaurer les réglages usine, ou sur NO (NON)
pour annuler l'opération.
Lorsque l'alarme est activée et enregistrée, l'icône de l'alarme 1 et/ou 2 s'affichera sur l'écran pour
en indiquer l'activation.
ATTENTION : tous les réglages de date, heure, alarme, égalisation et présélection de stations de
radio seront perdus.
FIRMWARE VERSION (VERSION DU MICROLOGICIEL)
Cette option permet d'afficher la version du micrologiciel installée sur l'appareil.
UTILISATION DE L'ALARME
ACTIVER OU DÉSACTIVER L'ALARME
Réglage de l'alarme
En mode veille, appuyer sur la touche
Allumer la radio et appuyer sur la touche
sélectionner l'alarme 1 ou l'alarme 2.
L'icône
1
ou l’icône
ou sur la touche
de la télécommande pour
commencera à clignoter sur l'écran.
Appuyer sur la touche ENTER pour accéder au menu Alarme. Appuyer sur les touches
de
la télécommande ou tourner la molette MENU/SELECT de l'unité principale pour régler l'heure de
déclenchement de l'alarme. Appuyer sur la touche ENTER ou sur la molette MENU/SELECT pour
confirmer le choix 1 et passer à la fonction suivante
revenir au menu précédent.
, ou appuyer sur la touche BACK pour
Après avoir configuré l'heure de l'alarme, il est possible de sélectionner la source de l'alarme (DAB/
FM/Buzzer). En configurant le mode DAB ou FM, il est possible d'associer une des radios présélectionnées ou encore la dernière station de radio écoutée.
1
ou sur la touche
1
ou sur
la touche
pour sélectionner l'alarme 1 ou 2, appuyer sur les touches
de la télécommande
pour sélectionner ON/OFF et confirmer la sélection en appuyant sur la touche ENTER.
Les icônes s'afficheront sur l'écran, confirmant donc que l'alarme a été activée.
OPTION SNOOZE (RÉPÉTITION) ET INTERRUPTION DE L'ALARME
Lorsque l'alarme sonne, appuyer sur la touche SNOOZE de la télécommande pour réenclencher
l'alarme après un laps de temps défini (en fonction des paramètres configurés dans le menu
correspondant - la valeur par défaut est de 5 minutes) ou en appuyant sur la molette VOL/STANDBY
de l'unité principale.
Durant le fonctionnement de la fonction SNOOZE, l'icône Zz apparaîtra sur l'écran, indiquant
l'activation du mode.
Pour arrêter l'alarme, appuyer sur n'importe quelle touche de la télécommande, autre la touche
SNOOZE, ou sur n'importe quelle molette de l'unité principale outre VOL/STANDBY.
L'option suivante consiste à configurer la fréquence de répétition de l'alarme parmi les propositions
suivantes :
Once (une fois) - Daily (quotidien) - Weekdays (du lundi au vendredi) - Weekends (samedi/dimanche).
Usi l'option Once est sélectionnée, il est nécessaire de confirmer la date de l'alarme avant de passer
à l'étape suivante. Configurer le volume de l'alarme.
78
de la télécommande pour activer ou
désactiver les alarmes. Il est également possible d'allumer la radio, d'appuyer sur la touche
79
FRANCAIS
1.
1