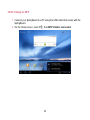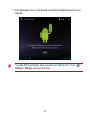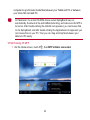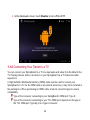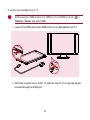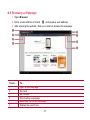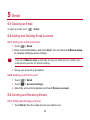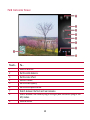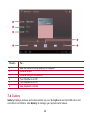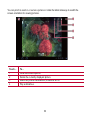
1
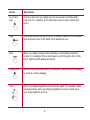
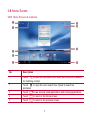
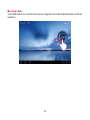
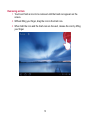
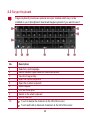
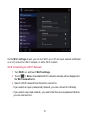
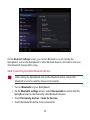
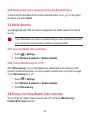
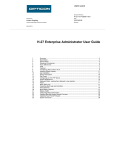
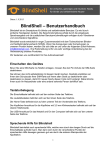
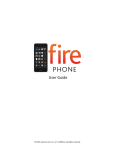
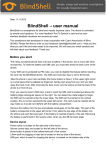
Contents
1 Getting Started ....................................................................................... 1
1.1 Welcome ...........................................................................................................................................1
1.2 SpringBoard at a Glance ............................................................................................................1
1.3 Installing the SIM and microSD Cards .................................................................................2
1.4 Switching Your SpringBoard On or Off .................................................................................3
1.5 Charging the Battery ....................................................................................................................3
1.6 Important Information About the Battery ..............................................................................4
1.7 Power-Saving Tips ........................................................................................................................5
1.8 Touchscreen Actions ....................................................................................................................5
1.9 Home Screen ..................................................................................................................................7
1.9.1 Home Screen at a Glance ...........................................................................................7
1.9.2 Home Screen Extensions.............................................................................................9
1.9.3 Customizing the Home Screen ................................................................................11
1.10 Locking and Unlocking the Screen ................................................................................... 14
1.10.1 Locking the Screen .................................................................................................... 14
1.10.2 Setting the Screen Timeout Period ..................................................................... 14
1.10.3 Unlocking the Screen ............................................................................................... 15
i
1.10.4 Setting the Screen Unlock Pattern ...................................................................... 15
1.11 Navigation Icons ....................................................................................................................... 16
1.12 Opening the Settings List ..................................................................................................... 17
1.13 Connecting Your Tablet to a PC......................................................................................... 19
1.13.1 Turning on MTP .......................................................................................................... 20
1.13.2 Hi Suite ........................................................................................................................... 22
1.13.3 MTP ................................................................................................................................. 22
1.13.4 Turning off MTP .......................................................................................................... 23
1.14 Connecting Your Tablet to a TV ......................................................................................... 24
2 Text Input ..............................................................................................26
2.1 Selecting a Text Input Method .............................................................................................. 26
2.2 Andriod Keyboard ....................................................................................................................... 27
2.3 Swype Keyboard ........................................................................................................................ 28
2.4 Editing Text ................................................................................................................................... 29
3 Wireless Networks ................................................................................30
3.1 Wi-Fi ................................................................................................................................................ 30
3.1.1 Turning Wi-Fi On or Off .............................................................................................. 30
3.1.2 Configuring Wi-Fi Settings ........................................................................................ 30
3.1.3 Connecting to a Wi-Fi Network ............................................................................... 31
ii
3.2 Bluetooth........................................................................................................................................ 32
3.2.1 Turning Bluetooth On or Off ..................................................................................... 32
3.2.2 Accessing Bluetooth settings ................................................................................... 32
3.2.3 Connecting to Another Bluetooth Device ............................................................ 33
3.2.4 Disconnecting from or Unpairing with Another Bluetooth Device ............. 34
3.3 Mobile Networks ......................................................................................................................... 34
3.3.1 Accessing Mobile Network Settings ...................................................................... 34
3.3.2 Turning Data Roaming On or Off ........................................................................... 34
3.4 Sharing Your SpringBoard's Data Connection ............................................................... 34
3.4.1 Sharing a Data Connection via USB .................................................................... 35
3.4.2 Sharing a Data Connection as a Portable Wi -Fi Hotspot............................. 35
3.5 Turning Airplane Mode On or Off ......................................................................................... 35
4 Browser ................................................................................................ 36
4.1 Browsing a Webpage ............................................................................................................... 37
4.2 Bookmarks .................................................................................................................................... 38
4.3 Downloading Files ..................................................................................................................... 39
5 Email .................................................................................................... 40
5.1 Opening an Email....................................................................................................................... 40
5.2 Adding and Deleting Email Accounts ................................................................................. 40
iii
5.2.1 Setting Up an Email Account ................................................................................... 40
5.2.2 Deleting an Email Account ........................................................................................ 40
5.3 Sending and Receiving Emails............................................................................................. 40
5.3.1 Editing and Sending an Email ................................................................................. 40
5.3.2 Reading an Email ......................................................................................................... 41
5.3.3 Other Operations .......................................................................................................... 41
6 Contacts ................................................................................................42
6.1 Accessing Contacts ................................................................................................................... 42
6.2 Creating a Contact ..................................................................................................................... 42
6.3 Importing Contacts ..................................................................................................................... 42
6.4 Editing Detailed Contact Information ................................................................................. 43
6.5 Deleting a Contact ..................................................................................................................... 43
6.6 Combining Contacts .................................................................................................................. 43
7 Multimedia ............................................................................................44
7.1 Sound Recorder.......................................................................................................................... 44
7.2 Camera and Camcorder .......................................................................................................... 44
7.2.1 Camera Screen ............................................................................................................. 45
7.2.2 Camcorder Screen ....................................................................................................... 46
7.3 Music ............................................................................................................................................... 47
iv
7.4 Gallery............................................................................................................................................. 48
7.4.1 Opening Gallery ............................................................................................................ 49
7.4.2 Viewing Pictures ............................................................................................................ 49
8 Applications .......................................................................................... 51
8.1 Calendar ........................................................................................................................................ 51
8.2 Alarms ............................................................................................................................................. 52
9 Security Settings .................................................................................. 53
9.1 Turning On the SIM Card PIN ............................................................................................... 53
9.2 Changing the SIM Card PIN .................................................................................................. 53
10 FAQs .................................................................................................. 54
11 Personal Information and Data Security .............................................. 56
12 Legal Notice ....................................................................................... 58
v
1 Getting Started
1.1 Welcome
Thank you for choosing SpringBoard as your daily life assistant and partner.
Your SpringBoard is a smart tablet that delivers high quality images, audio and video, and
convenient network and information services.
The figures in this guide are provided for your reference only. The appearance
and display features may vary slightly depending on the actual product version.
1.2 SpringBoard at a Glance
1
2
3
4
5
6
Volume key
Power button
Light sensor
Front camera
Headphone jack
Speaker
7
8
9
10
11
12
1
Speaker
Main camera
Microphone
Micro-USB port
HDMI port
Charger port
You can use the USB adapter provided with your SpringBoard to connect a
keyboard, mouse or USB flash drive to your SpringBoard.
1.3 Installing the SIM and microSD Cards
1. Remove the back cover.
2. Install the SIM card.
3. Install the microSD card.
4. Replace the back cover.
2
Do not remove the cover for the main camera.
When installing the SIM card, insert the card gently until it clicks firmly into place.
When removing the SIM card, push the card further into its slot and then release it
to make it pop out. Then remove the SIM card from the slot.
To remove the microSD card, touch
> Settings > Storage > Unmount SD
card. Push the card further into its slot and then release it to make it pop out.
Then the microSD card can be removed from the slot.
1.4 Switching Your SpringBoard On or Off
Press and hold the Power button until your SpringBoard vibrates to switch on your
SpringBoard. The first time you switch on the tablet, complete the setup by following the
on-screen instructions.
To switch off your SpringBoard, press and hold the Power button until the screen displays a
dialog box, and then touch OK in the dialog box.
When the SpringBoard is switched on or malfunctions, press and hold the Power
button for 10 seconds. After release, press and hold the Power button again until
your SpringBoard vibrates, indicating that it is restarting.
1.5 Charging the Battery
To charge the SpringBoard's battery, connect the charger to the charger port and plug the
charger into a power outlet, as shown in the following figure.
3
1.6 Important Information About the Battery
When charging the battery for the first time, charge it for at least 6 hours to ensure
that your SpringBoard displays the battery information correctly.
If the battery has not been used for a long time or the battery power is exhausted,
you may not be able to power on your tablet immediately after you begin charging
the battery. This is normal. Allow the battery to charge fo r a few minutes with the
tablet powered off before attempting to power it on.
Using data services increases the power consumption of the tablet and will
therefore reduce the length of time that the tablet can be used between battery
charges.
The time required to fully charge the battery depends on the ambient temperature
and the age of the battery.
4
When the battery power is low, your SpringBoard will alert you and display a
message. When the battery power is almost exhausted, your SpringBoard will
power off automatically.
1.7 Power-Saving Tips
When your SpringBoard is not in use, turn off the screen backlight.
Reduce the time it takes for the screen backlight to turn off when your tablet is idle.
Lower the screen brightness.
Decrease the volume.
Turn off Bluetooth when you are not using it.
Turn off Wi -Fi when you are not using it.
Turn off your tablet’s GPS receiver when you are not using it.
Turn off the data service when you are not using it.
1.8 Touchscreen Actions
On the touchscreen, you can use your finger to operate the applications and screen
elements conveniently. Your SpringBoard supports the following actions.
Action
Description
Touch
Tap applications or other elements with your finger to open or select
them. For example, touch the on-screen keyboard to enter letters,
numbers and symbols.
5
Action
Description
Touch and
hold
Touch an item with your finger and do not release it until the tablet
responds. For example, touch and hold an item to open its shortcut
menu.
Drag
Touch and hold an item and move it to a desired position. For example,
drag a shortcut icon to the trash can to delete the icon.
Flick
Move your finger quickly either vertically or horizontally across the
screen. For example, flick up and down to scroll through a list, or flick
left or right to switch between pictures.
Double-touch
Quickly touch the screen twice. For example, double -touch a webpage
to zoom in on the webpage.
Pinch
Pinch your fingers together and move them apart. For example, when
viewing pictures, pinch your fingers togeth er to zoom out and move
your fingers apart to zoom in.
6
1.9 Home Screen
1.9.1 Home Screen at a Glance
No.
Description
1
Touch
to open the text search box. Enter text in the box to search
for matching content.
Touch
to open the voice search box. Speak to s earch as
prompted.
2
3
4
Touch
Touch
to see recently used applications and running applications.
to return to the Home screen.
5
Touch
to return to the previous screen.
7
No.
Description
6
Displays the time, Wi-Fi status and signals, battery power, and more. To
open the notification panel, touch the digital clock.
Displays widgets and application shortcuts.
7
8
9
Touch
to access the Apps screen.
Touch
to open the customization screen.
Depending on the presets of the product you have purchased, your Home sc reen
might look a little different. The preceding figure is provided for your reference
only.
8
1.9.2 Home Screen Extensions
Flick left or right across the Home screen to switch between Home screen extensions.
9
You can also touch and hold a blank area of the Ho me screen or its extensions to display
screen thumbnails. Then touch the thumbnail of the screen you want to view.
10
1.9.3 Customizing the Home Screen
If there is enough room, you can add items such as shortcuts and widgets to the Home
screen. You can also chan ge the wallpaper to suit your preference.
Adding an Item
1. Flick to the Home screen or extension where you want to add an item.
2. Touch
in the upper right corner of the screen.
3. Touch an item type option from those displayed, for example Widgets or App
shortcuts.
4. Touch the item to be added to the Home screen. The icon for the selected item
will be automatically added to the Home screen.
11
Moving an Item
Touch and hold an icon on the Home screen, drag the icon to the desired position, and then
release it.
12
Removing an Item
1. Touch and hold an icon to be removed until the trash can appears on the
screen.
2. Without lifting your finger, drag the icon to the trash can.
3. When both the icon and the trash can are focused, release the icon by lifting
your finger.
13
Changing the Wallpaper
1. On the Home screen, touch
in the upper right corner of the screen.
2. Touch Wallpapers to select a picture and set it as the wallpaper.
1.10 Locking and Unlocking the Screen
1.10.1 Locking the Screen
When your SpringBoard is turned on, press the Power button to lock the screen.
If your SpringBoard is idle for a preset period of time, the screen will lock
automatically.
1.10.2 Setting the Screen Timeout Period
To set the idle time after which the SpringBoard automatically turns off and locks the screen,
touch
> Settings > Screen > Timeout .
14
1.10.3 Unlocking the Screen
1. Press the Power button to wake up the screen.
2. Drag the unlock icon to any point of the circle that is around the icon.
If you have set up a screen unlock pattern, draw the pattern to unlock the screen.
1.10.4 Setting the Screen Unlock Pattern
1. Touch
> Settings.
2. Touch Location & security > Configure lock screen > Pattern.
3. Set the screen unlock pattern as prompted.
15
1.11 Navigation Icons
The following icons are commonly used on the Home screen or other ap plication screens.
Touch the icons to perform the following operations.
Touch...
To...
Return to the previous screen.
Return to the Home screen.
Open the list of recently used applications and running applications.
View all applications installed on the tablet.
Open the customization screen.
Open an options menu. (When starting an application, you can see this icon
in the upper right corner of the screen.)
Close the keyboard. (When the keyboard is displayed, you can see this icon
in the lower left corner of the screen.)
Open a drop-down menu. (This icon appears in the lower right corner of
some text boxes.)
16
1.12 Opening the Settings List
In the settings list, you can view and change the settings for the SpringBoard's Wi-Fi,
sounds, date and time, and more.
On the Home screen, touch the digital clock in the lower right corner. In the
displayed menu, touch
, then Settings.
17
On the Home screen, touch
screen.
, then Settings to directly go to the settings
Date and time settings: Touch
Screen settings: Touch
Language settings: Touch
language.
> Settings > Date & time.
> Settings > Screen.
> Settings > Language & input > Select
18
1.13 Connecting Your Tablet to a PC
You can connect your SpringBoard to a PC to share resources between th e devices using
the USB cable that comes with the SpringBoard. The first time you connect the tablet to
your PC, an installation wizard will run automatically. Follow the wizard to install the Hi
Suite.
If the installation wizard does not run automatically when you connect your
SpringBoard to the PC, your SpringBoard will appear as an additional drive on
your PC. Double-click the corresponding drive to launch the installation wizard.
19
1.13.1 Turning on MTP
1. Connect your SpringBoard to a PC using the USB cable that comes with the
SpringBoard.
2. On the Home screen, touch
, then MTP initiator connected.
20
3. In the displayed screen, touch Enable to access the tablet storage from your
computer.
To enable MTP automatically when connected your tablet to a PC: Touch
Settings > Storage, and select Auto-open.
21
>
1.13.2 Hi Suite
On windows operating system, the installation of Windows Media Player 11 or
later is required to launch the Hi Suite.
You can use Hi Suite software to synchronize your contacts and calendar appointments
between your PC and Tablet.
1. Connecting the tablet to your PC and turn on MTP
2. Double-click the virtual CD-ROM device SpringBoard to launch the Hi Suite
software.
3. In the navigation tree on the left, you can choose Store to download
applications and in Download you can see the downloading status. If you
choose Management, you can install or uninstall applications on your tablet.
For more details, please refer to the Hi Suite help.
Hi Suite is designed to work on Windows XP SP2, Windows Vista, and Windows
7. It is recommended that you use one of these systems.
1.13.3 MTP
SpringBoard supports MTP funtion. You can also use MTP function to transfer files
between SpringBoard and PC:
− After connecting SpringBoard and PC, you will find a new drive on Window
Explorer. If you installed a micro SD card, you can find another new disk. Open
the disk to browser files on SpringBoard and trasnfer files between SpringBoard
and PC.
− Or you can open Windows Media Player (in Version 11 or later) to transfer
media files between your PC and SpringBoard. Follow the instructions on your
22
computer to synchronize media files between your Tablet and PC or between
your micro SD card and PC.
On Macintosh, the virtual CD-ROM device named SpringBoard may run
automatically. Double-click the androidfiletransfer.dmg, and make sure the MTP is
turned on. After Double-clicking the Android icon appeared, you can browse files
on the SpringBoard, and after double -clicking the Applications icon appeared, you
can browse files on your PC. Then you can drag and drop files between your
tablet and PC easily.
1.13.4 Turning off MTP
1. On the Home screen, touch
, then MTP initiator connected.
23
2. In the displayed screen, touch Disable to turn off the MTP.
1.14 Connecting Your Tablet to a TV
You can connect your SpringBoard to a TV to output audio and video from the tablet to the
TV. Playing pictures, videos, and music on your SpringBoard via a TV delivers a better
experience.
A High-Definition Multimedia Interface (HDMI) cable must be used to connect your
SpringBoard to a TV. As the HDMI cable is an optional accessory, it may not be included in
the packing box. When purchasing an HDMI cable, check its connector types to ensure
compatibility.
Type of the connector connecting to your SpringBoard's HDMI port: Type D
Type of the connector connecting to your TV's HDMI port: depends on the type of
the TV's HDMI port. Typically, it is a Type A connector.
24
To connect your SpringBoard to a TV:
Before using the HDMI function, turn HDMI on. To turn HDMI on, touch
Settings > Screen, and select HDMI.
>
1. Connect the HDMI cable to the HDMI ports of your SpringBoard and TV.
2. Select the program source of the TV, and then use the TV to play the signals
received through the HDMI port.
25
2 Text Input
Touch a text field to open the keyboard. Then touch letters and symbols on the keyboard to
enter text.
To close the keyboard, touch
in the lower left corner of the screen.
2.1 Selecting a Text Input Method
1. Touch
> Settings.
2. Touch Language & input > Current input method to select a text input
method.
26
2.2 Andriod Keyboard
No.
Description
1
2
3
4
5
6
Switch between uppercase and lowercase letters.
Switch to the number/symbol input mode.
Move to next item.
Enter a space.
Start a new line.
Touch to delete the character to the left of the cursor.
Touch and hold to delete all characters to the left of the cursor.
27
2.3 Swype Keyboard
Swype keyboard provides an optional text input method which may not be
installed on your SpringBoard. Download Swype keyboard if you want to use it.
No.
Description
1
2
3
4
5
6
7
8
9
10
Select an input language.
Switch between uppercase and lowercase letters.
View the Swype Help.
Open the symbol keyboard.
Open the number keyboard.
Enter a space.
Turn on voice input.
Switch to the small keyboard.
Start a new line.
Touch to delete the character to the left of the cursor.
Touch and hold to delete all characters to the left of the cursor.
28
2.4 Editing Text
1. Touch the text field where you want to edit text.
will appear at the cursor.
2. Move the cursor to the position where you want to edit text.
3. Drag the cursor to select the text you want to edit.
4. Touch Copy, Cut or Select all to edit the text, or touch the Delete key on the
keyboard to delete the selected text.
29
3 Wireless Networks
Your SpringBoard allows you to connect to various wireless networks and devices via Wi -Fi
or Bluetooth.
Using a wireless device or accessory while driving may cause distraction and
may be illegal. Always obey local laws and drive safely.
3.1 Wi-Fi
Wi-Fi is a wireless networking technology that allows users to access the Internet through
wireless access points. Wi-Fi connectivity depends on wireless access points and your
surroundings. To use Wi-Fi on your SpringBoard, you must access a wireless access point
or "hotspot".
3.1.1 Turning Wi-Fi On or Off
Touch
> Settings > Wireless & networks > Wi-Fi to turn Wi-Fi on or off.
3.1.2 Configuring Wi-Fi Settings
1. Touch
> Settings.
2. Touch Wireless & networks > Wi-Fi settings.
30
On the Wi-Fi settings screen, you can turn Wi -Fi on or off, turn open network notification
on or off, connect to a Wi -Fi network, or add a Wi -Fi network.
3.1.3 Connecting to a Wi-Fi Network
1. Turn Wi-Fi on, and touch Wi-Fi settings.
2. Touch
> Scan. All available Wi-Fi networks nearby will be displayed in
the Wi-Fi networks list.
3. Select a Wi-Fi network from the list to connect to.
− If you select an open (unsecured) network, you can connect to it directly.
− If you select a secured network, you must enter the access password before
you can connect to it.
31
If a Wi-Fi network you connected to previously is in range and if your
SpringBoard's Wi-Fi is turned on, you will automatically re-connect to the network.
After connecting to a Wi-Fi network, touch it in the Wi-Fi networks list to view
detailed information about its speed, security, address, and other settings.
3.2 Bluetooth
Your SpringBoard supports wireless connections between devices using Bluetooth.
When using Bluetooth, keep the SpringBoard within 10 meters of the other Bluetooth
devices to which you want to connect. Bluetooth connectivity is affected by the
surroundings. Obstacles like walls or other electronic equipment may interfere with your
Bluetooth connection.
3.2.1 Turning Bluetooth On or Off
Touch
> Settings > Wireless & networks > Bluetooth to turn Bluetooth on or off.
3.2.2 Accessing Bluetooth settings
1. Touch
> Settings.
2. Touch Wireless & networks > Bluetooth settings.
32
On the Bluetooth settings screen, you can turn Bluetooth on or off, rename the
SpringBoard, connect the SpringBoard to other Bluetooth devices, and scan for and view
other Bluetooth devices within range.
3.2.3 Connecting to Another Bluetooth Device
When pairing the SpringBoard with another Bluetooth device, ensure that
Bluetooth is turned on and the device is discoverable.
1. Turn on Bluetooth on your SpringBoard.
2. On the Bluetooth settings screen, select Discoverable to ensure that the
SpringBoard can be discovered by other Bluetooth devices.
3. Touch Find nearby devices > Scan for devices.
4. Touch the Bluetooth device to be connected to.
33
3.2.4 Disconnecting from or Unpairing with Another Bluetooth Device
To disconnect the SpringBoard from another Bluetooth device, touch
the device, and select Unpair.
on the right of
3.3 Mobile Networks
Your SpringBoard with a SIM card can be configured to use mobile network s for Internet
access.
If your tablet does not connect to a network after you insert a SIM card and switch
it on, contact your service provider to obtain access point details.
3.3.1 Accessing Mobile Network Settings
1. Touch
> Settings.
2. Touch Wireless & networks > Mobile networks.
3.3.2 Turning Data Roaming On or Off
When Data roaming is on, your SpringBoard can transmit and receive data over other
operators' mobile networks when your own operator's network does not provide coverage.
To turn Data roaming on or off:
1. Touch
> Settings.
2. Touch Wireless & networks > Mobile networks.
3. Touch Data roaming.
3.4 Sharing Your SpringBoard's Data Connection
You can share your tablet's data connection with a PC using the USB tethering or
Portable Wi-Fi hotspot function.
34
3.4.1 Sharing a Data Connection via USB
USB tethering only works with PCs running Windows XP, Windows Vista, or Windows 7.
1. Connect your SpringBoard to a PC using the USB cable that comes with the
SpringBoard.
2. Touch
> Settings.
3. Touch Wireless & networks > Tethering & portable hotspot.
4. Select USB tethering to share your data connection.
3.4.2 Sharing a Data Connection as a Portable Wi-Fi Hotspot
1. Touch
> Settings.
2. Touch Wireless & networks > Tethering & portable hotspot.
3. Select Portable Wi-Fi hotspot to share your data connection.
If you select Portable Wi-Fi hotspot to share a data connection, you can touch
Configure Wi-Fi hotspot to configure portable Wi -Fi hotspots.
3.5 Turning Airplane Mode On or Off
Using a mobile device or accessory with wireless radios while on board an aircraft may
interfere with the aircraft's electronic systems and is illegal in many countries. Always obey
applicable laws and turn airplane mode on. When airplane mode is on, your SpringBoard
will disable mobile network services, and turn off Bluetooth and Wi-Fi.
To turn airplane mode on or off:
1. On the Home screen, touch the digital clock in the lower right corner. Then
touch
on the displayed menu.
2. Touch ON or OFF next to Airplane mode.
35
4 Browser
Touch
> Browser .
To access more Browser settings, touch
screen.
in the upper right corner of the Browser
Your Browser also supports multi-webpage browsing. To open more webpages, touch
on the Browser screen.
36
4.1 Browsing a Webpage
1. Open Browser.
2. Enter a web address or touch
and speak a web address.
3. After opening the website, flick up or down to browse the webpage.
Touch...
To...
1
2
3
4
5
6
Open a new webpage.
Go back.
Go forward.
Stop loading a webpage.
Bookmark the current webpage.
Display the search box.
37
Touch...
To...
7
8
Access the bookmark screen.
View more menu options.
4.2 Bookmarks
When browsing a webpage, touch
You can also touch
to view more options.
to add the web address as a bookmark.
to open the bookmark screen. Then touch and hold a bookmark
38
4.3 Downloading Files
You can download files, images, and even applications from webpages. The downloaded
files will be stored on your SpringBoard or microSD card.
For example, to download an image, touch and hold the image on a webpage, and then
touch Save image in the displayed menu; to do wnload a file, touch and hold the link to a
file on a webpage, and then touch Save link in the displayed menu.
To protect your SpringBoard and personal data, set your tablet to download
applications only from trusted sources: Touch
> Settings > Applications,
and then clear the Unknown sources check box.
39
5 Email
5.1 Opening an Email
To open an email, touch
> Email.
5.2 Adding and Deleting Email Accounts
5.2.1 Setting Up an Email Account
1. Touch
> Email.
2. Enter account information, and touch Next. You can also touch Manual setup
to manually configure server settings.
If you touch Manual setup to manually set up your email account, contact your
email service provider for specific settings.
3. Set up your account as prompted.
5.2.2 Deleting an Email Account
1. Touch
> Email.
2. Touch
> Account settings.
3. Select the account to be deleted, and touch Remove account.
5.3 Sending and Receiving Emails
5.3.1 Editing and Sending an Email
1. Touch Email, then the email account you want to use.
40
2. Touch
in the upper right corner of the screen.
3. Enter the recipient's email address, the email subject, and the email content.
4. Touch Send in the upper right corner of the screen.
5.3.2 Reading an Email
1. Touch Email, and select the email account you want to use.
2. Touch
in the upper right corner of the screen to refresh the inbox, and
then select the email you want to read.
5.3.3 Other Operations
When reading an email, you can touch the icons listed in the following table to reply to or
forward the email.
Touch...
To...
Reply to the email sender.
Reply to the email sender and other recipients.
Forward the email.
41
6 Contacts
Contacts enables you to save and manage contact information such as the phone
numbers and email addresses of your contacts. After you save contact information on yo ur
tablet, you have easy access to the people with whom you want to communicate.
6.1 Accessing Contacts
Touch
> Contacts.
6.2 Creating a Contact
1. Touch Contacts.
2. Touch Create a new contact. If you already have some contacts saved in
Contacts, touch New.
3. Enter contact information.
4. Touch Done.
If you are accessing Contacts for the first time, you can touch Sign in to an
account to log in to your email account and synchronize contact information from
your email account.
6.3 Importing Contacts
1. Open Contacts.
2. Touch
in the upper right corner of the screen.
3. Touch Import/Export.
4. Select the SIM or microSD card from which you want to import contacts.
42
The first time you open Contacts, you can touch Import contacts from a file or
Import from SIM card to import contacts from the microSD or SIM card.
6.4 Editing Detailed Contact Information
1. Touch Contacts.
2. Touch the contact for whom detailed contact information is to be edited, and
touch
in the upper right corner of the screen.
3. Edit contact information, and touch Done.
6.5 Deleting a Contact
1. Touch Contacts.
2. Touch the contact to be deleted, and touch
in the upper right corner of
the screen.
3. Touch Delete contact.
6.6 Combining Contacts
1. Select a contact, and touch
2. Touch
.
> Join.
3. Touch the contact to be combined, and touch Done.
43
7 Multimedia
7.1 Sound Recorder
On the Apps screen, touch Sound Recorder to open the Sound Recorder screen. To use
the recorder:
Touch
to start to record.
Touch
to play the recording.
Touch
to stop recording.
7.2 Camera and Camcorder
On the Apps screen, touch Camera or Camcorder to launch the camera or the camcorder,
and take pictures or record videos.
Be sure to clean the protective lens cover with a microfiber cloth before you shoot
pictures and videos. The lens cover with smudges from fingers can ca use blurry
pictures with a “halo” effect.
44
7.2.1 Camera Screen
Touch...
To...
1
2
3
4
5
6
7
Zoom in and out.
Set the white balance.
Set the color effect.
Take a picture.
Configure the camera settings.
Switch between the front and rear cameras.
Switch between the camera (drag to the right) and camcorder (drag to the
left) modes.
Review photos.
8
45
7.2.2 Camcorder Screen
Touch...
To...
1
2
3
4
5
6
7
8
Zoom in and out.
Set the white balance.
Set the color effect.
Record a video.
Set the video quality.
Set the time lapse interval.
Switch between the front and rear cameras.
Switch between the camera (drag to the right) and camcorder (drag to the
left) modes.
Review videos.
9
46
7.3 Music
On the Apps screen, touch Music to open your music library. In the musi c library, your
music will be sorted by Artists, Albums, Songs, Playlists and Genres.
Touch...
To...
1
2
3
4
Open the drop-down menu to select a sorting mode.
Display the currently playing song.
Display the music search box.
View more menu options.
47
Touch...
To...
1
2
3
4
5
6
Add the track currently playing to a playlist.
View all artists.
View all songs in the album.
Turn Shuffle on or off.
Turn Repeat on or off.
Use playback controls.
7.4 Gallery
Gallery displays pictures and videos stored on your SpringBoard and microSD card, and
sorts them into folders. Use Gallery to manage your pictures and videos.
48
7.4.1 Opening Gallery
Touch
> Gallery.
On the Gallery screen, touch By album for more sorting modes.
If a large number of pictures are stored on your SpringBoard or microSD card, the
SpringBoard may take several minutes to detect and organize the pictures the
first time you open Gallery.
7.4.2 Viewing Pictures
1. On the Gallery screen, touch a folder to view the pictures in that folder.
2. Touch a picture to view it in full-screen mode. Flick left or right across the
screen to view the previous or next picture.
49
You can pinch to zoom in or out on a picture or rotate the tablet sideways to switch the
screen orientation for viewing pictures.
Touch...
To...
1
2
3
4
View more menu options.
Delete the currently displayed picture.
Share the picture via Bluetooth, email and so on.
Play a slideshow.
50
8 Applications
8.1 Calendar
Use Calendar to create and manage events, such as meetings and appointments. To open
Calendar, touch Calendar on the Apps screen.
Touch...
To...
1
2
3
4
5
Display
Display
Display
Display
Display
your calendar in day view.
your calendar in week view.
your calendar in month view.
the search box.
today's calendar view.
51
Touch...
To...
6
7
Create a new event.
View more calendar settings.
8.2 Alarms
1. Touch
> Clock to display the Clock screen.
2. Touch
to display the Alarm screen.
3. Select an alarm to enable it.
Touch an alarm to set it. To add more alarms, touch Add alarm.
52
9 Security Settings
If you have lost your PIN, consult your service provider.
9.1 Turning On the SIM Card PIN
1. Touch
> Settings.
2. Touch Location & security > Set up SIM card lock.
3. Touch Lock SIM card, and then enter the default SIM card PIN using the
on-screen keyboard.
4. Touch OK.
9.2 Changing the SIM Card PIN
1. Touch
> Settings.
2. Touch Location & security > Set up SIM card lock.
3. Touch Change SIM PIN, and then enter the current SIM card PIN using the
on-screen keyboard.
4. Enter the new SIM card PIN, and then touch OK.
53
10 FAQs
How Can I Prevent Automatic Change of Screen Orientation When Rotating My
Tablet?
Touch
> Settings > Screen, and then clear the Auto-rotate screen check box.
How Can I Set the Screen Lock?
Touch
> Settings > Location & security > Configure lock screen, and then select
Pattern, PIN or Password as a method for locking your SpringBoard's screen.
How Can I Stop a Song Playing in the Background?
When your SpringBoard is playing a song in the background,
is displayed in the
notification bar. Touch
to open the music playback screen, and then touch
to
stop playing the song.
How Can I Create an Application Shortcut on the Home Screen?
On the Apps screen, touch and hold an application icon until the Home screen thumbnails
are displayed. Then drag the icon to where you want to place it and release your finger.
How Can I Set a Ringtone for an Alarm?
1. Touch
> Clock to display the Clock screen.
2. Touch
to display the Alarm screen.
3. Touch the alarm for which you want to set a ringtone. On the alarm settings
screen, touch Ringtone.
How Can I Use the GPS?
1. Touch
> Settings > Location & security.
2. Select Use GPS satellites to turn on the GPS receiver.
54
How Can I View the Applications Running on My Tablet?
Touch
> Running.
How Can I Uninstall an Application?
1. Touch
> Settings > Applications > Manage applications.
2. Touch the application you want to uninstall, and then touch Uninstall.
How Can I Exit a Running Application?
After starting an application, if you touch
, the application will run in the background.
To exit the applications running in the background, touch
> Running >
.
What Can I Do When the SpringBoard Runs Slowly?
Access the settings menu of the browser, and clear the browser's cache.
Touch
> Settings > Applications > Manage applications. Then uninstall
unused applications or clear applications' caches.
55
11 Personal Information and Data Security
The use of some functions or third -party applications on your device could result in your
personal information and data being lost or becoming accessible to others. Several
measures are recommended to help you protect personal and confidential information.
Place your device in a safe area to prevent it from unauthorized use.
Set your device screen to lock and create a password or unlock pattern to open it.
Periodically back up personal information kept on your SIM/UIM card, memory card,
or stored in your device memory. If you change to a different device, be sure to
move or delete any personal information on your old device.
If you are worried about viruses when you receive messages or emails from a
stranger, you can delete them without opening them.
If you use your device to browse the Internet, avoid websites that might pose a
security risk to avoid theft of your personal information.
If you use services such as Wi -Fi tether or Bluetooth, set passwords for these
services to prevent unauthorized access. When these services are not in use, turn
them off.
Install or upgrade device security software and regularly scan for viruses.
Be sure to obtain third-party applications from a legitimate source. Downloaded
third-party applications should be scanned for viruses.
Install security software or patches released by Huawei or third -party application
providers.
Some applications require and transmit location information. As a result, a
third-party may be able to share your location information.
56
Your device may provide detection and diagnostic information to third -party
application providers. Third party vendors use this information to improve their
products and services.
If you have concerns about the security of your personal information and data,
please contact [email protected].
57
12 Legal Notice
Copyright © Huawei Technologies Co., Ltd. 2011. All rights reserved.
No part of this document may be reproduced or transmitted in any form or by any means
without prior written consent of Huawei Technologies Co., Ltd.
The product described in this manual may include copyrighted software of Huawei
Technologies Co., Ltd. and possible licensors. Customers shall not in any manner
reproduce, distribute, modify, decompile, disassemble, decrypt, extract, reverse engineer,
lease, assign, or sublicense the said software, unless such restrictions are prohibited by
applicable laws or such actions are approved by respective copyright holders.
Trademarks and Permissions
,
, and
Technologies Co., Ltd.
are trademarks or registered trademarks of Huawei
is a trademark of SRS Labs, Inc. TruMedia technology is incorporated under
license from SRS Labs, Inc.
SRS TruMedia™ is a feature-rich audio solutions suite tuned specifically for mobile devices,
which provides a cinema-like surround sound experience complete with deep, rich bass
and more intelligible vocals.
HDMI, the HDMI Logo, and High-Definition Multimedia In terface are trademarks or
registered trademarks of HDMI Licensing LLC in the United States and other countries.
Content owners use Microsoft PlayReady™ content access technology to protect their
intellectual property, including copyrighted content. This de vice uses PlayReady
technology to access PlayReady- protected content and/or WMDRM-protected content. If
the device fails to properly enforce restrictions on content usage, content owners may
58
require Microsoft to revoke the device’s ability to consume Play Ready-protected content.
Revocation should not affect unprotected content or content protected by other content
access technologies. Content owners may require you to upgrade PlayReady to access
their content. If you decline an upgrade, you will not be abl e to access content that requires
the upgrade.
Other trademarks, product, service and company names mentioned are the property of
their respective owners.
Notice
Some features of the product and its accessories described herein rely on the sof tware
installed, capacities and settings of local network, and therefore may not be activated or
may be limited by local network operators or network service providers. Thus the
descriptions herein may not match exactly the product or its accessories you p urchase.
Huawei Technologies Co., Ltd. reserves the right to change or modify any information or
specifications contained in this manual without prior notice and without any liability.
Third-Party Software Statement
Huawei Technologies Co., Ltd. does not own the intellectual property of the third -party
software and applications that are delivered with this product. Therefore, Huawei
Technologies Co., Ltd. will not provide any warranty of any kind for these third -party
software and applications. Neither will Huawei Technologies Co., Ltd. provide support to
customers who use these third -party software and applications, nor be responsible or liable
for the functions of these third-party software and applications.
Third-party software and applications services may be interrupted or terminated at any time.
Huawei Technologies Co., Ltd. does not guarantee that any content or service would be
maintained for any period during its availability. Third -party service providers provide
content and services through network or transmission tools outside of the control of Huawei
Technologies Co., Ltd. To the greatest extent permitted by applicable law, it is explicitly
stated that Huawei Technologies Co., Ltd. shall not compensate or be li able for services
provided by third-party service providers, or the interruption or termination of third -party
contents or services.
59
Huawei Technologies Co., Ltd. shall not be responsible for the legality, quality, or any other
aspects of any software installed on this product, or for any uploaded or downloaded
third-party works, such as texts, images, videos, or software. Customers shall bear the risk
for any and all effects, including incompatibility between the software and this product,
which result from installing software or uploading or downloading the third-party works.
This product uses the open-sourced Android operating system. Huawei Technologies Co.,
Ltd. has made necessary changes to the system. Therefore, this product may not support
all the functions that are supported by the standard Android operating system or may be
incompatible with third-party software. Huawei Technologies Co., Ltd. shall not be liable for
any of such situation.
DISCLAIMER OF WARRANTIES
THE CONTENTS OF THIS MANUAL ARE PROVIDED “AS IS”. EXCEPT AS REQUIRED
BY APPLICABLE LAWS, NO WARRANTIES OF ANY KIND, EITHER EXPRESS OR
IMPLIED, INCLUDING BUT NOT LIMITED TO, THE IMPLIED WARRANTIES OF
MERCHANTABILITY AND FITNESS FOR A PARTICULAR PURPOSE, ARE MADE IN
RELATION TO THE ACCURACY, RELIABILITY OR CONTENTS OF THIS MANUAL.
LIMITATIONS OF LIABILITY
TO THE MAXIMUM EXTENT PERMITTED BY APPLICABLE LAW, IN NO EVENT SHALL
HUAWEI TECHNOLOGIES CO., LTD. BE LIABLE FOR ANY SPECIAL, INCI DENTAL,
INDIRECT, OR CONSEQUENTIAL DAMAGES, OR LOST PROFITS, BUSINESS,
REVENUE, DATA, GOODWILL OR ANTICIPATED SAVINGS.
THE MAXIMUM LIABILITY (THIS LIMITATION SHALL NOT APPLY TO LIABILITY FOR
PERSONAL INJURY TO THE EXTENT APPLICABLE LAW PROHIBITS SUCH A
LIMITATION) OF HUAWEI TECHNOLOGIES CO., LTD. ARISING FROM THE USE OF
THE PRODUCT DESCRIBED IN THIS DOCUMENT SHALL BE LIMITED TO THE
AMOUNT PAID BY CUSTOMERS FOR THE PURCHASE OF THIS PRODUCT.
60
Import and Export Regulations
Customers shall comply with all applicable export or import laws and regulations and be
responsible to obtain all necessary governmental permits and licenses in order to export,
re-export or import the product mentioned in this manual including the software and
technical data therein.
Issue: 01 (2011–10–31)
Part Number: 903172
61