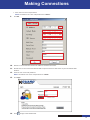
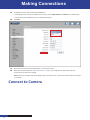
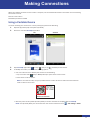
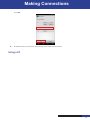
1
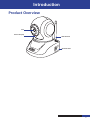
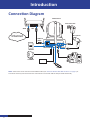
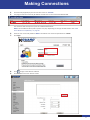
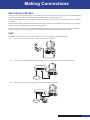
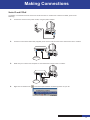
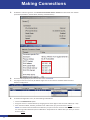
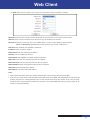
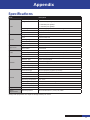
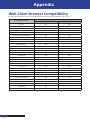
QRT-301
Web Client user name: admin
Web Client default password: admin
P2P user name: admin
P2P default password: 123456
Day & Night
WI-FI Network Camera
User's Manual
Contents
Introduction
Features...................................................4
Configure the Camera Settings...........26
Package Contents....................................4
Device..............................................27
Product Overview....................................5
Video...............................................27
Connection Diagram................................6
Audio...............................................28
Making Connection
Motion Detection............................28
Network Configuration............................7
Wireless Router....................................7
Wireless Router With WPS
Function............................................7
Alarm...............................................29
Network...........................................30
Wireless Lan....................................32
UPNP...............................................32
Wireless Router Without WPS
Function............................................8
DDNS...............................................33
Wired Router/Modem........................11
Indicator..........................................34
DHCP...............................................11
Users................................................34
Static IP and PPPoE..........................13
Log...................................................35
Connect to Camera................................17
Date & Time.....................................36
Using a Portable Device......................17
E-mail(SMTP)...................................36
Using a PC...........................................20
FTP...................................................37
Install Camera........................................21
SD Card............................................38
Before Installation...............................21
P2P Settings.....................................39
Installation Procedures.......................21
Local Settings...................................39
Fixed Mounting................................21
System.............................................40
Dynamical Mounting.......................21
Playback..............................................41
Web Client
Log In..................................................22
Cruise...............................................33
Searching and Playing Videos..........41
Appendix
Main Screen........................................23 Specifications.........................................43
Task Bar...............................................24 Web Client Browser Compatibility........44
Right Panel Control.............................25
WI-FI Network Camera User’s Manual
2
Safety and Regulatory Info
Safety Information
Warning
This is the symbol for indicating any potential hazard,
risk or condition requiring special attention.
The user needs to refer to the important operating
and maintenance or servicing instructions.
Caution
The lighting flash with an arrow head symbol, in an
equilateral triangle, is intended to alert the user.
There is dangerous “voltage” presence near by the
product’s enclosure which may be risk of person.
Safety Precautions
1. Read the user manual carefully before attempting
to install the camera and keep the manual for future
reference.
2. Follow all instructions.
3. Always keep the glass lens clean to obtain the best
picture quality. Clean only with dry cloth.
4. Do not install near water or heat sources such as
radiators or other apparatus that produce heat.
5. Do not install the camera in places with high humidity.
6. Do not install the camera in places highly exposed to
gas or oil.
7. Do not install the camera in places enclosed by metal.
This may shield the electromagnetic waves and cause
signal reception to fail.
8. Do not touch the camera with wet hands.
9. Do not expose the camera to radioactivity or place
near medical equipment with radio waves.
10. Do not service the camera by yourself. Refer all
servicing to authorized personnel.
11. Always handle the device with care.
Warning
To prevent fire or shock, DO NOT expose the unit to rain or
moisture.
Caution
To reduce the risk of electric shock, DO NOT use other power
cables other than the one supplied.
FCC Compliance Statement
This equipment has been tested and found to comply
with the limits for a Class C digital device, pursuant to Part
15 of the FCC Rules. These limits are designed to provide
reasonable protection against harmful interference when
the equipment is operated in a commercial environment.
This equipment generates, uses and can radiate radio
frequency energy and, if not installed and used in
accordance with the instructions, may cause harmful
interference to radio communications. Operation of this
equipment in a residential area is likely to cause harmful
interference in which case the user will be required to
correct the interference at his own expense.
Modifications not expressly approved by the
manufacturer could void the user’s authority to operate
the equipment under FCC rules.
Copyright
Copyright @All Rights Reserved.
All other trademarks mentioned in this manual are
trademarks of their respective companies.
Limitation of Liability
• This publication is provided “AS IS” without warranty of
any kind, either expressed or implied, including but not
limited to, the implied warranties of merchantability,
fitness for any particular purpose, or non-infringement
of a third party’s rights.
• This publication may include technical inaccuracies
or typographical errors. Changes may be made to
the information herein, at any time, for publication
improvements and/or of the corresponding device(s).
Disclaimer of Warranty
In no event shall the supplier be liable to any party
or any person, except for replacement or reasonable
maintenance of the product, for the cases, including but
not limited to the following:
• Any damage or loss, including but without limitation,
direct or indirect, special, consequential or exemplary,
arising out of or relating to the device;
• Personal injury or any damage caused by inappropriate
use or negligent operation of the user;
• Unauthorized disassemble, repair or modification of
the device by the user;
• Any problem, consequential inconvenience, or loss or
damage, arising out of combining the system with the
devices of a third party;
• Any claim or action for damages, brought by any
person or organization being a photogenic subject, due
to violation of privacy with the result of pictures from
a surveillance camera, including saved data, for some
reason, becomes public or is used for the purpose
other than for surveillance.
WI-FI Network Camera User’s Manual
3
Introduction
Thank you for choosing our Wi-Fi Network Camera. The QRT-301 features an easy-to-configure network interface,
allowing you to access the camera on your mobile/pad anywhere at any time.
If you are using a wireless router with the WPS function, all you need to do is to pair the router with the camera,
download the Kview QR application on your portable device, scan the QR code to add the camera, and start viewing
the remote live view. The network configuration can be completed without the use of a computer.
1
2
3
4
2s
3
2
1
WPS
WPS
RESET
DC IN
QR
Internet
4
5
Features
•
•
•
•
•
•
IEEE 802.11b/g/n 150Mbps Wireless Transmission
WPA-PSK & WPA2-PSK Wireless Encryption Support
720p (1 Mega pixels) High Quality Recording and Playback Support
WPS Support
Standard H.264 Compression For Enabling Smoother Video Images
Built-in SD Memory Card Slot for up to 32G
Package Contents
The following items come with your package. If any of them is missing or damaged, please contact your retailer.
•
•
•
•
•
•
•
•
Antenna
Quick Installation Guide
Software & User Manual CD
Power Adapter
RJ45 Cables
Screw Kit
Bracket
WPS/Reset Pin Tool
WI-FI Network Camera User’s Manual
4
Introduction
Product Overview
Lens
Status LED (red)
WiFi Antenna
QR Code Label
WI-FI Network Camera User’s Manual
5
Introduction
Connection Diagram
WiFi Antenna
Electrical Outlet
4
3
2
1
WPS
RESET
DC IN
LAN
WAN
Internet
Microphone
LAN Port
(RJ45)
LOCK
SD Card
Alarm Out
Speaker
Sensor In
*Pin Tool
NOTE: The Pin tool can be used to start the WPS function (see “Wireless Router With WPS Function” on page 7) or
to reset the camera (insert and hold in the reset hole for 15 seconds until the LAN port LEDs switch off).
WI-FI Network Camera User’s Manual
6
Making Connection
Network Configuration
Procedures of Network Configuration depend on the type of Router/Modem you are using.
For Wireless router, check if your wireless router supports WPS function.
For Wired router/modem, confirm which type of internet connection (DHCP, Static IP and PPPoE) you are using with
your Internet Service Provider (ISP) to complete the setup.
Wireless Router
If you are using a wireless router, check if your router supports WPS function before wireless setup.
Wireless Router With WPS Function
If your wireless router supports WPS function, perform the following to establish a connection from the camera to the
wireless router. Make sure the WPS function on router is activated first.
1.
Connect the camera to the power socket, using the power adapter.
2. Using a Pin tool, press and hold down the WPS/Reset button for 2 seconds. The camera’s status LED (red)
starts blinking.
3.
On your wireless router, press the WPS function key for a minute, to start WPS pairing.
IMPORTANT: For the WPS pairing process, you must press the WPS function within 1 minute after
pressing the WPS/Reset button in Step 2. However, the step may vary, depending on the wireless router’s
configuration.
4
3
2
1
WPS
WPS
RESET
DC IN
Internet
WI-FI Network Camera User’s Manual
7
Making Connections
4.
When the red status LED (see “Product Overview” on page 5) turns off, wait for 10 seconds until the
Camera boots up and starts rotating.
NOTE: When the red status LED starts blinking with a second interval, it means the wireless network
connection is successful.
5. Download KviewQR application and view the live view on your mobile devices. See “Connect to Camera” on
page 16.
Wireless Router Without WPS Function
If your wireless router does not support WPS function, perform the following to establish a connection from the
camera to the wireless router:
1.
Connect the camera to the power socket, using the power adapter.
2.
Connect one end of the RJ45 cable (supplied) to the camera and the other end to the wireless router.
4
3
2
1
WPS
RESET
DC IN
Internet
3.
Make sure your camera and computer are connected to the same router.
4
Internet
WI-FI Network Camera User’s Manual
8
3
2
1
WPS
RESET
DC IN
Making Connections
4.
5.
Insert the CD (supplied) to your PC’s CD drive. Click on Search IP.
The program lists the camera by IP address. Double-click on the camera’s IP address field.
The camera’s web client opens in your PC’s default web browser.
NOTE: The available functions/menu options may vary depending on the type of web browser. See “Web
Client Browser Compatibility” on page 44.
6.
7.
Enter the user name and password. NOTE: The default user name and password are “admin”.
Click Login.
8.
9.
Click
and go to the Wireless LAN tab.
Click Search to search for wireless router.
WI-FI Network Camera User’s Manual
9
Making Connections
10. Click on the router name and modify the following.
•
•
Check Using Wireless LAN option.
Enter the wireless router’s password in Key field.
11. Click Save.
12. Disconnect the RJ45 Ethernet cable from the camera.
4
3
2
1
WPS
RESET
DC IN
Internet
13. Disconnect and connect the power adapter, to restart the camera.
14. When the red status LED (see “Product Overview” on page 5) turns off, wait for 10 seconds until the
Camera boots up and starts rotating.
NOTE: When the red status LED starts blinking with a second interval, it means the wireless network
connection is successful.
15. Download KviewQR application and view the live view on your mobile devices. See “Connect to Camera” on
page 16.
WI-FI Network Camera User’s Manual
10
Making Connections
Wired Router/Modem
If you are using a wired router/modem, confirm the type of internet connection you are using and the related network
connection parameters with your Internet Service Provider (ISP), to complete the setup.
Dynamic Host Configuration Protocol (DHCP): Select this connection if your camera is connected to a router and DHCP
is enabled.
Static IP (Static Address): Select this connection if your camera is directly connected to a DSL modem and your ISP has
supplied you with a predefined IP for your Internet connection.
Point-to-Point Protocol over Ethernet (PPPoE): Select this connection if your camera is directly connected to the DSL
modem, and your ISP has supplied you with an authentication username and password to the Internet.
DHCP
To establish a connection from the camera to the wired router using DHCP, perform the following:
1.
Connect the camera to the power socket, using the power adapter.
2. Connect one end of the RJ45 cable (supplied) to the camera and the other end to the wired router.
4
3
2
1
WPS
RESET
DC IN
Internet
3.
Make sure your camera and computer are connected to the same router.
4
3
2
1
WPS
RESET
DC IN
Internet
WI-FI Network Camera User’s Manual
11
Making Connections
4.
5.
Insert the CD (supplied) to your PC’s CD drive. Click on Search IP.
The program lists the camera by IP address. Double-click on the camera’s IP address field.
The camera’s web client opens in your PC’s default web browser.
NOTE: The available functions/menu options may vary depending on the type of web browser. See “Web
Client Browser Compatibility” on page 44.
6.
7.
Enter the user name and password. The default user name and password are “admin” .
Click Login.
8.
9.
Disconnect and connect the power adapter, to restart the camera.
When the red status LED (see “Product Overview” on page 5) turns off, wait for 10 seconds until the
Camera boots up and starts rotating.
NOTE: When the red status LED starts blinking with a second interval, it means the wired network connection
is successful.
10. Download KviewQR application and view the live view on your mobile devices. See “Connect to Camera” on
page 16.
WI-FI Network Camera User’s Manual
12
Making Connections
Static IP and PPPoE
To establish a connection from the camera to the wired router or modem with a static IP or PPPoE, perform the
following:
1.
Connect the camera to the power socket, using the power adapter.
2.
Connect one end of the RJ45 cable (supplied) to the camera and the other end to the wired router or modem.
4
3
2
1
WPS
RESET
DC IN
Internet
3.
Make sure your camera and computer are connected to the same router or modem.
4
3
2
1
WPS
RESET
DC IN
Internet
4.
Right-click on Network icon (
) and choose Open Network and Sharing Center on your PC.
WI-FI Network Camera User’s Manual
13
Making Connections
5.
On Network and Sharing Center click Local Area Connection Status > Details and write down the network
parameters (IP Address, Subnet Mask, Gateway, and DNS Servers).
6.
7.
Insert the CD (supplied) to your PC’s CD drive. Click on Search IP.
The program lists the camera by IP address. Right-click on the camera’s IP address field and select
Network Configuration.
8.
In Network Configuration menu, do the following modifications:
• Uncheck the DHCP Server option.
• Assign the camera a new IP address by changing the last three digits of the current IP address (0 ~ 255).
• Enter the Subnet Mask, Gateway, and DNS server address that you just wrote down in Step 5.
NOTE: You need to enter the DNS server address if you plan to use the camera’s web client e-mail service
for receiving motion detection/alarm notifications. Verify DNS server address with your ISP if you cannot
find it on Step 5.
WI-FI Network Camera User’s Manual
14
Making Connections
• Enter the user name and password.
NOTE: The default user name and password are “admin”.
9.
Click OK.
10. Wait for a minute until the camera’s IP address is listed on the screen.
11. Double-click on the camera’s IP address field to open the camera’s web client on your PC’s default web
browser.
12. Enter the user name and password.
NOTE: The default user name and password are “admin”.
13. Click Login.
14. Click
and go to the Network tab.
WI-FI Network Camera User’s Manual
15
Making Connections
15. On Network screen, do the following modifications:
• Depending on the Internet connection you are using, select Static Address or PPPoE as the network type.
• Do the necessary modifications to the network parameters.
16. Click Save.
17. Disconnect and connect the power adapter, to restart the camera.
18. When the red status LED (see “Product Overview” on page 5) turns off, wait for 10 seconds until the
Camera boots up and starts rotating.
NOTE: When the red status LED starts blinking with a second interval, it means the wired network connection
is successful.
Connect to Camera
WI-FI Network Camera User’s Manual
16
Making Connections
When the network connection to the camera is complete, use the methods described in this section to start reviewing
the remote live view.
P2P user name: admin
P2P default password: 123456
Using a Portable Device
To access remotely your camera from a smart phone/pad, perform the following:
1.
2.
3.
4.
Open the App Store (iOS) or Play Store (Android).
Search for and install KviewQR application.
iOS
Open KviewQR application ( ) and tap
(iOS) or tap
To identify the camera, use one of the following options:
Android
(Android) to add a device.
• Use a bar code scanner to identify the camera. Do the following:
a. Tap on the bar code ( ) (iOS) or Scan (Android) to open the bar code scanner.
b. Scan the bar code on camera.
NOTE: To scan the bar code, aim your portable device’s camera at the bar code so that the entire bar
code is visible on the screen.
• Manually enter the 20-symbol QR Code (GUID) on the bar code label to the QR ID field in KviewQR.
NOTE: This QR Code (GUID) can also be found on the camera’s web client: click
> P2P Settings > GUID.
WI-FI Network Camera User’s Manual
17
Making Connections
5.
Do the following:
iOS devices:
a) Enter the default camera password: “123456”.
b) Tap OK.
c) Change the device name if necessary.
d) Tap Save.
Android devices:
a) Enter the default camera password: “123456” and change the device name if necessary.
WI-FI Network Camera User’s Manual
18
Making Connections
b) Tap OK.
6.
On Devices screen, tap camera to start viewing the live video from the camera.
Using a PC
WI-FI Network Camera User’s Manual
19
Making Connections
To access remotely your camera from a PC, follow the steps:
1.
2.
3.
4.
5.
Insert the CD (supplied) to your PC’s CD drive.
Click on PC Setup.
Follow the on-screen instructions and install the application on your PC.
Double-click
to open the KGard_IPCamClient.
Enter the user name and password.
NOTE: The default user name and password are “admin”.
6.
Click OK.
For more details, please refer to the IPCamClient User Manual in supplied CD.
Install Camera
WI-FI Network Camera User’s Manual
20
Making Connections
Follow the instructions in this section to install the camera and perform the cable connections.
Before Installation
It is recommended to complete the camera network connection (Camera to Router) and portable device connection
(Smart Phone/Pad to Camera) prior mounting the camera.
Installation Procedures
Fixed Mounting
Dynamical Mounting
1
2
WI-FI Network Camera User’s Manual
21
Web Client
Use Web Client to remotely access the Camera and configure the settings of Camera.
Before accessing Web Client for first time:
• Ensure that the Network settings of the Camera is properly configured. See “Network Configuration” on page 7.
• Ensure that the computer has a web browser, such as Internet Explorer or Safari, installed.
The available functions/menu options may vary depending on the type of web browser. See “Web Client Browser
Compatibility” on page 44.
Log In
Insert the CD (supplied) to your PC’s CD drive, and click IP Search. Ensure your computer and camera are connected to
the same router or modem.
The program lists the camera by IP address. Double-click on the camera’s IP address field.
Then enter the login name and password. Click Login to login.
NOTE:
• The default user name and password are “admin”.
• If you log in IE browser for the first time or the live view is not properly display on the screen, click Load OCX.
• If you log in web browser other than Internet Explorer, select the appropriate decode mode:
- Select QuickTime when using Safari.
- Select VLC when using Chrome/Firefox.
- Select Server Push when using other type of web browser.
WI-FI Network Camera User’s Manual
22
Web Client
OR
Open your computer web browser and enter the domain name you set for the camera or the designated DDNS
address in the URL box. You can find the designated DDNS address on the sticker or
> DDNS > DDNS Hostname.
NOTE: : Be sure to perform port forwarding first before browsing using the domain name or designated DDNS address.
Main Screen
After you login to Web Client, the Live screen appears.
Task Bar
Click to access the Settings page.
Click to search and play the recorded videos.
Click to view the live view.
Right Panel Control
WI-FI Network Camera User’s Manual
23
Web Client
Task Bar
To access the common functions, click the respective icon shown on the task bar.
• Click
to play the live video.
• Click
to stop the live video.
• Click
to take a snapshot.
The snapshot appears on the screen.
Click Save to save the picture on your computer.
• Click
to start record manually. The video recording starts. Click
to stop the manual recording.
• Click
to enable the audio function. You can hear the live audio from camera via PC if the audio setting is set to
ON. Click
to disable the audio function.
• Click
to enable the talk function. You can talk between PC and camera if audio device connected. Click it again,
will stop the talk function.
• Click
to stop the alarm manually.
WI-FI Network Camera User’s Manual
24
Web Client
Right Panel Control
You can use the Panel Control to access the PTZ Control panel and customize the display settings.
Set a preset point.
To set a preset point:
1. Click the direction arrow to
select the direction of the
camera.
2. Click
and select a preset
point number.
Start/stop cruise.
Click the direction arrow to select
the direction of the PTZ camera.
Go to a specific preset point.
Start vertical patrol
Enable the I/O output.
Stop vertical patrol.
Disable the I/O output.
(camera moves up and down).
Start horizontal patrol
(camera moves left and right).
Stop horizontal patrol.
Adjust the contrast level of the
display.
Adjust the Camera speed.
Adjust the brightness level of the
display.
Adjust the hue level of the display.
Adjust the saturation level of the
display.
Select the video format of your
location or select Outdoor if you
are using the Camera in a room
with sunlight.
Select the on-screen display color.
Check the box to see the mirror image
(left and right sides are reversed).
Check the box to see the reverse image
(image is flipped vertically).
WI-FI Network Camera User’s Manual
25
Web Client
Configure the Camera Settings
Click
tab to remotely configure the Camera.
Main menu
NOTE:
When all settings are complete, do the following:
• Click Save to save all the settings.
• Click Update to refresh the settings.
WI-FI Network Camera User’s Manual
26
Menu option/setting
Web Client
Device
View the Camera information including the device ID, Client version, and Host version, IP address, UPnP status, and
DDNS status.
The default device name is “IP CAMERA”. To customize the camera name, enter the new name in Description.
Video
Customize the video stream settings.
NOTE: To ensure a better video streaming, select the appropriate Initial Stream (Main-Stream or Sub-stream)
according to your network bandwidth.
Resolution: Select the video stream resolution.
WI-FI Network Camera User’s Manual
27
Web Client
Frame Rate: Select the video stream frame rate.
Bit Rate: Select the video stream bit rate.
NOTE: Higher bit rate produce better quality images, but occupy more bandwidth.
Image Quality: Select the video stream quality.
Audio
Customize the audio settings.
External Headset: Check this option to use the external microphone.
Built-in Headset: Check this option to use the built-in microphone.
Microphone Volume: Adjust the microphone volume level.
Speaker Volume: Adjust the speaker volume level.
Motion Detection
Customize the motion recording settings.
Motion Detection: Select on to enable motion detection alarm function.
Sensitivity: Select the motion detection sensitivity rate.
Alarm Duration: Set the alarm duration.
WI-FI Network Camera User’s Manual
28
Web Client
Linkage With Alarm: Check this box to activate the following action when the motion is detected.
• Alarm Output: Check this option to enable alarm output. See “Alarm” on page 29.
• SD-Card Record: Check this option to save the recorded videos directly into the SD card. See
“SD Card” on page 38.
• Send E-mail: Check this option to send a notification e-mail. See “E-mail(SMTP)” on page 36.
• FTP Upload: Check this option to upload the snapshots to the FTP server. See “FTP” on page
37.
Set Motion Detection Area
You can specify up to 3 areas for motion detection alarm. By default, the whole screen is marked for motion detection.
To mark the specific area, select the area number in Motion Area Items, and drag the mouse to highlight the scope to
mark the area (yellow block) for motion detection.
Select Detect All to set the whole screen as the motion detection armed zone.
Select Clear Detect to clear all marked motion detection zone.
NOTE: To avoid getting false triggers, it is recommended to set the motion detection area at an appropriate location
such as door, window, etc.
Alarm
Customize the sensor alarm settings.
External Alarm: Select on to enable external alarm function.
WI-FI Network Camera User’s Manual
29
Web Client
Alarm Duration: Set the external alarm output duration.
Lose SD-Card Alarm: Select on to automatically trigger the alarm if the Camera cannot detect the memory card.
Alarm Input1: Check the Enable box to enable alarm input. Select the alarm type in Mode.
NOTE: N.O. = Normal open; N.C. = Normal close.
Linkage With Alarm: Check this box to activate the following action when the alarm is triggered.
• Alarm Output: Check this option to enable alarm output.
• SD-Card Record: Check this option to save the recorded videos directly into the SD card. See
“SD Card” on page 38.
• Send E-mail: Check this option to send a notification e-mail. See “E-mail(SMTP)” on page 36.
• FTP Upload: Check this option to upload the snapshots to the FTP server. See “FTP” on page
37.
Network
Configure how the Camera connects to the network. This Camera provides three network connection options: Static IP
(Static Address), PPPoE, and DHCP (Dynamic Address).
Network Type: Select the type of network connection you are using.
• Static Address: Select this connection if your camera is directly connected to a DSL modem and your ISP has
supplied you with a predefined IP for your Internet connection.
• PPPoE: Select this connection if your camera is directly connected to the DSL modem, and your ISP has supplied
you with an authentication username and password to the Internet.
WI-FI Network Camera User’s Manual
30
Web Client
• DHCP: Select this connection if your camera is connected to a router and DHCP is enabled.
Media Port: Enter the port number that the device will use to send Camera command and video stream.
Web Port: Enter the port number that you will use to log in to the device via the web.
Phone Port: Enter the monitoring port of your mobile device. The port range is between 1024 to 65535.
NOTE: The Phone Port specified here must be the same port on your mobile device.
RTSP Port: Enter the RTSP port specified in the device.
IP Address: Enter the static IP address.
Subnet Mask: Enter the subnetwork IP address.
Gateway: Enter the gateway IP addresss.
Enable PPPoE: Select open to use PPPoE network connection.
PPPoE User: Enter the user name that your ISP has supplied.
PPPoE Password: Enter the password that your ISP has supplied.
PPPoE IP Address: Enter the IP address that your ISP has supplied.
DNS Server: Enter the DNS server address.
MAC Address: View the Camera MAC address.
NOTE:
• Obtain these information from your network administrator or your Internet Service Provider (ISP).
• If you cannot use the either of the two default media.web ports, 80 or 38401, the specified port may be occupied
by other programs or it is being blocked by your service provider. Enter other port number. In this case, you need
to add the port number after the IP address. For example, if you set the Web Port as 85, you need to enter the IP
address as “192.168.3.103:85”.
WI-FI Network Camera User’s Manual
31
Web Client
Wireless Lan
Configure wireless network settings.
Search: Click to search for available wireless router(s).
Using Wireless Lan: Check the box to use Wi-Fi function.
SSID: Enter the router name.
Network Type: Select the type of wireless network connection you are using.
NOTE: Select Adhoc if you using point-to-point transmission AP. Otherwise, select Infra.
Save Mode: Select the network security type.
Encryption: Select the encryption type.
Key: Enter the password as you set in your router.
UPNP
UPnP makes configuring your network easier and faster. To use the UPnP setting on the device, your router must
support UPnP and the feature is enabled.
Click the Enable UPNP box to enable the UPnP function.
NOTE: Make sure UPnP on router is enabled.
WI-FI Network Camera User’s Manual
32
Web Client
DDNS
DDNS (Dynamic DNS) is a service that registers a domain name and the floating IP address with a DDNS server so that
the domain name can be routed to the IP address even if the IP is changed in a dynamic IP system.
Enable DDNS: Select open to enable the DDNS function.
DDNS Service Type: Select DDNS server type.
DDNS User: Enter the user name you registered on DDNS server.
DDNS Password: Enter the password you registered on DDNS server.
DDNS Hostname: Enter the domain name you registered on DDNS server.
NOTE:
• To apply a third party DDNS server provider such as a DynDNS domain name, visit http:dyn.com/dns. Follow the
on-screen instructions to complete the account setup.
• If you are using the manufacturer DDNS (Factory DDNS), the DDNS User, Password, and Hostname options will be
generated automatically.
Cruise
Customize the Camera cruise settings.
WI-FI Network Camera User’s Manual
33
Web Client
Name: Enter the cruise name.
Status: Check to enable the current cruise mode.
Serial Number: Check the box to activate the selected preset mode.
Preset: Select the preset point that you have set with Right Panel Control. See “Right Panel Control” on page 25.
Residence Time: Specify the residence time for each preset point.
Speed: Specify the moving speed between two preset points.
Indicator
Configure the LED indicator behavior when the Camera is connected to the network.
Indicator Mode: Select the desired indicator setting.
• Blink when network connected; off when no connection: The LED indicator only blinks when
the Camera is connected to the network.
• Blink when network connected; Slow blink when no connection: The LED indicator blinks
rapidly when the Camera is connected to the network. Otherwise, the LED indicator blinks
slowly when the Camera is disconnected from the network.
• Always off: The LED indicator is always off when the Camera is connected to the network.
Users
Change the password and authorize users and set the access rights in using the Camera.
To change the administrator password, enter the new password in Password and click Save.
WI-FI Network Camera User’s Manual
34
Web Client
Configure Other Users
You can specify up to 9 users. Only the Super administrator (Super Admin) can create an account and grant access
rights to users.
To create a new user, enter the user name and password. Then select one of the access rights:
• Administrator: Enable to configure most of the parameters.
• Operator: Enable to do limited operations such as pan/tilt control.
• Visitor: Enable to view live video only.
Log
View the events log.
WI-FI Network Camera User’s Manual
35
Web Client
Date & Time
Configure the date and time settings.
Datetime: Display the current date and time.
Time Zone Setttings: Select the time zone in your location.
Timing Mode: Select the time mode.
NTP Server: Select the NTP server.
NOTE: This option is only available when the Timing Mode setting is set to NTP Timing.
E-mail(SMTP)
When the email settings are properly configured and the Send E-mail notification on motion detection/alarm page is
activated, the system will automatically send a notification email when events occur.
Enable E-mail: Check the box to to activate the email notification function.
Addresser: Enter the sender’s name.
Outbox: Enter the email address of the sender.
Inbox1/2/3: Enter the email address where the notification email is to be sent. You can set up to 3 email addresses.
SMTP Server: Enter the SMTP Server of the sending email server.
SSL Login: Check the box if your email server needs the SSL or TLS verification.
WI-FI Network Camera User’s Manual
36
Web Client
SMTP Port: Enter the SMTP port of the sending email server.
Auth User: Check the box to verify the user settings.
SMTP User: Enter the user name of the sender.
SMTP Password: Enter the password of the sender.
FTP
Configure the FTP server settings.
Enable FTP: Check the box to to activate the FTP function.
FTP Server: Enter the FTP server address.
FTP Port: Enter the port number of the FTP server.
FTP User: Enter the user name of the FTP server.
FTP Password: Enter the password of the FTP server.
Upload Folder: Specify the path of remote FTP server. Be sure to create a folder to store the uploaded snapshots.
FTP Mode: Specify the FTP server mode.
NOTE: Once the alarm is triggered, the system will automatically upload three snapshots to the FTP server every 1
second.
WI-FI Network Camera User’s Manual
37
Web Client
SD Card
Manage the memory card and configure the recording settings to be stored in the memory card.
Device Name: Display the name of the memory card.
Total Size: Display the total size of the memory card.
Available Space: Display the available storage size of the memory card.
Status: Display the state of the memory card.
Format: Click to format the memory card. All data will be deleted if formatted.
NOTE: Do not remove the SD card while card formatting is in progress.
Enable Auto Overwrite: Check the box to let the system to automatically overwrite the old recorded files when the
memory storage is full.
Enable Pre-Record: Check the box to enable pre-record function.
Alarm capture to SD card: Check the box to let the system to automatically save the recorded files to the memory card
when the alarm is triggered.
Pre-Record Time: Specify the pre-recording duration.
Record stream: Specify the type of the recording stream.
Manual Rec: Select open to enable manual recording.
Manual Record Pack Time: Set the manual recording duration.
WI-FI Network Camera User’s Manual
38
Web Client
P2P Settings
P2P password is the password that you enter after you have complete scanning the QR code or manually entering the
GUID via portable device/computer.
Default is 123456. We suggest you change the password to protect your privacy.
GUID: Display the GUID (QR Code).
UserName: Display the user name.
Password: Set or change the password of P2P. The default password is 123456.
Local Settings
Specify the local path directory to save downloaded videos, files, and snapshots.
Enable Alarm Record: Check the box to enable the system to automatically record a video when the alarm is triggered.
Alarm Record Time: Specify alarm recording duration.
Manual Record Pack Time: Specify the manual recording duration.
Record Path: Click the corresponding Browse button to modify the path.
WI-FI Network Camera User’s Manual
39
Web Client
System
Reboot the Camera, load factory defaults, or update the firmware and Web UI settings.
Reboot Device: Click to reboot the Camera.
Restore Factory Settings: Click to restore all parameters to the factory default settings.
Upgrade Device Firmware: Click the corresponding Browse button to select the latest firmware file. Then click Start to
update the firmware.
Upgrade Device Web UI: Click the corresponding Browse button to select the latest Web UI file. Then click Start to
update the Web UI.
WI-FI Network Camera User’s Manual
40
Web Client
Playback
Click
tab to search and play the recorded files stored in the memory card.
Searching and Playing Videos
Click
to search the video. A search window appears.
Search Mode: Specify the search mode.
File Type: Specify the file type.
Begin Time/End time: Filter the search by time period.
Click ok to search the videos. The search results are displayed on the screen.
WI-FI Network Camera User’s Manual
41
Web Client
Double-click the file that you want to play. The playback automatically starts.
Click to select the video.
Click to download the video.
Playback Control
Search results
Indicate Motion Detection video.
WI-FI Network Camera User’s Manual
42
Appendix
Specifications
Item
Description
Video Compression
H.264
Image Frame Rate
• 1280x720 pixels @30fps
• 640x368 pixels @30fps
• 320x208 pixels @30fps
Video
Camera
Night Vision
Audio
Network
General
Day / Night Mode
Color during day, switches to B&W at night
Frame Rate
Auto, 1fps ~ 30fps
Maximum Streams
2 Simultaneous Streams
Image Sensor
Mega Pixel Color CMOS sensor
Lens
3.6 mm fixed, F2.0
Viewing Angle
90°
Min. Illumination
0.5 Lux
Pan/Tilt Range
Horizontal: 320° & Vertical 120°
Night Vision Distance
up to 15M / 49ft
Illumination
Infread LED
Audio Input
Built-in Microphone & jack for external microphone
Audio Output
1 Built-in Speaker & 1 jack for external speaker
Compression
ADPCM
LAN Interface
Ethernet 10/100Mbps, Auto MDI/MDIX, RJ-45
Network Type
Static IP, DHCP, PPPoE
Wireless Interface
IEEE 802.11b/g/n (150Mbps)
ONVIF Support
Yes
Plug & Play (P2P)
Yes
WPS
Yes
External Storage
SD Card (Capacity supports up to 32G)
Alarm I/O
1 Channel Input, 1 Channel Output
RS485
N/A
Indoor / Outdoor
Indoor
Operating Temperature
0°C ~ 55°C
Operating Humidity
20% ~ 85%, non-condensing
Power Consumption
DC 5V/2A
Dimension (LxWxH)
105 x98 x130mm
Weight
N/A
N/A
System
Requirements
Operating System
Microsoft Windows 7 / Vista / XP / 2000
*Design and specifications are subject to change without prior notice.
QR Camera User’s Manual
43
Appendix
Web Client Browser Compatibility
See the following table for reference of the Web Client features supported by different web browsers
Function/Menu Option
Windows IE
Chrome / Firefox / Safari
Live View
YES
YES
Live Snapshot
YES
YES
Live Recording
YES
---
Live 2-Way Audio
YES
---
PTZ Controls
YES
YES
Preset Surveillance Position
YES
YES
Preset Cruise
YES
YES
Auto Patrol (Vertical/Horizontal)
YES
YES
Remote Playback
YES
---
Remote Backup
YES
---
Device Setup
YES
YES
Video Setup
YES
YES
Audio Setup
YES
YES
Motion Detection Setup
YES
YES
Alarm Setup
YES
YES
Network Setup
YES
YES
Wireless Lan Setup
YES
YES
UPNP Setup
YES
YES
DDNS Setup
YES
YES
Cruise Setup
YES
YES
Indicator Setup
YES
YES
Users Setup
YES
YES
Log Setup
YES
YES
Date & Time Setup
YES
YES
E-mail (SMTP) Setup
YES
YES
FTP Setup
YES
YES
SD Card Setup
YES
YES
P2P Setup
YES
YES
Local Setup
YES
---
System Setup
YES
YES
QR Camera User’s Manual
44
Browser Type
Customer Support
KGUARD INFORMATION CO., LTD.
USA Technical Support Contact
Address: 4F, No.113, Jian 2nd Road,
Jhonghe District, New Taipei City 23585, Taiwan
TEL: +886-2-8228-6080
FAX: +886-2-8221-6857
Email: [email protected]
TEL: 1-949-450-0052
Email: [email protected]