1
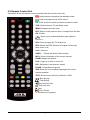
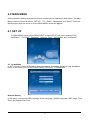
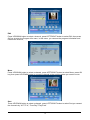
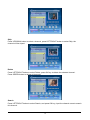
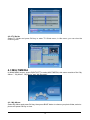
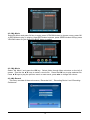
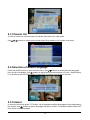
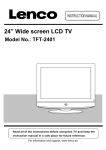
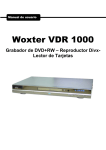
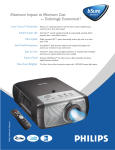
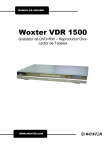
ENGLISH
SATELLITE TV RECEIVER (PVR Recorder)
user manual
TABLE OF CONTENTS
1- INTRODUCTION .................................................................................................... 01
1.1 Safety Instructions ....................................................................................... 01
1.2 Features & Accessories ............................................................................... 02
2- YOUR RECEIVER .................................................................................................. 03
2.1 Front Panel .................................................................................................. 03
2.2 Remote Control Unit .................................................................................... 04
2.3 Rear Panel .................................................................................................. 05
3- CONNECTIONS ..................................................................................................... 06
3.1 Connecting .................................................................................................. 06
3.2 Connecting to Satellite Dish ........................................................................ 06
4- MAIN MENU ........................................................................................................... 08
4.1 Set up .......................................................................................................... 08
4.1.1 Installation ...................................................................................... 08
4.1.2 TV Set up ....................................................................................... 10
4.1.3 Password ........................................................................................ 10
4.1.4 Advance Timer ................................................................................ 11
4.1.5 SW Update ..................................................................................... 11
4.1.6 Set Default ...................................................................................... 11
4.2 TV/Radio ..................................................................................................... 12
4.2.1 TV List ............................................................................................ 12
4.2.2 TV Guide ........................................................................................ 15
4.3 Multimedia .................................................................................................. 15
4.3.1 My Album ....................................................................................... 15
4.3.2 My Music ........................................................................................ 16
4.3.3 My Movie ........................................................................................ 16
4.3.4 My Record ...................................................................................... 16
4.4 Game .......................................................................................................... 17
5- OTHER OPERATIONS .......................................................................................... 17
5.1 Program guide (EPG) ................................................................................. 17
5.2 Zapping and Information banners ............................................................... 18
5.3 Channel List ................................................................................................ 19
5.4 Selection of Audio Language ...................................................................... 19
5.5 Teletext ....................................................................................................... 19
A1- TROUBLESHOOTING ......................................................................................... 20
A2- SPECIFICATIONS ............................................................................................... 21
1.0 INTRODUCTION
1.1 Safety Instructions
DO NOT INSTALL YOUR RECEIVER:
In a closed or poorly ventilated cabinet;
·
Directly on top of or under any another equipment;
·
On a surface which might obstruct the ventilation slots.
·
DO NOT EXPOSE THE RECEIVER OR ITS ACCESSORIES:
To direct sunlight or near any other equipment that generates heat;
·
To rain or intense moisture;
·
To any shock which may cause permanent damage to your receiver;
·
To any magnetic objects, such as loudspeakers, transformers, etc.;
·
To intense vibration;
·
Never open the cover. It is dangerous to touch the inside of the receiver due to high voltage
·
currents and possible electrical hazards. Your warranty will be void if the receiver has been
opened.
When the receiver is not used for a long period of time, you should unplug the power cord
·
from the wall socket.
Do not use a damaged power cord. It may cause a fire or an electrical shock.
·
Do not touch a power cord with wet hands. It may cause an electric shock.
·
Place the receiver in a well-ventilated environment.
·
When you are connecting the cables, be sure that the receiver is disconnected from the
·
mains supply voltage.
Do not use your receiver in a humid environment.
·
Make sure you read this user manual before installing your receiver.
How to Use This Manual
This manual provides complete instructions for installing and using this receiver.
The following symbols will serve as follow.
Warning
Indicates warning information.
Tips
Indicates any other additional important or helpful information.
MENU
Represents a button on the remote control or the receiver
(Bold Character)
Move to
Represents a menu item within a window.
(Italic Character)
1
1.2 Features & Accessories
·
For all digital Free-To-Air TV and Radio programmes via satellite
·
Display showing channel number or time
·
Separate power switch
·
Max. 4000 channel memory capacity for 64 satellites
·
4 Favourite lists for TV-and Radio programme
·
Quick and easy installation & user-friendly menu
·
Excellent Audio & Video quality
·
Parental lock function for menu and selectable per channel
·
Teletext via OSD & VBI. Supports DiSEqC 1.0 and DiSEqC 1.2
·
Electronic Programme Guide (EPG) for present/following event information and up to 7
days for on screen programme information
·
Full multi-lingual DVB subtitling and audio track support
·
Multi-lingual support on screen menu (OSD)
·
Edit functions for TV or Radio programme name and satellite name
·
Signal strength bar for digital transponders
·
Automatic, Network and manual channel scan options
·
Power on with last viewed channel
·
9 TimS0620er for recording and/ or sleep-timer with 3 modes (daily, weekly, once)
·
Game (Gomoku) and Calendar
·
User-friendly remote control with coloured function buttons
·
Low power consumption
·
Advanced timer function
·
Mosaic function: 9 TV Channel in overview
·
Automatic clock change: summer/ winter time
Accessories:
● User’s Manual
● 1 Remote control unit
2
2 Your Receiver
2.1 Front Panel
Figure 1. Front Panel
1. POWER Button
Switch the receiver to standby mode.
2. on/off Led
3. 4-digits Display
Displays Local Time in STAND BY mode.
Displays Channel Number in AWAKE mode.
4. USB 2.0 for album, music, movie and recording.
3
2.2 Remote Control Unit
All features of the set-top box can be controlled with the remote control unit.
: Switch between operation and standby modes
: Press to temporarily cut off the sound
0-9: Enter number or select a channel number to watch
TV/R: Switch between TV and Radio mode
MENU: Displays the main menu
EXIT: Return to the previous menu or escape from the item
OK: Confirm
: Move cursor up/down/left/right, page up/down,
Volume +/FAV: Press to display the TV favorite list.
EPG: Shows the EPG (Electronic Program Guide) only
when menu is off.
V+/V-: Volume+/AUDIO:
Display the Audio Select window.
INFO: Shows information of the current channel
ZOOM: Magnify the picture.
P+/P-: Page up or down in menu list
RCL: Switches to Last channel viewed.
PAUSE: Freeze/Resume picture.
SUB: Show the list of subtitled languages the current
channel supports.
TEXT: Shows current service’s Teletext on OSD.
: Slow playing.
: Fast playing.
: Play previous item.
: Play next item.
■: Stop.
: Play / Pause.
●: Records a live program.
4
2.3 Rear Panel
Figure 3.Rear Panel
1. SAT IN
Connect the digital signal from your LNB on the satellite dish to this connector.
2. SAT OUT
Gives you the possibility to connect an extra receiver (analogue or digital).
3. TV SCART
Use this connector to connect your receiver to your video recorder using a SCART
cable. Your video signal will now be looped through your receiver to your TV set.
4.VCR SCART Connector
Use this connector to connect your receiver to your video recorder using a SCART
cable.
5.CVBS
Video Output.
6. AUDIO Right and Left
These connectors give you the possibility to connect the audio signal to an external
amplifier, or the audio input of your TV.
7.S/PDIF
Use this output to connect your receiver to the input of your digital audio amplifier.
8. Power Cord
Your receiver requires a current of 100~240V AC (Auto-selectable), 50~60Hz +/-5%.
Check the power specification before connecting your receiver to the wall outlet.
5
3 Connections
3.1 Connecting
1.
Connect the satellite signal from the LNB to the SAT IN connector.
2.
Connect the SCART lead between the main SCART socket on the TV and the TV SCART
socket on the receiver
3.
4.
5.
Connect the Audio Left, Right RCA and VIDEO connectors at the back of the receiver to the
Audio Left, Right and VIDEO IN connectors on your TV set or audio amplifier.
Connect the VCR SCART socket to VCR.
Connect the COAXIAL S/PDIF connector at the back of the receiver to the S/PDIF connector
on audio amplifier.
Figure 4 Basic connection
3.2 Connecting to Satellite Dish
<Connecting a fixed satellite dish to your receiver>
First, choose which satellite you want to receive your signals from, and have your dealer aim your
dish at the requested satellite.
Connect a coax cable to your LNB and the other end directly to the SAT IN connector of your
receiver.
6
Figure 5 Connecting a fixed satellite dish
<Connecting multiple fixed dishes to your receiver using a DiSEqC 1.0 switch>
If you want to watch programs from more than one satellite (For example from Astra and from Hot
Bird) it is advisable to use fixed dishes and a DiSEqC 1.0 switch. Have your Dealer aim the
dishes at the requested satellites and connect the LNB's with coax cables to the IN connectors of
the DiSEqC 1.0 switch . Connect the OUT connector of the DiSEqC 1.0 switch to the SAT IN
connector at the back of your receiver.
Figure 6. Connecting multiple fixed dishes using a DiSEqC 1.0 switch
<Connecting a dish on a motorized positioner to your receiver>
Another possibility for watching programs from multiple satellites is by mounting
a dish to a motorized DiSEqC 1.2 positioner.
Have your dealer mount the dish to the positioner, set the correct angle of the elevation and let
him set the center point for your positioner.
Connect the LNB with a coax cable to the LNB IN connector of the positioner, and connect the
OUT connector of the positioner to the LNB IN connector at the back of your receiver.
Figure 7. Connecting a dish on a motorized positioner to your receiver
7
4.0 MAIN MENU
All the important settings and features of your receiver can be operated in Main Menu. The Main
Menu consists of five sub-menus: “SET UP”, “TV”, “Radio”, “Multimedia” and “Game”. Press the
MENU button when the menu is off, the MAIN MENU screen will appear.
4.1 SET UP
In MAIN MENU screen, press RIGHT/LEFT to select SE UP, this menu consists of the
“Installation “, “TV Setup”, “Password”, ”Advance Timer”, “SW Update” and “Set Default”.
4.1.1 Installation
In SET UP menu, press UP/DOWN to select Installation, then press OK key to enter Installation
menu. In this menu, you can set General Setting, MY DISH, TP MANAGER.
General Setting
In this menu, you can set OSD Language, Audio Language, Subtitle Language, GMT usage, Time
Zone, Set Date and Set Time.
8
MY DISH
In this menu, you can add satellite by pressing RED key, delete satellite by pressing GREEN key,
edit satellite by pressing YELLOW key and auto scan by pressing BLUE key.
TP MANAGER
In this menu, press LEFT/RIGHT to switch satellite, press UP/DOWN to switch Frequency, then
press RED key, you can add Frequency, press GREEN key, you can delete Frequency, press
YELLOW key, you can delete all.
Press OK key, you can edit Frequency.
9
4.1.2 TV Setup
In SET UP menu, press UP/DOWN to select TV Setup, then press OK key to enter TV Setup
menu. In this menu, you can set TV Format (4:3 LetterBox, 4:3 PanScan, 16:9 LetterBox 16:9
FitScreen), TV Mode (Auto, PAL), OSD Transparency (1~8), Banner Display Time (1S, 3S, 5S,
10S, 30S, Always), Video Output (CVBS+S-Video, RGB) and Video Enhancement (ON/OFF).
4.1.3 Password
In SET UP menu, press UP/DOWN to select Password, then press OK key to enter Password
menu. In this menu, you can setup Menu Lock(ON/OFF), Channel Lock (ON/OFF), Censorship
Lock (No Block, Total Block, 02~18), and Change Password (NO/YES).
10
4.1.4 Advance Timer
In SET UP menu, press UP/DOWN to select Advance Timer, press OK key to enter this menu. In
this menu, you can add timer by pressing RED key, you can setup Channel Type, Channel No.,
Channel Name, Start Date (Y/M/D), Start Time, End Time and Mode, then press OK key to save.
4.1.5 SW Update
In SET UP menu, press UP/DOWN to select SW Update, press OK key to enter this menu. In this
menu, you can update the software by USB/Card Reader.
4.1.6 Set Default
Select Set Default and press OK key, then press OK key, This will delete all user settings and
installed channels.
11
4.2 TV/Radio
The Radio operation is the same as TV.
In MAIN MENU screen, press RIGHT/LEFT to select TV, this menu consists of the “TV List “ and
“TV Guide”.
4.2.1 TV List
Select TV List and press OK key to enter TV List menu, in this menu, you can add channels to
different favorite groups, Lock channels, Edit channels, Move channels, Sort channels, Skip
channels, Delete channels, Search channels.
Favorites
Press UP/DOWN button to select a channel, press LEFT/RIGHT button to select Favorites, then
press 1~8 key to add the channel to the favorite group which you want to add to.
Lock
Press UP/DOWN button to select a channel, press LEFT/RIGHT button to select Lock, then press
OK key to lock the channel, press OK key again to cancel lock. Press YELLOW button to save.
12
Edit
Press UP/DOWN button to select a channel, press LEFT/RIGHT button to select Edit, then press
OK key to enter the Program Info menu, in this menu, you can see the program information and
rename the channel,
Move
Press UP/DOWN button to select a channel, press LEFT/RIGHT button to select Move, press OK
key, then press UP/DOWN button to move the channel to the position where you want to move.
Sort
Press UP/DOWN button to select a channel, press LEFT/RIGHT button to select Sort,you cansort
the channels by “A-Z”/”Z-A”, “Free-Pay”/”Pay-Free”.
13
Skip
Press UP/DOWN button to select a channel, press LEFT/RIGHT button to select Skip, the
channel will be skiped.
Delete
Press LEFT/RIGHT button to select Delete, press OK key to delete the selected channel.
Press GREEN button to delete all channels.
Search
Press LEFT/RIGHT button to select Search, and press OK key, input the channel name to search
this channel.
14
4.2.2 TV Guide
Select TV Guide and press OK key to enter TV Guide menu, in this menu, you can view the
channel guide.
4.3 MULTIMEDIA
In MAIN MENU screen, press RIGHT/LEFT to select MULTIMEDIA, this menu consists of the “My
Album “, “My Music”, “My Movie” and “My Recorder”.
4.3.1 My Album
Select My Album and press OK key, then press BLUE button to choose you photo folder, select a
photo and press OK key to view.
15
4.3.2 My Music
Select My Music and press OK key to enter, press UP/DOWN button to choose a song, press OK
or RED button to play, in playing, press RED button to pause, press GREEN button to stop, press
YELLOW button to cycle and press BLUE button to speed.
4.3.3 My Movie
Select “My Movie” and press the OK key. Select folder through Menu structure on the left of
screen. Use the the ▲▼ keys to select a movie file. Press the OK key to play selected file.
Press ▲▼ keys to play the previous movie or next movie, press ◄► to change the volume.
4.3.4 My Record
This menu consists of three sub-menus; “Recorded List” , “Recording Device” and “Recording
Preference”.
16
Recorded List
In this menu, you can view your record information and play your record.
Press ▲▼ keys to select the program, and press OK key to play.
Recording Device
In this menu, you can view the recording device and format disk.
Recording Preference
In this menu, you can setup the Recording Preference.
4.4 GAME
In MAIN MENU screen, press RIGHT/LEFT to select GAME, in this menu, you can play the
game, view the calendar and use the calculator.
5.0 OTHER OPERATIONS
5.1 Program Guide (EPG)
EPG shows the program schedule for the current channel. Availability of EPG depends from
broadcast and may not be available for all channels.
In no-menu state, press EPG button, the EPG Menu will appear. Screen divided to 3 main parts:
at the left channel list, at the right program schedule list and bottom part provide short program
description with program start-end time.
In channel list, use
buttons to choose the channel.
Use
to switch between channel list and program schedule. In program schedule list:
Use
buttons to choose program.
Use RED/GREEN buttons to select previous/next day of schedule.
Use
to switch between channel list and program schedule.
17
Use YELLOW button to display detailed program information.
Use BLUE button to program timer for selected programmes.
In program details:
Use
to scroll information in the window.
Use Exit to return to the list of programs.
5.2 Zapping and information banners
Zapping banner displayed automatically every time when you change channel in normal view
mode. It provides information about current channel list type, frequency, bandwidth, program
name, program No, and channel No..
Information banner can be displayed by pressing to INFO button.
Press INFO again to show the detail.
In Detail menu, press INFO to show the program information.
18
5.3 Channel list
To call on screen the current channel list press OK button from view mode.
Use
buttons to select channel and press OK to switch to full screen view mode.
5.4 Selection of Audio Language
Press the AUDIO button on your remote control. Use
buttons to select the audio language
from the list of available. Use
buttons to select sound mode between LR (Left + Right Stereo),
LL (Left Mono) and RR (Right Mono). Press EXIT to confirm your selection and exit.
5.5 Teletext
In channel view mode press TXT button. List of available subtitles languages will be displayed on
the screen. Use
buttons to select language and OK to confirm. To disable subtitles select OFF
from the list of the languages.
19
A.1 TROUBLESHOOTING
There may be various reasons for the abnormal operation of the receiver. Check the receiver
according to the procedures shown below. If the receiver does not work properly after checking it,
please contact the dealer. Don’t open the receiver cover. This may cause a dangerous situation.
Symptom
Cause
Remedy
The LED display on The power cord is not plugged Check that the power cord is plugged in
front panel does not in.
to the wall outlet.
light up.
No picture or sound Wrong connection of the Audio/ Connect the Audio/ Video output of the
Video output of the receiver to receiver to TV correctly. Press the
TV. Audio muting. TV power off. MUTE button Turn TV on.
No picture
The receiver can’t receive the
signal Incorrect values of some
tuner parameters Wrong
direction of the dish
The remote control The batteries of the remote
does not work
control are not inserted or
exhausted
20
Check the antenna cable, replace the
cable, or connect the cable to the
receiver tightly. Set the values of the
tuner parameters correctly in the
installation menu. Check the signal
strength with a spectrum analyzer and
adjust your dish correctly.
Check whether the batteries are
inserted correctly in your remote
control. Check the batteries, and if
exhausted replace the batteries in the
remote control.
A.2 SPECIFICATIONS
General Data:
Input Voltage Range: 100-240 V AC 50/60 Hz
Power consumption: max 20 W (with external HDD)
Stand-by power consumption: < 1 W (without external HDD)
Operating Temperature: +0°C ~ 40 ° C
Storage Temperature: -30°C ~ 80°C
Operating Humidity Range: 10% - 85%, RH, Non-condensing
Size (WxDxH) in mm: 230 x 165 x 45
Weight: ca. 0,8 kg
21