1
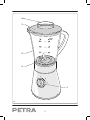
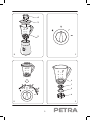
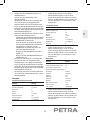
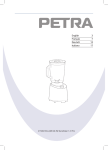
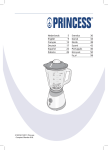
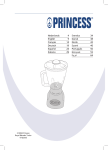
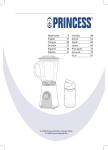
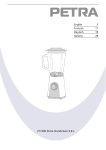
English Français Deutsch Italiano 212024 Petra Arctic Blender 212524 Petra Piano Black Arctic Blender 4 9 14 19 4 3 2 5 1 A 2 4 3 2 B C 2 7 5 6 D E 3 Congratulations! Mounting the jar (fig. B) EN • Mount the jar (2) onto the appliance. • Mount the jar lid (3) onto the jar (2). • Mount the jar lid insert (4) into the jar lid (3). You have purchased a Petra product. Our aim is to provide quality products with a tasteful design and at an affordable price. We hope that you will enjoy this product for many years. Switching on and off (fig. C & D) Before you proceed, we need you to pay attention to the following notes: - Do not switch on the appliance when the jar is empty (fig. D). - Do not leave the appliance switched on continuously for more than three minutes. Description (fig. A) Your 212024/212524 Petra blender has been designed for the following applications: chopping and mashing fruits and vegetables; preparing smoothies, shakes and juices; preparing cold soups; preparing dressings, dips and sauces. The maximum capacity of the appliance is 800 ml. The appliance is suitable for indoor use only. The appliance is suitable for domestic use only. • To switch on the appliance with continuous low speed, set the on/off switch (1) to the "I" position. • To switch on the appliance with continuous high speed, set the on/off switch (1) to the "II" position. • To switch on the appliance in pulse mode, set the on/off switch (1) to the "P" position. • To switch off the appliance, set the on/off switch (1) to the "O" position. Before you proceed, we need you to pay attention to the following notes: - The appliance has been designed for mixing cold and lukewarm ingredients (max. 55 °C). It is recommended not to use the appliance for mixing hot liquids and solids. Hot liquids and solids can easily cause the jar to break and the jar lid to abruptly come off the appliance due to steam pressure. Keep the jar lid pressed with your hand when mixing lukewarm liquids to prevent leakage. 1. On/off switch 2. Jar 3. Jar lid 4. Jar lid insert 5. Blade Hints for use Before you proceed, we need you to pay attention to the following notes: - Do not overload the appliance. Do not put too many ingredients into the jar at one time. • Cut the fruit and/or vegetables into pieces. Make sure that the pieces of fruit and/or vegetables fit in the jar. • Remove the jar lid from the jar. • Put the pieces of fruit and/or vegetables into the jar. • Mount the jar lid onto the jar. • Mount the jar lid insert into the jar lid. • Insert the mains plug into the wall socket. • Switch on the appliance by setting the on/off switch to the required position. The appliance chops the pieces of fruit and/or vegetables in a few seconds. The longer the appliance is switched on, the finer the pieces of fruit and/or vegetables will be chopped. • If necessary, add more pieces of fruit and/or vegetables: Initial use • Clean the appliance. Refer to the section "Cleaning and maintenance". • Clean the accessories. Refer to the section "Cleaning and maintenance". Assembly Before you proceed, we need you to pay attention to the following notes: - Before assembly or disassembly, switch off the appliance, remove the mains plug from the wall socket and wait until the appliance has cooled down. 4 • Put the ingredients in the blender. • Blend the ingredients until they are blended to a smooth, mixed substance. • Cover the substance and leave it in the refrigerator for 1-2 hours to cool down. Gazpacho Recipes Apricot pineapple smoothie Ingredients Quantity Apricot (fresh, diced) Pineapple (crushed) Strawberry Banana Water Skim milk powder Flax seed powder Protein powder 1 1/4 cup 6 1/2 1/2 cup 1 tbsp. 1 tsp. (option) 1 tbsp. (option) Strawberry (frozen) Banana (frozen) Mango Water Piña colada Flax seed powder Protein powder Ice cube 4 1/2 1/2 1 cup 2 tbsp. 1 tsp. (option) 1 tbsp. (option) 6 Tomato (quartered) Cucumber (sliced) Green pepper (with seeds) Union (sliced) Garlic Parsley Olive oil Wine vinegar Ice water Red wine Worcestershire sauce Tabasco sauce Salt / Pepper 4 1/2 1/2 1 2 cloves 4 sprigs 2 tbsp. 2 tbsp. 1/2 cup 1/2 cup 1 tsp. 1/4 tsp. as required Lemon garlic dressing Tropical shake Quantity Quantity • Put the ingredients in the blender. • Blend the ingredients until they are blended to a smooth, mixed substance. • Cover the substance and leave it in the refrigerator for 1-2 hours to cool down. • Put the ingredients in the blender. • Blend the ingredients until they are blended to a smooth, mixed substance. • Cover the substance and leave it in the refrigerator for 1-2 hours to cool down. Ingredients Ingredients Ingredients Quantity Tomato Lemon (no seeds) Garlic Flax seed powder Celery seed Cider vinegar Water Salt / Pepper 1 1 2 cloves 2 tbsp. 1/2 tsp. 1/4 cup 1/2 cup as required • Put the ingredients in the blender. • Blend the ingredients until they are blended to a smooth, mixed substance. • Cover the substance and leave it in the refrigerator for 1-2 hours to cool down. Hot Mexican salsa 5 Ingredients Quantity Tomato Union 4 1/2 EN - Turn the jar lid insert counterclockwise to remove the jar lid insert from the jar lid. - If the pieces are too large for the filling opening of the jar lid, switch off the appliance, remove the jar lid, and add the pieces of fruit and/or vegetables. - Mount the jar lid onto the jar. - Mount the jar lid insert into the jar lid. • Switch on the appliance by setting the on/off switch to the required position. The appliance chops the pieces of fruit and/or vegetables in a few seconds. The longer the appliance is switched on, the finer the pieces of fruit and/or vegetables will be chopped. • After use, switch off the appliance and remove the mains plug from the wall socket. EN Garlic Flax seed powder Ground cayenne pepper Chopped fresh coriander Cider vinegar Tabasco sauce 1 clove 2 tsp. 1/8 tsp. 3-4 tbsp. 1 tbsp. 1/4 tsp. Cleaning the blade (fig. E) The blade must be cleaned after each use. Before you proceed, we need you to pay attention to the following notes: - Always be careful when cleaning the blade. The blade is very sharp. Risk of personal injury. • Put the ingredients in the blender. • Blend the ingredients until they are blended to a smooth, mixed substance. • Cover the substance and leave it in the refrigerator for 1-2 hours to cool down. • Remove the plastic ring (6) from the bottom of the jar (2). • Remove the blade (5) and the rubber seal ring (7) from the bottom of the jar (2). • Clean the plastic ring, the rubber seal ring and the blade in soapy water. Rinse the accessories under running water. Fully dry the accessories. • Mount the blade (5) and the rubber seal ring (7) to the bottom of the jar (2). • Mount the plastic ring (6) to the bottom of the jar (2). Cleaning and maintenance The appliance must be cleaned after each use. Before you proceed, we need you to pay attention to the following notes: - Before cleaning or maintenance, switch off the appliance, remove the mains plug from the wall socket and wait until the appliance has cooled down. - Do not immerse the appliance in water or other liquids. - Always be careful when cleaning the blade. The blade is very sharp. Risk of personal injury. Before you proceed, we would like you to focus your attention on the following notes: - Do not use aggressive or abrasive cleaning agents to clean the appliance. - Do not use sharp objects to clean the appliance. - Do not clean the appliance in the dishwasher. It is not recommended to wash the removable parts of the appliance or the accessories in a dishwasher. Storage • Put the appliance and the accessories in the original packaging. • Store the appliance with the accessories in a dry and frost-free place, out of the reach of children. Safety instructions General safety • Read the manual carefully before use. Keep the manual for future reference. • Only use the appliance and the accessories for their intended purposes. Do not use the appliance and the accessories for other purposes than described in the manual. • Children should be supervised to ensure that they do not play with the appliance. • The appliance is not intended for use by persons (including children) with reduced physical, sensory or mental capabilities, or lack of experience and knowledge, unless they have been given supervision or instruction concerning use of the appliance by a person responsible for their safety. • Regularly check the appliance for possible damage. • Clean the outside of the appliance with a damp cloth. Thoroughly dry the outside of the appliance with a clean, dry cloth. • Clean the jar, the jar lid and the jar lid insert in soapy water. Rinse the jar, the jar lid and the jar lid insert under running water. Thoroughly dry the jar, the jar lid and the jar lid insert with a clean, dry cloth. 6 Safety instructions for blenders • Do not use the appliance outdoors. • Place the appliance on a stable and flat surface. • Keep the appliance away from heat sources. Do not place the appliance on hot surfaces or near open flames. • Do not use the appliance for pressing fruits or vegetables. • Do not use the appliance for beating eggs. • Do not use the appliance for kneading dough. • Do not use the appliance for grinding meat. • Do not use the appliance with an empty jar. • Always mount the jar lid and the jar lid insert before switching on the appliance. • Do not leave the appliance switched on continuously for more than three minutes. • Make sure that your hands are dry before touching the appliance. • Beware of sharp parts. Keep your hands away from the moving parts during use and during cleaning and maintenance. The appliance uses a sharp knife in the bottom of the jar. • Beware of hot parts. Wait until the appliance has cooled down before touching the housing and the parts of the appliance. The appliance becomes hot during use. • Be extra careful during cleaning and maintenance. Be extra careful when emptying the jar or handling the sharp blade. • Do not leave the appliance unattended during use. Electrical safety • Before use, always check that the mains voltage is the same as the voltage on the rating plate of the appliance. • The appliance is not intended to be operated by means of an external timer or separate remote-control system. • Connect the appliance to an earthed wall socket. If necessary, use an earthed extension cable of a suitable diameter (at least 3 x 1 mm2). • For additional protection, install a residual current device (RCD) with a rated residual operating current that does not exceed 30 mA. • Make sure that water cannot enter the contact plugs of the mains cable and the extension cable. • Always fully unwind the mains cable and the extension cable. • Make sure that the mains cable does not hang over the edge of a worktop and cannot be caught accidentally or tripped over. • Keep the mains cable away from heat, oil and sharp edges. 7 EN • Do not use the appliance if the mains cable or the mains plug is damaged or defective. If the mains cable or the mains plug is damaged or defective, it must be replaced by the manufacturer or an authorised repair agent. • Do not pull the mains cable to disconnect the mains plug from the mains. • Disconnect the mains plug from the mains when the appliance is not in use, before assembly or disassembly and before cleaning and maintenance. • Do not use the appliance if any part or any accessory is damaged or defective. If a part or an accessory is damaged or defective, it must be replaced by the manufacturer or an authorised repair agent. • Do not use the appliance near bathtubs, showers, basins or other vessels containing water. • Do not immerse the appliance in water or other liquids. If the appliance is immersed in water or other liquids, do not remove the appliance with your hands. Immediately remove the mains plug from the wall socket. If the appliance is immersed in water or other liquids, do not use the appliance again. • This appliance is intended to be used in domestic and similar applications such as staff kitchen areas in shops, offices and other working environments; farm houses; by clients in hotels, motels and other residential type environments; bed-andbreakfast type environments. U.K. Wiring instructions EN The wires in the mains lead are coloured in accordance with the following code: BLUE NEUTRAL BROWN LIVE GREEN/YELLOW EARTH As the colours of the wire in the mains lead of this appliance may not correspond with the colour markings identifying the terminals on your plug, proceed as follows: The wire which is coloured BLUE must be connected to the terminal which is marked with the letter N or coloured black. The wire which is coloured BROWN must be connected to the terminal which is marked with the letter L or coloured red. The wire which is coloured GREEN/YELLOW must be connected to the terminal which is marked with the letter E or GREEN or GREEN/YELLOW. and is coloured Warning! This appliance must be earthed. Disclaimer Subject to change; specifications can be changed without further notice. 8 Félicitations! - Avant le montage ou le démontage, arrêtez l'appareil, débranchez la fiche secteur de la prise murale et attendez que l'appareil refroidisse. Vous avez acheté un produit Petra. Nous souhaitons vous proposer des produits de qualité associant un design raffiné et des prix accessibles. Nous espérons que vous profiterez longtemps de ce produit. • Montez le pot (2) sur l'appareil. • Montez le couvercle (3) sur le pot (2). • Montez l'insert du couvercle du pot (4) dans le couvercle du pot (3). Description (fig. A) Votre mixeur 212024/212524 Petra a été conçu pour les applications suivantes : découper et écraser les fruits et légumes ; préparer des smoothies, des milk-shakes et des jus ; préparer des soupes froides ; préparer des assaisonnements et des sauces froides ou chaudes. L'appareil présente une capacité maximum de 800 ml. L'appareil est réservé à un usage à l'intérieur. L'appareil est réservé à un usage domestique. Mise en marche et arrêt (fig. C & D) Avant de procéder, vous devez faire attention aux remarques suivantes : - Ne mettez pas l'appareil en marche si le bol est vide (fig. D). - Ne faites pas fonctionner l’appareil pendant plus de trois minutes en continu. • Pour faire fonctionner l'appareil à vitesse lente continue, positionnez l’interrupteur marche/arrêt (1) sur "I". • Pour faire fonctionner l'appareil à vitesse rapide continue, positionnez l’interrupteur marche/arrêt (1) sur "II". • Pour faire fonctionner l'appareil en mode impulsion, positionnez l’interrupteur marche/arrêt (1) sur "P". • Pour éteindre l'appareil, positionnez l'interrupteur marche/arrêt (1) sur "O". Avant de procéder, vous devez faire attention aux remarques suivantes : - L'appareil a été conçu pour mélanger les ingrédients froids et tièdes (max. 55 °C). Nous vous recommandons de ne pas utiliser l'appareil pour mélanger les liquides et les solides chauds. Les liquides et les solides chauds peuvent facilement casser le pot et expulser violemment le couvercle du pot hors de l'appareil sous l'effet de la pression de la vapeur. Maintenez le couvercle du pot pressé avec votre main pour mélanger les liquides tièdes afin d'éviter toute fuite. 1. Interrupteur marche/arrêt 2. Pot 3. Couvercle du pot 4. Insert du couvercle du pot 5. Lame Conseils d'usage Avant de procéder, vous devez faire attention aux remarques suivantes : - Ne surchargez pas l'appareil. Ne placez pas trop d'ingrédients à la fois dans le pot. • Coupez les fruits ou légumes en morceaux. Assurez-vous que les morceaux de fruits ou légumes rentrent dans le pot. • Retirez le couvercle du pot. • Placez les morceaux de fruits ou légumes dans le pot. • Placez le couvercle sur le pot. • Montez l'insert du couvercle du pot dans le couvercle du pot. • Insérez la fiche secteur dans la prise murale. • Pour mettre l'appareil en marche, positionnez l’interrupteur marche/arrêt sur la position requise. L'appareil coupe les morceaux de fruits ou légumes en quelques secondes. Utilisation initiale • Nettoyez l'appareil. Consultez la section "Nettoyage et entretien". • Nettoyez les accessoires. Consultez la section "Nettoyage et entretien". Montage Avant de procéder, vous devez faire attention aux remarques suivantes : 9 FR Montage du bol (fig. B) Piña colada Poudre de grain de lin Poudre de protéines Glaçon FR Plus l'appareil reste en marche longtemps, plus les morceaux de fruits ou légumes sont coupé finement. • Si nécessaire, ajoutez davantage de morceaux de fruits ou légumes : - Tournez l'insert du couvercle du bol dans le sens antihoraire pour le retirer du couvercle. - Si les morceaux sont trop gros pour l'ouverture du couvercle du pot, arrêtez l'appareil, retirez le couvercle du pot et ajoutez les morceaux de fruits ou légumes. - Placez le couvercle sur le pot. - Montez l'insert du couvercle du pot dans le couvercle du pot. • Pour mettre l'appareil en marche, positionnez l’interrupteur marche/arrêt sur la position requise. L'appareil coupe les morceaux de fruits ou légumes en quelques secondes. Plus l'appareil reste en marche longtemps, plus les morceaux de fruits ou légumes sont coupé finement. • Après usage, arrêtez toujours l’appareil et débranchez la fiche secteur de la prise murale. • Placez les ingrédients dans le mixeur. • Mixez les ingrédients pour obtenir une substance fluide et homogène. • Couvrez la substance et laissez-la refroidir au réfrigérateur pendant 1 à 2 heures. Gazpacho Recettes Jus d'abricot-ananas Ingrédients Quantité Abricot (frais, en dés) Ananas (écrasé) Fraise Banane Eau Poudre de lait écrémé Poudre de grain de lin Poudre de protéines 1 1/4 tasse 6 1/2 1/2 tasse 1 cuil. soupe 1 cuil. café (option) 1 cuil. soupe (option) Fraise (gelée) Banane (gelée) Mangue Eau 4 1/2 1/2 1 tasse Quantité Tomate (quartiers) Concombre (tranché) Poivron vert (avec pépins) Oignon (tranché) Ail Persil Huile d'olive Vinaigre de vin Eau glacée Vin rouge Sauce Worcestershire Sauce Tabasco Sel / Poivre 4 1/2 1/2 1 2 clous de girofle 4 brins 2 cuil. soupe 2 cuil. soupe 1/2 tasse 1/2 tasse 1 cuil. café 1/4 cuil. café selon les goûts Assaisonnement citron-ail Shake tropical Quantité Ingrédients • Placez les ingrédients dans le mixeur. • Mixez les ingrédients pour obtenir une substance fluide et homogène. • Couvrez la substance et laissez-la refroidir au réfrigérateur pendant 1 à 2 heures. • Placez les ingrédients dans le mixeur. • Mixez les ingrédients pour obtenir une substance fluide et homogène. • Couvrez la substance et laissez-la refroidir au réfrigérateur pendant 1 à 2 heures. Ingrédients 2 cuil. soupe 1 cuil. café (option) 1 cuil. soupe (option) 6 Ingrédients Quantité Tomate Citron (sans pépin) Ail Poudre de grain de lin Graine de céleri Vinaigre de cidre Eau Sel / Poivre 1 1 2 clous de girofle 2 cuil. soupe 1/2 cuil. café 1/4 tasse 1/2 tasse selon les goûts • Placez les ingrédients dans le mixeur. • Mixez les ingrédients pour obtenir une substance fluide et homogène. • Couvrez la substance et laissez-la refroidir au réfrigérateur pendant 1 à 2 heures. 10 Ingrédients Quantité Tomate Oignon Ail Poudre de grain de lin Poivre de cayenne moulu Coriandre fraîchement coupée Vinaigre de cidre Sauce Tabasco 4 1/2 1 clou de girofle 2 cuil. café 1/8 cuil. café 3-4 cuil. soupe 1 cuil. soupe 1/4 cuil. café • Nettoyez le pot, le couvercle du bol et l'insert du couvercle du pot à l'eau savonneuse. Rincez le pot, le couvercle du bol et l'insert du couvercle du pot à l'eau savonneuse. Nettoyez soigneusement le pot, le couvercle du bol et l'insert du couvercle du pot avec un chiffon doux et sec. Nettoyage de la lame (fig. E) La lame doit être nettoyée après chaque utilisation. Avant de procéder, vous devez faire attention aux remarques suivantes : - Faites attention en touchant la lame. La lame est très coupante. Risque de blessures. • Placez les ingrédients dans le mixeur. • Mixez les ingrédients pour obtenir une substance fluide et homogène. • Couvrez la substance et laissez-la refroidir au réfrigérateur pendant 1 à 2 heures. • Retirez l'anneau plastique (6) du fond du bol (2). • Retirez la lame (5) et l'anneau d'étanchéité en caoutchouc (7) du fond du bol (2). • Nettoyez l'anneau plastique, l'anneau d'étanchéité en caoutchouc et la lame à l'eau savonneuse. Rincez les accessoires sous l’eau courante. Séchez complètement les accessoires. • Montez la lame (5) et l'anneau d'étanchéité en caoutchouc (7) au fond du bol (2). • Montez l'anneau plastique (6) au fond du bol (2). Nettoyage et entretien L’appareil doit être nettoyé après chaque utilisation. Avant de procéder, vous devez faire attention aux remarques suivantes : - Avant le nettoyage ou l'entretien, arrêtez l'appareil, débranchez la fiche secteur de la prise murale et attendez que l'appareil refroidisse. - Ne plongez pas l'appareil dans l'eau ou autres liquides. - Faites attention en touchant la lame. La lame est très coupante. Risque de blessures. Avant de procéder, nous souhaiterions que vous preniez connaissance des remarques suivantes : - N'utilisez pas de produits de nettoyage agressifs ou abrasifs pour nettoyer l'appareil. - Ne nettoyez pas l'appareil avec des objets coupants. - Ne nettoyez pas l'appareil dans le lavevaisselle. Il est déconseillé de nettoyer au lave-vaisselle les pièces amovibles de l'appareil ou les accessoires. • Contrôlez régulièrement les éventuels dommages sur l'appareil. • Nettoyez l'extérieur de l'appareil avec un chiffon humide. Séchez soigneusement l'extérieur de l'appareil avec un chiffon propre et sec. Rangement • Rangez l'appareil et les accessoires dans l'emballage d'origine. • Rangez l'appareil avec les accessoires dans un endroit sec, hors de portée des enfants et à l'abri du gel. Instructions de sécurité Sécurité générale • Lisez avec soin le manuel avant utilisation. Conservez le manuel pour référence future. • Utilisez l'appareil et ses accessoires uniquement pour leurs fins prévues. N'utilisez pas l'appareil et ses accessoires pour tout autre objet que celui exposé dans le manuel. 11 FR Sauce mexicaine piquante FR • Les enfants doivent toujours être surveillés pour s'assurer qu'ils ne jouent pas avec l'appareil. • Cet appareil n'est pas destiné à être utilisé par des personnes (notamment des enfants) présentant des capacités physiques, sensorielles, mentales ou motrices réduites voire dépourvues des connaissances et de l'expérience nécessaires, sauf sous la surveillance ou après avoir reçu des instructions d'usage de cet appareil par une personne responsable de leur sécurité. • N'utilisez pas l'appareil si une pièce ou un accessoire quelconque est endommagé ou défectueux. Si une pièce ou un accessoire quelconque est endommagé ou défectueux, il doit être remplacé par le fabricant ou par un réparateur agréé. • N'utilisez pas l'appareil à proximité d'une baignoire, d'une douche, d'un lavabo ou d'autres récipients contenant de l'eau. • Ne plongez pas l'appareil dans l'eau ou autres liquides. Si l'appareil est plongé dans l'eau ou d'autres liquides, ne retirez pas l'appareil avec vos mains. Débranchez immédiatement la fiche secteur de la prise murale. Si l'appareil est plongé dans l'eau ou autre liquide, ne l'utilisez pas à nouveau. • Cet appareil est destiné à un usage domestique et pour des applications similaires comme les zones de cuisine dans une boutique, un bureau ou autre environnement ; les fermes ; la clientèle des hôtels, motels et autres environnements résidentiels ; et les Bed & Breakfast. • Assurez-vous que l'eau ne peut pas s'infiltrer dans les contacts de prise du cordon d'alimentation et de la rallonge. • Déroulez toujours complètement le cordon d'alimentation et la rallonge. • Assurez-vous que le cordon d'alimentation ne pend pas sur le bord d'un plan de travail et ne peut pas être happé ou faire trébucher quelqu'un accidentellement. • Maintenez le cordon d'alimentation à l'écart de la chaleur, de l'huile et des bords tranchants. • N'utilisez pas l'appareil si le cordon d'alimentation ou la fiche secteur est endommagé ou défectueux. Si le cordon d'alimentation ou la fiche secteur est endommagé ou défectueux, il doit être remplacé par le fabricant ou par un réparateur agréé. • Ne tirez pas sur le cordon d'alimentation pour débrancher la fiche secteur du secteur. • Débranchez la fiche secteur du secteur lorsque l'appareil n'est pas utilisé, avant le montage ou le démontage de même qu'avant le nettoyage ou l'entretien. Instructions de sécurité pour les mixers • N'utilisez pas l'appareil à l'extérieur. • Placez l'appareil sur une surface stable et plane. • Maintenez l'appareil à l'écart des sources de chaleur. Ne placez pas l'appareil sur une surface chaude ou à proximité de flammes nues. • N'utilisez pas l'appareil pour presser des fruits ou des légumes. • N'utilisez pas l'appareil pour battre des œufs. • N'utilisez pas l'appareil pour pétrir de la pâte. • N'utilisez pas l'appareil pour hacher de la viande. • N'employez pas cet appareil avec un pot vide. • Montez toujours le couvercle du pot et son insert avant de mettre l'appareil en marche. • Ne faites pas fonctionner l’appareil pendant plus de trois minutes en continu. • Assurez-vous d'avoir les mains sèches avant de toucher l'appareil. Sécurité électrique • Avant toute utilisation, vérifiez que la tension du secteur correspond à celle indiquée sur la plaque signalétique de l'appareil. • L'appareil n'est pas conçu pour être utilisé avec une minuterie externe ou un système de télécommande séparé. • Connectez l'appareil à une prise murale mise à la terre. Si nécessaire, vous pouvez utiliser une rallonge d'un diamètre adapté (au moins 3 x 1 mm2). • Pour maximiser la protection, installez un dispositif de courant résiduel (RCD) présentant une intensité de service résiduelle nominale inférieure ou égale à 30 mA. 12 FR • Attention aux pièces coupantes. Maintenez vos mains à l'écart des pièces mobiles pendant l'utilisation, le nettoyage et l'entretien. L'appareil comporte un couteau coupant au fond du pot. • Attention aux pièces chaudes. Attendez que l'appareil ait suffisamment refroidi avant de toucher le carter ou ses autres pièces. L'appareil peut devenir chaud pendant l'usage. • Faites spécialement attention durant le nettoyage et la maintenance. Faites spécialement attention en vidant le pot et en manipulant la lame coupante. • Ne laissez jamais l'appareil sans surveillance pendant l'utilisation. Clause de non responsabilité Sous réserve de modifications ; les spécifications peuvent être modifiées sans préavis. 13 Zusammenbau Herzlichen Glückwunsch! Bevor Sie fortfahren, beachten Sie bitte unbedingt die folgenden Hinweise: - Schalten Sie das Gerät vor dem Zusammenbau bzw. der Zerlegung aus, ziehen Sie den Netzstecker aus der Wandsteckdose und warten Sie, bis das Gerät abgekühlt ist. Sie haben ein Petra Produkt erworben. Unser Ziel ist es, Qualitätsprodukte mit einem geschmackvollen Design zu einem erschwinglichen Preis anzubieten. Wir hoffen, dass Sie viele Jahre Gefallen an diesem Produkt finden. Beschreibung (Abb. A) Anbringen des Gefäßes (Abb. B) DE • Bringen Sie das Gefäß (2) am Gerät an. • Bringen Sie den Gefäßdeckel (3) am Gefäß (2) an. • Bringen Sie den Gefäßdeckel-Einsatz (4) im Gefäßdeckel (3) an. Ihr 212024/212524 Petra-Mixer wurde für folgende Anwendungen konstruiert: Zerkleinern und Pürieren von Früchten und Gemüse; Zubereitung von Smoothies, Shakes und Säften; Zubereitung von kalten Suppen; Zubereitung von Dressings, Dips und Saucen. Das maximale Fassungsvermögen des Geräts beträgt 800 ml. Das Gerät ist nur für den Gebrauch in geschlossenen Räumen geeignet. Das Gerät ist nur für den Hausgebrauch geeignet. Ein- und Ausschalten (Abb. C & D) Bevor Sie fortfahren, beachten Sie bitte unbedingt die folgenden Hinweise: - Schalten Sie das Gerät nicht ein, wenn das Gefäß leer ist (Abb. D). - Lassen Sie das Gerät nicht länger als drei Minuten ununterbrochen laufen. Bevor Sie fortfahren, beachten Sie bitte unbedingt die folgenden Hinweise: - Das Gerät wurde zum Mischen von kalten und lauwarmen Zutaten (max. 55 °C) konstruiert. Es wird davon abgeraten, das Gerät zum Mischen von heißen Flüssigkeiten und Feststoffen zu verwenden. Heiße Flüssigkeiten und Feststoffe können leicht ein Brechen des Gefäßes verursachen und bewirken, dass der Gefäßdeckel aufgrund des Dampfdrucks plötzlich vom Gerät abspringt. Halten Sie den Gefäßdeckel mit Ihrer Hand aufgedrückt, wenn Sie lauwarme Flüssigkeiten mischen, um ein Auslaufen zu verhindern. 1. Ein-/Aus-Schalter 2. Gefäß 3. Gefäßdeckel 4. Gefäßdeckel-Einsatz 5. Klinge • Um das Gerät mit kontinuierlich niedriger Geschwindigkeit einzuschalten, stellen Sie den Ein-/Aus-Schalter (1) auf Position "I". • Um das Gerät mit kontinuierlich hoher Geschwindigkeit einzuschalten, stellen Sie den Ein-/Aus-Schalter (1) auf Position "II". • Um das Gerät im Impulsmodus einzuschalten, stellen Sie den Ein-/Aus-Schalter (1) auf Position "P". • Um das Gerät auszuschalten, stellen Sie den Ein-/Aus-Schalter (1) auf Position "O". Hinweise für den Gebrauch Bevor Sie fortfahren, beachten Sie bitte unbedingt die folgenden Hinweise: - Überlasten Sie das Gerät nicht. Füllen Sie nicht zu viele Zutaten auf einmal in das Gefäß. • Schneiden Sie die Früchte und/oder das Gemüse in Stücke. Stellen Sie sicher, dass die Frucht- und/oder Gemüsestücke in das Gefäß passen. • Entfernen Sie den Gefäßdeckel vom Gefäß. • Füllen Sie die Frucht- und/oder Gemüsestücke in das Gefäß. • Bringen Sie den Gefäßdeckel auf dem Gefäß an. Erster Gebrauch • Reinigen Sie das Gerät. Siehe Abschnitt "Reinigung und Wartung". • Reinigen Sie das Zubehör. Siehe Abschnitt "Reinigung und Wartung". 14 • Bringen Sie den Gefäßdeckel-Einsatz im Gefäßdeckel an. • Stecken Sie den Netzstecker in die Wandsteckdose. • Schalten Sie das Gerät ein, indem Sie den Ein-/Aus-Schalter auf die gewünschte Position stellen. Das Gerät zerkleinert die Frucht- und/oder Gemüsestücke in wenigen Sekunden. Je länger das Gerät eingeschaltet ist, desto feiner werden die Frucht- und/oder Gemüsestücke zerkleinert. • Geben Sie, falls gewünscht, weitere Fruchtund/oder Gemüsestücke hinzu: - Drehen Sie den Gefäßdeckel-Einsatz gegen den Uhrzeigersinn, um den Einsatz vom Gefäßdeckel zu entfernen. - Sind die Stücke zu groß für die Einfüll öffnung des Gefäßdeckels, schalten Sie das Gerät aus, entfernen Sie den Gefäßdeckel und füllen Sie die Fruchtund/oder Gemüsestücke ein. - Bringen Sie den Gefäßdeckel auf dem Gefäß an. - Bringen Sie den Gefäßdeckel-Einsatz im Gefäßdeckel an. • Schalten Sie das Gerät ein, indem Sie den Ein-/Aus-Schalter auf die gewünschte Position stellen. Das Gerät zerkleinert die Frucht- und/oder Gemüsestücke in wenigen Sekunden. Je länger das Gerät eingeschaltet ist, desto feiner werden die Frucht- und/oder Gemüsestücke zerkleinert. • Schalten Sie das Gerät nach dem Gebrauch aus und ziehen Sie den Netzstecker aus der Wandsteckdose. • Füllen Sie die Zutaten in den Mixer. • Mixen Sie die Zutaten, bis sie zu einer feinen durchgemischten Substanz werden. • Decken Sie die Substanz ab und stellen Sie sie zum Abkühlen 1 bis 2 Stunden in den Kühlschrank. Aprikosen (frisch, gewürfelt) Ananas (zerkleinert) Erdbeeren Banane Wasser Magermilchpulver Leinsamenpulver Eiweißpulver 1 1/4 Tasse 6 1/2 1/2 Tasse 1 EL 1 TL (Option) 1 EL (Option) 4 1/2 1/2 1 Tasse 2 EL 1 TL (Option) 1 EL (Option) 6 Gazpacho Aprikosen-Ananas-Smoothie Menge Menge Erdbeeren (gefroren) Banane (gefroren) Mango Wasser Piña Colada Leinsamenpulver Eiweißpulver Eiswürfel • Füllen Sie die Zutaten in den Mixer. • Mixen Sie die Zutaten, bis sie zu einer feinen durchgemischten Substanz werden. • Decken Sie die Substanz ab und stellen Sie sie zum Abkühlen 1 bis 2 Stunden in den Kühlschrank. Rezepte Zutaten Zutaten Zutaten Menge Tomaten (geviertelt) Gurke (in Scheiben geschnitten) Grüne Paprika (mit Samen) Zwiebel (in Scheiben geschnitten) Knoblauch Petersilie Olivenöl Weinessig Eiswasser Rotwein Worcestershire-Sauce Tabasco-Sauce Salz / Pfeffer 4 1/2 1/2 1 2 Zehen 4 Zweige 2 EL 2 EL 1/2 Tasse 1/2 Tasse 1 TL 1/4 TL nach Bedarf • Füllen Sie die Zutaten in den Mixer. • Mixen Sie die Zutaten, bis sie zu einer feinen durchgemischten Substanz werden. • Decken Sie die Substanz ab und stellen Sie sie zum Abkühlen 1 bis 2 Stunden in den Kühlschrank. 15 DE Tropischer Shake Zitronen-Knoblauch-Dressing Zutaten Menge Tomate Zitrone (ohne Kerne) Knoblauch Leinsamenpulver Selleriesamen Apfelessig Wasser Salz / Pfeffer 1 1 2 Zehen 2 EL 1/2 TL 1/4 Tasse 1/2 Tasse nach Bedarf DE - Gehen Sie bei der Reinigung des Messers stets vorsichtig vor. Das Messer ist äußerst scharf! Es besteht Verletzungsgefahr! Bevor Sie fortfahren, richten Sie bitte Ihre Aufmerksamkeit auf folgende Hinweise: - Verwenden Sie keine aggressiven oder scheuernden Mittel, um das Gerät zu reinigen. - Verwenden Sie keine scharfen Gegenstände, um das Gerät zu reinigen. - Reinigen Sie das Gerät nicht in der Geschirrspülmaschine. Es wird nicht empfohlen, die entfernbaren Teile des Geräts oder das Zubehör in einer Geschirrspülmaschine zu waschen. • Füllen Sie die Zutaten in den Mixer. • Mixen Sie die Zutaten, bis sie zu einer feinen durchgemischten Substanz werden. • Decken Sie die Substanz ab und stellen Sie sie zum Abkühlen 1 bis 2 Stunden in den Kühlschrank. • Kontrollieren Sie das Gerät regelmäßig auf mögliche Schäden. • Reinigen Sie das Äußere des Geräts mit einem feuchten Lappen. Trocknen Sie das Äußere des Geräts gründlich mit einem sauberen, trockenen Tuch. • Reinigen Sie das Gefäß, den Gefäßdeckel und den Gefäßdeckel-Einsatz in Seifenwasser. Spülen Sie das Gefäß, den Gefäßdeckel und den Gefäßdeckel-Einsatz unter fließendem Wasser. Trocknen Sie das Gefäß, den Gefäßdeckel und den Gefäßdeckel-Einsatz gründlich mit einem sauberen, trockenen Tuch. Hot Mexican Salsa Zutaten Menge Tomate Zwiebel Knoblauch Leinsamenpulver Gemahlener Cayennepfeffer Zerkleinerter frischer Koriander Apfelessig Tabasco-Sauce 4 1/2 1 Zehe 2 TL 1/8 TL 3-4 EL 1 EL 1/4 TL • Füllen Sie die Zutaten in den Mixer. • Mixen Sie die Zutaten, bis sie zu einer feinen durchgemischten Substanz werden. • Decken Sie die Substanz ab und stellen Sie sie zum Abkühlen 1 bis 2 Stunden in den Kühlschrank. Reinigung des Messers (Abb. E) Das Messer muss nach jedem Gebrauch gereinigt werden. Bevor Sie fortfahren, beachten Sie bitte unbedingt die folgenden Hinweise: - Gehen Sie bei der Reinigung des Messers stets vorsichtig vor. Das Messer ist äußerst scharf! Es besteht Verletzungsgefahr! Reinigung und Wartung Das Gerät muss nach jedem Gebrauch gereinigt werden. • Entfernen Sie den Kunststoffring (6) von der Unterseite des Gefäßes (2). • Entfernen Sie das Messer (5) und den Gummidichtring (7) von der Unterseite des Gefäßes (2). • Reinigen Sie den Kunststoffring, den Gummidichtring und das Messer in Seifenwasser. Bevor Sie fortfahren, beachten Sie bitte unbedingt die folgenden Hinweise: - Schalten Sie das Gerät vor der Reinigung und Wartung aus, ziehen Sie den Netzstecker aus der Wandsteckdose und warten Sie, bis das Gerät abgekühlt ist. - Tauchen Sie das Gerät niemals in Wasser oder andere Flüssigkeiten ein. 16 Aufbewahrung • Verstauen Sie das Gerät und das Zubehör in der Originalverpackung. • Bewahren Sie das Gerät samt Zubehör an einem trockenen, frostfreien und für Kinder unerreichbaren Ort auf. Elektrische Sicherheit Sicherheitsanweisungen • Vergewissern Sie sich vor dem Gebrauch stets, dass die Netzspannung mit der Spannung auf dem Typenschild des Geräts übereinstimmt. • Das Gerät ist nicht dafür ausgelegt, von einer externen Zeitschaltuhr oder einem Fernsteuersystem betrieben zu werden. • Schließen Sie das Gerät an eine geerdete Wandsteckdose an. Verwenden Sie nötigenfalls ein geerdetes Verlängerungs kabel mit einem geeigneten Durchmesser (mindestens 3 x 1 mm2). • Lassen Sie als zusätzliche Schutzmaßnahme einen Fehlerstromschutzschalter (FI-Schutz schalter) installieren, der einen NennFehlerstrom von 30 mA nicht überschreitet. • Stellen Sie sicher, dass kein Wasser in die Steckkontakte des Netzkabels und in das Verlängerungskabel eindringen kann. • Wickeln Sie das Netzkabel und das Verlängerungskabel stets vollständig ab. • Vergewissern Sie sich, dass das Netzkabel nicht an der Kante einer Arbeitsplatte hängen bleibt und nicht versehentlich daran gezogen oder darüber gestolpert wird. • Halten Sie das Netzkabel von Hitzequellen, Öl und scharfen Kanten fern. • Verwenden Sie das Gerät nicht, wenn das Netzkabel oder der Netzstecker beschädigt oder defekt ist. Ist das Netzkabel oder der Netzstecker beschädigt oder defekt, muss das Teil vom Hersteller oder einem autorisierten Reparaturbetrieb ausgetauscht werden. Allgemeine Sicherheit • Lesen Sie das Handbuch vor dem Gebrauch genau durch. Bewahren Sie das Handbuch zur künftigen Bezugnahme auf. • Verwenden Sie das Gerät und sein Zubehör nur für den Zweck, für den es konstruiert wurde. Verwenden Sie das Gerät und sein Zubehör nicht für Zwecke, die nicht in diesem Handbuch beschrieben sind. • Kinder müssen stets beaufsichtigt werden, um sicherzustellen, dass sie nicht mit dem Gerät spielen. • Das Gerät darf nicht von Personen (einschließlich Kindern) mit eingeschränkten körperlichen, sensorischen oder geistigen Fähigkeiten oder ohne das erforderliche Wissen und die nötige Erfahrung benutzt werden, es sei denn, diese Personen werden beaufsichtigt oder in den Gebrauch des Geräts seitens einer für deren Sicherheit verantwortlichen Person eingewiesen. • Verwenden Sie das Gerät nicht, wenn ein Teil oder Zubehör beschädigt oder defekt ist. Ist ein Teil oder Zubehör beschädigt oder defekt, muss es vom Hersteller oder einem autorisierten Reparaturbetrieb ausgetauscht werden. • Verwenden Sie das Gerät nicht in der Nähe von Badewannen, Duschen, Bassins oder anderen Wasserbehältern. 17 DE • Tauchen Sie das Gerät niemals in Wasser oder andere Flüssigkeiten ein. Falls das Gerät in Wasser oder andere Flüssigkeiten eingetaucht wurde, nehmen Sie es nicht mit Ihren Händen heraus. Ziehen Sie sofort den Netzstecker aus der Wandsteckdose. Falls das Gerät in Wasser oder andere Flüssigkeiten eingetaucht wird, darf es nicht mehr verwendet werden. • Dieses Gerät darf nur für den Hausgebrauch und ähnliche Anwendungen wie in Personalküchenbereichen von Geschäften, Büros und anderen Arbeitsumgebungen, in Gutshäusern und von Kunden in Hotels, Motels und anderen Wohnbereichen zum Schlafen und Frühstücken verwendet werden. Spülen Sie das Zubehör unter fließendem Wasser. Trocknen Sie das Zubehör vollständig ab. • Bringen Sie das Messer (5) und den Gummidichtring (7) an der Unterseite des Gefäßes (2) an. • Bringen Sie den Kunststoffring (6) an der Unterseite des Gefäßes (2) an. Haftungsausschluss • Ziehen Sie niemals am Netzkabel, um den Netzstecker aus der Wandsteckdose zu ziehen. • Ziehen Sie den Netzstecker aus der Wandsteckdose, wenn das Gerät nicht gebraucht wird, sowie vor der Zerlegung bzw. dem Zusammenbau und vor der Reinigung und Wartung. Änderungen vorbehalten; die Daten können ohne Vorankündigung geändert werden. Sicherheitsanweisungen für Mixer DE • Verwenden Sie das Gerät nicht im Freien. • Stellen Sie das Gerät auf eine stabile, flache Oberfläche. • Halten Sie das Gerät von Wärmequellen fern. Stellen Sie das Gerät nicht auf heiße Oberflächen oder in die Nähe von offenen Flammen. • Verwenden Sie das Gerät nicht zum Entsaften von Obst und Gemüse. • Verwenden Sie das Gerät nicht zum Schlagen von Eiern. • Verwenden Sie das Gerät nicht zum Kneten von Teig. • Verwenden Sie das Gerät nicht zum Mahlen von Fleisch. • Verwenden Sie das Gerät nicht mit einem leeren Gefäß. • Bringen Sie vor dem Einschalten des Geräts stets den Gefäßdeckel und den GefäßdeckelEinsatz an. • Lassen Sie das Gerät nicht länger als drei Minuten ununterbrochen laufen. • Stellen Sie sicher, dass Ihre Hände trocken sind, bevor Sie das Gerät berühren. • Vorsicht vor scharfen Teilen. Halten Sie die Hände beim Gebrauch, der Reinigung und Wartung von den sich bewegenden Teilen fern. Das Gerät hat unten im Gefäß ein scharfes Messer. • Vorsicht vor heißen Teilen. Warten Sie, bis sich das Gerät abgekühlt hat, bevor Sie das Gehäuse und die Geräteteile berühren. Das Gerät wird beim Gebrauch heiß. • Gehen Sie bei der Reinigung und Wartung besonders vorsichtig vor. Gehen Sie beim Leeren des Gefäßes oder beim Umgang mit dem scharfen Messer besonders vorsichtig vor. • Lassen Sie das Gerät während des Gebrauchs nicht unbeaufsichtigt. 18 Congratulazioni! - Prima del montaggio o dello smontaggio, spegnere l'apparecchio, scollegare la spina di alimentazione dalla presa elettrica a parete e attendere che l'apparecchio si raffreddi. Avete acquistato un prodotto Petra. Il nostro scopo è quello di fornire prodotti di qualità con un design gradevole, ad un prezzo interessante. Ci auguriamo che possiate usufruire di questo prodotto per molti anni a venire. Montaggio della caraffa (fig. B) • Montare la caraffa (2) sull'apparecchio. • Montare il coperchio della caraffa (3) sulla caraffa (2). • Montare l'inserto del coperchio (4) sul coperchio della caraffa (3). Descrizione (fig. A) Il frullatore 212024/212524 Petra è stato progettato per le seguenti applicazioni: tritare e passare frutta e verdura; preparare frullati, frappè e succhi; preparare zuppe fredde; preparare condimenti, salse e sughi. La massima capacità dell'apparecchio è 800 ml. L'apparecchio è adatto esclusivamente per l'uso al coperto. L'apparecchio è adatto esclusivamente per uso domestico. Accensione e spegnimento (fig. C & D) Prima di procedere, è necessario porre attenzione alle seguenti note: - Non accendere l'apparecchio quando la caraffa è vuota (fig. D). - Non lasciare l'apparecchio acceso costantemente per oltre tre minuti. IT Prima di procedere, è necessario porre attenzione alle seguenti note: - L'apparecchio è stato progettato per miscelare ingredienti freddi e tiepidi (massimo 55 °C). Si raccomanda di non utilizzare l'apparecchio per miscelare ingredienti liquidi o solidi caldi. Ingredienti liquidi o solidi caldi possono facilmente causare la rottura della caraffa e l'espulsione improvvisa del coperchio della caraffa a causa della pressione del vapore. Per prevenire perdite tenere premuto il coperchio della caraffa durante la miscelazione di liquidi tiepidi. 1. Interruttore di accensione/spegnimento 2. Caraffa 3. Coperchio della caraffa 4. Inserto del coperchio della caraffa 5. Lame • Per accendere l'apparecchio a velocità bassa e costante, portare l'interruttore di accensione/ spegnimento (1) sulla posizione "I". • Per accendere l'apparecchio a velocità alta e costante, portare l'interruttore di accensione/ spegnimento (1) sulla posizione "II". • Per accendere l'apparecchio in modalità a impulsi, portare l'interruttore di accensione/ spegnimento (1) sulla posizione "P". • Per spegnere l'apparecchio, portate l'interruttore di accensione/spegnimento (1) sulla posizione "O". Suggerimenti per l'uso Prima di procedere, è necessario porre attenzione alle seguenti note: - Non sovraccaricare l'apparecchio. Non inserire troppi ingredienti contemporaneamente nella caraffa. Primo utilizzo • Pulire l'apparecchio. Consultare la sezione "Pulizia e manutenzione". • Pulire gli accessori. Consultare la sezione "Pulizia e manutenzione". • Spezzettare frutta e/o verdura. Controllare che i pezzetti di frutta e/o di verdura entrino nella caraffa. • Togliere il coperchio della caraffa alla caraffa. • Inserire i pezzetti di frutta e/o di verdura nella caraffa. • Montare il coperchio della caraffa sulla caraffa. Montaggio Prima di procedere, è necessario porre attenzione alle seguenti note: 19 IT • Montare l'inserto del coperchio sul coperchio della caraffa. • Inserire la spina di alimentazione nella presa a parete. • Accendere l'apparecchio impostando l'interruttore di accensione/spegnimento sulla posizione richiesta. Il frullatore trita i pezzetti di frutta e/o verdura in pochi secondi. Maggiore è il tempo di accensione dell'apparecchio e più sottili saranno tritati i pezzetti di frutta e/o verdura. • Se necessario, aggiungere altri pezzetti di frutta e/o verdura: - Ruotare l'inserto del coperchio in senso antiorario per estrarlo dal coperchio della caraffa. - Se i pezzetti sono troppo grandi per l'apertura di alimentazione sul coperchio della caraffa, spegnere l'apparecchio, togliere il coperchio della caraffa e aggiungere i pezzi di frutta e/o verdura. - Montare il coperchio della caraffa sulla caraffa. - Montare l'inserto del coperchio sul coperchio della caraffa. • Accendere l'apparecchio impostando l'interruttore di accensione/spegnimento sulla posizione richiesta. Il frullatore trita i pezzetti di frutta e/o verdura in pochi secondi. Maggiore è il tempo di accensione dell'apparecchio e più sottili saranno tritati i pezzetti di frutta e/o verdura. • Dopo l'uso, spegnere l'apparecchio e staccare la spina di alimentazione dalla presa elettrica a parete. • Introdurre gli ingredienti nel frullatore. • Miscelare gli ingredienti fino ad ottenere un frullato liscio e uniforme. • Coprire il frullato e tenerlo in frigorifero per 1-2 ore per raffreddarlo. Frappé tropicale Albicocca (fresca, a dadini) Ananas (schiacciato) Fragole Banana Acqua Latte scremato in polvere Semi di lino in polvere Proteine in polvere 1 1/4 tazza 6 1/2 1/2 tazza 1 cucchiaio 1 cucchiaino (facoltativo) 1 cucchiaio (facoltativo) Fragole (surgelate) Banana (surgelata) Mango Acqua Piña colada Semi di lino in polvere Proteine in polvere Cubetti di ghiaccio 4 1/2 1/2 1 tazza 2 cucchiaio 1 cucchiaino (facoltativo) 1 cucchiaio (facoltativo) 6 Gazpacho Frullato di albicocca e ananas Quantità Quantità • Introdurre gli ingredienti nel frullatore. • Miscelare gli ingredienti fino ad ottenere un frullato liscio e uniforme. • Coprire il frullato e tenerlo in frigorifero per 1-2 ore per raffreddarlo. Ricette Ingredienti Ingredienti Ingredienti Quantità Pomodori (divisi in quarti) Cetriolo (affettato) Paprica verde (semi) Cipolla (affettata) Aglio Prezzemolo Olio di oliva Aceto di vino Acqua fredda Vino rosso Salsa Worcestershire Salsa Tabasco Sale / Pepe 4 1/2 1/2 1 2 spicchi 4 rametti 2 cucchiaio 2 cucchiaio 1/2 tazza 1/2 tazza 1 cucchiaino 1/4 cucchiaino q.b. • Introdurre gli ingredienti nel frullatore. • Miscelare gli ingredienti fino ad ottenere un frullato liscio e uniforme. • Coprire il frullato e tenerlo in frigorifero per 1-2 ore per raffreddarlo. 20 Salsa al limone e aglio Quantità Pomodoro Limone (senza semi) Aglio Semi di lino in polvere Semi di sedano Aceto di sidro Acqua Sale / Pepe 1 1 2 spicchi 2 cucchiaio 1/2 cucchiaino 1/4 tazza 1/2 tazza q.b. - Porre sempre la massima attenzione nel pulire le lame. Le lame sono estremamente affilate. Rischio di lesioni personali. Prima di procedere, si prega di porre attenzione alle seguenti note: - Non utilizzare detergenti aggressivi o abrasivi per pulire l'apparecchio. - Non utilizzare oggetti affilati per pulire l'apparecchio. - Non lavare l'apparecchio in lavastoviglie. Si raccomanda di non lavare le parti rimovibili dell'apparecchio o gli accessori in lavastoviglie. • Introdurre gli ingredienti nel frullatore. • Miscelare gli ingredienti fino ad ottenere un frullato liscio e uniforme. • Coprire il frullato e tenerlo in frigorifero per 1-2 ore per raffreddarlo. • Controllare l'apparecchio a intervalli regolari, verificando che non sia danneggiato. • Pulire l'esterno dell'apparecchio con un panno umido. Asciugare a fondo l'esterno dell'apparecchio con un panno pulito e asciutto. • Lavare la caraffa, il coperchio della caraffa e l'inserto del coperchio in acqua saponosa. Sciacquare la caraffa, il coperchio della caraffa e l'inserto del coperchio in acqua corrente. Asciugare a fondo la caraffa, il coperchio della caraffa e l'inserto del coperchio con un panno pulito e asciutto. Salsa messicana piccante Ingredienti Quantità Pomodoro Cipolla Aglio Semi di lino in polvere Pepe di Cayenna macinato Coriandolo fresco tritato Aceto di sidro Salsa Tabasco 4 1/2 1 spicchio 2 cucchiaino 1/8 cucchiaino 3-4 cucchiai. 1 cucchiaio 1/4 cucchiaino Pulizia delle lame (fig. E) È necessario pulire le lame dopo ogni uso. • Introdurre gli ingredienti nel frullatore. • Miscelare gli ingredienti fino ad ottenere un frullato liscio e uniforme. • Coprire il frullato e tenerlo in frigorifero per 1-2 ore per raffreddarlo. Prima di procedere, è necessario porre attenzione alle seguenti note: - Porre sempre la massima attenzione nel pulire le lame. Le lame sono estremamente affilate. Rischio di lesioni personali. Pulizia e manutenzione • Togliere l'anello in plastica (6) dal fondo della caraffa (2). • Rimuovere le lame (5) e la guarnizione in gomma (7) dal fondo della caraffa (2). • Pulire l'anello in plastica, la guarnizione e le lame in acqua saponosa. Sciacquare gli accessori in acqua corrente. Asciugare completamente gli accessori. • Montare le lame (5) e la guarnizione in gomma (7) sul fondo della caraffa (2). • Montare l'anello in plastica (6) sul fondo della caraffa (2). È necessario pulire l'apparecchio dopo ogni uso. Prima di procedere, è necessario porre attenzione alle seguenti note: - Prima di qualsiasi operazione di pulizia o manutenzione, spegnere l'apparecchio, scollegare la spina di alimentazione dalla presa elettrica a parete e attendere che l'apparecchio si raffreddi. - Non immergere l'apparecchio in acqua o in altri liquidi. 21 IT Ingredienti Stoccaggio Sicurezza elettrica • Prima dell'uso, verificare sempre che la tensione di rete corrisponda alla tensione riportata sulla targhetta nominale dell'apparecchio. • L'apparecchio non è previsto per essere azionato mediante timer esterno o telecomando. • Collegare l'apparecchio a una presa a parete dotata di messa a terra. Se necessario, utilizzare un cavo di prolunga dotato di conduttore di messa a terra di diametro adeguato (almeno 3 x 1 mm2). • Come ulteriore protezione, installare un interruttore differenziale (RCD) con una corrente residua di funzionamento nominale non superiore a 30 mA. • Verificare che l'acqua non penetri negli spinotti del cavo di alimentazione e del cavo di prolunga. • Srotolare sempre completamente il cavo di alimentazione e il cavo di prolunga. • Verificare che il cavo di alimentazione non rimanga impigliato nel bordo di sporgenze o ripiani e non possa costituire fonte di rischio di incidenti o cadute. • Tenere il cavo di alimentazione lontano da fonti di calore, olio e spigoli taglienti. • Non usare l'apparecchio se il cavo di alimentazione o la spina sono danneggiati o difettosi. Se il cavo di alimentazione o la spina sono danneggiati o difettosi, devono essere sostituiti dal fabbricante o da un centro di assistenza autorizzato. • Per scollegare la spina di alimentazione elettrica, non tirare mai il cavo di alimentazione. • Se l'apparecchio non viene utilizzato, prima di eseguire operazioni di montaggio o smontaggio e prima di effettuare interventi di pulizia e manutenzione, scollegare sempre la spina dalla rete di alimentazione elettrica. • Collocare l'apparecchio e gli accessori nell'imballaggio originale. • Riporre l'apparecchio con i relativi accessori in un luogo asciutto, al riparo dal gelo e fuori dalla portata dei bambini. Istruzioni per la sicurezza Sicurezza generale IT • Leggere attentamente il manuale prima dell'uso. Conservare il manuale per future consultazioni. • Utilizzare l'apparecchio e gli accessori esclusivamente per gli scopi previsti. Non utilizzare l'apparecchio e gli accessori per scopi diversi da quelli descritti nel manuale. • Controllare sempre che i bambini non giochino con l'apparecchio. • Non è previsto l'uso dell'apparecchio da parte di bambini o persone con ridotte capacità fisiche, sensoriali o mentali oppure senza la necessaria pratica ed esperienza salvo quando le persone responsabili per la loro sicurezza offrono istruzioni precise oppure supervisionano l'uso dell'apparecchio. • Non usare l'apparecchio se presenta parti o accessori danneggiati o difettosi. Se una parte o un accessorio sono danneggiati o difettosi, devono essere sostituiti dal fabbricante o da un centro di assistenza autorizzato. • Non usare l'apparecchio in prossimità di vasche da bagno, docce, bacinelle o altri recipienti contenenti acqua. • Non immergere l'apparecchio in acqua o in altri liquidi. Se l'apparecchio viene immerso in acqua o in altri liquidi, non rimuovere l'apparecchio con le mani. Rimuovere immediatamente la spina di alimentazione dalla presa a parete. Se l'apparecchio viene immerso in acqua o altri liquidi, non riutilizzare l'apparecchio. • L'apparecchio è progettato esclusivamente per uso domestico e per applicazioni simili, quali stanze adibite a cucine per il personale nei negozi, uffici e altri ambienti di lavoro; fattorie; per clienti di hotel, motel e altri ambienti di tipo residenziale; bed and breakfast. Istruzioni per la sicurezza relative ai frullatori • Non usare l'apparecchio in ambienti esterni. • Collocare l'apparecchio su una superficie uniforme e stabile. 22 IT • Tenere l'apparecchio a distanza da fonti di calore. Non collocare l'apparecchio su superfici calde o vicino a fiamme libere. • Non utilizzare l'apparecchio per schiacciare frutta o verdura. • Non utilizzare l'apparecchio per sbattere uova. • Non utilizzare l'apparecchio per impastare. • Non utilizzare l'apparecchio per tritare carne. • Non utilizzare l'apparecchio con la caraffa vuota. • Montare sempre il coperchio della caraffa e l'inserto del coperchio prima di accendere l'apparecchio. • Non lasciare l'apparecchio acceso costantemente per oltre tre minuti. • Prima di toccare l'apparecchio assicurarsi di avere le mani asciutte. • Porre attenzione alle parti taglienti. Tenere le mani distanti dalle parti in movimento durante l'uso e durante gli interventi di pulizia e di manutenzione. L'apparecchio utilizza lame affilate sul fondo della caraffa. • Porre attenzione alle parti riscaldate. Attendere che l'apparecchio si sia raffreddato prima di toccarne l'involucro e i componenti. L'apparecchio si riscalda durante l'uso. • Porre particolare attenzione durante gli interventi di pulizia e manutenzione. Porre particolare attenzione durante lo svuotamento della caraffa o la manipolazione delle lame affilate. • Non lasciare l'apparecchio incustodito durante l'uso. lausola di esclusione C della responsabilità Soggetto a modifica; le specifiche possono subire variazioni senza preavviso. 23 PETRA Deutschland GmbH Eberhardstraße 73312 Geislingen Deutschland www.petra-electric.de © Petra 2012 07/12