1
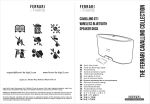
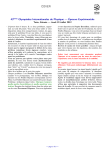
EN User Guide FR DE Benutzerhandbuch IT ES Manual del Usuario PT Manual do Utilizador NL Gebruikershandboek THE Cavallino FERRARI COLLECTION Cavallino GT1 Air airPlay & bluetooth speaker dock Introduction Thank you for purchasing the Ferrari by Logic3 Cavallino GT1 AirPlay & Bluetooth Speaker Dock. As with all Ferrari by Logic3 products it has been built to the highest manufacturing standards and tested throughout its development, to ensure you get the best possible product. Please read through and familiarize yourself with this manual before you use the Ferrari by Logic3 Cavallino GT1 AirPlay & Bluetooth Speaker Dock Product Registration: For your benefit, Logic3 recommends that You register Your Product online to record Your Product serial number and date of purchase, as this information will allow us to better serve Your needs. Please visit http://www.ferrari-bylogic3.com/register Compatibility AirPlay compatible with: iTunes, iPod touch (2nd, 3rd, and 4th generation), iPhone 4 / 4S iPhone 3G / 3GS iPad, iPad 2. new iPad For AirPlay, the Cavallino GT1 Air must be connected to Wi-Fi with networked access to a Mac or PC running iTunes 10.5 or later; or an iPad, iPhone, or iPod touch running iOS 5.0 or later. Bluetooth connectivity for Android and Windows based devices The Bluetooth® word mark and logos are registered trademarks owned by Bluetooth SIG, Inc. and any use of such marks by Ferrari by Logic3 is under license. Other trademarks and trade names are those of their respective owners. The Wi- -Fi® logo are registered trademarks of the Wi-Fi Alliance. Features 2.2.1 Stereo Speakers & Subwoofer. Class HD Amplifier delivering maximum power and high efficiency AirPlay enabled to stream music wirelessly from iTunes or other Apple devices. Bluetooth enabled for speakerphone technology and to wirelessly play your music Digital Signal Processing (DSP) for best performance, natural musical timbre and extended low frequency response. Apple Dock Connector to charge and play your apple device lassic metal gate gearbox Composite Video out and USB Charging Port Ferrari by Ferrari by Logic3 APP inspired by Ferrari: Alarm Clock World Time Playlists & Music Control Remote Control Dedicated Morphing App to enhance functionality within the Ferrari Speaker Collections Contents Check the packaging for the items shown below. Please retain the packing materials, as this will provide the safest way to transport this product. If any part of the product appears to be damaged, do not attempt to use it. Please contact Ferrari by Logic3 immediately via e-mail: [email protected] or via telephone: +44 (0) 1923 471 010 Cavallino GT1 Air Remote Control 2 x AAA AC Power Cord Line in Cable WARNING: To avoid danger of suffocation, keep plastic bags out of the reach of children. Overview Top Panel Volume - Volume + Power/Pairing Apple Dock Connector AirPlay Indicator RED Not Connected GREEN - Connected Source Indicator RED iPod BLUE Bluetooth GREEN - Aux Bottom Panel AC Socket Composite Video Connection Auxiliary 3.5mm Socket USB Charge Port Setting up your system 1. 2. 3. Select the correct mains power cable for your mains power socket. Connect the small end of the AC power cable into the AC power connector on the base of the Cavallino GT1 Air Plug the other end into a live AC (mains) outlet CAUTION: Do not cover the ventilation openings of the product. Installing the remote control battery 1. On the rear of the remote control, slide off the battery door of the remote control. 2. Insert the supplied batteries, observing the polarity as shown on remote control. 3. Replace battery cover WARNING: Please ensure that the battery is inserted correctly. If the battery is inse rted incorrectly (reversed polarity), this may cause personal injury as well as damage to your Cavallino GT1 Air. 1 - Power Press to turn On/OFF the system Press to select the Source 2 - Source Press to change Source Modes. 1 5 3 - Volume + Press to increase (+) the volume. Press and hold for faster adjustment. 4 - Volume Press to decrease ( ) the volume. Press and hold for faster adjustment. 6 7 2 3 4 5 - Play/Pause Press to play / pause the current track on the docked device. 6 - Skip forward Press once to skip to the next track. Press and hold to quickly scan forward through a track. 7 - Skip backward Press once to skip to the beginning of the current track Press twice to skip to the beginning of the previous track Press and hold to quickly scan backward through a track Operating your system You can turn on your Cavallino GT1 Air in any of the following two ways: Press the Power/Pairing on top of the Cavallino GT1 Air or press the Power button remote control. Wait for the Cavallino GT1 Air to boot up (AirPlay Indicator Red/ Source Indicator Orange will illuminate for 20seconds), once these lights go off the Cavallino GT1 Air is ready. To turn off the Cavallino GT1 Air, do either one of the following: Press and hold the seconds. Remove the docked device on the Cavallino GT1 Air or the remote control for 1-10 Power Saving Modes The Cavallino GT1 Air is equipped with an automatic power saving mode, if no music is detected for 15 minutes the GT1 will automatically switch itself to standby mode to conserve power. Docking your iPod, iPhone or iPad Please push the docking tray (A) in order to release the tray. 1 2 Cavallino GT1 (The GT1 will begin to boot up) Wait for AirPlay Indicator Red/ Source Indicator Orange light to go out. S Source will illuminate RED. Place an iPod, iPhone or iPad onto the Apple dock connector 3 The Cavallino GT1 Air will begin to play the music from your playlist. . A Download the Apps from the App store 1 Connecting your Apple device (some models) iPhone / iPad for the first time, a window will be displayed. By which you can then download the specified App. Note: Please ensure you are connected to the internet to download the App AirPlay Connectivity Wi-Fi Network Setup for AirPlay Check List Please verify the following steps before attempting to connect your Cavallino GT1 Air to a Wi-Fi network. ☐To enjoy AirPlay wireless audio, you must have the following: iTunes or an IOS device (iPod touch, iPhone or iPad) A functioning home network with Wi-Fi ☐Download the latest software updates for iTunes and your IOS device to ensure that you are able to enjoy the latest AirPlay enhancements and compatibility ☐Have your Wi-Fi network name (SSID) and password (if applicable) available for reference. Note: AirPlay requires iTunes 10.5 (Mac and PC) or later; OR an iPad/iPad2/New iPad iPhone 3G/3GS/4/4S, iPod touch 4th/3rd/2nd with Firmware iOS 5.0 or later on top of the Ferrari by Logic3 Speaker Dock. Wait for the Ferrari by Logic3 Speaker Dock to boot up (AirPlay Indicator Red/ Source Indicator Orange will illuminate for 20seconds), once the AirPlay indicator is illuminated RED, Ferrari by Logic3 Speaker Dock is ready to connect to AirPlay AirPlay Indicator Source Indicator GT1 Air 1. 2. Dock your iPad, iPhone or iPod on to the Ferrari by Logic3 Speaker Dock. Press and keep the Power/Paring and volume (-) button pressed for 3 seconds or until a message appears asking to share data. 3 SECONDS 3. 4. The current Wifi network settings from your Apple device will now be transferred to your Ferrari by Logic3 Speaker Dock. Wait for the AirPlay Indicator (Red) to turn to a solid Green. Not Connected Connected to AirPlay Note: Connecting to a network may take up to 20 seconds. If network connection is unsuccessful please reset the unit. A. Press and keep the Power/Paring and volume (+) button pressed for more than 5 seconds or until the Source B. C. Source indicator LED will then go out. If you still have problems connecting the unit to the network, please check your Apple device is connected to the network and also that your network is operating correctly. To reset the AP (Access Point) A. Press and keep the Power/Paring and volume (-) button pressed for more than 5 seconds or until the AirPlay LED B. C. Please power down the unit by holding the power button down for 2 seconds and then pressing it once to power up the unit and follow steps 1-5. 5. On your Apple device select the AirPlay symbol Dock i.e Cavallino Air on your iPod menu and select the Ferrari by Logic3 Speaker Success! Congratulations, you have successfully connected your unit to your wireless network and now you can start enjoying wireless audio anywhere in your home or office. Note: To begin using AirPlay wireless streaming, your AirPlay source (Mac or PC with your iTunes library as well as your iPod touch, iPhone or iPad) must be connected to the same Wi -Fi network that the unit is connected to. Music Connectivity Connecting to the GT1 Air You can connect to the GT1 in unit different ways: 1. 2. 3. 4. 5. 6. Using AirPlay to stream wirelessly from iTunes on your Mac or PC (iTunes can stream to multiple AirPlay speakers). Using AirPlay to stream wirelessly from your iPod touch, iPhone, iPad (iOS devices stream to only one AirPlay speaker at a time). Using the iPod dock connector for audio and charging your iPod, iPhone or iPad. Using Bluetooth to s Bluetooth device such as Apple device (certain models) and most Android / Window devices. Support Composite Video output with a RCA connector. Support the audio from your sound sources (Eg. TV, CD player) via a 3.5mm line in stereo cable. AirPlay via iPod touch, iPhone or iPad Using an iOS device: 1. 2. 3. 4. Connect your iOS device to the same WI-Fi network. Goto Settings Wi-Fi on your iOS device. Tap on iPod/iPhone Music App. Look for the AirPlay button next to the iPod music transport controls. Tap on the AirPlay icon and choose Cavallino Gt1 Air from the list of speakers. If the Cavallino GT1 Air is not available, restart your iOS device and verify that the unit is powered on and connected to the same WI-Fi network. Press play. AirPlay via iTunes Using a Mac or PC with iTunes: 1. 2. 3. 4. 5. 6. Connect your Mac or PC to the same Wi-Fi network as unit. Open iTunes on your computer. With ☒ activate the following option: iTunes Click OK, close iTunes preferences. Look for the AirPlay icon in the bottom right corner of the iTunes window. Click the AirPlay icon and choose Cavallino GT1 Air speaker, if this is not available, restart iTunes and verify that the unit is powered on and connected to the same Wi-Fi network. Playing AirPlay Music: Once you have connected your Cavallino GT1 to Airplay you can start playing your music. Press on the Cavallino GT1 remote control to play your iOS device. Press the button on the Cavallino GT1 remote control to skip to next track on your iOS device. Press the button on the Cavallino GT1 remote control to skip back to the beginning of the track currently playing on your iOS device. Press the button again immediately to skip to previous track. Press on the Cavallino GT1 remote control to pause play; Press again to resume it. Press the VOLUME + / - on the Cavallino GT1 or remote control to adjust the system volume. Bluetooth Connectivity Pairing the Ferrari by Logic3 Speaker Dock to your device Before you start ensure your Bluetooth device (mobile phone, MP3 player, computer, etc.) supports A2DP Bluetooth profile (Commonly known as stereo audio profile) to work with the player. Many of the latest mobile phones and PCs with built-in Bluetooth functionality will support this profile. For accurate information about your product, please er manual for details on the Bluetooth profiles. For the first time, you will need to pair your Bluetooth device with the Ferrari by Logic3 Speaker Dock before you can play music through the Ferrari by Logic3 Speaker Dock via Bluetooth. Pairing creates a devices can always recognize each other. Pairing: 1. o Source indicator illuminates BLUE and flashes slowly (once every 2 seconds). AirPlay Indicator Source Indicator LED configuration on Airplay models button on the Ferrari by Logic3 Speaker Dock for more than 10 seconds or until the 2. Press and hold the 3. Activate the Bluetooth on your device to search for other Bluetooth devices ( manual). 4. Search for the device 5. Once connected, icon will be shown on your devices display. 6. Ferrari by Logic3 Speaker Dock will automatically pair with the last paired device. and pair with this device. the Bluetooth Bluetooth source indicator status Flashing Slowly No device paired Flashing Quickly - Device pairing Permanently ON Device paired Playing Bluetooth Music: Once your device and the Ferrari by Logic3 Speaker Dock are paired you can start to play music through the Ferrari by Logic3 Speaker Dock via Bluetooth. Press the on the remote control to play your Bluetooth-enabled device. This function is dependent on your Bluetooth device. Press the Press the Volume on the Ferrari by Logic3 Speaker Dock or remote control to adjust the system volume. on the remote control again to pause play; press again to resume it. Using the Video Output When playing a docked iPod, iPhone and iPad with video capability, the VIDEO OUT connector provides a composite video output signal that can be viewed on a TV or computer monitor. To view this video output on your TV or monitor, connect the VIDEO OUT from the GT1 Air to a video input on your TV using a standard composite video cable (Not Included). Be sure to select the correct video input on your TV. Line In / Aux In Connection The Cavallino GT1 also offers the ability to allow other portable audio devices such as iPod shuffle, MP3, MiniDisc and Portable CD Players to be connected for use as a speaker system via the Aux In input. The AUX IN socket accepts a 3.5mm stereo cable plug. 1. Using the appropriate stereo cable, connect your audio device to the AUX IN input. Note: A device must be plugged into the AUX IN connector in order to select the AUX source. 2. 3. 4. 5. Select the AUX source by pressing GT1 or the by control, Source Indicator will illuminate GREEN. Turn on the audio device connected and press play on your device. Set the volume of the device connected to 50% volume. Use the Up/Down volume controls on the Cavallino GT1 / remote control to adjust to the correct listening volume. Note: The Cavallino GT1 Air remote control will not control devices connected to AUX IN. Charging your device with USB port The USB port at the bottom of the Cavallino GT1 provides a 5V 2.1A power output Note: The USB can only provide a maximum power of 5v 2.1A, do not exceed this voltage or current as it may cause damage to your Cavallino GT1 or device. Care and maintenance To clean the exterior surface of your product, you can wipe it using a soft, dry lint free cloth. Do not use solvents, chemicals, or sprays as this may damage the external surfaces and internal components Do not allow liquids to spill or objects to drop into any openings. Avoid products that are abrasive, or contain acid, alkali or anti-bacterial agents. Troubleshooting Problem What Should I do? Cavallino GT1 does not turn ON Check the AC Power Cable is connected firmly into the Cavallino GT1 Air and into the AC wall outlet and switched ON Ensure the Cavallino GT1 Air Power Switch is turned ON Ensure the correct source input is selected. No sound Check the play status on the connected device. Please try updating the software for your iPod using the latest iTunes which is available from Apple.com I have lost a part for the Cavallino GT1 Air Remote Control is not working Please refer to the spare parts listed on our website www.ferrari-by-logic3.com Replace Battery Check the Batteries are inserted correctly Check your Composite connection is connected correctly. No Picture Check your iPod is set to TV out (refer to your iPod manual for settings) Ensure you have selected the correct input channel on your TV I cannot play Bluetooth music from my other Bluetooth devices Ensure your device supports A2DP and AVRCP Bluetooth profiles Ensure you have paired your device to the Cavallino GT1 Bluetooth Sound Check For the best iPod, iPhone and iPhone listening experience with the Cavallino GT1, please activate iTunes Sound Check. Sound Check standardizes the volume of all the songs in your music library. The Cavallino GT1 is specially designed to provide a powerful but safe listening experience with Sound Check activated. Learn more about iTunes Sound here SAFETY INFORMATION guide for future reference. The lightning flash with arrowhead symbol within an equilateral triangle alerts the user to the presence of un-insulated, dangerous voltage within the system enclosure that may be of sufficient magnitude to constitute a risk of electric shock. The exclamation point within an equilateral triangle alerts the user to the presence of important SAFETY INFORMATION 1. 2. 3. 4. 5. 6. 7. 8. 9. 10. 11. 12. 13. 14. 15. 16. Read these instructions for all components before using this product. Keep these instructions for future reference. Heed all warnings Follow all instructions. Do not use this apparatus near water or moisture Do not use this product near a bathtub, washbowl, kitchen sink, laundry tub, in a wet basement, near a swimming pool or anywhere else that water is present. Clean only with a dry cloth and as directed by Ferrari by Logic3. Unplug this product from the wall outlet before cleaning. Do not bloc To ensure reliable operation of the product and to protect it from overheating, put the product in a position and location that will not interfere with its proper ventilation. For example, do not place the product on a bed, sofa, or similar surface that may block the ventilation openings. Do not put it in a built-in system, such as a bookcase or a cabinet that may keep air from flowing through its ventilation openings. Do not install near any heat sources, such as radiators, heat registers, stoves, or other apparatus (including amplifiers) that produce heat. Only use attachments/accessories specified by the manufacturer. Protect the power cord from being walked on or pinched, particularly at plugs, convenience receptacles, and the point where they exit from the apparatus. Unplug this apparatus during lightning storms or when unused for long periods of time to prevent damage to this product. Refer all servicing to qualified service personnel. Servicing is required when the apparatus has been damaged in any way: such as power supply cord or plug is damaged; liquid has been spilled or objects have fallen into the apparatus; the apparatus has been exposed to rain or moisture, does not operate normally, or has been dropped. Do not attempt to service this product yourself. Opening or removing covers may expose you to dangerous voltages or other hazards. Please call [email protected] to be referred to an authorized service centre near you. To reduce the risk of fire or electric shock, do not expose this product to rain or moisture. The product shall not be exposed to dripping or splashing, and objects filled with liquids, such as vases, shall not be placed on or near the product. As with any electronic products, use care not to spill liquids into any part of the product. Liquids can cause a failure and/or a fire hazard. Make no modifications to the product or accessories. Unauthorized alterations may compromise safety, regulatory compliance, and system performance, and will void the warranty. Do not place any naked flame sources, such as lighted candles, on or near the apparatus. 17. Contains small parts that may be a choking hazard. Not suitable for children under age 3. 18. To prevent risk of fire or electric shock, avoid overloading wall outlets, extension cords, or integral convenience receptacles. 19. Do not let objects or liquids enter the product as they may touch dangerous voltage points or short-out parts that could result in a fire or electric shock. 20. See product enclosure for safety-related markings. 21. Use proper power sources Plug the product into a proper power source, as described in the operating instructions or as marked on the product. BATTERY INFORMATION Keep batteries out of the reach of children and pets. If the battery begins to leak, do not allow the liquid to come in contact with your skin or eyes. If contact has been made, wash the affected area with plenty of water and seek medical advice immediately. Do not expose the product or battery to excessive heat, including direct sunlight or fire and storage or use inside cars in hot weather, where it can be exposed to temperatures in excess of 140°F (60°C). Doing so may cause the battery and power supply to generate heat, ruptures, or ignites. Using the product in this manner also may result in a loss of performance and a shortened life expectancy. If the battery is damaged and ignites, do not use water to extinguish flames. Instead, use a functioning fire extinguisher. Do not step on, throw, or drop batteries or the power supply or expose them to a strong shock. Do not pierce, crush, dent, or deform the batteries or power supply in any way. If either becomes deformed, properly dispose of it. Do not short-circuit batteries. Avoid storing them around metal objects such as keys, pocket change, paper clips, and jewellery. Do not dismantle, open, or shred the battery. The battery is intended to be used only with the Ferrari by Logic3 products and the power supply provided with it. The cells in the batteries perform best when operating at normal room temperature, 70°F (20°C). Declaration of Conformity Logic3 declare that the product described in this Instruction Manual has been tested and assessed and is in conformity with the relevant provisions of the following directives and National Laws and regulations adopting these directives. The EMC Directive 2004/108/EEC EN50332 Measurement of Maximum Sound Pressure RoHS Restriction of Hazardous Substances Directive REACH Issued in: Watford, Hertfordshire, United Kingdom. Signature: Date: 01/08/2012 [email protected] www.ferrari-by-logic3.com Logic3 plc. Rhodes Way, Watford, WD24 4YW, UK Logic3 plc. & Logic3 International Ltd. of Watford UK are the owners of the Logic3 registered trademark. Logic3 own registered and unregistered design rights and copyright subsisting in various products within its range. FERRARI, the PRANCING HORSE device, all associated logos and distinctive designs are trademarks of Ferrari S.p.A. The body designs of the Ferrari cars are protected as Ferrari property under design, trademark and trade dress regulations. All other trademarks, copyrights and trade names are registered properties of their respective owners. Logic3 are continually updating their products in the interest of improving the quality and design. Copyright in this manual is owned by Logic3 International Ltd. Rhodes Way.