1
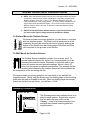
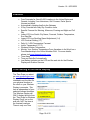
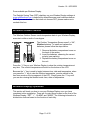
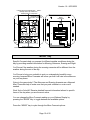
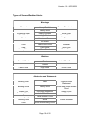
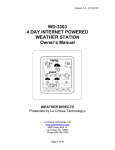
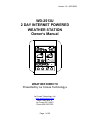
Version 1.8 - 9/23/2008 WD-2513U 2 DAY INTERNET POWERED WEATHER STATION Owner’s Manual WEATHER DIRECT® Presented by La Crosse Technology® La Crosse Technology, Ltd. www.weatherdirect.com 2809 Losey Blvd. S. La Crosse, WI 54601 Phone 608-785-7935 Page 1 of 25 Version 1.8 - 9/23/2008 Table of Contents Table of Contents ............................................................................................................................ 2 Congratulations................................................................................................................................ 4 Quality Forecasts ............................................................................................................................. 4 Weather Direct® is Green ............................................................................................................... 4 Included in the Box .......................................................................................................................... 5 915 MHz Wireless Sensor Technology ........................................................................................... 5 What You Need to Get Started: ....................................................................................................... 6 IMPORTANT MESSAGE: ................................................................................................................ 7 Set Up your WD-2513 ..................................................................................................................... 7 Hardware Installation ....................................................................................................................... 7 Wireless Outdoor Sensor Installation Options ............................................................................ 8 To Surface Mount the Outdoor Sensor: .................................................................................. 8 To Wall Mount the Outdoor Sensor: ....................................................................................... 8 Gateway Installation ........................................................................................................................ 8 Online Resources ............................................................................................................................ 9 Features......................................................................................................................................... 10 Time Setting on Wireless Display .................................................................................................. 10 Wireless Outdoor Sensor .............................................................................................................. 11 Wireless Display Operation ........................................................................................................... 11 “MODE” Key .............................................................................................................................. 12 “ALARM” Key ............................................................................................................................ 13 Turn Alarm ON/OFF.............................................................................................................. 13 Set Alarm Time ..................................................................................................................... 13 “+” Key ....................................................................................................................................... 14 Toggle Between Time, Date & Temperature ........................................................................ 14 View Outdoor Temperature................................................................................................... 14 Manually Request a Weather Direct® Data Update ............................................................. 14 “SET” Key .................................................................................................................................. 14 When ADD 4 LOCATIONS Expansion Option is Active ....................................................... 14 Changing Settings on Your Wireless Display ....................................................................... 15 Set Mode 1 – Set LCD Contrast (0-7) .............................................................................. 15 Set Mode 2 – Enable Acoustic Weather Warnings (ON/OFF) ......................................... 15 Set Mode 3 - Set Text Scrolling Speed (1-4).................................................................... 15 Set Mode 4 - View Device ID............................................................................................ 16 Factory Reset of Wireless Display................................................................................................. 16 FREE Trial of Expansion Options for 14 Days .............................................................................. 17 Four Additional Forecast Locations........................................................................................... 17 Page 2 of 25 Version 1.8 - 9/23/2008 Severe Weather Alerts .................................................................................................................. 18 Types of Severe Weather Alerts: .......................................................................................... 19 Forecast Icons Explained .............................................................................................................. 20 Care and Maintenance .................................................................................................................. 21 Battery Low Icons .......................................................................................................................... 21 Battery Replacement ..................................................................................................................... 22 Troubleshooting ............................................................................................................................. 22 Specifications................................................................................................................................. 22 Temperature Range .............................................................................................................. 22 Battery Life ............................................................................................................................ 22 Dimensions ........................................................................................................................... 22 Weather Direct® Update Rate .............................................................................................. 22 Weather Direct® Wireless Range ......................................................................................... 22 Power Requirements ..................................................................................................................... 22 Liability Disclaimer ......................................................................................................................... 23 FCC Statements ............................................................................................................................ 23 Warranty Information ..................................................................................................................... 24 Page 3 of 25 Version 1.8 - 9/23/2008 Congratulations You have just purchased the world’s first Internet-Powered Weather Station. Weather Direct® uses the power of the Internet to deliver weather data and other important information tailored to you, because you are in control of the information it delivers. We understand that no one likes having to read a manual, so we’ve tried to make this a fun and rewarding read. After all, Weather Direct® is all about you. It’s like having your own personal assistant to tell you the weather how, when and where you want it. Knowing how Weather Direct® works will allow you to get the most out of this innovative new system. Weather Direct® - Not Just Another Weather Station. Weather Direct® is the complete weather experience. Quality Forecasts Weather Direct® provides the most accurate forecast information available, customized to your exact location! Our forecasts go beyond backyard measurements by using Internet-enabled weather data provided by official National Weather Service instrumentation and local weather reporting stations widely distributed throughout North America. The same quality weather information used by meteorologists to deliver the local forecast plus additional weather data unique to the Weather Direct® network is available to you 24 hours a day! We provide the most detailed, customized, upto-date weather forecasts available on any medium. Weather Direct® allows you to pinpoint your exact location to ensure that you receive precision weather forecasts customized for you! Weather Direct® is Green We are doing our part to keep our planet healthy by eliminating our paper manuals, saving trees in the process. Not only are we reducing the amount of paper, but we are also trying to help you save space in your desk drawer, file cabinet or box in the basement where all these pesky manuals end up. Now you can print only the pages from this manual that you need… or not print any at all if you find what you are looking for online. Page 4 of 25 Version 1.8 - 9/23/2008 The Gateway uses only 1 watt of power with a two year battery life on the Wireless Display and Temperature sensor. Since the Weather Direct® system works even when your computer is off, you save money on electricity. Included in the Box The WD-2513U 2 Day Wireless Forecast Station is a complete Weather Direct® system that includes: • WD-2513U Wireless Display – Provides weather forecast information, time, date and other custom data from the Internet. Also receives and displays wireless outdoor temperature, from your backyard using the included Wireless Outdoor Sensor. • Wireless Gateway + Mounting Plate – Powers your Weather Direct® System with weather data and other customizable feeds from the Internet. Sends data your Wireless Display with a wireless range of up to 330 feet (open air). • TX-50U Wireless Outdoor Temperature Sensor + Mounting Plate – Measures the outdoor temperature where you are and sends temperature data to your Wireless Display with a wireless range of up to 330 feet (open air). • (4) Screws and drywall anchors for mounting the Wireless Outdoor Temperature Sensor and the Wireless Gateway • Quick Set Up Card • Weather Club Information Card • LAN cable to connect the Gateway to a network router • AC adapter for Gateway 915 MHz Wireless Sensor Technology This product offers: INSTANT TRANSMISSION is the state-of-the-art new wireless transmission technology, exclusively designed and developed by LA CROSSE TECHNOLOGY®. INSTANT TRANSMISSION offers you an immediate update (every 4 seconds!) of all your outdoor data measured from the sensors: follow your climatic variations in real-time! Page 5 of 25 Version 1.8 - 9/23/2008 What You Need to Get Started: • • • • • • • • • • High-speed Internet connection – cable, DSL or other broadband Internet service will work. NOTE: If you only have a Dial-Up Internet connection, Weather Direct® will not work. However, you can use Weather Direct® Lite with a Dial-Up connection using your computer’s USB port – see www.weatherdirect.com/lite Router or broadband modem with built-in router. (contact your Internet service provider ISP for information on compatibility with their service) If you have any questions about routers, or you would like a recommendation on a great router for use with Weather Direct®, see www.weatherdirect.com/router Valid e-mail address – required to make sure you can retrieve your password and receive other information about your user profile. 2 “AA” Alkaline batteries for the Wireless Outdoor Sensor NOTE: Rechargeable batteries are not recommended in the Wireless Outdoor Sensor due to the wide variation in performance between brands and types. Please use only fresh Alkaline batteries. 3 “AA” Alkaline or Rechargeable batteries for the Wireless Display Visit www.weatherdirect.com and click “Register” to Start After you have registered and selected a forecast location and Time Zone for your Wireless Display, the forecast data will show up on the display within 60 seconds. A reasonably current Windows, Macintosh, or Linux PC with internet browser installed is required for initial set up and configuration changes. The browser must be configured with Java Script enabled. Most browsers allow JavaScript as a standard feature. If you have turned off support for JavaScript in your browser, please allow JavaScript to run again to register or configure your Device. Page 6 of 25 Version 1.8 - 9/23/2008 IMPORTANT MESSAGE: Please DO NOT insert batteries into the Wireless Display or the Outdoor Sensor until instructed to do so. Connect the Gateway to an available LAN port on your network router with the LAN cable (included) and then power up the Gateway with the AC Adapter (included). Set Up your WD-2513 NOTE: The Quick Set-Up Card that is included in the box contains additional instructions to help you get started quickly if you want to perform a basic setup of your Weather Direct® system without reading this entire manual. Open www.weatherdirect.com in a web browser and click “REGISTER” at the top of the page. Our Online Registration Wizard will guide you through the complete registration process. Hardware Installation NOTE: Hardware installation is only intended to be performed after you have registered your Gateway and Wireless Display, inserted batteries into the Wireless Outdoor Temperature Sensor, and have confirmed successful reception of weather data. Page 7 of 25 Version 1.8 - 9/23/2008 Wireless Outdoor Sensor Installation Options NOTE: Move the Wireless Outdoor Sensor into its intended location and wait for 10 minutes to make sure the outdoor temperature is still being received by the Wireless Display. Press the “+” Key on your Wireless Display to show the outdoor temperature. If the display shows - -,-F for the outdoor temperature, the signal cannot reach the Wireless Display. Find a closer location to mount the Wireless Outdoor Sensor and wait 10 minutes to check the Wireless Display again for reception. DO NOT mount the Wireless Outdoor Sensor in a permanent fashion until you are sure the signal is being received by the Wireless Display. To Surface Mount the Outdoor Sensor: We have provided a mounting plate that you can attach to a surface with the supplied screws. The Sensor can be positioned on a flat surface by securing the stand to the bottom by gently pushing the bottom of the Sensor onto the holding pegs of the stand until they click into place in the grooves on the Sensor. To Wall Mount the Outdoor Sensor: The Outdoor Sensor is weather resistant, but not water proof. To ensure maximum Sensor life, mount it in a covered place out of the elements like under the eaves. Placement on the North side of your home will provide the most accurate readings. Mount it about 18” down from the eaves for optimum performance. This ensures that the weather data collected by the Outdoor Sensor will not be affected by the temperature of the air leaving the attic. We have provided a mounting plate that you can attach to the wall with the supplied screws. Gently snap the Sensor onto the holding pegs on the mounting plate after the plate is screwed to the wall. When the holding pegs are securely locked into the slots on the Sensor, you will hear a “Click”. Gateway Installation The Gateway should be installed indoors in an easy-to-reach location. Registration requires that you press the gray button on the Gateway. It can be mounted securely to the wall with the included mounting plate and drywall anchors. Page 8 of 25 Version 1.8 - 9/23/2008 If you require a longer LAN cable to mount the Gateway in a desired location, any standard Category 5 network cable will work, but a crossover cable may not work. Crossover cables designed to connect two computers without networking hardware may not work with your Gateway. NOTE: Network cables usually have length limitations. The same length limitations will apply that apply to computers on your home network. The Gateway sends weather forecasts to your Wireless Display over a maximum 330 ft. range. Walls and other obstructions between the Gateway and Wireless Display will affect the range. The Wireless Signal Icon will indicate the signal strength to let you know if your Gateway and Wireless Display are within range. Online Resources These links can help to enrich your Weather Direct® experience: • Help – www.weatherdirect.com/help • FREE Membership Included to the Weather Club, at www.theweatherclub.com featuring: Online weather forecasts by Meteorologist Paul Douglas Radar maps Video and photo uploads And Much more! • For a list of places to choose from as forecast locations www.weatherdirect.com/places Page 9 of 25 Version 1.8 - 9/23/2008 Features • • • • • • • • • • • • • • Free Forecasts for Over 40,000 Locations in the United States and Canada, Including Your Hometown, Golf Courses, Parks Sports Venues and More. Automatically Updates Itself via the Gateway 2 Day Forecast with Daily Sky Condition Icons Specific Forecast for Morning, Afternoon, Evening and Night and Full Day Lower LCD Line Scrolls City Name, Forecast, Outdoor Temperature, Sun Rise/Set Lower LCD Line Scrolling Speed Adjustment (1-4) LCD Contrast Setting (1-7) Daily HI / LOW Temperature Forecast Indoor Temperature (°F/°C) Wireless Outdoor Temperature Monitor Your Outdoor Temperature From Anywhere in the World on a Free Membership to the Online Weather Club. For more details, please visit www.theweatherclub.com Time Alarm Time and Date Set Automatically Low Battery Indicator on the LCD and the web site for the Wireless Display and Outdoor Sensors Time Setting on Wireless Display The Time Zone you select on www.weatherdirect.com for your Wireless Display is intended to set the time for your physical location so the clock on your Wireless Display is accurate. This time is independent of your selected forecast locations. The Wireless Display will ONLY display the time from the “Time Zone for Wireless Display Clock” set on the web site, NOT the time at the forecast locations. There is only one Time Page 10 of 25 Version 1.8 - 9/23/2008 Zone available per Wireless Display. The Daylight Saving Time (DST) checkbox on your Wireless Display settings at www.weatherdirect.com is selected by default because most locations observe DST. If you are in a location that does not observe DST, please make sure to uncheck this box. Wireless Outdoor Sensor The Wireless Outdoor Sensor sends temperature data to your Wireless Display, accurate to within a tenth of one degree. The Outdoor Temperature Sensor uses 2 x “AA”, Alkaline batteries. To install and replace the batteries, please follow the steps below: 1. Remove the battery compartment cover on the back of the sensor. 2. Insert the batteries, observing the correct polarity (see marking). 3. Replace the battery compartment cover on the unit. Press the “+” Key on your Wireless Display to show the outdoor temperature at any time. The outdoor temperature will scroll on the bottom of the LCD. Because the “+” key is used to toggle between time, date and temperature, when you press the “+” key to view the outdoor temperature, you also switch to the next view mode on the top segment of the LCD. Simply press the “+” key until you are also viewing the desired mode: time, date or temperature. Wireless Display Operation This section will teach you how to use your Wireless Display once you have completed online registration. There are 4 control Keys located on the front of the Wireless Display: “SET”, “+”, “ALARM” and “MODE”. The following information is divided into sections based on the function of each Key. Page 11 of 25 Version 1.8 - 9/23/2008 LCD Has 2 Day Forecasts Starting with “ TODAY”. Both Days Have a Sky Condition Icon with Daily HI and LO Temperature Display Date, Seconds, or Indoor Temperature Alarm Icon Battery Compartment Time 4 Function Keys Scrolling Text Display: Scrolls Location, Outdoor Temperature, Weather Data “MODE” Key Specific Forecasts help you prepare for different weather conditions during the day by providing weather information for Morning, Afternoon, Evening and Night. You'll know if the weather during the morning commute will be different from the weather during the rest of the day. You'll know to bring your umbrella to work on a deceptively beautiful sunny morning, because Micro Forecasts will inform you that it will rain in the afternoon on your way home. Going to the game today? The Afternoon and Evening forecasts are a lifesaver! Micro Forecasts help to make sure that you pack a blanket or a rain coat if needed. Work 2nd or 3rd shift? Receive detailed forecast information tailored to specific times of the day when you are the most active. You can change the Micro Forecast reading on your Wireless Display by pressing the “MODE” Key to toggle between the available options. Press the “MODE” key to cycle through the Micro Forecast options: Page 12 of 25 Version 1.8 - 9/23/2008 1. MORNING Forecast from 6:00 AM - 11:59 AM with Daily HI/LO Temperature 2. AFTERNOON Forecast from 12:00 PM - 5:59 PM with Daily HI/LO Temperature 3. EVENING Forecast from 6:00 PM - 11:59 PM with Daily HI/LO Temperature 4. NIGHT Forecast from 12:00 AM – 5:59 AM with Daily HI/LO Temperature 5. ROTATE Rotates between the four Micro Forecasts and the Daily Forecast 6. NEXT SECTION Shows the forecast for the next six hour period so you can be prepared for the upcoming weather. If it was morning now, it would show the afternoon forecast. If it was evening now, it would show the night forecast, etc. 7. ONLY DAY Shows only the Daily forecast when you are only interested in the weather for the day rather than forecasts for morning, afternoon, evening or night. “ALARM” Key Turn Alarm ON/OFF • • • Press the “ALARM” Key to turn the alarm ON. The Alarm icon “((•))” will appear on the LCD. Press the “ALARM” Key again to turn the alarm OFF. The Alarm icon “((•))” will disappear from the LCD. Press the “ALARM” Key when the alarm is sounding to stop the alarm for 24 Hours. Set Alarm Time • • • • Press and Hold the “ALARM” Key until the hours digit flashes to set the alarm time. Alarm will sound once every 24 hours while active. Press the “+” Key to change the hour. “PM” will indicate a PM time, while no icon next to the time means AM time. Press the “ALARM” key again and the minutes digit will flash. Press the “+” key to change minutes. Page 13 of 25 Version 1.8 - 9/23/2008 • Press the “ALARM” key once more to return to normal display “+” Key Toggle Between Time, Date & Temperature • The “+” Key cycles through the date, seconds and indoor temperature on the top segment of the LCD View Outdoor Temperature • • Press the “+” key to view the current outdoor temperature from your synchronized wireless outdoor sensor. Because the “+” key is used to toggle between time, date and temperature, when you press the “+” key to view the outdoor temperature, you also switch to the next view mode on the top segment of the LCD. Simply press the “+” key until you are also viewing the desired mode: time, date or temperature. Manually Request a Weather Direct® Data Update • • • • When you register your Wireless Display, the weather data is updated within a few minutes. Every 6 hours after that, your Gateway will send weather data to update your Wireless Display. After changing the forecast location or other setting on the web site, it can be up to six hours for your next scheduled automatic update. After adding an Expansion Option to your Wireless Display, it can be up to six hours for your next scheduled automatic update. If you do not want to wait for your Wireless Display to update automatically, Press and Hold the “+” Key for 3 seconds until your Wireless Display beeps once. A second beep within a few seconds will signify that the Wireless Display has received the data. “SET” Key When ADD 4 LOCATIONS Expansion Option is Active Press the “SET” Key to toggle between the forecast locations on the Wireless Display when the ADD 4 LOCATIONS Expansion Option is active. The name of the location will appear briefly on the bottom of the LCD when it is selected. Weather data for up to 5 locations can be viewed on your Wireless Display. Page 14 of 25 Version 1.8 - 9/23/2008 Changing Settings on Your Wireless Display Press and hold the “SET” Key until the Wireless Display beeps to enter the SET mode. Press the “SET” Key to toggle through the four SET modes. If you wait for 5 seconds without pressing a key, the Wireless Display will exit the SET mode and return to normal operation. The Four SET modes are: Set Mode 1 – Set LCD Contrast (0-7) Press and Hold the “SET” Key until the Wireless Display beeps to enter the SET mode “LCD” and number (0-7) will flash near the top. “SET LCD CONTRAST” will scroll across the bottom Press the “+” Key to update the LCD Contrast settings. Lightest Contrast = “0”, Darkest Contrast = “7” Press the “SET” Key to save the current settings and advance to the next option Set Mode 2 – Enable Acoustic Weather Warnings (ON/OFF) NOTE: This SET mode is only available when the Severe Weather Alerts Expansion Option is active. In addition to the scrolling text of the Severe Weather Alerts, an Acoustic Weather Warning provides a beep to notify you of a weather condition. You can turn this beep off to silence this warning so only the text of the warning is displayed. To change the setting, follow the instructions below: Press the “SET” Key until “AAL ON” or “AAL OFF” flashes at the top and “ENABLE ACOUSTIC WEATHER WARNINGS” scrolls across the bottom Press the “+” Key to turn AAL “ON” or “OFF” Press the “SET” Key to save the current settings and advance to the next option NOTE: You can silence an Acoustic Weather Warning by pressing any Key. Set Mode 3 - Set Text Scrolling Speed (1-4) Press the “SET” Key until “Scr” flashes at the top and “SET SCROLL SPEED” scrolls across the bottom The standard speed is set to “2” Page 15 of 25 Version 1.8 - 9/23/2008 There are four speeds available – “1” is the slowest and “4” is the fastest Press the “+” Key to change the scroll speed. Press the “SET” Key to save the current settings and advance to the next option Set Mode 4 - View Device ID NOTE: Device ID is a reference item for customer service only. You may press the “SET” Key again to exit SET mode if you are not asked to provide this number by customer service. Press the “SET” Key until “SEC 1” appears at the top The first part of the Device ID will appear at the bottom Press the ‘+” Key to view second part of the Device ID under “SEC 2” Press the “SET” Key to exit SET mode Factory Reset of Wireless Display NOTE: It is not possible to re-register a previously registered Wireless Display under a new account until the Wireless Display has been deleted from the user account on www.weatherdirect.com and a Factory Reset has been performed. NOTE: Expansion Options that are Lifetime Upgrades are still active on your Wireless Display even if you delete it from your user account on www.weatherdirect.com or perform a Factory Reset. The selection of locations and other custom settings will need to be performed again if the Wireless Display is re-registered. WARNING: The Factory Reset procedure will erase any registration and setup information from your Wireless Display. You must register the Wireless Display again with www.weatherdirect.com to use it after a Factory Reset. WARNING: Deleting the Wireless Display from a user account on www.weatherdirect.com will erase the weather and other setup information such as forecast locations from the Wireless Display. If you have trouble registering your Wireless Display after multiple attempts, you can try a Factory Reset. If you wish to give your Wireless Display to someone else or simply to register it under a different user account, you must perform the Factory Reset to clear the registration information from the memory of the Wireless Display and delete the device from the user account on www.weatherdirect.com Page 16 of 25 Version 1.8 - 9/23/2008 Additional diagnostic and reset information, including how to reset the gateway (if necessary), is contained at www.weatherdirect.com/help TO PERFORM THE FACTORY RESET: Hold both the “SET” and “ALARM” Keys down together for about 6 seconds; you will hear a double beep. This resets the Wireless Display to the original factory state. FREE Trial of Expansion Options for 14 Days When you register your Wireless Display and have the included forecast location selected, you will be given the opportunity to try our most popular Expansion Options FREE for 14 Days! 14 Days of FREE Expansion Options, including: 1. 4 Additional Forecast Locations on your Wireless Display Four Additional Forecast Locations The standard Weather Direct® Wireless Display includes weather information for one location. - But what about the weather happening in other places that are important to you? In addition to your standard location, the Four Additional Locations Expansion Option allows you to monitor four more forecast locations on your Wireless Display, for a total of five. Press the “SET” Key on your Wireless Display to display the weather data for another forecast location. You can have up to five locations on your Wireless Display. Every press of the “SET” Key rotates through the list of available locations. Now you can keep an eye on the weather where your daughter goes to school, your favorite vacation spot, your parents’ house and more. Page 17 of 25 Version 1.8 - 9/23/2008 Severe Weather Alerts Keep your family safe with Severe Weather Alerts issued by the National Weather Service. This valuable information will help you prepare for upcoming weather events. Choose which types of severe weather events you want to receive. Even be alerted via e-mail or SMS text message when you are away from your Wireless Display! Severe Weather Alerts are available for either 1 year or 3 year periods that cover one forecast location. You can add up to 5 total alert locations if you also have the Add 4 Locations Expansion Option active. Severe Weather Alerts are available for any of our 40,000 places to choose from if you have the 40,000 Places Expansion Option active. Weather Direct® is not liable for any incidents that may occur as a result of any National Weather Service alert. This alert service is provided as a convenience to make you aware of a potential situation, not as a replacement for local severe weather warning system Page 18 of 25 Version 1.8 - 9/23/2008 Types of Severe Weather Alerts: Warnings Blizzard Heavy Rainfall Severe Thunderstorm Coastal Flood Heavy Snow Severe Wind Excessive Heat Heavy Snowfall Small Craft Flash Flood High Wind Special Marine Flood Hurricane Force Storm Freeze Ice Storm Tornado Frost Lake Effect Snow Weather Gale Lake Snow Wind Chill Heavy Rain River Flood Winter Storm Watches Coastal Flood Flood Lake Effect Snow Excessive Heat Freeze Lake Snow Flash Flood High Wind River Flood Advisories and Statements Blowing Dust Heat Tropical Storm Statement Blowing Snow Heavy Snow Urban And Small Stream Flood Dense Fog Hurricane Statement Urban Flood Freezing Drizzle Lake Effect Snow Wind Freezing Fog Small Stream Flood Wind Chill Freezing Rain Snow Winter Weather Frost Snow And Blowing Snow Page 19 of 25 Version 1.8 - 9/23/2008 Forecast Icons Explained There are two sets of icons presented on your Wireless Display, one for day and one for night. A sun appears on many of the day icons while a moon appears on many of the night icons. NOTE: Trace precipitation will not display droplets on the icon and “MEDIUM” conditions generally use the “HEAVY” icons to communicate weather events that are likely to affect your plans for the day. Page 20 of 25 Version 1.8 - 9/23/2008 Care and Maintenance • • • • • • • • • • • Extreme temperatures, vibration and shock should be avoided as these may cause damage to the unit and give inaccurate readings. Precautions shall be taken when handling the batteries. Injuries, burns, or property damage may be resulted if the batteries are in contact with conducting materials, heat, corrosive materials or explosives. The batteries shall be taken out from the unit before the product is to be stored for a long period of time. Immediately remove all low powered batteries to avoid leakage and damage. Replace only with new batteries of the recommended type. When cleaning the display and casings, use a soft damp cloth only. Do not use solvents or scouring agents as they may mark the LCD and casings. Do not submerge the unit in water. Furthermore, fix all parts in place where the units are adequately protected against moisture and rain. Special care shall be taken when handling a damaged LCD display. The liquid crystals can be harmful to user's health. Do not make any repair attempts to the unit. Return them to their original point of purchase for repair by a qualified engineer. Opening and tampering with the unit may invalidate their guarantee. Never touch the exposed electronic circuit of the device as there is a danger of electric shock should it become exposed. Do not expose the units to extreme and sudden temperature changes, this may lead to reduce their accuracy. Batteries are the single largest cause of customer support cases. Please use plain Alkaline batteries in the Wireless Outdoor Sensor testing no less than 1.48 on a voltmeter or with and expiration date 7 years in the future. Rechargeable “AA” batteries may be used in the Wireless Display, but NOT in the Wireless Outdoor Sensor. Battery Low Icons • • When the batteries need to be replaced in the Wireless Outdoor Sensor, the LCD will display the “TX” icon. When the batteries need to be replaced in the Wireless Display, the LCD will display the “RX” icon. Page 21 of 25 Version 1.8 - 9/23/2008 Battery Replacement We recommend that you replace the batteries in all units regularly to ensure optimum accuracy of these units. Please see the battery life in the specifications below. Help us to keep our environment clean. Return used batteries to an authorized depot. Troubleshooting Visit www.weatherdirect.com/help for information on troubleshooting. Specifications Temperature Range Indoor Range: 14.1°F to 100°F (-9.9°C to 37.7°C) Outdoor Range: -39.8°F to +139.8°F (-39.8°C to 59.8°C) Update Interval: Every 4.5 seconds Battery Life Wireless Display (without Severe Weather Alerts Activated): Up to 2 Years Wireless Display (with Severe Weather Alerts Activated): Up to 15 Months Wireless Outdoor Sensor: Up to 2 Years Dimensions Wireless Display: 5.25” L x 1.125” W x 5.625” H Wireless Gateway: 6.63" L x 1" W x 1.56" H Wireless Outdoor Sensor: 1.5" L x .83" W x 5.05" H Weather Direct® Update Rate Every 6 Hours Weather Direct® Wireless Range Up to 330 Feet (open air) Power Requirements NOTE: Rechargeable batteries are not recommended due to the wide variation in performance between brands and types. Please use only fresh Alkaline batteries. Page 22 of 25 Version 1.8 - 9/23/2008 Wireless Display: 3 “AA” Batteries Alkaline or Rechargeable (not included) Wireless Gateway: Included AC Adapter & LAN Cable Wireless Temperature Sensor: 2 “AA” Alkaline Batteries (not included) Liability Disclaimer • • • • • The manufacturer and supplier cannot accept any responsibility for any incorrect readings and any consequences that occur should an inaccurate reading take place. This product is designed for use in the home only as indication of the temperature and weather forecast for the selected location. This product is not to be used for medical purposes or for public information. The specifications of this product may change without prior notice. This product is not a toy. Keep out of the reach of children. FCC Statements Statement according to FCC part 15.21: Modifications not expressly approved by this company could void the user's authority to operate the equipment. Statement according to FCC part 15.105: NOTE: This equipment has been tested and found to comply with the limits for a Class B digital device, pursuant to Part 15 of the FCC Rules. These limits are designed to provide reasonable protection against harmful interference in a residential installation. This equipment generates, uses and can radiate radio frequency energy and, if not installed and used in accordance with the instructions, may cause harmful interference to radio communications. However, there is no guarantee that interference will not occur in a particular installation. If this equipment does cause harmful interference to radio or television reception, which can be determined by turning the equipment off and on, the user is encouraged to try to correct the interference by one or more of the following measures: • Reorient or relocate the receiving antenna. • Increase the separation between the equipment and receiver. • Connect the equipment into an outlet on a circuit different from that to which the receiver is connected. • Consult the dealer or an experienced radio/TV technician for help. RF Exposure: This device is a very low power transmitter. There are no restrictions regarding RF Exposure requirement. Page 23 of 25 Version 1.8 - 9/23/2008 Warranty Information La Crosse Technology, Ltd provides a 1-year limited warranty on this product against manufacturing defects in materials and workmanship. This limited warranty begins on the original date of purchase, is valid only on products purchased and used in North America and only to the original purchaser of this product. To receive warranty service, the purchaser must contact La Crosse Technology, Ltd for problem determination and service procedures. Warranty service can only be performed by a La Crosse Technology, Ltd authorized service center. The original dated bill of sale must be presented upon request as proof of purchase to La Crosse Technology, Ltd or La Crosse Technology, Ltd’s authorized service center. La Crosse Technology, Ltd will repair or replace this product, at our option and at no charge as stipulated herein, with new or reconditioned parts or products if found to be defective during the limited warranty period specified above. All replaced parts and products become the property of La Crosse Technology, Ltd and must be returned to La Crosse Technology, Ltd Replacement parts and products assume the remaining original warranty, or ninety (90) days, whichever is longer. La Crosse Technology, Ltd will pay all expenses for labor and materials for all repairs covered by this warranty. If necessary repairs are not covered by this warranty, or if a product is examined which is not in need of repair, you will be charged for the repairs or examination. The owner must pay any shipping charges incurred in getting your La Crosse Technology, Ltd product to a La Crosse Technology, Ltd authorized service center. Your La Crosse Technology, Ltd warranty covers all defects in material and workmanship with the following specified exceptions: (1) damage caused by accident, unreasonable use or neglect (including the lack of reasonable and necessary maintenance); (2) damage occurring during shipment (claims must be presented to the carrier); (3) damage to, or deterioration of, any accessory or decorative surface; (4) damage resulting from failure to follow instructions contained in your owner’s manual; (5) damage resulting from the performance of repairs or alterations by someone other than an authorized La Crosse Technology, Ltd authorized service center; (6) units used for other than home use (7) applications and uses that this product was not intended or (8) the products inability to receive a signal due to any source of interference. This warranty covers only actual defects within the product itself, and does not cover the cost of installation or removal from a fixed installation, normal set-up or adjustments, claims based on misrepresentation by the seller or performance variations resulting from installation-related circumstances. LA CROSSE TECHNOLOGY, LTD WILL NOT ASSUME LIABILITY FOR INCIDENTAL, CONSEQUENTIAL, PUNITIVE, OR OTHER SIMILAR DAMAGES ASSOCIATED WITH THE OPERATION OR MALFUNCTION OF THIS PRODUCT. THIS PRODUCT IS NOT TO BE USED FOR MEDICAL Page 24 of 25 Version 1.8 - 9/23/2008 PURPOSES OR FOR PUBLIC INFORMATION. THIS PRODUCT IS NOT A TOY. KEEP OUT OF CHILDREN’S REACH. This warranty gives you specific legal rights. You may also have other rights specific to your State. Some States do not allow the exclusion of consequential or incidental damages; therefore the above exclusion of limitation may not apply to you. Support services are limited to the WD-2513 system components supplied and usage of the weather direct web site. Any other computer system components or Internet communication configurations (e.g. the computer, network, router, Internet browser, ISP service, etc.) are outside of the scope of our services. For warranty work, technical support, or information contact: Hours: Mon-Fri. – 8:00 AM to 5:30 PM Central e-mail: [email protected] La Crosse Technology, Ltd 2817 Losey Blvd. S. La Crosse, WI 54601 Phone: 608.785.7935 Fax: 608.796.1020 For information on other La Crosse Technology® products, e-mail: [email protected] All rights reserved. This handbook must not be reproduced in any form, even in excerpts, or duplicated or processed using electronic, mechanical or chemical procedures without written permission of the publisher. This handbook may contain mistakes and printing errors. The information in this handbook is regularly checked and corrections made in the next issue. We accept no liability for technical mistakes or printing errors, or their consequences. All trademarks and patents are acknowledged. Page 25 of 25