1
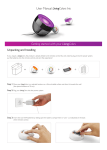
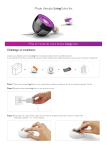
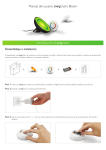
User Manual LivingColors Bloom
Getting started with your LivingColors
Unpacking and Installing
If you unpack a LivingColors, the product is already linked to the remote control. You only need to plug it into the power system,
put the batteries into the remote control and start the experience!
=
+
+
+
Step 1: Place your LivingColors in a selected location on a flat and stable surface and direct it towards the wall
(the optimal distance is 50 cm).
Step 2: Plug your LivingColors into the power system.
Step 3: Insert the two AAA-batteries by sliding open the battery compartment (+ and – as indicated) on the back
of the remote control.
Basic functionality
Switch the LivingColors “On” or “Off”:
Your LivingColors can be switched “On” and “Off ” by using the “I”- and “0”-button on the remote control.
If you switch the LivingColors “Off ”, it will remember your last setting for the next time you use it.
Colour selection:
To let your LivingColors change to whatever colour you like, simply rotate the colour wheel (rotary wheel at the centre of the remote
control) until you have found the right colour. If you rotate the wheel quickly, the colours will change quickly. If you rotate slowly,
the colours will change slowly and you can really fine-tune them.
Dimming:
Increase or decrease the light intensity by pressing the colour wheel on the top and bottom position.
Colour intensity (saturation):
If you want to add more white to your current colour or make your colour intense (saturated) again, you can easily change the colour
intensity (saturation). Just press the colour wheel on the left (more white) or right (more colour) position. If you keep pressing on the left
position, you will ultimately reach white.
Discovering your LivingColors
Extended functionality
Automatic Colour Change Mode:
You can also let your LivingColors change colours automatically. You can even choose how fast you want it to go through the whole colour
spectrum.
Sweep your finger clockwise around the colour wheel (one full circle, 360) and briefly press on “I” (“On”) to get into the Automatic
Colour Change Mode. The LivingColors will now start looping through the colours.
Change the speed of the Automatic Colour Change Mode stepwise (20 steps in total) by sweeping the colour wheel clockwise (to go
faster) or anticlockwise (to go slower) for 90° during the time that the Automatic Colour Change Mode is on.
While the Automatic Colour Change Mode is on, you can also adjust the saturation and brightness of the colours. To switch back to the
one colour mode, sweep your finger clockwise around the colour wheel and press “0” (“Off ”). Alternatively, you can switch lights off “0”
and on “I” again.
360°
+
360°
+
Favourite Buttons:
With your LivingColors you can store your two favourite colours for easy recall.
To store your favourite colour, first select it using the colour wheel (and dimming/colour intensity) on the remote control. Then press and
hold one of the Favourite Buttons until the LED indicator (hidden underneath the intensity up symbol) blinks (this will take +/- 5 seconds). Your favourite colour is now stored under the Favourite Button (1 or 2) that you have pressed. Whenever you want to go back to
your favourite colour, just press one of the Favourite Buttons. The LivingColors will now show your favourite colour.
You can also store a particular Automatic Colour Change Mode in this way.
=
5 sec
LED
=
5 sec
LED
How to use multiple LivingColors?
Connecting multiple Philips LivingColors
If you have multiple LivingColors at home, you can all use them with just one remote control. To connect the different LivingColors to the
same remote control, follow the instructions below.
Hold the remote control close against the Philips logo on the lens of the product, then press and hold the “I” button. The product will
flash 3 times. Hold the “I”-button until the LivingColors displays a green light. It is now connected to the remote control.
10sec
=
max 5cm
Repeat this procedure for every product you want to add to this remote control. After connecting all of the products to the remote
control, you will be able to let them all change colour at the same time. The same colour will be displayed by all of your LivingColors
products by only using one remote control.
products to your remote control (50 products maximum). If the logo is not on the
Note: You can only connect/add other
packaging/product, the product cannot be added to the system. For the LivingAmbiance luminaires, please make sure that you connect
both the coloured light (top of the shade) and white light (at the foot or ceiling plate).
Disconnecting multiple Philips LivingColors (optional)
If you connect another remote control to the same luminaire, it will be automatically disconnected from the first remote control (unless
the two remotes were connected first - see further).
Alternatively, you can disconnect a remote control from a luminaire as follows: Hold the remote control against the Philips logo on
the lens of the product, then press and hold the “0”-button. The product will flash 3 times. Hold the “0”-button until the LivingColors is
switched off automatically. The LivingColors is now disconnected.
10sec
=
max 5cm
Connecting additional Remote Controls
You can control the same products with several remote controls. This is convenient if, for example, you want to leave one remote control
in the kitchen and another one in the living room.
Step 1: Always reset the additional remote control first. Open its battery compartment and press the RESET button for a few seconds.
The LED indicator will blink once (hidden underneath the intensity up symbol). The remote control has now been reset.
Step 2: Hold the additional remote control close to your current remote (the “I”-buttons pointing at each other). Press the “I” buttons
simultaneously on both remotes while the LED indicators on the remote controls blink intermittently. When they stop blinking, the two
remotes are connected to the same network.
10 sec.
=
Step 3: You still need to connect the additional remote to the LivingColors. If you have two round remotes, you can do it easily by repeating the above action (bring two remotes close, then press on “I” until they stop blinking intermittently). This action needs to be done
directly after connection of the additional remote control. The additional remote is now connected to the same lights as the first remote
control.
10 sec.
=
What to do if your LivingColors is not responding properly?
Solution 1: Perform LivingColors and battery check
1.
2.
3.
4.
Unplug your LivingColors from the power network, plug it back in and check whether it reacts to the remote control.
Remove and reinsert batteries. The batteries should be correctly placed and inserted (+ and -). Check if batteries are charged.
If the remote control is still not working, try replacing the batteries.
If necessary, connect the remote control to the LivingColors again (same way as connecting multiple LivingColors to
one remote control).
10sec
=
max 5cm
Solution 2: Perform a channel switch
In rare cases, problems with the connection between your LivingColors and the remote control could be caused by heavy traffic on the
wireless network (e.g. a wireless router). Try moving the light away from the router or follow below procedure. Make sure that all LivingColors connected to the remote control are switched on, otherwise they will not respond after this action.
For the round remote control (with mechanical wheel), simultaneously press the “I”-button and “Favourite 2”-button for 5 seconds.
For the round remote control (with touch control), simultaneously press the “I”-button and “Scene 3”-button for 5 seconds.
For the long oval remote control, simultaneously press the “0”-button and saturation up button for 5 seconds.
The LivingColors will show an orange and then a green light for 1 second and then they revert to their previous setting. White lights
(LivingWhites) first blink once, then rapidly blink twice and revert to previous setting.
Solution 3: Reset the remote control
Open the remote control’s battery compartment and press the RESET button for a few seconds (e.g. with a paper clip). Make sure that
the batteries are in. After this action, you need to reconnect your LivingColors to the remote control.