1
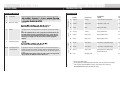
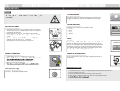
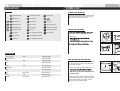
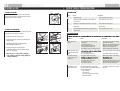
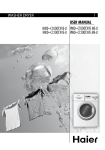
CONDENSER TUMBLE DRYER
USER MANUAL
HD80-01-U/HD80-01ME-U
Time
Very dry
Synthetic
Damp
Normal
7KG
Power
4-8
TABLE OF CONTENTS
9 - 15
16 - 18
COMPONENTS
BEFORE USE
3
THANKS FOR PURCHASING A HAIER PRODUCT
BEFORE USE
USING THE DEVICE
MAINTENANCE
Components . . . . . . . . . . . . . . . . . . 3
Program selection . . . . . . . . . . . . . 9
Cleaning & care . . . . . . . . . . . . . . 15
Preparation . . . . . . . . . . . . . . . . . . 4
Consumption & technical data . . . . 10
Display codes & troubleshooting . . . 17
Safety instructions . . . . . . . . . . . . . 5
Drying methods . . . . . . . . . . . . . . 11
Electric circuit diagram . . . . . . . . . . 18
Please read these instructions carefully before using this
device. The instructions contain important information which
will help you get the best out of the device and ensure safe
and proper installation, use and maintenance.
If you sell the device, give it away,
y or leave it behind when you
move house, make sure you also pass on this manual so that
the new owner can become familiar with the device and safety
warnings.
Keep this manual in a convenient place so you can always
refer to it for the safe and proper use of the device.
Installation. . . . . . . . . . . . . . . . . . . 6
Control panel . . . . . . . . . . . . . . . . . 7
LEGEND
Ys
Ye
No
ACCESSORIES
Optional
y any instructions in this manual with this "warning" sign must be
For your safety,
followed strictly.
Check the accessories and literature in accordance with this
list:
1x User manual
DISPOSAL
Do not dispose of electrical appliances as unsorted municipal waste, use separate collection facilities. Contact
your local government for information regarding the collection systems available. If electrical appliances are
chain, damaging your health and well-being.
When replacing old appliances with new ones, the retailer is legally obligated to take back your old appliance
for disposals at least free of charge.
1 Drainpipe
4
PREPAR ATION
BEFORE USE
PREPA
P RING THE TUMBLE DRYER
BEFORE USE
SAFE T Y INSTRUC TIONS
5
BEFORE SWITCHING THE DEVICE ON FOR THE FIRST TIME
Remove all the packing materials to prevent unsteadiness, including the polystyrene
base.
DESCRIPTION
Control panel
Drainage outlet
Tumble dryer door
Back plate
Water collection tank
Power cord
Service door for condenser
DO ...
... ensure that the device is installed and electrically
to local codes to prevent shock hazard and assure
stability during operation.
... install this tumble dryer properly in accordance with
the installation instructions before use.
... keep surrounding areas free from accumulation of
lint,t dust and dirt.
... use a separate earthed socket for the power supply.
... ensure that the electrical system meets the requirements laid out in the installation part of this manual.
Screw foot
DO NOT ...
... install or store this device outdoors in a damp place,
or in an area which may be prone to water leaks such
as under or near a sink unit. In the event of a water
leak allow the device to dry naturally.
... operate the tumble dryer if any parts are missing
or broken.
and liquids in the vicinity to the device.
... use an adaptor plug or extension cord.
... connect the device to the power supply until installation is complete.
... repair or replace any part of the appliance or
in the user-maintenance instructions or in published
user-repair instructions that you understand and have
skills to carry out.
DURING DAILY
L USE OF THE DEVICE
Synthetic
Power
This diagram may be slightly different from the layout of the tumble dryer you have
just purchased due to technical improvements.
DO ...
... wait until the tumble dryer has stopped completely
before reaching into the drum to prevent injury. Never
reach into the tumble dryer when the drum is moving.
... clean lint screen before or after each load.
DO NOT ...
... sit on top of the tumble dryer.
... remove the tumble dryer door to prevent accidental
entrapment before the device is removed from service.
... unplug the device before carrying out any maintenance or repair. Hold the plug and not the electric
cable when unplugging the power supply.
... wash items that have been soiled with substances
such as cooking oil, acetone, alcohol, petrol, kerosene,
spot removers, turpentine, waxes and wax removers
in hot water with an extra amount of detergent before
being dried in the tumble dryer.
... ensure that the device is not used by persons with
reduced physical, sensory or mental capabilities, lack
of experience and knowledge without supervision or
instruction by a person responsible for their safety.
... supervise children to ensure that they do not play
with the device.
... dry items such as foam rubber (latex foam), shower
caps, waterproof textiles, rubber backed articles and
... tamper with controls.
... dry unwashed items in the tumble dryer.
... dry items that have been previously cleaned in,
washed in, soaked in, or spotted with gasoline,
cleaning solvents, kerosene, waxes, etc. Do not store
these items spotted with gasoline, cleaning solvents,
kerosene, waxes, etc. on or near the tumble dryer.
These substances give off vapours that could ignite or
explode.
... use heat to dry items containing plastic, foam, rubber or similarly textured rubber-like materials or items
... stop a tumble dryer before the end of the drying
cycle unless all items are quickly removed and spread
out so that the heat is dissipated.
6
INSTALLATION
BEFORE USE
BEFORE USE
CONTROL PANEL
BASIC INSTRUCTIONS
I
H
7
J
To ensure the tumble dryer operates normally,
y attention must
be paid to the following instructions:
Time
¬ The tumble dryer must be level when installed. It’s bottom is equipped with adjustable feet. Adjust these 4 feet
to level the device before operation.
¬ Check whether any damage occurred to the tumble dryer
during transportation. A damaged tumble dryer must not
be used. If the device is damaged, contact your supplier.
¬
substances.
¬ The surrounding environment must be dry and ventilated.
¬ To allow the tumble dryer to perform better,r the ambient
temperature shall not be lower than 10 °C nor higher than
35 °C.
Clean
filter
DRAIN SWITCHOVER
During the drying of the laundry,
y the condensate water is
automatically collected in the water collection tank inside the
tumble dyer,r so that the water needs to be removed from
the tank after every drying cycle. If your tumble dryer is in
the vicinity of a drain, you may allow the condensed water
to discharge directly into the drain through the drainpipe
provided to avoid emptying the tank every time.
The method to connect the drainpipe is as follows:
1.
2.
3.
4.
Long Anti-crease
G
F
E
Signal
D
Damp
Damp
Normal
Normal
Wool
Very dry
Cool
Synthetic
Power
Start/pause
C
Anti-crease button
Delicate button
Delay button
Maintenance displays
B
A
I Display
J Maintenance displays
1
2.
A
¬ Power button
_ Press this button to turn the tumble dryer on and off.
B
¬ Program knob
_ Turn this knob to choose the desired drying program. This type of tumble dryer has 10
¬ Start/
t Pause button
9. When the drying program is selected, the relevant indicator light is on.
_ Press this button to start the tumble dryer. Press this button again during the operation of
D
¬ Signal button
_
E
¬ Anti-crease button
F
¬ Delicate button
C
dyer will pause. Press the button again and the program will continue.
3.
4.
L
CONNECTING TO THE POWER SUPPLY
Before connecting to the power supply,
y check:
¬ The socket is adequate for the maximum power of the
y fuses in the power circuit should
tumble dryer (For safety,
be rated for no less than 15A).
¬ The voltage should meet the requirement.
¬ The power outlet should be capable of accepting the
tumble dryer plug.
¬ Connect the device to an earthed socket outlet.
Delicate
20min
OPERATIONAL FUNCTIONS
Draw the drainpipe from the joint.
Insert the drainpipe on the fixture.
Take out the accessory drainpipe.
Fix the drainpipe at the place of the joint.
Note: The outlet of the drainpipe
p must not be
E
F
G
H
Power button
B Program knob
C Start/
t Pause button
D Signal button
Delay
Cotton
Very dry
30min
button to cancel the buzzer sound.
_ If this additional function is selected, the anti-crease phase at the end of the drying cycle is
lengthened by 60 minutes. The laundry can be removed at any time during the anti-crease
phase.
_ During a program, the drying temperature and power will decrease and the drying time will
increase to take better care of the delicate laundry.
8
CONTROL PANEL
BEFORE USE
OPERATIONAL FUNCTIONS
G
¬ Delay button
USING THE DEVICE
PROGRAM SELECTION
PROGRAM MODES
_ Press this button repeatedly before starting the program to enter the time you want the
J
¬ Display
¬ Maintenance displays
_
(see section "cleaning & care" on page 15).
E +F ¬ Combined buttons for
child lock function
_
By pressing the "anti-crease" and "delicate" buttons for 3 seconds after having started a
program, the button lock is activated. The display shows the remaining program time and
the lock alternatively. In order to cancel the button lock, press the two buttons again for 3
seconds.
Caution: When the program ends or the power supply is interrupted during a program, the child lock function will release.
Timer
I
_ The display shows the remaining program time, the delay time and other related informa
tion.
Note: The remaining time to start a program is the default time for the
program. During operation, with variation of factors such as the mois
ture content. The actual remaining time will be automatically adjusted until the preset drying result has been achieved and the program is
complete.
Cotton / Linen
densed
water tank (see section "cleaning & care" on page 15).
Synthetics
_ Clean tank
Special
¬Maintenance displays
DRYING DEGREE
RECOMMENDED
L AUNDRY
M A X.
LOA D
1 ¬ Very dry
Extra dry
Heavy cotton fabrics, sheets, gowns
8 kg
*)
2 ¬ Normal
Ready to wear
Cotton fabrics, sheets, coats
8 kg
3 ¬ Damp
Damp
Ordinary cotton fabrics
8 kg
4 ¬ Very dry
Extra dry
Heavy synthetic fabrics
4 kg
5 ¬ Normal
Ready to wear
Ordinary synthetic fabrics
4 kg
6 ¬ Damp
Ready to iron
Ordinary synthetic fabrics
4 kg
7 ¬ 30 min.
Timer 30 min.
Heavy fabrics, needing further drying
8 kg
8 ¬ 20 min.
Timer 20 min.
Heavy fabrics, needing further drying
8 kg
9 ¬ Wool **)
Ready to wear
Special programme for briefly treating
woollens with warm air
1 kg
10 ¬ Cool
Refreshing/airing
/
8 kg
P R O GR A M
19 hours, the delay time will turn off. After the delay is set, press the "start/pause" button
H
9
* ) EN 61121 test program setting.
**) Special programme for briefly treating woollens with warm air after they have been dried naturally,
worn or stored for long periods.Wool fibres stand up and the wool becomes soft and cosy.
Recommendation:Remove fabrics immediately after drying.
10
USING THE DEVICE
USING THE DEVICE
DRYING METHODS
CONSUMPTION & TECHNICAL DATA
CONSUMPTION TABLE
The drying cycle times are intended as a guide only. The actual time used may vary due to different local circumstances.
Cotton / Linen
1
2
3
Synthetics
4
5
6
Timer
7
8
Special
PROGRAM
9
10
¬
¬
¬
¬
¬
¬
¬
¬
¬
¬
LOAD
Very dry
)
Normal *
Damp
Very dry
Normal
Damp
30 min.
20 min.
Wool
cool
8 kg
8 kg
8 kg
4 kg
4 kg
4 kg
8 kg
8 kg
1 kg
8 kg
ENERGY
CONSUMPTION
DRYING
TIME
4.79 kWh
4.49 kWh
3.45 kWh
1.98 kWh
1.68 kWh
1.15 kWh
0.90 kWh
0.60 kWh
0.65 kWh
0.10 kWh
150 min
140 min
130 min
130 min
120 min
110 min
30 min
20 min
25 min
30 min
PLEASE NOTE
This tumble dryer is for domestic use only. Do not use it for purposes other
than that for which it was designed. Follow the instructions given on the
label of each garment and dry only machine-dryable garments.
PREPARATION
¬ Before use, clean any deposits from inside the drum of the tumble dryer with wet
cloth.
¬
POWER SUPPLY
Connect the tumble dryer to the power supply (220V to 240V~/50Hz).
*) EN 61121 test program setting.
BEFORE TURNING ON POWER
TECHNICAL DATA
HD80-01-U/HD80-01ME-U
Power source
220 - 240 V / 50 Hz
Max. working current (A)
12
Nominal load (kg)
8
Drying programs
10
Max. power (W)
2700
Dry heating power (W)
2500
Dimensions (HxDxW mm)
850x620x595
Net weight (kg)
42
Waterproofl evel
IPX4
Before turning on the power for the tumble dryer, please check.
¬ Whether the supply voltage is in accordance with the value indicated on the
nameplate.
¬ Whether the supply receptacle can withstand the maximum power load to the
tumble dryer.
¬ Whether the supply receptacle is in accordance with the plug of the tumble dryer.
If not, replace the power cord or receptacle to make them accord with each other.
our authorized service agent.
11
12
DRYING METHODS
USING THE DEVICE
USING THE DEVICE
13
WARNING
SELECTING PROGRAM
Do not dry silk, down and other delicate fabrics to avoid damage to
the laundry.
To get the best drying results, an appropriate drying program should be selected
according to the laundry type. Please turn the program knob to select the right
program.
SELECTING FUNCTIONAL
PREPA
P RING THE LAUNDRY
Drying
According to your requirements, select the additional function:
¬ Start delay
¬ Delicate
¬ Anti-crease
¬ Signal off
¬ Check whether the laundry to be dried is suitable to be dried in the tumble dryer.
¬ The tumble dryer can only dry the laundry that has been spun dry. Do not put too
wet laundry into the tumble dryer.
¬ Empty pockets from keys, coins, etc., remove lighters, matches and harder
decorative objects (e.g. brooches) and remove adornment that is not suitable to
be dried.
¬ Close zippers and hooks, make sure the buttons are sewn on tightly and place
small items such as socks, belts, bras, etc. in a mesh bag.
¬ Unfold large pieces of fabric such as bed sheets, bedspreads, etc.
Delay
Press the "start/
t pause" button. The tumble dryer will operate according to the pre-set
programs. The tumble dryer will stop operation automatically when a drying cycle
ends. The "end" sign will appear on the display. Open the tumble dryer door and take
out the laundry. If the laundry is not removed, the tumble dryer will start the anticrease protection automatically. During the anti-crease protection cycle, the tumble
dryer's drum will run at intervals to keep your laundry loose.
TURNING OFF THE TUMBLE DRYER
¬ Laundry should be spun as dry as possible in order to save energy.
¬ Make sure that the laundry you are going to dry is suitable for drying in a tumble
Press the power button to cut off the power supply and unplug the tumble dryer at
the wall socket.
¬ Place the laundry evenly into the drum after shaking it loose.
¬ Make sure not to overload the tumble dryer.
¬
softener instructions.
Press the key,the dryer will be automatically energized.
Delicat e
Anticrease
Signal
DRYING
LOADING THE TUMBLE DYER
switch on the power supply
Ready
Antit o iro n Airin g crease
TIPS FOR SAVING ENERGY
Power
1.
2.
3.
4.
5.
6.
Spin the laundry as dry as possible in the washing tumble dyer before putting it into the tumble dryer.
Avoid overloading the tumble dryer.
Shake the laundry and make it loose before loading it into the tumble dryer.
Choose a proper drying program. Make sure the laundry in not dried longer than needed.
Clean the condenser once a month.
Start/pause
14
DRYING METHODS
USING THE DEVICE
CARE CHART
CLEANING & CARE
15
MAINTENANCE
CLEANING THE TUMBLE DRYER
Wipe the body of the tumble dryer and the control panel with
a damp cloth. Remember not to use any organic solvent or
corrosive agent to avoid damage to the device.
Resistant material
Bleachable in cold water
Delicate fabric
Do not bleach
Washable at 95 °C
Iron at 200 °C
Hung to dry
Washable at 60 °C
Iron at 150 °C
Dry on clothes hanger
Washable at 40 °C
Iron at 100 °C
Tumble dry, normal heat
Washable at 30 °C
Don't iron
Tumble dry, reduced heat
CLEANING THE FILTER SCREEN
Hand wash
Dry cleaning with any solvent
Don't tumble dry
e
must be cleaned after every drying program is complete.
Dry clean only
Dry cleaning with pericloride
Wool Seal
Dry cleaning with aviation fuel
Don't dry clean
1. Open the door.
2.
3. O
4.
LOAD REFERENCE
Bed sheet (single)
C ot t o n
Approximately 800g
B l e n d e d f a b r i c c l ot h e s
/
Approximately 800g
Jackets
C ot t o n
Approximately 800g
Jeans
/
Approximately 800g
O ve r a l l s
Cot t on
Approximately 950g
During operation, steam condenses into water and is collected
in the water collection tank. Empty the water collection tank
after the program is complete.
L adies pyjamas
/
Approximately 200g
1. Hold the handle and pull the tank outwards to remove it.
Shir t s
/
Approximately 300g
Sock s
Blended fabrics
Approximately 50g
T-Shirts
Cot t on
Approximately 300g
2. Pour away the water. Put the tank back in place.
Note: Do not use the water for drinking or for
food processing.
Underwear
Blended fabrics
Approximately 70g
1.
2.
3.
4.
1.
2.
EMPTYING THE WATER COLLECTION TANK
If the tank has not been emptied, the tumble dryer will sound
an alarm every time the tank is full. In that case the indicator
light turns on and the tumble dryer will pause. It will not
restart until the tank is emptied and replaced.
16
CLEANING & CARE
MAINTENANCE
MAINTENANCE
DISPLAY CODES & TROUBLESHOOTING
CLEANING THE DRUM
17
DISPLAY CODES
After the tumble dryer has operated for a time, fabric caring
agents or calcium contained in the water will form an almost
invisible layer on the inside of the drum.
CLEANING THE CONDENSER
The condenser must be cleaned monthly. Switch off the power
supply and remove the plug before cleaning:
CODES
C AUSES
S OL U T IONS
_ Please contact the service center.
F2
¬ Drain pump error.
F3
¬ The thermal sensor(near the filter) is open-circuited or
short-circuited.
F4
¬ Temperature of the laundry in the drum does not change.
_ Please contact the service center.
F6
¬ The filter is full.
_ Clean the filter.
F9
¬ The thermal sensor(near the heater) is open-circuited or
short-circuited.
_ Please contact the service center.
_ Please contact the service center.
TROUBLESHOOTING
1. Unlock the maintenance flap and open it.
2. Screw both locking levers towards each other,Pull out the
handle/air cooler.
1.
2.
3.
4.
3. Thoroughly clean the handle/air cooler,allow all the
water to drip out,then clean the seals.
4. Re-insert the handle/air cooler,handle below,
unscrew both locking levers,close the maintenance flap
until it locks into position.
Note: Do not use a sharp tool cleaning the
heat exchanger, otherwise it may damage its
sealing performance.
PROBLEM
C AUSES
Tumble dryer fails to
operate.
¬ Poor connection to the power supply.
¬ Power failure.
¬ No drying program is set.
¬ Device has not been switched on.
¬ The water collection tank is full.
¬ The tumble dryer door is not properly closed.
Tumble dryer fails to operate and the display shows
"End".
by the program setting.
¬ There is no laundry in the drum.
Drying time is too long
and the results are not
satisfactory.
¬ The program setting is not correct.
Remaining time on the
display stops or skips.
The remaining time will be adjusted and
corrected continuously and automatically based
upon the following factors:
¬ Type of laundry.
¬ Loaded amount.
¬ The degree of spinning dry of laundry.
¬ Ambient temperature.
¬ The condenser is blocked.
¬ The tumble dryer is overloaded.
¬ The laundry is too wet.
¬ The vent duct is blocked.
SOL U T IONS
_ Check connection to the power supply.
_ Check the power supply.
_ Make sure a drying program has been set.
_ Make sure the device is switched on.
_ Empty the water collection tank.
_ Close the tumble dryer door properly.
_ Check if your program setting is appropriate.
_ Check if there's laundry in the drum.
_ Make sure the program is set correctly.
_
_ Clean the condenser.
_ Reduce the amount ofl aundry in the drum.
_ Spin the laundry properly before drying.
_ Check the vent duct and unblock it.
_ The automatic adjustment is a normal
operation.
18
MAINTENANCE
ELECTRIC CIRCUIT DIAGRAM
ELECTRIC CIRCUIT DIAGRAM
NTC1
NTC2
R1:
R2:
L:
PCB1, PCB2:
Heating1
Heating2
Lamp
Printed circuit board
T1:
NTC1:
NTC2:
PS:
Thermal cut-out
Temperature sensor
Temperature sensor
Drainage pump
K1:
K2:
H:
M:
Door switch
Water level switch
Humidity sensor
Motor
BS PLUG SAFETY DETAILS (FOR U.K. USER)
This appliance must be earthed. As the colours of the wires in the mains lead of this
apparatus may not correspond with the coloured markings identifying the terminals
in your plug, proceed as follows: The green and yellow wire must be connected to the
terminal in the plug marked E or by the earth symbol or coloured green or green
and yellow. The wire coloured blue must be connected to the terminal marked with
the letter N or coloured black. The wire coloured brown must be connected to the
terminal marked with the letter L or coloured red. If a 13 amp (BS 1363) plug is used,
Green and
yellow (Earth)
Brown (Live)
Blue (Neutral)
E
L
Fuse
N
Cord grip
Haier Europe Trading S.r.l.
Via De Cristoforis 12
21100 Varese - Italy
Tel + 39 0332 24511
Fax +39 0332 245146
E-mail [email protected]