1
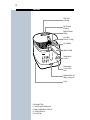
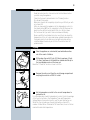
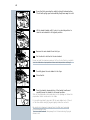
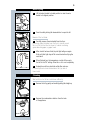
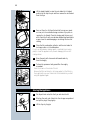
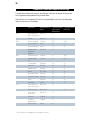
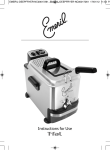
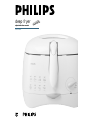
deep fryer
adjustable thermostat
HD6122
IMPORTANT SAFEGUARDS
When using electrical appliances, basic safety precautions
should always be followed including the following:
Read all instructions before using.
1. This appliance uses hot oil; it is very important to
make sure the unit is placed in a safe place while in
use or while the oil is still hot.
2. Extreme caution must be used when moving the
Deep Fryer containing hot oil or other hot liquids.
Do not move the Deep Fryer while cooking.
3. Close supervision is necessary when the appliance
is in use or when the oil is hot.
4. Do not touch hot surfaces.Always use oven mitts
when handling hot surfaces; and allow metal parts
to cool before cleaning.
5. Let the Deep Fryer cool completely before moving
it on or off the counter, before putting on or taking
off parts, before cleaning or before putting away.
6. Unplug the Deep Fryer from electrical outlet when
the unit is not in use and before cleaning. Make sure
the temperature control is turned to "M" position,
then remove plug from electrical outlet.
7. To protect against electrical shock, do not
immerse the Deep Fryer, cord or plug in water
or other liquids.
8. This appliance should not be used by children.
Close supervision is always necessary when this or
any other appliance is used by or near children.
9. Make sure the cord is not loose nor presents the
possibility of someone tripping over it.
10. Do not operate this appliance with a damaged cord
or plug, or after the appliance malfunctions, or has
been damaged in any manner; return the Deep Fryer
to the retail location where it was purchased for
examination, repair, or adjustment.
11. Use this appliance only for its intended use as
described in this manual. Do not use accessory
attachments not recommended by Philips Electronics
North America Corporation as they may cause fire,
electrical shock or injury.
12. Do not use outdoors or operate where oxygen is
being administered or in the presence of explosive
and/or flammable fumes.
13. Do not let cord hang over edge of table or counter,
or contact hot surfaces.
14. Do not place on or near a hot gas or electric burner,
or in a heated oven.
15. This appliance is intended for household use ONLY;
it is not for commercial or industrial use.
16. Any service of the Deep Fryer should be performed
by the retail location where it was purchased.
17. Do not place any items on top or next to this
appliance at any time.To prevent a fire, keep this
appliance clear of contact with any flammable
materials including curtains, draperies, walls, plastic
materials, etc., at all times.
18. Do not place any flammable materials in or close to
the Deep Fryer, such as paper, cardboard or plastic.
19. Oversized foods must not be inserted into the
Deep Fryer as they may create a fire. Do not overfill
the fry basket.
20. Do not use with an extension cord.
21. To disconnect Deep Fryer, turn Temperature
Control Dial to "M", then remove plug from
electrical outlet. Remove plug by gripping plug body
and pulling it from the outlet. Never yank or twist
cord to unplug.
22. Be sure basket handle is locked in place.
23. During frying, hot steam is released through vent
openings in lid. Keep your hands and face at a safe
distance from the steam.You should also be careful
of the hot steam when you open the lid.
SAVE THESE
INSTRUCTIONS
SPECIAL INSTRUCTIONS
The Deep Fryer has a short cord to reduce the hazards
of becoming entangled in or tripping over a longer cord.
USE OF AN EXTENSION CORD IS NOT
RECOMMENDED WITH DEEP FRYER.
Operating the Deep Fryer and another appliance at the
same time from the same electrical circuit could cause an
electrical overload condition, which would blow the fuse
or trip the circuit breaker.
SPECIAL POLARIZED PLUG
INSTRUCTIONS
This Philips Deep Fryer has a polarized plug for an
added safety feature.
• Plug will fit into polarized outlet only one way.
• If plug does not properly fit outlet at first, reverse it.
• If plug still does not fit, contact a qualified electrician.
DO NOT ATTEMPT TO DEFEAT
THIS SAFETY FEATURE
Table of Contents
Features
2
Important
3
Frying
3-4
After Frying
5
Cleaning
5-6
Storing the Appliance
6
Oil and Fat
7
Frying Tips
7-8
Troubleshooting Guide
9
Preparation Time and
Temperature Settings
10
For Assistance
11
Warranty
Back Cover
2
Features
Filter Vent
Openings
See Through
Window
Basket Release
Button
Non-Stick
Interior Coating
Wire Basket
Basket Handle
Temperature
Control
Temperature
Control Pilot
Light
Release Button for
Safety Locking Lid
Grips
•
•
•
•
•
Permanent Filter
Cord Storage Compartment
Steam Condensation Collector
Cool Wall Exterior
Non-slip Feet
3
Important:
• Read the Instructions for Use and look at the Illustrations before
you start using the appliance.
• Clean the fryer parts as described in the "Cleaning" section.
Dry all parts thoroughly.
• Make sure all parts are completely dry before you fill the fryer with
oil or liquid fat.
• After you have used the appliance, set the temperature control to
the lowest setting “M” (turn it completely to the left). Remove the
plug from the electrical outlet and let the oil or fat cool down.
Do not move the fryer until it has cooled down sufficiently.
• Never overfill the food basket since too much food can cause the
temperature of the oil to decrease below optimal temperature for
frying and result in foods that are not as light and crispy as they
could be. Basket should only be 1/2 full of food at the most for
optimal results.
Frying
1
C
Place the appliance on a horizontal, level and stable surface
out of the reach of children.
2
Fill the deep fryer with 2.5 qts. (2.3 liters) maximum, 1.5 qts.
(1.5 liters) minimum of oil, liquid fat or melted solid fat up to
the top indication mark on the inner pot.
Read the "Oil and Fat" section on how to do this.
C
3
C
4
Remove the entire cord from the cord storage compartment
and plug the cord into a 120V AC outlet.
Set the temperature control to the correct temperature to
preheat the oil.
For information about which temperature to select, check the package
of the food to be fried or the Preparation Time and Temperature
Settings Table in these instructions for use.The pilot light will go on.
While the fryer is heating up, the pilot light will go on and off a
number of times.When it remains off for some time, the oil or fat has
reached the selected temperature.
4
C
5
Open the lid by pressing the safety locking lid release button.
The lid will spring open automatically. Keep face away from lid.
C
6
Lift the basket handle until it locks in horizontal position to
raise the wire basket to its highest position.
C
7
Remove the wire basket from the fryer.
8
Put the food to be fried in the wire basket.
Never exceed the maximum amount of food to be fried in one batch
(see the table about preparation times and temperature settings).
C
C
9
Carefully place the wire basket in the fryer.
10
Close the lid.
11
Press the basket release button of the basket handle and
carefully lower the basket to its lowest position.
Stick to the preparation time indicated on the package or follow the
preparation times mentioned in the table.
For a uniform golden frying result, lift the wire basket out of the oil
or fat a few times during frying and gently shake the contents.
Be careful: hot steam will emerge from the filter vent openings
in the lid during frying.
This is normal; however, keep away from this area during frying as
steam is hot.
5
After Frying
C
1
Lift the basket handle to locked position to raise the wire
basket to its highest position.
C
2
Press the safety locking lid release button to open the lid.
Beware of the hot steam.
3 Carefully remove the wire basket from the fryer.
If necessary, shake the basket over the fryer to remove excess
fat or oil. Put the fried food in a bowl or colander containing
grease-absorbing paper, e.g. paper towel.
C
4
After a batch has been fried, the pilot light will go on again.
Wait until pilot light stays off for some time before frying the
next batch.
5
When finished, turn the temperature control all the way to
the left to the "M" setting. Allow fat or oil to cool completely.
6 Unplug the cord from electrical outlet after each use.
Oil can be poured out and strained when the fryer and oil
have cooled.
Cleaning
Wait until the oil or fat has cooled down sufficiently.
C
1
Remove the lid by gently and carefully pulling lid straight up.
C
2
Remove the condensation collector from the back
of the appliance.
6
C
3
Lift the basket handle to raise the wire basket to its highest
position, let fat drip into pot and then remove the wire basket
from the fryer.
C
4
Pour out the oil or fat from the back left corner pour spout
on inner pot into a suitable storage container if you plan on
reusing it or to discard. Clean the housing and the inner pot
with a moist cloth with non-abrasive dishwashing liquid and/or
a paper towel to avoid damaging or scratching the non-stick
coating.
5
Clean the lid, condensation collector and the wire basket in
hot soapy water or in the dishwasher.
Do not use any abrasive cleaning agents or materials (e.g scouring
pads) to clean the appliance as to prevent damaging the non-stick
coating interior.
6
C
Rinse the parts with clean water afterwards and dry
them thoroughly.
7
To clean the permanent anti-grease filter thoroughly
as needed:
• Undo the screws on the inside of the lid.
• Remove the filter and clean it in hot soapy water. Let the filter dry
thoroughly before you put it back into the lid and before you start
using the appliance again.
Storing the Appliance
C
1
Put all parts back onto/into the fryer and close the lid.
2
Wind up the cord, push it back into the storage compartment
and put the plug in the plug clip.
3
Lift the fryer by its grips.
7
Oil and Fat
It is recommended to use a good quality frying oil or liquid frying fat,
preferably vegetable oil or fat.You can also use solid frying fat, but in
that case you should melt it in a pan over low heat before using to
prevent splattering or overheating of the fat. Using butter or margarine
is not recommended due to lower smoking temperatures.
Only use types of oil or fat that are suitable for deep-frying and that
contain an antifoam agent.You can find this information on the package
or label of the oil or fat.
Never mix two different kinds of oil or fat!
Changing the oil or fat
As the oil or fat loses its favorable properties rather quickly, you should
change the oil or fat regularly.
Disposing of used oil or fat
Allow oil or fat to cool completely. Pour used oil or liquid fat back into
its original (resealable) plastic bottle.You can dispose of used solid fat
by letting it solidify in the fryer (without the basket in it) and
subsequently scooping it out of the fryer by means of a plastic or
rubber spatula and wrapping it in a newspaper. Never use metal
utensils as to prevent damaging non-stick coating.
Frying Tips
• Dry all foods before frying.
• Food should be as dry as possible before placing in basket.
• Do not add water or wet foods to cooking oils.Water will cause
oil to splatter.
For preparation times and temperature settings, see the table at the
end of this booklet.
Home-made French fries
You will make the tastiest and crispiest French fries in the following
way:
Use firm potatoes and cut them into sticks. Rinse the sticks with cold
water.
Fry the French fries twice:
• The first time for 4-6 minutes at a temperature of 320º F.
• The second time for 2-4 minutes at a temperature of 375º F.
8
Frozen food
Food from the freezer (+3.2º F to 0º F) will cool the oil or fat
considerably when it is immersed in it. Because it does not sear right
away, the food may also absorb too much oil or fat.Take the following
measures to prevent this:
Preferably allow frozen food to partly defrost at room temperature
and shake off as much ice and water as possible.
Do not fry very large quantities at one time (see the table with
preparation times and temperature settings).
Getting rid of unwanted flavors
Certain types of food, particularly fish, can give the oil or fat an
unpleasant flavor. To neutralize the taste of the oil or fat:
• Heat the oil or fat to a temperature of 300º F.
• Put two thin slices of bread or a few sprigs of parsley in the oil.
• Wait until no more bubbles appear and then scoop the bread or
the parsley out of the fryer with a spatula.
The oil or fat will now have a neutral taste again.
9
Troubleshooting Guide
If your fryer does not function properly or if the frying quality is insufficient, consult the table below.
Problem
Possible cause
The fried food does
not have a golden
brown color and/or is
not crispy.
The selected temperature Check on the package directions of the food or in the table in these
is too low and/or the
instructions for use whether the temperature and/or preparation time you
food has not been fried
have selected is/are correct.
long enough.
The fryer gives off a
strong unpleasant smell.
Steam escapes from
places other than the
filter.
Solution
There is too much food
in the basket.
Never fry more food at one time than the quantities indicated in the table.
The oil or fat does not
get hot enough.
The fuse of temperature control may have blown, causing the thermal safety
cut-out to switch the appliance off. Be sure you have set the Temperature
Control to the proper setting.
The permanent antigrease filter is saturated.
Remove the lid and clean the lid and filter in hot soapy water or in the
dishwasher.
The oil or fat isn't clean
anymore.
Change the oil or fat. Regularly strain the oil or fat to keep it fresh longer
if you plan on reusing it.
The type of oil or fat
used is not suitable for
deep-frying food.
Use frying oil or liquid frying fat of good quality. Never mix two different
types of oil or fat.
The lid has not been
closed properly.
Check whether the lid has been closed properly.
The permanent antigrease filter is saturated.
Remove the lid and clean the lid and filter in hot soapy water or in the
dishwasher.
The sealing ring around
If the ring is dirty, clean the lid in hot soapy water or in the dishwasher.
the metal inside of the lid
is dirty.
During frying, the oil or
fat spills over the edge of
the fryer.
The oil or fat foams too
much during frying.
There is too much oil or
fat in the fryer.
Make sure the oil or fat in the fryer does not exceed the top indication
mark on the inner pot.
The food contains too
much liquid.
Dry the food thoroughly before you start frying it and fry the food in
accordance with these instructions for use.
There is too much food
in the frying basket.
Do not fry more food at one time than the quantities indicated in the table.
The food contains too
much liquid.
Dry the food thoroughly before frying it.
The type of oil or fat
used is unsuitable for
deep-frying food.
Never mix two different types of oil or fat and use oil or liquid fat that
contains an antifoam agent.
The inner pot has not
been cleaned properly.
Clean the inner pot as described in these instructions for use.
10
Preparation Times and Temperature Settings
The table below indicates how much of a particular type of food you can prepare at one time and
which temperature and preparation time you should select.
If the instructions on the package of the food to be prepared differ from those in the table, always
follow the instructions on the package.
Temperature
Type of food
Advised quantity per
session
Frying time (minutes) Frying time (minutes)
fresh or (partly)
frozen food
defrosted food
320ºF
Home-made French
fries*) 1st frying cycle
600 g /21 0z
4-6
-
Fresh fish
450 g /16 oz
5-7
-
Chicken (drumsticks)
3-5 pieces
12-15
15-20
Cheese croquettes
5 pieces
4-5
6-7
Mini potato pancakes
4 pieces
3-4
4-5
Vegetable fritters
(mushrooms,
cauliflower)
8-10 pieces
2-3
-
Chinese spring rolls
2-3 pieces
6-7
10-12
Vietnamese spring
rolls
5-6 pieces
5-6
8-10
Chicken nuggets
8-10 pieces
3-4
4-5
Mini snacks
8-10 pieces
3-4
4-5
Meatballs (small)
8-10 pieces
3-4
4-5
Mussels
12-15 pieces
2-3
3-4
Squid rings in batter
8-10 pieces
3-4
4-5
Fish (pieces) in batter
8-10 pieces
3-4
4-5
Shrimp
8-10 pieces
3-4
4-5
Apple fritters
5 pieces
3-4
4-5
Home-made French
600 g /21 0z
fries*) 2nd frying cycle
3-4
-
Frozen French fries
450 g / 16 oz
-
5-6
Crisps (very thin
potato slices)
600 g /21 0z
3-4
-
Doughnuts
3-4 pieces
5-6
-
Camembert
(breadcrumbed)
2-4 pieces
2-3
-
Wiener schnitzel
2 pieces
3-4
-
340ºF
360ºF
375ºF
*) See 'Frying tips' for the preparation of home-made French fries.
For assistance
For assistance call toll free:
1-800-243-7884
or visit our website: www.philipsonline.com.
FULL ONE YEAR WARRANTY
Philips Electronics North America Corporation warrants each new
Philips product, model HD6122 (except cord), against defects in materials or workmanship for a period of one year from the date of purchase.
IMPORTANT: This warranty does not cover damage resulting
from accident, misuse or abuse, lack of reasonable care, the affixing
of any attachment not provided with the product or loss of parts or
subjecting the product to any but the specified voltage.*
PHILIPS ELECTRONICS NORTH AMERICA CORPORATION
WILL NOT PAY FOR UNAUTHORIZED SERVICE OF ANY
TYPE.
NO RESPONSIBILITY IS ASSUMED FOR ANY SPECIAL,
INCIDENTAL OR CONSEQUENTIAL DAMAGES.
In order to address warranty issues, simply take or ship the product
back to the retail location where it was purchased.
* Read enclosed instructions carefully.
Manufactured for:
Norelco Consumer Products Company
A Division of Philips Electronics North America Corporation
1010 Washington Blvd., Stamford, CT 06912-0015
For Assistance call 1-800-243-7884
MADE IN CHINA.
®
This symbol on the product’s nameplate means
it is listed by Underwriters’ Laboratories, Inc.
LISTED
PHILIPS and Philips Shield are Registered Trademarks of Koninklijke
Philips Electronics N.V.
© 2000 Philips Electronics North America Corporation.
All Rights Reserved.
HD6122
4222 001 93111