1
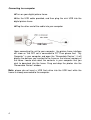
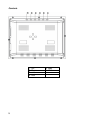
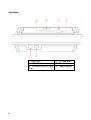
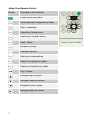
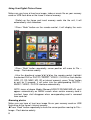
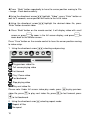
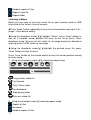
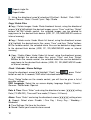
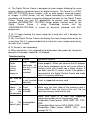
10.4 inch Digital Photo Frame
DF-1020
USER’S MANUAL
For information and support, www.lenco.eu
Table of Contents
Introduction ...............................................................………… ..3
Installing your Unit .....................................................................3
Connecting to a Computer...........................................................4
Controls…………………………………………………………… 5
Interfaces....................................................................................6
Using your remote control………………………………………….7
Using Your Digital Picture Frame..............................................8
Browsing photos……………………………………………………….9
photo Settings ...........................................................................9
Watching Video ..........................................................................9
Listening to Music .................................................................... 11
Copy/ Delete Files .................................................................... 12
Clock / Calendar / Alarm Settings ........................................... 12
Frequently asked questions .................................................... 13
Troubleshooting ....................................................................... 14
Specification…………………………………………………………..15
2
Introduction
Congratulations on your purchase of Digital Picture Frame, model DF 1020 .
Before operating the unit, please read this manual thoroughly, and retain it for
future reference. This manual will help you use many of the exciting and
useful features that will make your Digital Picture Frame viewing more
enjoyable.
This Digital Picture Frame lets you view digital pictures directly from your
camera's memory cards. You will be able to create a slideshow using multiple
transition effects or display one picture at a time. No computer, digital camera
or Internet connection is required.
This Digital Picture Frame is compatible with the following popular memory
card formats: Compact Flash®, SD™, XD, MultiMediaCard™, and Memory
Stick®.
It can also read files stored on a USB Flash drive inserted in the USB host
port.
Package Contents
·Stand
·Power Adapter
·USB Cable
·Digital Picture Frame
·User Manual
·Remote Control
Installing your Unit
◆ Open the package and remove the protective sleeve from the unit.
◆Locate the removable stand and place it in the corresponding holes at the
back of the unit
◆Plug in the AC adapter into power outlet. Plug the other end into the unit.
◆After the content is stored on the target flash device,Insert the device into
the correct slot.
Note: Please ensure that you have one photo/ music/ video file downloaded
into the memory card or frame’s internal memory.
3
Connecting to a computer
◆Turn on your digital picture frame.
◆Use the USB cable provided, and then plug the mini USB into the
digital picture frame
◆Plug the other end of the cable into your computer
Upon connecting the unit to your computer, the picture frame interface
will show as “the DPF set is connected to PC”.Then please find “My
Computer” in your computer and open the “Removable Device.”, it will
display the devices you inserted to the frame or the internal memory of
the frame. Locate and select the contents in your computer that you
wish to download into the frame. Drag and drop the photos into the
“Removable Device” window
Note: please do not insert a USB flash drive into the USB host while the
frame is already connected to the computer.
4
Controls
1. UP
2. Down
3. enter
4. Left
5
5. right
6. Exit
Interfaces
7. USB host
10.. CF card Slot
8. USB device
11. Power switch
9. SD/MMC/MS/xD Card 12. Power socket
Slot
6
Using Your Remote Control
Button
Description and Function
Switch on/off the frame
Switch between Image/Music/Video
Start a slideshow
Used to call setup menu
Used to call function menu
Back / Home
Increase Volume
Decrease volume
Confirm or rotate picture
Zoom in the picture or video
Zoom out the picture or video
Play / Pause
Navigate Up on screen
Navigate Down on screen
Navigate Left on screen
Navigate Right on screen
7
Using Your Digital Picture Frame
Make sure you have at least one image, video or music file on your memory
cards or USB flash drive or the frame’s internal memory.
⒈Switch on the frame and insert memory cards into the unit, it will
automatically start slideshow.
⒉Press “Back” button on the remote control, it will display the main
menu.
⒊Press “Back” button repeatedly, cursor position will move to File –
Image - Flash device orderly
⒋Use the directional arrows
on the remote control, highlight
the desired FILE or PHOTO / MUSIC / VIDEO / CLOCK or flash device
(USB, CF, SD, MMC, MS, XD or internal memory), press “Enter” button
or wait for 3 seconds, it will enter into the corresponding PHOTO /
MUSIC / VIDEO / CLOCK interface automatically.
NOTE:.icons of above Media (Memory/USB/CF/SD/MMC/MS/xD) shall
appear automatically on MENU screen when certain memory card is
inserted. Icons shall disappear when corresponding card is removed
from card slot.
Browsing photos
Make sure you have at least one image file on your memory cards or USB
flash drive or the frame’s internal memory.
◆Press “Back’’ button repeatedly to have the cursor position moving to File –
Image - Flash device orderly.
8
highlight the desired flash device (USB,
◆Using the directional arrows
CF, SD, MMC, MS, XD or internal memory), press “Enter” button or wait for 3
seconds, cursor position will move to the corresponding interface.
Using the directional arrows
highlight ‘’Image’’, press “Enter” button or
wait for 2-3 seconds, cursor position will move to the image in thumbnail
format.
Photo Settings
While viewing an individual image, pressing “Setup” button on the remote
control, you will then be given a list of possible features to change:
OSD Language: Select the on screen display language English / French /
German /Netherlands/ Spanish
Slide Duration: Select the duration of time (3 sec,10sec, 1min,10min)that
each image is shown in a slideshow.
Slide Order: Select the slideshow order Normal or Random.
Slide Effect: Adjust the transition effect between each image in a slideshow.
Optional effect includes Off / Random / Slide / Door / Shutter / Mosaic / Cross
Comb / Corner Slide / Snail / Dissolving / Roll.
Display Mode: Select image display size Original or Full screen
Photo Play Mode: Select image play mode with Single play mode / Slide
show mode / Multi image mode / multi round thumb / Round thumb / Free
thumb / Puzzle / Photo info
Photo Effect: Select display color for current image with Black & White /
Sepial1 / Sepial2 / Sepial3 / No Effect (original color)
Photo Fame: Select different frame styles to implement on current photo
Contrast: adjust display contrast
Brightness: adjust display brightness
Color: adjust display colour
Reset: Return to the factory settings
Watching Video
Make sure you have at least one video file on your memory cards or USB
flash drive or the frame’s internal memory.
9
◆Press “Back’’ button repeatedly to have the cursor position moving to File
– Image - Flash device orderly.
highlight ‘’Video’’, press “Enter” button or
◆Using the directional arrows
wait for 3 seconds, cursor position will move to the list of video.
◆ Using the directional arrows
“Enter” button to watch video.
highlight the desired video file, press
◆ Press “Back” button on the remote control, it will display video with small
screen or press
to zoom in the full screen display, and press
zoom back to the smaller screen.
to
Press “Func” button on the remote control to have the cursor position moving
to video setup.
1.Using the directional arrows
selecting and pressing:
Play previous video file
Full screen playing video
Fast forward
Play / Pause video
Fast backward.
Stop playing video
Play next video file
Please note: Under full screen video play mode, press
video file, press
to play next video file, press
to fast forward, press
to fast backward.
2.Using the directional arrow
Repeat all files
No repeat
10
to play previous
selecting repeat mode:
Random repeat all files
Repeat single file
Repeat folder
Listening to Music
Make sure you have at least one music file on your memory cards or USB
flash drive or the frame’s internal memory.
◆Press “Back’’ button repeatedly to have the cursor position moving to File –
Image - Flash device orderly.
◆Using the directional arrows
highlight ‘’Music’’, press “Enter” button or
wait for 3 seconds, cursor position will move to the list of music. Press
directional arrow
music list will switch to last page and press directional
arrow
music list will switch to next page.
◆Using the directional arrows
“Enter” button to listen to music.
highlight the desired music file, press
Press “Func” button on the remote control to have the cursor position moving
to music setup.
1.Using the directional arrows
selecting and pressing:
Play previous video file
Fast forward
Play / Pause video
Fast backward.
Stop playing video
Play next video file
2.Using the directional arrow
Repeat all files
No repeat
Random repeat all files
11
selecting repeat mode:
Repeat single file
Repeat folder
3.Using the directional arrow selecting EQ effect : Ballad / Club / R&B /
Dance / Normal / Rock / Classic / jazz / Pop / Studio
Copy/ Delete Files
◆Copy / Delete images: Under Photo thumbnail format, using the directional
arrows
highlight the desired images, press “Func” and then “Setup”
buttons on the remote control, the selected images can be deleted or
copy/move to the desired flash device (USB, CF, SD,/MMC/MS/XD cards or
internal memory).
◆Copy / Delete music: Under Music list format, using the directional arrows
highlight the desired music files, press “Func” and then “Setup” buttons
on the remote control, the selected music files can be deleted or copy/move
to the desired flash device (USB, CF, SD,/MMC/MS/XD cards or internal
memory).
◆ Copy / Delete Video: Under Video list format, using the directional arrows
highlight the desired video files, press “Func” and then “Setup”
buttons on the remote control, the selected video files can be deleted or
copy/move to the desired flash device (USB, CF, SD,/MMC/MS/XD cards
or internal memory).
Clock / Calendar / Alarm Settings
Using the directional arrows
highlight “Clock” icon
, press “Enter”
button or wait for 3 seconds, it will enter into clock/calendar interface.
Press “Setup” button on the remote control, you will then be given a list of
possible settings:
OSD Language: Select the on screen display language English / French /
German / Netherlands /Spanish
Date & Time: Press “Enter” and using the directional arrows
Date (YY-MM-DD), Time and Time mode (12 hours / 24 hours).
setting
Alarm: Press “Enter” and using the directional arrows
setting alarm:
◆ Repeat: Select alarm Disable / One Day / Every Day / Weekday /
Weekend
◆ Time Settings: Set time for the alarm
◆ Sound: Select your favourite alarm sound
12
setting
Auto Power: Press “Enter” and using the directional arrows
auto power on/off:
◆ Repeat: Select auto power on/off Disable / One Day / Every Day /
Weekday / Weekend
◆ Power on time: Set power on time
◆ Power off time: Set power off time
Calendar Display: Select calendar display mode with slide / With single /
With clock
Contrast: adjust display contrast
Brightness: adjust display brightness
Color: adjust display brightness
Note:the frame will enter into calendar interface when the cursor stayed still
image/video interface for longer than around7 minutes.
Frequently asked questions
1) Q: Why do my images take so long to load?
A: Generally the higher the resolution of the image, the longer it will take to
load. Resizing your images to a lower resolution will quicken the processing
time.
2) Q: What is the best picture resolution displayed on the screen?
A: The frame’s best resolution is 640*480
3) Q: How can I get my videos to play on the frame?
A: Please ensure that your video files are in a compatible format. This product
will play MPEG 1/2/4 , DivX (except V3.11) encoded
4) Q: How do I store music files?
A: First, use a personal computer and popular audio editing software to
convert your music to MP3/WMA/OGG format.The Digital Picture Frame will
only play MP3/WMA/OGG files so all Windows Media Player™ and/or
iTunes™ files will have to be converted first. You can use a card reader or
your digital camera to transfer those files to your memory card.
5) Q: Does the Digital Picture Frame have built-in memory?
A: Yes. The Digital Picture Frame has 128 MB internal memory to store your
files.
6) Q: How come the Digital Picture Frame does not show some of my images?
13
A: The Digital Picture Frame is designed to show images following the same
camera industry standards format as digital cameras. This format is a JPEG/
BMP/GIF/TIFF/PNG format images, such as web images, scanned images,
or images in RAW format, are not stored according to camera industry
standards and therefore cannot be displayed correctly on the Digital Picture
Frame. Please use your PC applications to convert such images into
standard JPEG/BMP/GIF/ TIFF/PNG format before viewing them on the
Digital Picture Frame. If using Photoshop ensure that the
JPEG/BMP/GIF/TIFF/PNG is saved as baseline standard and NOT
progressive.
7) Q: If I keep showing the same image for a long time, will it damage the
LCD screen?
A: No. The Digital Picture Frame can display the same image continuously for
a long time. But it is recommended not to show the same image continuously
for more than 1 month.
8) Q: Device is not responding
A: When de device is not responding to disconnect from power by taking the
plug out of the power socket for 10 seconds
Troubleshooting
Symptom
Cause
Digital
Picture
Frame
doesn’t
power on
No Start-up
screen
No
photo,
videos
or
music files
on
the
memorycard
Corrective Actions
Make sure you connect the AC adapter to the
The
power
frame properly. When you connect the AC adapter
connector to
to the frame and power up the unit, even without a
the unit is not
memory card, you should see a blank screen. If
securely
you don’t see the lit screen, check if the power is
inserted.
connected to the Digital Picture Frame and make
sure it is securely attached.
Memory card
is not inserted Insert a supported memory card
correctly
Verify if the way you inserted the card is correct.
Card
is Make sure the front label of the memory card is
wrongly
facing AWAY from the front of the unit. Do not
inserted
force the memory card into the slot
The
File Incompatible
doesn’t play format
14
Make sure there is at least one supported
image/music/video file on the memory card.
Compatible Photo format: JPEG, BMP, GIF, TIFF,
PNG
Compatible Music format: MP3, WMA, OGG
Compatible Video format: MPEG 1/2/4, DivX
(except V3.11)
Specifications
Type
Resolution
Output
Input
Internal Memory
Display Mode
File Format
Cards
USB ports
Start-up
Package contents
15
10.4 inch Digital Picture Frame
640 x 480
12 V ,1.5A
AC100-240V ~50/60Hz
128MB
4:3
JPEG,BMP,GIF,TIFF,PNG
MP3,WMA,OGG / MPEG 1/2/4
(except V3.11)
SD/MMC/MS/ xD/CF/USB
USB Host, USB Slave
Photo with music
Digital Photo Frame
AC/DC adaptor
User manual
Remote
USB cable
Stand
/
DivX