1
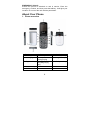
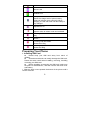
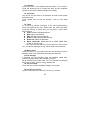
Confort 300 User Manual V.2.0 1 Contents For your safety ........................................................................... 3 About Your Phone ...................................................................... 4 Preparing Your Phone ............................................................... 6 Call functions.............................................................................. 8 Text entry ................................................................................. 10 Menu operation ........................................................................ 10 Menu functions ......................................................................... 10 1. Call center ..................................................................... 10 2. Messages...................................................................... 12 3. Communication ............................................................. 13 4. Camera ......................................................................... 14 5. Audio player .................................................................. 14 6. FM radio ........................................................................ 15 7. Organizer ...................................................................... 15 8. Multimedia..................................................................... 17 9. Settings ......................................................................... 18 10. User profiles ................................................................ 20 11. Web Services .............................................................. 20 12. SOS Settings .............................................................. 21 Maintain and Care .................................................................... 21 Safety ....................................................................................... 22 Technical Specifications .......................................................... 22 2 For your safety Read these simple guidelines. Breaking the rules may be dangerous or illegal. Further detailed information is given in this manual. ROAD SAFETY Always keep your hands free to operate the vehicle while driving. Park the vehicle before using your phone. SWITCH OFF IN AIRCRAFT Using of wireless telephones in aircraft may disrupt the operation of the aircraft. It is dangerous and illegal. Insure switching off the phone before going aboard. SWITCH OFF IN HOSPITALS Follow any restrictions or rules. Switch off the phone near medical equipment. SWITCH OFF WHEN REFUELING Switch off the phone at a refueling point or any fuel or chemicals places. SWITCH OFF NEAR BLASTING POINT Don’t use the phone where blasting is in progress. Observe restrictions, and follow any regulations or rules. INTERFERENCE All wireless phones may be susceptible to interference, which could affect the performance. USE NORMALLY Use in the normal position explained in the product documentation. Don't touch the antenna unnecessarily. ENHANCEMENTS AND BATTERIES Use only the approved enhancements and batteries. Do not connect incompatible products. 3 EMERGENCY CALLS Ensure the phone is switched on and in service. Enter the emergency number, and then press the talk key. It will give your location. Do not end the call until the permission. About Your Phone 1. Phone overview 1. Earpiece 4. Call key (SIM 2) 7. Flashing light 10. Right soft key 13. Number key 16. SOS button 2. Screen 5. OK key 8. Earphone/ Charger plug 11. Camera key/Magnifying key 14. Torch switch 4 3. Left soft key 6. Call key (SIM 1) 9. Navigation key 12. End/power key 15. Camera 2. Keypad Definitions Key Description Left Soft Key, Right Soft Key On the button above the screen shows the description text. Camera key/Magnifying key In the standby mode, Press this key to enter the camera mode. In the standby mode, long press this key to enter the magnifying mode. Call / Answer (Green) Key Press After dialing to connect, press if there is an incoming call to answer, press from standby to go to call records list. End/ Power Key Long press to power phone ON/OFF; Press to end; reject call; or to exit a menu. Navigation Keys Press up/down/left/right direction in menu to scroll, browse or in edit page to move cursor. 3. Display Icons Icon Explanation Signal Strength of SIM1/SIM2 Shows the received signal strength. Fuller bar means stronger signal. Lock the keypad New sim1 SMS New MMS GPRS 5 Divert all data calls Missed calls Headset is on Battery Status Shows the charge level of phone battery. Fuller bar indicate more power left. When charging, the bar will scroll until the battery is fully charged. Stopwatch is on Alarm Appears when an alarm is set and activated. Incoming Call Alert Mode Ring Incoming Call Alert Mode Vibrate Incoming Call Alert Mode Vibrate then Ring Incoming Call Alert Mode Vibrate and Ring Preparing Your Phone 1. Installing SIM Card l Please keep your SIM card away from reach of children. l Scratches and bends can easily damage the SIM card. Please be extra careful when installing, removing, handling or storing your SIM card. l Before installing or removing the SIM card, make sure the phone is switched OFF, and then remove the back cover and battery. 1. Slide the back covers upward the bottom of the phone until it can be removed. 6 2. Remove the battery (see Removing Battery). 3. Place SIM cad into the SIM holder. 4. Fit the battery with the metallic contacts at the right bottom comer. 5. Replace the back cover by fitting it to the back of the phone. 2. Install Battery (1)Connect the battery’s metal touch points separately with the battery compartment metal touch points, and enter the battery base to the slot. (2) Slide the back cover toward the top of the phone to lock the cover into its place. 3. Remove Battery Remove the back cover then push toward the bottom of the phone and lift the battery at the at the top side center to remove. l Settings and data stored in the phone or SIM card may be lost after the battery is removed. 4. Charge Battery Connect the charger to power supply, and then insert the charger pin into the I/O jack. Note: 1. When charging, DO NOT removes or takes out the battery to avoid the battery circuit to burn out. 2. While charging, it is normal that the phone and charger will become hot. 3. If the battery is completely empty, it may take a period of time before the charging icon appears on the display. 5. USB Management When USB cable plugged in, the USB charger function will startup. If there is a memory card inside the phone, the popup dialog box will ask you reboot the phone to used as a USB Flash Disk or not. 6. Power on and off Press and hold Power key to turn on/off the phone. And if you have set PIN or phone code, input it correctly. 7 7. Security Code PIN Code The PIN (Personal Identification Number) code protects your SIM card against unauthorized use. It is normally supplied with the SIM card package. Be careful while entering PIN code, 3 wrong tries in entering PIN code will block the SIM from use, requiring input of PUK code to unblock. Please contact your operator for further details. PIN2 Code The PIN2 code is required when activating certain special features (such as call costs and fixed dialing). It is normally supplied with the SIM card package. Be careful while entering PIN2 code, 3 wrong tries in entering PIN2 code will block the SIM from use, requiring input of PUK2 code to unblock. Please contact your operator for further details. PUK Code The PUK (Personal Unblocking Key) code is required to unblock a blocked PIN code. It is normally supplied with the SIM package; otherwise contact your service provider for the code. Keep your PUK code in a safe place, do not throw it away. Contact your service provider if it is lost. If your SIM is blocked,your phone will ask you to enter PUK code to unblock. You have 10 tries to enter the right PUK code, after which your SIM might be permanently blocked. Phone Password The Phone Code is a 4 to 8 digit security code that protects unauthorized use of your phone. The factory default code is “1122”. Once activated, the phone will ask you to enter Phone code every time it is turned on. For your protection, change the default phone code as soon as possible. Do not forget your phone password. Call functions 1. Making a Call 8 Make a domestic call Enter the phone number including the area code. Press the talk key to make a call. viz.: area code—telephone exchange numbers—P—extension numbers, then press talk key. Make an international call Enter the country code, the area code and the phone number, press talk key to dial. Make a call from Phone book Enter Phone book, select the phone number, and then press talk key to make a call or press center key to make an IP call. Redial a call by recent call lists In standby mode, press the right selection key to find the recent call lists, scroll to the number or name, then press talk key to dial. 2. Answer a call An incoming call window will be displayed as the phone receives a call. The number will appear on the window if you have opened this function. If this number is not saved in the phone book, the call’s district number will show it on the window. talk key to answer it. If an incoming call arrived during your operation in sub window, a new window will be popped to inform you and your any operation will be broken. If you missed a call, a missed call log will appear after you return to the start screen. 3. Call options During a call, the options content is changeable according to your call status. The functions of Call Waiting, Call Hold need the support of net work. Here are some parts of the options, like “pitch”, “New Call” ,“Phone Book”, “Message center” ,“Sound Recorder” ,”Background sound” ,“Mute”, “DTMF”, “Hold single call” and “End single call” 9 Text entry You may be requested to input text message many times when you using this phone. For example, when you write a message or add a new phone book record, you can select different input methods, such as ABC, abc…… You can input characters, letters, digitals or special characters including punctuations. Switch input methods In a text entry state, you can press the sym key to switch input method. Input method Switch to uppercase or lowercase mode. Press a key once to insert the first letter on the key, twice for the second letter, etc. If you pause briefly, the last letter in the display is accepted and your phone awaits the next entry. Input special character Press alt key to display the character list in edit screen Menu operation The phone provides a serious of menu. And you can select it according to your need. The functions exist in these menus and submenus. Access the menus by scrolling. Menu functions 1. Call center 1.1 Call history Select call history from main menu, you can view the information about call history, including missed calls, dialed calls, received calls, delete call log, call timer, call cost, SMS counter and GPRS counter. 1.2 General call settings Divert your incoming calls to voicemail or other numbers for SIM1/SIM2. There are five diverting ways, each of which can be set to 10 switch on; switch off and search. When the phone is switched on, key in the number to divert according to the indications on the screen. 1.2.1 SIM1 (SIM2) calls settings: l Caller ID There are these options; “set by network”, “hide id”, and “send id”. l Call waiting If it is supported by your service provider, call waiting will notifies you of an incoming call even if you are in a call. You can then accept, reject, or ignore the incoming call. To make this function available, please contact local network provider. l Call divert Call diverting is a network services, it tells your network to divert incoming calls to another number to avoid missing a call. The following is available: divert all voice calls, divert if unreachable, divert if no answer, divert if busy, divert all data calls, and cancel all divert. l Call barring If it is supported by your service provider, this function will enable you to restrict the incoming or outgoing calls. l Line switching Enter this menu user can switch to line1 or line2. 1.2.2 Black list Add the numbers what you do not want communicate to avoid harassing. 1.2.3 Auto redial It can dial the same phone number automatically after a failing dial with this function. 1.2.4 Speed dial Speed dial is a shortcut to dial frequently called numbers. Set the numbers to speed dials before use it. 1.2.5 Call time display Set it to “on” or “off” state 1.2.6 Call time reminder: There will be a hint sound when the setting time passed during a call. 1.2.7 Auto quick end Set on or off and time. 11 2. Messages 2.1 Text Message 2.1.1 Write message Access this menu to edit and send message, press “option” to do as following: Use Template, Insert object, Insert Number, Insert name, Insert bookmark, Input method, after finished edit, user can choose send or save message. 2.1.2 Inbox Access this menu to view the received messages. When has the new message, the phone will ring, the unread message icon also to be able to appear on top of the screen. Press ok key in view message screen to do the following functions: reply, delete, edit, forward, copy etc. 2.1.3 Outbox Access this menu to view the saved messages. Press ok key in viewing message screen to send, edit, delete, copy to phone/SIM, move to phone/SIM, delete all, copy all, move all and use number, use URL. 2.1.4 Templates There are ten predefined texts. User can use them to edit or delete. 2.1.5 SMS settings Access this menu to do the following functions: Profile Settings, Common settings, Memory Status, Preferred Storage. 2.2 MMS This function needs the supporting of network operators. Before using, be sure your SIM provides this function or not. You can consult the network operators. 2.2.1 Write message Access submenus of “write MMS”, there are several items: To, Cc, Bcc, subject and edit content. When you edit ,you can Done ,Input method ,Add picture, Add audio, Add video, Add attachment, Add slide before, Add silde after, Add bookmark text, preview and Slide timing . After finished edit, user can choose “send only”, “save”, “save and send etc” . 12 2.2.2 Inbox It stores the received MMS in inbox. When has the new MMS, the phone will ring, the unread MMS icon also to be able to appear on top of the screen. After download the MMS to the phone, you can do the following functions: view, delete, reply, save etc. 2.2.3 Outbox The failed sent MMS will be stored in outbox. Access this menu, user can choose “view”, “resent”, “forward”, “delete”, “delete all”, “move to draft”, “use detail” or “ read properties” to operate the MMS. 2.2.4 Drafts Store the MMS without sending for reading and sending later. Access this menu, select one MMS from the list and user can view, send, edit, delete, delete all, save as template, properties and use detail etc. 2.2.5 Templates There are five predefined MMS in the phone. User can view and use them. 2.2.6 MMS settings Access this menu, user can compose settings, send settings, retrieve settings, filter setting, server settings and memory status. Note: The storage space left for MMS in the phone is limited. So if the space is insufficient, please delete some unnecessary MMS. 2.3 Voice mail server This is a Network Service, and should be supported by the service provider. 2.4 Broadcast message Broadcast public information sent by the network providers. Use Cell Broadcast service, you can receive information on various subjects from network provider. For more available information, please contact your local network providers. 3. Communication Phonebook 13 When you enter phonebook you can found quick search, Search Contact, Add New Contact, Copy All, Delete, Caller groups, Extra Numbers, Phonebook settings, Caller Picture, Caller Ring Tone. Select a number, then you can, call, IP dial, send SMS, send MMS, view, edit, Delete, copy, move and send VCard, Add To Black List, Add To White List. Note: 1. One ring tone can only be select as caller ring tone after the file in the file manager send to the ring list. 2. Copy items from phone to SIM card, it can only copy the name and number of a record. Only the record in phonebook can be set as the member in the group, caller picture, caller ring tone and caller video. 4. Camera Select camera item in main menu to enter preview screen. Then press scroll right or left key to adjust the exposure parameter and scroll up or down key to adjust lens. Click the small icon on the screen to set the effect settings, white balance, delay time, cont shot, scene mode, image’s quality, image size. While preview, press soft left key to do the work: album, image settings, white balance, scene mode, effect settings, add frame, storage and restore default to set the parameters. And press center key to take photo 5. Audio player Select audio player in the main menu item or keyboard shortcut to enter the audio player interface. touch the scroll up key to play or pause and scroll down key to stop Mp3, touch the scroll left/right key to switch to the previous/next song, touch “List” to enter the list of song, then press “”option” to do the work such as Play, Detail, Add to Rings, Refresh List and Settings. The concrete operations in Settings are “Play List”, “List Update”, “Repeat”, “Shuffle”, “Background play”, “Bluetooth Stereo output”, “Bluetooth Earphone”, “Sound effects”,“Spectrum Display” ,“Lyrics Display”. Note: If “List Update” is opened, the play list will be created automatically form phone or memory card according to the storage. If closed, the user should create or delete the file in play list manually. 14 6. FM radio In the FM radio screen, you can touch the scroll left/right key to switch broadcast channels; touch the scroll down key to stop / play; touch the scroll up key to open auto search; - Channel list At most 20 channels could be saved in the list. - Manual Input Directly input the FM frequency of the channel. - Preset Auto search To search all channels and save them in the channel list automatically. - Settings To set the ‘back ground playing’ and ‘loud speaker’ state. Notes: The quality of FM is influenced by the range of broadcasting station. 7. Organizer You can use various functions provided in this phone, including calendar, Tasks, Shortcuts, world clock. 7.1 Bluetooth You can perform the following operation on Bluetooth: Power on/off: Turn off Bluetooth when you don’t want to connect other devices to your phone; Turn on Bluetooth to allow other devices to connect to your phone. Visibility: Allow your devices to be found by other devices, if your device is hidden (not visible), it can only be connected to by a previously paired device. My device: Add trusted devices that you can connect to your phone without entering the pass key again. Search audio device: Search for new devices nearby to add to your device list. My name: Enters a name for your device. This name will be shown in other Bluetooth devices. Advanced: Shows some information of your Bluetooth. 7.2 Alarm Press OK key to enter the setting, 15 7.3 Calendar Access this menu, the calendar will be shown on the screen. touch the direction key to change the date, and the calendar shown on the screen will be changed accordingly. 7.4 Calculator The phone can be used as a calculator to finish some simple arithmetic work. touch number key to enter the number. “·”key to enter radix point. 7.5 Tasks To do list may remind somebody to do some special things which are specified by user. When there are some task lists, touch left soft key or center key, you may entry a new screen with following: l View: View the selected task list. l Add: Add a new task list. l Edit: Edit the selected task list. l Delete: Delete the selected task list. l Delete all: Delete all task lists. l Send v-Calendar: Send task list by SMS, MMS, Blue Tooth, or save it to file. If you have set the alarm for some task lists, when it time out, your phone will begin to ring, and it will show the task list. 7.6 World clock Under this menu, you can look up current time and time zones of different cities in the world after selecting the time zone. 7.7File manager It provides you the functions such as browsing media files, checking storage space and formatting function. When browsing the media files, you can operate the selected files such as view, rename coping, deleting etc. 7.8 Unit converter There are two units are available: Weight and Length. 7.9 Currency converter Input the rate, then you can do the currency converter. 16 7.10 Stopwatch There are two types of stopwatches: typical stopwatch and multiplex stopwatch. 8. Multimedia 8.1 Image viewer Access this menu; you can view the pictures in the list. If you select one picture, there are several operations including “view”, “browse style”, “forward”, “rename”, “delete”, “delete all files”, “sort by” and “storage”. You can forward the picture to wallpaper, screen saver, power on display, power off display, phonebook and Bluetooth. Whether the operation can be successful or not is related to some factors such as the size of the screen. 8.2 Video recorder Press Ok key to start record, press OK key again to pause, press right soft key to exit and save. 8.3 Video player Access the menu, you can enter film list and touch “option” to choose a movie clip to play, forward, rename, delete, delete all files, and sort by. While playing, press scroll up or down key to adjust play speed, scroll right or left key to adjust the rate of progress. 8.4 Sound recorder The sound recorder supports two formats: WAV, AWB and AMR. When there’s no recording file in the current Storage Device, you can touch left soft key or OK key to entry the options as following: l Record: Start the recorder. l Settings: Set the Storage Device of recording file, phone memory or T-flash card. Set recording format, AMR or WAV. Set the recording sound quality, low or high. When recording files exist in the current Storage Device, you can press left soft key or OK key to enter the following options: 17 l Record:Start the recorder. l Play: Play the selected recording file. l Append: Append the recording data to the end of the selected file. (Only AMR format files support this operation.) l Rename:Rename the selected file name. l Delete:Delete the selected recording file. l Delete all files:Delete all the recording files. l Settings:Set the Storage Device of recording files, phone memory or T-flash card. Set recording format, AMR, AWB or WAV. Set the recording sound quality, low or high. l Forward : Send recording file to user profiles, MMS, Bluetooth. 9. Settings 9.1 Dual SIM settings Use this function user can switch between dual SIM open, only SIM1 open, only SIM2 open, flight mode. 9.2 Phone settings Time and Date Set the home city, time and date, time and date’s format. - Schedule power on/off You can set 4 power on/off schedule, and the phone will power on or power off according to the settings. - Language Select the operating language. - Preferred input methods You can set the default input methods in text editor. - Display characteristic Set Wallpaper, Screen Saver, Power On/Off Display.. - Greeting text Edit the greeting text. - Dedicated Key Access the menu you can modify the shortcut of the direction keys in standby mode. - LCD backlight You can set the backlight duration and brightness. - 18 9.3 Network settings This feature is available to operate network settings when you are roaming or travel outside. Access the menu; you can select the network manually or automatically. Before use the network, you must contact your local service provider or the roaming area before you use this function. 1. Add from list:Add a network from PLMN list. 2. New:Add a new network. 3. Change priority:Change the priority of the network. 4. Delete:Delete the current network. 9.4 Security settings You can set the security settings to protect the phone or SIM card from unauthorized use. The default security code is 1122. 9.4.1 SIM1/SIM2 Security setup l SIM Lock Set the phone to ask for your PIN code each time you start your phone (if this function is supported by your SIM card). Note: After three consecutive incorrect PIN code entries, the code will be blocked, and you need the PUK code to unblock it. The PIN code and PUK code are usually supplied by the SIM card. If you don’t get them, please contact with the supplier. The default PIN code is 1234 usually. l Fixed dial If your SIM support fixed dial, it can limit you to call fixed number. When the function is on, it can only call the phone number or phone number start by the fixed dial number. Note: it needs you to input PIN2 code to open or close this function. You can get the PIN2 code from service supplier. If the fixed dial is on, the phonebook only show the number of fixed dial. l Barred dial If your SIM support barred dial, it can limit you not to call barred number. When the function is on, it can not call the phone number in the barred dial list. Note: it needs you to input PIN2 code to open or close this function. You can get the PIN2 code from service supplier. If the fixed dial is on, the phonebook not show the number of barred dial. 19 l Change password You can change PIN code, PIN2 code here. 9.4.2 Phone Lock Phone lock can be used to lock the device to avoiding unauthorized use. Set the phone to ask for your security code each time you start your phone. 9.4.3 Auto Keypad Lock Press left soft key in standby mode, by press right soft key then ctrl key to lock the keypad. If the keypad is locked, you can unlock it by pressing right soft key, then press ctrl key. You can set the auto lock time in the submenu of this function, then the key will automatically be locked if there is no more action of the phone. 9.4.4 Change Password You can change phone lock password here. 9.5 Restore factory settings You can reset some of the Phone settings to their original values by input phone lock password. 10. User profiles User profiles define how your phone reacts when you receive a call or a message, how your keypad sounds when you press a key, and more. Each of the available profiles can be left at their default setting or customized to suit your needs. Select and customize the most suitable profile for your situation. The available modes are General, Meeting, Outdoor, Indoor, Headset. In standby mode, you can press and hold chr key to switch to silent mode. 11. Web Services Your phone supports WAP service and you can visit the service that your operator provides. With the browser, you can view HTML web pages on internet. 20 12. SOS Settings 12.1 SOS number Input the SOS phone number that will be dialed. 12.2 SOS SMS 12.2.1 SOS SMS STATUS: ON/OFF Set to activate or deactivate the SMS. (SOS SMS Status: When a SOS call activated, the stored SMS will send automatically to the SOS contacts if activate this function.) 12.2.2 SOS SMS Content Create the SOS message that will be sent. Maintain and Care Caring for Battery This phone uses a rechargeable battery as power source, when the charge is weak, recharge immediately to protect the batter life. It is best to drain the battery charge first. When not using the charger, unplug it from the power source and the phone. Over charging will shorten the battery life. Not leave the charger connected to the unit or battery for more than a week. Temperature affects battery charge capacity. Your battery may need to be warm up or cool down before charging. If the battery temperature is lower than 0°C and higher than + 45°C., it will not recharge. Use the battery as it is originally intended. Do not short circuit the battery by connecting the positive and negative terminals with a conductor. Do not use a damaged battery The battery will not perform properly and its life will be shortened if exposed to extreme temperatures. Do not place the battery in fire; follow local awls and ordinances in disposing used battery. Maintenance Do not leave your phone within the reach of small children (certain removable parts may be accidentally ingested). Do not use your phone in damp areas (bathroom, swimming pool…). Protect it from liquids and other moisture. Do not expose your phone to extreme temperatures lower 21 than - 10°C and higher than + 55°C. Safety Use of your phone is subject to safety measures designed to protect users and their environment. Road safety Do not use your phone when driving. In order to give your full attention to driving, stop and park safely before making a call. You must comply with any current legislation Aircraft safety When travelling by plane, you will need to switch your phone off when so instructed by the cabin crew or the warning signs. Using a mobile phone may be dangerous to the operation of the aircraft and may disrupt the phone network. Its use is illegal and you could be prosecuted or banned from using cellular networks in the future if you do not abide by these regulations. Environment safety Your phone is a radio transmitter which may interfere with electronic medical equipment or implants, such as hearing aids, pacemakers, insulin pumps, etc. It is recommended that a minimum separation of 15 cm be maintained between the phone and an implant. Your doctor or the manufacturers of such equipment will be able to give you any advice you may need in this area Do not use your phone in damp areas. Technical Specifications NOTE: Actual operating conditions depend on the local network environment, SIM, and user behavior. Warning: Any consequence caused by misuse, abuse, or not following any and all of the above-written suggestions and instructions shall not hold the producer in any way responsible to any degree. Announcement: The manufacturer reserves the right to change or upgrade specifications or software versions without prior or separate notice. Trade marks mentioned or used in this material belong to their respective owners. 22