1
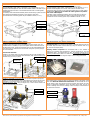
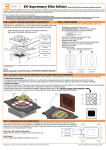
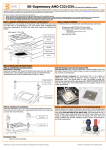
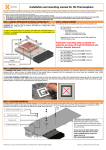
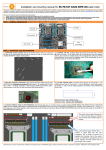
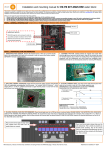
EK-Supremacy
series universal CPU water block installation manual
This product is intended for installation only by expert users. Please consult with a qualified technician for installation. Improper installation may result in damage to your equipment. EK Water Blocks assumes no liability
whatsoever, expressed or implied, for the use of these products, nor their installation. The following instructions are subject to change without notice. Please visit our web site at www.ekwb.com for updates. Before installation
of this product please read important notice, disclosure and warranty conditions printed on the back of the box.
Before you start using this product please follow these basic guidelines:
1. Please carefully read the manual before through before beginning with the installation process!
2. Please remove your motherboard from the computer to assure safest mounting process in order to prevent any possible damages to your CPU and/or motherboard’s circuit board (PCB).
3. The EK High Flow and EK-PSC type fittings require only a small amount of force to screw them firmly in place since the liquid seal is ensured by the rubber o-ring gaskets.
4. The use of corrosion inhibiting coolants is always recommended for any liquid cooling system.
STEP 1: GENERAL INFORMATION ON PRODUCT COMPATIBILITY
STEP 2: TABLE OF CONTENT
Congratulations on your purchase of EK-Supremacy universal CPU water block. This The following items are enclosed with each EK-Supremacy water block:
water block is pre-assembled for use with modern Intel desktop socket type
motherboards. By default this water block supports the following CPU sockets:
- EK-Supremacy universal CPU water block
- PreciseMount universal CPU mounting mechanism:
o
M4 threaded thumb screws (4 pcs)
- Intel socket LGA-1155/1156, LGA-1366 and LGA-2011
o
Springs (4 pcs)
- AMD socket S754/939/940, AMD AMx and FM1
o
M4 threaded thumb nuts (4 pcs)
o
-
Water block top
Gaskets
Mounting plate
o
o
Jet plate
Washers (4 pcs)
LGA-2011 M4 threaded mounting studs (4 pcs)
AMD mounting plate
Backplate rubber gasket
Backplate for Intel LGA-1366 and AMD socket motherboards
Backplate for Intel LGA-115x socket motherboards
Allen (hex) key 2.5mm
Additional jet plates:
Jet J2 (1.0mm thick) – optimized for LGA-1155/1156 CPUs
Jet J3 (0.7mm thick) – optimized for LGA-2011 CPUs
Copper base
Screws
Caution:
Legacy socket Intel LGA-775 is not supported by default – a EK-Backplate Supremacy LGA-775 (EAN:
3830046990617) is mandatory to install this water block on LGA-775 motherboards.
Narrow server type LGA-2011 is not supported by default – a Mounting plate Supremacy LGA-2011 Narrow
ILM (EAN: 3830046990600) is mandatory to install this water block on narrow server type LGA-2011 motherboards.
STEP 3.1 (optional): INSTALLING AMD MOUNTING PLATE AND REPLACING JET PLATE PROCEDURE
1) Place water block on an even surface and remove the four M4x14 DIN7991 screws attaching the top to the copper base using the enclosed 2.5mm Allen key.
2) Replacing mounting plate:
2.1) Replace the Intel mounting plate with AMD one. You will feel the mounting plate locking into the position when placed correctly on to the top.
2.2) Reseat the larger o-ring gasket (57x2 mm) into the gap between the mounting plate and water block top. Skip to step #4 to complete installation.
3) Replacing jet plate:
3.1) Remove the default jet J1 (0.8mm thick) and replace it with jet J2 or jet J3, depending on your CPU platform. You will feel the jet plate locking into the position
when placed correctly to the top. Reinstall smaller o-ring gasket if needed prior to replacing jet plate.
4) Carefully place copper base to waterblock top assembly, make sure gaskets stay in place! Beware of copper base orientation!
5) Repeat step #4 if necassery. Screw in all four (4) M4x14 DIN7991 screws using the enclosed 2.5mm Allen (hex) key.
Step #2.2
Step #3.1
Step #4
Step #2.1
STEP 4: PREPARING BACKPLATE RUBBER GASKET
The enclosed rubber gasket is essential part of the backplate and mounting system and must be used every time you
install this water block. The rubber backplate has a partially cut inner part which needs to be removed when installed on
Intel LGA-115x and LGA-2011 motherboard. The rubber is held on four places and can be peeled away with hand. These
two pieces can be reassembled later if needed.
Outer part
Intel LGA-115x and LGA-1366 socket:
Remove the inner core of the rubber and use the outer part only.
Inner core
(removable)
AMD sockets:
Use the whole rubber backplate including the inner core.
All disclosures, notices and warranty conditions are being written on the back of the box.
th
Revision 1.0. Released on 30 of May, 2012.
STEP 5: INSTALLING THE WATER BLOCK:
STEP 5a: Intel LGA-1366 and AMD socket motherboard:
1) Place motherboard on an even surface with front facing down.
2) Install backplate rubber gasket - depending on your CPU platform (see STEP 4) and place metal backplate for Intel LGA-1366 and AMD socket to the back of your
motherboard. Align the holes on the motherboard with holes on rubber gasket
and backplate.
3) Carefully rotate motherboard assembly with front side facing up with one hand
while holding the backplate and rubber in place with the other hand.
4) Install the rest of mounting system as per installation manual (see STEP 6)
STEP 5b: Intel LGA-115x socket motherboard:
1) Place motherboard on an even surface with front facing down.
2) Install backplate rubber gasket - depending on your CPU platform (see STEP 4) and place metal backplate for Intel LGA-115x socket to the back of your
motherboard. Align the holes on the motherboard with holes on rubber gasket
and backplate. Make sure to orientate the rubber gasket to fit past the
CPU socket ILM backplate.
3) Carefully rotate motherboard assembly with front side facing up with one
hand while holding the backplate and rubber in place with the other hand.
4) Install the rest of mounting system as per installation manual (see STEP 6)
Metal backplate
Metal backplate
Rubber gasket
Rubber gasket
Motherboard
PCB
Motherboard
PCB
figure 1: Isometric view of backplate assembly for LGA-1366
STEP 5c: Installing the mounting system:
Intel Socket LGA-115x/1366 and AMD sockets:
Install the M4 thumb screws of the PreciseMount mounting system onto your
motherboard. It is mandatory to put 0.7mm plastic washer underneath each of
the M4 thumb screws. Tighten the M4 thumb screw to the metal backplate with
your hands until you reach the end of the thread. Using tools (such as pliers) is
not recommended!
Intel Socket LGA-2011:
Install four (4) specific LGA-2011 M4 thumb screws into four M4 threaded stubs
on the LGA-2011 socket integrated latch mechanism (ILM). The screws are to be
installed using no tools (i.e. pliers).
M4 thumb screw
LGA 2011 M4
PVC washer
thumb screw
STEP 5e: Fastening the waterblock:
Install the waterblock on your CPU. Place an enclosed compression spring and
thumb nut over each M4 thumb screw. Start fastening two thumb nuts at a time,
preferably in cross pattern and do not tighten them fully until all of them are
partially screwed in. Then - using your fingers only - screw in all four thumb nuts
until you reach the end of the thread.
figure 2: Isometric view of backplate assembly for LGA-115x
STEP 5d: Preparing your CPU and applying TIM:
Cleaning the CPU: Once mounting mechanism is attached install the CPU into
the socket. Wipe the CPU’s contact surface (by using non–abrasive cloth or Qtip, as shown on sample photo).
Applying thermal compound: EK recommends blob or line method of
applying the enclosed Gelid GC-Extreme™ thermal compound to the CPU
heatspreader (IHS) - see sample photo on right. The quantity of about two rice
grains is just about right. There is no need to cover the whole IHS. Applying too
much thermal grease will have negative impact on the cooling performance!
STEP 6: CONNECTING WATER BLOCK TO THE COOLING CIRCUIT
Carefully identify the direction of the flow in your circuit. For the EK-Supremacy
series water block to operate properly the G1/4 port nearest to the center of the
water block MUST BE USED AS THE INLET PORT. EK recommends the use of
EK-PSC fittings. When using fittings other than EK-PSC series please use hose
clamps or appropriate substitute to secure the tubing to the barb. The use of
biocide containing and corrosion inhibiting coolant is always recommended for
any liquid cooling system.
Thumb nut
Coiled spring
EK-PSC fitting
Tubing
REQUIRED TOOLS
- allen key 2.5mm (enclosed)
All disclosures, notices and warranty conditions are being written on the back of the box.
th
Revision 1.0. Released on 30 of May, 2012.