1
__
__
- . -_..----_
-.. _
..........._-_.....
"_'''
'-"'''''',,''','''_,,
--.,..- ...........
-
.. ....... ........
......~"' .........
"' ........
,,,
'm
'i::''' :'"
,"II.'"
,,/. /
....:.li...
..
~
1/
• / It
f!! 1/ 111::.. ,,"
iiJ ~" II II 11 I. t::;;
It: :.·.1ft Il' II
.1 t">
,f': if ,,·ltj/l~::fi ·I"U· ;111::
.1: 1:1:"' "
'I
'"
1'''
I (..//
....
-_........-,.,,, ""
.......... hYIl""
-.~
.. ,...,......... "'"
Art No.: PYLE_$PORT$-PG$PW I
~
I: II ..
l::." !'
It:: 4la-oI:
t Iit!::Ji'::
i.
,"',',..... '1"..","
'" .... I
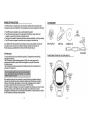
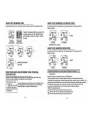
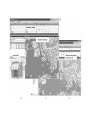
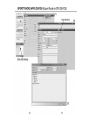
RANGE OF APPLICATION
ACCESSORIES
The GPS device is a navigation system . By using the 24 satellite netwofk circling the earth.
the posltion of user can be determined. This is possible at any time and averywhere in tha world.
®
• The GPS device is designed for use as a global positioning system.
• The GPS device servas mainly for tha measurement 01 distances. speed. altitude and
navigation by using the US·Amarican 24 satellite natwork.
• The device Is not usable for demanding applications such as paragliding , sky diving or soaring .
• The GPS device is designed for private use and not su~able for commercial use.
A use d ifferent other than described In this Instruction manua l Is not advisable and can lead
~,.,
(3V I CR2032)
Mounting Shoe
USB Clip
Installation CD
to damage or injury. We assume no liability lor damages resulting from improper use.
Further directions and explanaUons can be found In the Instruction manual.
~
Chest Belt
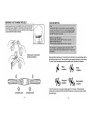
GPS Reception
To use the GPS function of your GPS device optimally, it Is imperative thai the following
instructions are followad .
The GPS device is a global positioning system ( =GPS), which ma inly serves for the
measurament 01 distances. speed, altitude and navigation by using the US·American
24 satel lite network.
The United States of America operates this 24 satell ~e netwofk and is responsible for its
accuracy and maintenance .
FUNCTION BUTTONS OF THE GPS DEVICE
Only during clear weather (dear sky) and suitable reception
area· open a.... a nd clear Vie ..... oflhe aky - can a faulUess
satellite reception be ensured.
Since satellrta Signals react very sensitively to outside Influences. bad weather cond~ions
(such as strong snowfall) as well as a d isturbed reception area (GPS device Is covered by
clothing or otherobj&ts. high buildings or narrow valleys and gorges prevent re<:eption)
can seriously impair the performance and accuracy of the GPS device.
The GP$ reception In buildings Is very reduced or Impossible. Nearwindows. as well as In rooms
with large windows and free sight of the sky, the position can be determ ined in certain
circumstances. depending on the current pos~ion of the satellites. In closed rooms and in cellars
the GPS reception is practically always Impossible.
- 1-
- 2-
CLEANING AND MAINTENANCE
• Clean the GPS device only with a soft, moist, lint free cloth.
• Do not use solvents, ac<dic or gaseous cleaning agents.
• Take care not to leave any water drops on the display of the GPS device. Water can cause
permanent discolorations.
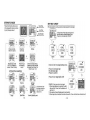
Rec ha r g in g th e watc h
At the back of the watch there are four contacts. Clip the connecting cable (As shown
in fig , 1) to the watch case with the four pins on the cable matching the four contact
on the case back. Plug the cable to the computer
Charging time is about 3 hours.
• Do not expose the display to bright sunl ight nor to ultraviolet radiation ,
• On the display of the GPS device is a transparent protective film.
You can remove this or leave it on the display to protect it from scratching.
Please take care that the GP$ device has a dear view of the sky to ensure a faulHess
reception olthe signals. Otherwise limitation olthe performaace and the accuracy could result.
Take care that the GP$ device is not covered by clothing ..
The receptioo could be distinctly reduced by this. yO\) can read more about GPS reception
in item "GPS Receptlo nH
Belt
,
• 3.
., .
,,
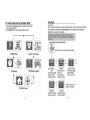
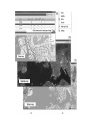
WEARING THE TRANSMITIER BELT
GPS RECEPTION
Adjusllhe elastic bell so Ihat il fils~ghUy around your chest j ust below
thepectoral musdes. Moisten the transmitter's conductive pads with
sa liva or ECGlIel {available at you r local chem ist's) in orde r lo ensure
a good contact with the skin at all ~mes,
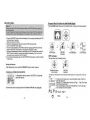
Tip:
Hold the GPS still for a few minutes in an open area before
you start your journey or drive in an open area w~h free sight
of the sky and sw~ch ~ on, press and hold the SATELLITE
a NI OFF for about 3 seconds,
"
Upward
Switch o n the G PS d evice:
Hold the SAT ELLITE O N IOFF for about 3 seconds,
Switch off t he GPS device:
Hold the SATELLITE ON I OFF for about 3 seconds,
The G PS device automatical ly starts 10 search for a GPS
signal, visible by the bl inking satellite symbol in the top left of
the display,
Positioning the Transm itter Bell
upward as per diagram.
Please note that rt can take up to 15 minutes from the first sta rt in new surroundings until the
first sate llite rece ption occurs. Then the satell ite symbol appears permanently on the display,
The more "waves· are displayed around the satellite symbol, the beller the reception:
!J~
~
conductive pads
conductive pads
- 5-
rJ.J
Weak
re ce ptio n
Very good
re c ept ion
~))
Good
reception
Best possib le
r ecepti on
If the GPS device has not received a Satell ite signa l in 30 mi nutes, GPS automat ically
switches off, By hold ing the SATELLITE ON/OFF button for 3 seconds, the search for GPS
signal start ag ain,
- 6-
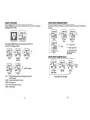
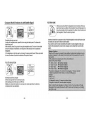
TIME MODE
TO TURN ON AND DISPLAY DIFFERENT MODE
Time setting
After the watch is fu lly charged. remove the USB connecto r The watch enters into lime mode.
During satellite reception (see rtem GPS Reception) time and date are set automatica lly.
Selting the time manually is not possibte .
1. Press and hold SATELLITE ON IOFF button for 3 seconds to
tum on the GPS devioo.
2. Press MODE button to switch between different mode.
•
681
40_196
• 78 40%
WI 06'25:36
!!Hi 86.55
SPEED Mode
.
DJ
Nottce: Please note that the GPS signal sends Greenwich
Mean Time (GMT), and it may be necessary to set a different
time zone.
HEART RATE Mode
. ~-~
SAT
To set a dIfferent lime zone, please follow.
"'~flT
2:23D6
18 OCT
Hold A for 3 Sec. to enter time/personal setting
j
• 2:23c6
A
A
00000'00.00
cccnCCOO
18 OCT
-
T IME Mode
16.5
STOPWATCH Mode
Set time format
"'''
Press BlC to toggle
between 12/24.
Press A to confirm
set GMT
Press B to minus
30min, C to
increase 30 min
Press A to confirm
set metric system
Press BlC to toggle
between KMIM
Press A to confirm
Press D Button al any
stage to exit setting.
COMPASS Mode
set birthday
Press BlC to select
Press A to confirm
_7 _
set weighl
Press BlC to select
Press A to confirm
- 8-
HOURLY CHIME
A
Hourly Chrme OFF
..
A
SPEED MODE
Press the MODE button until you are in the speed mode, as shown in the following
readout (graphics on the left).
681
Hourly Ch,me ON
..
f i 8Ei.55
Toggle between DatelYear Display
B
SRT I
..
VERR20J.O
Alarm Setting
-c
RLRRM
12m'
Hold
A
Press B to de<:rease dig~ by 1
Press C to increase digrt by 1
Press A to conform
Press D to save and leave alarm
setting
TURN ALARM ON/OFF
A
RLRRM
RLRRM
r--"
1200 '
1200
••
D.o
B
C
•
Sub FurlClion
By pressing the SELEC T button. you can change the readout in the
lower part of the display as fol lows:
5"'
• 2:2306
2:2306
18 OCT
.. CUrTent Speed
Remark : Alarm sound for 1 minute,
press any key to stop
A
- 9-
""
11.1111
c
""
6.22
An'meter
(!llJij
Tlip
~.~
'D.o'
'D_D" ~~~D_O·J~
D.D
WI [][NIII'[]D
c
~me ,
, ••
Average Spee(I
D.o -c. (Jn~·
'0_0' - .
c
""
21i8
Ma.S~
Loop (distance item)
OlD 622m
Odome'er
Oom~.
• CST" Distance Hold A to reset 0
• TM "Training time (displays the time moving, i.e. during standsti ll the time is stopped,
if the movement continues, the time continues as well.
GPS re<:eption provided!) HokfA to reset 0
• AVS "Average speed Hold A to reset 0
• MXS " Maximum speed Hold A 10 reset 0
• 000" Total distance Hold A to reset 0
• ALTI "Current AHitude
• CP "Compass (an arrow shows the direction (N, E, W or S) in wh ich you are moving)
N" North E" East W" West S" South
_10_
HEART RATE MODE
HEART RATE SUBMODE(TlMER)
Press the MODE button untit you are in the heart rate mode, as shown in the following
readOul(g raphics on the left).
Sy pressing the RECALL button(B) you can change the readout in the lower pa rt of the display
as follows:
IlD~19Ei
~
B
• 7840%
ffil06b36
-
40~1!35
• 7B ".
16
""
-
-
c
-
40-P196
•el!l!7B,,"
56.82
CalOlie
-
c
• 7B".
66.5
iiil]
-
c
Loop (limer item)
5",.,
_11 _
B
be~)
. ::: = In Zone limer
AVG
• '" = Below Zone limer
. ... " Above Zone limer
Timer starts when pulse
signal received
HEART RATE SUBMODE (AVG)
• 7B,,%
165
"'"
Average
Heart Rate
"Training time (d isplays the ~me training with chest
Hold A to reset 0
AVG " Average heart rate Hold A to reset
ZONE" Exercise ~one
CAL" Calorie Burnt Hold A to reset 0
SPD" Current Speed
B
::m2Ei'S
B
40~1!36
• TM
•
•
•
•
C
c
Average
heart rale
••
40~1!36
-
• 7B".
In Zone
Time r
By pressing the SELECT button, you can change the readoul in Ihe
lowe r part of the display as follows:
c
40~1!35
40~1!36
40~196
-. • 7B ,,% - . .,• 7B ,,%
"
'"
B
B
196
Highest
Lowest
IB
Hold button A to reset data
-12-
c
------00
Zone
User
HEART RATE SUBMODE ZONE
HEART RATE SUB MODE (CALORIEfFAT BURNT)
By pressing button B you C3n change Ihe readOUI in Ihe lower part of Ihe display as fol lows:
By pressing the RECALL button(B) you can change the readout in the lower part of the
dispJay as fol lows·
Press B to decrease dig it by one , press C to
increase digit by one, hold for fast forward
and backward. Press A to confirm Press D
to leave.
HOLDAto SET
PERSONAL
ZONEISETTtNG
Press A 10
lumZONE
ALERTIONIOFF
[
-.
B
4[]~195
•Bill(jj78,,"
LV -I
•Bill(jj78,,"
LV-3
B
c
• 7840%
[IJ!J!
52.68
.--
B
4[]~195
•f!2llliI78,,"
L\J-2
-.
B
Level 2
Heart Rate Submode
CALORIE
~~:g~~y~~U~~L!!~IT'S AND DETERMINE YOUR PERSONAL
You may al ready know your MHfI il you are an avid alhlete or n you
have already laken a Max. HeartRate test. 11 not, the loIlowing
lormula witt hetp you to make an educaled guess:
_13_
•
7840%
Iml
0.00
c
SPEEO
FAT BURNT
HEART RATE SUBMODE (SPEED MODE)
By pressing the RECALL button(B) you can change the readout in the lower part of the
dispJay as fol lows·
g
~.
40"'P196
7840%
Fljl~
66.5
•
SPEED
Level 3
40"'P196
B
CALORIE
Hold Button A to reset 0
Level 1
4[]~195
40"'P196
B
.-
40"'P196
7840%
•
'HI
-.c
TIMER
om
DISTANCE
Speed and Distance only works when GPS signal is received.
Training Time
Press Ihe C bullon in the heart rale mode unlil TIMER is shown .
The training time is shown in Ihe tower segment of Ihe display, in the middle the hea rt rale.
The display of Ihe Iraining time is aclivated automaliC3l1y when a heart rate signal is received . The
training time shows the lolal time you have worn the chesl belt and lhe heart rate was received by
the heart rate monitor watch , even if you switch 10 another mode from the heart rale mode.
If you press Ihe A bUllon shortly, you can choose between lhe following displays:
TIMER" The total training time
(I l"The time wh ile you were within the chosen training zone
( .. l " The time wh ile you were outside of the chosen lIaining zone
( ", l"The time wh ile you were below the chosen tra ining zone
-14-
STOPWATCH MODE
SETTING TARGET
Press the D button until you are
in the stopwatch mode, as shown
by the fol lowing readout
-.
B
Press A to stan,
Hold A to reset 0
Tolal TIme
•
Lap TIme
• Sub Function
•
OOm'62.38
DDDITlB"
LAP 02
B
If the stop watch is runn ing, press A to stop stopwatch to set ta rget
In Target menu Press B to choose one of
the infotmabons SpeedlD ,stance/Time
Press A to turn target Alert ON/OFF
1J
B
B
gglaps
Press B 10
record lap
D.O
[][]:S6'68.51
B
-
LAP FULL
After 99 laps stored
LAP FULL display on
screen , Press A 10 slop
110'56'68.51
B
DD:D51122 - .
Press B 10 go
inlO memory
re<:ord
••
00:]8'6118
DD:D2II22
l!1!:t:l!i
86,6
e
GORL
DIST~NCE
om
e
Distance
!:lEST-LAP
oom
Press B to read memory.
Fastest lap is the first data
to display, then Press C to
fOllow by lap 1 ...99
e
Ho ld
A to
enter into target setting menu.
Press C to increase dig it,
S to decrease digit,
Press D to confirm
.B
1!
B
Press A to turn target alert on/off
-.
-.
e
Target
-t 5-
In t~ e submode. Pless
a still.bIe 10 recotd lap
time. Hold A to reset
data baCk to 0
GORL
DISTRIH
L20
iD
A
REMARK: User can onty set one target
1. \r\ohen target distance is reached, the alell
wil l sound for 10 sec. And the distance wi ll
start from 0
2. The watch wi ll beep ff targel speed is not reached .
3. \r\ohen target time is reached , the alen will sound for 10 sec. And the timer will start from 0
DISTRNCE
e
.
Ie
LAP 04
e
GORL
TIME
TIme
OIl:01'62J8
STOPWATCH SUSMODE
-e .
g
~.
GORL
SPEED
om
-16-
Recording Data
Notice:
the following readout:
Please nole that the GPS and pu lse data are saved in Ihe GPS device only during on
going limekeeping.
You can change to all modes during timekeeping. the recording of GPS and pulse data
continues until you stop the timekeeping in the stopwatch mode or the memory is full.
1. Press the STISPISET button to start timekeeping . During ongoing timekeeping the GPS
and pulse data are recorded.
Maximum memory: 350 hours.
2. To stop the timekeeping and also the recording of GPS and pu lse data,
press the STISPISET button again .
3. To continue the timekeeping and therefore also the recording of GPS and pu lse data,
press the STISPISET button again, to stop aga in the STISPISET button.
4 . To reset the timekeeping and save the recording of the GPS and pulse data, press the
SELECT button for about 3 seconds during stopped timekeep ing. Your run or ride is
now saved as one record ing in the GPS device.
5. If you start the time keeping again with the STISPfSET button again , a second recording
is started . etc ..
~~
~ ~ (6~J c
way Point
Navigation
GPS Compass
-c.
Route Navigation
• '2~.
28'20.2"
E114'
II '52.8"
Current locatIOn
GPS Compass
The watch shows user's travelling direction
Deleting the Memory:
If the timekeep ing is at zero, press the STiSPISET button for about 5 seconds.
CLEAR ALL STORE DATA tN WATCH
In Stopwa tch memory screen, Hold SET for 5 seconds,
clears all memory
Middle arrow shows
Home direction
....,
Way Point
Navigation
The watch can memorize 16 point of interest(1 home location and 15 way points) To set way
paIn :
At the point of il)terest, go 10 currenl localion screen. Hold A to
N 22'23'11" save as way pOint
Press B or C to select which icon 10 set Flag 1
Ell2'S6'32" Then Press A 10 confirm.
TO download the saved recordings follow item Transfer of GPS data to a Co mpUlet.
<:>
II is not necessary to sel point of interest from 1 to 15, the user
can choose to set in any orders,
=
= 5
~ilHO l ~ilH 1
Flag 01 .. Flag 15
Home
-17-
Flag 15 or home.
.16-
Compass Mode (Functions only with Satellite Signal)
fi)
<:>
...
N 22'2]'11"
Ell 2'56'32"
-.
B
REMARK:
In the beginning Or when the user is not moving, the arrow points forward . VVhen user starts
to move , the arrow will point to the direction of the po int of interest
...
ROUTE NAVIGATION
®
Before your journey, Start the stopwatch to start recording , When you
want to turn back , use Return Home function . Press B, then press C \0
show home location hold A to go back to the Return Home function and
start navigation. Follow the arrow to go back .
<:>
0.08
Navigating through way pOint
In way point navigation mode. press B to show way point data. press C to choose the
des ired way point.
After selection. press B to go back to way point navigation mode. The arrow in the middle
shows the direction of destination. lower digit shows the distance from the destination
,/'"7'
RETURN HOME
N 21'2]'2]"
E122'62'3l"
-.
B
12.08
~
Download route from computer
(Please see appendix how to download route).
At the starting point of the route, turn GPS on.
Midd le arrow shows the direction on next way point , below d ig~ shows the distance
remaining to the route destirat ion.
-19-
Do wnload rou te from computer works on Route Naviga ti on mode only Rou te record
by watch can on ly use for return home fun ction
If you want to use the ro ute recorded by the watch in route navigation mode, you
need to fi~t download the route to the computer and ,e·install the route into the
watch
Dleplay of Poeltlon:
When the GPS device is connected to the satellites, the latitude and longitude for every
position is displayed. ArI N is added to \he latitude (north of the equator) or S (south of
the equator).
A W is added to the longitude (west of the prime meridian) or
E (east olthe prime meridian).
N" North" North
~ nOr1hem latitude
S " South" South ~ eouthem talhude
E " East" East
~ eastern longitude
W " West" West
.... western longitude
The position is displayed in the common lonnat degrees · minutes' se<::onds '
1 degree is subdivided into 60 minutes, one minute is 60 seconds.
Exampla:
N4S"S' 41.4·
E 14' 0' 45.0·
" 48 degrees 8 minutes 41.4 seconds northern latitude
14 degrees 0 minutes 45.0 se<::onds eastern Iong~ude
Note: During Route Navigation or Return Home, You must stay in Route
Navigation Submode otherwise the GPS device will not keep you tracking
along the route.
TECHNICAL DATA
LIGHT FUNCTION
Sy pressing the SATELLITE
button, the display is illuminated for about 3 sewnds.
Please note constant illumina~on of the display consumes more battery. which
results in a shorter lifespan of the battery.
A battery charge is necessary, If the display gets wea ker Of it fades totally. If the battery is
weak, the low battery symbol is displayed.
$
FAQ(TROUBLESHOOTING
Memory for GPS data:
Accuracy GPS:
350 hours
5 metres
The indic3tion of the accuracy is derived from the so called 50% CEP (Circular Error
Probabil ity) . This means that SO% of all measurements during very good satell ite reception
are within the stated radius of Sm . However this also means that half of the measured points
are outsides this radius
In this case 9S% of all measured points a within a circta of twice the stated radius. This
means that during very good satell ~e reception almost all points are with in a circta of 10m
radius. The determined pos~ion is in the worst case practically always accurate to about 10m.
NO Sate llile Reception
We rewmmend placing the GPS sport computer in an open area with free view of the sky
some minutes before you start your training . Please see notes as stated in "GPS Reception".
Accuracy of Positioning
"21-
-22-
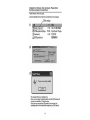
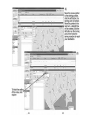
Procedure to install the sporttrack software.
(1 )
Downloading the Sport Tracks Step-1 go to site
http://wNw.zonefivesoftware.com/SportTracksJ
.I!!"tTr ....
·n~
"""::ow"""';';"~';'~~"~'-:',
.-.___--_......_.._--_-
,:
p'@:i'rn l1-:= 1
i~~;;#;;~~~r:::.,
..............
-,.....-...............,......-..- '1!!!!!IrJ_
(2)
Gf'S. ....... " ... _ _ _ _ _ ... ... _ . " ".
.
~.,
,.....
....
._-"
.........-_""'
... . ,....... __
.........
!!••oil ..._.s
. "',. . . ,. . ,
~ '''
SportTrntks 3.0 UW",<Ie
,--.......--""" .....
...
._
..._--_
..._"'
. -.--.---,-__
.---- ._- ._.._--._._--_....
.
...- .-----
. ,~-
---",-_.'''-'---''-_.-0-0".,...,
y . . . . . - -..... , . . . . .- , ... ~---.
........_ .. If!
~- .--
. ---.--~-
---~"'
...
H_~'
STEP 2
Click free trial version to install
......__
,-.~-~-,.-.- _._._.-
(3)
SportTra<:ks 3.0 Product Comparison
STEP 3
Click
trial version download
r.... _ _ _ ...... _ _ _ _ _ " " _
... _ . . __ .. "".__ . . ,&0._.__
....,.,._'... .-. ... .. .... ,....
...... -.. - ......- ..... ......
......., ... -...
.....
.. ... ""'._._-- .......
_- - -
' - ........... OP>_ .. . _ , , _ . , . . .
__-_-,,--
" " '. . . . _ _ M . . . . . . . .
"""-~
_-,,,-._--__
__ _-_._._- __ -._
_-·""""_..
.........
- . ..........
......... .. ...
...
...
.
......... ... ..- ..... ...
,.........
"'.-.....-.-.
·.............. -. ... ...
... _.............
.......
.-.. ....
·""",.---- ......
...
••
••
•••
•
'-~ .-
--. - - ~
-~.-
_-_
,~
-~
---~-- ~
_~.'''''''_'''I.OJ._
~ M_'_
.......
,
.---
,... -~"....
r ..'... .
--._---_...---..... ..-- . . .
..
••
••
•••
•
••
•
•
•
Download Trial Version
Downloading Sortware......
Down ICHI dlng ...
~ k 1""
_
_:n.
lot ~ ......... ..,0;0. (II SportTl..,k•. v .... _
..... Y"'" _ _ _ SportT""k•• 1>0001 ..., t ......
w. __ . ft .. you try out Span"""'" "",11wo Ol .. 90' _
. . "'"'" otM>ttI)r.I' ......" «k!iii.
lot _
.... on _
~
rou< c"P)' <II SporITloco U
.-e.
10 . ". .nood "'''ur" 00'" ...11.1>10 In 11>0 FULL .. nIon.
·U/III"'''. How'" """on hm SportT,oco .10<..0<1 _
1"• •• oy . ;''' ckk th. tog 9"'""
Y"'" OM t..y 111, uP10d0 rod - . .
.... ..,It ..... (II tl"
11M <01""", "" .... ",.., K<H/I. Th • .wi w.. \'0" to ... _ . - .
.
tlCP!'!I!!l!gqnp!M0?900-29'9lmtflnSoo!!ggltC I
~
(5)
.j!} Sportrradcs 3.0 setup
Welcome to the SportTracks 3.0 Setup
Wizard
The Seb.1p Willlf<l wi hstlli Spot tTr;,cb 3.0 on rout
tl>II¥lUMr. Cld.1i6t
1'1\. ... <1.
STEPS
Click NEXT
to conthlo: Of ClrnI;d to ~,.;t tt.... Seb.1p
Trial version of SportTrack 3.0
has no time limited. You may
enjoy the trial version for as
long as you like.
Press Later to enter into the
software.
If you want to use the full
version, please press Upgrade
Now, you can enjoy the full
version for a fee.
SportTracks 3.0
TRIAL VERSION
(6) L-......;===;...._---'
-3-
- 4-
Installation of software, driver and plugin, Please follow
the follow procedure to install driver.
Install software. driver and plugin.
Insert the diskette into the disk drive to install the driver and plugin.
Ii
setup
(1 )
SportTracks: 3 Pluain...
1 K8
"'''''''{~
;;;;;;; .Ii011!
i~
Readme.b:I
(2) HAEM"'" tii Ii WI! I I "
--
~:O;j1fI'l'"
Click install
c......'_17
---
IRl
(3) Install Plugm
Plugin successfully instilled .
• The required drivers are installed now.
• Now you can unplug the docking station with the GPS device and
remove the installation CD from the drive.
Every time you connect the USB cable to the computer, the
operating system wilt automatically recognize your GPS device.
- 5-
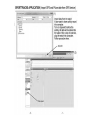
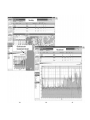
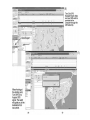
SPORTTRACKS APPLICATION (Import GPS and Pulse date from GPS device)
(1 )
. t.Io1o .... -
...
,.
.,....,.,w"'..,
Import data from the watch
If user want to have activity record
into computer.
Turn on stopwatch before the
activity, All data will be stored into
the watch . After a day of exercise,
plug the watch into computer.
Follow procedure here.
''''''
Ii ~W'.I<"''''
lieJR_
IiSc,,1io&
0"_
0 - __
eJlt>foo:rI,
Click OK
~~ (2)
..
, ", , ""
.
" ""
"~"~
". "
,,"~
~ " "." .
.q,""'_____
~
D~
--",
Click import
,
-6-
_7 _
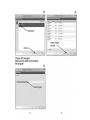
(3)
(6)
,
•
~
S~<t
lte." to Impon Into your Io9book
,.
B""""""
S .... ......,"
~
'"
11l'._'
'"
!il .... """"
Select device
••
s .........."
••
e-"""'''
••
B~t··",,,
.... ,- ,..,
""
'
,
~,,,-
.. "..,-......
,.. ... ........
.. .. . . . ....
'0) ",,, ......
,.,., .... "
II.....
",
",
""
'JO... "'" ......
,
transfer complete
Clicknext~
....
-.
Choose GPS navigator
Make sure the watch is connected to
the computer
,_.~i:~ N,"
-
~
~.
1-----------------
(5)
UUllU'IIlUII'IUllJIJI_I'I~
transferring data
.'
- B-
..
,
- 9-
c.c.c.---c_cc-,-,...
-,-il
(7)
information display
."
'
..
••
"
.
••,
,-
chart with dala
(8) 0
•• '
..
--~
. 13-
"''''
.. -.
No."
(9)
Satellite
[;!] Street
Terrain
I?
Hide Map Toots
'"
Settings
.. . ".. ' "......
, .. ..,
...
..
••••
~
~
~"""
""~".,
~""
~~"' (12)
Data display
"
.-
•••
••
.
..-...--
... __.
"-
"'--,
---
--....... ... .. ..-... "
... ...
"
••
.
.-.-.--
..
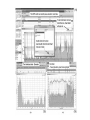
(13)
Ful l salKIn chart
,, !!
..
·17·
,
(14)
The GPS watch can record pace, elevation, heart rate.
-
... -.
... ,..,,.,, ... Ir"'~:;::;::::-,
, .. " " ...,
"""""
.... """".. ,."
~M
""""",
''''
" ,,,. ""
--
10"" R
"
To add information to chart, _
chick this icon, chart detail
will pop out
""""" ..
Double click the function
need to add . then click and chart
Click ok to finish
..-.-.---
"",".1.", •
The Individual chart - Elevation
w~~~~::::===::~~~~!~~~~~~
Heart rate combined ........_0(
E'
r
-18-
(15)
-19-
(16)
~'~" " (17)
oo ~_
".
,.
R..... T.... '"
.--'
..... .,..... ......
,~
-
"
"
•
""
.., "...
.
," "
"" "
Individual chart
- Heart rate
Individual chart
-20.
Individual chart - Pace
(18)
(19)
SPORTIRACKS APPLICATION (Export Route to GPS DEVICE)
~7128'l9J(1J'
,
loIo T, II, TIl '" to '"
2J<5 . 78
!i,O",2UL<'!
I." '.'9102171
21 2. 2S:l62721 'l9
."
loIo
,.11, TIl" 'ill =, 2 ) • 5
671!llOu12
11 " ,5 I. 17 l~ I~
1021 7lV:N 2S:III
7I:IlVlO
,.
~
-.
,--
(1)
e,""''''"" Route
~
~
,-
-.-.-
Summary
,
--.
---.~
~-
.-
'-
'=====d
',
~-
_...- '"
.oo.
•
•,
•
~
~
,.
o.o/OD
•
~~
. . , I[R
.-
•
•
Click Add Activity
._-
~.
~
'"--.~
lIeJM1"'_
lieJR_
-
--
""Iil c" ...
"-
s-
iili!lM1""'.. ' .... _
(3)
-22-
-23-
(2)
~I
'fT.f."l:'R'
~)
~ ~ ~ ~
,,',,'
Mave th emousepomer
. t
:;'.;:~:~E~:~:~:; ,!§r"Iii"'-""----~-"----"-""••'-"-.·'·.·".".•-...-....-------~J
I •• """"
!
!..,••. n~u.
,,,,:: ~ ;~~~;:::::;~.~-~;~::~.::'"::":.~:.;.~:::i~~
~::~~~:~
..,~_
.. ,,~ •• ,.
. ""
"'h " ~h~
,......
'
•
!::~ :; ~ ~g
I
j. :
' !iIi
f -..(!
- -
.
_ starting
Move the
pOinter
to the
point
is marked.
next tum, a straight li ne
will be created, cl ick the
~
left button on the turning
point, then follow the
~."--'l"" same procedure to reach
~.:.,~
your destination.
, \ '(1
,
:~~.".,.
••
to the starting position,
click the left button , the
--6
~~- (5)
,
.."... ~ . .. I ~~~:.;:;::::;;~~~
,,~"'~"u~
""''''''''''
""" "N"
"'~
...""'"
".,.""
,""""
.. "
•
~
"~,,."".
••
~"" .. !OU!
0-
--
I ••
,
•
\. I
,\ >-
,
To finish the s~ttinfl,.,
of the route , click
explore
.,..'-_._.
ijic
-24-
-25-
•
r;..-,;",.... _....,"--"",""
. ""
..,,,,,,.
... . ".....
lin""" .. "
.."",
,... " ... . .
..• .-
tiM¢'
(6)
,, ~ ~
"
00 "' ....
' ' ' ,, '' u
" ~.,,
~=., ,. ~,,,.
~
,,~
.. ~~U ..
"""'" 'IN..
" " .. 101O.
•_ .
'''" " Ill" "
""~"""'"D
. " " ~""
••
...
,.,.,
~
11
--
\,\
"".
"-
~
Click Export
.-
•.
' =-.
•
.~
,
"'
.. .........
-
.T_ ~ "
-~
..
" ""
"
",."
. " . ~"
"""
,,,,,.,,,,,,
""
"'
•
'"""M''''~
'''''.
"""",,,
""""".
.. ..... .
Then Click GPS
Navigator Export. Make
sure your GPS watch is
connected to the
Computer thorough the
USB cable Clip.
.,"-
-
--'"
.""" ,,,..,
......
...
-
~~- (7)
•••
~
-,-. .- ---
,.___________... ¢:::
,
;I
-,
.~
cso-
.-.-
When Arriving at
! 5 "('
S "'~'
the starting point.
Turn GPS on to
Acquire GPS
signal. The watch
wi ll guide you to the
destination that
,,~---'
was preset.
·26·
_.
·27·
..
0 , ...
--
_Route created on sporttrack and export to watch can only
be as navigation from starting point to destination.
_Route recorded in the watch can only be use as return
home, navigation from current location back to starting
point.
_To use route record by the watch for navigation, first
import the route to the computer then export the route
back to the watch, this route will be the same as route
created on sporttrack.
-
(E :tr
Art No : PYLE_S PQRTS-PGSPWl
28