1
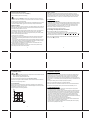
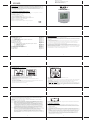
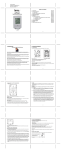
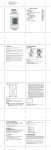
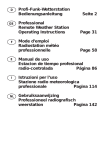
KSPO:1101-10
IROX OST14-MANUAL 3(Eng)
SIZE:W100 x H100(mm)
BY Lai HZ 23/7/10
Table of contents
1. Introduction
2. Operating elements
2.1 LCD display
2.2 Keys / Switch / Battery compartment
3. Putting into operation
4. Radio thermometer
5. Operation
5.1 Thermo/hygrometer
5.1.1 Reading of the temperature from each channel
5.1.2 MIN/MAX memory
5.1.3 Comfort zone
6. Change of battery
7. Care instructions
8. Support
9. Technical data (display unit)
JKTG-4R
Operating Instructions
Page 29
Page 30
Page 30
Page 31
Page 33
Page 34
Page 36
Page 36
Page 36
Page 37
Page 37
Page 38
Page 38
Page 39
Page 39
Version 1.1
1
28
1. INTRODUCTION
2. OPERATING ELEMENTS
Meteocentrale.ch is the weather forecast website operated by Meteomedia Ltd.
2.1 LCD DISPLAY
All functions are depicted on the liquid crystal display (LCD) in 3 windows.
Meteomedia is one of the leading weather services in Europe and, with its own Severe Weather
Centres in Switzerland and in Germany, among other things, specialist for modern early
warning systems for extreme weather conditions.
The core of the company is the private weather measurement network. It is one of the biggest
measurement networks in Europe.
Irox, market leader in the manufacturing of measuring devices, and Meteomedia have
developed a joint product line that convinces with its high quality measurements, simple
handling and elegant design.
The JKTG-4R is a high-quality thermo/hygrometer that gives you the absolutely unique feature
of choosing between three different max/min memory functions. The recording is done
independently for each of the 6 channels in total. The individual scanning of the 5 radio
sensors also makes operation transparent and calculable.
Please read the instructions carefully. They contain some useful and interesting information that
go beyond a mere explanation of how to operate the device.
Full-segment display
Radio channels 1-5:
- current measurement of the selected channel (=radio probe)
- memory values min/max of the selected channel
- battery status of the sender displayed
Comfort Zone:
- display of the comfort status of the measurement of the indoor thermo/hygrometer
Indoor thermo/hygro :
- temperature and relative air humidity of the display device (measures at the location where the
device is used)
- memory values min/max of the indoor thermo/hygrometer
- battery status of the display device
29
30
T/H SET
2.2 KEYS / SWITCH / BATTERY COMPARTMENT
- For the IN measurement, the MIN/MAX values of the temperature or the relative air humidity
are displayed below the current value. With this key, you can have the temperature or hygro
memory displayed.
Rear view
MIN-MAX
The MIN/MAX memory is managed and recorded depending on the setting. The setting applies
for all 6 channels
Pos. 1: PERM - From the last MEMORY RESET, the MIN/MAX recordings after the function
“drag indicator” are recorded. This recording is "PERMANENT", i.e. a new recording
does not start until after a new MEMORY reset.
Pos. 2: 24 Hr - If you choose this option, the MIN/MAX values for the last 24-28 hours in each
case are recorded. After expiry of this period, the MIN/MAX values that are older than
24-28 hours are removed from the memory. As soon as you have selected this option,
we recommend that you start the memory recording in a defined way with a
MEMORY RESET. This then starts a recording that triggers internally an elaborate
calculation and recording. The MIN/MAX values are administered here in blocks of four
hours.
Example: You want to be able to read the MIN/MAX values of the last 24-28 hours at all
times. Irrespective of when you look at the display, you will always see the extreme
values of the last 24-28 hours. Older recordings are deleted in the process.
°C/°F
- Changes the unit of temperature in the display from °C to °F or vice versa
MEMORY RESET
- Hold pressed for 3 seconds: Resets all memories (IN and CH1 ... CH5). The new recording
now begins depending on the setting of the MIN-MAX switch
CH (=CHANNEL)
- Press briefly: changes to display of the next channel (1
2
3
4
5
1
etc)
Pos. 3: DAY- If you select this option, the MIN/MAX values are recorded for 24 hours in each
case. You are free to choose when the recording should begin. The start is determined
by a MEMORY RESET and after 24 hours, the memory is automatically reset and a new
recording begins. Example: You want to be able to read the MIN/MAX values of the last
24 hours in each case at 8 p.m. You therefore carry out a MEMORY RESET at 8 p.m.
With this RESET, the clock begins to tick internally and this automatically resets the
memory after 24 hours and starts a new recording.
- Hold pressed for 3 seconds. For the radio channel active on the display (CH1 .... CH5),
a sender search is started. The three waves above the CH flash during the search process.
Only the sender of the channel displayed is searched for; the others remain unaffected.
31
32
4. RADIO THERMOMETER
Battery compartment
The operation of the radio sensor supplied with the device is easy:
- Open battery compartment
- Select channel
- Activate batteries (i.e. remove insulation strip) or insert batteries (please make sure that the
polarity is correct!)
- Close battery compartment again (please ensure that it is tightly closed!)
2 x 1.5 batteries of the size AM-4 resp. “AAA”
To open: slide lid in the direction of the arrow (indicated on the lid) after the stand has been
removed.
Other Irox radio sensors that are compatible with the JKTG-4R:
3 channels (can be used on the channels, 1, 2 or 3) : HTS12C, HTS33, HTS13*, HTC13
5 channels (can be used on all 5 channels): HTS55, JKR-1
3. PUTTING INTO OPERATION
(*HTS13 is included in the scope of delivery of the JKTG-4R and can be used on the
channels 1-3)
1. Put all radio sensors that you want to use into operation and place these in close proximity
(1-2 metres) to the reception device.
With the sensors with thermo and hygrometer, simply only the temperature is displayed on the
JKTG-4R.
2. Open the battery compartment of the display device and remove all insulation strips. If no
batteries are in the device, insert the 2 batteries (UM-3 or ‘AA’ 1.5 V) in the correct polarity.
Reception status display
3. Now close the battery compartment.
The wave symbol indicates the status of the signal reception of the channel displayed.
4. Directly after the activation of the batteries, all segments are displayed for a few seconds on
the display. The JKTG-4R then begins with the search of available sensors on all 5 channels.
5. As soon as the sensor is displayed correctly (see ‘Reception status’ in Chap., 4), you can set
up the sensor in the place where you want to effectively measure the outdoor temperature.
Under the most ideal conditions, this can be up to 30 m away. In reality, however, this is often
less. In the event of problems, try out other places, and do so both for the sensor and for the
display device. The radio sensor is weatherproof. Nevertheless, please place the sensor
where possible in the dry and at any rate in the shade.
6. If you would like to display further sensors on the reception device, you can purchase these
from shops. For outdoor use, we recommend weatherproof sensors. If you would like to
display other interior spaces, the sensor JKR-1 from the ‘Instruments by Jörg Kachelmann’
range is available in the same design as that of the display device and also has a large
display.
33
The unit is in searching mode.
Temperature readings are
securely registered.
No signals.
34
Start search process for a sensor
Signal ‘collisions’
Select the desired radio channel with the CHANNEL key.
Radio signals of other devices in their environment can cause disruptions or temporary
interruptions in reception. This is not bad but could be annoying under certain circumstances.
Such typical 'disruptive systems’ are radio door bells, wireless security systems, tube screens
(PC/TV), control systems, etc. In such cases, it can also be helpful to use another channel.
Example: Channel 4 (the number 4 is flashing)
Now press and hold the SEARCH key until the wave symbol starts to flash. The device now
searches for the sensor on channel no. 4. This process can take a few minutes and is finished
as soon as the wave symbol stops flashing.
We have deliberately ensured that the search channel can be individually called up per channel
so that sensors that are already logged in are not affected by subsequent enhancements.
Signal interruptions
Each sensor is read by the device once a minute. If more than 8 readings are read one after the
other without data, lines appear in the display for this channel and the JKTG-4R then stops any
other reception attempts after this for 8 hours.
The display device starts a reception again by itself after approx. 8 hours. If the original sender
is not found again, the device starts with a new search for a new sensor on this channel.
When the signal is interrupted, you can start a new signal search at any time manually. Please,
however,check the following points beforehand:
1. whether the sensor is still in place
2. the batteries of the sensor and the display device. Please also replace them when a battery
tester rates them as still being sufficient! Further info on this can be found in the FAQ on
www.irox.com.
Note: If the outdoor temperature drops sharply, the output of batteries that have been started
is also strongly reduced. It is therefore recommended that new batteries are always inserted
in the sensor at the beginning of the winter (alkaline type or better).
3. whether disturbances or shields are to be found in the area of the sender/receiver or the
distance between the two devices is too great.
5. OPERATION
5.1 THERMO/HYGROMETER
The JKTG-4R measures the temperature and relative air humidity directly and also receives the
measurements of up to a maximum of 5 IROX radio temperature sensors. Each sensor is to be
set to one of the channels 1-5 (resp.1-3 for 3-channel devices). The temperature currently
measured is displayed in the information windows in °C (or °F) and, for the location of the
display device, the relative air humidity in % and the Comfort Zone.
The following operations can be made in this function:
5.1.1 Reading of the temperature from each channel
Briefly confirm the key CH to jump from channel to channel.
- The next channel is thus displayed with each press of the key and activated for further
operations. The sequence of the activation is CH1 CH2 CH3 CH4 CH5 CH1
etc
This is independent of whether a radio sensor is available in the system or not.
Please note: The
measurement is always depicted in the lower window; channels 1-5 one
after the other in the upper window.
The search processes described above for a ‘lost’ sensor do not have any influence on any
other existing sensors that function without problems.
35
36
5.1.2 MIN/MAX memory
6. CHANGE OF BATTERY
a) The MIN/MAX values are always present on the display below the current measurement value.
- LEFT: Minimal (=lowest) temperature "MIN"
- RIGHT: Maximum (=highest) temperature "MAX"
: BATTERY CHANGE DISPLAY
The batteries last for around 8-12 months. Depending on the usage of the appliance and the
batteries used, this time can be slightly shorter or longer. In order to avoid a surprising and
unpleasant interruption to operations, the battery symbol appears in the two temperature
windows with the corresponding channel. This means that batteries of the display appliance (in
the IN window) or of a radio sender (in the CHx window) are becoming too weak and need to be
replaced.
The logic of the recordings is displayed in Section 2.2 Operating elements.
Please note: Lines appear if no data are available. This occurs when a channel is not allocated
or the sensor is no longer being received.
To change the batteries, please note Chapter 3 (Putting into operation).
Please only use new batteries and never mix old and new batteries.
5.1.3 Comfort Zone
The Comfort Zone is only displayed for the thermo/hygro measurement of the display device.
With the outdoor sensors, only the temperature is received and displayed; it is thus not possible
to calculate the Comfort Zone for CH1...CH5.
The logic is depicted in the following illustration:
Please also remember that used batteries should not be thrown in the household rubbish bin
but handed in at the designated collection points. The environment will thank you for it!
7. CARE INSTRUCTIONS
- Do not expose the device to extreme temperatures or direct sunlight over longer periods.
- Avoid blows and shocks of any kind to the device.
- For cleaning use a dry soft cloth that you have moistened with water and a mild cleaning agent.
Never use volatile substances such as benzene, thinner, cleansing agents in spray cans etc.
- When the device is not being used store it in a dry area and out of the reach of small children.
- If the device is activated under extreme coldness it may occur that the display becomes
illegible. As soon as it is returned to a warm environment the device will function normally.
- Please keep the user’s manual and other documents delivered with the device stored carefully
so that you can reference them at a later point if necessary.
- Please use only new batteries and never mix old and new batteries.
- Please also remember that old batteries should not be disposed of with household waste but
should be handed in at the designated collection centres.
- Important: With all Irox appliances, all disposal fees in Switzerland (vRG; advance recycling
fee) and in the EU (WEEE) have been paid.
37
38
KSPO:1101-10
IROX OST14-MANUAL 4(Ita)
SIZE:W100 x H100(mm)
BY Lai HZ 23/7/10
ENG
8. SUPPORT
This device is a new development of Irox Development Technology. All information was made
and checked by means of a functioning instrument. It may occur that adjustments and
improvements of the device will take place that due to typographical procedures were not able
to be listed in this manual. Should you notice deviations which make it difficult for you to
operate and use the instrument you may at any time download the latest manual onto your PC
free of charge at www.irox.com (please refer to the version number of the manual).
JKTG-4R
Istruzioni per l'uso
© Irox Development Technology
9. TECHNICAL DATA (DISPLAY UNIT)
Temperature and rel. humidity measurement
Measurement range temperature: Maximum range -50.0°C to + 70.0°C (23.0°F to 122.0°F)
Internal sensor : -20°C to +50°C
Measurement range humidity: Maximum range 1% to 99%
Resolution: 0.1°C(0.2°F) / 1% r.H.
Measurement accuracy:
+/-1°C in the range of +5°C to +40°C
+/-2°C in the remaining range
+/-5% r.F. in the range of 30% - 80% (at +5°C to + 40°C)
+/-7% r.F. in the range of 20% - 90% (at +5°C to + 40°C)
Measurement frequency of radio sensor: once every 60 secondes
Power: 2 pieces MA-4 or “AAA” 1.5V batteries
Dimensions / Weight (w/o stand):
Display unit: 86g (incl. batteries); 69(W) x 107 (H) x 10 (D) mm
Version 1.1
39
14
Indice
1. INTRODUZIONE
1. Introduzione
2. Elementi di controllo
2.1 Display LCD
2.2 Elementi di comando (Tasti / Interruttori /
Vano batterie)
3. Messa in funzione
4. Termometro radio
5. Uso
5.1 Termoigrometro
5.1.1 Consultazione della temperatura per ciascun
canale
5.1.2 Memoria MIN/MAX
5.1.3 Fascia comfort
6. Sostituzione della batteria
7. Manutenzione del apparecchio
8. Assistenza
9. Dati tecnici
Pagina 42
Pagina 43
Pagina 43
Pagina 44
Pagina 46
Pagina 47
Pagina 49
Pagina 49
Pagina 49
Pagina 50
Pagina 50
Pagina 51
Pagina 51
Pagina 52
Pagina 52
Meteocentrale.ch è il portale internet da Meteomedia SA.
Meteomedia è uno dei principali fornitori di servizi meteo d’Europa e, grazie alle proprie centrali
meteo in Svizzera e in Germania, è specialista tra l’altro della moderna previsione di maltempo
e intemperie.
La punta di diamante dell’impresa è la fitta rete di stazioni meteo proprie, che si afferma come
una delle principali in Europa.
Irox, leader di mercato nella produzione di strumenti di produzione, in collaborazione con
Meteomedia, ha sviluppato una linea di prodotti che si distingue per l’elevata qualità delle
misurazioni, per la semplicità d’utilizzo e l’elegante design.
Il modello JKTG-4R è un termoigrometro di elevata qualità, l'unico che offre tre diverse funzioni
di memoria per valori massimi/minimi. La registrazione avviene indipendentemente per
ciascuno dei 6 canali presenti. Inoltre, lo scanning individuale dei 5 sensori radio rende l'utilizzo
dell'apparecchio chiaro e schematico.
Si prega di leggere attentamente le seguenti istruzioni per l'uso, contenenti alcune indicazioni
utili ed interessanti, oltre alle consuete spiegazioni per l'uso.
41
2. ELEMENTI DI CONTROLLO
42
2.2 ELEMENTI DI COMANDO (TASTI / INTERRUTTORI / VANO BATTERIE)
Retro dell'apparecchio
2.1 DISPLAY LCD
Tutte le funzioni vengono visualizzate su un display a cristalli liquidi (LCD) su 3 finestre.
Display a segmenti interi
Canali di misurazione radio 1-5:
- misurazione attuale del canale selezionato (= sonda radio)
- valori minimi/massimi memorizzati per il canale selezionato
- stato della batteria del trasmettitore visualizzato
Fascia comfort:
- indicazione della fascia comfort per la misurazione del termoigrometro interno
Termoigrometro interno
:
- temperatura e umidità atmosferica relativa all'indicatore principale (misurazione nel punto in
cui si trova l'apparecchio)
- valori minimi/massimi memorizzati per il termoigrometro interno
- stato della batteria dell'indicatore principale
43
T/H SET
- Per la misurazione interna IN, sotto il valore attuale, vengono visualizzati i valori MIN/MAX di
temperatura e umidità atmosferica relativa. Questo tasto consente di visualizzare i dati
presenti nella memoria del termometro e dell'igrometro.
°C/°F
- Per impostare l'unità di misura della temperatura su °C o °F.
MEMORY RESET
- Tenendo premuto questo tasto per 3 secondi, è possibile azzerare tutti i dati in memoria (IN e
CH1 - CH5). A seconda dell'impostazione dell'interruttore MIN-MAX avrà inizio la nuova
registrazione.
CH (= CHANNEL / CANALE)
- Premere brevemente per passare alla visualizzazione del canale successivo
(1 2 3 4 5 1 etc)
- Tenendo premuto questo tasto per 3 secondi, viene avviata la ricerca del trasmettitore per il
canale radio, visualizzato sul display (CH1 - CH5). Durante la ricerca, le tre onde sopra al
canale CH lampeggiano. La ricerca riguarda solamente il trasmettitore del canale visualizzato,
mentre gli altri rimangono inalterati.
44
Vano batteria
MIN-MAX
Questa impostazione permette di gestire e registrare i dati MIN/MAX in memoria. Questa
impostazione è unica per tutti i 6 canali!
Pos. 1: PERM - Vengono registrati i valori MIN/MAX dall'ultimo MEMORY RESET mediante la
funzione "indicazione MAX/MIN". La registrazione "PERMANENTE" implica che la
registrazione inizia solamente dopo un MEMORY RESET.
Pos. 2: 24 Hr - Selezionando questa opzione vengono registrati i valori MIN/MAX delle ultime
24-28 ore. Al termine di questo periodo di tempo, i valori MIN/MAX precedenti alle
24-28 ore vengono rimossi dalla memoria. Dopo aver selezionato questa opzione, si
consiglia di iniziare la registrazione in memoria con un MEMORY RESET. La nuova
registrazione comincia dunque con complessi calcoli interni e relativa memorizzazione.
I valori MIN/MAX vengono gestiti in blocchi di 4 ore. Esempio: per consultare sempre i
valori MIN/MAX delle ultime 24-28 ore, indipendentemente dal momento in cui si
consulta l'indicatore. In tal modo saranno indicati sempre i valori estremi delle ultime
24-28 ore, mentre i rilevamenti precedenti saranno eliminati.
Pos. 3: DAY – Selezionando questa opzione vengono registrati i valori MIN/MAX su un arco di
tempo di 24 ore. È possibile decidere liberamente in che momento iniziare la
registrazione. L'inizio può essere stabilito da un MEMORY RESET e alla scadenza delle
24 ore la memoria sarà azzerata automaticamente al fine di avviare una nuova
registrazione. Esempio: per consultare i valori MIN/MAX delle ultime 24 ore ogni giorno
alle ore 20:00, effettuare un MEMORY RESET alle ore 20:00. In seguito al RESET
parte un timer interno che azzera automaticamente la memoria dopo 24 ore e inizia una
nuova registrazione.
45
2 batterie da 1.5, AM-4 o "AAA"
Apertura: dopo aver rimosso il piedistallo, spingere il coperchio nella direzione indicata dalla
freccia (raffigurata sul coperchio).
3. MESSA IN FUNZIONE
1. Mettere in funzione tutti i sensori radio desiderati e disporli nelle vicinanze (1-2 m) del
dispositivo ricevitore.
2. Aprire il vano batterie del dispositivo di visualizzazione e rimuovere tutte le strisce isolanti.
Se non sono presenti le batterie nell'apparecchio, inserire 2 batteria (UM-3 o „AA“ 1.5V) con
la polarità corretta.
3. Richiudere il vano batterie
4. Immediatamente dopo l’attivazione delle batterie appaiono sul display tutti i segmenti per
pochi secondi. subito dopo l’ JKTG-4R inizia con la ricerca dei sensori disponibili per tutti i 5
canali.
5. Non appena il sensore viene visualizzato correttamente (vedi „Stato del ricevitore“ al cap. 4)
è possibile posizionare il sensore sul luogo nel quale si vuole effettivamente misurare la
temperatura esterna e l'umidità esterna. In condizioni ideali il posizionamento può avvenire
fino a 30 m di distanza. Nella realtà numero è inferiore. In caso di problemi, tentate altri
luoghi e precisamente sia per il sensore che per il dispositivo di visualizzazione. Il
radiosensore è impermeabile. Posizionare il sensore in base alle possibilità, ma sarebbe
meglio all’asciutto e in un luogo ombroso.
46
6. In commercio è possibile acquistare ulteriori sensori da visualizzare sul ricevitore. Per
l'impiego all'esterno si consiglia di utilizzare sensori impermeabili da esterno. Per visualizzare
i dati di altri ambienti interni, è disponibile il sensore JKTG-4R della serie "Instruments
by Jörg Kachelmann", dotato di ampio display e realizzato nello stesso design dell'indicatore
principale.
4. TERMOMETRO RADIO
L'utilizzo del sensore radio fornito è molto semplice:
- Aprire il vano delle batterie.
- Selezionare il canale.
- Attivare le batterie togliendo le strisce d'isolamento, oppure inserire le batterie facendo molta
attenzione a rispettare la polarità.
- Richiudere il vano delle batterie, facendo attenzione alla guarnizione.
Altri radiosensori Irox compatibili con JKTG-4R sono:
3 canali (inseribile sui canali 1, 2 o 3) : HTS12C, HTS33, HTS13*, HTC13
5 canali (inseribile su tutti e 5 i canali) : HTS55, JKR-1*
(*HTS13 è incluso nella fornitura del JKTG-4R e può essere inserito sui canali 1-3)
Nei sensori con termometro e igrometro, nel JKTG-4R viene visualizzata solo la temperatura.
Visualizzazione stato di ricezione
Il simbolo a forma di onda mostra lo stato della ricezione del segnale del canale visualizzato.
L’unità è in modalità di ricerca.
I rilevamenti di temperatura
sono registrati in modo sicuro.
Assenza di segnale.
Avviare il procedimento di ricerca per un sensore
Selezionare con il tasto CHANNEL il radiocanale desiderato.
Esempio: Canale 4 (lampeggia il numero 4)
Tenere premuto adesso il tasto SEARCH finché il simbolo a forma di onda inizia a lampeggiare.
Adesso l'apparecchio cerca il sensore sul canale n. 4. Questo procedimento può durare
qualche minuto e viene concluso non appena il simbolo a forma di onda smette di lampeggiare.
Abbiamo apposta reso il processo di ricerca richiamabile singolarmente su ogni canale per non
influenzare i sensori già collegati in caso di ulteriori implementazioni.
Interruzioni di segnale
Ogni sensore viene letto dall’apparecchio una volta al minuto. Se si susseguono più di 8 letture
senza dati, appare nel display una barra per il relativo canale e l’JKTG-4R interrompe per 8 ore
qualsiasi altri tentativi di ricezione.
Il dispositivo di visualizzazione riparte nuovamente dopo 8 ore con la ricezione. Se il
trasmettitore originale non viene più trovato, l’apparecchio inizia con una nuova ricerca di un
nuovo sensore sull’attuale canale.
In occasione dell’interruzione del segnale è possibile iniziare in qualsiasi momento una nuova
ricerca manuale del segnale. Verificare prima i seguenti punti:
1. Se il sensore è ancora sul posto.
2. Le batterie del sensore e il dispositivo di visualizzazione. Sostituire le batterie anche se un
tester le considera ancora sufficientemente cariche! Per altre informazioni consultare il sito
www.irox.com nella sezione FAQ. Attenzione: Se la temperatura esterna cala notevolmente,
anche le prestazioni delle batterie in uso verrà considerevolmente ridotta. Si raccomanda
dunque di inserire delle nuove batterie nel sensore all’inizio dell’inverno (di tipo alcalino o
migliore)
3. Se ci sono interferenze o schermatura nell’area del trasmettitore/ricevitore o se la distanza
fra entrambi i dispositivi è troppo elevata.
I procedimenti di ricerca menzionati sopra relativi ad un sensore „perso“ non hanno alcun
influsso su tutti gli altri sensori presenti e perfettamente funzionati.
47
48
„Collisioni“ di segnale
5.1.2 Memoria MIN/MAX
I segnali radio di altri dispositivi nelle vicinanze possono causare delle interferenze e delle
interruzioni temporanee della ricezione. Ciò non è male, ma in certi casi da fastidio. Alcuni dei
tipici "dispositivi di disturbo" possono essere alcuni rilevatori acustici, impianti di allarme
wireless, schermi a raggi catodici (PC/TV), telecomandi, etc. Il tali casi può essere utile
adoperare un altro canale.
a) I valori MIN/MAX sono sempre presenti sul display sotto il valore attuale misurato.
- SINISTRA: temperatura minima (più bassa) "MIN"
- DESTRA: temperatura massima (più alta) "MAX"
5. USO
La logica delle registrazioni è descritta al paragrafo 2.2 Elementi di comando.
5.1 TERMOIGROMETRO
Attenzione! In assenza di dati disponibili, appaiono alcuni trattini. Ciò accade quando un
canale non è occupato oppure il sensore non viene più rilevato.
Il modello JKTG-4R misura direttamente la temperatura e l'umidità relativa, registrando al
contempo le misurazioni di altri 5 sensori radio di temperatura IROX. Ciascun sensore deve
essere impostato su uno dei canali 1-5 (oppure sui canali 1-3 per apparecchi a 3 canali). Il
display indica la temperatura attuale rilevata in °C (o in °F), mentre nel punto in cui si trova
l'indicatore principale sono indicate anche l'umidità atmosferica relativa in % e la fascia comfort.
È possibile eseguire i seguenti comandi in questa funzione:
5.1.3 Fascia comfort
La fascia comfort viene indicata esclusivamente con riferimento alla misurazione
termoigrometrica dell'indicatore principale. I sensori esterni rilevano e visualizzano solo la
temperatura, pertanto il calcolo della zona comfort per i canali CH1-CH5 non è possibile.
Il grafico seguente illustra la logica:
5.1.1 Consultazione della temperatura per ciascun canale
Premere brevemente il tasto CH per passare da un canale all'altro. Ogni volta che verrà
premuto questo tasto sarà visualizzato il canale successivo, che sarà attivo per ulteriori
comandi. La sequenza di attivazione è CH1 CH2 CH3 CH4 CH5 CH1 etc
indipendentemente dalla presenza o meno di un sensore radio nel sistema.
Attenzione! La misurazione
è raffigurata sempre nella finestra inferiore, mentre i canali 1-5
sono raffigurati in sequenza nella finestra superiore.
49
6. SOSTITUZIONE DELLA BATTERIA
: BATTERIA-SEGNALAZIONE DI SOSTITUZIONE
Le batterie hanno una durate di circa 8-12 mesi. In base all’utilizzo dell’apparecchio e delle
batteria adottate, tale intervallo di tempo può essere maggiore o minore. Per evitare
un’interruzione improvvisa e indesiderata del funzionamento dell’apparecchio, in entrambe le
finestre delle temperature con il relativo canale appare il simbolo della batteria.
Ciò significa che le batterie del dispositivo di visualizzazione (nella finestra IN) o di un
radiotrasmettitore (nella finestra CHx) sono questi scariche e devono essere sostituite.
Per la sostituzione delle batterie, vedere il capitolo 2 (messa in funzione).
50
8. ASSISTENZA
Quest'apparecchio è un nuovo prodotto di Irox Development Technology. Tutte le indicazioni
sono state effettuate e verificate rispetto ad un apparecchio perfettamente funzionante. È
possibile che subentrino modifiche e miglioramenti all'apparecchio, non inclusi nella presente
documentazione, per motivi legati alle esigenze di stampa. In caso di incongruenze o indicazioni
incomplete, che rendono difficoltoso l'uso o il funzionamento dell'apparecchio, è possibile
scaricare gratuitamente in ogni momento le ultime istruzioni aggiornate dal sito www.irox.com.
(Numero della versione sulla pagina 1)
© Irox Development Technology
Utilizzare esclusivamente nuove batterie e non mischiate mai batterie vecchie con quelle nuove.
9. DATI TECNICI
Fate anche attenzione al fatto che le batterie usate non vanno gettate nella pattumiera
domestica e che dovrebbero essere smaltite in un apposito luogo di raccolta. L’ambiente ve ne
sarà grato!
Misurazione della temperatura e dell'umidità
Intervallo di misurazione temper. : Massimo intervallo -50.0°C a + 70.0°C (23.0°F a 122.0°F)
Sensor interno : -20°C a +50°C
Intervallo di misurazione umidità : Massimo intervallo 1% a 99% um.rel.
7. MANUTENZIONE DEL APPARECCHIO
Sensibilità : 0.1°C (0.2°F) / 1% um.rel.
- Non esporre l'apparecchio a temperature estreme o direttamente al sole per un lungo periodo.
- Evitare urti violenti o colpi di qualunque tipo all'apparecchio.
- Per la pulizia utilizzare un panno morbido, inumidito con acqua e un detergente delicato. Non
utilizzare MAI sostanze volatili, come benzolo, diluenti, detergenti spray e simili.
- Quando non è in uso, riporre l'apparecchio in un luogo asciutto, fuori dalla portata dei bambini.
- Quando l'apparecchio viene attivata a temperature estremamente basse, può accadere che il
display non sia più leggibile. Appena l'apparecchio si trova in un ambiente più caldo,
riprenderà a funzionare correttamente.
- Conservare accuratamente le istruzioni per l'uso e l'ulteriore documentazione contenuta nella
confezione, per poterla consultare anche successivamente.
- Utilizzare esclusivamente batterie nuove e non mescolare mai batterie vecchie e nuove.
- Le batterie esauste non vanno MAI gettate nei rifiuti domestici, ma devono essere smaltite
negli appositi centri di raccolta.
- IMPORTANTE: per gli apparecchi Irox tutte le imposte di smaltimento sui rifiuti in Svizzera
(TRA) e nell'Unione Europea (WEEE) sono già corrisposte
Precisione di misurazione :
+/-1°C in in un intervallo da +5°C a +40°C
+/-2°C in tutti gli altri intervalli
+/-5% um.rel. in um intervallo da 30% - 80% (da +5°C a + 40°C)
+/-7% um.rel. in un intervallo da 20% - 90% (da +5°C a + 40°C)
51
Frequenza di misurazione del radiosensore: una volta ogni 60 secondi
Alimentazione: 2 pile AM-4 o “AAA” 1.5V
Dimensioni / Peso: Dispositivo di visualizzazione:
86g (con pile); 69 x 107 x 10 mm (senza piedistallo)
52