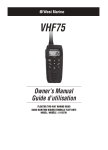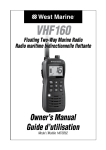
1
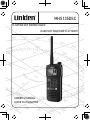
MHS135DSC
FLOATING VHF MARINE RADIO
RADIO VHF MARITIME FLOTTANTE
OWNER’S MANUAL
GUIDE D’UTILISATION
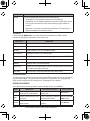
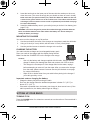
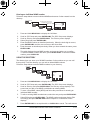
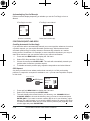
Making a Distress Call
Lift the red cover. Press and hold the DISTRESS
button for three seconds. Your radio transmits
your boat’s location every few minutes until you
receive a response.
Lift the red
cover and
press the red
DISTRESS
button
underneath.
## NOTE: If the radio displays Enter User MMSI, cancel the
automatic distress call and make a normal voice distress call.
Making a Voice Distress Call
Speak slowly - clearly - calmly.
For future reference, write your boat’s name & call sign here:
1.
2.
3.
4.
5.
6.
7.
8.
9.
10.
11.
12.
13.
14.
Make sure your radio is on.
On the microphone, press the 16/9-TRI button to switch to Channel 16 (156.8 MHz).
(If the corner of the display does not show 16, press the 16/9-TRI button again until
it does.)
Press the PUSH TO TALK button on the microphone and say: “MAYDAY -- MAYDAY
-- MAYDAY.”
Say “THIS IS {name of your boat (three times) and call sign/boat registration
number (once).”
Repeat “MAYDAY {name of your boat}” once.
Tell where you are: (what navigational aids or landmarks are near, or read the
latitude and longitude from your GPS).
State the nature of your distress (e.g. are you sinking, medical emergency, man
overboard, on fire, adrift, etc. ).
State the type of assistance you need (medical, towing, pumps, etc.).
Give number of persons aboard and conditions of any injured persons.
Estimate present seaworthiness of your ship (e.g. how immediate is the danger due
to flooding or fire or proximity to shore).
Briefly describe your ship, giving ship name (e.g. “Blue Duck is 32 foot cabin cruiser,
white hull, blue deck house”).
Say: “I WILL BE LISTENING ON CHANNEL 16.”
End message by saying “THIS IS {name or call sign of your boat}, OVER.”
Release the PUSH TO TALK button and listen.
If you do not get an answer after 30 seconds, repeat your call, beginning at step 3, above.
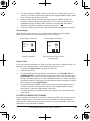
FAIRE UN APPEL DE DÉTRESSE
Soulevez le couvercle noir. Maintenez Distress enfoncé
pendant trois secondes. Votre radio transmettra
l’emplacement de votre bateau toutes les quelques minutes
jusqu’à ce que vous receviez une réponse.
## Remarque : Si la radio affiche Enter User MMSI, annulez
l’appel de détresse automatique et effectuez un appel de
détresse vocal normal.
Soulevez le
couvercle noir
et appuyez sur
le bouton rouge
Distress en
dessous.
Faire un appel de détresse
Parlez lentement – clairement – calmement.
Pour toute référence ultérieure, écrivez ci-dessous le nom et l’indicatif d’appel de votre bateau:
1. Vérifiez si votre radio est en marche.
2. Appuyez sur la touche 16/9-TRI du microphone afin de commuter au canal 16 (156,8
MHz). (Si le canal 16 n’apparaît pas à l’affichage, appuyez de nouveau sur la touche
16/9-TRI jusqu’à ce qu’il soit affiché.)
3. Appuyez sur le bouton de microphone Push-to-Talk et dites:“MAYDAY -- MAYDAY -MAYDAY”.
4. Donnez l’identité de votre navire en disant : “ICI {nom de votre bateau (trois fois) ou
indicatif d’appel et le numéro d’identification de votre bateau (une fois)}”.
5. Dites “MAYDAY {nom ou indicatif d’appel de votre bateau} une fois”.
6. Donnez votre position : (quels sont les points de repère ou aides à la navigation près
de vous ou lisez les coordonnées de longitude et de latitude apparaissant sur votre
dispositif GPS).
7. Révélez la nature de votre détresse (par exemple, nous sommes en train de couler,
urgence médicale, un homme à la mer, un incendie, nous sommes à la dérive, etc.
8. Révélez la nature de l’aide désirée (médicale, remorquage, essence, etc.)
9. Donnez le nombre de personnes à bord et les conditions des blessés, s’il y en a.
10. Donnez la condition de navigabilité actuelle de votre navire, tel que le degré de
l’urgence par rapport une inondation, et une incendie.
11. Donnez une brève description de votre navire en donnant le nom du bateau (par
exemple, “Blue Duck est un yacht de croisière de 32 pieds, avec une coque blanche et
un rouffle bleu.).
12. Dites : “JE VAIS ÉCOUTER SUR LE CANAL 16”.
13. Terminez le message en disant “ICI {nom ou indicatif d’appel de votre bateau}, À VOUS”.
14. Relâchez le bouton Push-to-Talk du microphone et écoutez.
Si vous n’obtenez pas de réponse après 30 secondes, répétez l’appel
encommençant à l’étape 3 ci-dessus.
Table of Contents
Introduction.................................. E-1
Features......................................... E-1
Getting Started............................. E-2
What’s included.............................. E-2
Parts of the MHS135DSC.............. E-2
Adjusting the Lamp.....................E-13
Adjust the LCD Contrast.............E-13
Measuring the Water
Temperature............................E-13
Turning the Key Beep
On and Off..............................E-13
Operating the Radio . .................. E-14
Front view.....................................E-2
Back view.....................................E-3
Changing the Channel................E-14
Making a Transmission...............E-14
Changing the transmission
level........................................E-14
How It Works................................ E-5
Digital Selective Calling
Features ................................. E-14
Charger.......................................... E-4
Reading the display....................... E-4
MENU/CALL Menus....................... E-5
Normal Menu................................E-5
Call Menu.....................................E-6
GPS/MEM Menus.............................. E-6
Operation Modes........................... E-6
Normal..........................................E-7
Scan.............................................E-8
Weather........................................E-9
Setting Up the Hardware.......... E-10
Attaching the Antenna.................. E-10
Installing the Battery.................... E-10
Using Alkaline Batteries............... E-10
Mounting the Charger...................E-11
Charging the Battery.....................E-11
Setting Up Your Radio............... E-12
Turning It On ............................... E-12
Entering the User MMSI............... E-12
Setting It Up................................. E-12
Changing the Volume ................E-12
Setting the Squelch Level...........E-12
Setting the UIC Channel
Mode (USA/CAN/INT).............E-12
Setting Key Lock........................E-12
Setting WX Alert Mode...............E-13
Setting FIPS Codes....................E-13
What is DSC? ............................. E-14
Advanced DSC features ............. E-15
MMSI Numbers............................ E-15
Entering MMSI numbers . ..........E-16
Entering Your User
MMSI Number . ......................E-16
Entering a group
MMSI number.........................E-16
Entering an individual
MMSI number.........................E-17
Using the Directory...................... E-17
Making DSC Calls........................ E-18
Calling a single station
(Individual Call) ......................E-19
Calling a particular group of
stations (Group Call)...............E-20
Calling all stations
(All-Ships Call)........................E-20
Making an automatic
distress call............................... E-20
Canceling an automatic
distress call ............................E-21
Receiving a DSC call................... E-21
Receive log.................................E-21
Returning a call from the
Receive Log . .........................E-22
Test Calls..................................... E-22
Making Test Calls (Test) ............E-22
Receiving Test Call Setup...........E-23
Acknowledging Test
Call Receipt............................E-24
Position Request and Reply......... E-24
Enabling Automatic
Position Reply.........................E-24
POS Request.............................E-24
Position Reply............................E-25
Position Send ............................E-25
Putting the radio into standby ..... E-25
Disabling automatic channel
switching...................................... E-26
GPS Features............................. E-26
GPS Operation Overview............. E-26
Favorites Menu............................. E-26
Goto Menu..................................E-27
Add Menu...................................E-27
GPS Setup Menu.......................... E-27
NMEA Features.......................... E-28
ADDITIONAL FEATURES.......... E-28
Using the Flashlight..................... E-28
Renaming Channels ................... E-29
Maintenance and
Troubleshooting..................... E-29
Specifications............................ E-30
Regulations and
Safety Warnings..................... E-36
Three Year Limited Warranty.... E-38
Introduction
Features
Your radio provides the following key features:
xx Submersible design. Complies with floating JIS8/IPX8 water-resistant standards,
which means the radio can be submerged in 1.5 meters of water for 30 minutes
without damage.
## Notes:
The radio will only meet this rating if fully assembled and all rubber seals and
bungs are well maintained and correctly fitted. This means that the speaker
microphone bung is inserted, and the battery pack (or case) and antenna are
attached and securely fastened.
After your radio is submerged in water, the sound might be distorted. This
is because there is still water remaining in and around the speaker and
microphone. Just shake the radio to clear excess water, and the sound should
return to normal.
If your radio is exposured to salt water, clean it thoroughly with fresh water
and dry it before turning it on.
The charger is not waterproof.
xx
xx
xx
Memory scan mode. Lets you save channels to memory and monitor them in
quick succession.
Transmitter power level select. Lets you boost the transmitter power from 1 W to
2.5 or 6 W for added transmission distance.
Battery level display and low battery alert.
Uniden MHS135DSC Radio Owner’s Manual
E-1
xx
xx
xx
xx
xx
xx
xx
Dual and Triple Watch operation. These different watch modes let you monitor
up to two Coast Guard Distress/Hailing channels and one weather channel along
with one regular marine channel.
All marine VHF channels for the U.S., Canada, and international waters
National Oceanic and Atmospheric Administration (NOAA) Weather Channel
watch. Sounds a warning tone when a hazard alert is issued.
SOS Strobe. A high intensity strobe LED can be set to blink an SOS pattern or to
be steady on.
Temperature. The thermal sensor lets you measure the water temperature. You
can display temperature in Farenheit or Celsius.
DSC. Lets you call other stations or groups using their unique identification code.
This radio complies with RCTM paper 56-95/SC01 Standards for DSC for marine
transceivers.
GPS. Lets you to save your current position as well as manually enter other
positions.You can save positions into a directory to return to them as desired.
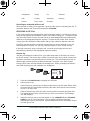
Getting Started
What’s included
Alkaline Battery
Case
(batteries not
included)
Antenna
Belt Clip
Lithium Ion
Battery
MHS135 Radio
Wrist Strap
Charger
Mounting Hardware
AC Adapter
Not shown:
External speaker/
microphone
DC Adapter
If any pieces are missing or damaged, contact Uniden Customer Service (see back
cover for contact information). For information on available accessories, visit
www.uniden.com.
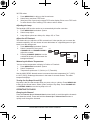
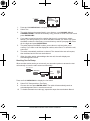
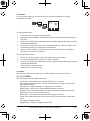
Parts of the MHS135DSC
Front view
Microphone/Speaker
connection
Distress
button
Antenna LCD display
VOL-SQ
button
GPS/MEM CLR/SCAN
button Power
button
Microphone
ENTERH/M/L
button
Push-to-talk/
16/9-Tri UP/DOWN WX/SOS MENU/CALL
Boost buttons (16/9buttons button button
triple
watch) button
E-2
Speaker
LED
Uniden MHS135DSC Radio Owner’s Manual
Thermal
sensor
Back view
Battery
latch
Button
Push -to-Talk
Battery charging
contacts
Battery
Belt clip
Press to...
Boost
Press and hold to...
Transmit on a current TX power
Boost TX to 6 W.
1st press: Go to CH 16.
16/9-Tri
2nd press: Go to CH 9.
Turn Triple Watch on and off.
CLR/SCAN
3rd press: Go back to the starting
channel.
-- Turn Weather mode on and off.
-- Move cursor to the left while in
Menu mode.
Access the radio menu.
-- Select menu items.
-- Return to normal Marine mode
when Marine channel list is
displayed.
Exit menu screens.
GPS/MEM
Enter or exit the GPS menu.
VOL-SQ
Enter or exit Volume Setting mode.
Enter or exit Scan mode.
Store or delete the current channel
into memory.
Enter or exit Squelch Setting mode.
Channel Up
Move up one channel at a time.
Move quickly up the channels.
Channel Down
Move down one channel at a time.
Move quickly down the channels.
WX/SOS
MENU/CALL
ENTER-H/M/L/
Turn SOS LED on and cycle through
SOS signal, flashlight, and off.
Access DSC call menu.
Change the TX power between Low
(1 W), MID (2.5 W), and 6 W.
Power
Turn MHS135DSC on and off.
Distress
Sends out emergency signal.
Uniden MHS135DSC Radio Owner’s Manual
E-3
Charger
CHARGE LED
Charging
contacts
Power jack
[cigarette (DC) or
wall (AC) plug]
Charging
latches
Screw holes
for mounting
Reading the display
The LCD display shows different
information depending on what you are doing.
This sample screen shows some of this
information. The table below shows possible
icons and what they mean.
Transmit
power level
Auto Channel
Switch status
GPS data
is valid
Display icons and what they mean
Icon
Keylock is
active
Receive Log
Message
UIC Channel
Weather Alert
Watch is on
USA
LOW
MEM
COMMERCIAL
Channel Name
Current channel
number
Battery
Status
A
This channel is
in Memory
What it means
You are currently transmitting.
The keys are locked.
Weather Alert Watch is turned on.
Valid GPS data is available.
The battery is fully charged, mostly charged, half charged, mostly empty, or
completely empty.
You have unread messages in the Receive Log.
S
Displays vessel’s current course. This icon displays when the Display mode is
Favorite or Compass.
+
This position mark displays on the compass when the radio is in Favorite
mode.
N
W
E
VOL or SQ
BRG
COG
SOG
DIST
E-4
Audio Vollume Setup mode or Squelch mode is active.
Bearing from boat’s position to destination from Favorite’s list.
Current course (Course over Ground)
Vessel’s current speed (Speed over Ground).
Distance from boat’s position to destination.
Uniden MHS135DSC Radio Owner’s Manual
Icon
What it means
LOW / MID / 6 W
The transmitter power is set to LOW (1 W), MID (2.5 W), or 6 W.
USA / CAN / INT
The radio is set to use US channels, CANadian channels, or INTernational
channels.
MEM
WX
SCAN
The current channel is saved in memory.
The radio is in Weather mode.
The radio is in Scan mode.
How It Works
Various menus let you establish guidelines and parameters for sending and receiving
calls. Menus also let you set your radio’s characteristics such as brightness, Code
selection, and contrast.
The MENU/CALL button accesses menus that let you set the way your radio operates.
The GPS/MEM button lets you set up your GPS features and save GPS locations to a
favorites list to use again later.
MENU/CALL Menus
You can set up the radio’s physical displays and operation modes (Normal menu) and
how you want to receive and send various types of calls (Call menu),
Normal Menu
Press MENU/CALL to display the following Normal menu options:
Menu Option
What it does
Display
Selects a display mode for the radio’s LCD. Options are: Marine, Position, Compss,
Favorite, Temperature, and GPS Status.
Setup
Lets you determine the following settings:
-- USA/CAN/INT. Selects which channels and frequencies your radio will
communicate with (USA, Canadian, or International)
-- Dual/TriWatch. You can set the radio for Dual Watch or Triple Watch.
-- Flashlight. Set the Strobe LED to on/off, SOS signal, or always on.
-- Key Lock. Locks the keypad so no entries can be made.
-- WX Alert. Enable the WX Alert fuction.
-- FIPS Codes. You can add FIPS codes and select them to activate the SAME
weather alert system.
-- Channel Name. Use this option to change channel names to something more
familiar to you.
-- DSC Watch. This feature turns DSC Watch on and off.
Uniden MHS135DSC Radio Owner’s Manual
E-5
Menu Option
System
What it does
You can set system-wide features using the following settings:
-- Lamp Adjust. This setting adjusts the brighness of the backlighting.
-- Contrast/RVS. You can adjust the brightness of the screen contrast higher or lower.
Once you get to the bottom limit of the contrast, selecting it again reverses the
contrasts.
-- Temperature. Your system can measure water temperature. This option lets you
display the temperature in Farenheit or Celsius.
Call Menu
Press and hold MENU/CALL to set the technical requirements for DSC function
operations through the Call menus. The menus are:
Menu Option
What it does
Individual
Sends an individual call to an individual station.
Group
Sends a call to a group.
All Ships
Sends URGENCY or SAFETY message to all ships.
POS Request
Requests the position of an individual vessel.
Position Send
Transmits your position to a vessel that was programmed into the DIRECTORY.
Test
Sends a test call.
Standby
Places the radio in an unattended mode.
Receive Log
Displays a list of all received calls to the radio. The MHS135DSC stores log data
for 10 distress calls and 50 other calls.
DSC Setup
Allows the user to set up Digital Selective Calling (DSC) service.
GPS/MEM
Menus
The Favorite menu lets you save and name sets of GPS coordinates so you can return
to that location again. You can recall the saved GPS coordinates, too. Configure the
GPS module through the GPS Setup menu. See page E-26 for details.
Operation Modes
Your radio has three main operation modes: Normal, Scan, and Weather.
Mode
What it does
Use it when you want to...
To turn it on/off
Normal
Monitors a single marine channel
and lets you talk on that channel.
Monitor a channel or talk to
another radio.
Scan
Monitors all the channels you save
into memory.
Check a small group of regularly- Press and hold CLR/
used channels for traffic.
SCAN for 2 sec.
Weather
Monitors the selected NOAA
weather channel.
Hear the current or forecasted
weather.
E-6
Uniden MHS135DSC Radio Owner’s Manual
(default mode)
Press WX/SOS
In addition to the three operation modes, your radio provides four different watch modes
which you can activate during any operation mode. In the watch modes, the radio briefly
checks for activity on a specific channel, then returns to its previous operation.
Watch mode
What it does
To turn it on/off
Weather Alert
Watch
Checks the last-used weather channel for
hazard alerts every few seconds.
Select Weather Alelrt On or Off from the
Setup menu.
Dual Watch
Checks emergency channel 16 for activity
every few seconds.
Select Dual or Triple Watch at Setup
menu, and press and hold 16/9-Tri for
2 seconds.
Triple Watch
Checks emergency channels 16 and 9 for
activity every few seconds.
Select Dual or Triple Watch at Setup
menu, and press and hold 16/9-Tri for
2 seconds.
DSC Watch
Checks the DSC channel every 2 seconds
for messages from other ships.
Turn DSC Watch on or off from the Setup/
DSC Watch menu.
## Note: Private boats must monitor channel 16 whenever they are underway. Water-going
vessels should have either Triple Watch or Dual Watch on at all times.
Normal
xx
xx
xx
xx
xx
To transmit, remove the radio from the charger, then press and hold Push to Talk.
Release the button when you are finished talking.
For the best sound quality, hold the microphone about two inches from your mouth
while you’re talking.
Press Channel Up to move up one channel at a time. Press and hold the button to
scroll quickly up the channels.
Press Channel Down to move down one channel at a time. Press and hold the
button to scroll quickly down the channels.
To change the transmit power, press and hold ENTER-H/M/L. The transmit power
cycles through LOW (1 W), MID (2.5 W), and 6 W, then back to LOW again. Press
BOOST on the left side of the radio to boost the transmit power to 6 W (Lithium Ion
battery) or to 2.5 W (alkaline batteries).
## If you are using alkaline batteries, 6 W is not available.
Normal mode with Weather Alert Watch
Monitoring Channel 25
If you activate Weather Alert Watch while
operating in normal mode, the radio checks the
Every few seconds, the
radio checks the last-used
most recently used weather channel every few
weather channel.
seconds. If it detects a weather or other hazard
alert, it will switch to that weather channel. (If you are actively
WX Alert wx
transmitting, the radio waits until you finish your transmission
Watch on
before checking the weather channel.)
Normal mode with Triple Watch or Dual Watch
If you activate Triple Watch while operating in normal mode, the radio checks channels
16 and 9 every few seconds; with Dual Watch turned on, the radio only checks channel
16. The radio will not check channels 16 or 9 while you are actively transmitting; it waits
Uniden MHS135DSC Radio Owner’s Manual
E-7
until your transmission is finished and then checks the channels.
Normal mode with DSC Watch
Monitoring Channel 25
If you activate DSC Watch while operating in
Normal mode, the radio checks channel 70
every few seconds.
70
Scan
70
Every few seconds, the radio
checks channel 70
70
with DSC Watch on
You can save channels into memory and then use scan mode to monitor those channels
from lowest to highest. If the radio detects a signal on a channel, it stays on that channel
as long as the signal is received; when the signal stops, the radio continues scanning.
When it detects a signal, the radio stays
on the channel until you press the
Channel Up button or the signal stops.
08
10
11
12
13
Resume
scan
17
15
14
The radio scans about
5 channels in 0.5 seconds.
Using the radio in scan mode
xx
xx
xx
xx
xx
xx
xx
To activate scan mode, press and hold CLR/SCAN.
You must have at least two channels in memory to start a scan.
You cannot transmit while in scan mode.
To save a channel into memory, select the channel, then press and hold the GPS/
MEM button. The MEM icon displays whenever you tune to that channel.
To remove a channel from memory, set the radio to that channel, then press and
hold the GPS/MEM button. The MEM icon no longer displays.
When the radio stays on a channel, press Channel Up to leave that channel and
resume scanning.
To end the scan, press and hold the CLR/SCAN button again; the radio remains on
the last scanned channel.
Scan mode with Weather Alert Watch
If you activate Weather Alert Watch while in scan mode, the radio checks the most
recently-used weather channel every few seconds, then continues scanning the next
channel in memory:
Memory Channel Scan
08
10
11
12
13
Every few seconds, the radio
checks the last-used weather
channel, then scans the next
channel.
14
15
17
20
WX Alert
Watch on
24
25
wx
Scan mode with Triple Watch or Dual Watch
If you activate Triple Watch while operating in scan mode, the radio checks channels 16
and 9 every few seconds, then goes on to scan the next channel; with Dual Watch
E-8
Uniden MHS135DSC Radio Owner’s Manual
turned on, the radio only checks channel 16:
Memory Channel Scan
08
10
11
12
13
Every few seconds, the
radio checks channels
16 & 9, then scans the
next channel.
16 09
14
15
17
20
24
25
Triple
Watch on
Both Weather Alert and Triple/Dual Watch in Scan mode
You can activate Weather Alert Watch and Triple/Dual Watch at the same time. The
radio performs both checks at their scheduled time:
Memory Channel Scan
08 10 11 12 13 14 15 17 20 24 25
Every few seconds, the
Every few seconds, the
radio checks channels
radio checks the last-used
16 & 9, then scans the
weather channel, then
next channel.
scans the next channel.
16 09
Triple
WX Alert wx
Watch on
Watch on
Scan mode with DSC Watch
If you activate DSC Watch while operating in Scan mode, the radio checks channel 70
every few seconds.
Memory Channel Scan
08
10
11
12
13
14
15
Channel 70 is
checked at every
channel interval.
17
20
24
25
DSC Watch
ON
70
70
70 etc.
Weather
The NOAA weather channels now cooperate with the FCC to alert you of other hazards
besides weather (child abduction alerts, nuclear, biological, etc.). In weather mode,
the radio monitors one of the ten NOAA weather channels. If a weather alert signal is
received in Weather Alert mode, the radio sounds an alert tone and the display blinks.
Using the radio in weather mode
xx
xx
xx
xx
You cannot transmit while in weather mode.
To enter weather mode, press WX/SOS.
To turn off the radio’s alert tone, press any button.
To cancel weather mode and return to the previous marine channel, press WX/
SOS again.
Weather mode with Weather Alert Watch
If you activate Weather Alert Watch while operating in weather mode, it operates as a
type of “sleep mode:” the radio stays on the weather channel and mutes the speaker. If
an alert is detected, the radio sounds an alert tone and turns the speaker back on. This
mode is very useful when you are anchoring for the night but want to keep informed of
hazards.
Uniden MHS135DSC Radio Owner’s Manual
E-9
Weather mode with Triple Watch or Dual Watch
If you activate Triple Watch while operating in weather
mode, the radio checks channels 16 and 9 every
few seconds; with Dual Watch turned on, the radio
only checks channel 16.
Weather mode with DSC Watch
If you activate DSC Watch
while operating in Weather mode, the
radio checks channel 70 every few
seconds.
Monitoring Weather Channel WX08
16 09
16 09
16 09
Every few seconds, the radio checks
channel 16, then c.hannel 9.
with Triple Watch on
Monitoring Weather Channel WX08
70
70
70
Every few seconds, the radio
checks channel 70
with DSC Watch on
Setting Up the Hardware
Attaching the Antenna
The antenna detaches from the radio for easy shipping or storage. To attach the
antenna to your radio, screw it tightly onto the anchor post at the top of the radio.
Installing the Battery
Your radio comes with a rechargeable Lithium Ion battery; for shipping safety, the
battery is not installed at the factory. The empty alkaline battery case is installed as a
placeholder.
1.
Insert the hook on the battery into the notch at the top of the battery compartment.
## Note: Each time you remove the battery, check the rubber seal around the battery
compartment. Make sure the seal is seated in the groove and there is no dirt or debris on
it. If the seal looks worn or damaged, contact customer service to order a replacement
(see back cover page for contact information).
2.
3.
Lower the battery until it rests flat in the compartment.
Bring the battery latch up and snap it into place.
Using Alkaline Batteries
The radio also comes with a battery case that holds four AAA-type alkaline batteries (not
included). You can use alkaline batteries as a backup for the Li-Ion battery so you can
still use your radio while your Li-Ion battery is recharging. For best performance, Uniden
recommends using extra-strength alkaline batteries such as Duracell Ultra® batteries.
## NOTE: When using alkaline batteries, transmit power is limited to a maximum of 2.5 W.
Follow these steps to use the alkaline battery case:
1.
2.
3.
E-10
Hold the lower part of the case in one hand
with the three battery contacts facing down. Use your thumb to hold the notch on
the lower part of the case.
With your other hand, grip the upper part of the case and lift the cover open.
Align the batteries’ positive and negative terminals with the drawing on the case
and snap each battery into place.
Uniden MHS135DSC Radio Owner’s Manual
4.
5.
Insert the two hooks on the lower part of the case into the notches on the cover;
close the cover. (The cover fits snugly but you should not have to force it closed.)
NOTE: Each time you open the battery case, check the rubber seal. Make sure the seal
is seated in the groove and there is no dirt or debris on it. If the rubber seal looks worn
or damaged, contact customer service to order a replacement (see the back cover page
for contact information).
Install the alkaline battery case in your radio just as you do the Li-Ion battery (see
page E-10).
WARNING! The case is designed to prevent the accidental charging of alkaline batteries.
Never use alkaline batteries in the radio without the battery case. Do not attempt to
modify the battery case design.
Mounting the Charger
You can mount the charger on any flat surface.
1.
2.
3.
Use the two holes at the base of the charger as a template to mark the drill holes.
Using a 1/8-inch (or 3 mm) drill bit, drill two holes 1/2 inch (13mm) deep.
Use the provided screws to attach the charger to the surface.
Charging the Battery
Your radio includes a charger and a rechargeable battery pack.
Place your radio in the charger with the display facing forward.
Make sure that the CHARGE LED on the charger turns orange.
Cautions:
xx
xx
xx
Use only the battery and charger supplied with this radio. Using a different
charger or battery can damage the radio and create a risk of fire or shock.
The charger is not waterproof. If the charger falls into the water, unplug it
before attempting to remove it from the water. After you remove the charger
from the water, please contact Customer Service (see the back cover page
for contact information).
Wipe off dirt or shake water from your radio before placing in the charger if
your radio gets dirty or wet.
Important notes on charging the battery
xx
xx
xx
Charge the battery fully before using the radio.
Don’t use the charger when the ambient temperature is below 0° C (32° F) or
above 45° C (113° F).
If the radio is powered down, the battery can charge in about seven hours. (If the
radio is powered on, the battery takes longer to charge.)
Setting Up Your Radio
Turning It On
Press the POWER button for at least two seconds to turn the radio on. Press and hold it
to turn the unit off.
Uniden MHS135DSC Radio Owner’s Manual
E-11
Entering the User MMSI
When you power up your radio for the first time, it displays MMSI Not Entered and then
displays a marine mode screen. User MMSI numbers are unique and cannot be entered
more than once. See page E-15 for general information about MMSI numbers and how to
get your specific User MMSI number and enter it.
Setting It Up
Even though you can change your radio’s settings at any time, you will probably want
to establish initial settings when you have turned it on for the first time. You will adjust
some of these settings on an as-needed basis, but some settings might only be set
once and not need adjustment at all.
Changing the Volume
To change the speaker volume, press VOL-SQ to enter Volume Setting mode.The VOL
Level Adjustment bar displays on the LCD. Press CHANNEL UP or CHANNEL DOWN to
increase or decrease the volume levels (0 - 15).
Setting the Squelch Level
The squelch feature reduces static on the speaker by filtering out any background
channel noise. At the lowest squelch level, the speaker plays all signals, including any
channel noise. Setting the squelch level higher filters out noise and lets only actual radio
transmissions through.
While listening to a channel, press and hold VOL-SQ to enter Squelch Setting mode.
The SQUELCH Level adjustment bar displays on the LCD. Press CHANNEL UP or
CHANNEL DOWN to increase or decrease the squelch levels (0 - 15).
## Note: Setting the squelch level too high may prevent you from hearing weaker
transmissions. If you are having difficulty hearing a transmission, try setting the squelch
level lower.
Setting the UIC Channel Mode (USA/CAN/INT)
You can select marine channels for the USA, Canada, or International waters.
1.
2.
3.
4.
Press MENU/CALL. The Normal menu displays.
Select Setup and press ENTER-H/M/L.The Setup menu displays.
Select USA/CAN/INT and press ENTER-H/M/L. The UIC Channels screen displays.
Select the mode you want and press ENTER-H/M/L.
Setting Key Lock
You can lock and unlock the keypad through the Setup menu. You can also unlock it by
pressing and holding MENU/CALL for 2 seconds.
Setting WX Alert Mode
From the SETUP menu, select WX Alert mode to turn this mode ON for the radio to
monitor weather channels and alert you to any broadcast weather alerts or notifications.
Setting FIPS Codes
FIPS codes identify geographic areas in the United States. FIPS codes allow you to
receive only the SAME alert occurring in a specific area. You can enter a maximum of
E-12
Uniden MHS135DSC Radio Owner’s Manual
30 FIPS codes.
1.
2.
3.
Press MENU/CALL to bring up the Normal menu.
Select Setup, and then FIPS Codes.
[New] and a list of previously entered FIPS codes display. Enter a new FIPS code
or select from the list of existing FIPS codes to edit or delete.
Adjusting the Lamp
The backlight LCD function can be set to automatically dim after a set time.
1.
2.
3.
Press MENU/CALL and select System.
Select Lamp Adjust.
Lamp Adjust options are Always On, Always Off, or Timer.
Adjust the LCD Contrast
This feature lets you adjust the LCD’s contrast level. It also permits you to reverse the
contrast completely. You can choose to have dark letters on a light background or light
letters on a dark background.
1.
2.
3.
Press MENU/CALL and select System.
Select Contrast/RVS, then press
CHANNEL UP or CHANNEL DOWN to
adjust the contrast.
Pressing CHANNEL DOWN to turn the
contrast all the way off will reverse the
background/letters.
Press
System
Contrast/RVS Contrast/RVS.
Measuring the Water Temperature
16
Normal
Back
[MENU]
USA
Select
[ENT]
Exit
[CLR]
You can set the temperature to display in Celsius or Farenheit.
1.
2.
3.
Press MENU/CALL and select System.
Select Temperature.
Temperature options are °C (Celsius) or °F (Farenheit).
Use the MHS135DSC thermal sensor to measure the water temperature [-4°F (-20°C)
to 122°F (50°C)]. Submerge the sensor in the water for several minutes. The water
temperture displays.
Turning the Key Beep On and Off
Key beep is the tone that sounds when you press a key or a button. Press MENU/CALL
to bring up the Normal menu. Select System, and then Key Beep. Press CHANNEL UP
or CHANNEL DOWN to turn the key beep on or off.
Operating the Radio
Changing the Channel
Press the Channel Up and Channel Down buttons briefly to scroll through the channels
one channel at a time. Press and hold the Channel Up or Channel Down button to
quickly scroll through the channels.
Uniden MHS135DSC Radio Owner’s Manual
E-13
Making a Transmission
Select the channel you want to transmit on, then press and hold the Push to Talk
button. Release the Push to Talk button when you’re finished talking to let the other
party respond.
xx To prevent stuck microphone problems or situations where the Push to Talk
button is pushed accidentally, the radio limits your talk time to 5 minutes in a single
transmission.
xx For the best sound quality, hold the microphone about two inches away from your
mouth.
xx See the channel lists starting on page E-23 for a list of receive-only channels.
Changing the transmission level
In most situations, 1 W transmission power is all you need. If you find yourself far away
from other stations and have trouble getting a response, you may need to increase the
transmission power. If your radio is powered by a Li-Ion battery, you can press and hold
the BOOST button to transmit at 6 W. Alkaline battery power boost is limited to 2.5 W.
To increase the transmission power in increments:
1.
2.
3.
Select the channel you want to transmit on.
Press ENTER-H/M/L to switch to the next transmission power level (for example,
from 1 W to 2.5 W, from 2.5 W to 6 W, or from 6 W back to 1 W).
The display shows the new transmission power as 6 W, MID, or LOW. The
transmit power remains at the new setting until you change it again.
## Note: Don’t forget to change the transmission setting back to 1 W when you move close
to other stations.
Some channels (for example, channels 13 and 67) limit the transmission power to 1 W.
When you tune to a limited-power channel, the radio automatically switches to 1 W. See
the channel lists starting on page E-31 for a list of power-restricted channels.
Digital Selective Calling Features
What is DSC?
Digital Selective Calling (DSC) is a standard that allows you to call other stations
using their unique identification code (the Maritime Mobile Service Identity or MMSI
number), just like you would call a phone number. To call another station, just enter that
station’s MMSI number and choose the voice channel you want to talk on. The radio
uses channel 70 to transmit your MMSI number to the other station along with the voice
channel you requested. If the other station accepts your call, both radios automatically
switch to the requested voice channel so you can talk to the other station.
DSC provides a system for automated distress calls. At the touch of a button, the radio
can transmit your MMSI number, the nature of your distress, and your current position
based on data from your GPS receiver. The radio repeats the distress call every few
minutes until it receives an acknowledgement.
The DSC standard dedicates a VHF channel—channel 70—to digital transmissions
only. Since digital transmissions require less bandwidth voice transmissions, channel 70
E-14
Uniden MHS135DSC Radio Owner’s Manual
avoids the problems of busy voice channels.
Advanced DSC features
Your radio supports the following DSC features:
Feature
Menu Item
Function
Individual Call
Individual
Contact another vessel from your directory.
Group Call
Group
Contact all vessels that share your group MMSI code.
All Ships Call
All Ships
Broadcast to all vessels within range (used for safety or
advisory messages).
Position Request
POS Request
Request the current location of another vessel.
Position Send
Position Send
Transmit your current location to another vessel.
Test Call
Test
Make sure your radio is working and configured correctly.
Standby Mode
Standby
Automatically respond to all DSC calls with “Unavailable” status.
Receive Log
Receive Log
Displays last 10 distress calls and last 50 general calls the
radio received.
DSC Setup
DSC Setup
Accesses DSC menus.
-- POS Reply
-- Test Reply
-- Group MMSI
-- User MMSI
-- Directory
-- Auto CH SW
MMSI Numbers
In order to use DSC features, you must be assigned a User MMSI number and
program that number into your radio. There are two other kinds of MMSI numbers:
individual numbers for use by single boats and group numbers for use by fleets, boating
organizations, event coordinators, etc.
You can get more information on MMSI numbers at these resources:
xx The dealer where you purchased the radio
xx Recreational boaters can obtain an MMSI number from the Boat Owner’s
Association of the U.S. (http://www.boatus.com/mmsi/ or call 800-536-1536) or Sea
Tow Services International (http://seatow.com/boating_safety/mmsi.asp)
xx Commercial boaters need a ship station license to get an MMSI number. For more
information, visit the Federal Communications Commission (FCC) website at http://
wireless.fcc.gov/marine/ fctsht14.html.
Entering MMSI numbers
Use the CHANNEL UP and CHANNEL DOWN keys to scroll through numbers (and
letters when entering names). When you see the number/letter you want, press the right
Uniden MHS135DSC Radio Owner’s Manual
E-15
arrow (GPS/MEM) to move the cursor to the next space. Press the left arrow (WX/SOS)
to back up.
When using the CHANNEL UP and CHANNEL DOWN keys to enter a name, the
alphabetic and numeric characters display in the following order:
xx Capital letters (A through Z)
xx Lower-case letters (a through z)
xx Punctuation (/ ‘ + -)
xx Numbers (0 through 9)
xx One blank space
Entering Your User MMSI Number
## NOTE: Be sure you have the correct User MMSI number before entering it in the radio.
The radio only allows you to enter the User MMSI once. If you need to re-enter the User
MMSI number, contact customer service (see back page for contact information).
1.
2.
3.
4.
When you power up your radio for the first time, it displays MMSI Not Entered and
then displays a marine mode screen. Press and hold MENU/CALL; the Enter User
MMSI screen displays.
Press ENTER-H/M/L. The User MMSI screen displays.
Enter the MMSI number as described previously to scroll through the numbers.
When the ninth digit is entered, the radio asks if you want to save the number and
confirm it. Press ENTER-H/M/L to save it.
Before saving the number, the radio displays the message Confirm number! User
MMSI data is Permanent! At this point you can edit the number (press MENU/
CALL), save the number (press ENTER-H/M/L), or return to the marine mode
screen (press CLR/SCAN),
Entering a group MMSI number
You can change the group MMSI number as often as you want. The first digit of a group
MMSI is fixed at “0.” Follow the steps below to enter a group MMSI number into the
radio:
Press and hold
Use the up and down arrows
to adjust each of the eight
digits in turn.
DSC Setup
Group MMSI
1.
2.
3.
4.
5.
E-16
Group MMSI
0________
16
USA
Back
[MENU]
Save
[ENT]
Exit
[CLR]
Press and hold MENU/CALL to display the Call Menu.
Scroll to DSC Setup and press ENTER-H/M/L.The DSC Setup menu displays.
Scroll to Group MMSI and press ENTER-H/M/L. The Group MMSI screen displays.
Group MMSI numbers always start with a 0, so that digit is already entered for
you. Enter the MMSI number as described previously. When the ninth digit is
correct, press ENTER-H/M/L. The radio asks you to confirm.
To save this MMSI number, press ENTER-H/M/L. To cancel this MMSI number,
press CLR/SCAN.
Uniden MHS135DSC Radio Owner’s Manual
Entering an individual MMSI number
Follow the steps below to enter individual MMSIs and names of other vessels into the
directory:
Press and hold
DSC Setup
Use the up and down arrows
to adjust each of the nine
digits in turn.
Directory
MMSI
0________
Name
[New]
1.
2.
3.
4.
5.
6.
7.
Back
[MENU]
16
USA
Save
[ENT]
Exit
[CLR]
Press and hold MENU/CALL to display the Call Menu.
Scroll to DSC Setup and press ENTER-H/M/L.The DSC Setup menu displays.
Scroll to Directory and press ENTER-H/M/L. The Directory menu displays.
Select [New] and press ENTER-H/M/L.
Enter the MMSI number as described previously. When the ninth digit is correct,
press ENTER-H/M/L and the cursor moves to the Name field.
Enter the name as described previously. When you have entered the name, press
ENTER-H/M/L.
The radio displays the new MMSI number and name and asks you to confirm.
To save this MMSI number and name, press ENTER-H/M/L To cancel this MMSI
number, press CLR/SCAN.
Using the Directory
The directory lets you store up to 20 MMSI numbers of other stations so you can call
them quickly. From the directory, you can edit or delete MMSI numbers.
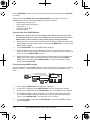
Follow the steps below to edit the MMSI numbers in your directory:
Press and hold
DSC
Setup
Directory
Select an
Entry
Edit
MMSI
123456789
Name
Uniden
16
USA
Back
[MENU]
1.
2.
3.
4.
5.
6.
7.
Save
[ENT]
Exit
[CLR]
Press and hold MENU/CALL to display the Call menu.
Scroll to DSC Setup and press ENTER-H/M/L.The DSC Setup menu displays.
Scroll to Directory and press ENTER-H/M/L.The Directory screen displays. This
screen lets you add a new MMSI or edit/delete an existing MMSI.
To enter a new MMSI, select [NEW] and follow the procedures for entering an
individual MMSI number.
To edit an existing MMSI number/name, select the entry and press ENTER-H/M/L.
Select Edit and press ENTER-H/M/L. The MMSI number and name display. Edit
accordingly and press ENTER-H/M/L when complete. A confirmation screen
displays.
Press ENTER-H/M/L to accept the edits or CLR/SCAN to cancel. The radio returns
Uniden MHS135DSC Radio Owner’s Manual
E-17
8.
9.
to the DSC Directory Edit screen.
To delete the directory entry, select Delete.
When you are satisfied with the directory list, press CLR/SCAN to close the menu
screen.
Making DSC Calls
There are essentially four different types of DSC voice calls:
Call type
What it does
When to use it
Distress
Alerts all stations that you need assistance
and sends them your current position.
In an emergency only.
Individual
Calls a single station using the User MMSL.
When you want to talk to another
station.
Group
Calls all the stations that have the same
Group MMSL as yours.
Any time you want with the whole
group you are traveling with at the
same time.
All Ships
Calls all stations within range of your radio.
Safety warnings (e.g., debris in the
water) or any urgent situation.
Suppose you are coordinating safety for a sailboat race. Before the race starts, you
instruct all the racers to enter your group MMSI number into their radios. During the
race:
xx Throughout the race, you use group calling to update the racers on the time, race
status, and any course corrections.
xx A power boat full of spectators comes too close to the race path. You use individual
calling to contact the power boat and advise them to stay clear of the race.
xx You see a rowboat entering the area, but since it doesn’t have a radio, you can’t
communicate with the rowboat. You use all ships calling to alert all the other boats
in the area of the possible danger.
E-18
Uniden MHS135DSC Radio Owner’s Manual
All ships call
All ships call
Group
call
Individual
call
Calling a single station (Individual Call)
To call a single station with DSC, follow these steps:
1.
2.
3.
4.
5.
Press and hold MENU/CALL to display the Call menu.
Select Individual.
The radio displays the names listed in your directory; use CHANNEL UP and
CHANNEL DOWN to choose the directory entry you want to call and press
ENTER-H/M/L.
If you want to call a station that is not in your directory, select Manual. The radio
prompts you to enter the MMSI number you want to call. Enter the MMSI number
the same way you enter directory entries (see page 22) Enter all nine digits and
press ENTER-H/M/L.
The radio prompts you to select a response channel. Use CHANNEL UP and
CHANNEL DOWN to scroll through the available channels. When you reach the
channel you want to use for a response, press the ENTER-H/M/L button.
The radio displays the MMSI number you are about to call and asks you to
confirm. If you want to call the displayed MMSI number, select Send (press
ENTER-H/M/L). To cancel the call, select Exit (press CLR/SCAN).
Uniden MHS135DSC Radio Owner’s Manual
E-19
6.
The radio automatically switches to channel 70 to transmit the call request.
When the other station accepts the call, both radios switch to the selected
response channel for voice transmission.
xx If the other station cannot respond on the channel you selected, the radio
displays Not support CH.
xx
Calling a particular group of stations (Group Call)
Group calling calls all the stations that share your group MMSI. You must have a group
MMSI programmed into the radio to make a group call, and the stations (boats) you are
calling must have this same group MMSI programmed into their radios.
1.
2.
3.
4.
5.
Press and hold MENU/CALL to display the Call menu.
Select Group.
The radio prompts you to select a response channel. Use CHANNEL UP and
CHANNEL DOWN to scroll through the available channels. When you reach the
channel you want to use for a response, press ENTER-H/M/L.
The radio asks you to confirm the call. Select Send (press ENTER-H/M/L) to
continue with the call or select Exit (press CLR/SCAN) to cancel the call.
The radio switches to channel 70 to transmit the call request then automatically
switches to the designated response channel.
Calling all stations (All-Ships Call)
All ships calling contacts all DSC radios within range of your boat. You should only
use all ships calling in the event of a Safety warning (such as debris in the water) or
to request assistance in an Urgency (any situation where your vessel has a serious
problem but is not yet in distress).
1.
2.
3.
4.
Open the Call menu.
Select All Ships, and then choose whether this is an Urgency call or a Safety call.
The radio asks you to confirm the call. Select Send (press ENTER-H/M/L) to
continue with the call or select Exit (press CLR/SCAN) to cancel the call.
The radio automatically switches to channel 70 to transmit the call request then
automatically switches to channel 16, the designated response channel for allships calling.
Making an automatic distress call
If you have programmed your MMSI number, your radio can transmit an automated
distress call with your current location and nature of the distress. The radio then
monitors channel 16 for a response and repeats the distress call every few minutes until
it receives an acknowledgement.
To send an automatic distress call, press and hold DISTRESS for three seconds. If no MMSI
number has been programmed, the radio prompts you to enter your MMSI number.
If you want to include the nature of your distress in the distress call, use the following
distress procedure:
1.
2.
E-20
Press DISTRESS.
The radio displays the list of distress conditions; use CHANNEL UP and
CHANNEL DOWN to choose the nature of your distress, then press and hold
DISTRESS for three seconds.
Uniden MHS135DSC Radio Owner’s Manual
Undesignated
Sinking
Fire
Overboard
Capsizing
Adrift
Flooding
Abandoning
Collision
Piracy, Armed
Grounding
Canceling an automatic distress call
While the radio is waiting for a response, it gives you the option of canceling the call. To
cancel the distress call, choose Exit and press CLR/SCAN.
Receiving a DSC call
If your radio receives an individual DSC call from another station, it sounds an incoming
call tone and displays the name/MSI number of the station calling you. To respond to the
call, select Send: Able-Comply; the radio sends an acknowledgement and automatically
switches to the designated response channel. To reject the call, select Send: UnableComply; the radio advises the other station that you are unable to respond to the call.
If the DSC request contains a response channel that you are not allowed to use, the
radio displays Not Support CH; your only response option is Send: Unable-Comply.
If the radio receives a group or all ships call, it sounds an incoming call tone and
automatically switches to the designated response channel.
Receive log
Just like your telephone’s caller ID list, your radio keeps track of the calls you receive
but do not answer. The receive log is useful if you have been off your boat or away from
your radio and want to see who has tried to contact you. The radio displays the last 10
distress calls and the last 50 non-distress calls that it received. If you have unread
incoming DSC calls, the radio displays a Message icon. When you display all Distress
and Other receiving logs, the message icon disappears.
Press and hold
Receive Log
Distress
Distress Log
123456789
246853790
357911135
Back
[MENU]
1.
2.
3.
4.
5.
Save
[ENT]
16
USA
Exit
[CLR]
Press and hold MENU/CALL to display the Call menu.
Select Receive Log.
Select Distress to see the last 10 distress calls received by the radio. Select Other
to see the last 50 normal calls received by the radio, then choose from Individual,
Group, or All Ships calls.
Calls are listed in the order they were received, with the newest call shown first.
The display blinks if there are new calls you have not reviewed. The Message
icon also displays.
Select the call you want to see the details of. Use CHANNEL UP and CHANNEL
DOWN to see all of the information. The log displays different information
depending on type of call received. See the table below for the information stored
for each type of call:
Uniden MHS135DSC Radio Owner’s Manual
E-21
DSC Call Type
Receive Log Information
Distress
MMSI (or name), position, time, nature code.
Distress Acknowledge
MMSI (or name), distress MMSI, position, time, nature code.
Distress Relay
MMSI (or name), distress MMSI, position, time, nature code.
Distress Relay
Acknowledge
MMSI (or name), distress MMSI, position, time, nature code.
Geographical
MMSI (or name), category code, communication channel number.
All Ships
MMSI (or name), category code, communication channel number.
Group
MMSI (or name), category code, communication channel number.
Individual
MMSI (or name), category code, communication channel number.
Individual Acknowledge
MMSI (or name), Completed/Unattended, category code, communication
channel number.
Test
MMSI (or name), category code.
Test Acknowledge
MMSI (or name), category code.
Pos Reply
MMSI (or name), position, time, category code.
Pos Request
MMSI (or name), category code.
Pos Send
MMSI (or name), position, time, category code.
6.
From the log menu, select Exit to close the receive log and return to the mode you
were in.
Returning a call from the Receive Log
You can return individual calls directly from the Receive Log. From the call detail screen,
press CHANNEL DOWN until Call Back appears at the bottom of the display. Press
ENTER-H/M/L to return that station’s call.
Test Calls
Making Test Calls (Test)
You can use the test call feature to make sure your radio is working and configured
correctly. To avoid overloading coastal receiving stations, you should limit test calls to
these stations to once a week.
## NOTE: Many coastal stations have specific frequencies and MMSI numbers you should
use for making test calls. Before making a test call to a coastal station, be sure to check
the Local Notice to Mariners (LNM), issued every week by the US Coast Guard. The LNMs
for each region are available online at http://www.navcen.uscg.gov/lnm/default.htm.
E-22
Uniden MHS135DSC Radio Owner’s Manual
Press and hold
Test
Test
[Manual]
JIM CASSIDY
KENT NEWMAN
16
USA
Back
[MENU]
1.
2.
3.
4.
5.
6.
7.
Exit
[CLR]
Select
[ENT]
Press and hold MENU/CALL to display the Call menu.
Select Test.
The radio displays the names listed in your directory; use CHANNEL UP and
CHANNEL DOWN to choose the directory entry you want to send a test call to and
press ENTER-H/M/L.
If you want to send a test call to a station that is not in your directory, select
Manual. The radio prompts you to enter the MMSI number you want to call. Enter
the MMSI number the same way you enter directory entries (see page 22). Enter
all nine digits and press ENTER-H/M/L.
The radio displays the MMSI number you are about to call and asks you to
confirm. If you want to call the displayed number, select Send. To cancel the call,
select Exit.
The radio automatically switches to channel 70 to transmit the test call request,
then switches back to the last-used channel.
When the other station acknowledges the test call, the radio displays an
acknowledgement screen.
Receiving Test Call Setup
When another station sends you a test call, you can select options to answer the test
call manually or have the radio answer automatically.
Test Reply
Press and hold
DSC Setup
Test Reply
18
Auto
Manual
Back
[MENU]
A
USA
Select
[ENT]
Exit
[CLR]
Press and hold MENU/CALL to display the Call menu.
Select DSC Setup and then Test Reply.
Choose Auto and press ENTER-H/M/L. The radio will automatically send an
acknowledgement when it receives a test call.
10. To disable automatic test call reply, repeat the steps above and select Manual.
8.
9.
Uniden MHS135DSC Radio Owner’s Manual
E-23
Acknowledging Test Call Receipt
Different screens display depending on whether you set the Test Reply to Auto or
Manual.
If Test Reply is set to Auto:
Test
1234567890
06/20 11:00
Safety
If Test Reply is set to Manual:
Test
123456789
18
18
Reply
A
A
USA
USA
Send
[ENT]
Exit
[CLR]
No action is necessary.
Exit
[CLR]
Select Send to send a reply.
Position Request and Reply
Enabling Automatic Position Reply
If you want the radio to automatically transmit your current position whenever it receives
a position request, you can enable automatic position reply. Most boaters activate
automatic position reply for safety reasons or because they subscribe to a marine
towing service. Sometimes—for example, in some competitive situations--you may not
want other stations to get your position without your manual confirmation
1.
2.
3.
4.
Press and hold MENU/CALL to display the Call menu.
Select DSC Setup and then POS Reply.
Choose Auto and press ENTER-H/M/L. The radio will automatically transmit your
position when it receives a position request.
To disable automatic position reply, repeat the steps above and select Manual.
POS Request
Any time you need to know where another boat currently is—to find your boating
partners, to respond to a request for assistance, etc.—you can send a position request
to their radio:
Press and hold
POS Request
POS Request
[Manual]
Norwester
Harris
Back
[MENU]
1.
2.
3.
E-24
Select
[ENT]
16
USA
Exit
[CLR]
Press and hold MENU/CALL to display the Call menu.
Select POS Request and press ENTER-H/M/L.
The radio displays the names listed in your directory; use CHANNEL UP and
CHANNEL DOWN to choose the directory entry you want to contact and press
ENTER-H/M/L. If you want to contact a station that is not in your directory, select
Manual. The radio prompts you to enter the MMSI number you want to call. Enter
the MMSI number the same way you enter directory entries (see page 22). Enter
all nine digits and press ENTER-H/M/L.
Uniden MHS135DSC Radio Owner’s Manual
4.
5.
6.
The radio displays the MMSI number you are about to contact and asks you to
confirm. If you want to request the position of the displayed MMSI number, select
Send. To cancel the request, select Exit.
When the other station responds, the radio displays the MMSI number, the
longitude, and the latitude of the other station. If your radio is connected to a
chartplotter through the NMEA OUT connection (see page 34), the position
information will also be displayed on the plotter screen.
If the other station does not have valid GPS data, the radio displays No Position.
Position Reply
When another station requests your current position, different screens display
depending on whether you set Position Reply to Auto or Manual.
If Position Reply is set to Auto:
POS Request
Harris
06/20 11:00
Routine
If Position Reply is set to Manual:
POS Request
Harris
16
Reply
USA
No action is necessary.
16
USA
Exit
[CLR]
Send
[ENT]
Exit
[CLR]
Select Send to send a reply or Exit to
reject the request.
Position Send
If you are requesting assistance or using an all ships call to give a safety warning, you
can send your current position so other stations know where you are:
1.
2.
3.
4.
5.
Press and hold MENU/CALL to display the Call menu.
Select Position Send.
The radio displays the names listed in your directory; use CHANNEL UP and
CHANNEL DOWN to choose the directory entry you want to contact and press
ENTER-H/M/L. If you want to contact a station that is not in your directory, select
Manual. The radio prompts you to enter the MMSI number you want to call. Enter
the MMSI number the same way you enter directory entries (see page 22). Enter
all nine digits and press ENTER-H/M/L.
The radio displays the MMSI number you are about to contact and asks you to
confirm. If you want to transmit your position to the displayed MMSI number,
select Send. To cancel the transmission, select Exit.
The radio transmits your MMSI number, your longitude, and your latitude to the
other station.
Putting the radio into standby
If you are leaving your radio or do not wish to answer any DSC calls, you can put your
radio in standby mode. If your radio receives an individual call, it will automatically
respond with a message that indicates your radio is currently unattended. Follow the
steps below to put your radio in standby:
Uniden MHS135DSC Radio Owner’s Manual
E-25
1.
2.
3.
Press and hold MENU/CALL to display the Call menu.
Select Standby to place your radio in standby mode.
To cancel standby and return to the mode your radio was in, press any button.
Disabling automatic channel switching
If you are involved in a bridge-to-bridge call, you may not want the radio to
automatically switch channels when it receives a DSC call. In cases like this, you can
disable automatic channel switching. If you receive an individual call, the radio will
respond with an unattended code, just as if the radio were in Standby.
Press and hold
DSC Setup
Auto CH SW
Auto CH SW
16
On
Off
Back
[MENU]
1.
2.
3.
USA
Select
[ENT]
Exit
[CLR]
Press and hold MENU/CALL to display the Call menu.
Select DCS Setup, then Auto CH SW.
Select Off and press ENTER-H/M/L. The radio will not automatically switch
channels until you reactivate this feature.
## NOTE: Use this feature with caution. Deactivating automatic switching and then
forgetting it can make it hard for you to receive DSC calls.
If you have unread incoming DSC calls, the radio displays a message icon. You will be
able to review who has called. The radio displays the last 10 distress calls and the last
50 non-distress calls it received (see page E-21).
GPS Features
GPS Operation Overview
Your GPS system provides more than just your specific location.The GPS Favorites
menus let you create a directory of favorite places and their coordinates so you can
easily return there. Using the GPS Setup menus, you can determine power-saving
options, measurement increments, and time settings
The radio is factory-preset to search for your geographic location when it is turned on
for the first time. You can also use GPS menus to set up specific parameters for your
GPS system.
Favorites Menu
The Favorites menu is comprised of the Goto menu and the Add menu. The Goto menu
adds (saves) the current GPS position as well as recalls that position and others you
have saved to sail back to it.
E-26
Uniden MHS135DSC Radio Owner’s Manual
Goto Menu
The Goto menu allows you to select from a list of saved coordinates or to input
coordinates manually.
Press
Favorite
Goto
Goto Fav.
[Manual]
Uniden
18
A
USA
Back
[MENU]
Select
[ENT]
Exit
[CLR]
To input coordinates
1.
2.
3.
4.
5.
From the Goto Fav. screen, select [Manual].
Manually input coordinates. When the last digit is entered, the screen displays Go
and Save.
Select Go to display the coordinates and the compass bearing and begin traveling
towards that destination.
Select Save to save the location into a Favorites directory. When you select Save,
the screen prompts you to name these coordinates.
When you have entered a name for the saved coordinates, they will appear on
the Goto Fav. screen as a selection.
To select a Goto Favorite
1.
2.
3.
From the Goto Fav. screen, select from the directory entries listed.
The screen displays three options: Go, Delete, and Edit.
Select Go to display the coordinates and the compass bearing and begin traveling
towards that destination.
Select Delete to delete the entry.
Select Edit to change the entry.
Add Menu
The Add menu allows you to save your current position to the Favorite directory.
GPS Setup Menu
The GPS Setup menu has eight sub-menus.
xx Unit Power. Turns power to the internal GPS module on and off.
xx Sog Unit (Speed over Ground). Set the measurement for Speed over Ground in
Knot, Mil/h, and Km/h.
xx GPS Module. Select the primary or secondary GPS module.
xx NMEA Output. Allows you to select NMEA sentences to receive.
xx Compass. You can decide whether you want to orient the compass screen with
North as up or your course direction as up.
xx Unit Power. Turns power to the internal GPS module on and off.
xx Power Save. Select the power level at which the GPS unit will enter Power Save
mode.
xx Time Adjust. Adjust local time.
xx Daylight Save. Adjust for Daylight Saving Time.
Uniden MHS135DSC Radio Owner’s Manual
E-27
NMEA Features
Your radio supports NMEA0183 Version 3.01, a standard for data communication
between marine instruments. If you are connected to a chartplotter and the radio
receives another boat’s position data (sentences) in a DSC call, the radio sends the
position data to the chartplotter so you can see the location.
NMEA sentences contain different sets of data. The MHS135DSC supports the following
sentences:
DATA
RMC
GLL
GNS
GGA
ZDA
UTC Time
O
O
O
O
O
Status (Valid/IInvalid)
O
O
O
O
X
Latitude/Longitude
O
O
O
O
X
X
Speed
O
X
X
X
Course
O
X
X
X
X
Date
O
X
X
X
O
The radio can output the following NMEA sentences:
GGA
GSV
DSC
GSA
RMC
DSE
To connect to a chartplotter:
RED - to NMEA (+) input
BLACK - to NMEA ground
YELLOW - to NMEA (+) output
1.
2.
3.
Connect the RED wire to the NMEA positive (+) output.
Connect the BLACK wire to the NMEA ground.
Connect the YELLOW wire to the NMEA positive (+) input.
## NOTE: Use waterproof tape to seal electrical connections.
ADDITIONAL FEATURES
Using the Flashlight
You can use this radio in an emergency. If you press and hold WX/SOS, the radio turns
on the high-intensity LED flashlight on your radio. Depending on how you set it up, the
LED functions as a flashlight, flashes “S O S” in international Morse Code, is always on,
or is off.
E-28
Uniden MHS135DSC Radio Owner’s Manual
## NOTE: Your radio operates normally when the SOS strobe is activated. However, the SOS
key is disabled during Key Lock and MENU operation.
Press
Setup
Flashlight
FLASHLIGHT
Strobe SOS
Always On
Off
16
USA
Back
[MENU]
1.
2.
3.
Save
[ENT]
Exit
[CLR]
Display the normal menu and press Setup.
Select FLASHLIGHT. The screen displays the FLASHLIGHT menu.
Select the desired setting and press ENTER-H/M/L.
Renaming Channels
If you discover that a marine radio channel has a different common name in your local
area, you can change the name of that channel to make it easier for you to use (see the
channel lists beginning on page E-31 for the default channel names). To rename a channel,
follow the steps below:
1.
2.
3.
4.
5.
6.
7.
Display the normal menu and choose the Setup sub-menu.
Select Channel Name. The screen displays the list of channels.
Use CHANNEL UP and CHANNEL DOWN to choose the channel you want to
change and press ENTER-H/M/L.
Select Rename to enter a new name for this channel. The radio prompts you to
enter a new name for this channel. Each name can be up to 12 characters. Use
CHANNEL UP and CHANNEL DOWN to change the name.
When you finish entering the name, the radio displays the new channel name and
asks you to confirm. To save this new channel name, select Save; to cancel the
change, select Exit. The radio returns to the channel list.
To restore a channel back to its original name, select the channel and choose
Default.
When you are satisfied with the channel list, select Exit.
Maintenance and Troubleshooting
Due to its rugged design, your radio requires very little maintenance. However, it is a
precision electronic instrument, so you should follow a few precautions:
xx If the antenna has been damaged, do not transmit except in an emergency
situation. Doing so may cause further radio damage.
xx You are responsible for continued FCC technical compliance of your radio.
xx Arrange for periodic performance checks with your Uniden dealer.
Uniden MHS135DSC Radio Owner’s Manual
E-29
Common Questions
Problem
Things to Try
The radio won’t turn on.
Charge the radio.
-The power LED on the charger
-doesn’t turn on.
---The radio won’t transmit.
I can’t hear anything from the
speaker.
Noise comes out of the
speaker all the time
I can transmit, but no one can
hear me.
I’m not getting hazard alerts.
Don’t use the charger when the ambient temperature is below 0° C (32°
F) or above 45° C (113° F).
Make sure the charging contacts on the radio and charger are clean.
Replace the battery.
Make sure you are not in Weather or Scan mode.
Make sure you are not trying to transmit on a receive-only channel or
transmit at the wrong power level for this channel (see the channel lists
starting on page E-31.
-- Check the battery power level; if it’s low, charge the battery before trying
to transmit.
-- Make sure the duration of each transmission is less than 5 minutes.
Adjust the squelch level; it is probably too high.
Adjust the squelch level; it is probably too low.
Check your UIC channel settings: does the area you are in use different
channel assignments?
Make sure Weather Alert Watch is turned on.
The channel number on the display will flash if the radio is in a watch mode
The display flashes, and I don’t
or in scan mode. Try turning off scanning, Weather Alert Watch, Triple Watch,
know why.
or Dual Watch beginning on page E-7.
Where can I find my radio’s
The serial number is on a plate inside the battery compartment.
serial number?
Specifications
General
Channels
Freq. Control
Freq. Tol.
All US/International/Canada marine channels
10 Weather channels
PLL
Transmit: 1.5 PPM (at 77°F/25°C)
Receive: 1.5 PPM (at 77°F/25°C)
Oper. Temp.
-4°F (-20°C) to +122°F(+50°C)
Antenna
Flexible Whip
Microphone
Built-in Electret type
Display
Liquid Crystal Display
Speaker
8Ω 1.0 W
Power Source
Rechargeable Lithium Ion Battery
7.4V 1040 mAh
E-30
Uniden MHS135DSC Radio Owner’s Manual
6.33 (H) x 2.57 (W) x 1.92 (D) inch
Size (without antenna)
161 (H) x 65.5 (W) x 48.8 (D) mm
Weight
10.9 oz (310g) (w/battery and antenna)
Transmitter
Frequency Range
156~158 MHz
Frequency Stability
±2.5 PPM
Power Output
1 W, 2.5 W, and 6 W
Spurious Emissions
-40 dB @ HI; -40 dB @ LO.
Current Drain
1450 mA (6 W)
Receiver
Double Conversion Super Heterodyne
Type
Phase Locked Loop system for Local Oscillator
Frequency Range
156~164 MHz
Sensitivity
0.23 μV for 12dB SINAD
Squelch Sensitivity
Threshold 0.2μV
Audio Frequency Response
+6 dB @ 500 Hz; -6 dB @ 2000Hz
Adjacent Channel Selectivity
70 dB @ ±25 kHz
Audio Output Power
1.0 W @MAX VOLUME
Current Drain
Squelched: 50mA; Max. Audio: 240mA
Channels and Frequencies (MHz)
US channel frequencies and names
Ch
1A
5A
6
7A
8
9
10
11
12
13
14
15
16
17
18A
RX Freq
156.050
156.250
156.300
156.350
156.400
156.450
156.500
156.550
156.600
156.650
156.700
156.750
156.800
156.850
156.900
TX Freq
156.050
156.250
156.300
156.350
156.400
156.450
156.500
156.550
156.600
156.650
156.700
Inhibit
156.800
156.850
156.900
US Marine Channels
Status
Name
Simplex
Vessel traffic system/commercial
Simplex
Vessel traffic system/commercial
Simplex
Inter-ship safety
Simplex
Commercial
Simplex
Commercial
Simplex
Non commercial
Simplex
Commercial
Simplex
Vessel traffic system
Simplex
Vessel traffic system
Simplex, 1 W
Bridge to bridge
Simplex
Vessel traffic system
Receive only
Environmental
Simplex
Distress, safety, and calling
Simplex, 1 W
Govt maritime control
Simplex
Commercial
Uniden MHS135DSC Radio Owner’s Manual
E-31
Ch
19A
20
20A
21A
22A
23A
24
25
26
27
28
63A
65A
66A
67
RX Freq
156.950
161.600
157.000
157.050
157.100
157.150
161.800
161.850
161.900
161.950
162.000
156.175
156.275
156.325
156.375
TX Freq
156.950
157.000
157.000
157.050
157.100
157.150
157.200
157.250
157.300
157.350
157.400
156.175
156.275
156.325
156.375
US Marine Channels
Status
Name
Simplex
Commercial
Duplex
Port operation
Simplex
Port operation
Simplex
Coast guard only
Simplex
Coast guard
Simplex
Coast guard only
Duplex
Marine operator
Duplex
Marine operator
Duplex
Marine operator
Duplex
Marine operator
Duplex
Marine operator
Simplex
Vessel traffic system
Simplex
Port operation
Simplex
Port operation
Simplex, 1 W
Bridge To Bridge
68
69
70
71
72
73
74
75
76
77
78A
79A
80A
81A
82A
83A
84
85
86
87
88
156.425
156.475
156.525
156.575
156.625
156.675
156.725
156.775
156.825
156.875
156.925
156.975
157.025
157.075
157.125
157.175
161.825
161.875
161.925
157.375
157.425
156.425
156.475
Inhibit
156.575
156.625
156.675
156.725
156.775
156.825
156.875
156.925
156.975
157.025
157.075
157.125
157.175
157.225
157.275
157.325
157.375
157.425
Simplex
Simplex
Receive only
Simplex
Simplex
Simplex
Simplex
Simplex, 1 W
Simplex, 1 W
Simplex, 1 W
Simplex
Simplex
Simplex
Simplex
Simplex
Simplex
Duplex
Duplex
Duplex
Simplex
Simplex
E-32
Non Commercial
Non Commercial
Digital Selective Calling
Non Commercial
Non Commercial (Ship-Ship)
Port Operation
Port Operation
Port Operation
Port Operation
Port Operation (Ship-Ship)
Non Commercial
Commercial
Commercial
Government
Government
Coast Guard
Marine Operator
Marine Operator
Marine Operator
Marine Operator
Commercial (Ship-Ship)
Uniden MHS135DSC Radio Owner’s Manual
Canadian channel frequencies and names
Ch
1
2
3
4A
5A
6
7A
8
9
10
11
12
13
14
15
16
17
18A
19A
20
21A
22A
23
24
25
26
27
28
60
RX Freq
160.650
160.700
160.750
156.200
156.250
156.300
156.350
156.400
156.450
156.500
156.550
156.600
156.650
156.700
156.750
156.800
156.850
156.900
156.950
161.600
157.050
157.100
161.750
161.800
161.850
161.900
161.950
162.000
160.625
TX Freq
156.050
156.100
156.150
156.200
156.250
156.300
156.350
156.400
156.450
156.500
156.550
156.600
156.650
156.700
156.750
156.800
156.850
156.900
156.950
157.000
157.050
157.100
157.150
157.200
157.250
157.300
157.350
157.400
156.025
61A
62A
63A
64
64A
65A
66A
67
68
69
156.075
156.125
156.175
160.825
156.225
156.275
156.325
156.375
156.425
156.475
156.075
156.125
156.175
156.225
156.225
156.275
156.325
156.375
156.425
156.475
Canadian Marine Channels
Status
Name
Duplex
Marine Operator
Duplex
Marine Operator
Duplex
Marine Operator
Simplex
Canadian Coast Guard
Simplex
Vessel Traffic System
Simplex
Inter-Ship Safety
Simplex
Commercial
Simplex
Commercial
Simplex
Boater Calling Channel
Simplex
Commercial
Simplex
Vessel Traffic System
Simplex
Vessel Traffic System
Simplex, 1 W
Bridge To Bridge
Simplex
Vessel Traffic System
Simplex, 1 W
Environmental
Simplex
Distress, safety, calling
Simplex, 1 W
State Control
Simplex
Commercial
Simplex
Canadian Coast Guard
Duplex, 1 W
Port Operation
Simplex
Canadian Coast Guard
Simplex
Canadian Coast Guard
Duplex
Marine Operator
Duplex
Marine Operator
Duplex
Marine Operator
Duplex
Marine Operator
Duplex
Marine Operator
Duplex
Marine Operator
Duplex
Marine Operator
Simplex
Simplex
Simplex
Duplex
Simplex
Simplex
Simplex, 1 W
Simplex
Simplex
Simplex
Canadian Coast Guard
Canadian Coast Guard
Port Operation
Marine Operator
Port Operation
Port Operation
Port Operation
Bridge To Bridge
Non Commercial
Non Commercial
Uniden MHS135DSC Radio Owner’s Manual
E-33
Ch
70
71
72
73
74
75
76
77
78A
79A
80A
81A
82A
83
83A
84
85
86
87
88
RX Freq
156.525
156.575
156.625
156.675
156.725
156.775
156.825
156.875
156.925
156.975
157.025
157.075
157.125
161.775
157.175
161.825
161.875
161.925
157.375
157.425
TX Freq
Inhibit
156.575
156.625
156.675
156.725
156.775
156.825
156.875
156.925
156.975
157.025
157.075
157.125
157.175
157.175
157.225
157.275
157.325
157.375
157.425
Canadian Marine Channels
Status
Name
Receive only
Digital Selective Calling
Simplex
Non Commercial
Simplex
Non Commercial
Simplex
Port Operation
Simplex
Port Operation
Simplex, 1 W
Port Operation
Simplex, 1 W
Port Operation
Simplex, 1 W
Port Operation
Simplex
Inter Ship
Simplex
Inter Ship
Simplex
Inter Ship
Simplex
Canadian Coast Guard
Simplex
Canadian Coast Guard
Duplex
Canadian Coast Guard
Simplex
Canadian Coast Guard
Duplex
Marine Operator
Duplex
Marine Operator
Duplex
Marine Operator
Simplex
Port Operation
Simplex
Port Operation
International channel frequencies and names
Ch
RX Freq
TX Freq
Status
Name on display
1
160.6500
156.0500
Duplex
Marine operator
2
160.7000
156.1000
Duplex
Marine operator
3
160.7500
156.1500
Duplex
Marine operator
4
160.8000
156.2000
Duplex
Marine operator
5
160.8500
156.2500
Duplex
Marine operator
6
156.3000
156.3000
Simplex
Inter-ship safety
7
160.9500
156.3500
Duplex
Marine operator
8
156.4000
156.4000
Simplex
Commercial (ship-ship)
9
156.4500
156.4500
Simplex
Boater calling channel
10
156.5000
156.5000
Simplex
Commercial
11
156.5500
156.5500
Simplex
Vessel traffic system
12
156.6000
156.6000
Simplex
Vessel traffic system
E-34
Uniden MHS135DSC Radio Owner’s Manual
Ch
RX Freq
TX Freq
Status
Name on display
13
156.6500
156.6500
Simplex
Bridge to bridge
14
156.7000
156.7000
Simplex
Vessel traffic system
15
156.7500
156.7500
Simplex, 1 W
Environmental
16
156.8000
156.8000
Simplex
Distress, Safety, Calling
17
156.8500
156.8500
Simplex, 1 W
Govt maritime control
18
161.5000
156.9000
Duplex
Port operation
19
161.5500
156.9500
Duplex
Commercial
20
161.6000
157.0000
Duplex
Port operation
21
161.6500
157.0500
Duplex
Port operation
22
161.7000
157.1000
Duplex
Port operation
23
161.7500
157.1500
Duplex
Marine operator
24
161.8000
157.2000
Duplex
Marine operator
25
161.8500
157.2500
Duplex
Marine operator
26
161.9000
157.3000
Duplex
Marine operator
27
161.9500
157.3500
Duplex
Marine operator
28
162.0000
157.4000
Duplex
Marine operator
60
160.6250
156.0250
Duplex
Marine operator
61
160.6750
156.0750
Duplex
Marine operator
62
160.7250
156.1250
Duplex
Marine operator
63
160.7750
156.1750
Duplex
Marine operator
64
160.8250
156.2250
Duplex
Marine operator
65
160.8750
156.2750
Duplex
Marine operator
66
160.9250
156.3250
Duplex
Marine operator
67
156.3750
156.3750
Simplex
Bridge to bridge
68
156.4250
156.4250
Simplex
Non commercial
69
156.4750
156.4750
Simplex
Non commercial
70
(156.5250)
(156.5250)
DSC Only
DSC
71
156.5750
156.5750
Simplex
Non commercial
72
156.6250
156.6250
Simplex
Non commercial
73
156.6750
156.6750
Simplex
Port operation
74
156.7250
156.7250
Simplex
Port operation
Uniden MHS135DSC Radio Owner’s Manual
E-35
Ch
RX Freq
TX Freq
Status
Name on display
75
156.7750
156.7750
Simplex, 1 W
Port operation
76
156.8250
156.8250
Simplex,
Port operation
77
156.8750
156.8750
Simplex
Port operation (ship-ship)
78
161.5250
156.9250
Duplex
Port operation
79
161.5750
156.9750
Duplex
Port operation
80
161.6250
157.0250
Duplex
Port operation
81
161.6750
157.0750
Duplex
Port operation
82
161.7250
157.1250
Duplex
Port operation
83
161.7750
157.1750
Duplex
Port operation
84
161.8250
157.2250
Duplex
Marine operator
85
161.8750
157.2750
Duplex
Marine operator
86
161.9250
157.3250
Duplex
Marine operator
87*
157.3750
157.3750
Simplex
Marine operator
88*
157.4250
157.4250
Simplex
Marine operator
Weather channel frequencies and names
Channel
RX
Channel
RX
WX01
WX02
WX03
WX04
WX05
162.5500
162.4000
162.4750
162.4250
162.4500
WX06
WX07
WX08
WX09
WX10
162.5000
162.5250
161.6500
161.7750
163.2750
Regulations and Safety Warnings
WARNING! Read this information before using the radio.
Maritime Radio Services Operation
Warning! This transmitter will operate on channels/frequencies that have restricted use in
the United States. The channel assignments include frequencies assigned for exclusive
use of the U.S. Coast Guard, use in Canada, and use in international waters. Operation on
these frequencies without proper authorization is strictly forbidden. See page E-31 for tables of
the available channels and their uses. If you are still not certain which channels to use, see
the FCC maritime radio page at the FCC website
(http://wireless.fcc.gov/marine/) or contact the FCC Call Center at 1-888-CALL-FCC.
For individuals requiring a license, such as commercial users, you should obtain a license
application from your nearest FCC field office (for US users) or Industry Canada (for
Canadian users).
Basic Radio Guidelines
You should familiarize yourself with the rules on marine radios and be aware of which rules
apply to your boat. Complete guidelines for all ship and marine radio types can be found at
E-36
Uniden MHS135DSC Radio Owner’s Manual
the US Coast Guard website under the topic Radio Info for Boaters (the direct link is
http://www.navcen.uscg.gov/marcomms/boater.htm). Here are a few guidelines that
affect nearly all boaters.
xx If you have a VHF radio on your boat, you must maintain a watch on channel 16
(156.800 MHz) whenever the radio is not being used to communicate. Starting in
2004, if a radio is carried, it must be on and set to channel 16 whenever your boat is
underway.
xx If you hear a distress call, wait a few minutes to let a shore station or Coast Guard
vessel respond. If no other station has responded after 5 minutes, you must respond
to the distress call.
xx Do not make false mayday or distress calls as a prank or to test your radio. (This is
essentially like making a false 9-1-1 call; you may be subject to fines.)
FCC/Industry Canada Information
Certification: FCC Part 80 or RSS-182
Output Power: 6 W
Emission: 16K0F3E
Transmitter Frequency Range: 156.025-157.425 MHz
This device complies with Part 15 of the FCC Rules. Operation is subject to the condition
that this device does not cause harmful interference.
Unauthorized changes or modifications to this equipment may void compliance with the
FCC Rules. Any change or modification must be approved in writing by Uniden. Changes or
modifications not approved by Uniden could void the user’s authority to operate the equipment.
FCC RF Exposure Information
In August 1996 the Federal Communications Commission (FCC) of the United States with
its action in Report and Order FCC 96-326 adopted an updated safety standard for human
exposure to radio frequency electromagnetic energy emitted by FCC regulated transmitters. Those guidelines are consistent with the safety standard previously set by both U.S.
and international standards bodies. The design of the radio complies with the FCC guidelines and these international standards.
Never allow children to operate the radio without adult supervision and the knowledge of
the following guidelines.
WARNING! It is up to the user to properly operate this radio transmitter to insure safe operation. Please adhere to the following:
Use only the supplied or an approved antenna. Unauthorized antennas, modifications, or
attachments could impair call quality, damage the radio, or violate FCC regulations.
Do not use the radio with a damaged antenna. If a damaged antenna comes into contact
with the skin, a minor burn may result. Please contact your local dealer for a replacement
antenna.
Body-Worn Operation
This device was tested for typical body-worn operations using the supplied belt-clip. To
maintain compliance with FCC RF exposure requirements, body-worn operations are restricted to the supplied belt-clip. For hand-held operation, the radio should be held 1 inch
from the user’s face. The use of accessories that do not satisfy these requirements may not
comply with FCC RF exposure requirements and should be avoided. For more information
about RF exposure, please visit the FCC website at www.fcc.gov.
Lithium Ion Battery Warning
This equipment contains a rechargeable Lithium Ion battery. The rechargeable Lithium Ion
battery contained in this equipment may explode if disposed of in a fire.
Do not short-circuit the battery.
Do not charge the rechargeable battery used in this equip-ment in any charger other than
Uniden MHS135DSC Radio Owner’s Manual
E-37
the one specified in the owner’s manual. Using another charger may damage the battery or
cause the battery to explode.
NOTE: Li-Ion batteries must be recycled or disposed of properly.
Avoid exposing the battery (whether attached to the radio or not) to direct sunlight, heated
cars, or temperatures below -4°F (-20°C) or above +140°F (+60°C). Exposing the chemical
contained within the battery pack to temperatures above +140°F (+60°C) may cause the
battery to rupture, fail, or reduce performance.
In case of exposure to the cell contents, wash the affected area thoroughly, and seek medical attention.
Three Year Limited Warranty
WARRANTOR: UNIDEN AMERICA CORP. (“Uniden”)
ELEMENTS OF WARRANTY: Uniden warrants, for three years, to the original retail owner,
this Uniden Product to be free from defects in materials and craftsmanship with only the
limitations or exclusions set out below.
WARRANTY DURATION: This warranty to the original user shall terminate and be of no
further effect 36 months after the date of original retail sale. The warranty is invalid if the
Product is (A) damaged or not maintained as reasonable or necessary, (B) modified, altered, or used as part of any conversion kits, subassemblies, or any configurations not sold
by Uniden, (C) improperly installed, (D) serviced or repaired by someone other than an
authorized Uniden service center for a defect or malfunction covered by this warranty, (E)
used in any conjunction with equipment or parts or as part of any system not manufactured
by Uniden, or (F) installed or programmed by anyone other than as detailed by the Operating Guide for this product.
STATEMENT OF REMEDY: In the event that the product does not conform to this warranty at any time while this war-ranty is in effect, warrantor will repair the defect and return
it to you without charge for parts, service, or any other cost (except shipping and handling)
incurred by warrantor or its representatives in connection with the performance of this
warranty. THE LIMITED WARRANTY SET FORTH ABOVE IS THE SOLE AND ENTIRE
WARRANTY PERTAINING TO THE PRODUCT AND IS IN LIEU OF AND EXCLUDES
ALL OTHER WARRANTIES OF ANY NATURE WHATSOEVER, WHETHER EXPRESS,
IMPLIED OR ARISING BY OPERATION OF LAW, INCLUDING, BUT NOT LIMITED TO
ANY IMPLIED WARRANTIES OF MERCHANTABILITY OR FITNESS FOR A PARTICULAR PURPOSE. THIS WARRANTY DOES NOT COVER OR PROVIDE FOR THE REIMBURSEMENT OR PAYMENT OF INCIDENTAL OR CONSEQUENTIAL DAMAGES. Some
states do not allow this exclusion or limitation of incidental or consequential damages so
the above limitation or exclusion may not apply to you.
LEGAL REMEDIES: This warranty gives you specific legal rights, and you may also have
other rights which vary from state to state. This warranty is void outside the United States
of America.
PROCEDURE FOR OBTAINING PERFORMANCE OF WARRANTY: If, after following the
instructions in this Operating Guide you are certain that the Product is defective, pack the
Product carefully (preferably in its original packaging). Include evidence of original purchase and a note describing the defect that has caused you to return it. The Product should
be shipped freight prepaid, by traceable means, or delivered, to warrantor at:
Uniden America Corporation
Parts and Service Division
4700 Amon Carter Boulevard
Fort Worth, TX, 76155
(800) 554-3988
E-38
Uniden MHS135DSC Radio Owner’s Manual