1
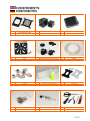
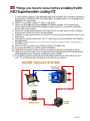
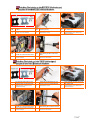
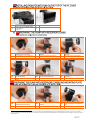
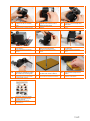
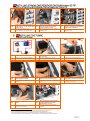
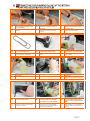
EN
CPU Water Block with AMD plate
EN
Pump
EN
Radiator
D
CPU Wasserkühler mit AMD
Montagehalterung
D
Pumpe
D
Radiator
EN
Fan
EN
Standalone/Combo Reservoir
EN
Tube
D
Lüfter
D
Ausgleichsbehälter/AGB-Pumpenaufsatz
D
Schlauch
EN
Fittings
EN
Water additive and Distilled water
EN
CPU Backplate
D
Anschlüsse
D
Wasserzusatz und destilliertes Wasser
D
CPU Backplate
EN
CPU mounting mechanism
EN
Thermal compound - grease
EN
Needed hardware for installation
D
CPU-Kühler Montagematerial
D
Wärmeleitpaste
D
Benötigtes Werkzeug für die Installation
-
-
-
-
AMD
Mounting
plate
Intel
Mounting
plate
Allen key
EN
D
Anleitung gilt für Kühler mit wechselbarer
Montagehalterung
EN
D
EN
Screw back all 4 screws. Do not use
high force!
EN
D
Die vier M4-Schrauben wieder einschrauben.
D
EN
D
EN
D
1
If you have water block with
changeable mounting plate take the
allen key and take next step.
Unscrew stock retention plate
screws
Die Schrauben an der vorhandenen
Halterung entfernen.
Place backplate with CPU screws
into CPU socket holes
UNI-Backplate zusammen mit den Schrauben
von der Rückseite des Mainboards anbringen.
EN
D
Unscrew four M4 screws with allen
key.
Die vier M4-Schrauben mit dem InbusSchlüssel lösen.
EN
Replace Intel Mounting plate with
AMD mounting plate.
D
Die Intel-Halterung gegen die AMD-Halterung
austauschen.
EN
Prepare EK UNI Backplate with CPU
mounting screws
EK Universal backplate parts
Benötigte Teile der Universal-Backplate
Remove stock retention plate and
backplate
Vorhandene Halterung und Backplate
entfernen.
D
EN
Place PVC washer, metal washer and
M4 nut on CPU mounting screw
EN
D
Von der Vorderseite Plastik-Unterlegscheiben,
Metall-Unterlegscheiben und Muttern an den
Schrauben anbringen.
D
This step is only obligatory when installing the water block on the AMD AM2/AM2+/AM3/AM3+ mother board.
Dieser Schritt ist notwendig nur wenn Sie den Wasser-Block auf eine AMD AM2/AM2+/AM3/AM3+ Hauptplatine montieren.
M4-Schrauben an der EK UNI-Backplate
anbringen.
Screw the mounting CPU mounting
screw while holding M4 nut
Die Muttern von vorne halten und von der
Rückseite her festschrauben.
EN
D
For Intel LGA 1155/1156 socket use
all parts
Benötigte Teile für die Installation.
EN
D
EN
Place PVC washer, metal washer
and M4 nut on CPU mounting screw
EN
D
Von der Vorderseite Plastik-Unterlegscheiben,
Metall-Unterlegscheiben und Muttern an den
Schrauben anbringen.
D
EN
For Intel LGA 1366 socket use only
metal backplate and POM standoffs
EN
D
Für Sockel 1366-Mainboards wird nur die
Metallene Backplate, zusammen mit den
Abstandhaltern benötigt.
D
EN
Place PVC washer, metal washer
and M4 nut on CPU mounting screw
EN
D
Von der Vorderseite Plastik-Unterlegscheiben,
Metall-Unterlegscheiben und Muttern an den
Schrauben anbringen.
D
Prepare EK UNI Backplate with CPU
mounting screws
UNI-Backplate mit den Schrauben und
Abstandhaltern versehen.
EN
Place backplate with CPU screws into
CPU socket holes
D
UNI-Backplate zusammen mit den Schrauben
und Abstandhaltern von der Rückseite des
Mainboards anbringen.
EN
Place backplate with CPU screws into
CPU socket holes
D
UNI-Backplate zusammen mit den Schrauben
und Abstandhaltern von der Rückseite des
Mainboards anbringen.
Tighten the CPU mounting screw
while holding the M4 nut with other
hand
Die Muttern von vorne halten und von der
Rückseite her festschrauben.
Prepare EK UNI Backplate with CPU
mounting screws and POM standoff
UNI-Backplate mit den Schrauben und
Abstandhaltern versehen.
Tighten the CPU mounting screw
while holding M4 nut with other hand
Die Muttern von vorne halten und von der
Rückseite her festschrauben.
EN
D
EN
D
EN
D
EN
D
Apply thermal grease in cross
pattern (stands for all CPU sockets)
Wärmeleitpaste auf der CPU verteilen.
EN
Peel off protective label from the
base of the CPU block
EN
Place CPU water block and place 4
springs and 4 Thumb nuts
D
Schutzfolie von der Unterseite des Kühlers
entfernen.
D
CPU-Kühler auf der CPU platzieren und
Unterlegscheiben, Federn und Rändelmuttern
auf den Schrauben anbringen.
EN
Screw in the motherboard mounting
standoffs
Apply pressure with screwing the
diagonal 2 thumb nuts
simultaneously.
Die Rändelmuttern überkreuzt in kleinen
Inkrementen anziehen, bis ein Strammer,
gleichmässiger Anpressdruck vorhanden ist.
Open PC case and remove stock
fans
Gehäuse öffnen und Original-Lüfter entfernen
Place motherboard in case and
screw in all mounting screws
Mainboard im Gehäuse platzieren und mit
Schrauben fixieren.
EN
Mark all the holes you need to mount
the motherboard.
D
Mit dem Mainboard übereinstimmende
Schraubenlöcher auf dem Mainboard-Tray
markieren.
EN
Remove the blank slots needed to
install the VGA card
D
Slotblenden auf Höhe der Grafikkarte
entfernen.
D
Distanzhülsen auf dem Mainboard-Tray
einschrauben.
EN
D
EN
D
2
Place 2 screws, hold them with one
hand and prepare 120mm fan
Zwei Schrauben von Hand fixieren.
Align mounting screws with threads
in radiator and screw in the screws
Nun die Schrauben mit einem
Schraubenzieher fest-ziehen.
EN
D
While holding the screws install
120mm fan
Lüfter von vorne über die Schrauben schieben.
EN
D
EN
Screw in all 4 screws to fasten the
radiator with fan
EN
D
Die restlichen beiden Schrauben ebenfalls
fixieren.
D
EN
To mount the radiator on the back
of the case use EK-UNI RAD Holder.
EN
D
Verwenden Sie den EK-RAD Holder Light, um
einen Radiator an der Rückseite anzubringen.
D
Use 2,5mm black plastic standoff and
M3×35mm screws to mount the
radiator.
Schwarze 2,5mm Abstandhalter und
M3x35mm Schrauben verwenden, um den
Radiator am Halter zu fixieren.
EN
D
While still holding the screws install
place radiator
Radiator vor den Lüfter platzieren.
Screw in the fitting and fasten it with
key (do not use high force)
Anschlüsse am Radiator anbringen.
Install 120mm FAN in pull mode with
M3×30 screws from radiator delivery.
Lüfter in saugender Ausrichtung am Radiator
festschrauben.
EK-UNI RAD Holder 120 is not included within the H3O series kit. It is just shown as an example how to simplify radiator mount when space in your case becomes critical.
EK-UNI RAD Holder 120 ist nicht im Lieferumfang von H3O Series Kit enthalten, kann aber separat gekauft werden. Es ist ein Beispiel dafür, die Heizkörper Installation zu
vereinfachen, wenn der Platz im PC-Gehäuse einsgeschränkt ist.
EN
To mount the radiator on the back
of the case use EK-UNI RAD Holder
EN
D
Wie im vorigen Beispiel den EK-RAD Holder
für die Installation
verwenden.
D
EN
EN
Place the o-ring (gasket) into the
channel
EN
O-Ring in der vorgesehenen Aussparung
platzieren.
D
D
Die vier Schrauben von der Vorderseite der
Pumpe entfernen.
D
EN
Fasten 4 screws with allen key (do
not use high force)
EN
D
EN
D
3
Unscrew (remove) 4 screws
fastening the front pump top
Die vier Schrauben mit einem Inbus-Schlüssel
anziehen.
Unscrew (remove) 4 screws
fastening the front pump top
Die vier Schrauben von der Vorderseite der
Pumpe entfernen.
Screw in G1/4 plug and fasten it with
key (do not use high force)
D
EN
Place 4 screws of the reservoir combo
into holes
AGB-Aufsatz mit den vier mitgelieferten
Schrauben fixieren.
Screw in fittings into reservoir combo
and pump
D
EN
Place the o-ring (gasket) into the
channel
EN
D
O-Ring in der vorgesehenen Aussparung
platzieren.
D
Install only one mounting screw and
screw it only for few turns with allen
key.
Erste Schraube anbringen und nur leicht
anziehen.
This is an example of EK-Coolstream XT (240) installed on top of the PC chassis via EK-UNI RAD Holder 120. Size of radiator depends on version of kit you have in possesion.
Dies ist ein Beispiel wie man EK-Coolstream XT (240) an der Oberseite des PC-Gehäuses über EK-UNI RAD Holder 120 installiert. Die Größe der Heizkörper variiert je nach Version
des gekauften Kits.
EN
Install the Pump mounting plate so
it sticks on to the one mounting
screw.
EN
D
Halterungsplatte an der Unterseite
anbringen, und mit der Schraube ausrichten.
D
EN
D
EN
D
EN
D
Install mounting bracket from the
pump delivery.
Pumpen-Halterungsteil an der Rückseite
anbringen.
Alternatively follow the encased
instruction manual for EK-DCP
mounting plate KIT
Alternativ folgen Sie die beiligende
Bedienungsanleitung für EK-DCP
Montageplatte KIT.
Schraube an der gegenüberliegenden Seite
anbringen.
Use M3×6mm screws and M3 nut to
fixate the mounting bracket.
D
Take the thicker sponge, peel of the
protective foil and stick it to bottom
side of DCP Pump mounting plate
Den dickeren Schwamm nehmen, die
Schutzfolie abziehen und an der Unterseite
der Halterungsplatte anbringen.
Align the mounting plate with
opposite screw hole and screw in
second mounting screw.
Die Halterung mit M3x6mm Schrauben
fixieren.
Make holes in thinner sponge and
use M4×12mm screws to fixate it
D
Im dünneren Schwamm Löcher einstanzen
und vier M4x12mm Schrauben durchschieben.
EN
D
EN
D
EN
D
Tighten all 4 screws equally using
gentle force.
Nun alle vier Schrauben anbringen und
anziehen.
Use tongs and screwdriver to screw
the M3 screws.
Die beiden Schrauben mit einer Zange
festhalten und mit einem Schraubenzieher
fixieren.
Pile of the protective foil and stick the
pump on thinner sponge to final
position
Schutzfolie abziehen und die beiden
Schwämme zusammenkleben.
EN
If you don’t have the right place to
install reservoir, you can use EK-UNI
Holders 50/70.
EN
D
Wenn nicht genügend Platz für die
Installation eines AGB vorhanden ist, sind die
EK-UNI Halterungen eine optimale Lösung.
D
EN
D
EN
D
EN
D
4
5
Examine the water loop diagram
Schauen Sie sich die Wasserkreislaufskitze
an.
Install the tube on fitting
Überwurfmutter über den Schlauch schieben
und den Schlauch auf der Anschlusstülle
anbringen.
Install tube on the rest of the
fittings
Die restlichen Schlauchstücke auf dieselbe Art
zuschneiden und befestigen.
EN
D
Which you can install on 5,25” Bay
cage with M4 screws and install
reservoir holders on them.
Die Halterungen können mit M4-schrauben an
der Innenseite des 5,25"- Laufwerkschachtes
befestigt werden.
Take a measure of how long tube
you will need
Von Auge nachmessen, wie lange das
benötigte Schlauch-Stück sein soll.
EN
Then install reservoir upon your
wishes. An oval holes of UNI Holders
makes it super adjustable.
D
Danach kann der Ausgleichsbehälter
angebracht werden.
EN
Cut the tube on marked spot
D
Schlauch nach der entsprechenden Länge
abschneiden.
EN
Screw in the securing ring of the
fitting to secure the tube properly
EN
Install tube on the rest of the fittings
D
Nun den Schlauch mit der Überwurfmutter
sichern.
D
Die restlichen Schlauchstücke auf dieselbe Art
zuschneiden und befestigen.
EN
Place the pump on a soft sponge to
prevent vibrations of the pump
transmitting to PC case 5
D
Die Pumpe sollte auf einer Dämm-Matte
platziert werden, um Vibrationsgeräusche zu
vermeiden.
This step depends of type of kit you have (shown for EK-H3O Supreme HF water cooling kit series).
Nur zu illustrativen Zwecken. Art des Reservoir hängt von der Version des gekauften Kits!
This step show alternative mounting for the EK-DCP pump without the encased EK-DCP mounting kit.
Dieser Schritt zeigt eine alternative Montierung für die EK-DCP Pumpe ohne den beiligenden EK-DCP Montage KIT.
EN
D
EN
D
Take the cabled with adaptors from
the pump delivery.
Kabeladapter aus dem Lieferumfang
verwenden.
Take a short piece of a cable or cut
a raw, uncoated paper clip
Ein kurzes Stück Kabel oder eine
Büroklammer verwenden, um den 24-Pin
Stecker des Netzteiles zu überbrücken.
EN
D
Connect pumps Male 3-PIN
connector to Female Connector of
the cable.
Den 3-Pin Anschluss der Pumpe mit dem
entsprechenden Anschluss des Adapters
verbinden.
EN
D
Connect green and any black pins of
a power supply ATX connector
EN
D
Das grüne Kabel am 24-Pin Stecker muss mit
einem der schwarzen Kabel verbunden
werden.
D
Für das Gemisch etwa 450ml destilliertes
Wasser verwenden.
Fill in the ready liquid about 2 cm
from the top
And fill in half of the water additive
concentrate
EN
Open top of the reservoir combo
EN
D
Und die Hälfte des Konzentrates beimischen.
D
Deckel des Ausgleichsbehälters entfernen.
D
EN
Fill up the liquid while the pump is
running and stop when the water
level reaches 2 cm under the edge
D
Turn on the power supply
Nun kann das Netzteil angeschaltet werden,
um die Pumpe zu starten.
Nun den 4-Pin Molex-Stecker mit einem
Anschluss des Netzteils verbinden.
EN
EN
EN
Connect 4-pin Molex female
connector to male Molex connector of
the power supply.
D
Während die Pumpe läuft, Kühlflüssigkeit
nachfüllen. Sollte sich der AGB komplett
entleeren, kann die Pumpe über das Netzteil
nochmals ausgeschaltet werden.
EN
D
Take about 450 ml of distilled water
Ausgleichsbehälter mit der Kühlflüssigkeit
auffüllen. (Achtung: Nicht randvoll auffüllen!)
Alternately turn off and turn on power
supply in period of few seconds to
speed up removing bubbles from the
water.
Ist der gesamte Kreislauf befüllt, kann die
Pumpe einige Male ein- und ausgeschaltet
werden, um Luftblasen aus dem Kreislauf zu
entfernen.
EN
Close the reservoir combo
EN
Shake and tip the PC case to remove
air caught in the radiator. You may
need to refill the liquid.
EN
Leave your PC case for 24 hour leak
test, to ensure the system is leak free
to avoid liquid spill over running PC
hardware.
Nun sollte die Pumpe 24 Stunden betrieben
werden, um sicher zu stellen, dass der Kreislauf
komplett dicht ist.
D
Deckel wieder auf dem Ausgleichsbehälter
aufschrauben.
D
Nun kann der PC etwas geneigt und gedreht
werden, um die restlichen Luftblasen aus dem
Kreislauf zu entfernen.
D
EN
Cover all exposed hardware with a
towel or paper towels
EN
Take a container and hold the pump
reservoir combo above it.
EN
D
EN
D
Alle Hardwareteile mit tüchern oder
Haushalts-Papier abdecken.
Let the water run away into the
container
Das Wasser aus dem AGB in den
Auffangbehälter fliessen lassen.
D
EN
D
EN
Keep the tubes over the towel to
prevent water to spill over the
hardware
EN
D
Die Schläuche über dem Auffangbehälter
oder den Tüchern halten.
D
Einen Auffangbehälter verwenden und die
Pumpe mit dem Ausgleichbehälter darüber
halten.
Unplug the tubes connecting to
pump reservoir combo, remove the
pump
Die Beiden Schläuche vor und nach dem
Pumpen-AGB Kombi entfernen.
Dry the tubes and pump with paper
towel
Komponenten mit den Tüchern trocken
wischen.
D
EN
D
Unscrew the G1/4 plug on the
Reservoir combo or slowly remove
one of the tube from fitting.
G1/4" Verschlusskappe entfernen.
Keep one tube in the container and
gently blow into the other tube to
additionally drain the system
In das eine Schlauchende pusten, um den
Kreislauf weiter zu entleeren.