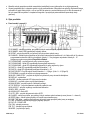
1
VDPC130 240-CHANNEL DMX CONTROLLER WITH JOG WHEELS 240-KANAALS DMX CONTROLLER MET JOG-WIELEN CONTRÔLEUR DMX 240 CANAUX AVEC ROUES JOG CONTROLADOR DMX DE 240 CANALES CON RUEDAS JOG 240-KANAL-DMX-STEUERGERÄT MIT JOG-RÄDERN 240 KANAŁOWY STEROWNIK DMX Z DWOMA POKRĘTŁAMI USER MANUAL GEBRUIKERSHANDLEIDING NOTICE D’EMPLOI MANUAL DEL USUARIO BEDIENUNGSANLEITUNG INSTRUKCJA OBSŁUGI VDPC130 – 240-CHANNEL DMX CONTROLLER WITH JOG WHEELS 1. Introduction To all residents of the European Union Important environmental information about this product This symbol on the device or the package indicates that disposal of the device after its lifecycle could harm the environment. Do not dispose of the unit (or batteries) as unsorted municipal waste; it should be taken to a specialized company for recycling. This device should be returned to your distributor or to a local recycling service. Respect the local environmental rules. If in doubt, contact your local waste disposal authorities. Thank you for buying the VDPC130! Please read the manual thoroughly before bringing this device into service. If the device was damaged in transit, don't install or use it and contact your dealer. 2. Safety Instructions Be very careful during the installation: touching live wires can cause life-threatening electroshocks. Keep this device away from rain and moisture. Unplug the mains lead before cleaning. • Damage caused by disregard of certain guidelines in this manual is not covered by the warranty and the dealer will not accept responsibility for any ensuing defects or problems. • A qualified technician should install and service this device. • Do not switch the device on immediately after it has been exposed to changes in temperature. Protect the device against damage by leaving it switched off until it has reached room temperature. • Keep the device away from heat or heat sources. • This device falls under protection class III. Always operate the device with an appropriate transformer. Check the device, the power cord and the transformer from time to time. • Make sure that the available voltage does not exceed the voltage stated in the specifications of this manual. • Do not crimp the power cord and protect it against damage. Have an authorized dealer replace it if necessary. • Disconnect the device from the mains to clean it or when it is not in use. Handle the power cord by the plug only. • Always plug in the power unit last. • Note that damage caused by user modifications to the device is not covered by the warranty. • Keep the device away from children and unauthorized users. 3. General Guidelines • This device is a DMX controller designed for controlling DMX effects or spots on stage, in discos, theatres, etc. The VDPC130 should only be used indoors with the included power adapter connected to an alternating current of max. 230VAC / 50Hz. • Do not shake the device. Avoid brute force when installing or operating the device. • Select a location where the device is protected against extreme heat, dust and moisture. • Familiarize yourself with the functions of the device before actually using it. Do not allow operation by unqualified people. Any damage that may occur will most probably be due to unprofessional use of the device. • Use the original packaging if the device is to be transported. • All modifications of the device are forbidden for safety reasons. • Only use the device for its intended purpose. All other uses may lead to short circuits, burns, electroshocks, crash, etc. Using the device in an unauthorized way will void the warranty. VDPC130_v3 2 VELLEMAN 4. Description a. Front Panel (fig. 1) 1. 2. 3. 4. SCANNER selection buttons: Choose your desired projector. SCANNER indicator LEDs SCENE selection buttons: Choose your desired scene. CHANNEL faders: Adjust the DMX values. Channel 1 ~ 8 can be adjusted after pressing the respective scanner button. Channel 9 ~ 16 can be adjusted after pressing the page selection button. 5. FOG MACHINE button: Activate the fog machine. 6. FOG MACHINE heating indicator 7. FOG MACHINE ready indicator 8. PAGE A indicator LED 9. PAGE B indicator LED 10. PAGE selection button: In manual mode, press this button to control channels 1 ~ 8 (page A) or channels 9 ~ 16 (page B) or both pages by means of the fader. 11. PROGRAM button 12. MUSIC / BANK COPY button: Press to put the device in sound-control mode. 13. DISPLAY 14. MODE indicator LEDs 15. BANK UP button 16. BANK DOWN button 17. TAP DISPLAY button 18. BLACKOUT button: Close the light output of all connected projectors via the shutter. 19. MIDI / REC button 20. ASSIGN LED 21. AUTO / DEL button 22. CHASER buttons (chaser 1 ~ chaser 6) 23. SPEED fader 24. FADE TIME fader 25. FINE button 26. PILE UP / CHASE LED 27A. PAN wheel 27B. TILT wheel 28. MODE button b. Rear Panel (fig. 2) VDPC130_v3 3 VELLEMAN 29. AUDIO input socket 30. MIDI input socket 31. DMX POLARITY selector 32. DMX output socket 33. DMX input socket 34. FOG MACHINE socket 35. DC input socket 36. POWER ON / OFF switch 5. Setup a. Installing the Device Install the device on a plane surface or install it in a rack. This device can be installed into a 19” rack. Make sure to use a double-door rack where both front and rear panels can be opened. The rack should be equipped with a cooling fan. When mounting the device into the rack, please make sure there is enough space around the device so hot air can escape. Steady overheating will damage the device. Fasten the DMX controller into the rack by means of 4 x M6 screws. Plug the adapter into the DC input socket (35) of the device. Plug the adapter into the mains. b. Sound Control Sound control works through the built-in microphone or through the LINE IN socket. Connect the sound signal from a mixer (e.g. MASTER 2) with the AUDIO input socket (29) on the rear panel. c. DMX512 Connection Only use a stereo shielded cable and 3-pin XLR plugs in order to connect the controller with the fixture or one fixture with another. d. Occupation of the XLR Connection Adjust the XLR polarity via the DMX POLARITY selector (31). e. DMX512 Chain with Termination A DMX terminator is recommended for installations where the DMX cable has to run a long distance or is in an electrically noisy environment (e.g. discos). The terminator prevents corruption of the digital control signal by electrical noise. The DMX terminator is simply an XLR plug with a 120Ω resistor between pins 2 and 3, which is then plugged into the XLR output socket of the last device in the chain. Please see illustrations. f. Projector Addressing Projector 1 2 3 4 VDPC130_v3 Start Address 1 21 41 61 Projector 5 6 7 8 Start Address 81 101 121 141 4 Projector 9 10 11 12 Start Address 161 181 201 221 VELLEMAN The DMX starting address should be assigned every 16 channels. Address every projector to the respective starting address otherwise the channel assignment will not be correct. Projectors with the same starting address will work synchronous. g. Channel Setting This device can control up to 12 x 16-channel scanners. The first 8 channels of each scanner can be controlled through the 8 faders. The next 8 channels are controlled through the 8 faders and the PAGE selection button (10) on page B. If the scanner features more than 16 channels, set the channels as follows: • • • • • Press the PROGRAM button (11) until the LEDs blink. Press the FINE (25) and the MODE (28) buttons simultaneously until the ASSIGN LED (20) turns on. Select your scanner by pressing the corresponding SCANNER button (1). Adjust the SPEED fader (23) to select the scanner channel (e.g. channel 9 or 10). Adjust the FADE TIME fader (24) to select the respective control channel of the controller (e.g. PAN (27A) or TILT (27B) wheel). • To set channel 19 and 20, press the PAGE selection button (10). The PAGE B indicator LED (9) will light. Repeat the two previous steps. Example: Set the SPEED fader (23) to channel 9 and the TIME fader (24) to X. This means the 9th channel of the scanner will be controlled by the PAN wheel (27A). h. FADE TIME Assignment With this function you can determine whether the fade time should be assigned to the pan/tilt movement or to all DMX channels. This is useful when the mirror or the moving head movement should be carried out slowly but the gobos and colours should be changed quickly. • Turn of the device. • Simultaneously press and hold the MODE (28) and the TAP DISPLAY button (17). • Turn on the device. Press the TAP / DISPLAY button (17) in order to switch between the two modes (ALL CH for all channels and ONLY X/Y for pan/tilt movement only). • Simultaneously press and hold the MODE (28) and TAP / DISPLAY button (17) to memorise your settings. All LEDs on the panel will flash indicating the setting has been saved. 6. Operation a. Manual Mode To select the manual mode, press the AUTO / DEL button (21) until the MANUAL LED (14) lights. In manual mode you can call up the connected scanners manually and control them through the faders. Note that the settings cannot be memorized. Select the desired scanner using the corresponding SCANNER button (1). Adjust the desired function through the faders. • Checking a BANK / SCENE Select the desired bank using the BANK buttons (16 and 17). Select the desired scene using the SCENE buttons (3). VDPC130_v3 5 VELLEMAN • Checking a CHASER Select the desired chaser using the CHASER buttons (22). Press TAP / DELAY (17). The display will show the steps in the chaser. Press the BANK buttons (16 and 17) to see each scene. • The PAGE selection button (10) Use this button to adjust the channel faders (4) from CH1 ~ 8 (page A LED is lit) to CH9 ~ 16 (page B LED is lit) or both of them (both LEDs are lit). • The DISPLAY button (17) Use this button to switch the display from a DMX value (0 ~ 255) to a percentage (0 ~ 100%). b. Programming A bank is a sequence of different scenes that will be called up one after another. With the VDPC130, you can program up to 30 different banks, each bank containing up to 8 scenes. • Assigning a Jog Wheel to a Channel o Choose your channel. o Press MIDI / REC (19) to confirm. • Programming a Scene o Press and hold the PROGRAM button (11) for 2 seconds to enter the programming mode. The PROGRAM LED will flash. o Select the desired scanner using the SCANNER selection buttons (1). o Adjust the settings (the value will be shown in the display) using the respective CHANNEL faders (4). o Press the MIDI / REC (19) to prepare saving mode. o Select the desired bank (01 ~ 30) which will be saved through the BANK buttons (15 and 16). o Press one of the SCENE buttons (3) in order to save the data. All LEDs on the panel will flash indicating the data is saved. o Select the next scanner using the SCANNER selection buttons (1) and repeat the steps above until programming is finished or the maximum number of steps (8) has been reached. o Press and hold the PROGRAM button (11) to exit the programming mode. • Running a Program o o o o Press the BANK buttons (15 and 16) and select the desired bank. Press the AUTO / DEL button (21). The auto LED will light. Adjust the speed using the SPEED fader (23) and the repetition rate using the FADE TIME fader (24). You can also adjust the speed by pressing the TAP button (17) twice. The time interval between two presses determines the speed (up to 10 minutes). • Checking a Program o Press and hold the PROGRAM button (11) and select the desired bank using the BANK buttons (15 and 16). o Check every scene individually by pressing the respective SCENE button (3). • Editing a Program o o o o o o o When programs have to be edited, it is necessary to modify a scene manually. Press and hold the PROGRAM button (11) to enter the programming mode. Select the program to be edited using the BANK buttons (15 and 16). Select the desired scanner using the SCANNER buttons (1). Adjust the desired settings using the respective CHANNEL faders (4). Press the MIDI / REC button (19) to prepare for saving. Select the desired scene using the SCENE button (3) and save. VDPC130_v3 6 VELLEMAN • Copying a Program o o o o o Press and hold the PROGRAM button (11) to enter the programming mode. Select the desired bank using the BANK buttons (15 and 16). Press the MIDI / REC button (19) to prepare for copying. Select the target bank using the BANK buttons (15 and 16). Press the MUSIC / BANK COPY button (12) to copy the bank. All LEDs on the panel will flash. c. The Chaser A chaser is a sequence of different banks that will be called up one after another. With this VDPC130, you can program up to 6 different chasers, each chaser up to 240 scenes. • Programming a Chaser o o o o o o o Press and hold the PROGRAM button (11) to enter the programming mode. Select the desired chaser using the CHASER selection buttons (22). Select the desired program using the BANK buttons (15 and 16). Select the desired scene using the SCENE selection buttons (3). Press the MIDI / REC button (19). Program the next step until the chaser is finished or the maximum number of scenes (240) has been reached. Press and hold the PROGRAM button (11) to save the chaser. • Running a Chaser o Press the respective CHASER buttons (22) and press the AUTO / DEL (21). Adjust the chaser speed by pressing the TAP button (17) twice. The time interval between two presses determines the speed (up to 10 minutes). o Press the MIDI / REC button (19) and select the desired record using the SCANNER selection buttons (1). • Checking a Chaser o Press and hold the PROGRAM button (11) and select the desired chaser using the CHASER buttons (22). o Press the DISPLAY button to switch the display to step mode. Check every scene individually by pressing the respective BANK button (15 and 16). • Editing a Chaser o Copying a Bank into a Chaser Press and hold the PROGRAM button (11) to enter the programming mode. Select the desired chaser using the CHASER buttons (22). The respective LEDs will be lit. Select the bank to be copied using the BANK buttons (15 and 16). Press the MUSIC / BANK COPY button (12) to prepare for copying. Press the MIDI / REC button (19) to copy the bank. All LEDs on the panel will flash. o Copying a Scene into a Chaser Press and hold the PROGRAM button (11) to enter the programming mode. Select the desired chaser using the CHASER buttons (22). The respective LEDs will be lit. Select the bank in which the scene will be copied using the BANK buttons (15 and 16). Select the scene you want to copy using the SCENE buttons (3). Press the MIDI / REC button (19) to copy the scene. All LEDs on the panel will flash. VDPC130_v3 7 VELLEMAN o Inserting a Scene into a Chaser Press and hold the PROGRAM button (11) to enter the programming mode. Select the desired chaser in which the scene will be inserted using the CHASER buttons (22). The respective LEDs will be lit. Press the TAP / DISPLAY button (17) to switch to the step mode. Select the scene where the new scene is to be inserted using the BANK buttons (15 and 16). Now, the display will show the scene. If you want to insert scene between scene 5 and 6, press the BANK UP / DOWN button (15 or 16) until the display shows STEP05. Press the MIDI / REC button (19) to prepare for inserting. The display shows the next scene. Select the bank where the scene is to be inserted using the BANK buttons (15 and 16). Select the scene to be inserted using the SCENE buttons (3). Press the MIDI / REC button (19) to insert the scene. All the LEDs on the panel will flash. o Deleting a Scene in a Chaser Press and hold the PROGRAM button (11) to enter the programming mode. Select the desired chaser in which the scene will be deleted using the CHASER buttons (22). Press the TAP / DISPLAY button (17) to switch to the step mode. Select the scene to be deleted using the BANK buttons (15 and 16). Press the AUTO / DEL button (21) to delete the scene. All the LEDs on the panel will flash. • Deleting a Chaser o Press and hold the PROGRAM button (11) to enter the programming mode. o Select the desired chaser using the CHASER selection buttons (22). o Press and hold the AUTO / DEL button (21) and the respective CHASER button (22) to delete the chaser. All the LEDs on the panel will flash. • Deleting all Chasers CAUTION: When you select this function, all programmed chasers will irrevocably be lost. The individual scenes and programs will still be maintained. o Switch off the device. o Press and hold the BANK DOWN button (16) and the AUTO / DEL button (21) while switching on the device. All LEDs on the panel will flash. d. Scenes • Inserting a Scene o Press and hold the PROGRAM button (11) to enter the programming mode. o Select the desired chaser using the CHASER buttons (22). The respective LEDs will be lit. o Press the TAP / DISPLAY button (17) to switch to the step mode. The display will show the scenes in the chaser. o Select the scene where the new scene is to be inserted using the BANK buttons (15 and 16). If you want to insert scene between scene 5 and 6, press the BANK UP / DOWN button (15 or 16) until the display shows STEP05. o Press the MIDI / REC button (19) to prepare for inserting. The display shows the next scene. o Select the bank where the scene is to be inserted using the BANK buttons (15 and 16). o Select the scene to be inserted using the SCENE buttons (3). o Press the MIDI / REC button (19) to insert the scene. All the LEDs on the panel will flash. VDPC130_v3 8 VELLEMAN • Copying a Scene o o o o o o Press and hold the PROGRAM button (11) to enter the programming mode. Select the bank in which the scene will be copied using the BANK buttons (15 and 16). Select the scene you want to copy using the SCENE buttons (3). Press the MIDI / REC button (19) to prepare for copying. Select the bank where you desire to copy the scene to using the BANK buttons (15 and 16). Press the desired SCENE button (3). All LEDs on the panel will flash. • Deleting a Scene o o o o o o Press and hold the PROGRAM button (11) to enter the programming mode. Select the bank in which the scene will be deleted using the BANK buttons (15 and 16). Press and hold the AUTO / DEL button (21). Select the desired chaser using the CHASER selection buttons (21). Press the SCENE button (3) corresponding to the scene to be deleted. The scene has been deleted. All the LEDs on the panel will flash. All 240 DMX channels of the deleted scenes will be set to 0. • Deleting all Scenes CAUTION: When you select this function, all programmed scenes will irrevocably be lost. o Press and hold the PROGRAM button (11) and the BANK DOWN button (16) while disconnecting the device from the mains. o Connect the device back to the mains. e. Sound-controlled Mode o Press the MUSIC / BANK COPY button (12). The LED will light. When the device receives a sound signal, it will work in sound-controlled mode. o Select the bank to be sound-controlled using the BANK buttons (15 and 16). o You may adjust the fade time using the FADE TIME fader (24). o Press a CHASER button (22). The chaser will be sound-controlled. You may press more than one chaser to run them one by one. o Adjust the duration time using the FADE TIME fader (24). f. Auto Mode o To select the auto mode, press the AUTO / DEL button (21) until the LED lights. o If no CHASER buttons (22) are pressed, it will automatically run a bank. Select the desired bank using the BANK buttons (15 and 16). o Press a CHASER button (22). The VDPC130 will automatically run the chaser. You may press more than one chaser and run them one by one. o You may adjust the interval time between the scenes using the SPEED fader (23) and adjust the duration time using the FADE TIME fader (24). g. MIDI Operation o Press and hold the MIDI / REC button (19) for about 2 seconds. o Select the respective MIDI channel (1 ~ 20) using the BANK buttons (15 and 16). o Press the MIDI / REC button (19) again to save the setting and to exit. VDPC130_v3 9 VELLEMAN 7. Cleaning and Maintenance 1. 2. 3. 4. 5. 6. All screws should be tightened and free of corrosion. The electric power supply cables must not show any damage. Have a qualified technician maintain the device. Disconnect the device from the mains prior to maintenance activities. Wipe the device regularly with a moist, lint-free cloth. Do not use alcohol or solvents. There are no user-serviceable parts. Contact your dealer for spare parts if necessary. 8. Technical Specifications Power Supply Power Consumption DMX in/out MIDI in Dimensions Total Weight 9-12VDC, 500mA max. 4W 3-pin female/male XLR 5-pin DIN 19” x 132 x 80mm 2.5kg The information in this manual is subject to change without prior notice. VDPC130 – 240-CHANNEL DMX CONTROLLER WITH JOG WHEELS 1. Inleiding Aan alle ingezetenen van de Europese Unie Belangrijke milieu-informatie betreffende dit product Dit symbool op het toestel of de verpakking geeft aan dat, als het na zijn levenscyclus wordt weggeworpen, dit toestel schade kan toebrengen aan het milieu. Gooi dit toestel (en eventuele batterijen) niet bij het gewone huishoudelijke afval; het moet bij een gespecialiseerd bedrijf terechtkomen voor recyclage. U moet dit toestel naar uw verdeler of naar een lokaal recyclagepunt brengen. Respecteer de plaatselijke milieuwetgeving. Hebt u vragen, contacteer dan de plaatselijke autoriteiten betreffende de verwijdering. Dank u voor uw aankoop! Lees deze handleiding grondig voor u het toestel in gebruik neemt. Werd het toestel beschadigd tijdens het transport, installeer het dan niet en raadpleeg uw dealer. 2. Veiligheidsinstructies Wees voorzichtig bij de installatie: raak geen kabels aan die onder stroom staan om dodelijke elektroshocks te vermijden. Bescherm dit toestel tegen regen en vochtigheid. Verzeker u ervan dat het toestel niet aangesloten is op een stroombron alvorens het te openen. • De garantie geldt niet voor schade door het negeren van bepaalde richtlijnen in deze handleiding en uw dealer zal de verantwoordelijkheid afwijzen voor defecten of problemen die hier rechtstreeks verband mee houden. • Laat dit toestel installeren en onderhouden door een geschoolde technicus. • Om beschadiging te vermijden, zet u het toestel best niet aan onmiddellijk nadat het werd blootgesteld aan temperatuurschommelingen. Wacht tot het toestel op kamertemperatuur gekomen is. • Houd het toestel uit de buurt van hitte en hittebronnen. • Dit toestel valt onder beschermingsklasse III. Voed het toestel met een gepaste voedingsadapter. Controleer regelmatig toestel, voedingskabel en voedingsadapter. • De beschikbare netspanning mag niet hoger zijn dan de spanning in de specificaties achteraan de handleiding. • De voedingskabel mag niet omgeplooid of beschadigd zijn. Laat uw dealer zo nodig een nieuwe kabel plaatsen. • Trek de stekker uit het stopcontact (trek nooit aan de kabel!) voordat u het toestel reinigt en als u het niet gebruikt. VDPC130_v3 10 VELLEMAN • Sluit het toestel altijd als laatste aan. • Schade door wijzigingen die de gebruiker heeft aangebracht aan het toestel vallen niet onder de garantie. • Houd dit toestel uit de buurt van kinderen en onbevoegden. 3. Algemene richtlijnen • Dit toestel is DMX controller ontworpen voor het besturen van spots op podia, in disco's, enz. U mag dit toestel enkel binnenshuis gebruiken door de meegeleverde adapter aan te sluiten op een wisselspanning van maximum 230VAC / 50Hz. • Schud het toestel niet dooreen. Vermijd brute kracht tijdens de installatie en de bediening van dit toestel. • Installeer het toestel weg van extreme temperaturen, vochtigheid en stof. • Leer eerst de functies van het toestel kennen voor u het gaat gebruiken. Ongeschoolde personen mogen dit toestel niet gebruiken. Meestal is beschadiging het gevolg van onprofessioneel gebruik. • Gebruik de oorspronkelijke verpakking wanneer u het toestel vervoert. • Om veiligheidsredenen mag de gebruiker geen wijzigingen aanbrengen aan het toestel. • Gebruik het toestel enkel waarvoor het gemaakt is. Andere toepassingen kunnen leiden tot kortsluitingen, brandwonden, elektrische schokken, enz. Bij onoordeelkundig gebruik vervalt de garantie. 4. Omschrijving a. Frontpaneel (zie fig. 1) 1. 2. 3. 4. SCANNER keuzeknoppen: Kies de gewenste spot. SCANNER LED-aanduiding SCENE keuzeknoppen: Kies de gewenste scène. CHANNEL schuifknoppen: Regeling van de DMX-waarden. Kanalen 1 ~ 8 kunnen ingesteld worden na een druk op de overeenstemmende scannerknop. Kanalen 9 ~ 16 kunnen ingesteld worden na een druk op selectieknop van de pagina. 5. Knop ROOKMACHINE: Inschakelen van de rookmachine. 6. Aanduiding oververhitting ROOKMACHINE 7. Aanduiding gebruiksklaar ROOKMACHINE 8. LED-aanduiding PAGINA A 9. LED-aanduiding PAGINA B 10. Keuzeknop PAGINA: In manuele mode, druk op deze knop om kanalen 1 ~ 8 (pagina A) of kanalen 9 ~ 16 (pagina B) of beide pagina’s langs de schuifknoppen te besturen. 11. PROGRAM 12. MUSIC / BANK COPY: Druk om het toestel in muziekgestuurde modus te plaatsen. 13. DISPLAY 14. MODE LED-aanduiding 15. BANK UP 16. BANK DOWN 17. TAP DISPLAY 18. BLACKOUT: Sluiting van de lichtuitgang van alle aangesloten spots via de sluiter. 19. MIDI / REC 20. ASSIGN LED 21. AUTO / DEL 22. CHASER (chaser 1 ~ chaser 6) 23. SPEED schuifknop 24. FADE TIME schuifknop 25. FINE 26. PILE UP / CHASE LED 27A. PAN-wiel 27B. TILT-wiel 28. MODE VDPC130_v3 11 VELLEMAN b. Achterpaneel (zie fig. 2) 29. Ingang AUDIO 30. Ingang MIDI 31. Keuzeschakelaar DMX POLARITEIT 32. Uitgang DMX 33. Ingang DMX 34. Ingang ROOKMACHINE 35. DC-ingang 36. POWER ON / OFF 5. Montage a. Het toestel monteren Installeer het toestel op een plat oppervlak of monteer het in een rack. De VDPC130 kan in een 19” rack worden gemonteerd. Gebruik hiervoor een rack met dubbele opening waar zowel het voor- als het achterpaneel geopend kan worden. Voorzie de rack van een ventilator. Zorg voor voldoende ruimte rond het toestel tijdens het installeren zodat de hete lucht kan ontsnappen. Oververhitting zal het toestel beschadigen. Maak het toestel in de rack vast met 4 x M6 schroeven. Steek de voedingsadapter in de DC-ingang (35) van het toestel. Steek de voedingsadapter in het stopcontact. b. Besturing via muziek Muziekbesturing gebeurt via de ingebouwde microfoon of via de LINE IN. Sluit het geluidssignaal van een mixer (bvb. MASTER 2) aan de AUDIO-ingang (29) op het achterpaneel. c. DMX512-aansluiting Gebruik enkel een afgeschermde stereokabel en 3-pin XLR-stekkers om de controller met het toestel of de toestellen onder elkaar aan te sluiten. d. Bezetting van de XLR-aansluiting Adjust the XLR polarity via the DMX POLARITY selector (31). e. DMX512-keten met terminator Een DMX terminator is aanbevolen als de DMX-kabel vrij lang is of wordt gebruikt in een omgeving met veel elektrische ruis (bvb. een discotheek). De terminator voorkomt corruptie van het digitale controlesignaal door elektrische ruis. De DMX terminator is niets meer dan een XLR-stekker met een weerstand van 120Ω van pin 2 naar 3. Deze XLRstekker wordt dan aangesloten op de XLR uitgang van het laatste toestel in de reeks. Zie de illustraties links. f. De projector adresseren Projector 1 2 3 4 VDPC130_v3 Startadres 1 21 41 61 Projector 5 6 7 8 Startadres 81 101 121 141 12 Projector 9 10 11 12 Startadres 161 181 201 221 VELLEMAN Het DMX startadres wordt eens om de 16 kanalen toegewezen. Wijs elke projector toe aan het respectievelijke startadres om een foutieve adressering te vermijden. Projectors met eenzelfde startadres reageren synchroon. g. Instellen van de kanalen Met de VDPC130 bestuurt u tot 12 x 16-kanaals scanners. De eerste 8 kanalen van elke scanner worden bestuurd via de 8 schuifknoppen. De volgende 8 kanalen worden bestuurd via de 8 schuifknoppen en de keuzeknop van de PAGINA (10) op pagina B. Stel de kanalen als volgt in wanneer de scanner over meer dan 16 kanalen beschikt: • • • • • Druk op PROGRAM (11) tot de LEDs knipperen. Druk gelijktijdig op FINE (25) en MODE (28) tot de ASSIGN LED (20) oplicht. Selecteer uw scanner door op de overeenstemmende SCANNER-knop (1) te drukken. Regel de SPEED-schuifknop (23) en selecteer het scannerkanaal (bvb. kanaal 9 of 10). Regel de FADE TIME-schuifknop (24) en selecteer het besturingskanaal van de controller (bvb. PAN- (27A) of TILT- (27B) wiel). • Om kanalen 19 en 20 in te stellen, druk op de keuzeknop van de PAGINA (10). De LED-aanduiding van PAGINA B (9) licht op. Herhaal de twee voorgaande stappen. Voorbeeld: Wijs de SPEED-schuifknop (23) toe aan kanaal 9 en de TIME-schuifknop (24) aan X. Dit wil zeggen dat het 9de kanaal van de scanner bestuurd kan worden door het PAN-wiel (27A). h. Toewijzing van de FADE-TIJD Met deze functie kunt u de fade-tijd aan de pan/tiltbeweging of aan alle DMX-kanalen toewijzen. Dit is vooral handig wanneer de spiegel of de moving head traag moeten bewegen, in tegenstelling tot de snelle beweging van de gobo’s en de kleuren. • Schakel het toestel uit. • Houd gelijktijdig MODE (28) TAP DISPLAY (17) ingedrukt. • Schakel het toestel opnieuw in. Druk op TAP / DISPLAY (17) om tussen de twee modi te schakelen (ALL CH voor alle kanalen en ONLY X/Y voor de pan/tiltbeweging). • Houd gelijktijdig MODE (28) en TAP / DISPLAY (17) ingedrukt om de instelling te bewaren. Alle LEDs op het paneel flitsen om aan te geven dat de instelling is bewaard. 6. Gebruik a. Manuele modus Om de manuele modus te selecteren, druk op AUTO / DEL (21) tot de MANUAL LED (14) oplicht. Hier kunt u de aangesloten scanners manueel oproepen en deze via de schuifknoppen besturen. De instellingen kunnen echter niet worden bewaard. Selecteer de gewenste scanner door middel van de overeenstemmende SCANNER-knop (1). Regel de gewenste functie door middel van de schuifknoppen. • Een BANK / SCÈNE controleren Selecteer de gewenste bank met de BANK-knoppen (16 en 17). Selecteer de gewenste scène met de SCÈNEknoppen (3). VDPC130_v3 13 VELLEMAN • Een CHASER controleren Selecteer de gewenste chaser met de CHASER-knoppen (22). Druk op TAP / DELAY (17). De display geeft de stappen in de chaser weer. Druk op de BANK-knoppen (16 and 17) om elke scène te bekijken. • Keuzeknop PAGINA (10) Gebruik deze knop om de kanaalschuifknoppen (4) van CH1 ~ 8 (LED van pagina A licht op) tot CH9 ~ 16 (LED van pagina B licht op) of beide (beide LEDs lichten op) in te stellen. • De DISPLAY-knop (17) Gebruik deze knop om in de display te schakelen tussen een DMX-waarde (0 ~ 255) en een percentage (0 ~ 100%). b. Programmering Een bank is een opeenvolging van verscheidene scènes die elk afzonderlijk en na elkaar opgeroepen zullen worden. Met de VDPC130 kunt u tot 30 verschillende banken met elk 8 scènes programmeren. • Een wiel aan een kanaal toewijzen o Kies het kanaal. o Druk op MIDI / REC (19) om te bevestigen. • Een scène programmeren o Houd de PROGRAM-knop (11) gedurende 2 seconden ingedrukt. De PROGRAM LED flitst. o Selecteer de gewenste scanner met de SCANNER-keuzeknoppen (1). o Configureer (de waarde wordt op de display weergegeven) met de respectievelijke KANAAL-schuifknoppen (4). o Druk op MIDI / REC (19). o Selecteer de bank (01 ~ 30) die u wenst te bewaren met de BANK-knoppen (15 en 16). o Druk op een van de SCÈNE-knoppen (3) om de gegevens te bewaren. Alle LEDs op het paneel flitsen om weer te geven dat de gegevens zijn bewaard. o Selecteer de volgende scanner met de SCANNER-keuzeknoppen (1) en herhaal de stappen hierboven tot u niet meer wenst te programmeren of het maximum aantal stappen (8) bereikt is. o Houd de PROGRAM-knop (11) ingedrukt om de programmeermodus te verlaten. • Een programma starten o o o o Druk op de BANK-knoppen (15 en 16) en selecteer de gewenste bank. Druk op AUTO / DEL (21). De LED licht op. Regel de snelheid met de SPEED-schuifknop (23), regel de herhaling met de FADE TIME-schuifknop (24). U kunt de snelheid ook instellen door tweemaal op de TAP-knop (17) te drukken. Het interval tussen twee drukbewegingen bepaalt de snelheid (tot 10 minuten). • Een programma controleren o Houd de PROGRAM-knop (11) ingedrukt en selecteer de gewenste bank met de BANK-knoppen (15 en 16). o Controleer elke scène door op de respectievelijke SCÈNE-knop (3) te drukken. • Een programma wijzigen o o o o o o o Wanneer u een programma wenst te wijzigen, moet u een scène manueel wijzigen. Houd de PROGRAM-knop (11) ingedrukt. Selecteer het te wijzigen programma met de BANK-knoppen (15 en 16). Selecteer de gewenste scanner met de SCANNER-knoppen (1). Configureer met de respectievelijke KANAAL-schuifknoppen (4). Druk op MIDI / REC (19). Selecteer de gewenste scène met de SCÈNE-knop (3) en bewaar. VDPC130_v3 14 VELLEMAN • Een programma kopiëren o o o o o Houd de PROGRAM-knop (11) ingedrukt. Selecteer de gewenste bank met de BANK-knoppen (15 en 16). Druk op MIDI / REC (19). Selecteer nu de doelbank met de BANK-knoppen (15 en 16). Druk op MUSIC / BANK COPY (12) om de bank te kopiëren. Alle LEDs op het paneel knipperen. c. De chaser Een chaser is een opeenvolging van verscheidene banken waarbij u een looplicht creëert. Met de VDPC130 kunt u tot 6 chasers met elk 240 scènes programmeren. • Een chaser programmeren o o o o o o o Houd de PROGRAM-knop (11) ingedrukt. Selecteer de gewenste chaser met de CHASER-knoppen (22). Selecteer het gewenste programma met de BANK-knoppen (15 en 16). Selecteer de gewenste scène met de SCÈNE-knoppen (3). Druk op MIDI / REC (19). Programmeer de volgende stap tot de chaser is voltooid of totdat het maximale aantal scènes (240) is bereikt.. Houd de PROGRAM-knop (11) ingedrukt om de chaser te bewaren. • Een chaser starten o Druk op de CHASER-knop (22) en daarna op AUTO / DEL (21). Regel de snelheid van de chaser door tweemaal op de TAP-knop (17) te drukken. Het interval tussen twee drukbewegingen bepaalt de snelheid (tot 10 minuten). o Druk op MIDI / REC (19) en selecteer de gewenste scanner met de SCANNER-knoppen (1). • Een chaser controleren o Houd de PROGRAM-knop (11) ingedrukt en selecteer de gewenste chaser met de CHASER-knoppen (22). o Druk op de DISPLAY-knop om naar de stappenmodus over te schakelen. Controleer elke scène door op de respectievelijke BANK-knop (15 en 16) te drukken. • Een chaser wijzigen o Een bank naar een chaser kopiëren Houd de PROGRAM)-knop (11) ingedrukt. Selecteer de gewenste chaser met de CHASER-knoppen (22). De LEDs lichten op. Selecteer de te kopiëren bank met de BANK-knoppen (15 en 16). Druk op MUSIC / BANK COPY (12). Druk nu op MIDI / REC (19) om de bank te kopiëren. Alle LEDs op het paneel flitsen. o Een scène naar een chaser kopiëren Houd de PROGRAM)-knop (11) ingedrukt. Selecteer de gewenste chaser met de CHASER-knoppen (22). De LEDs lichten op. Selecteer de bank waarnaar u de scène wenst te kopiëren met de BANK-knoppen (15 en 16). Selecteer de te kopiëren scène met de SCÈNE-knoppen (3). Druk nu op MIDI / REC (19) om de scène te kopiëren. Alle LEDs op het paneel flitsen. VDPC130_v3 15 VELLEMAN o Een scène in een chaser voegen Houd de PROGRAM-knop (11) ingedrukt. Selecteer de gewenste chaser waarin u de scène wenst toe te voegen met de CHASER-knoppen (22). De LEDs lichten op. Druk op TAP / DISPLAY (17) om naar de stappenmodus over te schakelen. Selecteer de scène waarnaar u de scène wenst in te voegen met de BANK-knoppen (15 en 16). De scène wordt op de display weergegeven. Wenst u een scène tussen scène 5 en scène 6 in te voegen, druk dan op BANK UP / DOWN (15 of 16) tot STEP05 op de display verschijnt. Druk op MIDI / REC (19). De display geeft de volgende scène weer. Selecteer de bank waarin u de scène wenst in te voegen met de BANK-knoppen (15 en 16). Selecteer de in te voegen scène met de SCÈNE-knoppen (3). Druk op MIDI / REC (19) om de scène in te voegen. Alle LEDs op het paneel flitsen. o Een scène uit een chaser wissen Houd de PROGRAM-knop (11) ingedrukt. Selecteer de gewenste chaser waarin u een scène wenst te wissen met de CHASER-knoppen (22). Druk op TAP / DISPLAY (17) om naar de stappenmodus over te schakelen. Selecteer de te wissen scène met de BANK-knoppen (15 en 16). Druk op AUTO / DEL (21) om de scène te wissen. Alle LEDs op het paneel flitsen. • Een chaser wissen o Houd de PROGRAM-knop (11) ingedrukt. o Selecteer de gewenste chaser met de CHASER-knoppen (22). o Houd AUTO / DEL (21) en de overeenstemmende CHASER-knop (22) ingedrukt om de chaser te wissen. Alle LEDs op het paneel flitsen. • Alle chasers wissen OPGELET: Bij het selecteren van deze functie zullen alle geprogrammeerde chasers onherroepelijk gewist worden. De individuele scènes en programma’s zijn wel nog beschikbaar. o Schakel het toestel uit. o Houd BANK DOWN (16) en AUTO / DEL (21) ingedrukt terwijl u het toestel opnieuw inschakelt. Alle LEDs op het paneel flitsen. d. Scènes • Een scène invoegen o Houd de PROGRAM-knop (11) ingedrukt. o Selecteer de gewenste chaser met de CHASER-knoppen (22). De LEDs lichten op. o Druk op TAP / DISPLAY (17) om naar de stappenmodus over te schakelen. De display geeft de scènes in de chaser weer. o Selecteer de scène waarin u de nieuwe scène wenst in te voegen met de BANK-knoppen (15 en 16). Wenst u een scène tussen scène 5 en scène 6 in te voegen, druk dan op BANK UP / DOWN (15 of 16) tot STEP05 op de display verschijnt. o Druk op MIDI / REC (19). De display geeft de volgende scène weer. o Selecteer de bank waar u de scène wenst in te voegen met de BANK-knoppen (15 en 16). o Selecteer de in te voegen scène met de SCÈNE-knoppen (3). o Druk op MIDI / REC (19) om de scène in te voegen. Alle LEDs op het paneel flitsen. VDPC130_v3 16 VELLEMAN • Een scène kopiëren o o o o o o Houd de PROGRAM-knop (11) ingedrukt. Selecteer de bank waarnaar u de scène wenst te kopiëren met de BANK-knoppen (15 en 16). Selecteer de te kopiëren scène met de SCÈNE-knoppen (3). Druk op MIDI / REC (19). Selecteer de bank waarnaar u de scène wenst te kopiëren met de BANK-knoppen (15 en 16). Druk op de gewenste SCÈNE-knop (3). Alle LEDs op het paneel flitsen. • Een scène wissen o o o o o o Houd de PROGRAM-knop (11) ingedrukt. Selecteer de bank met de te wissen scène met de BANK-knoppen (15 en 16). Houd AUTO / DEL (21) ingedrukt. Selecteer de gewenste chaser met de CHASER-knoppen (21). Druk op de overeenstemmende SCÈNE-knop (3). De scène werd gewist. Alle LEDs op het paneel flitsen. Alle 240 DMX-kanalen van de gewiste scènes worden terug op 0 geplaatst. • Alle scènes wissen OPGELET: Bij het selecteren van deze functie zullen alle geprogrammeerde scènes onherroepelijk gewist worden. o Houd de PROGRAM-knop (11) en BANK DOWN (16) ingedrukt terwijl u de stekker van het toestel uit het stopcontact trekt. o Koppel het toestel terug aan het lichtnet. e. Muziekgestuurde modus o Druk op MUSIC / BANK COPY (12). De LED licht op. Het toestel functioneert nu in muziekgestuurde modus van zodra deze een geluidssignaal ontvangt. o Selecteer de bank die u met muziek wenst te sturen met de BANK-knoppen (15 en 16). o Regel eventueel de fade-tijd met de FADE TIME-schuifknop (24). o Druk op een CHASER-knop (22). De chaser is nu muziekgestuurd. Druk op meer dan een chaser en laat deze sequentieel starten. o Regel de duur met de FADE TIME-schuifknop (24). f. Automatische modus o Om de automatische modus te selecteren, druk op AUTO / DEL (21) tot de LED oplicht. o Drukt u op geen enkele CHASER-knop (22), dan start het toestel automatische een bank. Selecteer de gewenste bank met de BANK-knoppen (15 en 16). o Druk op een CHASER-knop (22). De VDPC130 start automatisch een chaser. Druk op meer dan een chaser en laat deze sequentieel starten. o Regel het interval tussen de scenes met de SPEED-schuifknop (23) en de duur met de FADE TIMEschuifknop (24). g. MIDI-bediening o Houd MIDI / REC (19) gedurende een tweetal seconden ingedrukt. o Selecteer de respectieve MIDI-kanalen (1 ~ 20) met de BANK-knoppen (15 en 16). o Druk opnieuw op MIDI / REC (19) om de instellingen te bewaren en om te verlaten. VDPC130_v3 17 VELLEMAN 7. Reiniging en onderhoud 1. 2. 3. 4. 5. 6. Alle gebruikte schroeven moeten goed zijn aangespannen en mogen geen sporen van roest vertonen. De voedingskabels mogen niet beschadigd zijn. Laat het toestel onderhouden door een geschoolde technicus. Ontkoppel het toestel van het lichtnet voor u aan onderhoudswerkzaamheden begint. Maak het toestel geregeld schoon met een vochtige, niet pluizende doek. Gebruik geen alcohol of solvent. De gebruiker mag geen onderdelen vervangen. Bestel eventuele reserveonderdelen bij uw dealer. 8. Technische specificaties Voeding Verbruik DMX ingang/uitgang MIDI ingang Afmetingen Gewicht 9-12VDC, 500mA max. 4W 3-pin vrouwelijke/mannelijke XLR 5-pin DIN 19” x 132 x 80mm 2.5kg De informatie in deze handleiding kan te allen tijde worden gewijzigd zonder voorafgaande kennisgeving. VDPC130 – CONTRÔLEUR DMX 240 CANAUX AVEC ROUES JOG 1. Introduction Aux résidents de l'Union européenne Des informations environnementales importantes concernant ce produit Ce symbole sur l'appareil ou l'emballage indique que l’élimination d’un appareil en fin de vie peut polluer l'environnement. Ne pas jeter un appareil électrique ou électronique (et des piles éventuelles) parmi les déchets municipaux non sujets au tri sélectif ; une déchèterie traitera l’appareil en question. Renvoyer les équipements usagés à votre fournisseur ou à un service de recyclage local. Il convient de respecter la réglementation locale relative à la protection de l’environnement. En cas de questions, contacter les autorités locales pour élimination. Nous vous remercions de votre achat ! Lire la présente notice attentivement avant la mise en service de l’appareil. Si l’appareil a été endommagé pendant le transport, ne pas l’installer et consulter votre revendeur. 2. Prescriptions de sécurité Être prudent lors de l’installation : toucher un câble sous tension peut causer des électrochocs mortels. Protéger l’appareil contre la pluie et l’humidité. Débrancher le câble d'alimentation avant d'ouvrir le boîtier. • La garantie ne s’applique pas aux dommages survenus en négligeant certaines directives de cette notice et votre revendeur déclinera toute responsabilité pour les problèmes et les défauts qui en résultent. • Confier l’installation et l’entretien à un personnel qualifié. • Ne pas brancher l’appareil après exposition à des variations de température. Afin d’éviter des dommages, attendre jusqu’à ce que l’appareil ait atteint la température ambiante avant de l’utiliser. • Tenir l’appareil à l’écart de sources de chaleur. • Cet appareil ressort à la classe de protection III. Cet appareil doit être utilisé avec un adaptateur secteur adapté. Contrôler régulièrement l’état de l’adaptateur secteur, du cordon d’alimentation et de l’appareil. • La tension réseau ne peut pas dépasser la tension mentionnée dans les spécifications à la fin de cette notice. VDPC130_v3 18 VELLEMAN • Le câble d’alimentation ne peut pas être replissé ou endommagé. Demander à votre revendeur de renouveler le câble d’alimentation si nécessaire. • Débrancher l’appareil s’il n’est pas utilisé ou pour le nettoyer. Tirer la fiche pour débrancher l'appareil ; non pas le câble. • Raccorder l’alimentation en dernier. • Les dommages occasionnés par des modifications à l’appareil par le client, ne tombent pas sous la garantie. • Garder votre VDPC130 hors de la portée de personnes non qualifiées et de jeunes enfants. 3. Directives générales • Cet appareil est un contrôleur DMX permettant de contrôler des effets et des projecteurs DMX dans des discothèques, des théâtres, etc. Employer cet appareil à l’intérieur et avec l’adaptateur connecté à une source de courant CA de max. 230VCA / 50Hz. • Éviter de secouer l’appareil et traiter l’appareil avec circonspection pendant l’installation et l’opération. • Choisir un endroit où l’appareil est protégé contre la poussière, l’humidité et des températures extrêmes. • Se familiariser avec le fonctionnement de l’appareil avant de l’utiliser. Ne pas permettre pas aux personnes non qualifiées d’opérer cet appareil. La plupart des dégâts sont causés par un usage non professionnel. • Transporter l’appareil dans son emballage originel. • Toute modification de l’appareil est interdite pour des raisons de sécurité. • N’utiliser votre VDPC130 qu’à sa fonction prévue. Tout autre usage peut causer des courts-circuits, des brûlures, des électrochocs etc. Un usage impropre annule d'office la garantie. 4. Description a. Panneau frontal (voir ill. 1) 1. 2. 3. 4. Boutons de sélection SCANNER : Choisissez votre projecteur. Témoins LED SCANNER Boutons de sélection SCENE : Choisissez votre scène. Glissières de CANAL : Réglage des valeurs DMX. Les canaux 1 ~ 8 peuvent être réglés en enfonçant le bouton de scanner correspondant. Les canaux 9 ~ 16 peuvent être réglés en enfonçant le bouton de la sélection de la page. 5. Bouton « FOG MACHINE » : activation de la machine à fumée. 6. Témoin de surchauffe pour la MACHINE À FUMÉE 7. Témoin MACHINE À FUMÉE 8. Témoin LED PAGE A 9. Témoin LED PAGE B 10. Bouton de sélection de la PAGE : En mode manuel, enfoncer ce bouton-ci pour contrôler les canaux 1 ~ 8 (page A) ou les canaux 9 ~ 16 (page B) ou bien les deux pages à l’aide de la glissière. 11. Bouton de PROGRAMMATION 12. Bouton « MUSIC / BANK COPY » : Enfoncer ce bouton pour commuter vers le pilotage par la musique. 13. AFFICHAGE 14. Témoins LED MODE 15. Bouton « BANK UP » : Banc suivant. 16. Bouton « BANK DOWN » : Banc précédent. 17. Bouton « TAP DISPLAY » 18. Bouton « BLACKOUT » : Coupure de la sortie lumineuse de tous les projecteurs raccordés à l’aide de l’obturateur. 19. Bouton « MIDI / REC » 20. Témoin LED ASSIGN 21. Bouton « AUTO / DEL » 22. Boutons de POURSUITE (poursuite 1 ~ poursuite 6) 23. Glissière de VITESSE 24. Glissière du DÉLAI DU FONDU 25. Bouton FINE VDPC130_v3 19 VELLEMAN 26. Témoin LED PILE UP / CHASE 27A. Roue PAN 27B. Roue TILT 28. Bouton MODE b. Panneau arrière (voir ill. 2) 29. Prise d’entrée AUDIO 30. Prise d’entrée MIDI 31. Sélecteur de POLARITÉ DMX 32. Connexion de sortie DMX 33. Prise d’entrée DMX 34. Prise d’entrée pour la MACHINE À FUMÉE 35. Prise d’alimentation CC 36. Interrupteur ON / OFF 5. Installation a. Montage de l’appareil Placer l’appareil sur une surface plane ou le monter dans un rack. Cet appareil peut être monté dans un rack 19”. Utiliser un rack avec la possibilité d’ouvrir la face avant ainsi que la face arrière. Équiper le rack d’un ventilateur. S’assurer qu’il y ait suffisamment d’espace autour de l’appareil de manière à ce que l’air chaud puisse s’échapper. Une surchauffe peut endommager l’appareil. Fixer le VDPC130 à l’aide de quatre vis M6. Insérer l’adaptateur secteur dans la prise d’entrée CC (35) de l’appareil. Raccorder l’adaptateur secteur au réseau électrique. b. Pilotage par la musique L‘appareil peut être piloté par la musique grâce au microphone intégré ou la prise d’ENTRÉE EN LIGNE. Raccorder le signal sonore provenant de la table de mixage (p.ex. MASTER 2) à l’entrée AUDIO (29) située à l’arrière de l’appareil. c. Connexion DMX512 N’utiliser que des câbles stéréo blindés et des fiches XLR 3 points pour la connexion du contrôleur avec un appareil ou la connexion des appareils entre eux. d. Occupation de la connexion XLR Ajuster la polarité de la connexion XLR à l’aide du sélecteur de POLARITÉ DMX (31). e. Connexion DMX512 avec terminaison Une terminaison DMX est à recommander si le câble DMX doit couvrir une grande distance ou s’il est utilisé dans un environnement avec beaucoup de bruit électrique (p.ex. une discothèque). La terminaison prévient la corruption du signal de contrôle numérique par le bruit électrique. La terminaison DMX n’est rien d’autre qu’une fiche XLR avec une résistance de 120Ω de broche 2 vers broche 3 (voir illustration à gauche). Cette fiche XLR est connectée à la sortie XLR du dernier appareil de la série. VDPC130_v3 20 VELLEMAN f. Codage des projecteurs Projecteur 1 2 3 4 Adresse de départ 1 21 41 61 Adresse de départ 81 101 121 141 Projecteur 5 6 7 8 Projecteur 9 10 11 12 Adresse de départ 161 181 201 221 Il est nécessaire d’attribuer l’adresse de départ DMX en pas de 16. Coder chaque projecteur correspondant à l’adresse de départ respective. Le cas contraire, l’assignement des canaux sera incorrect. Tous les projecteurs adressés avec une même adresse de départ fonctionneront de manière synchronisée. g. Configuration des canaux Le VDPC130 peut contrôler jusqu’à 12 scanners à 16 canaux. Les huit premiers canaux de chaque scanner seront contrôlés depuis les huit glissières. Les huit derniers canaux seront contrôlés depuis les huit glissières et le buoton de sélection de la PAGE (10) sur la page B. Si le scanner comporte plus de 16 canaux, configurer les canaux comme suit : • • • • • Enfoncer le bouton de PROGRAMMATION (11) jusqu’à ce que la LED clignote. Enfoncer simultanément les boutons FINE (25) et (28) jusqu’à ce que la LED ASSIGN (20) s’allume. Sélectionner le scanner en enfonçant le bouton de SCANNER correspondant (1). Régler la glissière de VITESSE (23) pour sélectionner le canal du scanner (p.ex. canal 9 ou 10). Régler la glissière du DÉLAI DU FONDU (24) pour sélectionner le canal de contrôle (p.ex. la roue PAN (27A) ou TILT (27B)). • Pour configurer les canaux 19 et 20, enfoncer le bouton de sélection de la page (10). Le témoin LED de la PAGE B (9) s’allume. Répéter les deux étapes ci-dessous. Exemple : Positionner la glissière de VITESSE (23) sur la canal 9 et la glissière du DÉLAI DU FONDU (24) sur X. ceci veut dire que le 9ième canal du scanner sera contrôlé à partir de la roue PAN (27A). h. Attribution du DÉLAI DU FONDU Cette fonction vous permet d’attribuer le délai du fondu au mouvement pan/tilt ou à tous les canaux DMX. Cette fonction est particulièrement pratique au cas où la rotation du miroir ou du projecteur lyre doit s’effectuer de manière lente mais les gobos et les couleurs doivent changer de manière rapide. • Débrancher l’appareil. • Maintenir simultanément enfoncé les boutons MODE (28) et TAP DISPLAY (17). • Brancher l’appareil. Enfoncer le bouton TAP / DISPLAY (17) pour commuter entre les deux modes (ALL CH pour tous les canaux et ONLY X/Y pour le mouvement pan/tilt uniquement). • Maintenir simultanément enfoncé les boutons MODE (28) et TAP / DISPLAY (17) pour sauvegarder la configuration. Toutes les LEDs clignoteront pour indiquer la sauvegarde de la configuration. 6. Emploi a. Le mode manuel Pour sélectionner le mode manuel, enfoncer le bouton AUTO / DEL (21) jusqu’à ce que la LED MANUAL (14) s’allume. VDPC130_v3 21 VELLEMAN En mode manuel, il est possible de sélectionner manuellement le scanner et de la contrôler depuis les glissières. Cependant, les réglages ne peuvent pas être sauvegardés. Sélectionner le scanner à l’aide du bouton de SCANNER (1) correspondant. Ajuster la fonction souhaitée à l’aide des glissières. • Vérification d’un BANC / d’une SCÈNE Sélectionner votre banc à l’aide des boutons BANK (16 et 17). Sélectionner la scène à l’aide des boutons SCENE (3). • Vérification d’une POURSUITE Sélectionner la poursuite à l’aide des boutons de POURSUITE (22). Enfoncer TAP / DELAY (17). Les scènes seront affichées. Enfoncer les boutons BANK (16 et 17) pour visualiser chaque scène. • Le bouton de sélection de la PAGE (10) Utiliser ce bouton pour le réglage des glissières (4) du canal CH1 ~ 8 (la LED de la page A est allumée) au canal CH9 ~ 16 (la LED de la page B est allumée) ou des deux pages (les deux LEDs sont allumées). • Le bouton DISPLAY (17) Utiliser ce bouton pour commuter de la valeur DMX (0 ~ 255) vers la pourcentage (0 ~ 100%). b. La programmation Un banc est constitué de différentes scènes qui seront jouées successivement. Le VDPC130 vous permet de programmer jusqu’à 30 banc de 8 scènes chacun. • Attribution d’une roue à un canal o Sélectionner le canal. o Enfoncer MIDI / REC (19) pour confirmer. • Programmation d’une scène o Maintenir enfoncé le bouton de PROGRAMMATION (11) pendant 2 secondes pour accéder au mode de programmation. La LED de PROGRAMMATION s’allume. o Sélectionner le scanner à l’aide des boutons de sélection SCANNER (1). o Ajuster les réglages (la valeur sera affichée) à l’aide des glissières de CANAL (4). o Enfoncer le bouton MIDI / REC (19) pour lancer le mode de sauvegarde. o Sélectionner le banc (01 ~ 30) à sauvegarder à l’aide des boutons BANK (15 et 16). o Enfoncer un des boutons SCENE (3) pour sauvegarder les données. Toutes les LEDs clignoteront pour indiquer la sauvegarde des données. o Sélectionner le scanner suivant à l’aide des boutons de sélection SCANNER (1) et répéter les étapes cidessus jusqu’à ce que la programmation soit terminée ou le nombre maximal des scènes (8) soit atteint. o Maintenir enfoncé le bouton de PROGRAMMATION (11) pour quitter le mode de programmation. • Appel d’un programme o Enfoncer les boutons BANK (15 et 16) et sélectionner votre banc. o Enfoncer le bouton AUTO / DEL (21). La LED AUTO s’allume. o Régler la vitesse à l’aide de la glissière SPEED (23) et la fréquence de répétition à l’aide de la glissière du DÉLAI DU FONDU (24). o Il est possible de régler la vitesse en enfonçant le bouton TAP (17) à deux reprises. Le délai entre deux pressions détermine la vitesse (jusqu’à 10 minutes). VDPC130_v3 22 VELLEMAN • Vérification d’un programme o Maintenir enfoncé le bouton de PROGRAMMATION (11) et sélectionner votre banc à l’aide des boutons BANK (15 et 16). o Vérifier chaque scène individuellement en enfonçant le bouton SCENE (3) correspondant à la scène. • Éditer un programme o Si vous constatez qu’une scène ne correspond pas à vos présentations, il est nécessaire de modifier une scène manuellement. o Maintenir enfoncé le bouton de PROGRAMMATION (11) pour accéder au mode de programmation. o Sélectionner le programme à modifier à l’aide des boutons BANK (15 et 16). o Sélectionner le scanner à l’aide des boutons SCANNER (1). o Établir la configuration à l’aide de la glissière de CANAL (4). o Enfoncer le bouton MIDI / REC (19) pour lancer le mode de sauvegarde. o Sélectionner votre scène à l’aide des boutons SCENE (3) et mémoriser. • Copie d’un programme o o o o o Maintenir enfoncé le bouton de PROGRAMMATION (11) pour accéder au mode de programmation. Sélectionner le banc à l’aide des boutons BANK (15 et 16). Enfoncer le bouton MIDI / REC (19) pour lancer le mode de copie. Sélectionner le banc à l’aide des boutons BANK (15 et 16). Enfoncer le bouton MUSIC / BANK COPY (12) pour copier le banc. Toutes les LEDs s’allumeront. c. La poursuite Une poursuite est constituée d’une séquence de différents bancs qui seront joués successivement. Avec le VDPC130, il est possible de programmer jusqu’à 6 poursuites de 240 scènes chacune. • Programmation d’une poursuite Maintenir enfoncé le bouton de PROGRAMMATION (11) pour accéder au mode de programmation. Sélectionner votre poursuite à l’aide des boutons de sélection de POURSUITE (22). Sélectionner le programme à l’aide des boutons BANK (15 et 16). Sélectionner la scène à l’aide des boutons de sélection de SCENE (3). Enfoncer le bouton MIDI / REC (19). Programmer la scène suivante jusqu’à ce que la poursuite soit terminée ou le nombre maximal de scènes (240) soit atteint. o Maintenir enfoncé le bouton de PROGRAMMATION (11) pour sauvegarder la poursuite. o o o o o o • Appel d’une poursuite o Enfoncer le bouton de sélection de la POURSUITE (22) correspondant et enfoncer AUTO / DEL (21). Ajuster la vitesse de la poursuite en enfonçant le bouton TAP (17) à deux reprises. Le délai entre deux pressions détermine la vitesse (jusqu’à 10 minutes). o Enfoncer le bouton MIDI / REC (19) et sélectionner le projecteur à l’aide des boutons de sélection SCANNER (1). • Vérification d’une poursuite o Maintenir enfoncé le bouton de PROGRAMMATION (11) et sélectionner votre poursuite à l’aide des boutons de sélection CHASER (22). o Enfoncer le bouton DISPLAY pour commuter vers le mode des scènes. Vérifier chaque scène individuellement en enfonçant le bouton BANK (15 et 16) respectif. VDPC130_v3 23 VELLEMAN • Éditer une poursuite o Copie d’un banc vers une poursuite Maintenir enfoncé le bouton de PROGRAMMATION (11) pour accéder au mode de programmation. Sélectionner votre poursuite à l’aide des boutons de POURSUITE (22). Les LEDs respectives s’allument. Sélectionner le banc à copier à l’aide des boutons BANK (15 et 16). Enfoncer le bouton MUSIC / BANK COPY (12) pour lancer le mode de copie. Enfoncer le bouton MIDI / REC (19) pour copier le banc. Toutes les LEDs clignoteront. o Copie d’une scène vers une poursuite Maintenir enfoncé le bouton de PROGRAMMATION (11) pour accéder au mode de programmation. Sélectionner votre poursuite à l’aide des boutons de POURSUITE (22). La LED correspondante s’allume. Sélectionner le banc vers lequel vous désirez copier la scène à l’aide des boutons BANK (15 et 16). Sélectionner la scène à copier à l’aide des boutons SCENE (3). Enfoncer le bouton MIDI / REC (19) pour copier la scène. Toutes les LEDs clignoteront. o Insertion d’une scène dans une poursuite Maintenir enfoncé le bouton de PROGRAMMATION (11) pour accéder le mode de programmation. Sélectionner votre poursuite dans laquelle vous désirez insérer la scène à l’aide des boutons CHASER (22). Les LEDs respectives s’allument. Enfoncer le bouton TAP / DISPLAY (17) pour commuter vers le mode des scènes. Sélectionner la scène où vous désirez insérer la nouvelle scène à l’aide des boutons BANK (15 et 16). À présent, la scène est affichée. Si vous désirez insérer une scène entre scène 5 et 6, enfoncer le bouton BANK UP / DOWN (15 ou 16) jusqu’à ce que STEP05 s’affiche. Enfoncer le bouton MIDI / REC (19). La scène suivante est affichée. Sélectionner le banc dans laquelle vous désirez insérer la scène à l’aide des boutons BANK (15 et 16). Sélectionner la scène à insérer à l’aide des boutons SCENE (3). Enfoncer le bouton MIDI / REC (19) pour insérer la scène. Toutes les LEDs clignoteront. o Effacement d’une scène dans une poursuite Maintenir enfoncé le bouton de PROGRAMMATION (11) pour accéder au mode de programmation. Sélectionner votre poursuite dans laquelle vous désirez effacer une scène à l’aide des boutons CHASER (22). Enfoncer le bouton TAP / DISPLAY (17). Sélectionner la scène à effacer à l’aide des boutons BANK (15 et 16). Enfoncer le bouton AUTO / DEL (21) pour effacer la scène. Toutes les LEDs clignoteront. • Effacement d’une poursuite o Maintenir enfoncé le bouton de PROGRAMMATION (11) pour accéder au mode de programmation. o Sélectionner votre poursuite à l’aide des boutons CHASER (22). o Maintenir enfoncé le bouton AUTO / DEL (21) et le bouton CHASER (22) respectif pour effacer la poursuite. Toutes les LEDs clignoteront. • Effacement de toutes les poursuites ATTENTION : En sélectionnant cette fonction, toutes les poursuites programmées seront irrévocablement effacées. Cependant, les scènes et les programmes seront toujours disponibles. VDPC130_v3 24 VELLEMAN o Mettre l’appareil hors tension. o Maintenir enfoncé le bouton BANK DOWN (16) et le bouton AUTO / DEL (21) tout en mettant sous tension l’appareil. Toutes les LEDs clignoteront. d. Les scènes • Insertion d’une scène o o o o o o o o Maintenir enfoncé le bouton de PROGRAMMATION (11) pour accéder au mode de programmation. Sélectionner la poursuite à l’aide des boutons de POURSUITE (22). Les LEDs respectives s’allument. Enfoncer le bouton TAP / DISPLAY (17). Les scènes de la poursuite seront affichées. Sélectionner la scène dans laquelle vous désirez insérer la nouvelle scène à l’aide des boutons BANK (15 et 16). Si vous désirez insérer la scène entre les scènes 5 et 6, enfoncer le bouton BANK UP / DOWN (15 ou 16) jusqu’à ce que STEP05 s’affiche. Enfoncer le bouton MIDI / REC (19). La scène suivante est affichée. Sélectionner le banc dans laquelle vous désirez insérer la scène à l’aide des boutons BANK (15 et 16). Sélectionner la scène à insérer à l’aide des boutons SCENE (3). Enfoncer le bouton MIDI / REC (19) pour insérer la scène. Toutes les LEDs clignoteront. • Copie d’une scène o o o o o o Maintenir enfoncé le bouton de PROGRAMMATION (11) pour accéder au mode de programmation. Sélectionner le banc dans lequel se trouve la scène à l’aide des boutons BANK (15 et 16). Sélectionner la scène à copier à l’aide des boutons SCENE (3). Enfoncer le bouton MIDI / REC (19). Sélectionner le banc vers lequel vous désirez copier la scène à l’aide des boutons BANK (15 et 16). Enfoncer le bouton SCENE (3) désiré. Toutes les LEDs clignoteront. • Effacement d’une scène o o o o o o Maintenir enfoncé le bouton de PROGRAMMATION (11) pour accéder le mode de programmation. Sélectionner le banc dans lequel se trouve la scène à effacer à l’aide des boutons BANK (15 et 16). Maintenir enfoncé le bouton AUTO / DEL (21). Sélectionner la poursuite à l’aide des boutons de POURSUITE (21). Enfoncer le bouton SCENE (3) correspondant à la scène à effacer. La scène a été effacée. Toutes les LEDs clignoteront. Les 240 canaux DMX des scènes effacées seront remis à zéro. • Effacement de toutes les scènes ATTENTION : En sélectionnant cette fonction, toutes les scènes programmées seront irrévocablement effacées. o Maintenir enfoncé le bouton de PROGRAMMATION (11) et le bouton BANK DOWN (16) tout en débranchant l’appareil du réseau électrique. o Raccorder l’appareil au réseau électrique. e. Mode piloté par la musique o Enfoncer le bouton MUSIC / BANK COPY (12). La LED s’allume. L’appareil se met en mode pilotage par la musique dès qu’il reçoit un signal sonore. o Sélectionner le banc qui sera contrôlé par la musique à l’aide des boutons BANK (15 et 16). o Ajuster le délai du fondu à l’aide de la glissière du DÉLAI DU FONDU (24). VDPC130_v3 25 VELLEMAN o Enfoncer un bouton de POURSUITE (22). La poursuite sera pilotée par la musique. Il est possible de sélectionner plusieurs poursuites et de les appeler une par une. o Régler le délai du fondu à l’aide de la glissière du DÉLAI DU FONDU (24). f. Mode automatique o Pour sélectionner le mode automatique, enfoncer le bouton AUTO / DEL (21) jusqu’à ce que la LED s’allume. o Si aucun bouton de POURSUITE (22) n’est enfoncé, le contrôleur lance automatiquement un banc. Sélectionner votre banc à l’aide des boutons BANK (15 et 16). o Enfoncer un bouton de POURSUITE (22). Le VDPC130 lancera automatiquement une poursuite. Il est possible de sélectionner plusieurs poursuites et de les appeler une par une. o Ajuster le délai entre les scènes à l’aide de la glissière de VITESSE (23) et le délai du fondu à l’aide de la glissière du DÉLAI DU FONDU (24). g. Emploi en mode MIDI o Maintenir enfoncé le bouton MIDI / REC (19) pendant environ 2 secondes. o Sélectionner le canal MIDI (1 ~ 20) respectif à l’aide des boutons BANK (15 et 16). o Renfoncer le bouton MIDI / REC (19) pour sauvegarder la configuration et pour quitter le mode. 7. Nettoyage et entretien 1. 2. 3. 4. 5. 6. Serrer les écrous et les vis et vérifier qu’ils ne rouillent pas. Les câbles d'alimentation ne peuvent pas être endommagés. Un technicien qualifié doit entretenir l’appareil. Débrancher l’appareil avant de le nettoyer. Essuyer l’appareil régulièrement avec un chiffon humide non pelucheux. Éviter l’usage d’alcool et de solvants. Il n’y a aucune pièce maintenable par l’utilisateur. Commander des pièces de rechange éventuelles chez votre revendeur. 8. Spécifications techniques Alimentation Consommation Entrée/sortie DMX Entrée MIDI Dimensions Poids 9-12VCC, 500mA max. 4W XLR femelle/mâle à 3 points 5-pin DIN 19” x 132 x 80mm 2.5kg Toutes les informations présentées dans cette notice peuvent être modifiées sans notification préalable. VDPC130 – CONTROLADOR DMX DE 240 CANALES CON RUEDAS JOG 1. Introducción A los ciudadanos de la Unión Europea Importantes informaciones sobre el medio ambiente concerniente este producto Este símbolo en este aparato o el embalaje indica que, si tira las muestras inservibles, podrían dañar el medio ambiente. No tire este aparato (ni las pilas eventuales) en la basura doméstica; debe ir a una empresa especializada en reciclaje. Devuelva este aparato a su distribuidor o a la unidad de reciclaje local. Respete las leyes locales en relación con el medio ambiente. Si tiene dudas, contacte con las autoridades locales para eliminación. VDPC130_v3 26 VELLEMAN ¡Gracias por haber comprado el VDPC130! Lea cuidadosamente las instrucciones del manual antes de usarlo. Si el aparato ha sufrido algún daño en el transporte no lo instale y póngase en contacto con su distribuidor. 2. Instrucciones de seguridad Cuidado durante la instalación: puede sufrir una peligrosa descarga eléctrica al tocar los cables con un voltaje peligroso. No exponga este equipo a lluvia o humedad. Desconecte el cable de alimentación de la red antes de abrir la caja. • Daños causados por descuido de las instrucciones de seguridad de este manual invalidarán su garantía y su distribuidor no será responsable de ningún daño ni de otros problemas resultantes. • La instalación y el mantenimiento deben ser realizados por personal especializado. • No conecte el aparato si ha estado expuesto a grandes cambios de temperatura. Espere hasta que el aparato llegue a la temperatura ambiente. • Mantenga el aparato lejos de fuentes de calor. • Este aparato pertenece a la clase de protección III. Utilice este aparato con un adaptador de red adecuado. Controle regularmente el estado del adaptador, del cable de alimentación y del aparato. • Asegúrese de que la tensión de red no sea mayor que la tensión indicada en las especificaciones. • No aplaste el cable de alimentación y protéjalo contra posibles daños causados por algún tipo de superficie afilada. Si es necesario, pida a su distribuidor reemplazar el cable de alimentación. • Desconecte siempre el aparato si no va a usarlo durante un largo período de tiempo o antes de limpiarlo. Tire siempre del enchufe para desconectar el cable de red, nunca del propio cable. • Conecte siempre la alimentación en último lugar. • Los daños causados por modificaciones no autorizadas, no están cubiertos por la garantía. • Mantenga el VDPC130 lejos del alcance de personas no capacitadas y niños. 3. Normas generales • Este aparato es un controlado DMX que permite controlar efectos y proyectores DMX en discotecas, teatros, etc. Utilice este aparato sólo en interiores y con el adaptador conectado a una fuente de corriente CA de máx. 230VCA / 50Hz. • No agite el aparato. Evite usar excesiva fuerza durante la instalación y la reparación. • Seleccione un lugar de montaje donde el aparato no esté expuesto a polvo, humedad ni temperaturas extremas. • Familiarícese con el funcionamiento del aparato. Sólo personas cualificadas pueden manejar este aparato. La mayoría de los daños son causados por un uso inadecuado. • Transporte el aparato en su embalaje original. • Por razones de seguridad, las modificaciones no autorizadas del aparato están prohibidas. • Utilice sólo el VDPC130 para las aplicaciones descritas en este manual a fin de evitar p.ej. cortocircuitos, quemaduras, descargas eléctricas, etc. Un uso desautorizado puede causar daños y anula la garantía completamente. 4. Descripción a. Panel frontal (véase fig. 1) 1. 2. 3. 4. Botones de selección SCANNER: seleccione el proyector. Indicadores LED SCANNER Botones de selección SCENE: seleccione la escena. Conmutadores deslizantes de CANAL: Ajuste de los valores DMX. Es posible ajustar los canales 1 ~ 8 al pulsar el botón de escáner correspondiente. Es posible ajustar los canales 9 ~ 16 al pulsar el botón de la selección de la página. VDPC130_v3 27 VELLEMAN 5. Botón « FOG MACHINE »: para activar la máquina de humo. 6. Indicador de sobrecalentamiento para la MÁQUINA DE HUMO 7. Indicador MÁQUINA DE HUMO 8. Indicador LED PÁGINA A 9. Indicador LED PÁGIN B 10. Botón de selección de la PÁGINA: En el modo manual, pulse este botón para controlar los canales 1 ~ 8 (página A) o los canales 9 ~ 16 (página B) o las dos páginas con el conmutador deslizante. 11. Botón de PROGRAMACIÓN 12. Botón « MUSIC / BANK COPY »: pulse este botón para conmutar al control por la música. 13. PANTALLA 14. Indicadores LED MODE 15. Botón « BANK UP »: Banco siguiente. 16. Botón « BANK DOWN »: Banco anterior. 17. Botón « TAP DISPLAY » 18. Botón « BLACKOUT »: Desactive la salida luminosa de todos los proyectores conectados con el shutter. 19. Botón « MIDI / REC » 20. Indicador LED ASSIGN 21. Botón « AUTO / DEL » 22. Botones CHASER (chaser 1 ~ chaser 6) 23. Conmutador deslizante de VELOCIDAD 24. Conmutador deslizante deL FADE TIME (tiempo fade) 25. Botón FINE 26. Indicador LED PILE UP / CHASE 27A. Rueda PAN 27B. Rueda TILT 28. Botón MODE b. Panel trasero (véase fig. 2) 29. Toma de entrada AUDIO 30. Toma de entrada MIDI 31. Selector de POLARIDAD DMX 32. Conexión de salida DMX 33. Toma de entrada DMX 34. Toma de entrada para la MÁQUINA DE HUMO 35. Toma de alimentación CC 36. Interruptor ON / OFF 5. Instalación a. Montar el aparato Ponga el aparato en una superficie plana o móntelo en un rack. Es posible montar el aparato en un rack 19”. Utilice un rack con la posibilidad de abrir tanto el panel frontal como el panel trasero. Asegúrese de equipar el rack con un ventilador. Asegúrese de que haya bastante espacio alrededor del aparato para que el aire caliente pueda escaparse. Un sobrecalentamiento podría dañar el aparato. Fije el VDPC130 con cuatro tornillos M6. Introduzca el adaptador de red en la toma de entrada CC (35) del aparato. Conecte el adaptador a la red eléctrica. VDPC130_v3 28 VELLEMAN b. Control por la música Es posible controlar el aparato por la música gracias al micrófono incorporado o la toma de ENTRADA EN LÍNEA. Conecte la señal sonora que viene de la mesa de mezclas (p.ej. MASTER 2) a la entrada AUDIO (29) de la parte trasera del aparato. c. Conexión DMX512 Utilice sólo cables estéreo blindados y conectores XLR de 3 polos para conectar el controlador a un aparato o para conectar los aparatos el uno al otro. d. Ocupación de la conexión XLR Ajuste la polaridad de la conexión XLR con el selector de POLARIDAD DMX (31). e. Conexión DMX-512 con una terminación DMX Use una terminación DMX si el cable DMX debe cubrir una gran distancia o si se usa en un medio ambiente con mucho ruido eléctrico (ej. una discoteca). La terminación impide que el ruido eléctrico corrompa la señal de control digital. La terminación DMX no es más que un conector XLR con una resistencia de 120Ω de polo 2 a polo 3 (véase figura a la izquierda). Este conector XLR está conectado a la salida XLR del último aparato de la serie. f. Código de los proyectores Proyector 1 2 3 4 Dirección inicial 1 21 41 61 Dirección inicial 81 101 121 141 Proyector 5 6 7 8 Proyector 9 10 11 12 Dirección inicial 161 181 201 221 Es necesario atribuir la dirección inicial DMX cada 16 canales. Codifique cada proyector correspondiente a la dirección inicial respectiva. De otro modo, la asignación de los canales será incorrecta. Todos les proyectores con la misma dirección inicial funcionan de manera sincrónica. g. Configuración de los canales El VDPC130 puede controlar hasta 12 escáneres de 16 canales. Los primeros ocho canales de cada escáner se controlarán con los ocho conmutadores deslizantes. Los últimos ocho canales se controlarán con los ocho conmutadores deslizantes y el botón de selección PAGE (10) de la página B. Si el escáner tiene más de 16 canales, configure los canales de la siguiente manera: • • • • • Pulse el botón de PROGRAMACIÓN (11) hasta que el LED parpadee. Pulse los botones FINE (25) y (28) simultáneamente hasta que el LED ASSIGN (20) se ilumine. Seleccione el escáner al pulsar el botón de ESCÁNER correspondiente (1). Ajuste el conmutador deslizante de VELOCIDAD (23) para seleccionar el canal del escáner (p.ej. canal 9 ó 10). Ajuste el conmutador deslizante FADE TIME (24) para seleccionar el canal de control (p.ej. la rueda PAN (27A) o TILT (27B)). • Para configurar los canales 19 y 20, pulse el botón de selección de la página (10). El indicador LED de la PÁGINA B (9) se ilumina. Repita los dos pasos anteriores. VDPC130_v3 29 VELLEMAN Ejemplo: Ponga el conmutador deslizante de VELOCIDAD (23) en el canal 9 y el conmutador deslizante FADE TIME (24) en X. Esto quiere decir que el noveno canal del escáner se controlará con la rueda PAN (27A). h. Asignar el TIEMPO FADE Esta función le permite asignar el tiempo fade al movimiento pan/tilt o a todos los canales DMX. Esta función es muy práctica si la rotación del espejo o de la cabeza móvil debe efectuarse de manera lenta pero los gobos y los colores deben cambiar de manera rápida. • Desconecte el aparato. • Mantenga pulsado los botones MODE (28) y TAP DISPLAY (17) simultáneamente. • Conecte el aparato. Pulse el botón TAP / DISPLAY (17) para conmutar entre los dos modos (ALL CH para todos los canales y ONLY X/Y para sólo el movimiento pan/tilt). • Mantenga pulsado los botones MODE (28) y TAP / DISPLAY (17) simultáneamente para guardar la configuración. Todos los LEDs parpadearán para indicar que la configuración ha sido guardada. 6. Uso a. El modo manual Para seleccionar el modo manual, pulse el botón AUTO / DEL (21) hasta que el LED MANUAL (14) se ilumine. En el modo manual, es posible seleccionar el escáner manualmente y controlarlo con los conmutadores deslizantes. Tenga en cuenta que no es posible guardar los ajustes. Seleccione el escáner con el botón de SCANNER (1) correspondiente. Ajuste la función deseada con los conmutadores deslizantes. • Comprobar un BANCO / una ESCENA Seleccione el banco con los botones BANK (16 y 17). Seleccione la escena con los botones SCENE (3). • Comprobar un CHASER Seleccione el chaser con los botones CHASER (22). Pulse TAP / DELAY (17). Las escenas se visualizarán. Pulse los botones BANK (16 y 17) para visualizar cada escena. • El botón de selección de la PÁGINA (10) Utilice este botón para ajustar los conmutadores deslizantes (4) de canal CH1 ~ 8 (el LED de la página A está iluminado) a canal CH9 ~ 16 (el LED de la página B está iluminado) o de los dos páginas (los dos LEDs están iluminados). • El botón DISPLAY (17) Utilice este botón para conmutar del valor DMX (0 ~ 255) al porcentaje (0 ~ 100%). b. La programación Un banco consta de diferentes escenas que se reproducirán sucesivamente. El VDPC130 le permite programar hasta 30 bancos de 8 escenas cada uno. • Atribuir una rueda a un canal o Seleccione el canal. o Pulse MIDI / REC (19) para confirmar. VDPC130_v3 30 VELLEMAN • Programar una escena o Mantenga pulsado el botón de PROGRAMACIÓN (11) durante 2 segundos para entrar en el modo de programación. El LED de PROGRAMACIÓN se ilumina. o Seleccione el escáner con los botones de selección SCANNER (1). o Ajuste los ajustes (el valor se visualizará) con los conmutadores deslizantes de CANAL (4). o Pulse el botón MIDI / REC (19) para activar el modo ‘guardar’. o Seleccione el banco (01 ~ 30) que quiere guardar con los botones BANK (15 y 16). o Pulse uno de los botones SCENE (3) para guardar los datos. Todos los LEDs parpadearán para indicar que se están guardando los datos. o Seleccione el escáner siguiente con los botones de selección SCANNER (1) y repita los pasos (véase arriba) hasta que la programación se termine o el número máx. de escenas (8) esté alcanzado. o Mantenga pulsado el botón de PROGRAMACIÓN (11) para salirse del modo de programación. • Reproducir un programa o Pulse los botones BANK (15 y 16) y seleccione el banco. o Pulse el botón AUTO / DEL (21). El LED AUTO se ilumina. o Ajuste la velocidad con el conmutador deslizante SPEED (23) y la frecuencia de repetición con el conmutador deslizante FADE TIME (24). o Es posible ajustar la velocidad al pulsar el botón TAP (17) dos veces. El tiempo entre dos presiones determina la velocidad (hasta 10 minutos). • Comprobar un programa o Mantenga pulsado el botón de PROGRAMACIÓN (11) y seleccione el banco con los botones BANK (15 y 16). o Compruebe cada escena individualmente al pulsar el botón SCENE (3) correspondiente. • Editar un programa o Si observa que una escena no corresponde a sus presentaciones, es necesario modificar una escena manualmente. o Mantenga pulsado el botón de PROGRAMACIÓN (11) para entrar en el modo de programación. o Seleccione el programa que quiere modificar con los botones BANK (15 y 16). o Seleccione el escáner deseado con los botones SCANNER (1). o Ajuste los ajustes deseados con los conmutadores deslizantes de CANAL (4). o Pulse el botón MIDI / REC (19) para activar el modo ‘save’. o Seleccione la escena con los botones SCENE (3) y guárdela. • Copiar un programa o o o o o Mantenga pulsado el botón de PROGRAMACIÓN (11) para entrar en el modo de programación. Seleccione el banco con los botones BANK (15 y 16). Pulse el botón MIDI / REC (19) para activar el modo de copiar. Seleccione el banco con los botones BANK (15 y 16). Pulse el botón MUSIC / BANK COPY (12) para copiar el banco. Todos los LEDs se iluminarán. c. Chaser Un chaser consta de una secuencia de diferentes bancos que se reproducirán sucesivamente. Con el VDPC130, es posible programar hasta 6 chaser de 240 escenas cada uno. VDPC130_v3 31 VELLEMAN • Programar un chaser Mantenga pulsado el botón de PROGRAMACIÓN (11) para entrar en el modo de programación. Seleccione el chaser con los botones de selección del CHASER (22). Seleccione el programa con los botones BANK (15 et 16). Seleccione la escena con los botones de selección SCENE (3). Pulse el botón MIDI / REC (19). Programe la escena siguiente hasta que el chaser esté terminado o el número máx. de escenas (240) esté alcanzado. o Mantenga pulsado el botón de PROGRAMACIÓN (11) para guardar el chaser. o o o o o o • Reproducir un chaser o Pulse el botón de selección del CHASER (22) correspondiente y pulse AUTO / DEL (21). Ajuste la velocidad del chaser al pulsar el botón TAP (17) dos veces. El tiempo entre dos presiones determina la velocidad (hasta 10 minutes). o Pulse el botón MIDI / REC (19) y seleccione el proyector con los botones de selección SCANNER (1). • Comprobar un chaser o Mantenga pulsado el botón de PROGRAMACIÓN (11) y seleccione el chaser con los botones de selección CHASER (22). o Pulse el botón DISPLAY para conmutar al modo de escenas. Compruebe cada escena individualmente al pulsar el botón BANK (15 et 16) respectivo. • Editar un chaser o Copiar un banco a un chaser Mantenga pulsado el botón de PROGRAMACIÓN (11) para entrar en el modo de programación. Seleccione el chaser con los botones CHASER (22). Los LEDs respectivos se iluminan. Seleccione el banco que quiere copiar con los botones BANK (15 y 16). Pulse el botón MUSIC / BANK COPY (12) para activar el modo ‘copiar’. Pulse el botón MIDI / REC (19) para copiar el banco. Todos los LEDs parpadearán. o Copiar una escena a un chaser Mantenga pulsado el botón de PROGRAMACIÓN (11) para entrar en el modo de programación. Seleccione el chaser con los botones CHASER (22). El LED correspondiente se ilumina. Seleccione el banco al que quiere copiar la escena con los botones BANK (15 y 16). Seleccione la escena que quiere copiar con los botones SCENE (3). Pulse el botón MIDI / REC (19) para copiar la escena. Todos los LEDs parpadearán. o Introducir una escena en un chaser Mantenga pulsado el botón de PROGRAMACIÓN (11) para entrar en el modo de programación. Seleccione el chaser en que quiere introducir la escena con los botones CHASER (22). Los LEDs correspondientes se iluminan. Pulse el botón TAP / DISPLAY (17) para conmutar al modo de escenas. Seleccione la escena en la que quiere introducir la nueva escena con los botones BANK (15 y 16). Ahora, la escena se visualiza. Si quiere introducir una escena entre escena 5 y 6, pulse el botón BANK UP / DOWN (15 ó 16) hasta que STEP05 se visualice. Pulse el botón MIDI / REC (19). La escena siguiente se visualiza. Seleccione el banco en que quiere introducir la escena con los botones BANK (15 y 16). VDPC130_v3 32 VELLEMAN Seleccione la escena que quiere introducir con los botones SCENE (3). Pulse el botón MIDI / REC (19) para introducir la escena. Todos los LEDs parpadearán. o Borrar una escena en un chaser Mantenga pulsado el botón de PROGRAMACIÓN (11) para entrar en el modo de programación. Seleccione el chaser en que quiere borrar una escena con los botones CHASER (22). Pulse el botón TAP / DISPLAY (17). Seleccione la escena que quiere borrar con los botones BANK (15 y 16). Pulse el botón AUTO / DEL (21) para borrar la escena. Todos los LEDs parpadearán. • Borrar un chaser o Mantenga pulsado el botón de PROGRAMACIÓN (11) para entrar en el modo de programación. o Seleccione el chaser con los botones CHASER (22). o Mantenga pulsado el botón AUTO / DEL (21) y el botón CHASER (22) respectivo para borrar el chaser. Todos los LEDs parpadearán. • Borrar todos los chaser ¡OJO! : Al seleccionar esta función, todos los chaser programados se borrarán de manera irrevocable. Sin embargo, las escenas y los programas estarán siempre disponibles. o Desactive el aparato. o Mantenga pulsado el botón BANK DOWN (16) y el botón AUTO / DEL (21) al activar el aparato. Todos los LEDs parpadearán. d. Las escenas • Introducir una escena o o o o o o o o Mantenga pulsado el botón de PROGRAMACIÓN (11) para entrar en el modo de programación. Seleccione el chaser con los botones CHASER (22). Los LEDs correspondientes se iluminan. Pulse el botón TAP / DISPLAY (17). Las escenas del chaser se visualizarán. Seleccione la escena en la que quiere introducir la nueva escena con los botones BANK (15 y 16). Si quiere introducir la escena entre las escenas 5 y 6, pulse el botón BANK UP / DOWN (15 ó 16) hasta que STEP05 se visualice. Pulse el botón MIDI / REC (19). La escena siguiente se visualiza. Seleccione el banco en que quiere introducir la escena con los botones BANK (15 y 16). Seleccione la escena que quiere introducir con los botones SCENE (3). Pulse el botón MIDI / REC (19) para introducir la escena. Todos los LEDs parpadearán. • Copiar una escena o o o o o o Mantenga pulsado el botón de PROGRAMACIÓN (11) para entrar en el modo de programación. Seleccione el banco en que está la escena con los botones BANK (15 y 16). Seleccione la escena que quiere copiar con los botones SCENE (3). Pulse el botón MIDI / REC (19). Seleccione el banco al que quiere copiar la escena con los botones BANK (15 y 16). Pulse el botón SCENE (3) deseado. Todos los LEDs parpadearán. VDPC130_v3 33 VELLEMAN • Borrar una escena o o o o o o Mantenga pulsado el botón de PROGRAMACIÓN (11) para entrar en el modo de programación. Seleccione el banco en que está la escena que quiere borrar con los botones BANK (15 y 16). Mantenga pulsado el botón AUTO / DEL (21). Seleccione el chaser con los botones CHASER (21). Pulse el botón SCENE (3) que coincide con la escena que quiere borrar. La escena está borrada. Todos los LEDs parpadearán. Los 240 canales DMX de las escenas borradas se reinicializarán. • Borrar todas las escenas ¡OJO!: Al seleccionar esta función, todas las escenas programadas se borrarán de manera irrevocable. o Mantenga pulsado el botón de PROGRAMACIÓN (11) y el botón BANK DOWN (16) mientras conecta el aparato a la red eléctrica. o Conecte el aparato a la red eléctrica. e. Modo control por la música o Pulse el botón MUSIC / BANK COPY (12). El LED se ilumina. El aparato entra en el modo control por la música en cuanto reciba una señal sonora. o Seleccione el banco que se controlará por la música con los botones BANK (15 y 16). o Ajuste el tiempo fade con el conmutador deslizante FADE TIME (24). o Pulse un botón del CHASER (22). El chaser se controlará por la música. Es posible seleccionar varios chaser y reproducirlos uno a uno. o Ajuste el tiempo fade con el conmutador deslizante FADE TIME (24). f. Modo automático o Para seleccionar el modo automático, pulse el botón AUTO / DEL (21) hasta que el LED se ilumine. o Si no se pulsa ningún botón del CHASER (22), el controlador reproduce automáticamente un banco. Seleccione el banco con los botones BANK (15 y 16). o Pulse un botón del CHASER (22). El VDPC130 reproducirá automáticamente un chaser. Es posible seleccionar chaser y reproducirlos uno a uno. o Ajuste el tiempo fade con el conmutador deslizante VELOCIDAD (23) y el tiempo fade con el conmutador deslizante FADE TIME (24). g. Uso en modo MIDI o Mantenga pulsado el botón MIDI / REC (19) durante aproximadamente 2 segundos. o Seleccione el canal MIDI (1 ~ 20) respectivo con los botones BANK (15 y 16). o Vuelva a pulsar el botón MIDI / REC (19) para guardar la configuración y para salirse del modo. 7. Limpieza y mantenimiento 1. 2. 3. 4. 5. 6. Apriete bien las tuercas y los tornillos y verifique que no hay señales de oxidación. No dañe los cables de alimentación. Contacte con un técnico especializado para instalar el aparato. Desconecte el aparato de toda fuente antes de limpiarlo. Limpie el aparato regularmente con un paño húmedo sin pelusas. Evite el uso de alcohol y de disolventes. El usuario no habrá de efectuar el mantenimiento de ninguna pieza. Contacte con su distribuidor si necesita piezas de recambio. VDPC130_v3 34 VELLEMAN 8. Especificaciones Alimentación Consumo Entrada/salida DMX Entrada MIDI Dimensiones Peso 9-12VCC, 500mA máx. 4W XLR hembra/macho de 3 polos DIN de 5 polos 19” x 132 x 80mm 2.5kg Se pueden modificar las especificaciones y el contenido de este manual sin previo aviso. VDPC130 – 240-KANAL-DMX-STEUERGERÄT MIT JOG-RÄDERN 1. Einführung An alle Einwohner der Europäischen Union Wichtige Umweltinformationen über dieses Produkt Dieses Symbol auf dem Produkt oder der Verpackung zeigt an, dass die Entsorgung dieses Produktes nach seinem Lebenszyklus der Umwelt Schaden zufügen kann. Entsorgen Sie die Einheit (oder verwendeten Batterien) nicht als unsortiertes Hausmüll; die Einheit oder verwendeten Batterien müssen von einer spezialisierten Firma zwecks Recycling entsorgt werden. Diese Einheit muss an den Händler oder ein örtliches Recycling-Unternehmen retourniert werden. Respektieren Sie die örtlichen Umweltvorschriften. Falls Zweifel bestehen, wenden Sie sich für Entsorgungsrichtlinien an Ihre örtliche Behörde. Danke für den Kauf des VDPC130! Bitte lesen Sie diese Bedienungsanleitung vor Inbetriebnahme sorgfältig durch. Überprüfen Sie, ob Transportschäden vorliegen. Sollte dies der Fall sein, verwenden Sie das Gerät nicht und wenden Sie sich an Ihren Händler. 2. Sicherheitshinweise Seien Sie vorsichtig bei der Installation: Fassen Sie keine stromführenden Kabel an, um einen lebensgefährlichen elektrischen Schlag zu vermeiden. Schützen Sie das Gerät vor Feuchtigkeit und Nässe. Trennen Sie das Gerät vor dem Öffnen vom Netz. • Bei Schäden, die durch Nichtbeachtung der Bedienungsanleitung verursacht werden, erlischt der Garantieanspruch. Für daraus resultierende Folgeschäden übernimmt der Hersteller keine Haftung. • Installation und Wartung sind einer autorisierten Fachkraft vorbehalten. • Nehmen Sie das Gerät erst in Betrieb, nachdem es von einem kalten in einen warmen Raum gebracht wurde. Lassen Sie das Gerät solange ausgeschaltet, bis es die Zimmertemperatur erreicht hat. • Das Gerät von Wärmequellen fernhalten. • Der Aufbau dieses Gerätes entspricht Schutzklasse III. Verwenden Sie immer einen geeigneten Transformator. Überprüfen Sie regelmäßig das Gerät, den Transformator und das Stromkabel. • Vergewissern Sie sich, dass die anzuschließende Netzspannung nicht höher ist als die Netzspannung beschrieben in dieser Bedienungsanleitung. • Achten Sie darauf, dass die Netzleitung nicht gequetscht oder durch scharfe Kanten beschädigt werden kann. Bei Beschädigungen soll eine Fachkraft das Kabel ersetzen. • Trennen Sie das Gerät bei Nichtbenutzung und vor jeder Reinigung vom Netz. Fassen Sie dazu den Netzstecker an der Grifffläche an und ziehen Sie nie an der Netzleitung. • Schließen Sie die Stromversorgung immer zuletzt an. • Bei Schäden verursacht durch eigenmächtige Änderungen erlischt der Garantieanspruch. • Halten Sie Kinder und Unbefugte vom Gerät fern. VDPC130_v3 35 VELLEMAN 3. Allgemeine Richtlinien • Dieses Gerät ist eine Lichtsteuerung für den professionellen Einsatz auf Bühnen, in Discotheken, Theatern, usw. Das VDPC130 ist zur Verwendung in Innenräumen und mit einer Wechselspannung von 230Vac/50Hz konzipiert worden. • Vermeiden Sie Erschütterungen. Vermeiden Sie rohe Gewalt während der Installation und Bedienung des Gerätes. • Achten Sie bei der Wahl des Installationsortes darauf, dass das Gerät keinem Staub, keiner Feuchtigkeit und extremen Temperaturen ausgesetzt wird. • Nehmen Sie das Gerät erst in Betrieb, nachdem Sie sich mit seinen Funktionen vertraut gemacht haben. Lassen Sie das Gerät nicht von Personen bedienen, die sich nicht mit dem Gerät auskennen. Meist ist die Beschädigung des Gerätes das Ergebnis von unfachmännischer Bedienung. • Verwenden Sie die Originalverpackung, wenn das Gerät transportiert werden soll. • Eigenmächtige Änderungen sind aus Sicherheitsgründen verboten. • Verwenden Sie das Gerät nur für Anwendungen in dieser Bedienungsanleitung beschrieben, sonst kann dies zu Schäden am Produkt führen und erlischt der Garantieanspruch. Jede andere Verwendung ist mit Gefahren wie Kurzschluss, Brandwunden, elektrischem Schlag, Lampenexplosion, usw. verbunden. Bei unsachgemäßem Gebrauch erlischt der Garantieanspruch. 4. Beschreibung a. Frontplatte (Siehe Abb. 1) 1. 2. 3. 4. SCANNER Auswahltasten: Wählen Sie den gewünschten Scheinwerfer. SCANNER Anzeige-LEDs SZENEN-Auswahltasten: Wählen Sie die gewünschte Szene. KANAL-Blendregler: regeln Sie die DMX-Werte. Kanäle 1 ~ 8 können geregelt werden wenn Sie die entsprechende Scannertaste drücken. Kanäle 9 ~ 16 können geregelt werden, indem Sie die Seitenauswahltasten drücken. 5. NEBELMASCHINETASTE: aktiviert die Nebelmaschine. 6. HEIZUNGSANZEIGE Nebelmaschine 7. 'FERTIG'-ANZEIGE Nebelmaschine 8. SEITE A-Anzeige 9. SEITE B-Anzeige-LED 10. SEITENAUSWAHLTASTE: Im manuellen Modus, drücken Sie diese Taste um Kanäle 1 ~ 8 (Seite A) oder Kanäle 9 ~ 16 (Seite B) oder beide Seiten mit dem Blendregler zu steuern. 11. PROGRAMM-Taste 12. 'MUSIC/ BANK COPY'-Taste: Drücken Sie diese Taste um das Gerät auf musikgesteuerten Modus einzustellen. 13. DISPLAY 14. MODUS-AnzeigeLEDs 15. BANK UP-Taste 16. BANK DOWN-Taste 17. TAP DISPLAY-Taste 18. BLACKOUT-Taste: Verdunkelt die Lichtausbeute von allen angeschlossenen Scheinwerfern über den Shutter. 19. MIDI / REC-Taste 20. ASSIGN LED 21. AUTO/DEL-Taste 22. CHASER-Taste (Chaser 1 ~ Chaser 6) 23. GESCHWINDIGKEITSBLENDREGLER 24. FADE TIME Blendregler 25. FINE-Taste 26. PILE UP / CHASE LED VDPC130_v3 36 VELLEMAN 27A. SCHWENKRAD 27B. NEIGUNGSRAD 28. MODE-Taste b. Rückplatte (Siehe Abb. 2) 29. AUDIO-Eingang 30. MIDI-Eingang 31. DMX-POLARITÄTSWAHLSCHALTER 32. DMX-Ausgang 33. DMX-Eingang 34. NEBELMASCHINENANSCHLUSS 35. DC-EINGANG 36. EIN/AUS-SCHALTER 5. Konfiguration a. Gerät installieren Stellen Sie das Gerät auf eine stabile, flache Oberfläche oder montieren Sie es in einem Rack. Dieses Gerät kann in einem 19” Rack montiert werden. Achten Sie darauf, dass Sie einen Rack mit doppelter Tür verwenden, damit sowohl die Frontplatte als auch die Rückplatte geöffnet werden kann. Der Rack muss mit einem Lüfter ausgestattet sein. Wenn Sie das Gerät im Rack montieren, achten Sie darauf, dass es genügend Freiraum um das Gerät gibt, damit heiße Luft austreten kann. Ständige Überhitzung wird das Gerät beschädigen. Befestigen Sie das DMX-Steuergerät am Rack mit 4 x M6-Schrauben. Schließen Sie das Netzgerät an den DC-Eingang (35) des Gerätes an. Stecken Sie das Netzgerät in eine Steckdose. b. Musiksteuerung Musiksteuerung funktioniert über das eingebaute Mikrofon oder über den LINE IN-Anschluss. Verbinden Sie das Tonsignal eines Mischpultes (z.B. MASTER 2) mit dem AUDIO-Eingangsanschluss (29) auf der Rückplatte. c. DMX512-Anschluss Verwenden Sie nur ein abgeschirmtes Kabel und 3-polige XLR-Anschlüsse um das Steuergerät mit einer Vorrichtung oder eine Vorrichtung mit einer anderen zu verbinden. d. XLR-Belegung Regeln Sie die XLR-Polarität über den DMX-POLARITÄT-Schalter (31). e. DMX-512-Kette mit Abschlusswiderstand Ein DMX-Abschlusswiderstand ist empfehlenswert für Installationen, bei denen das DMXKabel lang ist oder in einer Umgebung mit vielem elektrischem Rauschen (z.B. Discos). Der Abschlusswiderstand verhindert Störung des digitalen Steuersignals durch elektrisches Rauschen. Der DMX-Abschlusswiderstand ist nur eine XLR-Buchse mit einem 120Ω Widerstand zwischen 2 und 3, die den XLR-Ausgang des letzten Geräts in der Kette angeschlossen wird. Siehe Abbildung. VDPC130_v3 37 VELLEMAN f. Scheinwerferadressierung Scheinwerfer 1 2 3 4 Startadresse 1 21 41 61 Scheinwerfer 5 6 7 8 Startadresse 81 101 121 141 Scheinwerfer 9 10 11 12 Startadresse 161 181 201 221 Die DMX-Adresse sollte alle 16 Kanäle zugewiesen werden. Weisen Sie jedem Projektor die entsprechende Startadresse zu, sonst wird die Kanalzuweisung nicht korrekt sein. Scheinwerfer mit derselben Adresse werden synchron funktionieren. g. Kanaleinstellung Dieses Gerät kann bis zu 12 x 16-Kanal-Scanner steuern. Die ersten 8 Kanäle jedes Scanners können über 8 Blendregler gesteuert werden. Die nächsten 8 Kanäle werden über die 8 Blendregler und die SEITENAUSWAHLTASTE (10) auf Seite B gesteuert. Wenn der Scanner über 160 Kanäle hat, stellen Sie die Kanäle wie folgt ein. • • • • • Drücken Sie die PROGRAMM-Taste (11) bis die LEDs blinken. Drücken Sie FINE (25) und MODE (28) zur gleichen Zeit bis die ASSIGN LED (20) aufleuchtet. Wählen Sie Ihren Scanner, indem Sie die entsprechende SCANNER-Taste drücken (1). Regeln Sie den GESCHWINDIGKEITSBLENDREGLER (23) um den Scannerkanal (z.B. Kanal 9 oder 10). Regeln Sie den FADE TIME-Blendregler (24) um den entsprechenden Steuerkanal des Steuergerätes zu selektieren (z.B. SCHWENK- (27A) oder NEIGUNGSRAD (27B)). • Um Kanäle 19 und 20 einzustellen, drücken Sie die SEITENAISWAHLTASTE (10). Die SEITE B Anzeige-LED (9) wird aufleuchten. Wiederholen Sie die zwei vorigen Schritte. Beispiel: Stellen Sie den GESCHWINDIGKEITSBLENDREGLER (23) auf Kanal 9 und den TIME-Blendregler (24) auf X. Das bedeutet, dass der 9. Kanal des Scanners über das SCHWENKRAD (27A) gesteuert werden wird. h. FADE-ZEIT Mit dieser Funktion können Sie bestimmen, ob die Fade-Zeit der Schwenk-/Neigebewegung oder allen DMX-Kanälen zugewiesen werden sollte. Das ist praktisch wenn die Spiegel- oder Scheinwerferbewegung sehr langsam ausgeführt werden muss, aber die Goboräder und die Farben schnell gewechselt werden müssen. • Schalten Sie das Gerät aus. • Halten Sie gleichzeitig die MODUS- (28) und TAP DISPLAY-Tasten (17) gedrückt. • Schalten Sie das Gerät ein. Drücken Sie die TAP / DISPLAY-Taste (17) um zwischen den zwei Modi zu wechseln (ALL CH für alle Kanäle und ONLY X/Y für nur Schwenk-/Neigebewegung). • Drücken Sie gleichzeitig MODUS (28) und TAP / DISPLAY (17) um Ihre Einstellungen zu speichern. Alle LEDs auf dem Bedienfeld werden blinken wenn die Einstellungen gespeichert sind. 6. Bedienung a. Manueller Modus Um den manuellen Modus zu selektieren, drücken Sie die AUTO / DEL-Taste (21) bis die MANUAL LED (14) aufleuchtet. VDPC130_v3 38 VELLEMAN Im manuellen Modus können Sie die angeschlossenen Scanner manuell abrufen und sie über die Blendregler Fader steuern. Beachten Sie, dass die Einstellungen nicht gespeichert werden können. Wählen Sie den gewünschten Scanner mit der entsprechenden SCANNER-Taste (1). Regeln Sie die gewünschte Funktion über die Blendregler. • Eine BANK / SZENE überprüfen Wählen Sie die gewünschte Bank mit den BANK-Tasten (16 und 17). Wählen Sie die gewünschte Szene mit den entsprechenden SZENEN-Tasten (3). • CHASER überprüfen Wählen Sie den gewünschten Chaser mit den CHASER-Tasten (22). Drücken Sie TAP / DELAY (17). Das Display wird die Schritte im Chaser zeigen. Drücken Sie die BANK –Tasten (16 und 17) um jede Szene zu sehen. • Die SEITENAUSWAHLTASTE (10) Verwenden Sie diese Taste um die Blendregler (4) von CH1 ~ 8 (Seite A LED brennt) bis CH9 ~ 16 (Seite B LED brennt) oder die beiden (die beiden LEDs brennen), zu wählen. • Die DISPLAY-Taste (17) Verwenden Sie diese Taste um das Display von einem DMX-Wert (0 ~ 255) auf einen Prozentsatz umzuwandeln. (0 ~ 100%). b. Programmierung Eine Bank ist eine Sequenz verschiedener Szenen, die die eine nach der anderen abgerufen werden. Mit dem VDPC130, können Sie bis zu 30 verschiedene Speicherbanken programmieren, jede Speicherbank enthält bis zu 8 Szenen. • Einem Kanal ein Rad zuweisen o Wählen Sie den Kanal. o Drücken Sie MIDI / REC (19) zum Bestätigen. • Eine Szene programmieren o Halten Sie die PROGRAMM-Taste 2 Sekunden gedrückt (11) um den Programmiermodus zu öffnen. Die Programm-LED wird blinken. o Wählen Sie den gewünschten Scanner mit den SCANNER-Auswahltasten (1). o Regeln Sie die Einstellungen (der Wert wird auf dem Schirm gezeigt), verwenden Sie die entsprechenden KANALBLENDREGLER (4). o Drücken Sie MIDI / REC (19) um den Speichermodus vorzubereiten. o Wählen Sie die gewünschte Speicherbank (01 ~ 30), die über die BANK-Tasten (15 und 16) gespeichert werden. o Drücken Sie eine der SZENENTASTEN(3) um die Daten zu speichern. Alle LEDs werden blinken, als Anzeige, dass die Daten gespeichert sind. o Wählen Sie den nächsten Scanner mit den SCANNERAUSWAHLTASTEN (1) und wiederholen Sie die oben erwähnten Schritte bis das Programmieren beendet ist oder die Maximalanzahl Schritte (8) erreicht wurde. o Halten Sie die PROGRAMM-Taste (11) gedrückt um den Programmiermodus zu verlassen. • Ein Programm laufen lassen o Drücken Sie die BANK-Tasten (15 & 16) und wählen Sie die gewünschte Speicherbank. o Drücken Sie die AUTO / DEL-Taste (21). Die Auto LED wird aufleuchten. o Regeln Sie die Geschwindigkeit mit dem GESCHWINDIGKEITSBLENDREGLER (23) und die Wiederholdungsrate mit dem FADE TIME-Blendregler (24). VDPC130_v3 39 VELLEMAN o Sie können auch die Geschwindigkeit bestimmen, indem Sie die TAP-Taste (17) zweimal drücken. Das Zeitintervall zwischen zwei Tastendrücke bestimmt die Geschwindigkeit (bis zu 10 Minuten). • Ein Programm überprüfen o Halten Sie die PROGRAMM-Taste (11) und wählen Sie die gewünschte Speicherbank mit den BANK-Tasten (15 und 16). o Überprüfen Sie jede Szene individuell, indem Sie SZENEN-Taste (3) drücken. • Ein Programm bearbeiten o o o o o o o Wenn Programme bearbeitet werden müssen, ist es notwendig, dass Sie eine Szene manuell ändern. Halten Sie die PROGRAMM-Taste gedrückt (11) um den Programmiermodus zu ändern. Wählen Sie das zu bearbeitende Programm mit den BANK-Tasten (15 und 16). Wählen Sie den gewünschten Scanner mit den SCANNER-Tasten (1). Regeln Sie die gewünschten Einstellungen mit den entsprechenden CHANNEL-Blendreglern (4). Drücken Sie die MIDI / REC-Taste (19) um das Speichern vorzubereiten. Wählen Sie die gewünschte Szene mit der SZENEN-Taste (3) und speichern Sie. • Ein Programm kopieren o o o o o Halten Sie die PROGRAMM-Taste (11) gedrückt um den Programmiermodus zu öffnen. Wählen Sie die gewünschte Speicherbank mit den BANK-Tasten (15 und 16). Drücken Sie die MIDI / REC-Taste (19) zur Kopier-Vorbereitung. Wählen Sie die Ziel-Speicherbank mit den BANK-Tasten (15 und 16). Drücken Sie die MUSIC / BANK COPY-Taste (12) um die Speicherbank zu kopieren. Alle LEDs auf dem Bedienfeld werden blinken. c. Der Chaser Ein Chaser ist eine Sequenz verschiedener Speicherbanken, die die eine nach der anderen abgerufen werden. Mit diesem VDPC130, können Sie bis zu 6 verschiedene Chasers mit jeweils bis zu 240 Szenen programmieren. • Einen Chaser programmieren o o o o o o Halten Sie die PROGRAMM-Taste (11) gedrückt um den Programmiermodus zu öffnen. Wählen Sie den gewünschten Chaser mit den CHASER-Tasten (22). Wählen Sie das gewünschte Programm mit den BANK-Tasten (15 und 16). Wählen Sie die gewünschte Szene mit den SZENEN-Tasten (3). Drücken Sie die MIDI / REC-Taste (19). Programmieren Sie den nächsten Schritt bis der Chaser fertig ist oder die Maximalanzahl Szenen (240) erreicht wurde. • Einen Chaser ablaufen lassen o Drücken Sie die entsprechenden CHASER-Tasten (22) und drücken Sie AUTO / DEL (21). Regeln Sie die Chasergeschwindigkeit, indem Sie die TAP-Taste (17) zweimal drücken. Das Zeitintervall zwischen zwei Tastendrücken bestimmt die Geschwindigkeit (bis zu 10 Minuten). o Drücken Sie die MIDI / REC-Taste (19) und wählen Sie die gewünschte Aufnahme mit den SCANNERAuswahltasten (1). VDPC130_v3 40 VELLEMAN • Einen Chaser überprüfen o Halten Sie die PROGRAMM-Taste (11) gedrückt und wählen Sie den gewünschten Chaser mit den CHASERTasten (22). o Drücken Sie DISPLAY-Taste um das Display auf 'Schrittmodus' umzuschalten. Überprüfen Sie jede Szene individuell, indem Sie die entsprechende BANK-Taste drücken (15 und 16). • Einen Chaser bearbeiten o Eine Speicherbank nach einem Chaser kopieren Drücken Sie die PROGRAMM-Taste (11) um den Programmiermodus zu öffnen. Wählen Sie den gewünschten Chaser mit den CHASER-Tasten (22). Die entsprechenden LEDs werden brennen. Wählen Sie die zu kopierende Speicherbank mit den BANK-Tasten (15 und 16). Drücken Sie die MUSIC / BANK COPY-Taste (12) um das Kopieren vorzubereiten. Drücken Sie die MIDI / REC-Taste (19) um die Bank zu kopieren. All LEDs werden blinken. o Eine Szene nach einem Chaser kopieren Drücken Sie die PROGRAMM-Taste (11) um den Programmiermodus zu öffnen. Wählen Sie den gewünschten Chaser mit den CHASER-Tasten (22). Die entsprechenden LEDs werden brennen. Wählen Sie die zu kopierende Speicherbank mit den BANK-Tasten (15 und 16). Wählen Sie die zu kopierende Szene mit den SZENEN-Tasten (3). Drücken Sie die MIDI / REC-Taste (19) um die Bank zu kopieren. Alle LEDs werden blinken. o Eine Szene in einen Chaser einfügen Drücken Sie die PROGRAMM-Taste (11) um den Programmiermodus zu öffnen. Wählen Sie den gewünschten Chaser, in den Sie die Szene einfügen werden, mit den CHASER-Tasten (22). Die entsprechenden LEDs werden aufleuchten. Drücken Sie TAP / DISPLAY (17) um auf den Schritt-Modus umzuschalten. Wählen Sie eine Szene wo die neue Szene eingefügt werden soll, mit den BANK-Tasten (15 und 16). Jetzt wird das Display die Szene zeigen. Wenn Sie eine Szene zwischen Szenen 5 und 6 einfügen wollen, drücken Sie die BANK UP / DOWN-Taste (15 oder 16) bis das Display STEP05 zeigt. Drücken Sie die MIDI / REC-Taste (19) um die Einfügung vorzubereiten. Das Display zeigt die nächste Szene. Wählen Sie die Speicherbank wo Sie die Szene einfügen wollen mit den BANK-Tasten (15 und 16). Wählen Sie die einzufügende Szene mit den SZENEN-Tasten (3). Drücken Sie die MIDI / REC-Taste (19) um die Szene einzufügen. Alle LEDs auf dem Bedienfeld werden blinken. o Eine Szene in einem Chaser löschen Drücken Sie die PROGRAMM-Taste (11) um den Programmiermodus zu öffnen. Wählen Sie den Chaser, in dem die Szene gelöscht werden wird, mit den CHASER-Tasten (22). Drücken Sie die TAP / DISPLAY-Taste (17) um auf den Schritt-Modus umzuschalten. Wählen Sie die zu löschende Szene mit den BANK-Tasten (15 und 16). Drücken Sie die AUTO / DEL-Taste (21) um die Szene zu löschen. Alle LEDs auf dem Bedienfeld werden blinken. VDPC130_v3 41 VELLEMAN • Einen Chaser löschen o Halten Sie die PROGRAMM-Taste gedrückt (11) um den Programmiermodus zu öffnen. o Wählen Sie den gewünschten Chaser mit den CHASER-Auswahltasten (22). o Halten Sie die AUTO / DEL-Taste (21) und die entsprechende CHASER-Taste (22) gedrückt um den Chaser zu löschen. Alle LEDs werden blinken. • Alle Chasers löschen VORSICHT: Wenn Sie diese Funktion selektieren, werden Sie alle Chaser unwiderruflich verlieren. Die individuellen Szenen und Programme werden erhalten bleiben. o Schalten Sie das Gerät aus. o Halten Sie die BANK DOWN-Taste (16) und die AUTO / DEL-Taste (21) gedrückt während Sie das Gerät einschalten. Alle LEDs auf dem Bedienfeld werden blinken. d. Szenen • Eine Szene einfügen o Halten Sie die PROGRAMM-Taste gedrückt (11) um den Programmiermodus zu öffnen. o Wählen Sie den gewünschten Chaser mit den CHASER-Tasten (22). Die entsprechende LED wird aufleuchten. o Drücken Sie die TAP / DISPLAY-Taste (17) um auf den Schrittmodus umzuschalten. Das Display wird die Szenen im Chaser zeigen. o Wählen Sie die Szene wo die neue Szene eingefügt werden soll mit den BANK-Tasten (15 und 16). Wenn Sie eine Szene zwischen Szene 5 und 6 einfügen wollen, drücken BANK UP / DOWN (15 oder 16) bis das Display STEP05 zeigt. o Drücken Sie die MIDI / REC-Taste (19) um die Einfügung vorzubereiten. Das Display zeigt die nächste Szene. o Wählen Sie die Speicherbank wo die Szene eingefügt werden soll, mit den BANK-Tasten (15 und 16). o Wählen Sie die einzufügende Szene mit den SZENEN-Tasten (3). o Drücken Sie die MIDI / REC-Taste (19) um die Szene einzufügen. Alle LEDs auf dem Bedienfeld werden blinken. • Eine Szene kopieren o o o o o o Halten Sie die PROGRAMM-Taste gedrückt (11) um den Programmiermodus zu öffnen. Wählen Sie die Speicherbank, nach der die Szene kopiert werden wird, mit den BANK-Tasten (15 und 16). Wählen Sie die zu kopierende Szene mit den SZENEN-Tasten (3). Drücken Sie die MIDI / REC-Taste (19) um das Kopieren vorzubereiten. Wählen Sie die Speicherbank, nach der Sie die Szene kopieren wollen, mit den BANK-Tasten (15 und 16). Drücken Sie die gewünschte SZENEN-Taste (3). Alle LEDs auf dem Bedienfeld werden blinken. • Eine Szene löschen o o o o o o Halten Sie die PROGRAMM-Taste gedrückt (11) um den Programmiermodus zu öffnen. Wählen Sie die Speicherbank mit der zu löschenden Szene mit den BANK-Tasten (15 und 16). Halten Sie die AUTO / DEL-Taste gedrückt (21). Wählen Sie den gewünschten CHASER mit den Auswahltasten (21). Drücken Sie die SZENE-Taste (3), die mit der zu löschenden Szene übereinstimmt. Die Szene ist gelöscht worden. Alle LEDs auf dem Bedienfeld werden blinken. All 240 DMX-Kanäle der gelöschten Szenen werden auf 0 eingestellt. VDPC130_v3 42 VELLEMAN • Alle Szenen löschen. VORSICHT: Wenn Sie diese Funktion wählen, werden alle programmierten Szenen unwiderruflich verloren gehen. o Halten Sie die PROGRAMM-Taste (11) und die BANK DOWN-Taste (16) gedrückt während Sie das Gerät vom Netz trennen. o Schließen Sie das Gerät wieder an das Netz an. e. Musikgesteuerter Modus o Drücken Sie die MUSIC / BANK COPY-Taste (12). Die LED wird aufleuchten. Wenn das Gerät ein Tonsignal empfängt, wird das Gerät in musikgesteuertem Modus funktionieren. o Wählen Sie die Bank, die musikgesteuert werden soll, mit den BANK-Tasten (15 und 16). o Sie können die Fadezeit mit dem FADE TIME-Blendregler bestimmen (24). o Drücken Sie eine CHASER-Taste (22). Der Chaser wird musikgesteuert werden. Sie können mehrere Chaser wählen und den einen nach dem anderen laufen lassen. o Regeln Sie die Fadezeit mit dem FADE TIME-Blendregler (24). f. Auto Modus o Um den automatischen Modus zu wählen, drücken Sie die AUTO / DEL-Taste 21) bis die LED aufleuchtet. o Wenn keine CHASER-Tasten (22) gedrückt werden, wird das Gerät automatisch eine Bank laufen lassen. Wählen Sie die gewünschte Bank mit den BANK-Tasten (15 und 16). o Drücken Sie eine CHASER-Taste (22). Das VDPC130 wird automatisch den Chaser laufen lassen. Sie können mehrere Chaser drücken und den einen nach dem anderen laufen lassen. o Sie können das Intervall zwischen den Szenen mit dem GESCHWINDIGKEITS-Blendregler (23) regeln und die Dauer mit dem FADE TIME-Blendregler bestimmen (24). g. MIDI o Drücken Sie 2 Sekunden die MIDI / REC-Taste (19). o Wählen Sie den geeigneten MIDI-Kanal (1 ~ 20) mit den BANK-Tasten (15 und 16). o Drücken Sie die nochmals MIDI / REC-Taste (19) um die Einstellung zu speichern und diesen Modus zu verlassen. 7. Wartung & Pflege 1. Verwendete Schrauben müssen fest angespannt werden und dürfen keine Rostspuren zeigen. 2. Sorgen Sie dafür, dass die Netzkabel nicht beschädigt sind. Lassen Sie das Gerät von einer Fachkraft installieren. 3. Trennen Sie das Gerät vom Netz ehe Sie mit den Servicearbeiten anfangen. 4. Verwenden Sie zur Reinigung ein feuchtes Tuch. Verwenden Sie auf keinen Fall Alkohol oder irgendwelche Lösungsmittel. 5. Es gibt keine wartbaren Teile außer der Lampe und der Sicherung. 6. Bestellen Sie eventuelle Ersatzteile bei Ihrem Fachhändler. 8. Technische Daten Stromversorgung Stromverbrauch DMX EIN/AUS MIDI-Eingang Abmessungen Gesamtgewicht 9-12VDC, 500mA max. 4W 3-polige(r) XLR Buchse/Stecker 5-poliger DIN-Anschluss 19” x 132 x 80mm 2.5kg Alle Änderungen vorbehalten. VDPC130_v3 43 VELLEMAN VDPC130 – 240 KANAŁOWY STEROWNIK DMX Z DWOMA POKRĘTŁAMI 1. Wstep. Przeznaczona dla mieszkańców Unii Europejskiej. Ważne informacje dotyczące środowiska. Ten symbol umieszczony na urządzeniu bądź opakowaniu wskazuje, że wyrzucenie produktu może być szkodliwe dla środowiska. Nie wyrzucaj urządzenia lub baterii do zbiorczego śmietnika, tylko do specjalnie przeznaczonych do tego pojemników na urządzenia elektroniczne lub skontaktuj się z firmą zajmującą się recyklingiem. Urządzenie możesz oddać dystrybutorowi lub firmie zajmującej się recyklingiem. Postępuj zgodnie z zasadami bezpieczeństwa dotyczącymi środowiska. Jeśli masz wątpliwości skontaktuj się z firmą zajmującą się utylizacją odpadów. Dziękujemy za wybór naszego produktu VDPC130! Zanim zdecydujecie się Państwo dostarczyć produkt do serwisu prosimy o uważne zapoznanie się z jego instrukcją obsługi. 2. Instrukcje bezpieczeństwa, środki ostrożności. Proszę zachować wszelką ostrożność podczas instalacji urządzenia. Bezpośrednie dotknięcie elementów będących pod napięciem grozi porażeniem wysokim napięciem. Chronić przed deszczem, wilgocią, oblaniem oraz innym kontaktem z cieczami. Przed otworzeniem obudowy odłączyć urządzenie z sieci energetycznej. • Wszelkie szkody spowodowane użytkowaniem niezgodnym z niniejszą instrukcją nie są objęte gwarancją, a sprzedawca nie ponosi za nie odpowiedzialności. • Montaż oraz naprawy powinny być przeprowadzone przez wykwalifikowany personel techniczny. • Nie włączać urządzenia, gdy było ono narażone na duże zmiany temperatury. Przed włączeniem należy odczekać, aż urządzenie osiągnie temperaturę otoczenia. • Wybieraj miejsca pracy wolne od wysokiej temperatury. • Urządzenie wykonane jest w III klasie ochrony. Urzadzenia zawsze są zasilane przez reduktor napiecia. Przeglądaj regularnie stan reduktora napiecia oraz przewodów zasilających • Upewnij się że dostępne napięcie sieci energetycznie nie przekracza napięcia podanego w specyfikacji technicznej urządzenia. • Nie wiąż przewodu zasilającego, chroń przewód przez ostrymi krawędziami mogącymi go uszkodzić. W razie konieczności jego wymiany zwróć się do swojego sprzedawcy. • Zawsze gdy nie używasz urządzenia lub będą przeprowadzane czynności konserwacyjne, wyłącz je z sieci energetycznej. Wyciągaj przewód chwytając za jego wtyczkę sieciową. • Always plug in the power unit last. • Wszelkie szkody powstałe na skutek samodzielnej modyfikacji przez użytkownika nie są objęte gwarancją. • Chronić przed dziećmi oraz użytkownikami nieautoryzowanymi. 3. Wskazówki ogólne. • Urządzenie zaprojektowane jest do profesjonalnego użytkowania na scenie, w dyskotekach, teatrach itp. VDPC130 powinien być używany tylko w pomieszczeniach, napięcie zasilania wynosi max. 230VAC / 50Hz. • Chroń to urządzenie przed wstrząsami i uderzeniami, zwłaszcza w trakcie użytkowania. Nie potrząsaj urządzeniem, unikaj dużej siły podczas instalacji i obsługi urządzenia. • Wybieraj miejsca pracy wolne od wysokiej temperatury, dużego zapylenia oraz wilgotności. • Zapoznaj się z instrukcją obsługi zanim rozpoczniesz pracę z urządzeniem. Nie dopuszczaj do obsługi urządzenia osób niewykwalifikowanych. Wiele szkód urządzenia wynika z nieprofesjonalnego i niezgodnego z przeznaczeniem użytkowaniem produktu. • Do transportu używaj tylko oryginalnego opakowania. VDPC130_v3 44 VELLEMAN • Wszelkie szkody powstałe na skutek samodzielnej modyfikacji przez użytkownika nie są objęte gwarancją. • Używaj urządzenia tylko i wyłącznie zgodnie z jego przeznaczeniem. Wszystkie inne sposoby użytkowania mogą prowadzić do spięć elektrycznych, a co za tym idzie do pożarów, porażeń elektrycznych itd. Nie stosowanie się do tych zasad lub korzystanie z urządzenia niezgodnie z powyższymi postanowieniami spowoduje utratę gwarancji. 4. Opis produktu. a. Panel przedni (rysunek 1). 27. SCANNER - sekcja przycisków, przy pomocy których możesz wybrać projektor, skaner e.t.c. 28. SCANNER - diody LED sygnalizujące wybrany skaner. 29. SCENE - sekcja przycisków, przy pomocy których możesz wybrać scenę. 30. CHANNEL - Suwaki wykorzystywane są do kontroli intensywności kanałów od 1 do 8 albo od 9 do 16 podczas programowania skanerów lub innych urządzeń. Kanały 1 ~ 8 są dostępne natychmiast. Kanały 9 ~ 16 dostępne po wyborze przyciskiem Page Select Button. 31. FOG MACHINE - przycisk kontroli pracy wytwornicy dymu. 32. FOG MACHINE - dioda LED sygnalizująca prace grzałki wytwornicy. 33. FOG MACHINE - dioda LED sygnalizująca gotowość do pracy wytwornicy dymu. 34. PAGE A - dioda LED sygnalizująca aktywność kanałów 1 ~ 8. 35. PAGE B - dioda LED sygnalizująca aktywność kanałów 9 ~ 16. 36. PAGE SELECT- Przycisk wyboru kontroli kanałów 1 ~ 8 (Page A) lub 9 ~ 16 (Page B). 37. PROGRAM - przycisk do wejścia w tryb programowania. 38. MUSIC / BANK COPY - przycisk do wejścia w tryb kontroli pracy sterownika dżwiękiem. 39. DISPLAY - wyświetlacz 40. MODE - diodowy wskaźnik LED trybu pracy kontrolera. 41. BANK UP - przyciski wyboru w górę banku pamięci. 42. BANK DOWN - przyciski wyboru w dół banku pamięci. 43. TAP DISPLAY - przycisk ustawiania szybkości prędkości scen. 44. BLACKOUT - przycisk szybkiego zaciemniania skanerów. 45. MIDI / REC - przycisk. 46. ASSIGN LED - dioda LED. 47. AUTO / DEL - przycisk aktywowania trybu AUTO. 48. CHASER - sekcja przycisków, przy pomocy których możesz wybrać sekwencje scen.(chaser 1 ~ chaser 6) 49. SPEED fader - suwak wykorzystywany do kontroli czasu trwania sceny. 50. FADE TIME fader - suwak wykorzystywany do kontroli czasu przejścia jednej sceny w następną 51. FINE - przełącznik włączania precyzyjnej regulacji pokręteł. 52. PILE UP / CHASE LED 27A. PAN - pokrętło panoramy. 27B. TILT - pokrętło kąta pochylenia. 28. MODE - przycisk trybu pracy. VDPC130_v3 45 VELLEMAN b. Panel tylni (rysunek 2). 37. AUDIO wejście audio. 38. MIDI IN - wejście MIDI. 39. DMX POLARITY – przełącznik wyboru polaryzacji sygnału DMX. 40. DMX OUT - gniazdo wyjściowe sygnału DMX. 41. DMX IN - gniazdo wejściowe sygnału DMX. 42. FOG MACHINE – gniazdo wyjściowe sterowania wytwornicą dymu. 43. DC INPUT – gniazdo zasilania sterownika. 44. POWER ON / OFF – włącznik zasilania sterownika. 5. Ustawienia. a. Montaż urządzenia. Kontroler przystosowany jest do montażu na pulpicie lub w szafie rackowej systemu 19”. Szafa powinna być wyposażona w tylne i przedni drzwi, a jej przestrzeń powinna by wentylowana. Zachowaj wokół sterownika odpowiednia ilośc miejsca, tak aby był możliwy swobodny przepływ powietrza. Nadmierna temperatura może spowodować przegrzanie urządzenia i jego uszkodzenie. Sterownik zamocuj przy pomocy śrub 4 x M6. W pierwszej kolejności podłącz wtyczke zasilającą DC (35) do kontrolera, a następnie do sieci energetycznej. b. Tryb pracy sterowany dźwiękiem - Sound Control Sterownik może być sterowany dźwiękiem przez wewnątrz wbudowany mikrofon lub przez wejście audio LINE IN (29) typu LINE, który znajduje się na panelu tylnym. Możesz podłączyć sygnał z wyjścia miksera np. MASTER 2. c. Podłączenie gniazd DMX512. Używaj tylko przewodów ekranowanych zakończonych złączami XLR 3-pin z zatrzaskami. d. Konfigurowanie podłączenia gniazd DMX. Wybierz właściwą polaryzację sygnału DMX przy pomocy włącznika DMX POLARITY (31). e. DMX512 Chain with Termination Zaleca się stosowanie terminatora w instalacjach rozległych, które są narażone na silne zakłócenia sygnału sterującego DMX ( dyskoteki). Terminator zapobiega uszkodzeniu lub utracie sygnału sterującego DMX. Budwa terminatora DMX jest bardzo prosta. Wystarczy pomiędzy nóżki 2 i 3 wlutowac rezystor 120Ω we wtyczce żeńskiej XLR. Terminator podłącza się do ostatniego urządzenia w sieci DMX. Patrz na rysunek. VDPC130_v3 46 VELLEMAN f. Projector Addressing Projektor 1 2 3 4 Adres początkowy 1 21 41 61 Adres początkowy 81 101 121 141 Projektor 5 6 7 8 Projektor 9 10 11 12 Adres początkowy 161 181 201 221 Należy prawidłowo przypisać urządzeniom adresy startowe DMX. Proszę posłużyć się powyższą tabelą i odczytać właściwe adresy. Źle dobrany adres będzie przyczyną niewłasciwą pracą urządzenia lub brakiem nad nim kontroli. Adres startowy DMX należy przypisać co 16 kanałów. Projektory / skanery o tym samym adresie startowym DMX będa pracowały pracy synchronicznie g. Ustawianie kanałów. Kontroler DMX może sterować do 12 urządzeń każde po 16 kanałów. Pierwsze 8 kanałów jest sterowanych przez 8 regulatorów CHANEL faders (4) będących w zakresie Page A. Aby sterować kanałami 9 ~ 16 należy przełączyć zakres regulatorów na Page B przełącznikiem PAGE SELECT (10). Jeżeli skaner oferuje wiecej niż 16 kanałów ustaw kanały w następujący sposób: • • • • • • Wciśnij i przytrzymaj przycisk PROGRAM (11) dopóki diody LED zaczną pulsować. Wciśnij jednocześnie przyciski FINE (25) oraz MODE (28) dopóki dioda się zaświeci. Wybierz właściwy skaner jednym z przycisków SCANNER (1). Suwakiem SPEED (23) wybierz kanał skanera (np. 9 lub 10 kanał). Suwakiem FADE TIME (24) wybierz odpowiedni kanał kontrolera (np. pokrętło PAN (27A) lub TILT (27B)). Aby ustawić kanał 19 i 20, naciśnij przycisk wyboru stron PAGE SELECT (10). Dioda LED PAGE B (9) zaświeci. Powtórz dwa poprzednie kroki. Przykład: Ustaw suwakiem SPEED (23) kanał 9 oraz FADE TIME (24) kanał X. Oznacza to, że kanał 9 skanera będzie kontrolowany przez pokrętło PAN (27A). h. Ustawianie czasu przejścia FADE TIME. Dzięki tej funkcji możesz określić, czy czas przejścia powinien być przypisany do ruchów PAN / TILT lub do wszystkich kanałów DMX. Jest to przydatne, gdy lustro lub przenoszenia ruchu głowy skanera powinno być prowadzone powoli, ale dla gobo i kolorów należy szybko zmienić. • Wyłącz zasilanie sterownika. • Jednocześnie wciśnij i przytrzymaj przyciski MODE (28) oraz TAP DISPLAY (17). • Włącz urządzenie. Naciśnij przycisk TAP / DISPLAY (17) będziesz się przełączał pomiedzy trybami pracy (ALL CH dla wszystkich kanałów i ONLY X/Y tylko ruchy PAN / TILT). • Aby zapamiętać ustawione parametry jednocześnie wciśnij i przytrzymaj przyciski MODE (28) oraz TAP DISPLAY (17). Przyjęcie danych zostanie zasygnalizowane pulsowaniem diod LED. 6. Działanie. a. Tryb ręczny MANUAL MODE. Aby wybrać ręczny tryb pracy wciśnij przycisk AUTO / DEL (21) dopóki się nie zaświeci dioda MANUAL LED (14). VDPC130_v3 47 VELLEMAN W trybie ręcznym możesz sterować poszczególnymi skanerami sterując nimi za pomocą suwaków SCENE (4). Pamietaj, że ustawienia nie zostaną zapamiętane. Wybierz właściwy skaner jednym z przycisków SCANNER (1). Regulujj wybrane przez siebie funkcje suwakami CHANNEL (4). • Odtwarzanie BANK / SCENE. Za pomocą przycisków wyboru banku BANK UP (15) /BANK DOWN (16) wybierz bank, który chcesz odtworzyć, a nastepnie wybierz właściwą scenę jednym z przycisków SCEANE (3). • Odtwarzanie sekwencji scen CHASER. Wybierz właściwą sekwencje scen jednym z przycisków CHASER (22). Naciśnij przycisk TAP / DISPLAY (17). Wyświetlacz pokaże numer kroku. Za pomocą przycisków wyboru banku BANK UP (15) /BANK DOWN (16) możesz wybrac i obejrzeć każdą scenę. • Przycisk wyboru grupy suwaków PAGE SELECT (10). Tym przyciskiem możesz wybrać grupę suwaków ustawinia parametrów kanałów CHANEL (4). Przycisk wyboru kontroli kanałów PAGE SELECT (10) 1 ~ 8 (Page A), świeci się dioda LED PAGE A lub 9 ~ 16 (Page B) , świeci się dioda LED PAGE B.lub jednoczesnie kanały 1 ~ 16 świecą się diody LED PAGE A i PAGE B • Przycisk DISPLAY (17). Naciskając ten przycisk możesz wybrać sposób wyświetlania wartości poziomów suwaków pomiędzy 0 - 255 lub 0% - 100%. b. Programowanie. Bank jest ciągiem scen, które są w nim zapamiętane, które można kolejno odtworzyć. W kontrolerze DMX VDPC130, można zapamiętać do 30 banków po 8 scen w każdym. • Przypisanie pokrętła do kanału. o Wybierz kanał. o Aby zapamiętać wybór naciśnij przycisk MIDI / REC (19). • Programowanie sceny. o Wejdź w tryb programowania przez naciśniecie i przytrzymanie przycisku PROGRAM (11) przez 2 sekundy, dopóki nie zacznie pulsować dioda PROGRAM LED. o Wybierz właściwy skaner jednym z przycisków SCANNER (1). o Suwakami kanałów FADERS (4) ustawiamy wymagane poziomy parametrów wybranego skanera.Regulowane wartości będą wyświetlane na wyświetlaczu. o Aby przygotować dane do zapisu wciśnij przycisk MIDI / REC (19). o Za pomocą przycisków wyboru banku BANK UP (15) /BANK DOWN (16) wybierz bank, w którym chcesz zapisać scenę. o Wybierz właściwą scenę jednym z przycisków SCENE (3). Zapis danych zostanie potwierdzony pulsowaniem diod LED. o Wybierz właściwy skaner jednym z przycisków SCANNER (1). Wybierz koleny skaner jednym z przycisków SCANNER (1), który chcesz zaprogramować i powtórz powyższe kroki. W jednym banku możesz zapamiętać do 8 scen. o Aby wyjść z trybu programowania wciśnij ponownie i przytrzymaj przycisk PROGRAM (11). • Uruchamianie programu. o Za pomocą przycisków wyboru banku BANK UP (15) /BANK DOWN (16) wybierz bank, który chcesz odtworzyć. o Naciśnij przycisk AUTO / DEL (21). Dioda LED AUTO zaświeci się. VDPC130_v3 48 VELLEMAN o Przy pomocy suwaków SPEED fader (23) oraz FADE TIME fader (24) ustaw czas trwania i czas przejścia jednej sceny w drugą scenę. o Prędkośc odtwarzania scen można ustawić inna metodą. Aby ustawić prędkość odtwarzania naciśnij dwukrotne przycisk TAP (17). Odstęp czasowy pomiędzy naciśnięciami jest automatycznie przeliczany na szybkość działania programu (max. do 10 minut). Jeżeli naciśniesz więcej niż dwa razy przycisk TAP (17) to tylko czas pomiędzy ostatnimi naciśnięciami zostanie przeliczony. • Sprawdzanie programu. o Wejdź w tryb programowania przez naciśniecie i przytrzymanie przycisku PROGRAM (11) przez 2 sekundy dopóki nie zacznie pulsować dioda PROGRAM LED, a nastepnie za pomocą przycisków wyboru banku BANK UP (15) /BANK DOWN (16) wybierz bank, który chcesz sprawdzić. o Przy pomocy przycisków SCENE (3) wybierz sceny, które chcesz sprawdzić • Edycja programu. o Gdy zajdzie potrzeba edycji programu można to przeprowadzić tylko ręcznie. o Wejdź w tryb programowania przez naciśniecie i przytrzymanie przycisku PROGRAM (11) przez 2 sekundy dopóki nie zacznie pulsować dioda PROGRAM LED. o Przy pomocy przycisków wyboru banku BANK UP (15) /BANK DOWN (16) wybierz bank, który chcesz zaprogramować. o Wybierz właściwy skaner jednym z przycisków SCANNER (1). o Suwakami kanałów FADERS (4) ustawiamy wymagane poziomy parametrów wybranego skanera. o Aby przygotować dane do zapisu wciśnij przycisk MIDI / REC (19). o Zapamietaj nowe nastawy przez wybranie właściwej sceny jednym z przycisków SCENE (3). • Kopiowanie programu o Wejdź w tryb programowania przez naciśniecie i przytrzymanie przycisku PROGRAM (11) przez 2 sekundy dopóki nie zacznie pulsować dioda PROGRAM LED. o Przy pomocy przycisków wyboru banku BANK UP (15) /BANK DOWN (16) wybierz bank, który chcesz zaprogramować. o Aby przygotować dane do zapisu wciśnij przycisk MIDI / REC (19). o Przy pomocy przycisków wyboru banku BANK UP (15) /BANK DOWN (16) wybierz bank, który chcesz skopiować. o Aby przekopiować bank naciśnij przycisk MUSIC / BANK COPY (12). Wszystkie diody LED na panelu zaczną pulsować. c. Sekwencje scen CHSER. Sekwencja scen CHASER jest ciągiem scen, które są w niej zapamiętane, które można je kolejno odtworzyć. W kontrolerze DMX VDPC130, można zapamiętać do 240 scen w 6 pamięciach CHASERACH. • Programowanie sewkecji scen ( CHASER). o Wejdź w tryb programowania przez naciśniecie i przytrzymanie przycisku PROGRAM (11) przez 2 sekundy dopóki nie zacznie pulsować dioda PROGRAM LED. o Wybierz przyciskiem numer właściwej sekwencji sceny CHASER (22). o Przy pomocy przycisków wyboru banku BANK UP (15) /BANK DOWN (16) wybierz bank, który chcesz użyć. o Przy pomocy przycisków SCENE (3) wybierz sceny, które chcesz użyć. o Aby przygotować dane do zapisu wciśnij przycisk MIDI / REC (19). o Możesz zaprogramować kolejny krok sekwencji scen. Wybierz kolejna scenę, którę chcesz zaprogramować powtarzając trzy poprzednie kroki. Pamiętaj, że jedna sekwecja scen CHASER może pomieścić do 240 scen. o Aby wyjść z trybu programowania i zapamiętać sekwencje sen wciśnij i przytrzymaj przycisk PROGRAM (11). VDPC130_v3 49 VELLEMAN • Uruchamianie sewkecji scen ( CHASER). o Wybierz przyciskiem numer właściwej sekwencji sceny CHASER (22), a naciśnij przycisk AUTO / DEL (21). Ustaw prędkość odtwarzania nacikając dwukrotne przycisk TAP (17). Odstęp czasowy pomiędzy naciśnięciami jest automatycznie przeliczany na szybkość działania programu (max. do 10 minut). Jeżeli naciśniesz więcej niż dwa razy przycisk TAP (17) to tylko czas pomiędzy ostatnimi naciśnięciami zostanie przeliczony. o Naciśnij przycisk MIDI / REC (19), a następnie wybierz właściwy skaner jednym z przycisków SCANNER (1). • Sprawdzanie sewkecji scen ( CHASER). o Wejdź w tryb programowania przez naciśniecie i przytrzymanie przycisku PROGRAM (11) przez 2 sekundy, dopóki nie zacznie pulsować dioda PROGRAM LED, a nastepnie wybierz przyciskiem numer właściwej sekwencji sceny CHASER (22), którą chcesz sprawdzić. o Aby włączyć wyświetanie informacji na wyświetlaczu wciśnij przycisk DISPLAY (17). Używając przyciski wyboru banku BANK UP (15) /BANK DOWN (16) wybierz każdą kolejną scenę, którą chcesz obejrzeć. • Edycja sewkecji scen ( CHASER). o Kopiowanie banku do sewkecji scen chaser. Wejdź w tryb programowania przez naciśniecie i przytrzymanie przycisku PROGRAM (11) przez 2 sekundy dopóki nie zacznie pulsować dioda PROGRAM LED. Wybierz przyciskiem numer właściwej sekwencji sceny CHASER (22), do której chesz skopiować bank secen. Zaświeci się dioda LED z numerem sekwecji scen. Przy pomocy przycisków wyboru banku BANK UP (15) /BANK DOWN (16) wybierz bank, który chcesz skopiować. Aby przygotować dane do zapisu wciśnij przycisk MUSIC / BANK COPY (12). Aby skopiowac bank wciśnij przycisk MIDI / REC (19). Wszystkie diody LED na panelu zaświecą się. o Kopiowanie sceny do sewkecji scen chaser. Wejdź w tryb programowania przez naciśniecie i przytrzymanie przycisku PROGRAM (11) przez 2 sekundy dopóki nie zacznie pulsować dioda PROGRAM LED. Wybierz przyciskiem numer właściwej sekwencji sceny CHASER (22), do której chcesz skopiować scenę. Zaświeci się dioda LED z numerem sekwecji scen. Przy pomocy przycisków wyboru banku BANK UP (15) /BANK DOWN (16) wybierz bank, z którego chcesz skopiować scenę. Przy pomocy przycisków SCENE (3) wybierz scenę, którą chcesz skopiować. Aby skopiowac bank wciśnij przycisk MIDI / REC (19). Wszystkie diody LED na panelu zaświecą się. o Wstawianie sceny do sekwencji scen chaser. Wejdź w tryb programowania przez naciśniecie i przytrzymanie przycisku PROGRAM (11) przez 2 sekundy dopóki nie zacznie pulsować dioda PROGRAM LED. Wybierz przyciskiem numer właściwej sekwencji sceny CHASER (22), do której chesz wstawić scenę. Zaświeci się dioda LED z numerem sekwecji scen. Aby przełączyć się w tryb pracy krokowej naciśnij przyciak TAP / DISPLAY (17). Przy pomocy przycisków wyboru banku BANK UP (15) /BANK DOWN (16) wybierz miejsce gdzie ma być wstawiona scena.Wyświetlacz pokazuje numer sceny. Jeżeli chcesz wstawić nową scene pomiędzy 5 a 6 scene to przy pomocy przycisków wyboru banku BANK UP (15) /BANK DOWN (16) wybieraj kolejno sceny, aż na wyświetlaczu pojawi się STEP05. Wciśnij przycisk MIDI / REC (19), aby przygotować scene do wstawienia. Wyświetlacz wyświetli kolejny numer sceny. VDPC130_v3 50 VELLEMAN Przy pomocy przycisków wyboru banku BANK UP (15) /BANK DOWN (16) wybierz bank, w którym znajduje się scena do skopiownia. Przy pomocy przycisków SCENE (3) wybierz scenę, którą chcesz skopiować. Aby skopiowac bank wciśnij przycisk MIDI / REC (19). Wszystkie diody LED na panelu zaświecą się. o Usuwanie sceny z sekwencji scen chaser. Wejdź w tryb programowania przez naciśniecie i przytrzymanie przycisku PROGRAM (11) przez 2 sekundy dopóki nie zacznie pulsować dioda PROGRAM LED. Wybierz przyciskiem numer właściwej sekwencji sceny CHASER (22), z której chcesz usunąć scene. Aby przełączyć się w tryb pracy krokowej naciśnij przyciak TAP / DISPLAY (17). Przy pomocy przycisków wyboru banku BANK UP (15) /BANK DOWN (16) wybierz scenę, którą chcesz usunąć. Aby usunąc scene nacisnik przycisk AUTO / DEL (21). diody LED na panelu zaświecą się. • Kasowanie sekwencji scen chaser. o Wejdź w tryb programowania przez naciśniecie i przytrzymanie przycisku PROGRAM (11) przez 2 sekundy dopóki nie zacznie pulsować dioda PROGRAM LED. o Wybierz przyciskiem numer właściwej sekwencji sceny CHASER (22), z którą chcesz usunąć. o Aby skasować sekwencję scen wciśnij i przytrzymaj przycisk AUTO / DEL (21) oraz wcześniej wybrany przcisk wybranej sekwencji scen CHASER (22). Wszystkie diody LED na panelu zaświecą się. • Kasowanie wszystkich sekwencji scen chaser. UWAGA: Jeżeli wybierzesz tę funkcję wszystkie sekwencje scen zostaną utracone bezpowrotnie. Zostaną zachowane poszczególne sceny. o Wyłącz zasilanie sterownika. o Jednocześnie wciśnij i przytrzymaj przyciaki BANK DOWN (16) oraz AUTO / DEL (21),w tym czasie wąłcza zsilanie sterownika. Wszystkie diody LEC na panelu zaczna pulsować. d. Sceny. • Wstaw scenę. o Wejdź w tryb programowania przez naciśniecie i przytrzymanie przycisku PROGRAM (11) przez 2 sekundy dopóki nie zacznie pulsować dioda PROGRAM LED. o Select the desired chaser using the CHASER buttons (22). The respective LEDs will be lit. o Aby przełączyć się w tryb pracy krokowej naciśnij przyciak TAP / DISPLAY (17). Wyświetlacz wyświetli numer sceny w sekwencji scen. o Przy pomocy przycisków wyboru banku BANK UP (15) /BANK DOWN (16) wybierz scenę, którą chcesz wstawić. Jeżeli chcesz wstawić nową scene pomiędzy 5 a 6 scene to przy pomocy przycisków wyboru banku BANK UP (15) /BANK DOWN (16) wybieraj kolejno sceny, aż na wyświetlaczu pojawi się STEP05. o Aby skopiowac bank wciśnij przycisk MIDI / REC (19). Wyświetlacz pokaże kolejny numer sceny. o Przy pomocy przycisków wyboru banku BANK UP (15) /BANK DOWN (16) wybierz bank, do którego chcesz wstawić scenę. o Przy pomocy przycisków SCENE (3) wybierz sceny które chcesz wstawić. o Aby wsyawić scenę wciśnij przycisk MIDI / REC (19). Wszystkie diody LED na panelu zaświecą się. • Kopiowanie scen. o Wejdź w tryb programowania przez naciśniecie i przytrzymanie przycisku PROGRAM (11) przez 2 sekundy dopóki nie zacznie pulsować dioda PROGRAM LED. VDPC130_v3 51 VELLEMAN o Przy pomocy przycisków wyboru banku BANK UP (15) /BANK DOWN (16) wybierz bank, z którego chcesz skopiowac scenę. o pomocy przycisków SCENE (3) wybierz scenę,którą chcesz skopiować o Naciśnij przycisk MIDI / REC (19), aby przygotować dane do zapisu. o Przy pomocy przycisków wyboru banku BANK UP (15) /BANK DOWN (16) wybierz bank, do którego chcesz skopiowac scenę. o Naciśnij przycisk z numerem sceny SCENE (3), pod którą chcesz zapamiętać scenę. Wszystkie diody LED na panelu zaświecą się. • Usuwanie sceny. o Wejdź w tryb programowania przez naciśniecie i przytrzymanie przycisku PROGRAM (11) przez 2 sekundy dopóki nie zacznie pulsować dioda PROGRAM LED. o Przy pomocy przycisków wyboru banku BANK UP (15) /BANK DOWN (16) wybierz bank, z którego chcesz usunąć scenę. o Wciśnij i przytrzymaj przycisk AUTO / DEL (21). o Wybierz przyciskiem numerem sekwencji sceny CHASER (22), w której znaduje scena do usunięcia. o Naciśnij przycisk z numerem sceny SCENE (3), którą chcesz usunąć. o Scena została usunieta. Wszystkie diody LED na panelu zaczna pulsować. Wszystkie 240 scen zoatało wyzerowanych. • Deleting all Scenes UWAGA: Jeżeli wybierzesz tę funkcje wszytkie sceny zostaną usunięte bezpowrotnie. o Wyłacz zasilanie sterownika DMX. Jednocześnie naciśnij i przytrzymaj przyciski PROGRAM (11) oraz BANK DOWN (16). o Włącz zasilanie sterownika DMX. e. Tryb pracy wyzwalany dźwiękiem - MUSIC RUN. o Naciśnij przycisk MUSIC / BANK COPY (12). Zaświeci się sygnalizacyjna dioda LED. Kontroler jest sterowany dochodzącym do niego dźwiekiem o Przy pomocy przycisków wyboru banku BANK UP (15) /BANK DOWN (16) wybierz bank, z którego chcesz odtworzyć sceny w trybie MUSIC RUN. o Ustaw czas odtwarzania scen suwakiem FADE TIME (24). o Wybierz przyciskiem numerem sekwencji sceny CHASER (22), którą chcesz odtwarzać w trybie MUSIC RUN. Możesz wybrać kilka kolejnych sekwencji scen, które będą odtwarzane jedna po drugiej. o Ustaw czas odtwarzania scen suwakiem FADE TIME (24). f. Tryb pracy automatycznej - Auto Mode o Aby wybrać tryb AUTO MODE wciśnij przycisk AUTO / DEL (21), dopóki nie zaświeci się dioda syganlizacujna LED. o Jeżeli nie wciśnięto żadnego przycisku CHASER (22) automatycznie zostanie odtworzony bank. Przy pomocy przycisków wyboru banku BANK UP (15) /BANK DOWN (16) wybierz bank, z którego chcesz odtworzyć sceny w trybie AUTO MODE. o Wciśnij przycisk CHASER (22). Sterownik DMX VDPC130 uruchamis się automatycznie w trybie AUTO MODE. Możesz wybrać kilka kolejnych sekwencji scen, które będą odtwarzane jedna po drugiej. o Za pomocą suwaków SPEED (23) oraz FADE TIME (24) możesz wyregulować czas trwania oraz czas przejścia pomiędzy scenami. VDPC130_v3 52 VELLEMAN g. Tryb pracy MIDI - MIDI Operation o Wciśnij i przytrzymaj przycisk MIDI / REC (19) na czas nie krótszy niż 2 sekundy. o Wybierz właściwy kanał MIDI w zakresie (1 ~ 20) uzywając w tym celu przycisków wyboru banku BANK UP (15) /BANK DOWN (16). o Wciśnij ponownie przycisk MIDI / REC (19), aby zapamietać ustawiony kanał i wyjść z trybu ustawiania. 7. Czyszczenie i konserwacja. 1. Wszystkie śruby mocujące oraz elementy urządzenia muszą być pewnie skręcone oraz nie mogą być skorodowane. 2. Zaczepy montażowe oraz złącza nie powinny być modyfikowane ani zmieniane ich położenie. Nie wiercić dodatkowych otworów w zaczepach. 3. Kable elektryczne muszą być nieuszkodzone. Montaż urządzenia powinien być przeprowadzony prze osoby wykwalifikowane. 4. Przed przystąpieniem do czynności konserwacyjnych odłącz urządzenie od zasilania. 5. Urządzenie należy regularnie czyścić wilgotną szmatką. Nie używać alkoholu lub rozpuszczalników. 6. Obsługę urządzenia należy powierzać osobom wykwalifikowanym. Naprawiaj zawsze przy pomocy oryginalnych części. W celu ich nabycia skontaktuj się z dostawcą urządzenia. 8. Specyfikacja techniczna. Zasilanie Pobór mocy Złacza DMX wej./ wyj. MIDI wej. Wymiary Waga 9-12VDC, 500mA. max. 4W. 3-pin XLR żeńskie / męskie. 5-pin DIN 19” x 132 x 80mm 2.5kg Informacje zawarte w niniejszym podręczniku mogą ulec zmianie bez uprzedzenia. VDPC130_v3 53 VELLEMAN Velleman® Service and Quality Warranty Velleman® has over 35 years of experience in the electronics world and distributes its products in more than 85 countries. All our products fulfil strict quality requirements and legal stipulations in the EU. In order to ensure the quality, our products regularly go through an extra quality check, both by an internal quality department and by specialized external organisations. If, all precautionary measures notwithstanding, problems should occur, please make appeal to our warranty (see guarantee conditions). General Warranty Conditions Concerning Consumer Products (for EU): • All consumer products are subject to a 24-month warranty on production flaws and defective material as from the original date of purchase. • Velleman® can decide to replace an article with an equivalent article, or to refund the retail value totally or partially when the complaint is valid and a free repair or replacement of the article is impossible, or if the expenses are out of proportion. You will be delivered a replacing article or a refund at the value of 100% of the purchase price in case of a flaw occurred in the first year after the date of purchase and delivery, or a replacing article at 50% of the purchase price or a refund at the value of 50% of the retail value in case of a flaw occurred in the second year after the date of purchase and delivery. • Not covered by warranty: - all direct or indirect damage caused after delivery to the article (e.g. by oxidation, shocks, falls, dust, dirt, humidity...), and by the article, as well as its contents (e.g. data loss), compensation for loss of profits; - frequently replaced consumable goods, parts or accessories such as batteries, lamps, rubber parts, drive belts... (unlimited list); - flaws resulting from fire, water damage, lightning, accident, natural disaster, etc. …; - flaws caused deliberately, negligently or resulting from improper handling, negligent maintenance, abusive use or use contrary to the manufacturer’s instructions; - damage caused by a commercial, professional or collective use of the article (the warranty validity will be reduced to six (6) months when the article is used professionally); - damage resulting from an inappropriate packing and shipping of the article; - all damage caused by modification, repair or alteration performed by a third party without written permission by Velleman®. • Articles to be repaired must be delivered to your Velleman® dealer, solidly packed (preferably in the original packaging), and be completed with the original receipt of purchase and a clear flaw description. • Hint: In order to save on cost and time, please reread the manual and check if the flaw is caused by obvious causes prior to presenting the article for repair. Note that returning a non-defective article can also involve handling costs. • Repairs occurring after warranty expiration are subject to shipping costs. • The above conditions are without prejudice to all commercial warranties. The above enumeration is subject to modification according to the article (see article’s manual). Velleman® service- en kwaliteitsgarantie Velleman® heeft ruim 35 jaar ervaring in de elektronicawereld en verdeelt in meer dan 85 landen. Al onze producten beantwoorden aan strikte kwaliteitseisen en aan de wettelijke bepalingen geldig in de EU. Om de kwaliteit te waarborgen, ondergaan onze producten op regelmatige tijdstippen een extra kwaliteitscontrole, zowel door onze eigen kwaliteitsafdeling als door externe gespecialiseerde organisaties. Mocht er ondanks deze voorzorgen toch een probleem optreden, dan kunt u steeds een beroep doen op onze waarborg (zie waarborgvoorwaarden). Algemene waarborgvoorwaarden consumentengoederen (voor Europese Unie): • Op alle consumentengoederen geldt een garantieperiode van 24 maanden op productie- en materiaalfouten en dit vanaf de oorspronkelijke aankoopdatum. • Indien de klacht gegrond is en een gratis reparatie of vervanging van een artikel onmogelijk is of indien de kosten hiervoor buiten verhouding zijn, kan Velleman® beslissen het desbetreffende artikel te vervangen door een gelijkwaardig artikel of de aankoopsom van het artikel gedeeltelijk of volledig terug te betalen. In dat geval krijgt u een vervangend product of terugbetaling ter waarde van 100% van de aankoopsom bij ontdekking van een gebrek tot één jaar na aankoop en levering, of een vervangend product tegen 50% van de kostprijs of terugbetaling van 50 % bij ontdekking na één jaar tot 2 jaar. • Valt niet onder waarborg: - alle rechtstreekse of onrechtstreekse schade na de levering veroorzaakt aan het toestel (bv. door oxidatie, schokken, val, stof, vuil, vocht...), en door het toestel, alsook zijn inhoud (bv. verlies van data), vergoeding voor eventuele winstderving. - verbruiksgoederen, onderdelen of hulpstukken die regelmatig dienen te worden vervangen, zoals bv. batterijen, lampen, rubberen onderdelen, aandrijfriemen... (onbeperkte lijst). - defecten ten gevolge van brand, waterschade, bliksem, ongevallen, natuurrampen, enz. - defecten veroorzaakt door opzet, nalatigheid of door een onoordeelkundige behandeling, slecht onderhoud of abnormaal gebruik of gebruik van het toestel strijdig met de voorschriften van de fabrikant. - schade ten gevolge van een commercieel, professioneel of collectief gebruik van het apparaat (bij professioneel gebruik wordt de garantieperiode herleid tot 6 maand). - schade veroorzaakt door onvoldoende bescherming bij transport van het apparaat. - alle schade door wijzigingen, reparaties of modificaties uitgevoerd door derden zonder toestemming van Velleman®. • Toestellen dienen ter reparatie aangeboden te worden bij uw Velleman®verdeler. Het toestel dient vergezeld te zijn van het oorspronkelijke aankoopbewijs. Zorg voor een degelijke verpakking (bij voorkeur de originele verpakking) en voeg een duidelijke foutomschrijving bij. • Tip: alvorens het toestel voor reparatie aan te bieden, kijk nog eens na of er geen voor de hand liggende reden is waarom het toestel niet naar behoren werkt (zie handleiding). Op deze wijze kunt u kosten en tijd besparen. Denk eraan dat er ook voor niet-defecte toestellen een kost voor controle aangerekend kan worden. • Bij reparaties buiten de waarborgperiode zullen transportkosten aangerekend worden. • Elke commerciële garantie laat deze rechten onverminderd. Bovenstaande opsomming kan eventueel aangepast worden naargelang de aard van het product (zie handleiding van het betreffende product). Garantie de service et de qualité Velleman® Velleman® jouit d’une expérience de plus de 35 ans dans le monde de l’électronique avec une distribution dans plus de 85 pays. Tous nos produits répondent à des exigences de qualité rigoureuses et à des dispositions légales en vigueur dans l’UE. Afin de garantir la qualité, nous soumettons régulièrement nos produits à des contrôles de qualité supplémentaires, tant par notre propre service qualité que par un service qualité externe. Dans le cas improbable d’un défaut malgré toutes les précautions, il est possible d’invoquer notre garantie (voir les conditions de garantie). Conditions générales concernant la garantie sur les produits grand public (pour l’UE) : • tout produit grand public est garanti 24 mois contre tout vice de production ou de matériaux à dater du jour d’acquisition effective ; • si la plainte est justifiée et que la réparation ou le remplacement d’un article est jugé impossible, ou lorsque les coûts s’avèrent disproportionnés, Velleman® s’autorise à remplacer ledit article par un article équivalent ou à rembourser la totalité ou une partie du prix d’achat. Le cas échéant, il vous sera consenti un article de remplacement ou le remboursement complet du prix d’achat lors d’un défaut dans un délai de 1 an après l’achat et la livraison, ou un article de remplacement moyennant 50% du prix d’achat ou le remboursement de 50% du prix d’achat lors d’un défaut après 1 à 2 ans. • sont par conséquent exclus : - tout dommage direct ou indirect survenu à l’article après livraison (p.ex. dommage lié à l’oxydation, choc, chute, poussière, sable, impureté…) et provoqué par l’appareil, ainsi que son contenu (p.ex. perte de données) et une indemnisation éventuelle pour perte de revenus ; - tout bien de consommation ou accessoire, ou pièce qui nécessite un remplacement régulier comme p.ex. piles, ampoules, pièces en caoutchouc, courroies… (liste illimitée) ; - tout dommage qui résulte d’un incendie, de la foudre, d’un accident, d’une catastrophe naturelle, etc. ; - out dommage provoqué par une négligence, volontaire ou non, une utilisation ou un entretien incorrects, ou une utilisation de l’appareil contraire aux prescriptions du fabricant ; - tout dommage à cause d’une utilisation commerciale, professionnelle ou collective de l’appareil (la période de garantie sera réduite à 6 mois lors d’une utilisation professionnelle) ; - tout dommage à l’appareil qui résulte d’une utilisation incorrecte ou différente que celle pour laquelle il a été initialement prévu comme décrit dans la notice ; - tout dommage engendré par un retour de l’appareil emballé dans un conditionnement non ou insuffisamment protégé. - toute réparation ou modification effectuée par une tierce personne sans l’autorisation explicite de SA Velleman® ; - frais de transport de et vers Velleman® si l’appareil n’est plus couvert sous la garantie. • toute réparation sera fournie par l’endroit de l’achat. L’appareil doit nécessairement être accompagné du bon d’achat d’origine et être dûment conditionné (de préférence dans l’emballage d’origine avec mention du défaut) ; • tuyau : il est conseillé de consulter la notice et de contrôler câbles, piles, etc. avant de retourner l’appareil. Un appareil retourné jugé défectueux qui s’avère en bon état de marche pourra faire l’objet d’une note de frais à charge du consommateur ; • une réparation effectuée en-dehors de la période de garantie fera l’objet de frais de transport ; • toute garantie commerciale ne porte pas atteinte aux conditions susmentionnées. La liste susmentionnée peut être sujette à une complémentation selon le type de l’article et être mentionnée dans la notice d’emploi. Velleman® Service- und Qualitätsgarantie Velleman® hat gut 35 Jahre Erfahrung in der Elektronikwelt und vertreibt seine Produkte in über 85 Ländern. Alle Produkte entsprechen den strengen Qualitätsforderungen und gesetzlichen Anforderungen in der EU. Um die Qualität zu gewährleisten werden unsere Produkte regelmäßig einer zusätzlichen Qualitätskontrolle unterworfen, sowohl von unserer eigenen Qualitätsabteilung als auch von externen spezialisierten Organisationen. Sollten, trotz aller Vorsichtsmaßnahmen, Probleme auftreten, nehmen Sie bitte die Garantie in Anspruch (siehe Garantiebedingungen). Allgemeine Garantiebedingungen in Bezug auf Konsumgüter (für die Europäische Union): • Alle Produkte haben für Material- oder Herstellungsfehler eine Garantieperiode von 24 Monaten ab Verkaufsdatum. • Wenn die Klage berechtigt ist und falls eine kostenlose Reparatur oder ein Austausch des Gerätes unmöglicht ist, oder wenn die Kosten dafür unverhältnismäßig sind, kann Velleman® sich darüber entscheiden, dieses Produkt durch ein gleiches Produkt zu ersetzen oder die Kaufsumme ganz oder teilweise zurückzuzahlen. In diesem Fall erhalten Sie ein Ersatzprodukt oder eine Rückzahlung im Werte von 100% der Kaufsumme im Falle eines Defektes bis zu 1 Jahr nach Kauf oder Lieferung, oder Sie bekommen ein Ersatzprodukt im Werte von 50% der Kaufsumme oder eine Rückzahlung im Werte von 50 % im Falle eines Defektes im zweiten Jahr. • Von der Garantie ausgeschlossen sind: - alle direkten oder indirekten Schäden, die nach Lieferung am Gerät und durch das Gerät verursacht werden (z.B. Oxidation, Stöße, Fall, Staub, Schmutz, Feuchtigkeit, ...), sowie auch der Inhalt (z.B. Datenverlust), Entschädigung für eventuellen Gewinnausfall. - Verbrauchsgüter, Teile oder Zubehörteile, die regelmäßig ausgewechselt werden, wie z.B. Batterien, Lampen, Gummiteile, Treibriemen, usw. (unbeschränkte Liste). - Schäden verursacht durch Brandschaden, Wasserschaden, Blitz, Unfälle, Naturkatastrophen, usw. - Schäden verursacht durch absichtliche, nachlässige oder unsachgemäße Anwendung, schlechte Wartung, zweckentfremdete Anwendung oder Nichtbeachtung von Benutzerhinweisen in der Bedienungsanleitung. - Schäden infolge einer kommerziellen, professionellen oder kollektiven Anwendung des Gerätes (bei gewerblicher Anwendung wird die Garantieperiode auf 6 Monate zurückgeführt). - Schäden verursacht durch eine unsachgemäße Verpackung und unsachgemäßen Transport des Gerätes. - alle Schäden verursacht durch unautorisierte Änderungen, Reparaturen oder Modifikationen, die von einem Dritten ohne Erlaubnis von Velleman® vorgenommen werden. • Im Fall einer Reparatur, wenden Sie sich an Ihren Velleman®-Verteiler. Legen Sie das Produkt ordnungsgemäß verpackt (vorzugsweise die Originalverpackung) und mit dem Original-Kaufbeleg vor. Fügen Sie eine deutliche Fehlerumschreibung hinzu. • Hinweis: Um Kosten und Zeit zu sparen, lesen Sie die Bedienungsanleitung nochmals und überprüfen Sie, ob es keinen auf de Hand liegenden Grund gibt, ehe Sie das Gerät zur Reparatur zurückschicken. Stellt sich bei der Überprüfung des Geräts heraus, dass kein Geräteschaden vorliegt, könnte dem Kunden eine Untersuchungspauschale berechnet. • Für Reparaturen nach Ablauf der Garantiefrist werden Transportkosten berechnet. • Jede kommerzielle Garantie lässt diese Rechte unberührt. Velleman ® usług i gwarancja jakości Velleman ® ma ponad 35 latnie doświadczenie w świecie elektroniki. Dystrybuujemy swoje produkty do ponad 85 krajów. Wszystkie nasze produkty spełniają surowe wymagania jakościowe oraz wypełniają normy i dyrekrywy obowiązujące w krajach UE. W celu zapewnienia najwyższej jakości naszych produktów, przechodzą one regularne oraz dodatkowo wyrywkowe badania kontroli jakości, zarówno naszego wewnętrznego działu jakości jak również wyspecjalizowanych firm zewnętrznych. Pomimo dołożenia wszelkich starań czasem mogą się pojawić się problemy techniczne, prosimy odwołać się do gwarancji (patrz warunki gwarancji). Ogólne Warunki dotyczące gwarancji Consumer Products (UE): • Wszystkie produkty konsumenckie podlegają 24-miesięcznej gwarancji na wady produkcyjne i materiałowe od daty zakupu. • W przypadku gdy usterka jest niemozliwa do usnięcia, koszt usunięcia jest nadmiernie wysoki Velleman ® może zdecydować o wymianie artykułu na nowy wolny od wad lub zwrócić zapłąconą kwotę. Zwrot gotówki może jednak nastąpić z uwzględnieniem poniższych warunków: - zwrot 100% ceny zakupu w przypadku gdy wada wystąpiła w ciągu pierwszego roku od daty zakupu i dostawy - wymina wadliwego artykółu na nowy wolny od wad z odpłatnościa 50% ceny detalicznej lub zwrot 50% kwoty ceny nabycia w przypadku gdy wada wystąpiła w drugim roku od daty zakupu i dostawy. • Produkt nie podlega naprawie gwarancyjnej: - gdy wszystkie bezpośrednie lub pośrednie szkody spowodowane są działaniem czynników środowiskowych lub losowych (np. przez utlenianie, wstrząsy, upadki, kurz, brud, ...), wilgotności; - gwarant nie ponosi odpowiedzialności za szkody wynikających z utraty danych; - utrata zysków z tytułu niesprawności produktu; - z gwarancji wyłaczone są matriały eksploatacyjne: baterie, żarówki, paski napędowe, gumowe elementy napędowe... (nieograniczona lista); - usterka wynika z dziłania pożaru, zalania wszelkimi cieczami, uderzenia pioruna, upadku lub klęski żywiołowej, itp.; - usterka wynika z zaniedbań eksploatacyjnych tj. umyślne bądź nieumyślne zaniechanie czyszczenia, koserwacji, wymiany materiałów ekspolatacyjnych, niedbalstwa lub z niewłaściwego obchodzenia się lub niezgodnego użytkowania z instrukcją producenta; - szkody wynikające z nadmiernego użytkowania gdy nie jest do tego celu przeznaczony tj. działalność komerycjna, zawodowa lub wspólne użytkowanie przez wiele osób - okres obowiązywania gwarancji zostanie obniżony do 6 (sześć) miesięcy; - Szkody wynikające ze źle zabezpieczonej wysyłki produktu; - Wszelkie szkody spowodowane przez nieautoryzowaną naprawę, modyfikację, przeróbkę produktu przez osoby trzecia jak również bez pisemnej zgody firmy Velleman®. • Uszkodzony produkt musi zostać dostarczony do sprzedawcy ® Velleman, solidnie zapakowany (najlepiej w oryginalnym opakowaniu), wraz z wyposażeniem z jakim produkt został sprzedany. W przypadku wysyłki towaru w opakowaniu innym niż oryginalnym ryzyko usterki produktu oraz tego skutki przechodza na właściciela produktu. Wraz z niesprawnym produktem należy dołączyć jasny i szczegółowy opis jego usterki, wady; • Wskazówka: Aby zaoszczędzić na kosztach i czasie, proszę szczegółowo zapoznać się z instrukcja obsługi, czy przyczyną wady są okoliczności techniczne czy też wynikaja wyłącznie z nieznajomości obsługi produktu. W przypadku wysyłki sprawnego produktu do serwisu nabywca może zostać obciążony kosztmi obsługi oraz transportu. • W przypadku napraw pogwarancyjnych lub odpłatnych klient ponosi dodatkowo koszt wysyłki produktu do i z serwisu. • wymienione wyżej warunki są bez uszczerbku dla wszystkich komercyjnych gwarancji. Powyższe postanowienia mogą podlegać modyfikacji w zależności od wyrobu (patrz art obsługi). Die oben stehende Aufzählung kann eventuell angepasst werden gemäß der Art des Produktes (siehe Bedienungsanleitung des Gerätes). Garantía de servicio y calidad Velleman® Velleman® disfruta de una experiencia de más de 35 años en el mundo de la electrónica con una distribución en más de 85 países. Todos nuestros productos responden a normas de calidad rigurosas y disposiciones legales vigentes en la UE. Para garantizar la calidad, sometimos nuestros productos regularmente a controles de calidad adicionales, tanto por nuestro propio servicio de calidad como por un servicio de calidad externo. En el caso improbable de que surgieran problemas a pesar de todas las precauciones, es posible apelar a nuestra garantía (véase las condiciones de garantía). Condiciones generales referentes a la garantía sobre productos de venta al público (para la Unión Europea): • Todos los productos de venta al público tienen un período de garantía de 24 meses contra errores de producción o errores en materiales desde la adquisición original; • Si la queja está fundada y si la reparación o la sustitución de un artículo es imposible, o si los gastos son desproporcionados, Velleman® autoriza reemplazar el artículo por un artículo equivalente o reembolsar la totalidad o una parte del precio de compra. En este caso, recibirá un artículo de recambio o el reembolso completo del precio de compra al descubrir un defecto hasta un año después de la compra y la entrega, o un artículo de recambio al 50% del precio de compra o la sustitución de un 50% del precio de compra al descubrir un defecto después de 1 a 2 años. • Por consiguiente, están excluidos entre otras cosas: - todos los daños causados directamente o indirectamente al aparato y su contenido después de la entrega (p.ej. por oxidación, choques, caída,...) y causados por el aparato, al igual que el contenido (p.ej. pérdida de datos) y una indemnización eventual para falta de ganancias; - partes o accesorios que deban ser reemplazados regularmente, como por ejemplo baterías, lámparas, partes de goma, ... (lista ilimitada) - defectos causados por un incendio, daños causados por el agua, rayos, accidentes, catástrofes naturales, etc. ; - defectos causados a conciencia , descuido o por malos tratos, un mantenimiento inapropiado o un uso anormal del aparato contrario a las instrucciones del fabricante; - daños causados por un uso comercial, profesional o colectivo del aparato (el período de garantía se reducirá a 6 meses con uso profesional) ; - daños causados por un uso incorrecto o un uso ajeno al que est está previsto el producto inicialmente como está descrito en el manual del usuario ; - daños causados por una protección insuficiente al transportar el aparato. - daños causados por reparaciones o modificaciones efectuadas por una tercera persona sin la autorización explicita de SA Velleman® ; - se calcula gastos de transporte de y a Velleman® si el aparato ya no está cubierto por la garantía. • Cualquier reparación se efectuará por el lugar de compra. Devuelva el aparato con la factura de compra original y transpórtelo en un embalaje sólido (preferentemente el embalaje original). Incluya también una buena descripción del defecto ; • Consejo: Lea el manual del usuario y controle los cables, las pilas, etc. antes de devolver el aparato. Si no se encuentra un defecto en el artículo los gastos podrían correr a cargo del cliente; • Los gastos de transporte correrán a carga del cliente para una reparación efectuada fuera del periode de garantía. • Cualquier gesto comercial no disminuye estos derechos. La lista previamente mencionada puede ser adaptada según el tipo de artículo (véase el manual del usuario del artículo en cuestión) VDPC130_v3 55 VELLEMAN