1
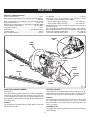
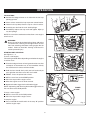
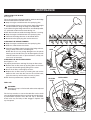
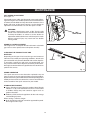
RHT2660DA
PETROL HEDGE TRIMMER
OPERATOR'S MANUAL
GENERAL SAFETY RULES
WARNING
Read and understand all instructions. Failure to
follow all instructions listed below, may result in electric
shock, fire and/or carbon monoxide poisoning which
will cause death or serious personal injury.
■
■
READ ALL INSTRUCTIONS BEFORE USING THIS PRODUCT
■ DO NOT ALLOW CHILDREN OR UNTRAINED INDIVIDUALS
TO USE THIS UNIT.
■ KNOW YOUR MACHINE. Read the operator’s manual
carefully. Learn the machine’s applications and limitations
as well as the specific potential hazards related to this
machine.
■ KEEP GUARDS IN PLACE and in working order. Never
operate the machine with any guard or cover removed. Make
sure all guards are operating properly before each use.
■ REMOVE ADJUSTING KEYS AND WRENCHES. Form
habit of checking to see that keys and adjusting wrenches
are removed from machine before turning it on.
■ TO REDUCE THE RISK OF INJURY, keep children and
visitors away. All visitors should wear safety glasses and be
kept a safe distance from work area.
■ KEEP THE AREA OF OPERATION CLEAR OF ALL
PERSONS, particularly small children, and pets.
■ DO NOT OPERATE THE ENGINE IN A CONFINED SPACE
where dangerous carbon monoxide fumes can collect.
Carbon monoxide is a colourless, odorless and an extremely
dangerous gas and can cause unconsciousness or death.
■ USE RIGHT MACHINE. Don’ t force machine or attachment to do
a job it was not designed for. Don’ t use it for a purpose not intended.
■ DRESS PROPERLY. Do not wear loose clothing, gloves,
neckties, or jewelry. They can get caught and draw you into
moving parts. Rubber gloves and non-slip footwear are
recommended when working outdoors. Also wear protective
hair covering to contain long hair.
■ DO NOT OPERATE THE EQUIPMENT WHILE BAREFOOT OR WHEN WEARING SANDALS OR SIMILAR
LIGHTWEIGHT FOOTWEAR. Wear protective footwear that
will protect your feet and improve your footing on slippery
surfaces.
■ EXERCISE CAUTION TO AVOID SLIPPING OR FALLING.
■ ALWAYS WEAR SAFETY GLASSES WITH SIDE SHIELDS.
Everyday eyeglasses have only impact-resistant lenses; they
are NOT safety glasses.
■ DON’T OVERREACH OR STAND ON UNSTABLE
SUPPORT. Keep proper footing and balance at all times.
■ USE ONLY RECOMMENDED ACCESSORIES. The use of
improper accessories may cause risk of injury.
■ CHECK DAMAGED PARTS. Before further use of the
machine, a guard or other part that is damaged should be
carefully checked to determine that it will operate properly and
perform its intended function. Check for alignment of moving
parts, binding of moving parts, breakage of parts, mounting
and any other conditions that may affect its operation. A guard
or other part that is damaged must be properly repaired or
replaced by an authorised service centre to avoid risk of
personal injury.
■ NEVER LEAVE MACHINE RUNNING UNATTENDED.
■
■
■
■
■
■
■
■
■
■
■
■
■
■
■
■
2
TURN POWER OFF. Don’t leave machine until it comes to
a complete stop.
KEEP THE ENGINE FREE OF GRASS, LEAVES, OR
GREASE to reduce the chance of a fire hazard.
KEEP THE EXHAUST PIPE FREE OF FOREIGN
OBJECTS.
FOLLOW MANUFACTURER’S RECOMMENDATIONS
FOR SAFE LOADING, UNLOADING, TRANSPORT, AND
STORAGE OF MACHINE.
KEEP MACHINE DRY, CLEAN, AND FREE FROM
LUBRICANT AND GREASE. Always use a clean cloth when
cleaning. Never use brake fluids, petrol, petroleum-based
products, or any solvents to clean machine.
STAY ALERT AND EXERCISE CONTROL. Watch what you
are doing and use common sense. Do not operate tool when
you are tired. Do not rush.
DO NOT OPERATE THE PRODUCT WHILE UNDER
THE INFLUENCE OF DRUGS, ALCOHOL, OR ANY
MEDICATION.
CHECK THE WORK AREA BEFORE EACH USE. Remove
all objects such as rocks, broken glass, nails, wire, or string
which can be thrown or become entangled in the machine.
DO NOT USE MACHINE IF SWITCH DOES NOT TURN
IT ON AND OFF. Have defective switches replaced by an
authorised service centre.
BEFORE CLEANING, REPAIRING, OR INSPECTING,
shut off the engine and make certain all moving parts have
stopped. Disconnect the spark plug wire, and keep the wire
away from the plug to prevent accidental starting.
AVOID DANGEROUS ENVIRONMENT. Don’ t use in damp
or wet locations or expose to rain. Keep work area well lit.
NEVER USE IN AN EXPLOSIVE ATMOSPHERE. Normal
sparking of the motor could ignite fumes.
DO NOT OPERATE WHILE SMOKING OR NEAR AN OPEN
FLAME.
DO NOT OPERATE at night, at times of heavy fog, or at any
other times when your field of vision might be limited and it
would be difficult to gain a clear view of area.
Be familiar with all controls and the proper use of the
machine.
Beware of overhead power lines.
The cutting mechanism strikes any foreign object or the
machine should start making any unusual noise or vibration,
shut off the power source and allow the machine to stop.
Disconnect the spark plug wire from the spark plug and take
the following steps:
1. Inspect for damage;
2. Check for and tighten any loose parts;
3. Have any damaged parts replaced or repaired with
parts having equivalent specifications.
Stop the engine and disconnect the spark plug wire from the
spark plug before
1. When adjusting the working position of the cutting
device;
2. Cleaning or clearing a blockage;
3. Checking, maintenance or working on the machine.
Do not inhale fuel fumes as they are toxic.
SPECIFIC SAFETY RULES
■ OPERATE THE UNIT WITH BOTH HANDS.
■ DO NOT OPERATE AROUND dry brush, twigs, cloth rags,
or other flammable materials.
■ NEVER START THE MACHINE if ice has formed in any
part of the equipment.
■ DO NOT USE ACIDS, ALKALINES, SOLVENTS,
FLAMMABLE MATERIAL, OR INDUSTRIAL GRADE
SOLUTIONS in this product. These products can cause
physical injuries to the operator and irreversible damage
to the machine.
■ NEVER ATTEMPT TO MAKE ANY ADJUSTMENTS
WHILE THE ENGINE (MOTOR) IS RUNNING (except
where specifically recommended by the manufacturer).
■ PROTECTIVE COVERS MUST ALWAYS COVER
ROTATING PARTS WHEN THE ENGINE IS RUNNING.
■ KEEP COOLING AIR INTAKE (recoil starter area) and
muffler side of the engine at least 1m away from buildings,
obstructions, and other burnable objects.
■ KEEP THE ENGINE AWAY FROM FLAMMABLES AND
OTHER HAZARDOUS MATERIALS.
■ KEEP AWAY FROM HOT PARTS. The muffler and other
engine parts become very hot, use caution.
■ DO NOT TOUCH THE SPARK PLUG AND IGNITION
CABLE when starting and operating the engine.
■ CHECK FUEL HOSES AND JOINTS for looseness and
fuel leakage before each use.
■ CHECK BOLTS AND NUTS for looseness before each use.
A loose bolt or nut may cause serious engine problems.
■ USE EYE AND HEAR PROTECTION DEVICES.
■ ALWAYS REFUEL OUTDOORS. Never refuel indoors or
in a poorly ventilated area.
■ NEVER STORE THE MACHINE WITH FUEL IN THE
FUEL TANK INSIDE A BUILDING where ignition sources
are present, such as hot water and space heaters, clothes
dryers, and the like.
■ IF THE FUEL TANK HAS TO BE DRAINED, DO THIS
OUTDOORS.
■ TO REDUCE THE RISK OF FIRE AND BURN INJURY,
handle fuel with care. It is highly flammable.
■ DO NOT SMOKE WHILE HANDLING FUEL.
■ ADD FUEL BEFORE STARTING THE ENGINE. Never
remove the cap of the fuel tank or add fuel while the engine
is running or when the engine is hot.
■ LOOSEN FUEL CAP SLOWLY to release pressure and to
keep fuel from escaping around the cap.
■ REPLACE ALL FUEL TANK AND CONTAINER CAPS
SECURELY.
■ WIPE SPILLED FUEL FROM THE UNIT. Move 9m away
from refueling site before starting engine.
■ IF FUEL IS SPILLED, do not attempt to start the engine
but move the machine away from the area of spillage and
avoid creating any source of ignition until fuel vapors have
dissipated.
■ NEVER ATTEMPT TO BURN OFF SPILLED FUEL
UNDER ANY CIRCUMSTANCES.
■ BEFORE STORING, ALLOW THE ENGINE TO COOL.
■ STORE FUEL IN A COOL, WELL-VENTILATED AREA,
safely away from spark and/or flame-producing equip-ment.
■ STORE FUEL IN CONTAINERS specifically designed for
this purpose.
■ EMPTY FUEL TANK AND RESTRAIN THE UNIT FROM
MOVING before transporting in a vehicle.
■ WHEN SERVICING USE ONLY IDENTICAL RYOBI
REPLACEMENT PARTS. Use of any other parts may
create a hazard or cause product damage.
■ MAKE SURE MINIMUM CLEARANCE of 1m is maintained from combustible materials.
■ SAVE THESE INSTRUCTIONS. Refer to them frequently
and use them to instruct other users. If you loan someone
this tool, loan them these instructions also.
■ Never operate the product without the safety guard in place
and in good condition.
■ Keep the working area free from wires, nails, metallic cable,
glass, stones and debris.
■ Do not cut against hard objects, this could cause injury or
damage the trimmer.
■ Do not cross roads or gravel paths with the trimmer still
running.
■ As equipment user, you are responsible for third parties in
the working area.
■ While operating the tool, always hold it firmly with both hands
by the two handles and ensure a firm footing, especially if
steps or ladders are used. Don’t touch the blades!
■ Make sure you hold the tool firmly with both handles and that
you are well balanced with your weight evenly distributed
on both feet.
■ Keep the cutting system below level of your waist.
■ Keep your fingers and other body parts away from the
cutting blade.
■
■
■
■
■
■
■
■
■
■
■
■
3
CAUTION:
Certain parts of the machine may become hot in
use.
Familiarise yourself with your surroundings and be on the
alert for possible hazards which you may not notice because
of the noise from the machine.
Never grasp the tool by the blade.
Large variation in temperature can lead to condensation
inside the tool. Before use, give the machine time to adjust
to the temperature of work area.
Let the tool work at its own pace. Do not overload.
Never attempt to use an incomplete machine or one fitted
with an unauthorised modification.
When transporting, disconnect the spark plug wire.
During transport or storage always cover the with the
scabbard.
Do not attempt to repair the machine unless you are
qualified to do so.
Do not operate the machine with a damaged or excessively
worn cutting device.
To reduce fire hazard keep engine and silencer free of
debris, leaves, or excessive lubricant.
Always ensure all handles are fitted when using the
machine.
Know how to stop the machine quickly in an emergency.
SYMBOLS
Some of the following symbols may be used on this product. Please study them and learn their meaning. Proper
interpretation of these symbols will allow you to operate the product better and safer.
SYMBOL
NAME
EXPLANATION
Safety Alert Symbol
Precautions that involve your safety.
Read the Operator’s Manual
To reduce the risk of injury, user must read and
understand operator’s manual before using this product.
Eye, Hearing and Head
Protection
Wear eye protection and hearing protection when
operating this equipment.
Sharp cutting blades
To prevent serious injury, do not touch cutting blades.
Operate With Two Hands
Hold and operate the hedge trimmer properly with both
hands.
Keep Bystanders Away
Keep all bystanders at least 15m away.
No Smoking
Do not smoke when mixing fuel or filling fuel tank.
Petrol
Use unleaded petrol intended for motor vehicle use with
an octane rating of 87 ([R+M]/2) or higher.
Lubricant
Use synthetic 2-stroke lubricant for air cooled engines.
Mix Petrol and Lubricant
Mix the fuel mix thoroughly and also each time before
refuelling.
Switch
On/Off Switch
I = ON to Run
O = OFF to Stop
Wet Conditions Alert
Do not use in rain or wet conditions.
4
SYMBOLS
The following signal words and meanings are intended to explain the levels of risk associated with this product.
SYMBOL
SIGNAL
MEANING
DANGER:
Indicates an imminently hazardous situation, which, if not avoided, will
result in death or serious injury.
WARNING:
Indicates a potentially hazardous situation, which, if not avoided, could
result in death or serious injury.
CAUTION:
Indicates a potentially hazardous situation, which, if not avoided, may result
in minor or moderate injury.
CAUTION:
(Without Safety Alert Symbol) Indicates a situation that may result in
property damage.
SERVICE
WARNING:
To avoid serious personal injury, do not attempt
to use this product until you read thoroughly and
understand completely the operator’s manual. If you
do not understand the warnings and instructions in the
operator’s manual, do not use this product. Call Ryobi
customer service for assistance.
Servicing requires extreme care and knowledge and should
be performed only by a qualified service technician. For
service we suggest you return the product to the nearest
AUTHORISED SERVICE CENTRE for repair.When servicing,
use only identical replacement parts.
WARNING:
The operation of any power tool can result in foreign
objects being thrown into your eyes, which can result
in severe eye damage. Before beginning power tool
operation, always wear safety goggles or safety glasses
with side shields and, when needed, a full face shield.
We recommend Wide Vision Safety Mask for use
over eyeglasses or standard safety glasses with side
shields.
SAVE THESE INSTRUCTIONS
5
FEATURES
PRODUCT SPECIFICATIONS
Engine Displacement ................................................. 26 cc
Max Engine Performance (in Accordance with ISO 8893) ...
................................................................................0.67 kW
Fuel Consumption (in Accordance with ISO 8893) at Max
Engine Performance ...............................................0.51 L/h
Specific Fuel Consumption (in Accordance with ISO 8893)
at Max Engine Performance .............................0.76 L/kW.h
Fuel Tank Capacity ......................................................0.3 L
Blade Type ............................................ Dual Reciprocating
Cutting Length ........................................................... 60 cm
Max Cutting Capacity ...............................................28 mm
Dry Weight ............................................................... 5.34 kg
Vibration Level (in accordance with Annex C of EN
774:1996+A1+A2+A3/prEN 10517:2003)
- Front Handle (Idling / Racing) ...................4.5 / 23.8 m/s2
- Rear Handle (Idling / Racing) ....................9.6 / 25.6 m/s2
Sound Pressure Level at Operator’s Position (in accordance
with Annex D of
EN 774:1996+A1+A2+A3/prEN 10517:2003) ..105.1 dB (A)
Measured Sound Power Level (in accordance with EN ISO
3744:1995 and ISO 11094:1991) ....................112.1 dB (A)
Guaranteed Sound Power Level .........................113 dB (A)
STARTER
GRIP
FRONT
HANDLE
ON/OFF
SWITCH
BLADES
GUARD
TRIGGER
LOCK
SHEATH
ROTATING
HANDLE
THROTTLE
TRIGGER
Fig. 1
KNOW YOUR HEDGE TRIMMER
See Figure 1.
The safe use of this product requires an understanding of the
information on the tool and in this operator’s manual as well
as a knowledge of the project you are attempting. Before use
of this product, familiarise yourself with all operating features
and safety rules.
ROTATING HANDLE
The handle can be rotated to lock at either side in 45° or 90°
angles for ease of use when trimming. This is a handy feature
when trimming vertically or along the sides of shrubbery.
SHEATH
The sheath keeps the operator from coming in contact with
the sharp blades when the tool is not in use. It also helps
keep the blades from being nicked or damaged when the
tool is in storage.
GUARD
The guard helps to deflect chips or other debris away from
the operator’s hands.
TRIGGER LOCK
The trigger lock prevents unintentional starting of the hedge
trimmer blades.
6
ASSEMBLY
UNPACKING
This product has been shipped completely assembled.
■ Carefully remove the product and any accessories from
the box. Make sure that all items listed in the packing list
are included.
■ Inspect the product carefully to make sure no breakage
or damage occurred during shipping.
■ Do not discard the packing material until you have carefully
inspected and satisfactorily operated the product.
■ If any parts are damaged or missing, please call
1300 557 442 for assistance.
WARNING:
If any parts are damaged or missing do not operate
this product until the parts are replaced. Failure to heed
this warning could result in serious personal injury.
WARNING:
Do not attempt to modify this product or create
accessories not recommended for use with this product.
Any such alteration or modification is misuse and could
result in a hazardous condition leading to possible
serious personal injury.
WARNING:
To prevent accidental starting that could cause serious
personal injury, always disconnect the engine spark
plug wire from the spark plug when assembling
parts.
PACKING LIST
Hedge Trimmer
Sheath
2-Cycle Engine Lubricant
Operator’s Manual
OPERATION
WARNING:
Do not allow familiarity with products to make you
careless. Remember that a careless fraction of a second is
sufficient to inflict serious injury.
FUELING AND REFUELING THE TRIMMER
FUEL MIXTURE
This product is powered by a 2-cycle engine and requires
pre-mixing petrol and 2-cycle lubricant. Pre-mix unleaded
petrol and 2-cycle engine lubricant in a clean container
approved for petrol.
WARNING:
Always wear safety goggles or safety glasses with
side shields when operating power tools. Failure to do
so could result in objects being thrown into your eyes
resulting in possible serious injury.
■ This engine is certified to operate on unleaded petrol
intended for automotive use.
■ Mix high quality 2-cycle engine lubricant at 20ml per 1
litre.
■ Do not use automotive lubricant or 2-cycle outboard
lubricant.
WARNING:
Do not use any attachments or accessories not
recommended by the manufacturer of this product. The
use of attachments or accessories not recommended
can result in serious personal injury.
■ DO NOT mix quantities larger than usable in a 30-day
period.
APPLICATIONS
You may use this product for the purposes listed below:
■ Trimming and shaping hedges and shrubbery.
PREMIUM EXACT MIX (50:1)
PETROL
LUBRICANT
1 gallon (US)
1 litre
7
2.6 oz.
20 cc (20 ml)
OPERATION
FILLING TANK
■ Position the hedge trimmer on its side with the fuel cap
pointing upward.
■ Clean surface around fuel cap to prevent contamination.
■ Loosen fuel cap slowly. Rest the cap on a clean surface.
■ Carefully pour fuel into the tank. Avoid spillage.
■ Immediately replace fuel cap and hand tighten. Wipe up
any fuel spillage.
Fig. 2
NOTE: It is normal for smoke to be emitted from a new engine
after first use.
START
WARNING:
Always shut off engine before fueling. Never add fuel to
a machine with a running or hot engine. Move at least
10m. from refueling site before starting engine. Do not
smoke! Failure to heed this warning could result in
serious personal injury.
STARTING AND STOPPING
See Figures 2 - 4.
To start a cold engine:
The starting method differs depending on whether the engine
is cold or warm.
RUN
■ Place the hedge trimmer on level ground and ensure that
no objects or obstructions are in the immediate vicinity
that could come in contact with the blades.
■ Hold the front handle firmly with your left hand and put
your right foot onto the base of the rear handle.
Fig. 3
■ PRIME - Press the primer bulb 7 times.
ON/OFF
SWITCH
■ SET the start lever to the START position.
■ PULL the rope until the engine starts.
■ Allow the engine to run for 6-10 seconds.
■ Squeeze throttle trigger lock and throttle trigger.
NOTE: Squeezing and releasing the throttle trigger releases
the start lever to the RUN position.
TRIGGER
LOCK
To start a warm engine:
■ SET the start lever to the RUN positon.
■ PULL the rope until the engine starts.
To stop the engine:
THROTTLE
TRIGGER
■ Press and hold the on/off switch in the stop “ O ” position
until the engine stops.
8
Fig. 4
OPERATION
WARNING:
When the engine starts with the throttle trigger
locked, the blades will move. Keep body, objects,
and obstructions away from blades. Failure to keep
away from the blades can result in serious injury.
ROTATING HANDLE
KNOB
ROTATING HANDLE
See Figure 5.
The handle can be rotated 45° or 90° to the left or to the
right.
To rotate handle:
■ Shut off the hedge trimmer.
■ Disengage the throttle trigger.
Fig. 5
■ Pull back on the rotating handle knob.
■ Turn handle to the right or to the left.
■ Release rotating handle knob.
■ Keep turning handle until it locks into place in one of the
45° or 90° positions.
NOTE: The trimmer will only operate at one of these locked
positions. The handle is locked when the rotating handle knob
is securely into place, is not extended, and the handle will no
longer move to either side.
CUTTING TIPS
See Figure 6.
WARNING:
Always keep both hands on the hedge trimmer handles.
Never hold shrubs with one hand and operate hedge
trimmer with the other. Failure to heed this warning can
result in serious injury.
Fig. 6
trimming new growth, use a wide sweeping action, so that
the stems are fed directly into the cutting blade. Older
growth will have thicker stems and will be trimmed easiest
by using a sawing movement.
OPERATING THE HEDGE TRIMMER
WARNING:
Clear the area to be cut before each use. Remove all
objects such as cords, lights, wire, or loose string which
can become entangled in the cutting blade and create
a risk of serious personal injury.
WARNING:
Read the safety information for safe operation using
the blade. Extreme care must be taken when using
blades to ensure safe operation. Refer to Specific
Safety Rules.
■ Do not force the hedge trimmer through heavy shrubbery.
This can cause the blades to bind and slow down. If the
blades slow down, reduce the pace.
■ Do not attempt to cut stems or twigs that are larger than
28 mm. thick, or those obviously too large to feed into the
cutting blade. Use a non-powered hand saw or pruning
saw to trim large stems.
■ If blades do become jammed, stop the engine, allow the
blades to stop, and remove the obstruction.
■ If desired, you can use a string to help cut your hedge
level. Decide how high you want the hedge. Stretch a piece
of string along the hedge at the desired height. Trim the
hedge just above the guide line of string. Trim the side of
a hedge so that it will be slightly narrower at the top. More
of the hedge will be exposed when shaped this way, and
it will be more uniform.
■ Always wear gloves when using the hedge trimmer. When
■ Always hold hedge trimmer with both hands when operating.
Use a firm grip on the handles. The unit is used for cutting
in either direction in a slow, sweeping action from side to
side.
■ The hedge trimmer should be positioned so that your body
will not come into contact with the muffler on the power head.
Stand so that you are stable and balanced on both feet.
■ Inspect and clear the area of any hidden objects.
■ Never use the hedge trimmer near power lines, fencing,
posts, buildings, or other immovable objects.
■ Never use a blade after hitting a hard object without first
inspecting it for damage. Do not use if any damage is
detected.
9
MAINTENANCE
WARNING:
When servicing, use only identical replacement parts.
Use of any other parts may create a hazard or cause
product damage.
REPLACING BLADES
See Figure 7.
Periodically inspect the blades for damage and wear. Always
use the manufacturer’s specified replacement blades.
■ Stop the engine and disconnect the spark plug wire.
■ Place the hedge trimmer upside down on a workbench
and remove the gear box cover screws.
■ Remove the gear box cover and set aside.
■ Remove the blade screws.
■ Remove the old blade.
■ Install the new blade and reinstall blade screws to
secure.
■ Install the gear box cover and reinstall gear box cover
screws to secure.
WARNING:
Always wear safety goggles or safety glasses with side
shields during product operation. If operation is dusty,
also wear a dust mask.
WARNING:
Before inspecting, cleaning, or servicing the machine,
shut off engine, wait for all moving parts to stop, and
disconnect spark plug wire and move it away from spark
plug. Failure to follow these instructions can result in
serious personal injury or property damage.
GENERAL MAINTENANCE
Avoid using solvents when cleaning plastic parts. Most plastics
are susceptible to damage from various types of commercial
solvents and may be damaged by their use. Use clean cloths
to remove dirt, dust, lubricant, grease, etc.
GEAR BOX
COVER
SCREWS
WARNING:
Do not at any time let brake fluids, petrol, petroleum-based
products, penetrating lubricants, etc., come in contact
with plastic parts. Chemicals can damage, weaken or
destroy plastic which may result in serious personal
injury.
Only the parts shown on the parts list are intended to
be repaired or replaced by the customer. All other parts
should be replaced at an Authorised Service Centre.
BLADE
SCREWS
GEAR BOX
COVER
GEAR
WARNING:
Blades are sharp. When handling the blade assembly,
wear non-slip, heavy-duty protective gloves. Do not
place your hand or fingers between blades or in any
position where they could get pinched or cut. NEVER
touch blades or service unit with the spark plug wire
connected.
Fig. 7
10
MAINTENANCE
LUBRICATING THE BLADE
See Figure 8.
For easier operation and longer blade life, lubricate the hedge
trimmer blade before and after each use.
■ Stop the engine and disconnect the spark plug wire.
■ Lay the hedge trimmer on a flat surface. Apply light weight
machine lubricant along the edge of the top blade.
If you will be using the hedge trimmer for an extended period,
it is advisable to lubricate the blade during use.
NOTE: Do not lubricate while the hedge trimmer is running.
■ Stop the engine and disconnect the spark plug wire.
■ Lubricate the hedge trimmer as described above.
■ Reconnect the spark plug wire and resume use.
CLEANING THE HEDGE TRIMMER
■ Stop the engine and disconnect the spark plug wire.
■ Slide the scabbard over the blade.
Fig. 8
■ Clean dirt and debris from the body of the hedge trimmer,
using a damp cloth with a mild detergent.
LATCH
NOTE: Do not use any strong detergents on the plastic
housing or the handle. They can be damaged by certain
aromatic lubricants such as pine and lemon, and by solvents such as kerosene.
CLEANING THE AIR FILTER SCREEN
See Figures 9 - 10.
For proper performance and long life, keep air filter clean.
■ Remove the air filter cover by pushing down on the latch
with your thumb while gently pulling on the cover.
■ Brush the air filter screen lightly to clean.
■ Replace the air filter cover by inserting the tabs on the
bottom of the cover into the slots on the air filter base;
push the cover up until it latches securely in place.
NOTE: For best performance, replace annually.
AIR FILTER
COVER
PULL COVER
TO OPEN
Fig. 9
AIR FILTER
COVER
FILTER SCREEN
LATCH
FUEL CAP
WARNING:
A leaking fuel cap is a fire hazard and must be replaced
immediately.
The fuel cap contains a non-serviceable filter and a check
valve. A clogged fuel filter will cause poor engine performance.
If performance improves when the fuel cap is loosened,
check valve may be faulty or filter clogged. Replace fuel
cap if required.
Fig. 10
11
MAINTENANCE
IDLE SPEED ADJUSTMENT
See Figure 11.
If the blades move at idle, the idle speed screw needs adjusting on the engine. Turn the idle speed screw counterclockwise
to reduce the idle RPM and stop the blade movement. If the
blades still move at idle speed, contact a service dealer for
adjustment and discontinue use until the repair is made.
WARNING:
The blades should never move at idle. Turn the idle
speed screw counterclockwise to reduce the idle RPM
and stop the blades, or contact a service dealer for
adjustment and discontinue use until the repair is made.
Serious personal injury may result from the blades
turning at idle.
IDLE
SPEED SCREW
Fig. 11
SPARK PLUG REPLACEMENT
This engine uses a Champion RCJ6Y with .025 in. electrode
gap. Use an exact replacement and replace annually.
CLEANING THE EXHAUST PORT AND
MUFFLER
Depending on the type of fuel used, the type and amount of
lubricant used, and/or your operating conditions, the exhaust
port and muffler may become blocked with carbon deposits.
If you notice a power loss with your gas powered tool, you
may need to remove these deposits to restore performance.
We highly recommend that only qualified service technicians
perform this service.
SHEATH
Fig. 12
SPARK ARRESTOR
The spark arrestor must be cleaned or replaced every 50
hours or yearly to ensure proper performance of the product.
Spark arrestors may be in different locations depending on the
model purchased. Please contact the nearest service dealer
for the location of the spark arrestor for your model.
STORING THE PRODUCT
■ Clean all foreign material from the product. Store idle unit
indoors in a dry, well-ventilated area that is inaccessible
to children. Keep away from corrosive agents such as
garden chemicals.
■ Abide by all ISO and local regulations for the safe storage
and handling of petrol.
When storing 1 month or longer:
■ Drain all fuel from tank into a container approved for petrol.
Run engine until it stops.
12
TROUBLESHOOTING
PROBLEM
POSSIBLE CAUSE
REMEDY
Engine will not start.
No spark.
Clean or replace spark plug. Reset spark plug gap. Refer to Spark
Plug Replacement earlier in this manual.
No fuel.
Push primer bulb until bulb is full of fuel. If bulb does not fill, primary
fuel delivery system is blocked. Contact a servicing dealer. If primer
bulb fills, engine may be flooded, proceed to next item.
Engine is flooded.
Pull starter three times with choke lever at “RUN”. If engine does
not start, move choke lever to “START” and repeat normal starting
procedure. If engine still fails to start, repeat procedure with a new
spark plug.
Starter rope pulls harder
now than when new.
Contact a servicing dealer.
Engine starts but will
not accelerate.
Engine requires approximately three minutes to
warm up.
Allow engine to completely warm up. If engine does not accelerate
after three minutes, contact a servicing dealer.
Engine starts but will
only run at high speed
at half choke.
Carburetor requires
adjustment.
Contact a servicing dealer.
Engine does not reach
full speed and emits
excessive smoke.
Check lubricant fuel mixture.
Air filter screen is dirty.
Use fresh fuel and the correct 2-cycle lubricant mix.
Clean air filter screen. Refer to Cleaning The Air Filter Screen earlier
in this manual.
Spark arrester screen is
dirty.
Contact a servicing dealer.
I d l e s p e e d s c r ew o n
carburettor needs adjustment
Turn idle speed screw clockwise to increase idle speed. See figure
11. The blades should not move at idle.
Engine starts, runs,
and accelerates but
will not idle.
EMISSIONS MAINTENANCE SCHEDULE AND WARRANTED PARTS LIST
Emissions Parts
Inspect Before
Each Use
Clean Every
5 Hours
Replace
Every 25 Hours
or Yearly
Clean Every
25 Hours
or Yearly
Replace Every
50 Hours
CATALYST MUFFLER ASSEMBLY ...................................................................................................................... X
AIR FILTER ASSY
includes:
Filter Screen ..................................................... X
SPARK SCREEN..................................................................................................................................................X
FUEL TANK ASSY
includes:
Fuel Lines ........................ X
Fuel Cap .......................... X
IGNITION ASSY
includes:
Spark Plug........................................................................................ X
ALL EMISSIONS-RELATED PARTS ARE WARRANTED FOR TWO YEARS OR FOR THE PERIOD OF TIME PRIOR
TO THE PARTS FIRST SCHEDULED REPLACEMENT WHICHEVER COMES FIRST.
13
LIMITED WARRANTY
TTI warrants this outdoor product to be free of defects in material or workmanship for 24 months from the date of purchase by
the original purchaser, subject to the limitations below. Please keep your invoice as proof of date of purchase.
This warranty is only applicable where the product is used for personal and non-commercial purposes. This warranty
does not cover damage or liability caused by / due to misuse, abuse, accidental or intentional acts by user, improper handling,
unreasonable use, negligence, failure by end user to follow operating procedures outlined in the user’s manual, attempted
repair by non-qualified professional, unauthorized repair, modification, or use of accessories and/or attachments not specifically
recommended by authorized party.
This warranty does not cover belts, brushes, bags, bulbs or any part which ordinary wear and tear results in required replacement
during warranty period. Unless specifically provided under applicable law, this warranty does not cover transportation cost or
consumable items such as fuses.
This limited warranty is void if the product’s original identification (trade mark, serial number, etc.) markings have been defaced,
altered or removed or if product is not purchased from an authorized reseller or if product is sold AS IS and / or WITH ALL
FAULTS.
Subject to all applicable local regulations, the provisions of this limited warranty are in lieu of any other written warranty, whether
express or implied, written or oral, including any warranty of MERCHANTABILITY OR FITNESS FOR A PARTICULAR PURPOSE.
IN NO EVENT SHALL WE BE LIABLE FOR SPECIAL, INCIDENTAL, CONSEQUENTIAL OR INCIDENTAL DAMAGES. OUR
MAXIMUM LIABILITY SHALL NOT EXCEED THE ACTUAL PURCHASE PRICE PAID BY YOU FOR THE PRODUCT.
This warranty is valid only in the European Union, Australia and New Zealand. Outside these areas, please contact your
authorized Ryobi dealer to determine if another warranty applies.
CE DECLARATION OF CONFORMITY
We declare in sole responsibility that the product, to which this certificate applies, conforms to the basic health and safety
requirements of the Machinery Directive 98/37/EC and other relevant directives, like EMC Directive 2004/108/EC and
Directive 2000/14/EC with amendment 2005/88/EC.
To effect correct application of the health and safety requirements stated in the EEC directives, the following European
and/or national standards and/or technical specifications were consulted:
EN 774: 1996+A1+A2+A3/prEN 10517:2003, EN ISO 3744:1995, ISO 11094:1991,
EN ISO 12100-1:2003, EN ISO 12100-2:2003, EN 563:1994, EN 294:1992, ISO 3864-1:2002, ISO 3864-2:2004.
We declare this product complies to the requirements of the Directive 2000/14/EC with amendment 2005/88/EC.
This product has been assessed to conform to the Directive 2000/14/EC with amendment 2005/88/EC by means of unit
verification by TÜV Rheinland Product Safety GmbH.
Measured sound power level [dB (A)]:
112.1
Guaranteed sound power level [dB (A)]:
113
Date of issuance:
11/2007
Technical documents are kept by Homelite Far East Co., Ltd. 24/F, 388 Castle Peak Road, Tsuen Wan, N. T., Hong Kong.
Declared in 11/2007 by Homelite Far East Co., Ltd.
14
RYOBI TECHNOLOGIES (UK) LIMITED.
Medina House,
Fieldhouse Lane, Marlow,
Buckinghamshire,
SL7 1TB,
UNITED KINGDOM
Tel: + 44 (0)1628 894400
Fax: +44 (0)1628 894401
Technical helpline: +44 (0) 800 3890305
RYOBI TECHNOLOGIES GMBH
Itterpark 4
D-40724 Hilden
DEUTSCHLAND
Tel: + 49 (0) 2103 2958-0
Fax: + 49 (0) 2103 2958-29
RYOBI TECHNOLOGIES GMBH
Vertriebsbüro Österreich
Schinitzgasse 13
A-8605 Kapfenberg
Tel.: + 43 (0) 3862 23590-0
Fax: + 43 (0) 3862 23590-25
RYOBI TECHNOLOGIES SAS
Immeuble Le Grand Roissy
Z.A. du Gué - 35 rue de Guivry
77990 LE MESNIL AMELOT FRANCE
Phone: + 33 (0)1 60 94 69 70
Fax: + 33 (0)1 60 94 69 79
TECHTRONIC INDUSTRIES AUSTRALIA PTY
LIMITED.
Building B, Rosehill Industrial Estate,
3 Shirley Street,
Rosehill NSW 2142
AUSTRALIA
Tel: (02) 8892 1800 or 1300 361 505
Fax: 1800 807 993
RYOBI BELGIUM
Avenue des Pâquerettes, 55
Zoning artisanal - bâtiment 5
B - 1410 Waterloo
BELGIQUE
Tel : + 32 (0) 2 357 81 40
Fax : + 32 (0) 2 357 81 49
TECHTRONIC INDUSTRIES (NZ) LIMITED.
27 Clemow Drive, Mt Wellington
PO Box 12-806, Penrose, Auckland
NEW ZEALAND
Tel: + 64 (0) 9 573 0230 Free Call: +64 0800 279 624
Fax: + 64 (0) 9 573 0231
RYOBI ITALIA
Via Vincenzo Borelli, 13
I - 41100 Modena
ITALIA
Tel : + 39 (0) 59 23 84 08
Fax : + 39 (0) 59 24 69 60
A&M MIDDLE EAST FZCO
P.O.Box 61254
Jedel Ali, Dubai,
UNITED ARAB EMIRATES
Tel.: + 971 4 8861399
Fax: + 971 4 8861400
RYOBI IBÉRICA
Avenidad de la Industria 52
28820 Coslada - Madrid
ESPANA
Tel : + 34 (0) 91 627 93 26
Fax : + 34 (0) 91 627 93 29
TECHTRONIC INDUSTRIES NORDIC
Stamholmen 147, 4. DK-2650 Hvidovre
DENMARK
Tel.: (+45) 43 56 55 55
Fax: (+45) 43 56 55 56
TECHTRONIC INDUSTRIES (ASIA) CO. LTD.
24/F, CDW Building,
388 Castle Peak Road,
Tsuen Wan, Hong Kong.
Tel : + 852 2402 6888
Machine: 26cc hedge trimmer
Type: RHT2660DA
Name of company:
Address:
Name / title: Andrew Eyre
Homelite Far East Co., Ltd.
24/F, CDW Building,
388 Castle Peak Road,
Tsuen Wan Hong Kong.
Vice President, Engineering
Signature:
11 / 2007
15