Transcript
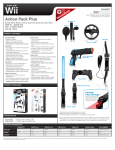
Avec le MotionPLUS Wii
1. Assurez-vous que l’étui silicone est installé sur la télécommande Wii
2. Etendez entièrement le socle de la télécommande.
3. Insérez l’embout de la dragonne à travers l’orifice circulaire situé au dos du socle de la télécommande.
4. Insérez d’abord la partie supérieure de la télécommande. Assurez-vous d’insérer la télécommande sous la
languette située sur la partie supérieure du socle.
5. Une fois la partie supérieure insérée, appuyez sur la partie centrale et inférieure de la télécommande pour l’insérer
totalement dans le socle.
6. Remontez la partie inférieure du socle de la télécommande pour sécuriser la télécommande Wii.
7. Pour retirer la télécommande Wii, étendez entièrement le socle de la télécommande.
8. En utilisant votre index, sortez la télécommande Wii de l’orifice circulaire situé au dos du socle.
9. Poussez la télécommande Wii vers le haut pour la sortir.
Sans le MotionPLUS Wii
1. Assurez-vous que l’étui silicone est installé sur la télécommande Wii
2. Assurez-vous d’avoir entièrement étendu le socle de la télécommande.
3. Insérez la dragonne via l’orifice inférieur.
4. Insérez d’abord la partie supérieure de la télécommande. Assurez-vous d’insérer la télécommande sous la
languette située sur la partie supérieure du socle.
5. Une fois la partie supérieure insérée, appuyez sur la partie centrale et inférieure de la télécommande pour l’insérer
totalement dans le socle.
6. Remontez la partie inférieure du socle de la télécommande pour sécuriser la télécommande Wii.
7. Pour retirer la télécommande Wii, étendez entièrement le socle de la télécommande.
8. En utilisant votre index, sortez la télécommande Wii de l’orifice circulaire situé au dos du socle.
9. Poussez la télécommande Wii vers le haut pour la sortir.
INSTALLATION DU SABRE LASER:
1. Retirez le cache du compartiment à piles situé sur le côté du sabre laser. (a small screwdriver is needed)
2. Insérez 2 piles « AAA » puis replacez le couvercle du compartiment à piles.
REMARQUE: Le commutateur MARCHE/ARRET du sabre laser est situé sous le couvercle du compartiment à piles.
Lorsque vous appuyez dessus, le sabre laser s’illumine en ROUGE ou en BLEU (selon le sabre que vous tenez). Afin
de prévenir tout gaspillage d'énergie, assurez-vous d’éteindre le sabre laser lorsque vous ne l’utilisez pas.
3. Connectez l’accessoire au socle de la télécommande. Pour installer le sabre laser, placez la partie inférieure de
l’accessoire dans le socle pour télécommande. Les petits tenons situés sur la partie supérieure du socle pour la
télécommande doivent être insérés dans les espaces situés sur la partie inférieure de l’accessoire. Faites
correspondre les flèches situées sur le socle de la télécommande avec celles de l’accessoire.
4. Tournez l’accessoire dans le sens antihoraire jusqu’au clic. L’accessoire est verrouillé.
5. Pour retirer l’accessoire du socle, maintenez enfoncée la touche UNLOCK-LOCK puis tournez l'accessoire dans le
sens horaire puis séparez-le du socle de la télécommande.
REMARQUE: N’utilisez aucun accessoire ne s'adaptant pas au connecteur d'extension. En cas de problème avec un
accessoire, contactez l’équipe d’assistance de dreamGEAR à l’adresse [email protected].
MODE OPÉRATOIRE DU CONNECTEUR D’EXTENSION EXTERNE DU SOCLE DE LA TÉLÉCOMMANDE:
1. Pour ouvrir le loquet de verrouillage, appuyez sur le bouton situé sous le bouton Lock-Unlock du socle pour la
télécommande.
2. En dirigeant la partie supérieure du socle vers le bas, utilisez le connecteur Infrarouge de la télécommande Wii
pour effectuer des sélections sur l’écran.
3. Une fois les sélections terminées, fermez le loquet de verrouillage. Un clic est émis lorsque le loquet est verrouillé.
INSTALLATION DE LA TÉLÉCOMMANDE WII (AVEC MOTIONPLUS WII) SUR LE VOLANT:
REMARQUE: Le volant n’est pas compatible avec l’étui silicone pour la télécommande Wii. Assurez-vous de retirer
l’étui silicone pour la télécommande Wii avant de tenter toute installation. Veuillez vous référer au manuel d’utilisation
de la télécommande Wii pour l’installation et le retrait de l’étui silicone.
1. Ouvrez le loquet situé sur la partie avant du volant.
2. Insérez la dragonne fixée à la télécommande Wii à travers l’orifice situé sur le côté droit du volant puis tirez.
3. Installez la télécommande Wii avec MotionPLUS Wii sur le volant de manière à ce que les touches directionnelles
de la télécommande soient dirigées sur le côté gauche du volant.
4. Refermez le loquet pour fixer la télécommande Wii au Volant.
REMARQUE: Utilisez le connecteur d’extension externe du volant pour naviguer dans les menus.
PACKAGE CONTENTS:
• Remote Cradle
• Glow Saber Extension
• Racing Wheel
• Dual Trigger Light Blaster
1. Ouvrez le loquet situé sur la partie avant du volant.
2. Insérez la dragonne fixée à la télécommande Wii à travers l’orifice situé sur le côté droit du volant puis tirez.
3. Installez la télécommande Wii sur le volant de manière à ce que les touches directionnelles de la télécommande
soient dirigées sur le côté gauche du volant.
REMARQUE: Assurez-vous d’avoir entièrement inséré la télécommande Wii dans le côté gauche du Volant.
4. Refermez le loquet pour fixer la télécommande Wii au Volant.
REMARQUE: Utilisez le connecteur d’extension externe du volant pour naviguer dans les menus.
INSTALLATION DES PILES DANS LE PISTOLET LASER À DEUX GÂCHETTES:
1. Dévissez le couvercle du compartiment à piles (situé sous la poignée du pistolet) en utilisant un mini tournevis (non
fourni).
2. Insérez 2 piles « AAA » en respectant la polarité puis refermez le couvercle du compartiment à piles.
3. Vissez fermement le couvercle du compartiment à piles avant toute utilisation.
REMARQUE: Le commutateur d’alimentation situé près du compartiment à piles permet d’activer/désactiver la
lumière et le vibreur du pistolet laser.
INSTALLATION DE LA TÉLÉCOMMANDE DANS LE PISTOLET LASER À DEUX GÂCHETTES:
REMARQUE: Le pistolet laser à deux gâchettes n’est pas compatible avec l’étui silicone pour la télécommande Wii.
Assurez-vous de retirer l’étui silicone pour la télécommande Wii avant de tenter toute installation. Veuillez vous référer
au manuel d’utilisation de la télécommande Wii pour l’installation et le retrait de l’étui silicone.
REMARQUE: Utilisez le connecteur d’extension externe du pistolet laser à deux gâchettes pour naviguer dans les
menus.
Avec le Wii MotionPLUS
1. Ouvrez les loquets situés sur la partie supérieure du pistolet laser.
2. Insérez la télécommande Wii dans le pistolet en faisant glisser celle-ci dans l’emplacement pour télécommande
Wii du pistolet (l’extrémité avec les touches directionnelles doit être dirigée vers le haut).
3. Insérez l’extrémité avec les touches directionnelles de la télécommande Wii jusqu’à la butée.
4. Fermer les loquets du pistolet laser. Lorsque vous jouez à un jeu ne requérant pas la Wii Nunchuk™, vous pouvez
désormais jouer. Lorsque le jeu nécessite l’utilisation du Nunchuk Wii, passez à l’étape 5.
5. Assurez-vous que le couvercle du connecteur du Wii MotionPLUS est retiré avant d’insérer le connecteur du
Nunchuk Wii dans le connecteur d’extension externe du Wii MotionPLUS.
Sans le Wii MotionPLUS
1. Ouvrez les loquets situés sur la partie supérieure du pistolet laser.
2. Insérez la télécommande Wii dans le pistolet en faisant glisser celle-ci dans l’emplacement pour télécommande
Wii du pistolet (l’extrémité avec les touches directionnelles doit être dirigée vers le haut).
3. Insérez l’extrémité avec les touches directionnelles de la télécommande Wii jusqu’à la butée.
4. Refermez le loquet le plus proche de la touche « A » de la télécommande Wii. Lorsque vous jouez à un jeu ne
requérant pas le Nunchuk Wii™, refermez le second loquet, vous pouvez désormais jouer. Lorsque le jeu
nécessite l’utilisation du Nunchuk Wii, passez à l’étape 5.
5. Via l’orifice arrière du pistolet, faites glisser le connecteur du Nunchuk Wii sous le loquet arrière du pistolet puis
connectez le Nunchuk Wii à la télécommande Wii. Assurez-vous que le couvercle du connecteur de la
télécommande Wii est retiré avant d’insérer le connecteur du Nunchuk Wii dans le connecteur d’extension externe
de la télécommande Wii.
6. Fermez le loquet arrière.
REMARQUE: La gâchette inférieure du pistolet active le bouton A, tandis que la gâchette supérieure active le bouton
B. Veuillez vous référer au manuel d’utilisation du jeu pour connaître la configuration des touches.
RETRAIT DE LA TÉLÉCOMMANDE DU PISTOLET LASER À DEUX GÂCHETTES:
1. Lorsque le Nunchuk Wii est fixé à la télécommande Wii ou le MotionPLUS Wii, retirez d’abord le Nunchuk Wii
avant de retirer la télécommande Wii du pistolet.
REMARQUE: Veuillez vous référer au manuel d’utilisation de la télécommande pour davantage d’informations sur le
retrait du Nunchuk Wii.
2. Ouvrez les deux loquets situés sur la partie supérieure du pistolet puis sortez la télécommande Wii en tirant
celle-ci depuis la partie arrière.
REMARQUE: Pensez tout d’abord à votre sécurité. Lorsque vous agitez le socle pour télécommande Wii avec un
accessoire connecté, observez les objets et personnes qui vous entourent afin de ne pas blesser quelqu’un ou
endommager un objet. Afin de prévenir toute blessure corporelle et dommage, assurez-vous que la télécommande
Wii est fermement connectée au socle pour télécommande Wii et que vous vous situez à une distance suffisamment
éloignée de votre téléviseur et des personnes qui vous entourent. Les accessoires fournis sont conçus SEULEMENT
pour le jeu et ne doivent jamais être utilisés pour blesser des personnes, briser des objets ou autres accessoires.
Utilisez toujours la dragonne de la télécommande Wii lors de l’utilisation des accessoires fournis. Veuillez vous référer
au manuel d’utilisation de la télécommande Wii pour l’installation et le retrait des dragonnes.
STIPULATION D’EXONÉRATION: dreamGEAR ne sera en AUCUN CAS tenu responsable des blessures corporelles
et des dommages de biens causés lors de l’utilisation de ce produit. Il est de la responsabilité de l’utilisateur d’utiliser
l’unité en toute sécurité.
1. Open the latch located on the front of the Racing Wheel.
2. Insert the wrist strap attached to the Wii Remote through the hole on the right side of the Racing Wheel and pull
through.
3. Place the Wii Remote into the wheel so that the directional button is located on the left side of the wheel.
NOTE: Make sure that the Wii Remote is pushed all the way to the left side of the Racing Wheel.
4. Close the latch to secure the Wii Remote into the Racing Wheel.
NOTE: Use the pass-through port on the Racing Wheel to navigate through any menus.
HOW TO INSERT THE WII REMOTE INTO THE REMOTE CRADLE:
NOTE: The Remote Cradle can only be used with the Wii Remote Jacket attached to the Wii Remote. Please refer to
the Wii Remote’s User’s Guide on how to install and uninstall the Wii Remote Jacket.
With Wii MotionPLUS
1. Make sure that the Wii Remote is inserted into the Wii Remote Jacket.
2. Extend the body of the Remote Cradle all the way down.
3. Insert the wrist strap through the circular hole located toward the back of the Remote Cradle.
4. Insert the top of the Wii Remote first. Make sure that you insert the remote underneath the tab located towards
the top of the Remote Cradle.
5. Once the top is inserted, push the middle and bottom of the Wii Remote until flush with the Remote Cradle.
6. Push the bottom of the Remote Cradle upward to secure the Wii Remote.
7. To remove the Wii Remote, fully extend the body of the Remote Cradle all the way down.
8. Using your index finger, push the Wii Remote out from the circular hole located on the back of the Remote
Cradle.
9. Lift the Wii Remote up and out.
Without Wii MotionPLUS
1. Make sure that the Wii Remote is inserted into the Wii Remote Jacket.
2. Make sure that the body of the Remote Cradle is pushed all the way down.
3. Insert the wrist strap through the bottom hole.
4. Insert the top of the Wii Remote first. Make sure that you insert the remote underneath the tab located towards
the top of the Remote Cradle.
5. Once the top is inserted, push the middle and bottom of the Wii Remote until Flush with the Remote Cradle.
6. Push the bottom of the Remote Cradle upward to secure the Wii Remote.
7. To remove the Wii Remote, fully extend the body of the Remote Cradle all the way down.
8. Using your index finger, push the Wii Remote out from the circular hole located on the back of the Remote
Cradle.
9. Lift the Wii Remote up and out.
HOW TO INSTALL THE GLOW SABER EXTENSION:
1. Remove the battery cover on the side of the Saber Extension. (a small screwdriver is needed)
2. Insert 2 “AAA” batteries and replace the battery cover.
NOTE: The ON/OFF button for the Saber Extension is located below the battery cover. When pressed, the Saber
Extension illuminates RED or BLUE (depending which saber you have in hand). Make sure you turn the Saber OFF
when not in use to preserve battery life.
3. Attach the extension onto the Remote Cradle. To attach the Saber Extension, place the bottom of the extension
to the Remote Cradle. The small pegs on the top of the Remote Cradle should fit into the gaps of the bottom of
the extension. Match the pointed arrows located on both the Remote Cradle and each extension.
4. Turn the extension counter-clockwise until you hear a clicking sound. The extension will lock into place.
5. To release the extension from the Remote Cradle, hold down the UNLOCK-LOCK button and turn the extension
clockwise and pull off the Remote Cradle.
NOTE: Do not use any extension if they do not lock into place. If you are having issues with any extensions, please
contact the dreamGEAR Support Team at [email protected].
HOW TO USE THE PASS-THROUGH PORT ON THE REMOTE CRADLE:
1. To unhinge the breakaway latch, press the button located under the Lock-Unlock button on the Remote Cradle.
2. With the top of the Remote Cradle down, use the IR port on the Wii Remote to make your on-screen selections.
3. After your on-screen selections have been made, re-hinge the breakaway latch. You will hear a clicking sound to
indicate that the latch is back in place.
HOW TO INSTALL THE WII REMOTE INTO THE RACING WHEEL WITH WII MOTIONPLUS:
NOTE: The Racing Wheel is not compatible with the Wii Remote Jacket. Be sure to remove the Wii Remote Jacket
before attempting to install. Please refer to the Wii Remote’s User’s Guide on how to install and uninstall the Wii
Remote Jacket.
HOW TO INSTALL BATTERIES INTO THE DUAL TRIGGER LIGHT BLASTER:
1. Unscrew the battery compartment door (located on the bottom of the Blaster handle) using a mini-screw-driver
(not included).
2. Insert 2 “AAA” batteries in the correct +/- direction and close the battery compartment door.
3. Screw the battery compartment door shut tightly before using.
NOTE: The power switch next to the battery compartment turns the LED & Rumble functions of the Blaster ON and
OFF.
HOW TO INSERT THE WII REMOTE INTO THE DUAL TRIGGER LIGHT BLASTER:
NOTE: The Dual Trigger Light Blaster is not compatible with the Wii Remote Jacket. Be sure to remove the Wii
Remote Jacket before attempting to install. Please refer to the Wii Remote’s User’s Guide on how to install and
uninstall the Wii Remote Jacket.
NOTE: Use the pass-through port on the Dual Trigger Light Blaster to navigate through any menus.
With Wii MotionPLUS
1. Open both latches located at the top of the Blaster.
2. Insert the Wii Remote into the Blaster by sliding it into the Wii Remote cradle of the Blaster (directional pad end
first with the buttons facing upward).
3. Slide the directional pad end of the Wii Remote towards the front of the Blaster until it stops.
4. Close the latches on the Blaster. If you are playing a game that does not require the Nunchuk, you are ready to
play. If your game requires the use of the Nunchuk, continue to step 5.
5. Make sure the connector cover of the Wii MotionPLUS has been removed and insert the connector plug of the
Nunchuk into the External Extension Connector of the Wii MotionPLUS.
Without Wii MotionPLUS
1. Open both latches located at the top of the Blaster.
2. Insert the Wii Remote into the Blaster by sliding it into the Wii Remote cradle of the Blaster (directional pad end
first with the buttons facing upward).
3. Slide the directional pad end of the Wii Remote towards the front of the Blaster until it stops.
4. Close the latch that is closest to the “A” button on the Wii Remote. If you are playing a game that does not
require the Nunchuk, close the second latch and you are ready to play. If your game requires the use of the
Nunchuk, continue to step 5.
5. Through the back opening of the Blaster, slip the connector plug of the Wii Nunchuk under the back latch on the
Blaster and connect the Wii Nunchuk to the Wii Remote. Make sure that the connector cover of the Wii Remote
has been removed before inserting the connector plug of the Wii Nunchuk into the External Extension Connector
of the Wii Remote.
6. Close the back latch.
NOTE: The bottom trigger of the Blaster activates the A button, the top trigger activates the B button. Please refer
to your game’s User’s Guide for button configuration.
HOW TO REMOVE THE WII REMOTE FROM THE DUAL TRIGGER LIGHT BLASTER:
1. If the Nunchuk is attached to the Wii Remote or the Wii MotionPLUS, remove the Nunchuk first before trying to
remove the Wii Remote from the Blaster.
NOTE: Please refer to the Wii Remote’s User’s Guide for Nunchuk removal instructions.
2. Open both latches located on the top of the Blaster and lift the Wii Remote up from the back and slide the Wii
Remote until it is completely out of the Blaster.
NOTE: Always practice safety first. When you are swinging the Remote Cradle with an extension attached, be aware
of your surroundings, making sure not to hit anyone or anything. To prevent injury and property damage, make sure
the Wii Remote is properly and securely attached to your Remote Cradle and that you are a reasonable distance
from your television and any people around you. The accessories included are designed for gaming ONLY and
should never be used to strike people, objects or other accessories. Always use your Wii Remote wrist straps when
using the accessories included. Please refer to your Wii Remote’s User’s Guide to install or uninstall the wrist straps.
DISCLAIMER: dreamGEAR is NOT responsible for any personal injury or damage to property when using this
product. It is the user’s responsibility to practice proper safety procedures.
1. Open the latch located on the front of the Racing Wheel.
2. Insert the wrist strap attached to the Wii Remote through the hole on the right side of the Racing Wheel and pull
through.
3. Place the Wii Remote with Wii MotionPLUS into the wheel so that the directional button is located on the left side
of the wheel.
4. Close the latch to secure the Wii Remote into the Racing Wheel.
NOTE: Use the pass-through port on the Racing Wheel to navigate through any menus.
HOW TO INSTALL THE WII REMOTE INTO THE RACING WHEEL WITHOUT WII MOTIONPLUS:
NOTE: The Racing Wheel is not compatible with the Wii Remote Jacket. Be sure to remove the Wii Remote Jacket
before attempting to install. Please refer to the Wii Remote’s User’s Guide on how to install and uninstall the Wii
Remote Jacket.
All dreamGEAR/i.Sound products come with a limited warranty and
have been subjected to a thorough series of tests to ensure the highest
level of dependability and compatibility. It is unlikely that you will
experience any problem, but if a defect should become apparent
during the use of this product, dreamGEAR warrants to the original
consumer purchaser that this product will be free from defects in
material and workmanship for a period of 120 days from the date of
your original purchase. If a defect covered by this warranty occurs,
dreamGEAR, at its option, will repair or replace the product purchased
at no charge. If a replacement is necessary and your product is no
longer available, a comparable product may be substituted at the sole
discretion of dreamGEAR.
This warranty does not cover normal wear and tear, abusive use or
misuse, modification, tampering or by any other cause not related to
either materials or workmanship. This warranty does not apply to
products used for any industrial, professional or commercial purposes.
For service on any defective product under the 120-day warranty
policy, please contact Consumer Support
to obtain a Return Authorization Number.
NOTE: dreamGEAR will not process any defective claims without
a Return Authorization Number.
Consumer Support Hotline:
877-999-DREAM (3732) (U.S. and Canada only) or
310-222-1045 (International)
Consumer Support Email: [email protected]
Websites:
www.dreamgear.net
www.isound.net
CONTENIDO DEL EMBALAJE:
• Base para control remoto
• Extensión Sable luminoso
• Volante de carreras
• Arma Láser con doble gatillo
• Guía de usuario/Tarjeta de garantía
• Tarjeta de registro
CÓMO INSERTAR EL CONTROL REMOTO WII EN LA BASE DEL REMOTO:
NOTA: La Base del Remoto puede utilizarse solamente con el Forro para Control Remoto Wii instalado en el Control
Remoto Wii. Consulte la Guía de Usuario del Control Remoto Wii para ver cómo instalar y desinstalar el Forro para
Control Remoto Wii.
Con Wii MotionPLUS
1. Asegúrese de que el Control Remoto Wii esté insertado en el Forro para Control Remoto Wii.
2. Extienda el cuerpo de la Base del Control Remoto en toda su longitud.
3. Inserte la correa de muñeca a través del agujero circular ubicado hacia la parte trasera de la Base para control
remoto.
4. Inserte primero la parte superior del Control Remoto Wii. Asegúrese de insertar el control remoto por debajo de la
pestaña ubicada hacia la parte superior de la Base del control remoto.
5. Una vez insertada la parte superior, empuje las partes media e inferior del Control Remoto Wii hasta que quede al
ras con la Base del control remoto.
6. Empuje hacia arriba la parte inferior de la Base del control remoto para que el Control Remoto Wii quede firme.
7. Para retirar el Control Remoto Wii, extienda el cuerpo de la Base del Control Remoto en toda su longitud.
8. Usando su dedo índice, empuje el Control Remoto Wii fuera del agujero circular ubicado en la parte trasera de la
Base del control remoto.
9. Levante el Control Remoto Wii y extráigalo.
Sin Wii MotionPLUS
1. Asegúrese de que el Control Remoto Wii esté insertado en el Forro para Control Remoto Wii.
2. Asegúrese de que el cuerpo de la Base del control remoto esté totalmente extendido.
3. Inserte la correa de muñeca a través del agujero de la parte inferior.
4. Inserte primero la parte superior del Control Remoto Wii. Asegúrese de insertar el control remoto por debajo de la
pestaña ubicada hacia la parte superior de la Base del control remoto.
5. Una vez insertada la parte superior, empuje las partes media e inferior del Control Remoto Wii hasta que quede al
ras con la Base del control remoto.
6. Empuje hacia arriba la parte inferior de la Base del control remoto para que el Control Remoto Wii quede firme.
7. Para retirar el Control Remoto Wii, extienda el cuerpo de la Base del Control Remoto en toda su longitud.
8. Usando su dedo índice, empuje el Control Remoto Wii fuera del agujero circular ubicado en la parte trasera de la
Base del control remoto.
9. Levante el Control Remoto Wii y extráigalo.
INSTALACIÓN DE LA EXTENSIÓN SABLE LUMINOSO:
1. Abrir la tapa de la unidad de baterías en un costado de la Extensión Sable (se requiere de un destornillador
pequeño)
2. Insertar 2 baterías tamaño triple A (AAA) y volver a colocar la tapa de la unidad.
NOTA: El botón ON/OFF de la Extensión Sable se encuentra debajo de la tapa de la unidad de baterías. Al presionar,
la extensión Sable, se ilumina en ROJO o en AZUL (dependiendo del sable que se tenga en la mano). Asegurar que
el Sable esté apagado en OFF cuando no esté en uso, a fin de preservar la vida útil de las baterías.
3. Conectar la extensión en la base para el Control Remoto. Para conectar la extensión del Sable, colocar la parte
inferior de la extensión en la base para el Control Remoto. Las pequeñas placas de la base para el Control
Remoto deben calzar entre los espacios de la parte inferior de la extensión. Alinear las flechas indicadas en la
base para el Control Remoto y en cada extensión.
4. Girar la extensión en el sentido contrario de las manillas del reloj y cuando sienta un click la Extensión quedará fija
en su lugar.
5. Para retirar la extensión de la base para el Control Remoto, presione el botón indicado UNLOCK-LOCK y girar la
extensión en el sentido de las manillas del reloj para luego tirarlo hacia arriba para sacarlo de la base del Control
Remoto.
NOTA: No usar ninguna Extensión si no queda fija en su lugar. Si tiene problemas con cualquiera de las Extensiónes,
por favor contactar al Equipo de Soporte de dreamGEAR al email [email protected].
CÓMO USAR EL PUERTO DE PASO DE LA BASE DEL CONTROL REMOTO:
1. Para separar el cierre, presione el botón ubicado bajo el botón Lock-Unlock de la base para el Control remoto.
2. Con la parte superior de la Base de control remoto hacia abajo, use el puerto IR del Control Remoto Wii para
realizar sus selecciones en pantalla.
3. Después de haber hecho sus selecciones en pantalla, reponga el cierre. Escuchará un sonido de “clic” para
indicar que el cierre está de nuevo en su lugar.
VOLANTE DE CARRERAS
Cómo instalar el Control Remoto Wii en el Volante de Carreras con el Wii MotionPLUS:
NOTA: El Volante de Carreras no es compatible con el Forro para Control Remoto Wii. Asegúrese de retirarlo antes
de intentar instalarlo. Consulte la Guía de Usuario del Control Remoto Wii para ver cómo instalar y desinstalar el
Forro para Control Remoto Wii.
FOR TECHNICAL SUPPORT
PLEASE CONTACT: 1-877-999-DREAM
or [email protected]
1. Abra el cierre ubicado en la parte delantera del Volante de Carreras.
2. Inserte la correa de muñeca unida al Control Remoto Wii a través del agujero del lado derecho del Volante de
Carreras y tire de ella.
3. Coloque el Control Remoto Wii con el Wii MotionPLUS en el volante de forma tal que el mando direccional está
ubicado en el lado izquierdo del volante.
USER’S GUIDE
INSTALLATION DE LA TÉLÉCOMMANDE WII SUR LE SOCLE POUR TÉLÉCOMMANDE:
REMARQUE: Fixez l’étui silicone sur la télécommande Wii avant d’insérer celle-ci sur le socle. Veuillez vous référer
au manuel d’utilisation de la télécommande Wii pour l’installation et le retrait de l’étui silicone.
INSTALLATION DE LA TÉLÉCOMMANDE WII (SANS MOTIONPLUS WII) SUR LE VOLANT:
REMARQUE: Le volant n’est pas compatible avec l’étui silicone pour la télécommande Wii. Assurez-vous de retirer
l’étui silicone pour la télécommande Wii avant de tenter toute installation. Veuillez vous référer au manuel d’utilisation
de la télécommande Wii pour l’installation et le retrait de l’étui silicone.
3-in-1 Game Essentials PLUS
CONTENIDO DEL EMBALAJE:
• Socle de la télécommande
• Sabre laser
• Volant
• Pistolet laser avec deux gâchettes
• Manuel d’utilisation/carte de garantie.
• Carte d’inscription.
DGWII-3151
4. Reponga el cierre para asegurar el Control Remoto Wii en el Volante de Carreras.
NOTA: Use el puerto de paso del Volante de Carreras para navegar por los menús.
Cómo instalar el Control Remoto Wii en el Volante de Carreras sin el Wii MotionPLUS:
NOTA: El Volante de Carreras no es compatible con el Forro para Control Remoto Wii. Asegúrese de retirarlo antes
de intentar instalarlo. Consulte la Guía de Usuario del Control Remoto Wii para ver cómo instalar y desinstalar el
Forro para Control Remoto Wii.
1. Abra el cierre ubicado en la parte delantera del Volante de Carreras.
2. Inserte la correa de muñeca unida al Control Remoto Wii a través del agujero del lado derecho del Volante de
Carreras y tire de ella.
3. Coloque el Control Remoto Wii en el volante de forma tal que el mando direccional está ubicado en su lado
izquierdo.
NOTA: Asegúrese de empujar completamente el Control Remoto Wii hacia el lado izquierdo del Volante de Carreras.
4. Reponga el cierre para asegurar el Control Remoto Wii en el Volante de Carreras.
NOTA: Use el puerto de paso del Volante de Carreras para navegar por los menús.
INSTALACIÓN DE LAS BATERÍAS EN EL ARMA LÁSER CON DOBLE GATILLO:
1. Destornillar la tapa de la unidad de baterías (ubicada en la parte inferior del mango del Arma Láser) con un
destornillador mini (no viene incluido con este producto).
2. Insertar 2 baterías tamaño triple a (AAA) en la posición correcta y cerrar la tapa de la unidad de baterías.
3. Atornillar firmemente la tapa de la unidad de baterías antes de usar el Arma Láser.
NOTA: El interruptor al lado de la unidad de baterías sirve para encender (ON) y apagar (OFF) las funciones LED y el
sonido del Arma Láser.
INSTALACIÓN DEL CONTROL REMOTO WII EN EL ARMA LÁSER CON DOBLE GATILLO:
NOTA: El Arma Láser con doble gatillo no es compatible con la funda del Control Remoto Wii. Asegurar que el
Control Remoto Wii esté sin funda antes de instalarlo. Por favor consultar el Manual de Uso del Control Remoto Wii
para colocar y retirar la funda del Control Remoto Wii.
NOTA: Usar el Puerto con paso para infrarrojos del Arma Láser con doble gatillo para navegar por todos los menus
disponibles.
Si tiene Wii MotionPLUS
1. Abrir los dos seguros ubicados en la parte superior del Arma Láser.
2. Insertar el Control Remoto Wii en el Arma Láser, deslizándolo en la base Wii para el Arma Láser (el extremo con
las flechas de control primero y con los botones hacia arriba).
3. Introducir el extremo con las flechas de control del Control Remoto Wii hacia la parte de adelante del Arma Láser
hasta que quede fijo en su lugar.
4. Cerrar los seguros del Arma Láser. Si se está jugando un juego que no requiere un Nunchuk, se está listo para
jugar. Si el juego requiere un Nunchuk, continuar con el paso siguiente (paso 5).
5. Asegurarse de retirar la cubierta del conector del Wii MotionPLUS e insertar el enchufe conector del Nunchuk en
el conector externo de la Extensión del Wii MotionPLUS.
Si no tiene Wii MotionPLUS
1. Abrir los dos seguros ubicados en la parte superior del Arma Laser.
2. Insertar el Control Remoto Wii en el Arma Láser, deslizándolo en la base Wii para el Arma Láser (el extremo con
las flechas de control primero y con los botones hacia arriba).
3. Introducir el extremo con las flechas de control del Control Remoto Wii hacia la parte delantera del Arma Láser
hasta que quede fijo en su lugar.
4. Cerrar el seguro que está más cerca del botón “A” del Control Remoto Wii. Si se está jungando un juego que no
requiere un Nunchuk, cierre el otro seguro y se está listo para jugar. Si el juego requiere un Nunchuk, continuar
con el paso siguiente (paso 5).
5. En la parte posterior, el Arma Laser tiene una apertura por la cual se debe introducir el enchufe conector del
Nunchuk Wii debajo del seguro de atrás del Arma Laser y conectar el Nunchuk Wii al Control Remoto Wii.
Asegurarse de retirar la cubierta del conector del Control Remoto Wii antes de introducir el enchufe conector del
Nunchuk Wii en el conector externo de la Extensión del Control Remoto Wii.
6. Cierre el seguro de atrás.
NOTA: El gatillo de abajo del Arma Laser activa el botón A, el gatillo de arriba activa el botón B. Por favor consultar el
Manual de Uso para configurar los botones.
RETIRO DEL CONTROL REMOTO WII DEL ARMA LASER:
1. Si el Nunchuk está conectado al Control Remoto Wii o al Wii MotionPLUS, retirar primero el Nunchuk antes de
tratar de retirar el Control Remoto Wii del Arma Laser.
NOTA: Por favor consultar las instrucciones en el Manual de Uso del Control Remoto Wii para retirar el Nunchuk.
2. Abrir los dos seguros ubicados en la parte superior del Arma Laser y tirar hacia arriba el Control Remoto Wii por la
parte de atrás e deslizar el Control Remoto Wii hasta que esté completamente fuera del Arma Laser.
NOTA: La seguridad siempre es lo primero. Cuando esté haciendo movimientos giratorios con una extensión
acoplada a la Base para el control remoto, tenga cuidado con lo que le rodea y tome precauciones para no golpear a
nadie ni a ningún objeto. Para evitar lesiones y daños a la propiedad, asegúrese de que el Control Remoto Wii esté
acoplado adecuada y firmemente a la Base para Control Remoto Wii y de estar a una distancia razonable de su
televisor y de cualquier persona que esté en los alrededores. Los accesorios del Juego Deportivo 6 en 1 están
diseñados para jugar SOLAMENTE y nunca deben utilizarse para golpear personas, objetos ni a otros accesorios.
Utilice siempre sus correas de muñeca para Control Remoto Wii cuando emplee los accesorios incluidos. Consulte la
Guía de Usuario del Control Remoto Wii para ver cómo instalar y desinstalar las manillas.
DESCARGO DE RESPOSABILIDAD: dreamGEAR NO es responsable de ninguna lesión personal o daño a la
propiedad derivados del uso de este producto. Es responsabilidad del usuario poner en práctica los procedimientos
de seguridad apropiados.