1
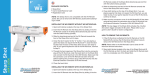
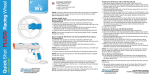
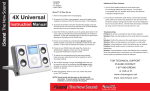
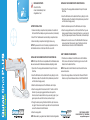
PACKAGE CONTENTS:
INSTALLING THE WII REMOTE WITH WII MOTIONPLUS:
• Quick Shot Plus
• User’s Guide/Warranty Card
• Registration Card
1. Open both of the orange latches located at the top of the Quick
Shot Plus.
2. Insert the Wii Remote into the Quick Shot Plus by sliding it into the
Wii Remote cradle of the Quick Shot Plus (directional pad end first
with the buttons facing upward).
BATTERY INSTALLATION:
3. Slide the directional pad end of the Wii Remote until it stops.
1. Unscrew the battery compartment door (located on the bottom of
the Quick Shot Plus handle) using a mini-screwdriver (not included).
4. Close the orange latches on the on the Quick Shot Plus. If you are
playing a game that does not require the Nunchuk, you are ready to
play. If your game requires the use of the Nunchuk, continue to step 5.
2. Insert 2 “AAA” batteries and close the battery compartment door.
3. Screw the battery compartment door tightly before using.
NOTE: The power switch next to the battery compartment turns the
LED & Rumble functions of the Quick Shot Plus on and off.
5. Make sure the connector cover of the Wii MotionPLUS has been
removed and insert the connector plug of the Nunchuk into the
External Extension Connector of the Wii MotionPLUS.
HOW TO REMOVE THE WII REMOTE:
INSTALLING THE WII REMOTE WITHOUT WII MOTIONPLUS:
NOTE: The Quick Shot Plus is not compatible with the Wii Remote Jacket.
Be sure to remove the Wii Remote Jacket before attempting to install.
1. If the Nunchuk is attached to the Wii Remote or the Wii MotionPLUS, remove the Nunchuk first before trying to remove the Wii
Remote from the Quick Shot Plus.
1. Open both of the orange latches located at the top of the Quick
Shot Plus.
NOTE: Please refer to the Wii Remote’s User’s Guide for Nunchuk
removal instructions.
2. Insert the Wii Remote into the Quick Shot Plus by sliding it into the
Wii Remote cradle of the Quick Shot Plus (directional pad end first
with the buttons facing upward).
2. Open both orange latches on the Quick Shot Plus and lift the Wii
Remote out by the Lock Release buttons on the Wii MotionPLUS.
3. Slide the directional pad end of the Wii Remote until it stops.
4. Close the orange latch that is closest to the “A” button on the Wii
Remote. If you are playing a game that does not require the
Nunchuk, close the second latch and you are ready to play. If your
game requires the use of the Nunchuk, continue to step 5.
5. Through the back opening of the Quick Shot Plus, slip the connector plug of the Nunchuk under the open latch on the Quick Shot and
connect the Nunchuk to the Wii Remote.
6. Close the orange latch.
NOTE: Please refer to your game’s User’s Guide for button configurations.
FOR TECHNICAL SUPPORT
PLEASE CONTACT: 1-877-999-DREAM
or [email protected]
CONTENIDO DEL PAQUETE:
6. Cierre el seguro naranja.
• Quick Shot Plus
• Guía del usuario/Tarjeta de garantía
• Tarjeta de registro
NOTA: Por favor, vea la guía de usuario del juego para la configuración
de botones.
COLOCACIÓN DE LA PILA/BATERÍA:
1. Desenrosque la tapa del compartimiento de las pilas/baterías
(situado en la parte inferior del mango del Quick Shot Plus) usando
un destornillador pequeño (no incluido).
2. Coloque 2 pilas/baterías “AAA” y cierre la tapa del compartimiento.
3. Vuelva a enroscar la tapa con firmeza antes de utilizarlo.
NOTA: El interruptor junto al compartimiento de las baterías activa o
desactiva las funciones LED y Vibración del Quick Shot Plus
COLOCACIÓN DEL MANDO DE CONTROL WII SIN EL
WII MOTIONPLUS:
NOTA: El Quick Shot Plus no es compatible con la funda de silicona
para mando Wii. Asegúrese de sacar la funda del mando Wii antes de
intentar colocarlo.
1. Abra los dos seguros naranja situados en la parte superior del Quick
Shot Plus.
2. Coloque el mando de control Wii dentro del Quick Shot Plus
deslizándolo dentro de receptáculo (primero el extremo de la cruz
de dirección con los botones mirando hacia arriba).
3. Deslice el extremo de la cruz de dirección del mando Wii hasta que
se detenga.
4. Cierre el seguro naranja que está más próximo al botón “A” del
mando Wii. Si va a jugar a un juego que no requiere Nunchuk, cierre
el otro seguro y está listo para jugar. Si el juego necesita del
Nunchuk, continúe con el paso 5.
5. A través de la abertura trasera del Quick Shot Plus, deslice la clavija
del conector del Nunchuk por debajo el seguro naranja abierto del
Quick Shot y conecte el Nunchuk al mando Wii.
COLOCACIÓN DEL MANDO DE CONTROL WII CON EL
WII MOTIONPLUS:
1. Abra los dos seguros naranja situados en la parte superior del Quick
Shot Plus.
2. Coloque el mando de control Wii dentro del Quick Shot Plus
deslizándolo dentro de receptáculo (primero el extremo de la cruz
de dirección con los botones mirando hacia arriba).
3. Deslice el extremo de la cruz de dirección del mando Wii hasta que
se detenga.
4. Cierre los seguros naranja del Quick Shot Plus. Si está jugando un
juego que no requiere Nunchuk, está listo para jugar. Si el juego
necesita del Nunchuk, continúe con el paso 5.
5. Compruebe que ha quitado el tapón del conector del Wii MotionPLUS y ha conectado el Nunchuk en el conector de Extensión
Externa del Wii MotionPLUS.
COMO SACAR EL MANDO DE CONTROL WII:
1. Si el Nunchuk está conectado al mando de control Wii o al Wii
MotionPLUS, primero desconecte el Nunchuk antes de intentar
quitar el mando de control del Quick Shot Plus.
NOTA: Por favor vea la guía de usuario de su mando de control Wii
para instrucciones de desconexión del Nunchuk.
2. Abra ambos seguros naranjas del Quick Shot Plus y levante el
mando Wii por los botones de liberación del Wii MotionPLUS.
PARA SOPORTE TÉCNICO
CONTACTE AL: 1-877-999-DREAM
o [email protected]
CONTENU DE L'EMBALLAGE :
• Quick Shot Plus
• Guide de l'utilisateur/Carte de garantie
• Carte d’enregistrement
REMARQUE : Reportez-vous au manuel d'utilisation de votre jeu pour
les configurations des boutons.
INSTALLATION DU WIIMOTE AVEC LE WII MOTIONPLUS :
1. Ouvrez les deux loquets situés en haut du Quick Shot Plus.
INSTALLATION DES PILES :
1. Dévissez le couvercle du compartiment pour piles (situé sous la
manche du Quick Shot Plus handle)
2. Insérer 2 piles “AAA et refermez le couvercle du compartiment pour
piles.
3. Vissez le couvercle du compartiment pour piles avant de l'utiliser.
REMARQUE : L'interrupteur d'alimentation situé à côté du compartiment pour piles permet d'allumer et d'éteindre le témoin et la fonction
de vibration Rumble du Quick Shot Plus.
2. Insérez la Wiimote dans le Quick Shot Plus en la faisant glisser dans
le socle pour Wiimote du Quick Shot Plus (l'extrémité du pavé
directionnel en premier avec les boutons orientés vers le haut).
3. Glissez l'extrémité du pavé directionnel de la Wiimote jusqu'à ce
qu'il n'avance plus.
4. Fermez les loquets orangés du Quick Shot Plus. Si vous jouez à un
jeu qui ne nécessite pas le Nunchuk, vous pouvez commencer à
jouer. Si votre jeu nécessite l'utilisation du Nunchuk, continuez à
l'étape 5.
5. Assurez-vous que le capuchon du connecteur de Wii MotionPLUS a
été retiré and et insérez le connecteur du Nunchuk dans la rallonge
du connecteur externe du Wii MotionPLUS.
INSTALLATION DU WIIMOTE SANS LE WII MOTIONPLUS :
REMARQUE : Le Quick Shot Plus n'est pas compatible avec la
Wiimote avec étui. Retirez l'étui de la Wiimote avant l'installation.
1. Ouvrez les deux loquets situés en haut du Quick Shot Plus.
2. Insérez la Wiimote dans le Quick Shot Plus en la faisant glisser dans
le socle pour Wiimote du Quick Shot Plus (l'extrémité du pavé
directionnel en premier avec les boutons orientés vers le haut).
3. Glissez l'extrémité du pavé directionnel de la Wiimote jusqu'à ce
qu'il n'avance plus.
COMMENT ENLEVER LA WIIMOTE :
1. Si le Nunchuk est attaché à la Wiimote ou au Wii MotionPLUS,
enlevez d'abord le Nunchuk avant d'essayer d'enlever la Wiimote du
Quick Shot Plus.
REMARQUE : Reportez-vous au manuel d'utilisation de la Wiimote
pour le retrait du Nunchuk.
2. Ouvrez les deux loquets orangés du Quick Shot Plus et soulevez la
Wiimote par les boutons de désengagement du Wii MotionPLUS.
4. Fermez le loquet orangé qui est le plus proche du bouton “A” de la
Wiimote. Si vous jouez à un jeu qui ne nécessite pas le Nunchuk,
fermez le second loquet et vous pouvez commencer à jouer. Si votre
jeu nécessite l'utilisation du Nunchuk, continuez à l'étape 5.
5. Par l'ouverture arrière du Quick Shot Plus, glissez le connecteur
depuis le Nunchuk en dessous du loquet ouvert du Quick Shot et
connectez le Nunchuk à la Wiimote.
6. Fermez le loquet orangé.
POUR ASSISTANCE TECHNIQUE
VEUILLEZ CONTACTER : 1-877-999-DREAM
Ou [email protected]