1
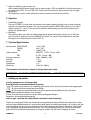
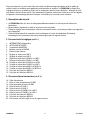
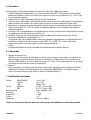
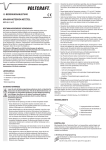
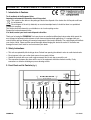
PROMIX100 – STEREO MIXER 4 CHANNELS + 2 MICROPHONE CHANNELS
1. Introduction & Features
To all residents of the European Union
Important environmental information about this product
This symbol on the device or the package indicates that disposal of the device after its lifecycle could harm
the environment.
Do not dispose of the unit (or batteries) as unsorted municipal waste; it should be taken to a specialised
company for recycling.
This device should be returned to your distributor or to a local recycling service.
Respect the local environmental rules.
If in doubt, contact your local waste disposal authorities.
Thank you for buying the PROMIX100! You have chosen an excellent multifunctional stereo mixer which meets the
most stringent requirements with reference to both home and professional applications. It is equipped with one
control function per level allowing all connected components to be tuned individually. The output display will facilitate
your choice of level. Please read the manual thoroughly before bringing this device into service. If the device was
damaged in transit, don't install or use it and contact your dealer.
2. Safety Instructions
•
•
•
•
This unit uses potentially lethal voltage doses. Refrain from opening the cabinet in order to avoid electroshocks.
Do not expose to the sun or other heat sources for any period of time.
Handle the controls with care: avoid rough movements and do not drop or smash the set.
The connections between the mixer and the rest of the equipment should be checked carefully. Faulty
connections or defective shielding may cause buzzing sounds.
3. Front Panel and its Controls (fig. 1)
1
2
3
4
13 14 12 15 11
3
PROMIX100
9
10 8
9
1
7
6
5
VELLEMAN
1.
2.
3.
4.
5.
6.
7
8.
9.
10.
11.
12.
13.
14.
15.
POWER switch
OUTPUT DISPLAY
MONITOR switch
Monitor LEVEL control
Headphone jack
Volume control for LINE 4
Volume control for LINE 3
Input selector for PHONO 2 or LINE 2
Input selector for PHONO 1 or LINE1
Volume control for PHONO 2 or LINE 2
Volume control for PHONO 1or LINE 1
Volume control for MIKE 2 and MIKE 4
Volume control for MIKE 1 and MIKE 3
6.3mm jack for MIKE 1
6.3mm jack for MIKE 2
4. Rear Panel and its Controls (fig. 2)
16
16.
17.
18.
19.
20.
21.
22.
23.
24.
25.
17 18 19 20 21 22
23
24
25
Power supply cable
Record output jacks L/R REC
Main output jacks L/R AMP
Input jacks L/R LINE 4
Input jacks L/R LINE 3
Input jacks L/R PHONO 2 or LINE 2
Input jacks L/R PHONO 1 or LINE 1
6.3mm jack for MIKE 4
6.3mm jack for MIKE 3
Earth terminal screw: counters humming sounds.
5. Connections
All connections have to be made correctly in order for the device to work properly.
1. If you wish to turn the apparatus off, simply put the "POWER" switch (1) in the "off" position. All connections must
be established when the apparatus is off. In other words, make sure that all linear controls (4, 6, 7, 10-13) are at
zero.
2. Insert the supply cable plug (20) into the current socket.
3. All necessary inputs are connected to cinch plugs through shielded cables. The output jacks are connected to a
stereo unit, also through shielded cables.
4. Microphones: up to 4 microphones can be connected to this mixer through the 6.35mm plugs (14, 15, 26, 28).
Please use a suitable adapter if your microphones are equipped with a different type of plug.
5. Compact disc players, cassette recorders, video recorders, tape recorders and other high level audio signal
sources as well as amplifiers should be connected to the cinch sockets (23, 24).
6. A record player with a magnetic pick-up can be connected to the cinch sockets (25, 26).
PROMIX100
2
VELLEMAN
7. Output for amplifiers, tape recorders, etc.
Audio equipment with its personal input (such as tape recorders, VCR's and amplifiers) should be connected to
the output socket "REC" (21) and "AMP" (22). Please verify that the input is always connected to the output.
8. Headphones
The headphones used for sound monitoring should be connected to the 6.35mm socket (5).
6. Operation
1. Sound mixing controls
Press the "POWER" (1) switch when all connections have been completed and the sound sources have been
adjusted and connected to the mixer. The sound is mixed through the LINE/PHONO selector (8, 9) and the 6
volume controls (6, 7, 10-13). These are used to obtain the desired mixing ratio and the final mixed sound
through the amplifier output.
2. Monitoring
The monitor enables you to listen to individual input signals before sliding up the volume control. Select the
control function in question by using the MONITOR (3) switch. The volume of the headphones for pre-fader
listening has to be adjusted via the control LEVEL (4).
7. Technical Specifications
Input functions MICROPHONE
PHONO
LINE
Output functions
REC
Frequency response
Distortion
S/N ratio
Headphones
Dimensions
1.5mV / 10KΩ
3mV / 47KΩ
150mV / 22KΩ
MASTER 0.775V, 7V max. / 600Ω
0.775V, 7V max. / 600Ω
20Hz - 20000Hz ± 2dB
< 0.1%
> 50dB
≥ 8Ω
270 x 45 x 180mm
The information in this manual is subject to change without prior notice.
PROMIX100 – 4-KANAALS STEREO MENGPANEEL + 2 INGANGEN VOOR MICROFOON
1. Inleiding en kenmerken
Aan alle ingezetenen van de Europese Unie
Belangrijke milieu-informatie betreffende dit product
Dit symbool op het toestel of de verpakking geeft aan dat, als het na zijn levenscyclus wordt weggeworpen,
dit toestel schade kan toebrengen aan het milieu.
Gooi dit toestel (en eventuele batterijen) niet bij het gewone huishoudelijke afval; het moet bij een
gespecialiseerd bedrijf terechtkomen voor recyclage.
U moet dit toestel naar uw verdeler of naar een lokaal recyclagepunt brengen.
Respecteer de plaatselijke milieuwetgeving.
Hebt u vragen, contacteer dan de plaatselijke autoriteiten inzake verwijdering.
Dank u voor uw aankoop! U hebt een uitstekende keuze gemaakt want deze multifunctionele stereo mixer voldoet
aan de hoogste kwaliteitsnormen voor zowel professioneel gebruik als vrijetijdstoepassingen. Hij is uitgerust met één
controlefunctie per niveau zodat alle componenten individueel kunnen worden afgesteld. Dankzij de output display
kunt u gemakkelijk het gewenste niveau selecteren. Lees deze handleiding grondig voor u het toestel in gebruik
neemt. Werd het toestel beschadigd tijdens het transport, installeer het dan niet en raadpleeg uw dealer.
PROMIX100
3
VELLEMAN
2. Veiligheidsinstructies
• Dit apparaat gebruikt een potentieel dodelijk voltage: maak het niet open, zo vermijdt u elektroshocks.
• Stel het apparaat niet langdurig bloot aan zonnestralen of andere warmtebronnen.
• Behandel de knoppen en schakelaars voorzichtig: vermijd hevige bewegingen, laat het toestel niet vallen en sla
er niet op.
• Zie de aansluiting tussen de mixer en de rest van de apparatuur zorgvuldig na. Slechte verbindingen of een
beschadigde huls kunnen leiden tot zoemgeluiden.
3. Instrumentenbord (front) en bedieningsknoppen (zie fig. 1)
1.
2.
3.
4.
5.
6.
7
8.
9.
10.
11.
12.
13.
14.
15.
Voedingsschakelaar (POWER)
UITGANG DISPLAY
MONITOR schakelaar
Monitor niveauregeling
Aansluiting voor koptelefoon
Volumeregelaar voor LINE 4
Volumeregelaar voor LINE 3
Ingangs(keuze)schakelaar voor PHONO 2 of LINE 2
Ingangs(keuze)schakelaar voor PHONO 1 of LINE 1
Volumeregelaar voor PHONO 2 of LINE 2
Volumeregelaar voor PHONO 1 of LINE 1
Volumeregelaar voor MICRO 2 en MICRO 4
Volumeregelaar voor MICRO 1 en MICRO 3
6.3mm aansluiting voor MICRO 1
6.3mm aansluiting voor MICRO 2
4. Achterpaneel en aansluitingen (zie fig. 2)
16.
17.
18.
19.
20.
21.
22.
23.
24.
25.
Stroomvoorzieningskabel
Opnameuitgangsconnector L/R REC
Belangrijkste uitgangsconnectoren L/R AMP
Ingangsconnectoren L/R LINE 4
Ingangsconnectoren L/R LINE 3
Ingangsconnectoren L/R PHONO 2 of LINE 2
Ingansconnectoren L/R PHONO 1 of LINE 1
6.3mm aansluiting voor MICRO 4
6.3mm aansluiting voor MICRO 3
Aardingklemschroef: afstellen bij zoemgeluiden.
5. Aansluitingen
Het apparaat werkt enkel zoals het hoort indien de aansluitingen correct zijn uitgevoerd.
1. Controleer of de "POWER" schakelaar (1) zich wel degelijk in de "uit"-stand bevindt. Enkel dan is het apparaat
uitgeschakeld en kunnen de aansluitingen op een veilige manier worden uitgevoerd. Zorg er dus voor dat de
lineaire schuifregelaars (4, 6, 7, 10-13) op 0 staan.
2. Stop de stekker van de voedingskabel (20) in de spanningsconnector.
3. Alle benodigde ingangen zijn aangesloten op cinchstekkers d.m.v. afgeschermde kabels. De
uitgangsaansluitingen worden eveneens d.m.v. afgeschermde kabels aangesloten op een stereo-installatie.
4. Microfoons: u kunt maximum vier microfoons aansluiten op deze mixer via de 6.35mm plugs (14, 15, 26, 28).
Gebruik een geschikte adapter indien uw microfoons uitgerust zijn met een ander type plug.
5. Cassetterecorders, cd-spelers, videorecorders, bandrecorders en andere hoogwaardige geluidsbronnen en
versterkers worden aangesloten op de cinchstekkers (23, 24).
PROMIX100
4
VELLEMAN
6. U kunt een platenspeler met een magnetisch opname-element aansluiten op de cinchstekkers (25, 26).
7. Uitgangen voor versterkers, bandrecorders, enz.
Audioapparatuur met eigen ingangen zoals bandrecorders, videorecorders en versterkers moeten worden
aangesloten op de uitgangsstekker "REC" (21) en "AMP" (22). Zorg ervoor dat de ingang altijd verbonden is met
de uitgang!
8. Koptelefoon
De koptelefoon die u gebruikt om de kwaliteit van de geluidsweergave te controleren, moeten aangesloten zijn op
de 6.35mm stekker (5)
6. Bediening
1. Afstelling van het mengpaneel
Wanneer alle aansluitingen zijn uitgevoerd en de geluidsbronnen zijn afgesteld en aangesloten op de mixer,
drukt u de "POWER" (1) knop in. Het geluid wordt gemixt d.m.v. de LINE/PHONO keuzeschakelaar (8, 9), en de
6 volumeregelaars (6, 7, 10-13). Deze regelaars worden gebruikt om de gewenste mixverhouding en de eindmix
te regelen via de uitgangen van de versterker.
2. Monitor
Dankzij de monitor kunt u elk ingangssignaal afzonderlijk beluisteren voordat u het volume opdrijft. Gebruik de
MONITOR (3) schakelaar om de gewenste bedieningsfunctie te selecteren. Het volume van de koptelefoon die
wordt gebruikt bij het voorbeluisteren, wordt geregeld via de bedieningsfunctie LEVEL (4).
7. Technische specificaties
Ingangen
Uitgangen
MICROFOON
PHONO
LINE
MASTER
REC
Bandbreedte
Distorsie
S/R verhouding
Koptelefoon
Afmetingen
1.5mV / 10KΩ
3mV / 47KΩ
150mV / 22KΩ
0.775V, 7V max. / 600Ω
0.775V, 7V max. / 600Ω
20Hz - 20000Hz ± 2dB
< 0.1%
> 50dB
≥ 8Ω
270 x 45 x 180mm
De informatie in deze handleiding kan te allen tijde worden gewijzigd zonder voorafgaande kennisgeving.
PROMIX100 – TABLE DE MIXAGE STEREO A 4 CANAUX + 2 ENTREES MICROPHONE
1. Introduction et caractéristiques
Aux résidents de l'Union Européenne
Des informations environnementales importantes concernant ce produit
Ce symbole sur l'appareil ou l'emballage indique que, si l'appareil est jeté après sa vie, il peut nuire à
l'environnement.
Ne jetez pas cet appareil (et des piles éventuelles) parmi les déchets ménagers; il doit arriver chez une firme
spécialisée pour recyclage.
Vous êtes tenu à porter cet appareil à votre revendeur ou un point de recyclage local.
Respectez la législation environnementale locale.
Si vous avez des questions, contactez les autorités locales pour élimination.
PROMIX100
5
VELLEMAN
Nous vous remercions de votre achat! Vous avez choisi une table de mixage polyvalente de haute qualité qui
satisfait à toutes les conditions pour applications professionnelles et amateurs. La PROMIX100 est équipé d'un
réglage par niveau, ce qui permet de régler tous les composants reliés de façon individuelle. L'affichage de sortie
vous aidera à choisir le niveau désiré. Lisez attentivement la présente notice avant la mise en service de l'appareil.
Si l’appareil a été endommagé pendant le transport, ne l'installez pas et consultez votre revendeur.
2. Prescriptions de sécurité
• La PROMIX100 utilise des doses de voltage potentiellement mortelles. Ne l'ouvrez pas afin d'éviter des
électrochocs.
• Ne pas exposer longuement au soleil ou toute autre source de chaleur.
• Traitez les réglages avec circonspection: évitez les mouvements violents, ne laissez pas tomber votre appareil et
ne le frappez pas.
• Vérifiez méticuleusement les connexions entre le mélangeur et le reste de l'équipement. Du blindage
endommagé ou des connexions incorrectes pourraient provoquer des signaux sonores.
3. Panneau frontal et réglages (voir ill. 1)
1.
2.
3.
4.
5
6.
7
8.
9.
10.
11.
12.
13.
14.
15.
INTERRUPTEUR d'alimentation
AFFICHAGE DE SORTIE
Commutateur MONITEUR
Moniteur contrôle de NIVEAU
Entrée casque d'écoute
Réglage du volume pour LINE 4
Réglage de volume pour LINE 3
Sélecteur d'entrée pour PHONO 2 ou LINE 2
Sélecteur d'entrée pour PHONO 1 ou LINE1
Contrôle de volume pour PHONO 2 ou LINE 2
Contrôle de volume pour PHONO 1ou LINE 1
Contrôle de volume pour MICRO 2 et MICRO 4
Contrôle de volume pour MICRO 1 et MICRO 3
Prise jack de 6.3mm pour MICRO 1
Prise jack de 6.3mm pour MICRO 2
4. Panneau arrière et connexions (voir ill. 2)
16.
17.
18.
19.
20.
21.
22.
23.
24.
25.
Câble d'alimentation
Fiche de sortie enregistrement L/R REC
Fiches principales de sortie L/R AMP
Fiches d'entrée L/R LINE 4
Fiches d'entrée L/R LINE 3
Fiches d'entrée L/R PHONO 2 ou LINE 2
Fiches d'entrée L/R PHONO 1 ou LINE 1
Prise jack de 6.3mm pour MICRO 4
Prise jack de 6.3mm pour MICRO 3
Etau de mise à la terre: régler en cas de signaux sonores.
PROMIX100
6
VELLEMAN
5. Connexions
Afin de garantir un fonctionnement optimal, les connexions doivent être établies correctement.
1. Vérifiez si l'interrupteur d'alimentation (1) se trouve en position éteint (OFF). Toute connexion doit être établie
pendant que l'appareil est éteint. En d'autres mots, assurez-vous que tous les graduateurs (4, 6, 7, 10-13) sont
mis aux positions minimales.
2. Insérez la fiche du câble d'alimentation (20) dans le socle d'alimentation.
3. Toutes les entrées nécessaires sont raccordées aux socles cinch au moyen de câbles blindés. Le même type de
câble est employé afin d'établir le lien entre les jacks de sortie et un élément spécifique de l'unité stéréo
4. Microphones: un maximum de quatre microphones peut être branché sur cette table de mixage en utilisant les
fiches jack de 6.35mm (14, 15, 26, 28). Utilisez un adaptateur approprié si vos microphones sont équipés de
fiches jacks différents.
5. Les lecteurs CD, les magnétophones, les magnétoscopes et d'autres sources sonores de haute qualité, ainsi que
les amplificateurs sont reliés aux socles cinch (23, 24).
6. Un tourne-disque avec une cellule magnétique à aimant mobile peut être relié aux socles cinch (25, 26).
7. Sorties pour amplificateurs, magnétophones, etc.
Tout appareil ayant son entrée personnelle, comme par exemple les magnétophones, les magnétoscopes et les
amplificateurs, doit être raccordé aux socles de sortie "REC" (21) et "AMP" (22). Il est de la plus haute
importance de vérifier si l'entrée est reliée à la sortie de façon permanente.
8. Casque
Le casque dont l'utilisateur ce sert afin de contrôler le son doit être raccordé au jack de 6.35mm (5).
6. Commandes
1. Réglage du mixage de son
Quand toutes les connexions ont été établies et toutes les sources sonores ont été réglées et raccordées à la
table de mixage, vous pouvez enfoncer le bouton de l'interrupteur (1) d'alimentation. Le son est mixé avec le
sélecteur LINE/PHONO (8, 9) et les 6 contrôles de volume (6, 7, 10-13). Ces contrôles règlent le ratio du mixage
et le mixage final au moyen des sorties de l'amplificateur.
2. Moniteur
Grâce au moniteur, il est possible d'écouter chaque signal d'entrée séparément avant d'augmenter le volume.
Sélectionnez la fonction de contrôle appropriée via le commutateur MONITEUR (3). Vous pouvez régler le
volume du casque utilisé pour la pré-écoute au moyen du contrôle NIVEAU (4).
7. Spécifications techniques
Entrées
MICROPHONE
PHONO
LINE
Sorties
MASTER
REC
Bande passante
Distorsion
Rapport S/B
Casque
Dimensions
1.5mV / 10KΩ
3mV / 47KΩ
150mV / 22KΩ
0.775V, 7V max. / 600Ω
0.775V, 7V max. / 600Ω
20Hz - 20000Hz ± 2dB
< 0.1%
> 50dB
≥ 8Ω
270 x 45 x 180mm
Toutes les informations présentées dans cette notice peuvent être modifiées sans notification préalable.
PROMIX100
7
VELLEMAN
PROMIX100 – MESA DE MEZCLAS ESTÉREO DE 4 CANALES + 2 ENTRADAS DE MICRÓFONO
1. Introducción & Características
A los ciudadanos de la Unión Europea
Importantes informaciones sobre el medio ambiente concerniente este producto
Este símbolo en este aparato o el embalaje indica que, si tira las muestras inservibles, podrían dañar el
medio ambiente.
No tire este aparato (ni las pilas eventuales) en la basura doméstica; debe ir a una empresa especializada
en reciclaje. Devuelva este aparato a su distribuidor o a la unidad de reciclaje local.
Respete las leyes locales en relación con el medio ambiente.
Si tiene dudas, contacte con las autoridades locales para residuos.
¡Gracias por haber comprado la PROMIX100! Ha seleccionado una mesa de mezclas multifunción de alta calidad
que cumple con todas las condiciones para aplicaciones profesionales y amateur. La PROMIX100 está equipada
con un ajuste por nivel, lo que permite ajustar todos los componentes conectados de manera individual. Gracias al
display de salida puede seleccionar fácilmente el nivel deseado. Lea cuidadosamente las instrucciones del manual
antes de usar el aparato. Si el aparato ha sufrido algún daño en el transporte no lo instale y póngase en contacto
con su distribuidor.
2. Instrucciones de seguridad
•
•
•
•
La PROMIX100 funciona con una tensión potencialmente mortal. No la abra para evitar descargas eléctricas.
No exponga el aparato mucho tiempo al sol ni a otra fuente de calor.
¡Trate los ajustes con cuidado!: evite movimientos violentos, no deje caer el aparato y no lo golpee.
Verifique cuidadosamente las conexiones entre la mesa de mezclas y lo demás del equipo. Un blindaje dañado o
conexiones incorrectas podrían causar zumbidos.
3. Panel frontal y ajustes (véase fig. 1)
1.
2.
3.
4.
5
6.
7
8.
9.
10.
11.
12.
13.
14.
15.
INTERRUPTOR de alimentación
DISPLAY DE SALIDA
Conmutador MONITOR
Monitor ajuste del NIVEL
Entrada auriculares
Ajuste de volumen para LINE 4
Ajuste de volumen para LINE 3
Selector de entrada para PHONO 2 o LINE 2
Selector de entrada para PHONO 1 o LINE1
Ajuste de volumen para PHONO 2 o LINE 2
Ajuste de volumen para PHONO 1o LINE 1
Ajuste de volumen para MICRO 2 y MICRO 4
Ajuste de volumen para MICRO 1 y MICRO 3
Conector jack de 6.3mm para MICRO 1
Conector jack de 6.3mm para MICRO 2
4. Panel trasero y conexiones (véase fig. 2)
16.
17.
18.
19.
20.
21.
Cable de alimentación
Conector de salida grabación L/R REC
Conectores principales de salida L/R AMP
Conectores de entrada L/R LINE 4
Conectores de entrada L/R LINE 3
Conectores de entrada L/R PHONO 2 o LINE 2
PROMIX100
8
VELLEMAN
22.
23.
24.
25.
Conectores de entrada L/R PHONO 1 o LINE 1
Conector jack de 6.3mm para MICRO 4
Conector jack de 6.3mm para MICRO 3
Regleta de conexión con tornillos puesta a tierra: se ajusta en caso de zumbidos.
5. Conexiones
Para garantizar un funcionamiento óptimo, conecte las conexiones correctamente.
1. Verifique si el interruptor de alimentación (1) está en la posición desactivada (OFF). Haga sólo las conexiones si
el aparato está desconectado. En otras palabras, asegúrese de que todos los ajustes (4, 6, 7, 10-13) estén en la
posición 0.
2. Enchufe el cable de alimentación (20).
3. Todas las entradas necesarias están conectadas por cables blindados a los conectores cinch. Las conexiones
de salida se conectan también con cables blindados a una instalación estéreo
4. Micrófonos: es posible conectar máx. cuatro micrófonos a la mesa de mezclas al utilizar los conectores jack de
6.35mm (14, 15, 26, 28). Utilice un adaptador adecuado si los micrófonos están equipados con conectores jacks
diferentes.
5. Lectores de CD, magnetófonos, videograbadoras, otras fuentes sonoras de alta calidad y amplificadores se
conectan a los conectores cinch (23, 24).
6. Es posible conectar un tocadiscos con brazo magnético a los conectores cinch (25, 26).
7. Salidas para amplificadores, magnetófonos, etc.
Conecte un equipo de audio con propia entrada, como por ejemplo magnetófonos, videograbadoras y
amplificadores, a los conectores de salida "REC" (21) y "AMP" (22). Asegúrese de que la entrada siempre esté
conectada a la salida.
8. Auriculares
Conecte los auriculares que utiliza para controlar la calidad del sonido al conector jack de 6.35mm (5).
6. Funcionamiento
1. Ajustar la mesa de mezclas
Después de haber realizado las conexiones y después de haber ajustado y conectado las fuentes sonoras a la
mesa de mezclas, pulse el botón del interruptor (1) de alimentación. El sonido se mezcla con el selector
LINE/PHONO (8, 9) y los 6 ajustes de volumen (6, 7, 10-13). Los ajustes se utilizan para regular la razón de
mezcla deseada y la mezcla final por las salidas del amplificador.
2. Monitor
Gracias al monitor, es posible oír cada señal de entrada por separado antes de aumentar el volumen. Seleccione
la función de control adecuada por el conmutador MONITOR (3). Puede ajustar el volumen de los auriculares
utilizados para la pre-escucha con el ajuste del NIVEL (4).
7. Especificaciones
Entradas
MICROPHONE
PHONO
LINE
Salidas
MASTER
REC
Ancho de banda
Distorsión
Relación señal / ruido
Auriculares
Dimensiones
1.5mV / 10KΩ
3mV / 47KΩ
150mV / 22KΩ
0.775V, 7V máx. / 600Ω
0.775V, 7V máx. / 600Ω
20Hz - 20000Hz ± 2dB
< 0.1%
> 50dB
≥ 8Ω
270 x 45 x 180mm
Se pueden modificar las especificaciones y el contenido de este manual sin previo aviso.
PROMIX100
9
VELLEMAN
PROMIX100 – 4-KANAL-STEREO-MISCHPULT
1. Einführung
An alle Einwohner der Europäischen Union
Wichtige Umweltinformationen über dieses Produkt
Dieses Symbol auf dem Produkt oder der Verpackung zeigt an, dass die Entsorgung dieses Produktes nach
seinem Lebenszyklus der Umwelt Schaden zufügen kann.
Entsorgen Sie die Einheit (oder verwendeten Batterien) nicht als unsortiertes Hausmüll; die Einheit oder
verwendeten Batterien müssen von einer spezialisierten Firma zwecks Recycling entsorgt werden.
Diese Einheit muss an den Händler oder ein örtliches Recycling-Unternehmen retourniert werden.
Respektieren Sie die örtlichen Umweltvorschriften.
Falls Zweifel bestehen, wenden Sie sich für Entsorgungsrichtlinien an Ihre örtliche Behörde.
Danke für den Kauf des PROMIX100! Sie haben sich entschieden für ein ausgezeichnetes Stereo-Mischpult, das die
höchsten Bedingungen bezüglich Applikationen im Heim- oder Profibereich erfüllt. Es hat eine Steuerfunktion pro
Niveau damit Sie alle angeschlossenen Geräte individuell steuern können. Packen Sie das Gerät aus. Überprüfen
Sie, ob Transportschäden vorliegen. Sollte dies der Fall sein, verwenden Sie das Gerät nicht und wenden Sie sich
an Ihren Händler. Lesen Sie diese Bedienungsanleitung vor Inbetriebnahme sorgfältig durch und bewahren Sie sie
für künftige Einsichtnahme auf.
2. Sicherheitsvorschriften
• Dieses Gerät verwendet möglich tödliche Spannungen. Öffnen Sie das Gehäuse nicht. So vermeiden Sie
elektrische Schläge.
• Das Gerät keinem Sonnelicht oder Wärmequellen aussetzen.
• Seien Sie vorsichtig mit den Bedienelementen: vermeiden Sie rohe Gewalt, Erschütterungen und Fälle.
• Die Verbindungen zwischen das Mischpult und dem Rest der Geräte müssen sorgfältig geprüft werden.
Schlechte Anschlüsse oder fehlerhafte Abschirmung können ein Summen verursachen.
3. Frontplatte & Bedienelemente (Siehe Abb. 1)
1. EIN/AUS-Schalter
2. AUSGANGSDISPLAY
3. MONITOR-Schalter
4. Monitor LEVEL-Bedienelement
5. Kopfhöreranschluss
6. Lautstärkeregelung für LINE 4
7. Lautstärkeregelung für LINE 3
8. Eingangswahlschalter für PHONO 2 oder LINE 2
9. Eingangswahlschalter für PHONO 1 oder LINE 1
10. Lautstärkeregelung für PHONO 2 oder LINE 2
11. Lautstärkeregelung für PHONO 1 oder LINE 1
12. Lautstärkeregelung für MIKE 2 und MIKE 4
13. Lautstärkeregelung für MIKE 1 und MIKE 3
14. 6.3mm-Anschluss für MIKE 1
15. 6.3mm-Anschluss für MIKE 2
PROMIX100
10
VELLEMAN
4. Rückplatte & Bedienelemente (Siehe Abb. 2)
16. Stromversorgungskabel
17. Ausgangsanschlüsse L/R REC (Aufnahme)
18. Hauptausgangsanschlüsse L/R AMP
19. Eingangsanschlüsse L/R LINE 4
20. Eingangsanschlüsse L/R LINE 3
21. Eingangsanschlüsse L/R PHONO 2 oder LINE 2
22. Eingangsanschlüsse L/R PHONO 1 oder LINE 1
23. 6.3mm-Anschluss für MIKE 4
24. 6.3mm-Anschlmuss für MIKE 3
25. Erdungsanschluss: zum Ausgleichen von Gebrumm
5. Anschlüsse
Alle Anschlüsse müssen korrekt ausgeführt werden, damit das Gerät richtig funktioniert.
1. Wenn Sie das Gerät ausschalten wollen, stellen Sie den EIN/AUS-Schalter in die "AUS"-Position.
Stellen Sie alle Verbindungen her wenn das Gerät ausgeschaltet ist, mit anderen Worten, achten Sie darauf,
dass alle lineare Bedienelemente (4, 6, 7, 10-13) auf Null stehen.
2. Stecken Sie das Versorgungskabel (20) in die Steckdose.
3. Alle notwendigen Eingänge werden mit Cinch-Anschlüssen und abgeschirmten Kabeln angeschlossen.
4. Mikrofone: bis zu 4 Mikrofone können an dieses Mischpult angeschlossen werden über die 6.35mm-Anschlüsse
(14, 15, 26, 28). Bitte Benutzen Sie einen geeigneten Adapter wenn Ihre Mikrofone einen anderen Steckertyp
haben.
5. CD-Player, Kassettenrecorder, Videorecorder, Tonbandgeräte und andere High-Level-Audiosignalquellen und
Verstärker müssen an den Cinch-Anschlüsse (23, 24) angeschlossen werden.
6. Ein Aufnahmegerät mit einem magnetischen Aufnehmer kann an der Cinch-Anschlüsse (25, 26) angeschlossen
werden.
7. Ausgang für Verstärker, Tonbandgeräte, usw.
Audiogeräte mit einem eigenen Eingang (wie Tonbandgeräte, Videorecorder und Verstärker) müssen an den
Ausgang "REC" (21) und "AMP" (22) angeschlossen werden. Kontrollieren Sie, ob der Eingang immer an den
Ausgang angeschlossen ist.
8. Kopfhörer
Die Kopfhörer für Soundmonitoring werden sollten an den 6.35mm-Anschluss (5) angeschlossen werden.
6. Betrieb
1. Tonmischungselemente
Drücken Sie den EIN/AUS-Schalter (1) wenn alle Verbindungen hergestellt sind und die Tonquellen geregelt und
an das Mischpult angeschlossen sind. Der Ton wird über den LINE/PHONO Wahlschalter (8, 9) und die
Lautstärkeregler (6, 7, 10-13) gemischt. Diese werden verwendet um das gewünschte Mischverhältnis und den
endgültigen gemischten Ton über den Verstärkersausgang zu bekommen.
2. Monitoring
Der Monitor erlaubt Ihnen, individuelle Eingangssignale anzuhören bevor Sie die Lautstärke erhöhen.
Wählen Sie die betreffende Funktion mit dem MONITOR (3)-Schalter. Die Lautstärke des Kopfhörers zum PreFader-Anhören muss über das Bedienelement LEVEL (4) geregelt werden.
PROMIX100
11
VELLEMAN
7. Technische Daten
Eingänge
Ausgänge
MIKROFON
PHONO
LINE
MASTER
REC
Bandbreite
Verzerrung
Signal/Rauschabstand
Kopfhörer
Abmessungen
1.5mV / 10KΩ
3mV / 47KΩ
150mV / 22KΩ
0.775V, 7V max. / 600Ω
0.775V, 7V max. / 600Ω
20Hz - 20000Hz ± 2dB
< 0.1%
> 50dB
≥ 8Ω
270 x 45 x 180mm
Alle Änderungen vorbehalten.
PROMIX100
12
VELLEMAN