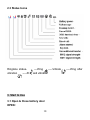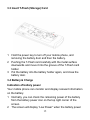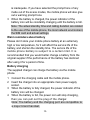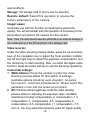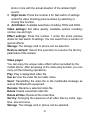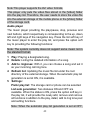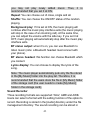
1
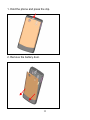
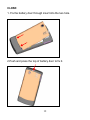
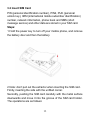
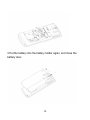
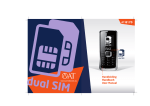
Dear Customer, Thank you for purchasing the mobile phone. Kindly read this user manual carefully to learn about key functional characteristics and operational methods of this mobile phone. The mobile phone is a dual SIM, dual standby phone that supports high-speed Internet through GPRS and enables you to surf on the WAP network with comfort and ease. It also has T-Flash (storage) card slot for carrying all the extra data you need. In addition this phone sports key functions such as: Short message service (SMS) and multimedia message service (MMS). E-book reader. Bluetooth connectivity. Powerful alarm clock, world time, calculator, voice recording and memorandum functions to arrange your work or study. File management function enables you to manage the files more conveniently. Embedded high-resolution digital camera and video, offers you the possibility to capture special moments any place and any time. 64-chord ring tone function enables you to select and customize the ring tones to your favorite tunes. Then mobile phone is a feature rich phone to take care of all your communication and entertainment needs. We wish you have a happy user experience! 1. POINTS OF ATTENTION ON SAFETY ................................ 3 2. YOUR MOBILE PHONE ....................................................... 6 1 2.1 KEY ARRANGEMENT ....................................................................6 2.2 SCREEN........................................................................................9 2.3 STATUS ICONS ............................................................................10 3. START TO USE .................................................................. 10 3.1 OPEN & CLOSE BATTERY DOOR..................................................10 3.2 INSERT SIM CARD .....................................................................13 3.3 INSERT T-FLASH (STORAGE) CARD ............................................15 3.4 BATTERY & CHARGE .................................................................15 3.5 SWITCH ON OR SWITCH OFF .......................................................18 3.6 USE PASSWORDS ........................................................................18 3.7 USE PERSONAL HANDS-FREE PACKAGE ......................................21 4. COMMON FUNCTIONS ..................................................... 21 4.1 MAKE A CALL ............................................................................21 4.2 VOLUME ADJUSTMENT ...............................................................22 4.3 ANSWERING A CALL ...................................................................22 4.4 OPTIONS IN A CALL ....................................................................22 2 4.5 MAGIC CALL .............................................................................23 5. MENU GUIDE ..................................................................... 24 5.1 SETTINGS .................................................................................24 5.2 CALL CENTER ...........................................................................30 5.3 USER PROFILES ........................................................................35 5.4 MULTIMEDIA .............................................................................38 5.5 MESSAGES .................................................................................44 5.6 FUN & GAMES ...........................................................................51 5.7 ORGANIZER ...............................................................................52 5.8 PHONEBOOK ..............................................................................56 5.9 FILE MANAGEMENT ...................................................................58 6. COMMON PROBLEMS & TROUBLESHOOTING.............. 60 1. Points of attention on safety IMPORTANT! 3 Please read these instructions carefully and follow them implicitly in case of any dangerous or illicit situations. Note driving safety It is strongly recommended that you do not use a mobile phone when driving. Please use the personal hand free package when a call is inevitable. Please put your mobile phone in the mobile phone holder safely, and don’t put it at a passenger’s seat or any other place that may risk a drop of your mobile phone in the case of collision or emergency brake. Switch off your mobile phone on the airplane Interference caused by mobile phones affects aviation safety, and thus it is illegal to use it on the airplane. Please make sure your mobile phone is switched off when you are on a plane. Switch off your mobile phone in blasting operation area You should strictly obey relevant laws and regulations and switch off your mobile phone in or near blasting operation area. Switch off your mobile phone near dangerous area Your cell phone is not allowed to switch on when the refueling and chemical substance area is nearby. In a hospital When using it in a hospital, you should be subject to the relevant 4 rules specified by the hospital. Make sure your mobile phone is switched off when medical equipment is nearby. Any wireless transmission equipment, mobile phones included, will affect its performance. Other electronic equipment may be affected as well. If you have any question in this regard, please consult relevant doctor or equipment supplier directly. Interference Any interference caused by wireless equipment can do damage to its performance. Qualified services Only authorized services are allowed to install or repair mobile phones. If you install or repair it by yourself or someone unauthorized, you may break the guarantee rules. Accessories and batteries Only manufacturer recognized accessories and batteries can be used. Reasonable use It should be used normally. It is absolutely forbidden to put it on the condition that with an extremely high temperature (over 60 Celsius degrees), for example, do not put it under the window where it can be exposed to the sunshine directly. Remember to use wet or antistatic cloth, instead of using any cloth with static electricity to clean it. Emergency call 5 Make sure your mobile phone is powered on and is in the service, if you would like to make an emergency call number such as 112, pressing the dial key and confirm your location, simply explain what has happened, and don’t terminate the call without any permission. Note: Like any mobile phone, it may not be supported due to the network coverage and wireless signal transmission. What’s more, some networks even don’t support the 112 emergency call services. Therefore, the communication under emergent situations (such as first aid) should not be completely depended on mobile phones. You can consult and check with you local network operators. 2. Your Mobile Phone 2.1 Key Arrangement The following keys are included as follows: Key Name Description Dial key Use SIM1 to make call. Dial key Use SIM2 to make call. 6 Power key Ending a call. Pressing this key to switch on or off your mobile phone. Return to the standby mode or cancel the current operation under the function list mode. Soft key Use it to execute an operation that corresponds to the last line of characters. Navigation key Use it to roll the function list or options in the phone book. Use it to roll the cursor under the edit mode. Use it to enter corresponding functions with respective keys under the standby mode. Press the up, down, left and right direction keys to adjust the focal length and exposure compensation under the shoot preview mode. Press the middle key to enter the video shoot preview mode, and press the up, down, left and right direction keys to adjust the focal length and exposure compensation. 7 Number keys Used it to do some transfer among numbers, letters, and some special characters. Holding the # key to start or cancel the mute mode under the standby mode. Press the Left key+ * key to lock or unlock the keypad under the standby mode. Pressing the # key to switch the input method under the editing window. Press corresponding number keys for fast switch between settings of corresponding functions under the shoot preview status. Press corresponding number keys for fast switch between settings of corresponding functions under the video preview status. Press the * key to select symbols under the editing window. 8 When slide down the phone, you can see four shortcut keys: Play a forward file. Audio player Stop file. shortcut key Play or stop the current file. Play next file. 2.2 Screen This is a single-screen mobile phone. 9 2.3 Status Icons Ringtone status: vibration ----Ring -----Vibrate -----Ring and vibrate 3. Start to Use 3.1 Open & Close battery door OPEN: 10 -----Ring after 1. Hold the phone and press the clip. 2. Remove the battery door. 11 CLOSE: 1. Fix the battery door through insert into the two hole. 2.Push and press the top of battery door to fix it. 12 3.2 Insert SIM Card PIN (personal identification number), PIN2, PUK (personal unlock key), IMSI (international mobile subscriber identification) number, network information, phone book and SMS (short message service) and other data are stored in your SIM card. Steps: 1 Hold the power key to turn off your mobile phone, and remove the battery door and then the battery. 2 Note: don’t pull out the extractor when inserting the SIM card. Firstly, inserting the side with the unfilled corner. Secondly, pushing the SIM card carefully with the metal surface downwards and move it into the groove of the SIM card holder. The operations are as follows: 13 3 Put the battery into the battery holder again, and close the battery door. 14 3.3 Insert T-Flash (Storage) Card 1 Hold the power key to turn off your mobile phone, and removing the battery door and then the battery. 2 Pushing the T-Flash card carefully with the metal surface downwards and move it into the groove of the T-Flash card holder. 3 Put the battery into the battery holder again, and close the battery door. 3.4 Battery & Charge Indication of battery power Your mobile phone can monitor and display relevant information on the battery. 1 Normally, you can check the remaining power of the battery from the battery power icon on the top right corner of the screen. 2 The screen will display “Low Power” when the battery power 15 is inadequate. If you have selected the prompt tone of any mode out of the scene modes, the mobile phone will also give out a warning prompt tone. 3 When the battery is charged, the power indicator of the battery icon will be constantly changing until the battery is full. Note: The actual standby time and calling duration are related to the use of the mobile phone, the local network environment, the SIM card and actual settings. Warm reminders about battery Please don’t store your mobile phone battery at an extremely high or low temperature, for it will affect the service life of the battery, and shorten the standby time. The service life of the mobile phone battery is subject to a certain limit. It is recommended that you would better change a battery from the original supplier if the performance of the battery has declined after using it for a period of time. Battery charging The supplied charger can charge the battery via the mobile phone. 1 2 Connect the charging cable and the mobile phone. Insert the charger into an appropriate main power supply socket. 3 When the battery is fully charged, the power indicator of the battery icon will be changed. 4 When the battery is full, the power icon will stop changing, then you can pull out the plug of the charger. Note: The battery and the charging port are compatible to a major brand handset. 16 Points of attention on use of battery 1 Be sure to switch off the mobile phone before you remove the battery. 2 Please use it carefully. A short circuit will occur if the positive pole (+) and the negative pole (-) of the battery is connected with a metal object (for example, a coin or clip), it may do damage to both the battery and the metal object. Make sure that no metal object will be connected simultaneously with the positive pole and the negative pole of the battery after it is removed and put in a bag. 3 Don’t throw the battery into the fire, or use it under an extremely high temperature condition. 4 Don’t attempt to dismantle or modify the battery. 5 Don’t put battery in an occasion with strong mechanical impact, or use a hard object to penetrate the battery. 6 Battery should be put in a cool and dry place to avoid direct sunlight. It should not be placed in a high temperature (over 60 Celsius degrees) environment. 7 If battery gives out any peculiar smell or getting overheated, you should stop using it. 8 If the battery is found to have any crack, deformation, damage of other type or electrolyte leakage, it should be stopped using immediately. 9 Please clean your skin or clothes immediately with soap and clear water if they contact leaking electrolyte, and wash your eyes completely with clear water if any electrolyte splashes into. 10 In case of any injury caused by incorrect charge, only original battery is allowed to be charged. 17 11 Don’t use the li-ion battery when the temperature is extremely low, for the maximum standby/call time is not available at a low temperature. 12 Don’t clean the battery with water or organic solvent, or immerse the battery in water. 13 Make sure the battery is fully charged if it has been out of use for a long period. 14 It is recommended that the rejected battery be returned to the mobile phone manufacturer or placed in a designated public area for rejected battery recycling. Don’t mix it with other garbage or throw it freely. 3.5 Switch on or Switch off 1 2 3 4 5 Holding the power key to switch on the mobile phone. The screen will display the start cartoon. If you are required to enter the mobile phone password, enter the password and press the OK soft key. The default password of the mobile phone is 1122. If you are required to enter the PIN code, entering the PIN code and pressing the OK soft key. As to a newly subscribed SIM card, the PIN code is provided by the network operator. Entering the standby interface. Holding the power to switch off the mobile phone. 3.6 Use Passwords A series of passwords have been set in your mobile phone and SIM card, for they can prevent any unauthorized use of your mobile phone and SIM card. When you are required to enter any password below, entering the correct password (displayed in “*”), and then press the OK soft key. If you enter an incorrect 18 password, first press the Clear soft key to delete the wrong information, and then provide a correct password. You may follow the instruction “Settings->Security settings>Change password” or “Settings->Security settings >SIM1/SIM2 security settings ->Change password” to change the PIN code, the PIN2 code as well as the mobile phone lock password. Mobile phone password The mobile phone password is the same as the mobile phone lock password, which could prevent unauthorized use of your mobile phone as well. The mobile phone password preset by the manufacturer is 1122. If your mobile phone is locked, the mobile phone password will be required to start the mobile phone. Note: The mobile phone password may include 4~8 digits. Please change the password in time, and remember what you have set. The password used by the theft proof trace function is the mobile phone password. PIN code The PIN code (personal identification number, 4~8 digits) is used to prevent unauthorized use of your SIM card. If the PIN verification function is activated, the PIN code will be required to start the mobile phone each time. If you have entered the PIN code incorrectly for three times, the SIM card will be locked. The following instructions indicate how to unlock the card: 1 Enter the correct PUK code in line with the prompt on the screen to unlock the SIM card. 2 Then enter a new PIN code and press the OK soft key. 3 When you are prompted to reenter the new PIN code, reenter the new PIN code and press the OK soft key. 19 4 If the PUK code is correct, the SIM card will be unlocked, and the PIN code is reset. Warning: If you have entered the PIN code incorrectly for three times, the SIM card will be locked automatically, in that case you need to use the PUK code to unlock the card. The PUK code is generally kept by the network operator. PUK code The PUK code (the PIN unlocking password, 8 digits) is used to unlock the locked PIN code. The PUK code is provided by the manufacturer together with the SIM card. If you have entered the PUK code incorrectly for ten times, the SIM card will be invalidated. You need to ask your network operator for a new card. PIN2 code The PIN2 code (4~8 digits) is provided together with the SIM card, which is used to set the fixed dial and other functions. Please contact your network operator to check if your SIM card supports such functions. If you have entered the PIN2 code incorrectly for three times, the PIN2 code will be locked. The PIN2 code will be unlocked only by entering the correct PUK2 code. The operations are as follows: 1 Enter the correct PUK2 code in line with the prompt on the screen to unlock the PIN2 code. 2 Then enter a new PIN2 code and press the OK soft key. 3 When you are prompted to reenter the new PIN2 code, reenter the new PIN2 code and press the OK soft key. PUK2 code The PUK2 code (the PIN2 unlocking password, 8 digits) is used 20 to unlock the locked PIN2 code. The PUK2 code is provided by the manufacturer together with the SIM card. If the PUK2 code has not been provided, please contact your network operator. If you have entered the PUK2 code incorrectly for ten times, you will be unable to use the functions of the PUK2 code. If you want to use these functions, please contact your network operator to change a new card. Prohibition password When you operate the call restriction function, the prohibition password is needed. The function can be operated after you get this password from your network operator. 3.7 Use personal hands-free package You can make or answer a call without holding your mobile phone by using personal hands-free package. When you insert the personal hands-free package into the earphone hole, it will be functioned as a receiver and microphone. Note: The 3.5" earphone not support this function. 4. Common Functions 4.1 Make a call 1 Enter the area code and phone number under the standby mode, and press the dial key 1 or dial key 2 to dial the number you have entered. 2 Press the power key to end the call. International call Press the * key twice continuously, and you will see the “+”. Enter the country code, area code and phone number, pressing the dial key. 21 Dial an extension After you have entered the phone number of a switchboard, press the * key three times consecutively, and you will see the “P” symbol, or press the * key four times consecutively and you will see the “W" symbol, and then enter the extension number and press the dial key. Correct a wrong input Pressing the right soft key to delete the wrong information . Redial a previous number Press the dial key to enter the dialed record list, and press it directly to make calls. Dial a quick dial number 1 Edit the quick dial record in the quick dial list under the following path: “Call center-> Call settings->Advance settings->Speed dial”. 2 Set the quick dial status at ON, press a number key from 2 to 9 in the quick dial list to call a corresponding number. 4.2 Volume adjustment You can adjust the call volume simply by pressing the up or down volume key during a call. 4.3 Answering a call 1 Press the dial key 1 to answer an incoming call. 2 Press the power key can end the call. 3 Press the power key to reject an incoming call. 4.4 Options in a call A big number of control functions are available for you during a call. 22 Call waiting If this function is available and you have already activated it, you can hear the call waiting tone if there is an incoming call during the call. If you choose” answer the incoming call”, press the dial key or left soft key, the first call will be automatically held while you are answering the incoming call. See the Hold/Switch section. Hold/Switch When an incoming call is held on during another ongoing call, you can press the left soft key to switch between them. With this operation, the ongoing call can be switched into the held status while the kept call, vice versa, thereby enabling you to speak to the other caller. Call hold If this function is supported by the network, you can answer another call during an ongoing call. Mute This function can activate or deactivate the microphone and other connected microphone of the mobile phone. It can prevent your voice heard by others. Other options in a call With this function is available, you can access to the phone book, short message, recording and so on. Please browse the Menu Guide section in detail. 4.5 Magic Call Your mobile phone supports the function of Magic Voice. You can choose from different kinds of voice which are shown in the menu. On the other side of the phone the call receiver will hear the 23 sound effect from the voice you have chosen. 5. Menu Guide Here we have listed the available functions, after browsing you will have a good understanding of how to operate your mobile phone. 5.1 Settings Dual SIM settings Dual SIM open: When you select this mode, two SIM cards can access to the net at the same time. Only SIM 1 open: When you are in this status, only SIM 1 is available to surf the net. Only SIM 2 open: When you are in this status, only SIM 2 can be online. Flight mode: When the flight mode is launched, you can not receive or transmit network signals, which is different from that under the normal mode. Anti-theft setting The default password is: 0000. In the menu “Anti-theft Setting—State—--Receiver’s Number”, user can activate the function of “Anti-theft system” and input a security mobile number. When the original SIM card is replaced, phone will send a SMS message to the user’s preset designated mobile number, and prompt the user the phone is being used by a non-designated 24 user. By replying to that alert SMS message, the user can access the currently replaced SIM card number, and perform remote control through sending the following code to the mobile: (1) remote shutdown and lock the phone: #CLOSE#password. (2) long-range clear the telephone book: #CLEARPHONEBOOK#password. (3) remote get phonebook: #GETPHONEBOOK#password. The password is the one you set for the Anti-theft system. Phone settings Time and date: 1> Set home city: select a city. 2> Set time/date: set time and the date. 3> Set format: set time and date format. Schedule power on/off: Set the automatic start/shutdown time for the mobile phone. Note: When the mobile phone is connected with a computer and used as an external storage, the function of “switched on” automatically will be invalid. Language: When you enter the menu “Language” interface, after selection, the menu and prompt information will be changed correspondingly. Pref. input methods: Set the default input methods for text editing. Display characteristics: 1 Wallpaper: Users can use either the photos provided by the 25 mobile phone or those downloaded themselves as the wallpaper. 2 Screen saver: Set the screen saver photo and the time. Firstly setting the screen saver status at ON, then setting the time, lastly selecting a screen saver photo or 3D cartoon. Users can use either the photos provided by the mobile phone or the photos or 3D cartoons downloaded themselves as the screen saver. 3 Power on display: Users can use either the photos provided by the mobile phone or those downloaded themselves as the start cartoon. 4 Power off display: Users can use either the photos provided by the mobile phone or those downloaded themselves as the shutdown cartoon. 5 Show date and time: When this function is set at ON, the date and the time will appear in the standby mode. 6 Show owner number: When this function is set at ON, and user set the owner number at the owner number menu, the owner number will appear in the standby mode. You can set the SIM1or SIM2 owner number. Greeting text: After editing the welcome message and choosing “ON”, the welcoming message will be displayed on the start-up screen. Dedicated key: Define the functions of the up, down, left and right direction keys of the navigation key, and press a direction key to access the defined function under the standby interface mode. Auto update of date and the time: 26 This function can be set at ON or OFF. Note: It is related to the local network whether the automatic time update function is supported. Misc.settings: LCD backlight: Set the duration and brightness of the LCD backlight. Network settings SIM1 network settings: Setup the SIM1 network; please contact your network operator to get the following network services: Network selection You can determine the network selection mode when the phone is in the roaming state here: Automatic selection/Manual selection. You can use this function only after you have made an effective roaming. It can be set automatically or manually (the automatic selection recommended). Preferences Select the preferred network operator. The default network operator is the one that provides the SIM1. SIM2 network settings: Setup the SIM2 network, please contact your network operator to get the following network services: Network selection It may be set automatically or manually (the automatic selection recommended). Preferences 27 Select the preferred network operator. The default network operator is the one that provides the SIM2. Security settings You can use PIN1 code, PIN2 code, keypad lock, phone code to protect the phone’s various functions. SIM1 security settings: SIM1 lock: Inputting the PIN code is required. Only correct PIN code is provided then the lock can be set. If the SIM card lock is set at ON, inputting the PIN password will be required when the mobile phone is started each time. Inputting an incorrect PIN password will lead to the inputting of the PUK code (the personal unlocking key code). The PUK code is used to unlock and change the locked PIN code. Please contact your network operator if the PUK code has not been provided or missed. Fixed dial: If this function is available for your SIM card, you can limit the outgoing numbers. If it has been activated, you can only dial the numbers on the fixed dialing list. Setting this function requires you to enter the PIN2 code, which needs your network operator to support. Note: After the PIN2 code has been entered when the mobile phone is started, it needs the inputting of the PIN2 code to shut down the mobile phone. Therefore, if you don’t want others to change the fixed dialing status, you may shut down the mobile phone after setting and restart it again. Barred dial: If this function is available for your SIM card, you can limit the outgoing numbers. If it has been activated, you can not dial the 28 numbers on the fixed dialing list. Setting this function requires you to enter the PIN2 code, which needs your network operator to support. Change password: It is used to change the SIM1 PIN code, the PIN2 code. SIM2 security settings: SIM2 lock: Inputting of the PIN code is required. Only after a correct PIN code is inputted then the lock can be set. If the SIM card lock is set at ON, inputting of the PIN password will be required when the mobile phone is started each time. Input an incorrect PIN password will require the inputting of the PUK code (the personal unlocking key code). The PUK code is used to unlock and change the locked PIN code. Please contact your network operator if the PUK code has not been provided or missed. Fixed dial: If this function is available for your SIM card, you can limit the outgoing numbers. If it has been activated, you can only dial the phone numbers on the fixed dialing list. Setting it requires your entering to the PIN2 code. It also needs the support from the network operator. Note: After the PIN2 code has been entered when the mobile phone is started, it needs the input of the PIN2 code to shut down the mobile phone. Therefore, if you don’t want others to change the fixed dialing status, you may shut down the mobile phone after setting and restart it again. Change password: It is used to change the SIM2 PIN code, the SIM2 PIN2 code. 29 Phone lock: It is used to lock and unlock your mobile phone. If the mobile phone is locked, inputting of the mobile phone password will be required when the SIM card is changed. The default phone lock password is 1122. Auto keyboard lock: It is used to lock and unlock the keyboard of your mobile phone. User can press left soft key + *key to lock or unlock the keypad. Change password: It is used to change the mobile phone password: Step1: enter you current phone password Step2: enter new phone password Step3: enter your new phone password that you have entered before. Restore factory settings It will restore all the settings to the ex-factor preset values, and thus it is recommended to think twice before you use it. Note: The ex-factory password of the mobile phone is 1122. 5.2 Call center Call history There are SIM1 call history and SIM2 call history menus. They have the same submenus. 1.Missed calls: 30 With it, you can check the record of recent missed calls in SIM1 or SIM2. 2.Dialed calls: With it, you can check the record of the recent dialed calls. Entering this interface and then selecting a dialed number. 3.Received calls: With it, you can check the record of the recent answered calls in SIM1 or SIM2. Entering this interface and then selecting an answered number. 4.Delete call logs: With it, you can delete the missed call in SIM1 or SIM2, the dialed call and the answered call records, and you can delete all the history records as well. 5.Call timers: With it, you can check the history of the prior call in SIM1 or SIM2. The total dialed calls and the total answered calls as well as the resetting of all the calls are available. 6.Call cost: With it, you can check the bill of the prior call and the total bill of all the calls in SIM1 or SIM2, reset the call bill, and set the bill restriction, price and tariff. It needs the network support. 7.Text message counter: With it, you can set the sent and received short messages in SIM1 or SIM2. 8.GPRS counter: With it, you can check the traffic of the prior transmission and the prior receipt in SIM1 or SIM2, and the total traffic of all the 31 transmissions and receipts, and reset the counter. Call settings SIM1 Call settings Caller ID: You may choose from the system preset number provided by your network operator, the hidden number and the sent number. The ex-factory default status of the mobile phone is the system preset number. Call waiting: 1> 2> 3> Activate: If it is being operated, you can receive the alarm from the network the moment you have got an incoming call during an ongoing call, and the number of the new call will appear on the screen. Deactivate: If it is switched off, no alarm can be received from the network the moment you have got an incoming call during an ongoing call. Query status: It is used to inquire the current status with the network. Call divert: 1> 2> 3> 4> Divert all voice calls: When this function is on, all the incoming calls will be forwarded to a designated number. Divert if unreachable: When this function is on, the incoming calls will be forwarded to a designated number when such calls fail to arrive at the dialed number. Divert if no answer: When this function is on, an incoming call will be forwarded to a designated number if it is not answered after the specified no-answer time. Divert if busy: When this function is on, the incoming calls will be forwarded to a designated number when the local mobile phone is busy. 32 5> Divert all data calls: Forwarding of all incoming calls needs the support of the network operator. 6> Cancel all diverts: This function is used to cancel various forward functions, i.e. to set a forward function at OFF. Call barring: 1 Outgoing calls: All calls: When this function is on, no calls can be made. International calls: When this function is on, no international calls can be made. International calls except to home PLMN: When this restriction is on and the user stays abroad, the user can only call the local numbers of the foreign country or the numbers in the host country (that is the country of the network operator). 2 Incoming calls All calls: When this function is on, no incoming calls can be answered. When roaming: When this restriction is on, you are unable to answer calls when you use the mobile phone out of the attributive service area. 3 Activate all: Activate the barring on the calls, and this will require the network restriction password provided by the network operator. 4 Cancel all Cancel the barring on the calls, and this will require the network restriction password provided by the network operator. 33 5 Change barring password It is used to change the barring password. Entering the original restriction password requires changing of the password. Line switching: It is used to switch between Line 1 and Line 2. The default line is Line 1. Note: If Line 2 is selected, whether you can dial out calls or not is related to the local network. Closed user group: Internal groups are divided by the network operator. A member of a certain group can only call other members of the same group to restrict the telephone bill. Note: This function needs the support from the network operator that has provided the SIM card. SIM2 Call settings The same as SIM1 call settings. Advance settings Black list: It is used to set the black list function. This will bar all the numbers on the list to call in. Auto redial: Activate or deactivate the automatic redial function. When this function is ON, the mobile phone will automatically redial the number that has not been answered previously after a period of time. Speed dial: 34 1 Enable speed dial: you can set eight numbers for speed dial. When it is on, you can long press number key to call the number at standby mode. 2 Set number: it can display number list that you have set. Call cheater: With it, you can set the background sound function On or Off as such the call receiver will hear the preset background sound during a call. There are 10 preset background sound effects for selection and user is also able to make 10 other background sounds by himself. Call time display: When it’s on, the call time can display at calling interface. Call time reminder: This function can prompt every time that you set at calling. Auto quick end: This function can auto restrict the time that you set Magic call Your mobile phone supports the function of Magic Voice. You can choose from different kinds of voice which are shown in the menu. On the other side of the phone the call receiver will hear the sound effect from the voice you have chosen. 5.3 User profiles General 35 1 Activate 2 Customize: Tone settings: Ring tone setting including: the ring tone for incoming calls, power on, power off, messages and keystroke. Users may choose either the ring tones preset in the mobile phone or edited by users themselves or downloaded. Volume: Including the volume setting of the ringing tone and key tone. Alert type: a Ring only: Ring only and no vibration in case of an incoming call. b Vib. only: Vibration only and no ring in case of an incoming call. c Vib. and ring: Both ring and vibration in case of an incoming call. d Vib. then ring: Ring after vibration in case of an incoming call. Ring type: a Single: Ring only once in the case of an incoming call. b Repeat: The ring tone will continuously play in the case of an incoming call. c Ascending: The ring tone will continuously play with a rising volume in the case of an incoming call. Extra tone: a Warning: A prompt tone for an operating need. b Error: A prompt tone given in the case of an operating error. c Camp on: A prompt tone produced in the case of a 36 successful network search. Connect: A prompt tone generated after a calling connection. Answer mode: Cover answer: It is used to answering an incoming call by sliding up the phone. d Any key: It is used to answer an incoming call by pressing any key, except the right soft key and the hang-up key. Meeting See the "general" section for details. Outdoor See the "general" section in details. Indoor See the "general" section for details. Headset Insert the earphone automatically to enter the headset mode. The start option is not available in this condition, but key and automatic answering modes are offered for selection. See the "general" section in details. Bluetooth After the mobile phone is connected with the Bluetooth earphone, it will automatically enter the Bluetooth mode. The start option is not severed. See the "general" section in details. Note: Hold the # key to activate or deactivate the mute mode. Incoming calls, short messages and the alarm adopt the vibration, and other settings are muted in this condition. 37 5.4 Multimedia Camera Press left soft key to enter camera preview, and press left soft key again, you can see the following items: Photos: 1 View: Browsing a selected photo file. 2 Browse style: You can check photos either with the list mode or the matrix mode. 3 Use as: Use a selected photo file and you can set it as follows: the wallpaper, the screen saver, the start cartoon, the switched off cartoon and the phone book as well. 4 Send: Transmitting the photo file to the multimedia message as well as the Bluetooth equipment. 5 Rename: Rename a selected photo file. 6 Delete: Delete a selected photo file. 7 Delete all files: Delete all the photo files. 8 Sort by: Arrange the sequence of all photo files by name, type, time, size and none. 9 Storage: The storage card or phone can be selected. Camera settings: 1 2 Shutter sound: A number of sound effects can be selected. EV: Press the left and right direction keys under the shoot preview status for fast adjustment of the exposure. Available selections include compensation -2, compensation -1.5, compensation -1, compensation -0.5, compensation 0, 38 compensation +0.5, compensation +1, compensation +1.5, and +2. You may adjust the exposure value for higher photo quality in line with the actual situation of the ambient light source. 3 Anti-flicker: Available selections including 50Hz and 60Hz. 4 Delay timer: Press the number 4 under the shoot preview status for fast switch of settings. You can choose whether to delay the shooting, and the shoot delay time. 5 Cont. shot: Press the number 5 under the shoot preview status for fast switch of settings. You can choose out of OFF, single-photo, three-photo, five-photo continuous shooting. Image settings: 1 Image size: Press the number 8 under the shoot preview status for fast switch of settings. The larger the photo is, the more the space will take up. 2 Image quality: Press the number 7 under the shoot preview status for fast switch of settings. Available options including: low, normal and high. The higher the quality grade is, the more photos can be taken up in the storage space. White balance: Press the number 2 under the shoot preview status for fast switch of settings. Available options including: auto, daylight, tungsten, fluorescent, cloudy and incandescent. Please select this parameter in line with the actual environment. Scene mode: Press the number 6 for fast switch of settings under the shoot preview status by selecting or closing the night shot mode. Effect settings: Press the number 1 under the shoot preview status for fast switch of settings. You can select from a number of 39 special effects. Storage: The storage card or phone can be selected. Restore default: Select this operation to resume the factory parameters of the camera. Imager viewer It provides you with the function of checking the picture file quickly. You will be familiar with the operation of accessing to the photo album provided in the camera function section. Note: Thus, the user should save the photo file in an external storage of the mobile phone or the [Photo] folder of the storage card. Video recorder Under the video shooting preview status, press the up and down keys of the navigation key to adjust the focal variation multiple, the left and right keys to adjust the exposure compensation, and the central key to start shooting. After you enter the digital video function, press the select soft key to use the following operations: Camcorder settings: 1 White balance: Press the number 2 under the video shooting preview status for fast switch of settings. Available options including: auto, daylight, tungsten, fluorescent, cloud and incandescence. Please select this parameter in line with the actual environment. 2 EV: Press the left and right keys under the video shooting preview status to adjusting the exposure value. Available selections including: compensation -2, compensation -1.5, compensation -1, compensation -0.5, compensation 0, compensation +0.5, compensation +1, compensation +1.5, and +2. You may adjust the exposure value for higher quality 40 photo in line with the actual situation of the ambient light source. 3 Night mode: Press the number 4 for fast switch of settings under the video shooting preview status by selecting or closing this function. 4 Anti-flicker: Available selections including: 50Hz and 60Hz. Video settings: Set video quality, Available options including: normal, low and high. Effect settings: Press the number 1 under the shoot preview status for fast switch of settings. You can select from a number of special effects. Storage: The storage card or phone can be selected. Restore default: Select this operation to resume the factory parameters of the camera. Video player You can enjoy the unique video effect cartoon provided by the mobile phone. After accessing to the video play function, you can carry out the following operations: Play: Play a designated video file. Use as: Use the video file as Caller video. Send: Transmitting the video file to the multimedia message as well as the Bluetooth equipment. Rename: Rename a selected video file. Delete: Delete a selected video file. Delete all files: Delete all the video files. Sort by: Arranging the sequence of all video files by name, type, time, size and none. Storage: The storage card or phone can be selected. 41 Note:This player supports the AVI video formats. This player only puts the video files stored in the [Video] folder into the play list. Therefore, the user needs to store the video file into the external storage of the mobile phone or the [Video] folder of the storage card. Audio player The music player providing the play/pause, stop, previous and next buttons, which respectively is corresponding to the up, down, left and right keys of the navigation key. Press the list soft key of the music player to enter the play list, and press the option soft key to providing the following functions: Note: The system currently does not support some music not in the standard format. 1 2 3 Play: Playing a designated song. Details: Listing the detailed information of a song. Add to ringtones: With it, you can choose a song and set it as your incoming call ring tone. 4 Refresh list: Updating the music file list under the root directory of the external storage. When the automatic play list generation is set at ON, it is available. 5 Settings: Prefer play list: The storage card or phone can be selected. List auto generation: Two statuses ON and OFF are available. When the status is ON, press the option soft key in the play list, it will provide the newly add, remove and remove all functions in addition to the play, detail, add to ring tone pool and setting functions. Note: When the automatic play list generation is set at OFF, 42 you may not play newly added music. Thus, it is recommended that you set it at ON. Repeat: You can choose out of close, single and all. Shuffle: You can choose the ON/OFF status of the random playing. Background play: If it is set at ON, the music playing will continue after the music play interface exits (the music playing will stop in the case of an incoming call). At the same time, you can adjust the volume with the side key. If you set it at OFF, music playing will automatically stop after the music play interface exits. BT stereo output: when it’s on, you can use Bluetooth to listen music (note: a Bluetooth headset must connect with your phone). BT stereo headset: this function can choose Bluetooth which you connect. Lyrics display: You can choose to display the lyrics of the song. Note: The music player automatically puts only the file stored in the [My Music] folder into the play list. Therefore, it is recommended that the users store the file in [My Music] folder of the storage card (the user needs to create [My Music] folder in the storage card). Sound Recorder Three recording formats are supported: WAV, AMR and AWB. Users can select a format with the setting function of the option to record. Recording is stored in the [Audio] directory under the file management directory. The sound recording can be stored in 43 memory card or phone. FM radio Before using the FM radio function, please insert the headset. During FM radio playing, press OK key you can start recording, and press left soft key, you can select following functions: 1. Channel list: list or edit all user saved or predefined channels. 2. Manual input: enter the numbers of one channel and play it directly. 3. Auto search: auto-search all the valid channels and update them to the channel list. 4. Settings: user can set ON or OFF to background play and loud speaker, and set the record format, audio quality and record storage here. 5. Record: record the current FM radio program. 6. Append: append current playing FM program to the existed file. 7. File list: select it to access the recorded files list. Schedule FM record You can use this function to set the time and record a FM radio program. 5.5 Messages 44 SMS Write message Press the # key to switch the input method when editing a short message. 1> You can select out of the following options: SIM1 done: To complete editing of a short message. SIM2 done: To complete editing of a short message. Input method: Select current input method. Insert templates: Phrases preset in the mobile phone when it leaves the factory. Insert object: Inserting a picture, cartoon, and melody as well as a ring tone. Text format: Enter to set the text style, alignment and paragraph. Insert contact number: Select a number from the phone book and insert it. Insert contact name: Select a name from the phone book and insert it. Insert bookmark: Select a bookmark and insert it. 2> After selecting the “done” operation in step 1, now you can choose from the following options: Send only: Send the message. Save and send: Save the short message in the outbox and send it. Save: Save the short message in the draft box without sending it. Send to many: Send the short message to a plurality of receivers. Send by group: Send the short message to a group. Inbox SIM1 Inbox: display the message of inbox in SIM1. 45 SIM2 Inbox: display the message of inbox in SIM2. Press the “option” soft key to read short messages. You can choose out of the following options: Reply: Reply to a short message received to the sender in line with the phone number contained in the short message. Delete: Delete a short message. Forward: Forward the original message to a desired destination. Copy to phone: Copy a short message to the mobile phone. Move to phone: Move a short message to the mobile phone. Delete all: Delete all the messages in the inbox. Copy all: Copy the messages in the inbox from the SIM card or the mobile phone. Move all: Move the messages in the inbox from the SIM card or the mobile phone. Use number: Extract a designated phone number, save it to the SIM card or the mobile phone for future use, or directly call back. Use URL: Extract a designated URL, save it to the SIM card or the mobile phone for future use. SIM card or the mobile phone for future use, or directly call back. Chat: Chat with a number. Outbox SIM1 Outbox: display the message of outbox in SIM1. SIM2 Outbox: display the message of outbox in SIM2. 1 When the “Outbox” option is selected, the screen will display the short messages in the Outbox. 2 Press the OK soft key to browse the content of the current 46 message. 3 Press the “option” soft key to read a message, and you can choose from a plurality of functions, sending, editing, deleting, and copying to mobile phone, moving to mobile phone, deleting all, copying all, moving all and extracting number are included. Templates The mobile phone stores a number of common phrases as templates. User can edit or delete these phrases. SMS settings The SIM1 and SIM2 have the same menus. Profile settings: With this function, you can save or revise the short message center number required to send short messages (this number can be obtained from the network operator), the folder name, the effective period and the sending format. Common settings: With this function, you can set the message reporting and reply path. After the message reporting is activated, you can receive the status report from the short message center on whether the short message has been successfully sent. It depends on your network operator whether this function is available. Memory status: Check the proportion of the short messages stored in the SIM card and the mobile phone in the total capacity. The specific capacity depends on the contents of the short messages and the situations of the mobile phone and the SIM card. Preferred storage: Check or revise the default storage location of short messages. 47 MMS Write message When writing a message, you can select the receiver, the copy, the blind copy, the subject and edited contents. To: The receiver may be a phone number or an email address. CC: Copy the multimedia message to a mobile phone number or an email address. BCC: Copy the multimedia message as a blind copy to a mobile phone number or an email address. Subject: Set the subject of the multimedia message. Edit content: Edit the content of a multimedia message, and the user may add characters, photos, sound, video and attachments. Inbox Select a multimedia message, and press the left soft key to access the following options: View: View this multimedia message. Reply: you can reply MMS to the sender or all. Reply by SMS: you can reply SMS to the sender or all. Reply all: you can reply MMS to the sender or all. Forward: Forward this multimedia message to other destination. Delete: Delete this multimedia message. Delete all: Delete all the multimedia messages in the inbox. Save as template: Save this multimedia message as template. Properties: Check the details of the multimedia message. 48 The sender, the copy, the subject, the date, the size of the multimedia message and other information are included. Outbox Enter the Outbox, and press the left soft key to choose out of the following options: View: View this multimedia message. Forward: Forward this multimedia message to other destination. Edit: you can edit the multimedia message. Delete: Delete this multimedia message. Delete all: Delete all the multimedia messages in the outbox. Save as template: you can save this multimedia message as the template. Properties: Check the details of the multimedia message. The sender, the copy, the subject, the date, the size of the multimedia message and other information are included. Drafts Enter the draft box, and press the left soft key to choose out of the following options: View: View this multimedia message. Send: Send this multimedia message. Edit: Edit this multimedia message. Delete: Delete this multimedia message. Delete all: Delete all the multimedia messages in the drafts. Save as template: Save this multimedia message as template Properties: Check the details of the multimedia message. The sender, the copy, the subject, the date, the size of the multimedia 49 message and other information are included. Templates The mobile phone stores a number of common phrases. The user can edit or delete these phrases. MMS Settings Profiles It is used to set the network required by multimedia messages. Please contact your network operator for details on how to configure the network setting. Common settings Compose: It is used to set the creation mode, picture resizing, auto signature and signature text. Send: It is used to set the validity period, delivery report, read report, priority, slide timing, delivery time. Retrieve: It is used to set the home network for receiving multimedia messages, the roaming network, read report and delivery report. Filter: It is used to filter anonymous senders, advertisement messages. Memory status: It is used to check the storage status of the multimedia messages. Chat You can use this function to chat with somebody by send message. 50 Voicemail server In “Message” menu, you can choose “Voice mail server” to entry this function. The SIM1 and SIM2 have the same menus. Call voicemail: use this function you can listen to the voice mail. Edit: edit voice mail number. Broadcast message Note: It is related to the local network whether the function is supported. Receive mode: Set ON or OFF. Read message: Read the broadcast message that you have received. Languages: Choose the language that you want. Channel settings: You can Add broadcast message. 5.6 Fun & Games Java Java Applications Enter this menu to run your Java applications. Java settings Enter to set parameters of Java Applications. Java default security Enter this menu to set security options of Java, or restore to the default settings. 51 Games There is one game: Puzzle. You can play it by reading game help. Game settings: Including game background voice, sound effect, volume, and the ON/OFF setting of the game vibration. E-book reader It supports the .txt-format text, and the default value is the txt files under the [E-Book] directory. Services WAP 1> 2> 3> 4> 5> Homepage: Default web address of the Internet. Bookmarks: Storing the frequently web addresses. Recent pages: Storing the recent web addresses. Offline page: Browse recording. Input address: Pressing the left key to confirm the selections, typing the website to access to the Internet. 6> Service inbox: Information sent by websites to users. 7> Settings: It is used to set the network required by WAP. Please contact your network operator for details on how to configure the network setting. Data account User can edit detailed settings for each predefined account 5.7 Organizer 52 Calendar When you enter the options, there are some submenus: 1> View: view the event that you add. 2> View all: view all the event that you add. 3> Add event: you can add event by this function. 4> Delete event: you can delete event by this function. 5> Jump to date: jump to the data that you want. 6> Go to weekly view: you can choose Go to monthly view or Go to weekly view mode. To-Do-List Press the left soft key to select the memorandum, enter the memorandum interface, select an affair to be handled, and touch an option with the touch kit to perform a number of operations, including browse, add, edit, delete records, delete all records and send the memorandum. If no memorandum information has been added, press the left soft key to select the “add” option to add memorandum information. If memorandum information has been added, use up and down direction keys to select a memorandum on the memorandum list, and carry out the following operations: View: Checking the current arrangement memorandum. Add: Adding a new memorandum. Edit: Press up and down direction keys to select the options of a memorandum, and make relevant revisions. Delete: Delete the memorandum. Delete overdue: Delete the overdue memorandum. Delete all: Delete all the memorandums. Send vCalendar: Send the memorandum via a short message, 53 or the Bluetooth equipment, or save it as a file. Save as file: Save the memorandum to Phone or Memory card Alarm Press the left soft key to select the alarm clock entering the alarm clock interface. Five alarm clocks in total, and the default value of each alarm clock is off. Select an alarm clock, edit the alarm clock by using the touch kit or pressing the left soft key, and carry out relevant settings. World clock It enables you to check the current local time in different regions throughout the world. Shortcuts You can choose more functions that you want to use. Extra Calculator You can use it to perform adding, deducting, multiplying and dividing calculations. Press the left soft key under the standby status to enter the main menu, and then select the mobile assistant and calculator in turn to access the calculator application interface. You can enter numbers by pressing the number keys from 0 to 9 and press the up, down, left and right direction keys to select the desired calculation. Use the touch kit to clear the latest input or result, press the left soft key or OK key to calculate, and touch the return key to exit the calculator. Currency converter Used for currency conversion. Health It is a BMI (body mass index) calculator. You can enter your 54 height and weight then press OK key to check you BMI. The health result will indicate you are: Thin, Normal or Fat in accordance with your input figures. Stopwatch: With it, you can use your mobile phone as a stop watch. Available modes including: a Typical stopwatch, and a nWay stopwatch. Bluetooth Activate/Deactivate Bluetooth equipment To activate the Bluetooth equipment: -> Bluetooth -> Power. If the Bluetooth equipment is power on, the mobile phone will automatically connect the hand free equipment previously used. You may activate or deactivate the corresponding equipment according to your need. When the Bluetooth earphone is matched with your mobile phone, you can use the earphone to dial and answer calls. If your mobile phone supports voice dial, the Bluetooth earphone can also be used for voice dial. Send file to other equipment You can copy or move photos, sound, video and other files to other equipment with the Bluetooth wireless connection. *Note: To save power, please turn off the Bluetooth equipment when it is not in use. All the files transmitted via the Bluetooth equipment are stored in the external storage of the mobile phone or the [Received] folder of the storage card. After the mobile phone is connected with the Bluetooth earphone, it will automatically enter the Bluetooth mode. The start option is not severed. See the "general" section in details. 55 5.8 Phonebook The mobile phone can save up to 1000 phone numbers, and the number of phone numbers that the SIM card can store depends on the storage capacity of the SIM card. Quick search Use this function you can find the number that you want to search quickly. And you can change the input mode by pressing # key. Search contact This function allows you to find the desired contact quickly. Add new contact This function is used to add new phone numbers to the phone book. New numbers can be added to the SIM card or the mobile phone. Copy all This function is used to copy all the contacts in the mobile phone to the SIM card and vice versa. Delete This function provides you with the choices from SIM card, the mobile phone and item by item. If you want to delete all the contacts for SIM or mobile phone, you must input the phone lock password, the default password is “1122”. 56 Caller groups This function enables you to setting the name, the incoming ring tone, the incoming call picture, the video link and member for each group. Extra numbers This function is used to set the local mobile phone number, this function can help you to set owner number, service number and SOS number. Phonebook Settings Memory status: Display the used space and total space of the phone books of the mobile phone and the SIM card. Preferred storage: Set the location to store newly added numbers. The storage location is the SIM card or the mobile phone if the default status is selected. Fields: When adding new numbers to the mobile phone, select necessary fields, including the home phone number, the company name, the email address, the office number, the fax number, the birthday, the photo, the video link, the ring tone selection and the incoming call group. My vCard: This function allows you to edit and send your name card. vCard version: you can choose vCard version. Caller picture Select a photo as the incoming call photo. The photo size should be smaller than 20K. To new contact: Set the new call record, and set the photo as the incoming call photo. To selected contact: Change an original incoming call photo. 57 To caller group: Set the photo as the incoming call photo for an incoming call group selected. Caller ringtone Set the ring tone for incoming calls. After a ring tone is selected, the following options are available: To new contact: Set the new call record, and set the ring tone as the incoming call ring tone. To selected contact: Change an original incoming call ring tone. To caller group: Set the ring tone as the incoming call ring tone for an incoming call group selected. Caller video Set the video for incoming call. After a video is selected, the following options are available: To new contact: Set the new call record, and set the video as the incoming call video. To selected contact: Change an original incoming call video. To caller group: Set the video as the incoming call video for an incoming call group selected. 5.9 File Management File Management contains options: Phone and Memory card (The option of ‘Memory card’ depends on the insertion of the T-Flash card) 58 User is allowed to choose out from open, new folder and format functions. The handset can support up to 2GB T-Flash card. Open This allows user to list the root folder and files of the storage card. If the designated item is a folder, press the option soft key to carry out the following operations: 1 Open: Open a designated folder; 2 New folder: Create a new folder in a designated folder; 3 Rename: Rename a designated folder; 4 Delete: Delete a designated folder; 5 Sort by: Sort the files in the storage card to display them by name, type, time, size and none after sequencing. If the designated item is a file, press the option soft key to carry out the following operations for different types of files: 1 View (Play): View or play a designated file; 2 Use as: Sound files can be sent to the scene mode and the Bluetooth equipment; the photo files to the wallpaper, the screen saver, the start cartoon, the shutdown cartoon, the phone book, and the Bluetooth equipment; the video files to the phone book, and the Bluetooth equipment; and other files to the Bluetooth equipment; 3 Send: Transmitting the selected file to the multimedia message as well as the Bluetooth equipment. 4 Details: List the date and size of a designated file; 5 Rename: Rename a selected file; 6 Copy: Copy a selected file to a designated location, and if the remaining space is not enough to allow completion of the copy operation, the mobile phone will provide prompt information; 59 7 8 9 Move: Move a designated file to a designated location; Delete: Delete a selected file; Delete all files: Delete all the files under the directory where the designated file is located; 10 Sort by: Sort the files in the storage card to display them by name, type, time, size and none after sequencing. New folder With this function, you can create a new folder in a designated location. Format With this function, you can format all the data in the storage card. The data can not be recovered after formatting. Please use this function with care 6. Common Problems & Troubleshooting Before contacting the after-sales service provider, conduct the following simple checks and this may save your unnecessary time and expense on repair. Common Problems Unable to start the mobile phone Cause & Troubleshooting Check whether you hold the start key for at least 3 seconds. Check whether the battery is in poor state. Please remove the battery, install it again, and try to restart it. Check whether the battery has run out of 60 power, and if yes, please charge the battery. Unable to connect network Display messages at start Poor calling quality Weak signals. Please retry in a place with strong signals. Beyond the network coverage of your network operator. Invalid SIM card. Please contact your network operator. Check whether the SIM card has been correctly inserted. Locked. You have selected the automatic locking function, and entering the mobile phone password before using it. Enter PIN. You have selected the option of entering PIN for each start of the mobile phone, and so you must enter the PIN code (When the mobile phone is first used, the PIN code on the SIM card must be entered). Enter the PUK code. Wrong inputting of the PIN code will lock up your mobile phone, and you should use the PUK code provided by the network operator to launch it again. Please check whether the volume has been adjusted appropriately. The mobile phone is used in the place with poor signals, such as near a high-rise building or in a basement, where radio waves can not effectively reach. The mobile phone is used in peak hours, for 61 example, the time to go to and leave work, and line congestion makes it impossible to call. Short standby time SIM card error Unable to dial out The standby time is related to the system settings of the network, and the mobile phone is possibly in an area with poor signals. When it fails to receive signals, the mobile phone will continuously transmit to look for a base station, thereby consuming a lot of battery power and leading to a shorter standby time. Please move to a place with strong signals or shut down the mobile phone for a moment. Replacing a new battery is needed. The metal surface of the SIM card is contaminated. Please clean the metal contact of the SIM card with clean cloth. The SIM card has not been inserted correctly. Damaged SIM card. Please contact your network operator. Please confirm whether you have pressed the dial key after dialing a number. Please confirm whether you have paid the telephone bill. Please confirm whether the SIM card is valid. Please confirm whether the call barring 62 Caller unable to contact you Unable to charge Unable to set some functions function has been activated. Please confirm whether the fixed calling function has been activated. Please check whether you have connected your mobile to the network. Please confirm whether you have paid the telephone bill. Please confirm whether the SIM card is valid. Please confirm whether the call barring function has been activated. Please confirm whether the fixed calling function has been activated. Poor contact. Check whether the plug has been connected in place. Charging on the condition that the temperature below -10º C or above 55º C. If the battery or charger has been spoiled, change it for a new one. Misoperation. Your network operator does not support these functions, or you have not applied for such functions. Special Avowal 1. The information above has been checked; our company reserves the hermeneutic power to any print errors or misunderstanding on the content. 2. Please note that any technology improvement will be 63 added into new versions of instruction manual without any prior notice. The product appearance and color are subject to the actual appliance. The colour of the mobile phone in the sales package may differ from that shown in this user manual and on the packaging. Enhancements may vary by market. Please check with your local dealer. Specifications are subject to change without prior notice. 64