1
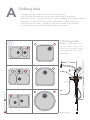
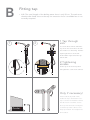
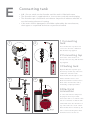
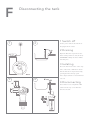
Installation guide VAQ
Before installing read this guide first
Introduction
The operation of the Quooker
The Quooker system consists of a small tank under the sink which is connected
to the boiling-water tap. This tank is connected to the water by a so-called inlet
combination. The water is heated electrically to approx. 110°C and is kept at
this temperature. When boiling water is drawn off, cold water flows into the
tank at the same time and is automatically heated. Before the water leaves the
tank it is purified by the HiTAC® water filter (High Temperature Activated
Carbon). If the entire content is used in one go the heating time is ten to
fifteen minutes, depending on the electrical power (see technical specifications).
Different tanks are available: the PRO3-VAQ (1600 W) and the PRO7-VAQ
(3000 W). All Quooker taps are fitted with a childproof push-and-turn handle
and are also vertically adjustable and insulated.
Installation, maintenance and warranty
The Quooker can be installed wherever there is a water supply and a socket.
The Quooker comes with a handy installation kit (including the required inlet
combination) for easy fitting, and is maintenance-free. The HiTAC® filter
cartridge has to be replaced about once every five years, when any lime scale
that has built is also removed from the tank.
The warranty period is two years and covers supply of parts only. This does not
include labour costs.
Please note, that under no circumstances should the Quooker be connected to
a descaling system that reduces the pH level of the water as this will void the
warranty.
Technical specifications
Tanktype
PRO3-VAQ
Voltage
Wattage
Capacity
Heating-up time cold tank
Standby power consumption
Tank height
Tank diameter
Tap hole size
Max. working pressure
Safety features
230 V
230 V
1600 W
3000 W
3 litres
7 litres
10 mins.
15 mins.
10 W
10 W
40 cm
47 cm
15 cm
20 cm
32 mm
32 mm
10 bar
10 bar
maximum temperature
pressure relief valve 10 bar
ceramic
High Temperature Activated Carbon,
life expectation approx. 5 years
WRAS certificate no. 0601100
Water shut-off valve
HiTAC® water filter
Approval
PRO7-VAQ
Declaration of conformity
Peteri B.V., Staalstraat 13, 2984 AJ Ridderkerk (The Netherlands) herewith
declares, on our own responsibility, that the products Quooker PRO3-VAQ and
PRO7-VAQ are in accordance with the conditions of the following Directives:
- 72/23/EEC Low voltage Directive
- 89/336/EEC Electromagnetic Compatibility Directive
- 97/23/EG Pressure Equipment Directive
and are in conformity with the following standards:
EN 60335-1:02 + A11:04 + A1:04
EN 60335-2-21:03 + A1:05
EN 60335-2-15:03
EN 50366:03 (Electromagnetic Fields)
The Netherlands, Ridderkerk, 19-08-2008
Niels Peteri
Managing director
Content of the pack
1.
2.
3.
4.
5.
6.
1
Quooker tank
Quooker tap
Quooker inlet combination
Quooker drill bit, fibre rings, PVC nipple and drain hose
Quooker brochure
Installation guide and tips for use
2
3
4
Overview of Quooker installation
It is recommended that you install the Quooker in the following order:
A. Drill hole
B. Fit tap
C. Connect water
D. Connect drain
E. Connect tank
A
1
Drilling hole
• The tap should be located in one corner of the basin(s).
• N.B. It must be possible to move the tap outlet freely up and down.
When the outlet is in its lowest position it projects approx. 25 cm below the sink.
Bear this in mind when fitting the inlet combination, sockets and the like.
• The radius of the outlet is a good 16 cm from the centre of the tap hole,
which determines how far the outlet extends into the basin.
1 Drilling hole
Allowing for the basin and the mixer
tap, select a suitable location for the
Quooker tap (see examples). Using the
correct drill bit, drill a hole of 32-35
Q
Quooker tap
M
Mixer tap
mm in the sink.
B
1
Fitting tap
• N.B. The total length of the boiling water hose is only 50 cm. The tank must
therefore be fitted close to the tap. An extension hose is available but is not
normally required.
2
1 Tap through
sink
Loosen the brass sink nut. Clinch the
loop in the hose and remove the sink
nut and the loose metal ring. Push the
tap through the hole in the sink.
Fit the rubber ring between the tap
and the sink.
2 Tightening
screws
Set the tap to the desired position
and tighten the screws in the sink nut.
Only if necessary!
A hex head bolt (key width 2 mm)
enables the tap to be twisted if necessary. Loosen the hex head bolt. Viewed
from above turn it clockwise as far as
the stop. Then turn back a few degrees
so that the tap outlet is able to move
freely up and down. Then retighten the
hex head bolt.
C
1
Connecting water
• N.B. The Quooker operates under water supply pressure and must always be
fitted with the inlet combination (supplied).
• The Quooker boiling-water tap must be connected according to the locally
applicable regulations.
• Position the inlet combination at such a height that the difference in height
between it and the drain is the maximum possible to allow the expansion
water to run off (see D4).
2
1 Cutting through
cold water pipe
Cut through the cold water pipe at a
suitable point.
2 Making space
for T-piece
3 Connecting
T-piece
Position the T-piece between the pipe
sections and tighten the clamping nuts.
4 Fitting the inlet
combination
Connect the inlet combination to the
3
4
T-piece with a copper tube (15 mm).
Screw the transparent funnel in the
hole in the inlet combination provided
for this purpose.
D
1
Connecting drain
The Quooker tank releases expansion water via the inlet combination during
heating, this water is being fed into the grey funnel. The funnel can easily be
connected to the drain by means of the drain hose supplied. The drilling kit also
supplied can be used to make a connection to the drain pipe.
Try to keep the difference in height between the inlet combination and the
connection to the drain as large as possible, to keep the drain water from
flowing back.
2
1 Drilling hole
Using the drill bit supplied, drill and
tap in one operation a threaded hole
in the grey PVC drain pipe. Drill slowly
so that the PVC does not melt.
Turn back anticlockwise to preserve
the thread.
2 Screwing in
nipple
First try to screw the nipple in the
hole before fitting permanently with
PVC glue.
3 Hose to drain
Slide the drain hose over the PVC
3
4
nipple.
4 Hose on inlet
combination
Connect the other side of the hose
with a suspended bend to the funnel
of the inlet combination. This will
create a water lock to prevent smells
from the drain pipe.
E
1
Connecting tank
• N.B. Do not switch on the Quooker until the tank is filled with water.
• The Quooker tank is supplied with a 3-core mains cord with earthed plug.
• The Quooker tap is fitted with an indicator lamp which indicates whether or
not the heating element is heating.
• If the mains lead is damaged it should be replaced by the manufacturer,
their agent or a qualified technician to prevent a hazard.
2
1 Connecting
tank
Place the Quooker in position and
connect it to the inlet combination
with the fibre ring supplied.
2 Connecting tap
Connect the other short hose to
the tap in the same way with the fibre
ring supplied.
3 Flushing tank
Open the Quooker tap. Now open
the main tap and the tap of the inlet
combination. Check for leaks.
Flush the Quooker through for a few
3
4
minutes until the water is clear.
Black water will flow out first. This is
Norit carbon from the filter and is,
incidentally, completely harmless.
4 Electrical
connection
To connect the indicator lamp insert
the plug into the hole provided.
Connect the tank to an earthed socket
and do not switch it on until the tank
is filled with water. The ‘Q’ button on
top of the tank is the on/off - switch.
After the Quooker has heated up, the
entire content of boiling water must
be flushed out once before use.
F
1
Disconnecting the tank
2
1 Switch off
Set the power switch off and remove
the plug from the outlet.
2 Draining
Open the Quooker tap and leave the
water running until it is cold (10-15°C).
ATTENTION: initially the water will be
extremely hot.
3 Isolating
Close the main water valve or the stop
valve of the inlet combination. Check
that the Quooker is depressurised by
opening the Quooker tap again.
If it is depressurised no water will flow
3
4
out of it.
4 Disconnecting
Unscrew the hoses and pull the LED
cable from the top cover. Drain the
unit into the sink.
UK | 30.005.03 | V02
www.quooker.co.uk
Q U O O K E R U K L T D 3 Waterpark Hall Montpellier Mews Salford M7 4ZY (UK)
P +44 (0)207 9233355 F +44 (0)207 9001590 Internet quooker.co.uk E-mail [email protected]