1
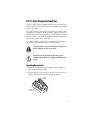
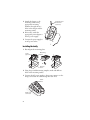
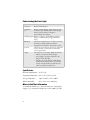
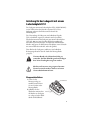
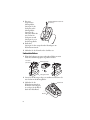
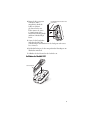
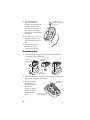
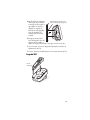
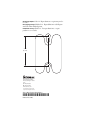
Instructions
Anleitung
Instrucciones
SF51
1-Bay Charger
Ladegerät mit einem Steckplatz
cargador de 1 compartimiento
Contents
SF51 1-Bay Charger Instructions . . . . . . . . . . . . . . . . . . . . . 3
Anleitung für das Ladegerät mit einem Ladesteckplatz SF51. 7
Instrucciones del cargador de 1 compartimiento del SF51 . 11
ii
SF51 1-Bay Charger Instructions
The SF51 1-Bay Charger (Model 074645) is an accessory for the
SF51 Cordless Scanner. These instructions explain how to install
and use the charger.
To use the charger you also need a 1-bay AC power supply (P/N
851-086-xxx) (sold and ordered separately) with these AC power
adapters: Australia; Continental Europe; North America, Central
America, Mexico, and Japan; United Kingdom; flat plate (for use
with an AC power cord, not included).
To install the charger (optional), you need mounting hardware
appropriate for the thickness of the mounting surface.
To prevent fire or electric shock, do not expose the
battery charger to rain or moisture.
You must use the appropriate Intermec power
supply with this device or equipment damage may
occur.
Installing Horizontally
1 Using the provided mounting template, mark and drill two
holes in the mounting surface.
2 Connect the AC power supply to the power connector on the
charger, and route the cable through the cable feed.
Cable
feed
Power
connector
3
3 Attach the charger to the
mounting surface using
appropriate mounting
hardware through the two
holes in the charger and the
mounting surface.
#8 bugle head
deck screw
(2 places)
4 If necessary, attach the
appropriate power adapter to
the AC power supply.
5 Connect the power supply to
an AC power outlet.
Installing Vertically
1 Reconfigure the mounting plate.
Screw
(2 places)
Mounting
plate
C
A
B
Charger
base
2 Using the provided mounting template, mark and drill two
holes in the mounting surface.
3 Connect the AC power supply to the power connector on the
charger, and route the cable through the cable feed.
Cable
feed
Power
connector
4
4 Install the appropriate mounting hardware (not included)
through the two holes you drilled in Step 2 leaving a 0.64 cm
(1/4 in) gap between the mounting surface and screw head.
5 Place the keyhole slots on the charger base over the screw
heads and slide the charger down until it locks into place.
#10 pan head wood
screw (2 places)
A
B
6 If necessary, attach the appropriate power adapter to the AC
power supply.
7 Connect the power supply to an AC power outlet.
Charging the SF51
Status
light
5
Understanding the Status Light
Color
Description
Steady green
Slow flashing
green
Battery is fully charged.
Battery is quick charging. Quick charging occurs
for the first hour that the SF51 is in the charger.
After 1 hour, the battery is charged to
approximately 75% capacity.
Fast flashing green Battery is charging. A fully discharged battery
charges to 100% capacity in approximately 3
hours.
Flashing red
The battery temperature is too cold or too hot for
the battery to charge. Make sure that the
temperature is from 0°C to 35°C (32°F to 95°F).
Steady red
The battery is not charging. You need to replace the
battery. For help, contact your local Intermec
service representative.
No light
The charger is not operating. Make sure that the:
• SF51 is correctly seated in the charger.
• power supply is properly connected to the
charger and an AC outlet.
• charging pins on the charger and the battery
contacts on the SF51 are clean. To clean the
contacts, rub them with a pencil eraser and
remove any debris from the eraser.
Specifications
Electrical requirements: x 5V, 1.5A
Operating temperature: 0°C to 35°C (32°F to 95°F)
Storage temperature:
-20°C to 60°C (-4°F to 140°F)
Relative humidity:
0% to 95% non-condensing
Where to Find More Information
To download manuals, go to www.intermec.com. For Product
Support, go to intermec.custhelp.com or call 1-800-755-5505.
6
Anleitung für das Ladegerät mit einem
Ladesteckplatz SF51
Das Ladegerät mit einem Ladesteckplatz SF51 (Modell 074645)
ist ein Zubehör für den Schnurlos-Scanner SF51. Diese
Anleitung erläutert den Einbau und Gebrauch des
Akkuladegeräts.
Zur Verwendung des Ladegeräts sind außerdem folgende
Teile erforderlich (separat zu verkaufen und zu bestellen):
Wechselstromnetzteil für Ladegerät mit einem Ladesteckplatz
(P/N 851-086-xxx) mit folgenden Wechselstromadaptern:
Australien; Kontinentaleuropa; Nordamerika, Mittelamerika,
Mexiko und Japan; Großbritannien; Flachplatte (zum Gebrauch
mit einem Wechselstromkabel, nicht inbegriffen)
Zum Einbau des Ladegeräts (wahlweise) sind außerdem
Befestigungsschrauben (für die Stärke der Montagefläche
geeignet).
Warnung
Vorsicht
Um einen Brand oder elektrischen Schlag zu
vermeiden, darf das Akkuladegerät keinem Regen
bzw. keiner Feuchtigkeit ausgesetzt werden.
Mit diesem Gerät muss ein geeignetes IntermecNetzteil verwendet werden, damit es zu keinen
Geräteschäden kommen kann.
Waagerechter Einbau
1 Setzen Sie die
Montagevorlage an,
markieren und bohren
Sie zwei Löcher in die
Montagefläche.
Kabelkanal
2 Schließen Sie das
Wechselstromnetzteil an Buchse
die Buchse am Ladegerät
an; verlegen Sie das Kabel
durch den Kabalkanal.
7
3 Bei einer
waagerechten
Montagefläche
befestigen Sie das
Ladegerät an der
Montagefläche.
Setzen Sie die
Schrauben durch die
zwei Löcher im
Ladegerät ein und
befestigen Sie es an
der Montagefläche.
Halbrundkopfschrauben #8
(2 Stellen)
4 Bei Bedarf
befestigen Sie den entsprechenden Netzadapter am
Wechselstromnetzteil.
5 Schließen Sie das Netzteil an der Steckdose an.
Senkrechter Einbau
1 Wenn das Ladegerät an einer senkrechten Fläche montiert
wird, muss die Montageplatte abgeändert werden.
Schraube
(2 Stellen)
Montageplatte
C
A
B
Ladegerätsockel
2 Setzen Sie die Montagevorlage an, markieren und bohren Sie
zwei Löcher in die Montagefläche.
3 Schließen Sie das
Wechselstromnetzteil an
die Buchse am Ladegerät
an; verlegen Sie das Kabel
durch den Kabalkanal.
Kabelkanal
Buchse
8
4 Bauen Sie die geeigneten
Schrauben (nicht
mitgeliefert) durch die
beiden in Schritt 2
gebohrten Löcher ein.
Dabei müssen Sie einen
6,4 mm breiten Spalt
zwischen der Montagefläche
und dem Schraubenkopf
lassen.
Flachkopfholzschrauben #10
(2 Stellen)
A
B
5 Setzen Sie die Langlöcher
im Ladesockel über die
Schraubenköpfe und drücken Sie das Ladegerät nach unten,
bis es einrastet.
6 Bei Bedarf befestigen Sie den entsprechenden Netzadapter am
Wechselstromnetzteil.
7 Schließen Sie das Netzteil an der Steckdose an.
Aufladen des Modells SF51
Status
Statusleuchte
light
9
Erläuterung der Statusanzeige
Farbe
Beschreibung
Konstant grün Der Akku ist vollständig geladen.
Blinkt
Der Akku wird im Schnellverfahren geladen. Die
langsam grün Schnellladung erfolgt während der ersten halben
Stunde, in der sich das Modell SF51 im Ladegerät
befindet. Nach 30 Minuten ist der Akku etwa zu 75%
geladen.
Blinkt
Der Akku wird geladen. Ein vollständig entladener
schnell grün
Akku wird in etwa 3 Stunden vollständig aufgeladen.
Blinkt rot
Die Temperatur ist zu kalt oder zu heiß und der Akku
wird nicht geladen. Sicherstellen, dass die Temperatur
zwischen 0 °C und 35 °C (32 °F und 95 °F) liegt.
Konstant rot
Der Akku wird nicht geladen. Der Akku muss ersetzt
werden. Hilfestellungen erhalten Sie von Ihrem
örtlichen Intermec-Vertreter.
Keine
Das Ladegerät ist außer Betrieb. Folgendes
Leuchte an
sicherstellen:
• Das Modell SF51 ist korrekt in das Ladegerät
eingeschoben.
• Das Netzteil ist korrekt an das Ladegerät und die
Steckdose angeschlossen.
Die Ladepole des Ladegeräts und die Akkukontakte
des Modells SF51 sind sauber. Zum Reinigen der
Kontakte, diese mit einem Radiergummi abreiben
und alle Radiergummirückstände entfernen.
Technische Daten
Stromversorgung:
x 5 V, 1,5 A
Betriebstemperatur:
0 °C bis 35 °C (32 °F bis 95 °F)
Lagertemperatur:
-20 °C bis 60 °C (-4 °F bis 140 °F)
Relative Luftfeuchtigkeit:0% bis 95%, nicht kondensierend
Verweise zu weiteren Informationen
Zum Herunterladen von Handbüchern besuchen Sie
www.intermec.com. Produktunterstützung erhalten Sie unter
intermec.custhelp.com oder rufen Sie 1-800-755-5505 an.
Benötigt Intermec Wechselstromnetzteil (Bestellnr. 851-086001) ~100 bis 240 VAC, 50-60 Hz
10
Instrucciones del cargador de 1
compartimiento del SF51
El cargador de 1 compartimiento del SF51 (Modelo 074645)
es un accesorio para el escáner inalámbrico SF51. Estas
instrucciones explican cómo instalar y usar el cargador.
Para usar el cargador también necesita este artículo (se venden y
piden por separado): fuente de alimentación de CA para 1
compartimiento (P/N 851-086-xxx) con estos adaptadores de
CA: Australia; Europa Continental; Norteamérica,
Centroamérica, México y Japón; Reino Unido; Placa plana (para
usar con un cable de alimentación de CA, no se incluye).
Para instalar el cargador (opcional), también se necesitan estos
artículos: herraje de montaje (adecuado para el espesor de la
superficie de montaje).
Advertencia
Precaución
Para evitar incendios o choque eléctrico, no
exponga el cargador de batería a la lluvia ni a la
humedad.
Debe usar la fuente de alimentación Intermec
adecuada con este dispositivo, de lo contrario
puede dañarse el equipo.
Instalación horizontal
1 Usando la
plantilla de
montaje provista,
marque y taladre
dos agujeros en la
superficie de
montaje.
Alimentador
de cable
Connector de
2 Conecte la fuente alimentación
de alimentación
de CA al conector eléctrico del cargador y guíe el cable a
través del alimentador de cable.
11
3 Para una superficie
horizontal, instale el
cargador en la superficie de
montaje usando herraje
adecuado de montaje a
través de los dos agujeros
del cargador y la superficie
de montaje.
Tornillo #8 con
cabeza de trompeta
(2 lugares)
4 Si es necesario, conecte el
adaptador adecuado a la
fuente de alimentación de
CA.
5 Conecte la fuente de
alimentación a un
tomacorriente de CA.
Instalación vertical
1 Si está instalando el cargador sobre una superficie vertical,
reconfigure la placa de montaje.
Tornillo
(2 lugares)
Placa de
montaje
C
A
B
Base
cargadora
2 Usando la plantilla de montaje provista, marque y taladre dos
agujeros en la superficie de montaje.
3 Conecte la fuente
de alimentación
de CA al conector
eléctrico del
cargador y guíe el
cable a través del
alimentador de
Connector de
cable.
alimentación
12
Alimentador
de cable
4 Instale el herraje adecuado
de montaje (no se incluye)
a través de los dos agujeros
que taladró en el paso 2
dejando un espacio de
0.64 cm (1/4 de pulgada)
entre la superficie de
montaje y la cabeza del
tornillo.
Tornillo #10 para madera con
cabeza redondeada (2 lugares)
A
B
5 Ponga las ranuras de la
base del cargador sobre las
cabezas de los tornillos y
deslice el cargador hacia abajo hasta que se trabe en su sitio.
6 Si es necesario, conecte el adaptador adecuado a la fuente de
alimentación de CA.
7 Conecte la fuente de alimentación a un tomacorriente de CA.
Carga del SF51
Luz de
estado
13
Explicación de las luces de estado
Color
Descripción
Verde constante La batería está totalmente cargada.
Verde
La batería está cargando rápidamente. La carga
parpadeante lento rápida ocurre en la primera hora que está el SF51
en el cargador. Después de 1 hora, la batería se
carga hasta una capacidad aproximada del 75%.
Verde
La batería está cargando. Una batería totalmente
parpadeante
descargada se carga al 100% en unas 3 horas.
rápido
Rojo parpadeante La temperatura de la batería es demasiado baja o
demasiado alta para que cargue la batería.
Compruebe que la temperatura sea de 0°C a 35°C
(32°F a 95°F).
Rojo constante
La batería no está cargando. Debe cambiar la
batería. Para obtener ayuda, diríjase al
representante local de servicio de Intermec.
No hay luz
El cargador no funciona. Revise lo siguiente:
• El SF51 está asentado correctamente en el
cargador.
• la fuente de alimentación está debidamente
conectada al cargador y a un tomacorriente de
CA.
• las patillas de carga del cargador y los contactos
de la batería en el SF51 están limpios. Para
limpiar los contactos, frótelos con una goma de
borrar de lápiz y elimine todo residuo del
borrador.
Especificaciones
Requisitos eléctricos:
x 5V, 1.5A
Temperatura de operación:
0°C a 35°C (32°F a 95°F)
Temperatura de almacenamiento: -20°C a 60°C (-4°F a 140°F)
Humedad relativa:
0% a 95%, no condensante
Dónde obtener más información
Para descargar manuales, visite www.intermec.com. Para
Asistencia de Productos, visite intermec.custhelp.com o llame al
1-800-755-5505.
14
15
Mounting Template: Scale 1:1. Reproductions or copies may not be
to scale.
Maßstab 1:1 Reproduktionen oder Kopien
sind evtl. nicht maßstabsgetreu.
Plantilla de montaje: Escala 1:1. Las reproducciones o copias
pueden no ser a escala.
Befestigungsvorlage:
7 cm
(2 3/4 in)
Worldwide Headquarters
6001 36th Avenue West
Everett, Washington 98203
U.S.A.
tel 425.348.2600
fax 425.355.9551
www.intermec.com
© 2006 Intermec Technologies
Corporation. All rights reserved.
SF51 1-Bay Charger Instructions
*074477-003*
P/N 074477-003