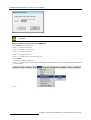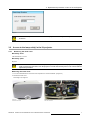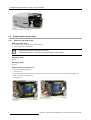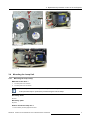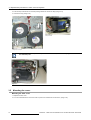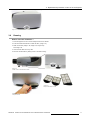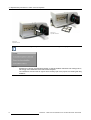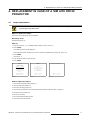
1
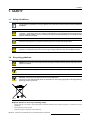
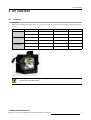
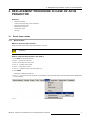
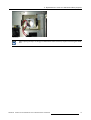
Lamp Kit for iQ/SIM4/OV DR 120 Projectors
Installation Manual
R9841770 - R9841771
R9841100 - R9841111
R9841760 - R9841761
R5976375/05
20/04/2006
Barco nv Presentations
Noordlaan 5, 8520 Kuurne
Phone: +32 56.36.82.11
Fax: +32 56.35.86.51
E-mail: [email protected]
Visit us at the web: www.barco.com
Printed in Belgium
Copyright ©
All rights reserved. No part of this document may be copied, reproduced or translated. It shall not otherwise be recorded, transmitted or
stored in a retrieval system without the prior written consent of Barco.
Federal Communications Commission (FCC Statement)
This equipment has been tested and found to comply with the limits for a class A digital device, pursuant to Part 15 of the FCC rules.
These limits are designed to provide reasonable protection against harmful interference when the equipment is operated in a commercial
environment. This equipment generates, uses, and can radiate radio frequency energy and, if not installed and used in accordance with
the instruction manual, may cause harmful interference to radio communications. Operation of this equipment in a residential area may
cause harmful interference, in which case the user will be responsible for correcting any interference.
Trademarks
Brand and product names mentioned in this manual may be trademarks, registered trademarks or copyrights of their respective holders.
All brand and product names mentioned in this manual serve as comments or examples and are not to be understood as advertising for
the products or their manufactures.
1. Safety
1. SAFETY
1.1
Safety Guidelines
This procedure is intended for use only by qualified service technicians who have been trained and authorized
by BARCO !
WARNING: Hot Surface and Risk of Explosion:Switch the projector to stand by and let it cool down for at least
15 minutes . These lamps consist of a quartz arc tube operating at very high temperature and high pressure
which may explode suddenly. There is a risk of personal injury and property damage from hot quartz arc tube
particles if handled incorrectly.
WARNING:
Risk of Electrical Shock: Power down the projector and unplug the power cord from the wall
outlet. Once the projector is cooled down and the power is off, continue with the procedure.
WARNING: Lamp Runtime Warning: Do not exceed the indicated maximum total lifetime of the lamp for safe
operation in normal power mode. Do not use it longer ! Always replace the lamp with the BARCO lamp kit.
1.2
Recycling guidelines
WARNING: Do not break or crush lamps because this may pose health and environmental risks when mercury
vapors are released.
CAUTION: To avoid breaking the lamps, repack carefully when storing and transporting them.
CAUTION:
Lamps may not be disposed as normal household trash.
Contact your local waste disposal facility for information on the recycling program for HID (High Intensity
Discharge ) lamps in your area.
Image 1-1
Disposal options for mercury-containing lamps
•
Recycle through a municipal or solid waste district household hazardous waste collection program in accordance with local
regulations.
•
Direct shipment to lamp recycler
•
Shipment through a hazardous waste transporter
R5976375 LAMP KIT FOR IQ/SIM4/OV DR 120 PROJECTORS 20/04/2006
1
1. Safety
2
R5976375 LAMP KIT FOR IQ/SIM4/OV DR 120 PROJECTORS 20/04/2006
2. Kit Content
2. KIT CONTENT
2.1
Contents
Overview
Depending on the Kitnumber ordered the kit may contain 1 or 2 lamps, the lamp power may also differ according to the type of
Projector.
IQ200/OV DR120
IQ300/MGP10/SIM4
IQ350/400/5001
Kitnumber
Description
Quantity
Manual
R9841771
120 W Lamp
1
R5976375
R9841770
120 W Lamp
2
R5976375
R9841111
200 W Lamp
1
R5976375
R9841100
200 W Lamp
2
R5976375
R9841761
250 W Lamp
1
R5976375
R9841760
250 W Lamp
2
R5976375
Image 2-1
CAUTION: Do not touch the cover glass with your fingers. If the lamp is touched, finger prints can be removed
by cleaning the lamp with alcohol.
1.
The 350 uses the 250 lamp on 200W only
R5976375 LAMP KIT FOR IQ/SIM4/OV DR 120 PROJECTORS 20/04/2006
3
2. Kit Content
4
R5976375 LAMP KIT FOR IQ/SIM4/OV DR 120 PROJECTORS 20/04/2006
3. Replacement procedure in case of an iQ Projector
3. REPLACEMENT PROCEDURE IN CASE OF AN IQ
PROJECTOR
Overview
3.1
3.1.1
•
Reset lamp runtime
•
Access to the lamp unit(s) in the iQ projector
•
Removing the lamp unit(s)
•
Mounting the Lamp Unit
•
Mounting the cover.
•
Cleaning
Reset lamp runtime
Reset runtime
When to reset the lamp runtime ?
The lamp runtime should only be reset when placing a new lamp.
WARNING: Lamp runtime reset as well as the lamp replacement can only be done by a Barco authorized
technician.
How to reset the lamp runtime in the iQ/iD ?
1. Press MENU to activate the Tool bar
2. Press → to select the Lamp item
3. Press ↓ to Pull down the Lamp menu
4. Use ↑ or ↓ to select Reset runtime
5. Press → to pull down the menu
6. Use ↑ or ↓ to select the lamp to be reset (image 3-1)
7. Press ENTER
A dialog box is displayed (image 3-2)
8. Use ←or →, the numeric keys on the remote, or the keypad to change the serial number of the lamp (serial number 0000000 will
not be accepted).
Image 3-1
R5976375 LAMP KIT FOR IQ/SIM4/OV DR 120 PROJECTORS 20/04/2006
5
3. Replacement procedure in case of an iQ Projector
Image 3-2
WARNING: Lamp runtime reset as well as the lamp replacement can only be done by a Barco authorized
technician.
How to reset the lamp runtime in the SIM5Plus?
1. Press MENU to activate the Tool bar
2. Press → to select the Lamp item
3. Press ↓ to Pull down the Lamp menu
4. Use ↑ or ↓ to select Reset runtime
5. Press → to pull down the menu
6. Use ↑ or ↓ to select the lamp to be reset (image 3-3)
7. Press ENTER
A dialog box is displayed (image 3-4)
8. Use ←or →, the numeric keys on the remote, or the keypad to change the serial number of the lamp (serial number 0000000 will
not be accepted).
Image 3-3
6
R5976375 LAMP KIT FOR IQ/SIM4/OV DR 120 PROJECTORS 20/04/2006
3. Replacement procedure in case of an iQ Projector
Image 3-4
WARNING: Lamp runtime reset as well as the lamp replacement can only be done by a Barco authorized
technician.
3.2
3.2.1
Access to the lamp unit(s) in the iQ projector
Removing the back cover
Necessary tools
a flat screwdriver of 10 mm
Necessary parts
No parts.
WARNING: Risk of Electrical Shock: For replacement procedures power down the projector and unplug the
power cord from the wall outlet. Once the projector is cooled down and the power is off, continue with the
replacement procedure.
Removing the back cover
1. Turn with a screwdriver the cover lock screw A quarter turn counter clockwise. (image 3-5)
2. Remove the back cover.
See image 3-6, image 3-7.
Image 3-5
rear cover lock screw
Image 3-6
rear cover removed
R5976375 LAMP KIT FOR IQ/SIM4/OV DR 120 PROJECTORS 20/04/2006
7
3. Replacement procedure in case of an iQ Projector
Image 3-7
right view of the projector, rear cover removed
3.3
Removing the lamp unit(s)
3.3.1
Removing the lamp unit(s)
What has to be done ?
1.
The lamp power connection has to be disconnected.
2.
The lamp unit has to be removed.
Perform the procedure for both lamps if necessary.
In this procedure lamp1 is replaced, the procedure being the same for lamp2.
Necessary tools
No tools.
Necessary parts
No parts.
How to remove the lamp unit ?
1. Disconnect the lamp (image 3-8)
See image 3-9.
2. Push the lamp locking handle slightly to the left (or to the right for lamp 2) and turn it over to unlock the lamp (image 3-10)
3. Take out the lamp unit (image 3-11)
See image 3-12.
Image 3-8
lamp connector
8
Image 3-9
disconnected lamp connector
R5976375 LAMP KIT FOR IQ/SIM4/OV DR 120 PROJECTORS 20/04/2006
3. Replacement procedure in case of an iQ Projector
Image 3-11
Image 3-10
unlocking lamp 1 & lamp 2
Image 3-12
Lamp 1 removed
3.4
Mounting the Lamp Unit
3.4.1
Mounting the lamp unit(s)
What has to be done ?
1.
The lamp has to be mounted
2.
The lamp has to be connected.
Perform the procedure for both lamps if both lamps have to be replaced.
In this procedure lamp1 is replaced, the procedure being the same for lamp2.
Necessary tools
No tools.
Necessary parts
No parts.
How to mount the lamp unit ?
1. Place carefully the lamp against the frame
R5976375 LAMP KIT FOR IQ/SIM4/OV DR 120 PROJECTORS 20/04/2006
9
3. Replacement procedure in case of an iQ Projector
2. Push the lamp inwards and turn the lamp locking handle over to lock the lamp (image 3-13)
3. Connect the lamp (image 3-14)
Image 3-14
Lamp connected
Image 3-13
locking lamp 1 & lamp 2
The new 120W lamp driver (B4006511K) has a different connector, therefore an adapting connector is used on
the 120W lamp unit.
Image 3-15
3.5
Mounting the cover.
Mounting the back cover
1. Replace the back cover.
2. Turn with a screwdriver the cover lock screw a quarter turn clockwise to lock the cover. (image 3-16)
10
R5976375 LAMP KIT FOR IQ/SIM4/OV DR 120 PROJECTORS 20/04/2006
3. Replacement procedure in case of an iQ Projector
Image 3-16
3.6
Cleaning
How to clean the dustfilters ?
1. Place the projector so as to access easily the filter to be cleaned
2. Push the handle downwards to unlock the filter. (image 3-17)
3. Slide out the filter (image 3-18, image 3-19, image 3-20)
See image 3-21.
4. Clean the dust filter with a dry cloth.
5. Re-insert the dust filter by sliding it back in the filter housing.
Image 3-17
Location of the x-cube filter and its handle
Image 3-19
lamp & X-Cube filters removed
Image 3-18
Lamp filter removal
R5976375 LAMP KIT FOR IQ/SIM4/OV DR 120 PROJECTORS 20/04/2006
11
3. Replacement procedure in case of an iQ Projector
Image 3-21
Input filter removed
Image 3-20
Input filter removal
If the airflow is falling under a predetermined treshold value a warning will be displayed on the screen.
Image 3-22
At that time it is strongly recommended to replace or clean the dustfilter under the X-cube. Failing to do so,
will strongly reduce the lifetime of the LCD’s and the analyzers.
The manufacturer reserves itself the right to refuse warranty repair if the projector was working with dirty
dustfilters.
12
R5976375 LAMP KIT FOR IQ/SIM4/OV DR 120 PROJECTORS 20/04/2006
4. Replacement in case of a SIM 4/OV DR120 projector
4. REPLACEMENT IN CASE OF A SIM 4/OV DR120
PROJECTOR
4.1
Lamp replacement
CAUTION: Do not touch the cover glass with your fingers. If the lamp is touched, finger prints can be removed
by cleaning the lamp with alcohol.
When to replace the lamp?
The lamp must be replaced at the end of lifetime.
Necessary tools
hexagonal ball driver (5)
Start up
1. Push the cursor key ↑ or ↓ to highlight Reset Lamp Run Time. (menu 4-1)
2. Press ENTER.
The following warning will be displayed :
Risk of electrical shock. Reset lamp run time is reserved to qualified service personnel. (menu 4-2)
3. Press ENTER
See menu 4-3.
4. Enter the serial number of the new lamp
5. Press ENTER
SERVICE
WARNING
Enter serial number:
IDENTIFICATION
CHANGE PASSWORD
CHANGE PROJ. ADDRESS
CHANGE BAUDRATE PC
RESET LAMP RUNTIME
LAMP RUNTIME HISTORY
LIGHT OUTPUT
VOLTAGE DIAGNOSTICS
---------------------
_ _ _ _ _ _ _
RISK OF
ELECTRICAL SHOCK
--------------------RESET LAMP RUN TIME
is reserved to
qualified
service personnel
MORE...
Select with ↑ or ↓
then <ENTER>
<EXIT> to return
Menu 4-1
<ENTER> to accept
<EXIT> to return
<ENTER> to accept
<EXIT> to return
Menu 4-2
Menu 4-3
How to replace the lamp ?
1. Unscrew the hexagonal screw (image 4-1)
2. Open the side door (image 4-2)
3. Disconnect the lamp (image 4-3)
4. Use the long screwdriver to move locking handle downwards to unlock the lamp. (image 4-4)
5. Remove the lamp (image 4-5)
6. Mount the new lamp
7. Move lamp locking handle upwards
8. Close and secure the side door
R5976375 LAMP KIT FOR IQ/SIM4/OV DR 120 PROJECTORS 20/04/2006
13
4. Replacement in case of a SIM 4/OV DR120 projector
Image 4-1
Location of side door screw
Image 4-2
side door open
Image 4-3
Lamp disconnected
LOCK
UNLOCK
Image 4-4
Lamp locking handle
14
R5976375 LAMP KIT FOR IQ/SIM4/OV DR 120 PROJECTORS 20/04/2006
4. Replacement in case of a SIM 4/OV DR120 projector
Image 4-5
Lamp removed
When replacing the lamp it is strongly recommended to check and clean (or replace if necessary) the dustfilters.
R5976375 LAMP KIT FOR IQ/SIM4/OV DR 120 PROJECTORS 20/04/2006
15
4. Replacement in case of a SIM 4/OV DR120 projector
16
R5976375 LAMP KIT FOR IQ/SIM4/OV DR 120 PROJECTORS 20/04/2006
Index
INDEX
A
access
access 7
mounting 9
removing 8
runtime reset iQ
7
5
C
Content 3
cover 7, 10
mounting 10
removing 7
F
Filters 11
cleaning
M
Menu 5
Lamp menu 5
reset runtime
5
R
guidelines 1
recycling 1
Recycling 1
replacement 5, 13
iQ 5
right side 13
sim4/OV DR120 13
Runtime 5
reset 5
K
S
11
G
Kit 3
content
3
safety 1
guidelines
1
L
lamp
5, 7–9
R5976375 LAMP KIT FOR IQ/SIM4/OV DR 120 PROJECTORS 20/04/2006
17
Index
18
R5976375 LAMP KIT FOR IQ/SIM4/OV DR 120 PROJECTORS 20/04/2006
Revision Sheet
To:
Barco nv Presentations
Noordlaan 5, 8520 Kuurne
Phone: +32 56.36.82.11, Fax: +32 56.35.86.51
E-mail: [email protected], Web: www.barco.com
From:
Date:
Please correct the following points in this documentation (R5976375/05):
page
R5976375
wrong
LAMP KIT
FOR IQ/SIM4/OV
correct
DR 120 PROJECTORS
20/04/2006