1
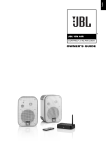
02/08/07
14:07
Side 1
English
34199_Control_2_4G_Eng
®
JBL ON AIR
®
CONTROL® 2.4G
OWNER’S GUIDE
34199_Control_2_4G_Eng
02/08/07
14:07
Side 2
FEDERAL COMMUNICATIONS
COMMISSION INTERFERENCE
STATEMENT
This equipment has been tested and found to comply with the limits
for a Class B digital device, pursuant to Part 15 of the FCC Rules.
These limits are designed to provide reasonable protection against
harmful interference in a residential installation.
This equipment generates, uses and can radiate radio frequency
energy and, if not installed and used in accordance with the
instructions, may cause harmful interference to radio
communications. However, there is no guarantee that interference
will not occur in a particular installation. If this equipment does
cause harmful interference to radio or television reception, which
can be determined by turning the equipment off and on, the user is
encouraged to try to correct the interference by one of the
following measures:
• Reorient or relocate the receiving antenna.
• Increase the separation between the equipment and receiver.
• Connect the equipment into an outlet on a circuit different from that
to which the receiver is connected.
• Consult the dealer or an experienced radio/TV technician for help.
FCC Caution: To assure continued compliance, any changes or
modifications not expressly approved by the party responsible for
compliance could void the user's authority to operate this
equipment. (Example - use only shielded interface cables when
connecting to computer or peripheral devices).
FCC Radiation Exposure Statement
This equipment complies with FCC RF radiation exposure limits set
forth for an uncontrolled environment. This equipment should be
installed and operated with a minimum distance of 20 centimeters
between the radiator and your body.
This device complies with Part 15 of the FCC Rules. Operation is subject to the following
two conditions:
(1) This device may not cause harmful interference, and
(2) This device must accept any interference received, including interference that may
cause undesired operation.
Declaration of Conformity
We, Harman Consumer Group Inc.
2, route de Tours
72500 Chateau du Loir
France
declare in own responsibility that the products described
in this owner’s manual are in compliance with technical
standards:
EN 61000-6-3:2001
EN 61000-6-1:2001
Laurent Rault
Harman Consumer Group Inc.
Chateau du Loir, France 8/07
2
Declaration of Conformity
We, Harman Consumer Group Inc.
2, route de Tours
72500 Chateau du Loir
France
declare in own responsibility that the product described
in this owner’s manual is in compliance with technical
standards:
EN 55013:2001+A1:2003
EN 55020:2002+A1:2003
EN 61000-3-2:2000
EN 61000-3-3:1995+A1:2001
EN 60065:2002
EN 301489-1 V 1.6.1:2005
EN 301489-17 V 1.2.1:2003
EN 300328 V 1.6.1:2004
Laurent Rault
Harman Consumer Group Inc.
Chateau du Loir, France 8/07
02/08/07
14:07
Side 3
English
34199_Control_2_4G_Eng
READ FIRST! Important Safety Precautions!
1. Read these instructions.
2. Keep these instructions.
3. Heed all warnings.
4. Follow all instructions.
5. Do not use this apparatus near water.
6. Clean only with a dry cloth.
7. Do not block any ventilation openings.
Install in accordance with the
manufacturer’s instructions.
8. Do not install near any heat sources such
as radiators, heat registers, stoves or other
apparatus (including amplifiers) that
produce heat.
9. Do not defeat the safety purpose of the
polarized or grounding-type plug.
A polarized plug has two blades with one
wider than the other. A grounding-type plug
has two blades and a third grounding prong.
The wide blade or the third prong is
provided for your safety. If the provided plug
does not fit into your outlet, consult an
electrician for replacement of the obsolete
outlet.
10. Protect the power cord from being
walked on or pinched, particularly at plugs,
convenience receptacles and the point
where they exit from the apparatus.
11. Only use attachments/accessories
specified by the manufacturer.
12. Use only with the cart, stand,
tripod, bracket or table specified
by the manufacturer or sold with
the apparatus. When a cart is
used, use caution when moving the
cart/apparatus combination to avoid injury
from tip-over.
13. Unplug this apparatus during lightning
storms or when unused for long periods of
time.
14. Refer all servicing to qualified service
personnel. Servicing is required when the
apparatus has been damaged in any way,
such as power-supply cord or plug is
damaged, liquid has been spilled or objects
have fallen into the apparatus, the
apparatus has been exposed to rain or
moisture, does not operate normally, or has
been dropped.
15. Do not use attachments not
recommended by the product manufacturer,
as they may cause hazards.
16. This product should be operated only
from the type of power source indicated on
the marking label. If you are not sure of the
type of power supply to your home, consult
your product dealer or local power
company. For products intended to operate
from battery power or other sources, refer
to the operating instructions.
17. If an outside antenna or cable system is
connected to the product, be sure the
antenna or cable system is grounded so as
to provide some protection against voltage
surges and built-up static charges. Article
810 of the National Electrical Code, ANSI/
NFPA 70, provides information with regard
to proper grounding of the mast and
supporting structure, grounding of the leadin wire to an antenna discharge unit, size of
grounding conductors, location of antennadischarge unit, connection to grounding
electrodes, and requirements for the
grounding electrode. See Figure A.
18. An outside antenna system should not
be located in the vicinity of overhead power
lines or other electric light or power circuits,
or where it can fall into such power lines or
circuits. When installing an outside antenna
system, extreme care should be taken to
keep from touching such power lines or
circuits, as contact with them might be fatal.
19. Do not overload wall outlets, extension
cords, or integral convenience receptacles,
as this can result in a risk of fire or electric
shock.
20. Never push objects of any kind into this
product through openings, as they may
touch dangerous voltage points or short-out
parts, which could result in a fire or electric
shock. Never spill liquid of any kind on the
product.
21. The apparatus shall not be exposed to
dripping or splashing, and no objects filled
with liquids, such as vases, shall be placed
on the apparatus.
22. Do not attempt to service this product
yourself, as opening or removing covers
may expose you to dangerous voltage or
other hazards. Refer all servicing to
qualified service personnel.
23. When replacement parts are required,
be sure the service technician has used
replacement parts specified by the
manufacturer or that have the same
characteristics as the original part.
Unauthorized substitutions may result in
fire, electric shock or other hazards.
24. Upon completion of any service or
repairs to this product, ask the service
technician to perform safety checks to
determine that the product is in proper
operating condition.
25. The product should be mounted to a wall
or ceiling only as recommended by the
manufacturer.
Figure A.
Example of Antenna Grounding as per
National Electrical Code ANSI/NFPA 70
3
34199_Control_2_4G_Eng
02/08/07
14:07
Side 4
THANK YOU FOR CHOOSING JBL
For more than 60 years, JBL has been involved in every aspect of
music and film recording and reproduction, from live performances
to the recordings you play in your home, car or office.
We’re confident that the JBL system you have chosen will provide
every note of enjoyment that you expected – and that when you think
about purchasing additional audio equipment for your home, car or
office, you will once again choose JBL.
Please take a moment to register your product on our Web site at
www.jbl.com. It enables us to keep you posted on our latest
advance-ments, and helps us to better understand our customers
and build products that meet their needs and expectations.
The JBL On Air Control 2.4G is an advanced wireless loudspeaker
system that allows you to enjoy your favorite music in remote
locations around your home, or to add surround speakers to your
home theater system without running wires to the back of the room.
To ensure trouble-free performance, please carefully read these
instructions completely before connecting or using the system.
®
1
MUTE
0
INPUT
3
VOL
2
Remote Control
4
5
®
UNPACKING THE SYSTEM
Carefully unpack the system. If you suspect damage from transit,
report it immediately to your dealer and/or delivery service.
Keep the shipping carton and packing materials for future use.
Open the package and verify the following contents:
Included
1 x Transmitter module
1 x Universal power supply for transmitter
1 x 120V 2-Prong AC power cord for transmitter power supply
1 x 230V 2-Prong AC power cord for transmitter power supply
1 x Wall-mount bracket for transmitter with 2 x panhead
M3 x 4 machine screws for attaching wall-mount bracket
to transmitter
4 x Small round self-adhesive feet – to be attached on
transmitter left side panel if transmitter to be used vertically
1 x Active speaker/receiver (left-channel speaker)
1 x Universal power supply for active speaker/receiver
1 x 120V 3-Prong AC power cord for active speaker/receiver
power supply
1 x 230V 3-Prong AC power cord for active speaker/receiver
power supply
1 x Wall-mount holder for active speaker/receiver universal
power supply
1 x Passive speaker (right-channel speaker)
2 x Wall-mount rotatable brackets for active and passive speakers
(includes bar wrench and backup cords)
1 x Remote control
1 x Interconnect cable (1m/3.3 ft. RCA – RCA)
1 x Interconnect cable (1m/3.3 ft. RCA – 1/8-inch mini plug)
10m/33 ft. x Speaker wire
1 x Owner’s manual (multilanguage)
1 x USA warranty sheet
–
ID
CODE
1 2 3 4
+
TO RIGHT SPEAKER
DC 20V SUB-OUT LINE-IN
LEFT-CHANNEL SPEAKER
6
8
7
–
Left/Active Speaker
(Rear)
+
TO LEFT SPEAKER
RIGHT-CHANNEL SPEAKER
Right/Passive
Speaker
9
Wireless Transmitter
ID
CODE
A
4
B
1 2 3 4
R INPUT L
C
D
02/08/07
14:07
Side 5
English
34199_Control_2_4G_Eng
CONNECTIONS
Notes: For the sake of simplicity, throughout this manual we have
used the term “source” when describing connections and operation.
This would apply to any device such as an A/V receiver, audio
component, computer or portable music player.
Step 2.
Determine the location of the surround speakers.
Subwoofer
The JBL On Air Control 2.4G is designed for use in most countries
worldwide, depending upon local regulations.
It includes 120V – 230V, 50/60Hz universal power supplies for the
transmitter module and the active speaker. While we have included
the two most commonly used AC cords with this product, your AC
electrical outlet may require the use of a different AC cord. For your
safety, it is essential to use an AC cord that is fully compatible with
your local electrical system. When in doubt, please consult your
local JBL dealer or distributor.
Left Front
Channel
Center
Channel
Right Front
Channel
The JBL On Air may be connected to your source in several ways.
First, determine how you would like to use the JBL On Air
Control 2.4G; then follow the setup instructions for that application.
Couch
Application 1
Adding surround speakers to a home theater system.
Continue reading the instructions for Application 1 below.
Left Rear
Channel
Left
Surround
Channel
Center Rear
Channel
Right Rear
Channel
Right
Surround
Channel
Application 2
Adding speakers to remote locations around your home.
Application 1
Adding surround speakers to a home theater system:
Subwoofer
Determine if your source contains preamp outputs for rear/surround
channels, usually indicated by RCA-type jacks on the back of the
receiver labeled as “surround preout” (please refer to your source’s
owner’s manual to confirm whether it includes the preamp outputs).
If your receiver includes these outputs, follow the steps below.
If not, connection is not recommended.
Note: Make sure power is turned off on all components.
Right Front
Channel
Center
Channel
Right
Surround
Channel
Left Front
Channel
Step 1.
Connect the interconnect cable (included) to the left and right
surround/rear preamp outputs on the back of your source and the
input on the transmitter module D, as shown in Figure 1.
RECEIVER/PROCESSOR
Surround Channel
Preamp Outputs
R
Left
Surround
Channel
Figure 2. Place the active (left) speaker in the recommended
location for the left surround speaker.
L
ID
CODE
1 2 3 4
R INPUT L
Figure 1.
5
34199_Control_2_4G_Eng
02/08/07
14:07
Side 6
Step 3. Connect the speaker wire (included) to the push terminals on
the active speaker 5 and the push terminals on the rear of the
passive speaker 9.
See Figure 3. Please note that the speaker wire supplied features a
polarity stripe to help distinguish its two conductors. Use this
polarity stripe to ensure that you are connecting the positive (+)
terminal on one speaker to the positive (+) terminal on the other, and
the negative (–) to the negative (–). It does not matter whether you
use the striped conductor for connecting the positive (+) terminals or
the negative (–) terminals.
outputs. If your computer does feature preamp or line outputs, we
recommend that they be used instead of speaker outputs.
Some computer sound cards feature preamp outputs in addition to
or instead of speaker outputs. If your computer does feature preamp
outputs, we recommend that they be used instead of speaker
outputs. If you would like to connect the computer to the
JBL On Air Control 2.4G using preamp outputs on your computer,
follow the steps in Connection A.
Connection Option A
Connecting using the preamp outputs on your source:
Note: Make sure power is turned off on all components.
ID
CODE
1 2 3 4
–
+
–
+
TO RIGHT SPEAKER
Step 1.
Connect the interconnect cable (included) to the left and right
front/main preamp outputs or zone 2 outputs or REC outputs and the
inputs on the transmitter module D, as shown in Figure 4.
TO LEFT SPEAKER
DC 20V SUB OUT LINE IN
LEFT CHANNEL SPEAKER
SOURCE
RIGHT CHANNEL SPEAKER
Front/Main/Second Room
Preamp Outputs
Figure 3.
R
Step 4. Plug the transmitter module B and active speaker 6 into
the wall outlet, using the correct power supply and power cord.
Make sure the transmitter’s antenna A is extended upwards.
L
Step 5. If necessary, configure your source to activate the preamp
level outputs for the surround/rear channels (consult your source’s
owner’s manual for specific instructions).
Make sure the ID code setting on the transmitter C is set to the
same setting as that on the active speaker 4. See Page 8 of this
manual for more information on ID codes. When connected properly,
the top LED on the front of the active speaker should be green. When
first plugged in, it will sometimes take several seconds for the
Control 2.4G active speaker to initialize and “wake up.“ Until then,
the top LED will be in red. Once the top LED is green, the bottom LED
should flash green until the transmitter and active speaker “lock in.”
It will then also illuminate in solid green. This LED will light in orange
if the local input on the active speaker is selected (see Page 8 under
Local Input for more details).
Application 2
Adding speakers to remote locations around your home:
Audio sources that can be used in this application may be an A/V
receiver or audio receiver, a portable audio player, or a computer
featuring a sound card. First, determine whether your source
contains RCA-type preamp outputs for the front/main channels or a
1/8-inch stereo single-pin output. On an A/V or audio receiver, the
preamp outputs are usually indicated by RCA-type jacks on the back
of the receiver labeled as “pre-out” (please refer to your source’s
owner’s manual to confirm whether it includes preamp outputs). If
your source includes these RCA-type outputs, follow the steps in
Connection Option A.
If your source features a 1/8-inch single-pin stereo jack, follow steps
in Connection Option B. If your receiver does not feature either type
of preamp outputs for the front/main channels, it cannot be used
with Control 2.4G. Some computer sound cards feature more than
one 1/8-inch single-pin jack. There is almost always one output that
is called a speaker output. However, some sound cards feature a
preamp output or line output in addition to or instead of speaker
6
ID
CODE
1234
R INPUT L
Figure 4.
Step 2. Place the active speaker in the desired location in your home
near an AC outlet, as it needs to plug in to the wall.
Step 3. Connect the speaker wire (included) to the push terminals on
the active speaker 5 and the push terminals on the rear of the
passive speaker 9, as shown in Figure 3. Please note that the
speaker wire supplied features a polarity stripe to help distinguish its
two conductors. Use this polarity stripe to ensure that you are
connecting the positive (+) terminal on one speaker to the positive
(+) terminal on the other, and the negative (–) to the negative (–).
It does not matter whether you use the striped conductor for
connecting the positive (+) terminals or the negative (–) terminals.
Step 4. Plug the transmitter module B and active speaker 6 into
the wall outlet, using the correct power supply and power cord.
Make sure the transmitter’s antenna A is extended upwards.
Step 5. Make sure the ID code setting on the transmitter C is set to
the same setting as that on the active speaker 4. See Page 8 of this
manual for more information on ID codes. If necessary, configure
your receiver to activate the preamp level outputs for the main/front
channels (consult your source’s owner’s manual for specific
instructions).
02/08/07
14:07
Side 7
English
34199_Control_2_4G_Eng
When connected properly, the top LED on the front of the active
speaker should be green. When first plugged in, it will sometimes
take several seconds for the Control 2.4G active speaker to initialize
and “wake up.” Until then, the top LED will be in red. Once the top
LED is green, the bottom LED should flash green until the transmitter
and active speaker “lock in.” It will then also light in solid green.
This LED will light in orange if the local input on the active speaker is
selected (see Page 8 under Local Input for more details).
Connection Option B
Connecting using the 1/8-inch single-pin stereo jack on your
source:
Note: Make sure power is turned off on all components.
Step 4. Plug the transmitter module B and active speaker 6 into
the wall outlet, using the correct power supply and power cord.
Make sure the transmitter’s antenna A is extended upward.
Make sure the ID code setting on the transmitter C is set to the
same setting as that on the active speaker 4. See Page 8 of this
manual for more information on ID codes. When connected properly,
the top LED on the front of the active speaker should be green.
When first plugged in, it will sometimes take several seconds for the
Control 2.4G active speaker to initialize and “wake up”. Until then the
top LED will be in red. Once the top LED is green, the bottom LED
should flash green until the transmitter and active speaker “lock in”.
It will then also light in solid green. This LED will light in orange if the
local input on the active speaker is selected (see Page 8 under Local
Input for more details).
Step 1. Connect the RCA – 1/8-inch mini-jack cable (included) to the
preamp out, line out or headphone output of your portable audio
player and the inputs on the transmitter module D, as shown in
Figure 5.
Portable Audio Device or
Computer Headphone Jack (1/8") Mini
ID
CODE
1 2 3 4
R INPUT L
Figure 5.
Step 2. Place the active speaker in the desired location in your home
near an AC outlet, as it needs to plug into the wall.
Step 3. Connect the speaker wire (included) to the push terminals on
the active speaker 5 and the push terminals on the rear of the
passive speaker 9, as shown in Figure 3. Please note that the
speaker wire supplied features a polarity stripe to help distinguish
its two conductors. Use this polarity stripe to ensure that you are
connecting the positive (+) terminal on one speaker to the positive
(+) terminal on the other, and the negative (–) to the negative (–).
It does not matter whether you use the striped conductor for
connecting the positive (+) terminals or the negative (–) terminals.
7
34199_Control_2_4G_Eng
02/08/07
14:07
Side 8
OPERATION
Adjusting the Volume
Application 1
Adding surround speakers to a home theater system:
In this application, the output level of your Control 2.4G active
speakers will not only be dependent on the volume setting of your
A/V source, it will also need to be properly adjusted after installation
and before use in order to be able to work correctly with the other
speakers in your multichannel surround system. To adjust the output
level, turn you A/V source on, set your A/V source’s volume control
about a third of the way up, and activate the speaker-leveladjustment test tone. Make sure that the Control 2.4G transmitter
and speakers are on, both of its speakers are connected, and there
is RF lock (i.e., lower LED on active speaker is solid green). Using the
Control 2.4G remote control 1 and 2 adjust the volume level of
Control 2.4G until its output level is balanced with the rest of the
speakers in your surround system. From this point on, you will not be
using the remote control of your Control 2.4G for volume settings.
You will be increasing and decreasing the output level for the entire
surround sound system using your A/V source’s volume control.
Please note that Control 2.4G will retain its volume setting when it is
in standby, so there is no need to set its volume level every time the
system is turned on.
Application 2
Adding speakers to remote locations around your home:
Depending on the type of connection and the specific source that
you are using, the volume setting on your receiver may affect the
sound output level of your Control 2.4G. To check whether the output
from your source is volume-dependent, turn the volume level on your
receiver to approximately half-way. Turn on your Control 2.4G
transmitter and active speaker. Once the lower LED on the active
speaker lights in solid green, indicating that RF lock has been
achieved, verify that there is sound output from the active speaker.
Then increase and decrease the volume control on your receiver
and observe whether this affects the sound output from your active
speakers. If it does not, then the volume control on your source unit
can be set at any position that you may desire as it does not affect
the performance of Control 2.4G. If changing the volume setting on
your source does affect the output from Control 2.4G, then you will
need to always keep your source’s volume control at about half-way
up with audio receivers or A/V receivers, at about three-quarters of
the way up when using a computer, and at maximum if using a
portable audio device. From this point on, you will use the remote
control included with the JBL On Air Control 2.4G wireless speaker
system to adjust the volume 1 and 2.
Local Input
The JBL On Air Control 2.4G wireless speaker system also includes a
local input 8 on the rear of the active speaker. This input allows you
to hook up a portable audio player directly to the speaker wherever
you may happen to be. For example, you could have the system
connected to your receiver as described in Application 2, listening to
a local FM station and then hook up your portable music player to
the local input and switch between the two different sources.
To connect portable audio player to the active speaker, simply
connect the preamp out, line out or headphone jack to the line-in 8
on the rear of the active speaker using a 1/8-inch mini-jack –
1/8-inch mini-jack cable (not included).
To switch between the two sources, push the input button 3 on the
remote control.
8
ID Code
In the unlikely event that you experience interference when
operating the system, or if you have more than one set of Control
2.4G transmitters and receivers in operation, you may change the
channel in which the system operates. On the transmitter module
and the active speaker, there is a four-position “ID Code” selector.
Simply set the selectors to one of the other positions. The transmitter
and active speaker must be set to the same position in order for the
system to function correctly. You can also set up a maximum of two
pairs of speakers to be receiving from the same transmitter by
setting the channel selector on the transmitter and both of the active
speakers to the same channel. Please note that the two active
speakers need to be at least 10m (33 feet) apart, or reception and
operating range in one or both units may be degraded.
Indicator Light Information
Power Indicator LED
(Top)
Input LED
(Bottom)
Green
System is on
Transmitter and speaker are
communicating (RF lock)
Blinking Green
Receiving IR command
from remote control
Transmitter and speaker are
not communicating (no RF lock)
Red
Standby
(no signal being received)
Orange
Local input is selected
Subwoofer Output
The JBL On Air Control 2.4G wireless speaker system includes a
subwoofer output 7 on the rear of the active speaker. This output
allows you to feed the low-frequency sounds to a separate powered
subwoofer. A powered subwoofer will deliver deeper bass response
than is possible with speakers alone.
To connect a powered subwoofer to the active speaker, simply
connect the subout 7 on the active speaker to the line-in on the
rear of the powered subwoofer using a 1/8-inch stereo mini-jack –
dual-RCA cable (not included*). Please note that this output is full
range and not filtered or low-passed. Make sure that your powered
subwoofer features a low-pass crossover network and that this
crossover is indeed selected. Do not use the LFE input on a powered
subwoofer as it is not filtered and you will be hearing a lot of
undesirable higher frequency information from your subwoofer.
* Only one stereo mini-jack/dual RCA cable is included with the
system. If you are following Application 2, Connection Option B, you
will need to purchase this cable.
A Word About Wireless Products
The JBL On Air Control 2.4G wireless speaker system utilizes
advanced wireless transceivers operating in the 2.4GHz frequency
band. This is the same frequency band that is used for wireless
home networks and high-quality cordless phones. It also allows for
the transmission of high-performance, full-spectrum sound to
remote locations, wirelessly.
Like all wireless devices, the JBL On Air Control 2.4G wireless
speaker’s operating range may vary depending upon variables such
as building construction methods and materials, atmospheric
conditions and other sources of interference. Please consult your
JBL dealer or distributor or visit us at www.jbl.com for further
information or assistance.
02/08/07
14:07
Side 9
English
34199_Control_2_4G_Eng
WALL AND STAND PLACEMENT
Adjustable wall brackets are included for the two speakers and
transmitter module. The included bracket are for wall-mounting only.
It is not to be used for ceiling mounting. Ceiling mounting of the
Control 2.4G transmitter and/or speakers is not recommended,
regardless of bracket used.
A. Loosen and remove the molded nut (2) by turning it counter
clockwise. Use the supplied metal bar (5) if necessary by inserting
it in one of the holes on the molded nut (2).
Wall-Mounting the Speakers
Using Wall Brackets Provided
Important safety note: Proper selection of mounting hardware not
included herein, and proper assembly and installation of brackets,
including, but not limited to, selection of appropriate weight-bearing
support and bracket use with the specified speaker only is the
exclusive responsibility of the customer. Manufacturer disclaims any
liability for the selection of mounting hardware and/or bracket
installation.
C. Slide on the molded nut (2) onto the ball/shaft (3) with threaded
opening facing the ball, and thread on the metal nut (1) all the way
onto the ball/shaft (3), with the nut’s (1) ”knurled” surface facing
away from the ball.
B. Pull the ball/shaft (3) out of the wall bracket (4).
D. Screw on the ball/shaft (3) into the threaded 1/4"-20 insert on the
back of the speaker cabinet (6) until it is fully seated against the
bottom of the insert. Back out the ball-shaft assembly 1/2 of a turn
and tighten the nut against the speaker. If the ball and shaft
assembly is not backed out before tightening the nut, performing
Step G below may dislodge the threaded insert in the speaker
housing and permanently damage the speaker.
E. Tighten the ”knurled” nut (1) using a crescent wrench until it is
firmly seated against the back of the speaker and has fully locked
the ball/shaft (3) and the speaker cabinet together. Pleace note
that once this nut is tightened, it may embed some marks on the
back of the speaker where the attachment is made. However,
these marks will be covered by the nut (1).
F. The back-up cord (8) is provided as an additional measure to
prevent the fall of the speaker in case the speaker becomes
detached from the wall bracket.
One of the two lower screws (9) that attach the wall bracket (4) to
the wall will need to go through the eyelet (11) at the end of the cord
before going through the wall bracket hole. Mount the wall bracket
(4) onto a wood stud on the wall, using #10, minimum 1-inch-long,
panhead wood screws. Make sure that all 4 screws are driven into
the stud, not drywall. If the bracket needs to be mounted on
drywall, the use of properly selected and installed wall-anchors
and screws is essential. Make sure that the screw head is at least
0.36 of an inches (approximately 3/8 of an inches) or larger in
diameter so that it can properly hold the backup cord eyelet (11).
G. Holding the speaker cabinet (7) with both hands, reinsert the ball
portion of the ball/shaft (3) into the wall bracket (4).
H. Hand-tighten the molded nut (2) while positioning the speaker for
the intended orientation.
I. Once the orientation of the speaker is finalized, use the metal bar
(5) in one of the holes on the molded nut (2) and tighten securely.
J. Securely attach the other end (10) of the backup cord (8) to the
Control 2.4G, by engaging it through the bar (12) on the back
speaker.
Exploded
Also included with the system is a wall-mount holder for the active
speaker’s power supply. If desired, you may attach this holder to the
wall and insert the speaker’s power supply.
–
+
TO LEFT SPEAKER
CORRECT
–
+
TO LEFT SPEAKER
INCORRECT
9
34199_Control_2_4G_Eng
02/08/07
14:07
Side 10
Wall-Mounting the Speakers Using
Third-Party Wall Brackets
Each JBL On Air Control 2.4G wireless speaker contains a
1/4"-20 threaded insert on the back to facilitate the use of third-party
wall brackets. Please consult your JBL dealer or distributor for
recommendations.
NOTES: Customer is responsible for proper selection and
installation of appropriate third-party wall brackets.
The threaded insert on the bottom of the speaker is not intended for
wall-bracket attachment. It is provided for use with an appropriate
third-party floorstand.
Stand-Mounting the Speakers
Each JBL On Air Control 2.4G wireless speaker contains a
1/4"-20 threaded insert on the bottom to facilitate the use of thirdparty floor stands. Please consult your JBL dealer for
recommendations.
NOTE: Customer is responsible for proper selection and installation
of appropriate third-party wall brackets and/or floor stands.
Wall-Mounting the Transmitter Module
Step 1. Insert the two M3 x 4 machine screws through the wall
bracket and into the rear of the transmitter module, as shown in
Figure 6.
Figure 6.
Step 2. Attach the transmitter module with wall bracket to the wall
using suitable hardware, and wall anchors if necessary.
MAINTENANCE AND SERVICE
The speaker and transmitter enclosures may be cleaned using a soft
cloth to remove fingerprints or to wipe off dust.
All wiring connections should be inspected and cleaned or remade
periodically. The frequency of maintenance depends on the metals
involved in the connections, atmospheric conditions and other
factors, but once per year is the minimum.
In the event that your system ever needs service, contact your local
JBL dealer or distributor, or visit www.jbl.com for a service center
near you.
10
02/08/07
14:07
Side 11
English
34199_Control_2_4G_Eng
SPECIFICATIONS
Frequency Range (±3dB):
80Hz – 20kHz
Amplifier Output:
15 Watts per channel
Low-Frequency Driver:
100mm (4") Magnetically shielded
High-Frequency Driver:
12mm (1/2") Titanium-laminate, magnetically shielded
Operating Range:
Up to 21m (70') depending upon conditions
RF Operating Frequency:
2.4GHz
Dimensions
Speaker (H x W x D):
229mm x 156mm x 140mm
(9" x 6-1/8" x 5-1/2")
Transmitter (H x W x D):
29mm x 124mm x 98mm
(1-1/8" x 4-7/8" x 3-7/8")
95mm (3-3/4") High with antenna extended
Weight
Active Speaker:
2.1kg (4.6 lb)
Passive Speaker:
2.0kg (4.3 lb)
Transmitter:
0.2kg (0.5 lb)
Features, specifications and appearance are subject to change without notice.
11
34199_Control_2_4G_Eng
02/08/07
14:07
Side 12
JBL and Control Series are trademarks of Harman International Industries, Incorporated,
registered in the United States and/or other countries. Pro Sound Comes Home are trademark
of Harman International Industries, Incorporated.
PRO SOUND COMES HOME™
®
Harman Consumer Group, Inc., 250 Crossways Park Drive, Woodbury, NY 11797, USA
8500 Balboa Boulevard, Northridge, CA 91329, USA
2, route de Tours, 72500 Château du Loir, France
516.255.4JBL (4525) (USA only) www.jbl.com
© 2007 Harman International Industries, Incorporated. All rights reserved.
Part No. 406-000-05529-E