1
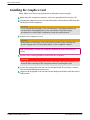
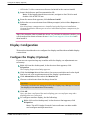
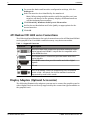
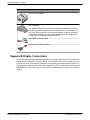
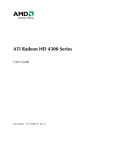
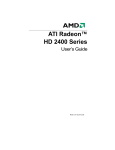
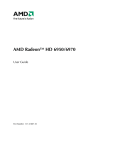
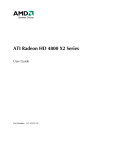
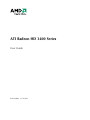
ATI Radeon HD 3400 Series
User Guide
Part Number: 137-41448
ii
© 2007 Advanced Micro Devices Inc. All rights reserved.
The contents of this document are provided in connection with Advanced Micro Devices, Inc. (“AMD”)
products. AMD makes no representations or warranties with respect to the accuracy or completeness of
the contents of this publication and reserves the right to make changes to specifications and product
descriptions at any time without notice. The information contained herein may be of a preliminary or
advance nature and is subject to change without notice. No license, whether express, implied, arising by
estoppel or otherwise, to any intellectual property rights is granted by this publication. Except as set forth
in AMD’s Standard Terms and Conditions of Sale, AMD assumes no liability whatsoever, and disclaims
any express or implied warranty, relating to its products including, but not limited to, the implied
warranty of merchantability, fitness for a particular purpose, or infringement of any intellectual
property right. AMD’s products are not designed, intended, authorized or warranted for use as
components in systems intended for surgical implant into the body, or in other applications intended to
support or sustain life, or in any other application in which the failure of AMD’s product could create a
situation where personal injury, death, or severe property or environmental damage may occur. AMD
reserves the right to discontinue or make changes to its products at any time without notice.
AMD's products are not designed, intended, authorized or warranted for use as components in systems
intended for surgical implant into the body, or in other applications intended to support or sustain life,
or in any other application in which the failure of AMD's product could create a situation where personal
injury, death, or severe property or environmental damage may occur. AMD reserves the right to
discontinue or make changes to its products at any time without notice.
Trademarks
AMD, the AMD Arrow logo, AMD Athlon, AMD Opteron and combinations thereof, ATI and ATI product
and product-feature names are trademarks of Advanced Micro Devices, Inc.
HyperTransport is a licensed trademark of the HyperTransport Technology Consortium.
Microsoft is a registered trademark of Microsoft Corporation.
Other product names used in this publication are for identification purposes only and may be trademarks
of their respective companies.
Disclaimer
While every precaution has been taken in the preparation of this document, Advanced Micro Devices,
Inc. assumes no liability with respect to the operation or use of AMD hardware, software or other
products and documentation described herein, for any act or omission of AMD concerning such products
or this documentation, for any interruption of service, loss or interruption of business, loss of anticipatory
profits, or for punitive, incidental or consequential damages in connection with the furnishing,
performance, or use of the AMD hardware, software, or other products and documentation provided
herein.
Advanced Micro Devices, Inc. reserves the right to make changes without further notice to a product or
system described herein to improve reliability, function or design. With respect to AMD products which
this document relates, AMD disclaims all express or implied warranties regarding such products,
including but not limited to, the implied warranties of merchantability, fitness for a particular purpose,
and non-infringement.
Product Notices
Dolby® Laboratories, Inc.
Manufactured under license from Dolby® Laboratories. Dolby and the double-D symbol are trademarks
of Dolby Laboratories. Confidential Unpublished Works.
© 1992-1997 Dolby Laboratories, Inc. All rights reserved.
Macrovision
Apparatus Claims of U.S. Patent Nos. 4,631,603; 4,819,098; 4,907,093; 5,315,448; and 6,516,132. Licensed for
limited viewing uses only.
This product incorporates copyright protection technology that is protected by US patents and other
intellectual property rights. Use of this copyright protection technology must be authorized by
Macrovision, and is intended for home and other limited viewing uses only unless otherwise authorized
by Macrovision. Reverse engineering or disassembly is prohibited.
Documentation Updates
AMD is constantly improving its product and associated documentation. To maximize the value of your
AMD product, you should ensure that you have the latest documentation. AMD’s documentation contains
helpful installation/configuration tips and other valuable feature information.
ATI Radeon HD 3400 Series
© 2007 Advanced Micro Devices, Inc.
iii
Important Safety Instructions
Note: This product is for use only with compatible UL listed personal computers
that have installation instructions detailing user installation of this class of product.
1. Read all the instructions.
Read all the safety and operating instructions before the product is operated.
2. Retain the instructions.
Retain the safety and operating instructions for future reference.
3. Heed all warnings.
Obey all warnings on the product and in the instructions.
4. Ground appropriately.
Caution:
For continued protection against the risk of electric shock and fire, install this
accessory only in products equipped with a three-wire grounding plug, a plug
having a third (grounding) pin. A 3-pin plug will only fit into a grounding-type
power outlet. This is a safety feature. If you are unable to insert the plug into the
desired outlet, contact an electrician to replace the obsolete outlet. Do not remove
the grounding pin of a three-pin plug.
5. Attach card securely.
Completely tighten all product-securing pins to provide continuous bonding
between the product and the computer chassis.
6. For cards with TV tuners:
a. Ground outdoor antenna appropriately.
Caution:
Since an outdoor antenna or cable system may be connected to the product,
be sure that the antenna or cable system is grounded so as to provide some
protection against voltage surges and built-up static charges. Article 810 of the
National Electrical Code, ANSI/NFPA 70, provides information with regard to
proper grounding of the mast and supporting structure, grounding of the leadin wire to the antenna discharge unit, size of grounding conductors, location
of antenna-discharge unit, connection of grounding electrodes, and
requirements for the grounding electrode.
b. Unplug during storms and when unused for long periods of time.
Caution:
For added protection for this product during a lightning storm, or when it is
left unattended and unused for long periods of time, unplug it from the wall
outlet and disconnect the antenna or cable system. This will prevent damage
to the product from power-line surges.
c. Install outdoor antenna system away from power lines.
Warning:
When installing an outside antenna system, extreme care should be taken to
keep from touching such power lines or circuits, as contact with them may be
fatal.
© 2007 Advanced Micro Devices, Inc.
ATI Radeon HD 3400 Series
iv
Caution:
An outside antenna system should not be located in the vicinity of overhead
power lines or other light or power circuits, or where it can fall into such
power lines or circuits.
Note to CATV system installer:
This reminder is provided to call the CATV systems installer’s attention to Section 820-40
of the NEC, which provides guidelines for proper grounding and, in particular, specifies
that the cable ground shall be connected to the grounding system of the building as close
to the point of cable entry as is practical.
ATI Radeon HD 3400 Series
© 2007 Advanced Micro Devices, Inc.
Contents
Installation . . . . . . . . . . . . . . . . . . . . . . . . . . . . . . . . . . . . . . . . . . . . . . . . . . . . . .1
Installation Overview . . . . . . . . . . . . . . . . . . . . . . . . . . . . . . . . . . . . . . . . . . . . . . . . . . . . . . . . . . 1
Replacing an Existing Card . . . . . . . . . . . . . . . . . . . . . . . . . . . . . . . . . . . . . . . . . . . . . . . . . . . . . . . . . . . . . . . . . . . 1
First Card for this PC . . . . . . . . . . . . . . . . . . . . . . . . . . . . . . . . . . . . . . . . . . . . . . . . . . . . . . . . . . . . . . . . . . . . . . . . . . 1
Record the Serial and Part Numbers . . . . . . . . . . . . . . . . . . . . . . . . . . . . . . . . . . . . . . . . . . . . . . . 1
Uninstalling the Old Driver (Windows® XP) . . . . . . . . . . . . . . . . . . . . . . . . . . . . . . . . . . . . . . . . 2
Uninstalling the Old Driver (Windows Vista™) . . . . . . . . . . . . . . . . . . . . . . . . . . . . . . . . . . . . . . 2
Installing the Graphics Card . . . . . . . . . . . . . . . . . . . . . . . . . . . . . . . . . . . . . . . . . . . . . . . . . . . . . 3
Installing the ATI Catalyst™ Software Suite . . . . . . . . . . . . . . . . . . . . . . . . . . . . . . . . . . . . . . . . . 4
Display Configuration . . . . . . . . . . . . . . . . . . . . . . . . . . . . . . . . . . . . . . . . . . . . . . . . . . . . . . . . . . 5
Configure the Display (Optional) . . . . . . . . . . . . . . . . . . . . . . . . . . . . . . . . . . . . . . . . . . . . . . . . . . . . . . . . . . . . . 5
ATI Radeon HD 3400 series Connections . . . . . . . . . . . . . . . . . . . . . . . . . . . . . . . . . . . . . . . . . . . . . . . . . . . . 6
Display Adapters (Optional Accessories) . . . . . . . . . . . . . . . . . . . . . . . . . . . . . . . . . . . . . . . . . . . . . . . . . . . . . .6
Supported Display Connections . . . . . . . . . . . . . . . . . . . . . . . . . . . . . . . . . . . . . . . . . . . . . . . . . . . . . . . . . . . . . . 7
ATI CrossFireX . . . . . . . . . . . . . . . . . . . . . . . . . . . . . . . . . . . . . . . . . . . . . . . . . . .9
ATI CrossFireX Introduction . . . . . . . . . . . . . . . . . . . . . . . . . . . . . . . . . . . . . . . . . . . . . . . . . . . . . 9
Installing a Graphics Cards for Hybrid ATI CrossFireX Setup . . . . . . . . . . . . . . . . . . . . . . . . . . . . 9
Installing the Second Card for ATI CrossFireX Setup . . . . . . . . . . . . . . . . . . . . . . . . . . . . . . . . . 11
Enabling ATI CrossFireX . . . . . . . . . . . . . . . . . . . . . . . . . . . . . . . . . . . . . . . . . . . . . . . . . . . . . . . 13
ATI CrossFireX Troubleshooting . . . . . . . . . . . . . . . . . . . . . . . . . . . . . . . . . . . . . . . . . . . . . . . . . 13
Change Motherboard BIOS Settings . . . . . . . . . . . . . . . . . . . . . . . . . . . . . . . . . . . . . . . . . . . . . . . . . . . . . . . . . 13
Use Graphics Cards with Different Amounts of Memory . . . . . . . . . . . . . . . . . . . . . . . . . . . . . . . . . . . . 13
3D Client is Active . . . . . . . . . . . . . . . . . . . . . . . . . . . . . . . . . . . . . . . . . . . . . . . . . . . . . . . . . . . . . . . . . . . . . . . . . . 14
ATI CrossFireX is Currently Unavailable . . . . . . . . . . . . . . . . . . . . . . . . . . . . . . . . . . . . . . . . . . . . . . . . . . . . . 14
Screen Rotation is Unavailable . . . . . . . . . . . . . . . . . . . . . . . . . . . . . . . . . . . . . . . . . . . . . . . . . . . . . . . . . . . . . . 14
Video Displays Flicker During System Startup . . . . . . . . . . . . . . . . . . . . . . . . . . . . . . . . . . . . . . . . . . . . . . . 14
ATI CrossFireX Starts in Software Mode . . . . . . . . . . . . . . . . . . . . . . . . . . . . . . . . . . . . . . . . . . . . . . . . . . . . . 14
ATI CrossFireX Disabled After Swapping/Moving Cards . . . . . . . . . . . . . . . . . . . . . . . . . . . . . . . . . . . . . 14
Reference . . . . . . . . . . . . . . . . . . . . . . . . . . . . . . . . . . . . . . . . . . . . . . . . . . . . . .15
System Requirements . . . . . . . . . . . . . . . . . . . . . . . . . . . . . . . . . . . . . . . . . . . . . . . . . . . . . . . . . 15
Hardware . . . . . . . . . . . . . . . . . . . . . . . . . . . . . . . . . . . . . . . . . . . . . . . . . . . . . . . . . . . . . . . . . . . . . . . . . . . . . . . . . . . 15
CrossFire Requirements . . . . . . . . . . . . . . . . . . . . . . . . . . . . . . . . . . . . . . . . . . . . . . . . . . . . . . . . . . . . . . . . . . . . . 15
Using ATI Catalyst Control Center . . . . . . . . . . . . . . . . . . . . . . . . . . . . . . . . . . . . . . . . . . . . . . . 15
ATI Catalyst Control Center Overview . . . . . . . . . . . . . . . . . . . . . . . . . . . . . . . . . . . . . . . . . . . . . . . . . . . . . . . 15
Starting the ATI Catalyst Control Center Software . . . . . . . . . . . . . . . . . . . . . . . . . . . . . . . . . . . . . . . . . . . .16
Accessing ATI Catalyst Control Center Help . . . . . . . . . . . . . . . . . . . . . . . . . . . . . . . . . . . . . . . . . . . . . . . . . 16
Searching the Help . . . . . . . . . . . . . . . . . . . . . . . . . . . . . . . . . . . . . . . . . . . . . . . . . . . . . . . . . . . . . . . . . . . . . . . . . . 17
Graphics Card Installation Troubleshooting Tips . . . . . . . . . . . . . . . . . . . . . . . . . . . . . . . . . . . . 17
vi
The graphics card doesn't fit any of the motherboard slots. . . . . . . . . . . . . . . . . . . . . . . . . . . . . . . . . . . 17
The computer beeps and the boot process stops. . . . . . . . . . . . . . . . . . . . . . . . . . . . . . . . . . . . . . . . . . . . . 17
The computer does not boot up properly. . . . . . . . . . . . . . . . . . . . . . . . . . . . . . . . . . . . . . . . . . . . . . . . . . . . 17
The computer boots up but there is no display. . . . . . . . . . . . . . . . . . . . . . . . . . . . . . . . . . . . . . . . . . . . . . .17
HDTV/HDTV Adapter Troubleshooting . . . . . . . . . . . . . . . . . . . . . . . . . . . . . . . . . . . . . . . . . . . 17
Customer Care . . . . . . . . . . . . . . . . . . . . . . . . . . . . . . . . . . . . . . . . . . . . . . . . . . . . . . . . . . . . . . 18
International Compliance Information . . . . . . . . . . . . . . . . . . . . . . . . . . . . . . . . . . . . . . . . . . . . 19
FCC Compliance Information . . . . . . . . . . . . . . . . . . . . . . . . . . . . . . . . . . . . . . . . . . . . . . . . . . . . . . . . . . . . . . . 20
Industry Canada Compliance Statement . . . . . . . . . . . . . . . . . . . . . . . . . . . . . . . . . . . . . . . . . . . . . . . . . . . . . 20
CE Compliance Information . . . . . . . . . . . . . . . . . . . . . . . . . . . . . . . . . . . . . . . . . . . . . . . . . . . . . . . . . . . . . . . . . 20
Electrical Safety . . . . . . . . . . . . . . . . . . . . . . . . . . . . . . . . . . . . . . . . . . . . . . . . . . . . . . . . . . . . . . . . . . . . . . . . . . . . . 21
Waste Electrical and Electronic Equipment (WEEE) Directive Compliance . . . . . . . . . . . . . . . . . . . 21
VCCI Class B ITE Compliance Information . . . . . . . . . . . . . . . . . . . . . . . . . . . . . . . . . . . . . . . . . . . . . . . . . . 21
MIC Certification Information . . . . . . . . . . . . . . . . . . . . . . . . . . . . . . . . . . . . . . . . . . . . . . . . . . . . . . . . . . . . . . . 22
BSMI Certification Information . . . . . . . . . . . . . . . . . . . . . . . . . . . . . . . . . . . . . . . . . . . . . . . . . . . . . . . . . . . . . . 22
ATI Radeon HD 3400 Series
© 2007 Advanced Micro Devices, Inc.
Chapter 1
Installation
For support, you will need to record the serial number and the part number for
the card before installation.
Installation Overview
The installation of the card has slightly different procedures depending on
whether you are replacing an existing card or installing a graphics card in a PC
for the first time. This section briefly describes the high-level steps for both cases.
Replacing an Existing Card
If you are replacing an existing graphics card, you need to:
1. Start the computer and then uninstall the old graphics driver.
2. Turn off the computer and then remove the old card.
3. Install the new card and then connect the monitor.
4. Start the computer and then install the new drivers and software.
5. Restart the computer.
First Card for this PC
If this is the first graphics card for this PC, you need to:
1. With the computer off, install the new card and then connect the monitor.
2. Start the computer and then install the new drivers and software.
3. Restart the computer.
Record the Serial and Part Numbers
Write down the serial number and part number before installing. The serial
number and 102 part number on the graphics card are required for registration
and free support. They are located on a sticker on the back of the card.
Figure 1–1 Sample Serial and Part Numbers
The emphasized numbers in bold are required for registration and free support.
2
Installation
Uninstalling the Old Driver (Windows® XP)
Follow these steps to uninstall the existing graphics card driver in preparation
for installation of a new card.
1. With the current graphics card still in the computer, close all open
applications.
2. On the Windows taskbar, click Start ▷ Control Panel and then double-click
Add or Remove Programs.
3. Select the current graphics card driver and then click Add/Remove.
The wizard will appear and help remove the current display drivers.
4. Turn off the system after the driver has been removed.
Note: If the previously installed graphics card has any additional
software installed, this software may also need to be removed before
restarting the computer. For example, DVD Player or Multimedia
applications.
Uninstalling the Old Driver (Windows Vista™)
Follow these steps to uninstall the existing graphics card driver in preparation
for installation of a new card.
1. With the current graphics card still in the computer, close all open
applications.
2. Click Start ▷ Control Panel. Double-click Programs and Features and then
select the graphics card driver from the list of software programs.
3. Double-click Hardware and Sound and then double-click Device Manager.
4. Expand Display Adapter and then right-click the driver for the graphics card
you are replacing.
5. In the shortcut menu that appears, click Install.
The driver for the old graphics card is uninstalled.
6. Turn off the system.
ATI Radeon HD 3400 Series
© 2007 Advanced Micro Devices, Inc.
First Card for this PC
3
Installing the Graphics Card
Note: Make sure that your system has an adequate power supply.
1. Make sure the computer, monitor, and other peripheral devices are off.
2. Unplug the computer power cord and disconnect the monitor cable from the
back panel of the computer.
Caution:
To avoid possible damage to the motherboard, wait approximately 20
seconds after unplugging the power cord before disconnecting a
peripheral or removing a component from the motherboard.
3. Remove the computer cover.
Caution:
Remember to discharge your body’s static electricity by touching the
power supply case or the metal surface of the computer chassis.
Tip: If necessary, consult the computer manual for help removing the
cover.
4. Remove any existing graphics cards from the computer.
Warning:
Some graphics cards can get hot while operating. Wait approximately five
minutes after turning off the computer before touching the card.
5. Locate the appropriate bus slot on the motherboard. If necessary, remove
the corresponding back panel cover.
6. Align the new graphics card in the bus slot and press firmly until the card is
fully seated.
© 2007 Advanced Micro Devices, Inc.
ATI Radeon HD 3400 Series
4
Installation
Figure 1–2 Graphics Card Installation
7. Fasten the graphics card securely to the back panel.
8. Make sure the cables are not interfering with anything inside the computer
(for example, a cooling fan) and then replace the computer cover.
9. Reconnect any cables you have disconnected and plug in the computer
power cord.
10. Turn on the monitor and then the computer.
The computer should start normally and the software must be installed next.
Installing the ATI Catalyst™ Software Suite
To install or remove software, you must have administrator rights or be logged
on as a user with administrator rights.
Note: The installation dialog displays in English if the operating system’s
language is not supported.
Software is provided to both operate and take advantage of all the features of the
graphics card. Software includes:
• The graphics card drivers.
• ATI Catalyst™ Control Center software.
• HydraVision™ software (included in the custom install).
• SurroundView™ software (included in the custom install).
ATI Radeon HD 3400 Series
© 2007 Advanced Micro Devices, Inc.
Configure the Display (Optional)
5
• ATI Avivo™ video converter software (included in the custom install).
1. Insert the Software and Documentation CD.
Note: If the install wizard does not start, navigate to the CD drive and
double-click ATISETUP.exe.
2. From the menu that appears, click Software Install.
3. Follow the on-screen instructions. When prompted, select either Express or
Custom .
Not all software components are installed using the Express installation.
Custom installation allows you to select individual software components for
installation.
Tip: If the installer fails to install the driver, or you have a software conflict, you
can download the latest software from ati.amd.com/support/driver.html and
then install it.
Display Configuration
This section describes how to configure the display and lists the available display
connections.
Configure the Display (Optional)
If you are not experiencing any troubles with the display, no adjustments are
necessary.
1. Right-click on the desktop and, in the shortcut that appears, click
Properties.
The Display Properties dialog appears.
2. Click the Settings tab and then select the screen resolution and color depth
that best suit your requirements and the display’s performance.
3. Click Advanced and then select the Monitor tab.
4. Choose a refresh rate from the drop-down list.
Caution:
Choosing a refresh rate unsupported by the display may damage it. Consult
the display’s documentation if necessary.
5. Click OK.
Once you have configured the main display you can configure any other
displays that are connected.
6. To configure another display, do the following:
a. Right-click on the desktop and, in the shortcut that appears, click
Properties.
Note: The ATI Catalyst Control Center software can also enable
and configure multiple monitors.
© 2007 Advanced Micro Devices, Inc.
ATI Radeon HD 3400 Series
6
Installation
b. To access the basic multi-monitor configuration settings, click the
Settings tab.
c. Select the monitor icon identified by the number 2.
Note: When using multiple monitors with the graphics card, one
monitor will always be the primary display, additional monitors
will be designated as secondary.
d. Click Extend my Windows desktop onto this monitor.
e. Set the Screen Resolution and Color Quality as appropriate for the
second monitor.
f. Click OK.
ATI Radeon HD 3400 series Connections
The following figure illustrates the typical connections on the ATI Radeon HD 3400
series graphics card. Available connections may vary between models.
Table 1–1 Supported Connectors
Connector
Description
The DVI-I Dual Link connection provides audio and video
digital signals and HDMI™ output that is compatible with
most HDMI devices.
The DisplayPort™ connection provides audio and video
digital signals.
The HDMI connection provides audio and video digital
signals.
TV out
VGA is an analog connector supporting video resolution
mode of 640 × 480 pixels, the lowest standard resolution
supported by most video cards.
Display Adapters (Optional Accessories)
The following illustrates the adapters you can use to connect the graphics card to
other display devices not directly supported by the connection types available on
the graphics card.
ATI Radeon HD 3400 Series
© 2007 Advanced Micro Devices, Inc.
Supported Display Connections
Adapter
7
Description
DVI-to-VGA adapter
DVI-to-HDMI
The HDMI adapter is a proprietary adapter manufactured and
sold by approved manufacturers (like Wieson Technologies Co.,
Ltd.) that has a specific detection mechanism to allow properly
configured graphics cards to pass HDMI signals through a DVI
connection to an HDMI compliant device.
7-pin HDTV output cable
DisplayPort-to-DVI adapter
Supported Display Connections
To ensure the highest possible performance, only one display device is supported
when ATI CrossFireX™ is active. When ATI CrossFireX is active, display devices
connected to the other connections on both graphics cards are rendered inactive.
The graphics card provides hardware support for DVI-I and VGA monitors, and
HDMI HDTVs (either directly or using a DVI-to-HDMI adapter). It also provides TV
output.
© 2007 Advanced Micro Devices, Inc.
ATI Radeon HD 3400 Series
8
Installation
Table 1–2 Display Configurations (ATI CrossFireX Inactive)
Display
CRT analog display
Connections
• VGA connection
• DVI-I-to-VGA adapter
LCD digital monitor
• DVI-I connection
• VGA connection
• DVI-I-to-VGA adapter
• DisplayPort connection
• DisplayPort-to-DVI adapter
TV
• DVI-to-HDTV adapter and RCA cables
• 7-pin S-Video output cable
• 7-pin S-Video-to-composite adapter and RCA cables
HDTV display
• DVI connection
• DVI-to-HDTV adapter and RCA cables
• DisplayPort-to-DVI adapter
HDMI HDTV
• HDMI connection
• DVI-to-HDMI adapter and HDMI cable
ATI Radeon HD 3400 Series
© 2007 Advanced Micro Devices, Inc.
Chapter 2
ATI CrossFireX
ATI CrossFireX Introduction
ATI CrossFireX technology harnesses two or more GPUs (graphics processing
units) to be used in a single computer to run a display, creating a highperformance gaming platform. Typically, setup involves 2 or more graphics
cards, but with the appropriate motherboard, the technology can use a single
card and the built-in GPU of the motherboard. ATI CrossFireX works with all 3D
games and applications.
ATI CrossFireX is designed for optimal use on a single display; however, it is also
possible for each GPU in an ATI CrossFireX configuration to individually drive
their own monitors when ATI CrossFireX support is not enabled.
Note: The ATI Catalyst Control Center software contains a different
ATI CrossFireX user interface for each configuration type and automatically loads
the appropriate one when a valid ATI CrossFireX configuration is detected in your
system.
If ATI Catalyst™ A.I. is enabled in the ATI Catalyst Control Center software, the
optimal rendering mode available for the application is automatically selected.
Installing a Graphics Cards for Hybrid ATI CrossFireX
Setup
Note: Make sure that your system has an adequate power supply.
An AMD-certified motherboard is required for a Hybrid ATI CrossFireX setup.
For an up-to-date listing of certified motherboards, see ati.amd.com/products/
certified.
Installing a graphics card for Hybrid ATI CrossFireX setup is the same as installing
a graphics card normally. The difference is ATI CrossFireX can be enabled after
installation.
1. Make sure the computer, monitor, and other peripheral devices are off.
2. Unplug the computer power cord and disconnect the monitor cable from the
back panel of the computer.
Caution:
To avoid possible damage to the motherboard, wait approximately 20
seconds after unplugging the power cord before disconnecting a
peripheral or removing a component from the motherboard.
3. Remove the computer cover.
If necessary, consult the computer manual for help removing the cover.
10
ATI CrossFireX
Caution:
Remember to discharge your body’s static electricity by touching the
power supply case or the metal surface of the computer chassis.
4. Remove any unneeded graphics cards from the computer.
Warning:
Some graphics cards can get hot while operating. Wait approximately five
minutes after turning off the computer before touching the card.
5. Locate the PCIe® slots on the motherboard. If necessary, remove the
corresponding back panel cover.
6. Align the new graphics card in the PCIe slot and press firmly until the card
is fully seated.
Figure 2–1 Graphics Card Installation
7. Fasten the graphics card securely to the back panel.
8. Make sure the cables are not interfering with anything inside the computer
(for example, a cooling fan) and then replace the computer cover.
9. Reconnect any cables you have disconnected and plug in the computer
power cord.
10. Turn on the monitor and then the computer.
You now need to enable ATI CrossFireX in ATI Catalyst Control Center.
ATI Radeon HD 3400 Series
© 2007 Advanced Micro Devices, Inc.
11
Installing the Second Card for ATI CrossFireX Setup
This procedure describes installing a second card to complete a dual-card
ATI CrossFireX setup and assumes the first card has already been installed.
Note: Make sure that your system has an adequate power supply.
1. Make sure the computer, monitor, and other peripheral devices are off.
2. Unplug the computer power cord and disconnect the monitor cable from the
back panel of the computer.
Caution:
To avoid possible damage to the motherboard, wait approximately 20
seconds after unplugging the power cord before disconnecting a
peripheral or removing a component from the motherboard.
3. Remove the computer cover.
If necessary, consult the computer manual for help removing the cover.
Caution:
Remember to discharge your body’s static electricity by touching the
power supply case or the metal surface of the computer chassis.
4. Remove any unneeded graphics cards from the computer.
Warning:
Some graphics cards can get hot while operating. Wait approximately five
minutes after turning off the computer before touching the card.
5. Locate the PCIe slots on the motherboard. If necessary, remove the
corresponding back panel cover.
6. Align the new graphics card in the secondary PCIe slot next to the existing
graphics card and press firmly until the card is fully seated.
7. Remove protection tags from the ends of the ATI CrossFireX interconnects
and connect the cards.
Caution:
Always handle the interconnects by the connector only. Do not push or pull
on the flexible cable.
© 2007 Advanced Micro Devices, Inc.
ATI Radeon HD 3400 Series
12
ATI CrossFireX
Figure 2–2 ATI CrossFireX Bridge Interconnect Protection Tag
Figure 2–3 ATI CrossFireX Installation
1
ATI CrossFireX graphics card
2
Interconnect
8. Fasten the graphics cards securely to the back panel.
9. Make sure the cables are not interfering with anything inside the computer
(for example, a cooling fan) and then replace the computer cover.
ATI Radeon HD 3400 Series
© 2007 Advanced Micro Devices, Inc.
Change Motherboard BIOS Settings
13
10. Reconnect any cables you have disconnected and plug in the computer
power cord.
11. Turn on the monitor and then the computer.
You now need to enable ATI CrossFireX in ATI Catalyst Control Center.
Enabling ATI CrossFireX
When a ATI CrossFireX configuration is detected for the first time by the
ATI Catalyst display driver, ATI CrossFireX is automatically enabled, and the best
possible GPU combination is selected based on your hardware configuration. If
necessary, you can change the existing ATI CrossFireX configuration using the
following procedure.
1. From the Graphics Settings tree in the ATI Catalyst Control Center software,
click CrossFire™.
2. From the Graphics Adapter list, select the graphics card that acts as the
Display GPU.
3. Select Enable CrossFire™.
Note: If your system has more than two ATI CrossFireX graphics
cards, the Selecting a Render GPU dialog appears prompting you to
select a graphics card to partner with the Display GPU.
4. Click Apply.
When ATI CrossFireX is enabled, GPU Accelerated Physics is automatically
disabled for all cards in the configuration as are all displays except the one used
by ATI CrossFireX.
ATI CrossFireX Troubleshooting
Change Motherboard BIOS Settings
Some motherboards may have a system BIOS option to switch between single
and dual PCIe slot support. The default setting may be single slot support. Refer
to the motherboard’s manual for information to enable dual PCIe slot support.
For more information see the ATI CrossFireX Web page at ati.amd.com/
crossfire.
Use Graphics Cards with Different Amounts of Memory
In some ATI CrossFireX configurations, graphics cards with different amounts of
memory can by used; however, restarting your computer is required after
enabling ATI CrossFireX. This will cause ATI CrossFireX to reduce the amount of
memory on the card with the most amount of memory to match the memory size
of the graphics card with the least amount of memory.
Clicking OK to the memory mismatch error message will restart your computer.
© 2007 Advanced Micro Devices, Inc.
ATI Radeon HD 3400 Series
14
ATI CrossFireX
Note: When disabling ATI CrossFireX you will be given the option to
restart your computer to restore the original graphics memory size or
continue with the reduced memory size.
3D Client is Active
You will not be able to start ATI CrossFireX if a 3D application, game, or video
playback, such as a DVD movie, is running.
Close all open 3D applications, games, and movie player applications, and then
enable ATI CrossFireX.
ATI CrossFireX is Currently Unavailable
This error has occurred because ATI CrossFireX did not correctly detect your
graphics hardware or there is a problem with the software.
• Check that the graphics cards are installed correctly.
• Check that the interconnect cable is installed correctly.
• Close all running 3D applications.
• Re-install the ATI Catalyst Control Center and drivers.
Screen Rotation is Unavailable
Screen rotation function does not work or is unavailable.
Screen rotation is not an available feature on ATI CrossFireX systems.
Video Displays Flicker During System Startup
This is normal during ATI CrossFireX start-up.
ATI CrossFireX Starts in Software Mode
This is normal when starting up for the first time after installing two
ATI CrossFireX graphics cards if neither card is installed in the primary
PCI Express® slot. You can change the ATI CrossFireX mode in the
ATI Catalyst Control Center.
ATI CrossFireX Disabled After Swapping/Moving Cards
If you change the ATI CrossFireX configuration by moving the graphics cards to
different slots on the motherboard, disable ATI CrossFireX and restore factory
default settings in ATI Catalyst Control Center first. Once the cards have been
swapped, enable ATI CrossFireX. This ensures the new configuration is detected
by the computer.
ATI Radeon HD 3400 Series
© 2007 Advanced Micro Devices, Inc.
Chapter 3
Reference
The following section offers troubleshooting tips and provides customer care,
warranty, and compliance information.
System Requirements
Hardware
Minimum requirements are:
• Motherboard with one PCIe ×16 lane graphics slot.
• AMD Athlon™ or Intel® Pentium® 4 CPU.
• 1 GB RAM.
• CD-ROM or DVD-ROM drive for installing software.
• A 400 watt or better power supply. For a list of certified power supplies, see
ati.amd.com/certifiedpsu.
CrossFire Requirements
To implement a CrossFire configuration using the ATI Radeon HD 3400 series
requires:
• A CrossFire certified motherboard. For an up-to-date listing of certified
motherboards, see ati.amd.com/products/certified.
• A PCIe 400 watt or greater power supply. For an up-to-date listing of certified
power supplies, see ati.amd.com/certifiedpsu.
Using ATI Catalyst Control Center
ATI Catalyst Control Center Overview
The ATI Catalyst Control Center software provides access to the display features
of the graphics card. Use the software to fine-tune graphics settings, enable or
disable connected display devices, and change the orientation of the desktop.
Many features display previews of the changes before they are applied.
A simplified view of the features that includes wizards to quickly
make changes.
A powerful interface that enables complete configuration of the
Advanced View
feature set of the graphics card.
The ATI Catalyst Control Center software can be customized for easy access to
the most-used features.
Basic View
16
Reference
For information on the individual features of the software, access the
comprehensive in-program help system (see Accessing Help or visit the AMD
Customer Care Web site at http://ati.amd.com/support/).
Starting the ATI Catalyst Control Center Software
The following table shows the ways you can start the
ATI Catalyst Control Center software:
Table 3–1 ATI Catalyst Control Center Access Routes
Access Route
Windows Desktop
Instructions
1. Right-click anywhere on the desktop.
2. From the shortcut menu that appears, click ATI
CATALYST(R) Control Center.
Windows Start
Menu
1. Click Start on the Windows task bar.
Windows System
Tray
1. Right-click the ATI icon in the Windows System Tray.
Desktop Shortcut
When you first installed the ATI Catalyst Control Center,
the setup wizard provided you with the option of placing
a shortcut on the desktop. If you chose this option, you can
double-click the ATI Catalyst Control Center desktop
shortcut.
Predefined Hot
Keys
Press the predefined hot keys, Ctrl+Alt+C, to launch
ATI Catalyst Control Center. You can also define your own
hot key sequence by using the
ATI Catalyst Control Center Hotkey Manager.
2. Select All Programs ▷ Catalyst Control Center.
2. From the short menu, select ATI Catalyst Control
Center.
Accessing ATI Catalyst Control Center Help
ATI Catalyst Control Center Help provides information on the features and
concepts of your ATI Radeon graphics card. You can also use the
ATI Catalyst Control Center Help feature to access usage information, generate a
problem report, and get software version information for your graphics card.
1. Open ATI Catalyst Control Center in the Advanced view.
2. Choose one of the following options:
➭
Press the F1 key at any time to get specific help on the currently
displayed information.
➭
From the ATI Catalyst Control Center Dashboard, choose Help ▷ Help
Contents to browse the entire help contents.
➭
From the ATI Catalyst Control Center Dashboard, choose Help ▷ Search
Help to search the help contents for a specific term.
➭
To access AMD's Web site, from the ATI Catalyst Control Center
Dashboard, choose Help ▷ Go to ATI.com.
ATI Radeon HD 3400 Series
© 2007 Advanced Micro Devices, Inc.
Searching the Help
17
Searching the Help
1. In Advanced view, click Help in the Dashboard.
2. Click Search Help.
3. Enter the word(s) you wish to search for the in search box of the
ATI Catalyst Control Center Help.
4. Click Go.
Graphics Card Installation Troubleshooting Tips
For more advanced troubleshooting information, contact AMD Customer Care
for ATI products at ati.amd.com.
The graphics card doesn't fit any of the motherboard slots.
The graphics card needs to be exchanged for one with a bus that matches the
motherboard.
The computer beeps and the boot process stops.
Make certain that the graphics card is properly connected to the internal power
supply and the motherboard.
The computer does not boot up properly.
Verify that the installation instructions were followed correctly.
Make certain that the graphics card is properly connected to the power supply
and the motherboard.
If using Windows operating system, restart your computer in Safe Mode. For
information on Safe Mode, consult the Windows documentation.
Check the system configuration utility for interrupt assignments.
The computer boots up but there is no display.
Verify that the monitor is connected properly to the computer and a power
supply.
If your motherboard has on-board graphics capabilities, you may need to disable
them. Consult your motherboard documentation for more information.
Note: Some manufacturers do not allow the on-board graphics to be
disabled or to become the secondary display.
HDTV/HDTV Adapter Troubleshooting
For more advanced troubleshooting information, contact AMD Customer Care
for ATI products at ati.amd.com.
© 2007 Advanced Micro Devices, Inc.
ATI Radeon HD 3400 Series
18
Reference
Table 3–2 HDTV/HDTV Adapter Troubleshooting Tips
Problem
Possible Solution
The colors on the Ensure that the connections between the component video
TV display are
adapter and the HDTV are correct.
incorrect.
There is no
The TV will not display anything until Windows starts; this
display on the TV. may take several minutes.
Make sure the TV is set to YPbPr input.
Make sure that the HDTV component video adapter is
properly connected.
DVDs will not
play in highquality modes.
Copy-protected DVDs restrict playback to 480i and 480p
modes.
The entire
display is not
visible.
If the component input device supports it, try 720p mode.
The display
appears tilted.
Consult the HDTV documentation.
The CRT display
is green.
The system is in component output mode. Restart the
computer with only the CRT monitor connected.
Customer Care
For detailed instructions on how to use your product, refer to the documentation
included on the installation CD.
To activate Customer Care, you must register your product at ati.amd.com/
online/registration.
If you require further assistance with your product, the following Customer Care
options are available:
ATI Radeon HD 3400 Series
© 2007 Advanced Micro Devices, Inc.
The computer boots up but there is no display.
19
Service
Availability
Language Access
Online or
mail
24 hours a day
English,
French,
Spanish
http://ati.amd.com/
support/
English
1-877-284-1566 (tollfree)
or
Telephone
US &
Canada
Monday to Thursday: 9:00
a.m. to 5:30 p.m.
Friday: 9:00 a.m. to 3:00 p.m.
Note: AMD reserves
the right to change
hours of support. For
more information,
please refer to
ati.amd.com/support/
terms/.
or
Advanced Micro
Devices, Inc., Graphics
Product Group,
Attention: Customer
Care, 1 Commerce
Valley Drive East,
Markham, Ontario,
Canada L3T 7X6
1-905-882-2626 (Canada)
(International and/or
local toll charges to
Canada will apply).
AMD Customer Care for Graphics Products will work to resolve your issue and
help you to get your ATI product up and running. If your issue is not resolved,
our technicians will determine whether the difficulty you are experiencing is the
result of the ATI product, whether your product contains a defect, and whether
your product is under warranty.
• AMD Customer Care is unable to assist with refunds, returns, or exchange-
specific inquiries. If resolving the problem being experienced is critical to
your decision to keep the product, it is your responsibility to ensure that you
know and are within the period of time your reseller will allow for refunds,
returns, or exchange.
• AMD is not responsible for any expense incurred accessing Customer Care.
It is expected that customers will review the expense associated with the
available support options and will choose the method that best meets their
needs and budget.
• AMD Customer Care reserves the right to limit support options for products
that are not registered or are reaching end of life.
International Compliance Information
This section details the worldwide compliance information for this product,
which is manufactured to be compliant in the regions where it is sold.
© 2007 Advanced Micro Devices, Inc.
ATI Radeon HD 3400 Series
20
Reference
FCC Compliance Information
This product complies with FCC Rules part 15. Operation is subject to the
following conditions:
• This device may not cause harmful interference.
• This device must accept any interference received, including interference
that may cause undesired operation.
This equipment has been tested and found to comply with the limits for a Class B
digital device, pursuant to Part 15 of the FCC Rules. These limits are designed to
provide reasonable protection against harmful interference in a residential
installation. This equipment generates, uses and can radiate radio frequency
energy and, if not installed and used in accordance with manufacturer's
instructions, may cause harmful interference to radio communications.
However, there is no guarantee that interference will not occur in a particular
installation. If this equipment does cause harmful interference to radio or
television reception, which can be determined by turning the equipment off and
on, the user is encouraged to try to correct the interference by one or more of the
following measures:
• Re-orient or relocate the receiving antenna.
• Increase the separation between the equipment and receiver.
• Connect the equipment to an outlet on a circuit different from that to which
the receiver is connected.
• Consult the dealer or an experienced radio/TV technician for help.
The use of shielded cables for connection of the monitor to the graphics card is
required to ensure compliance with FCC regulations. Changes or modifications
to this unit not expressly approved by the party responsible for compliance could
void the user's authority to operate this equipment.
Complies with FCC 15.107, 15.109, 15.111, and 15.117.
For further compliance information:
Advanced Micro Devices, Inc.
62 Forest Street
Marlborough, MA 01752
USA Tel: 508-303-3900
Industry Canada Compliance Statement
This Class B digital apparatus complies with Canadian ICES-003 and with BETS-7,
Section 3.6.
Cet appareil numérique de la Classe B est conforme à la norme NMB-003 du
Canada, et NTMR-7, Section 3.6.
CE Compliance Information
EMC Directive 2004/108/EC CISPR 22:2003 +A1:2004/EN 55022:1998 +A1:2000
+A2:2003—Class B: Limits and methods of measurement of radio disturbance
characteristics of Information Technology Equipment. CISPR24:1997/EN
55024:1998 +A1:2001 and +A2:2003—Information Technology Equipment—
Immunity Characteristics—Limits and Methods of Measurements
ATI Radeon HD 3400 Series
© 2007 Advanced Micro Devices, Inc.
Electrical Safety
21
Electrical Safety
Europe: The Low Voltage Directive—2006/95/EC EN 60950-1, 1st edition—Safety of
Information Technology Equipment
USA/Canada:
• UL 60950-1, 1st edition, 2006-07-07 (Information Technology Equipment—
Safety—Part 1: General Requirements)
• CSA C22.2 No. 60950-1-03, 1st edition, 2006-07 (Information Technology
Equipment—Safety—Part 1: General Requirements)
To meet UL safety requirements, the computer’s maximum room temperature
should not exceed 40 °C.
Waste Electrical and Electronic Equipment (WEEE) Directive
Compliance
This product was manufactured by Advanced Micro Devices, Inc.
VCCI Class B ITE Compliance Information
© 2007 Advanced Micro Devices, Inc.
ATI Radeon HD 3400 Series
22
Reference
MIC Certification Information
"Class B" Equipment (Household purpose info/telecommunications equipment)
As this equipment has undergone EMC registration for household purpose, this
product can be used in any area including residential area.
BSMI Certification Information
ATI Radeon HD 3400 Series
© 2007 Advanced Micro Devices, Inc.