1
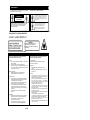
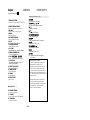
QXA67 10 28~35 WARNINGS To reduce the risk of fire or electric shock, do not expose This appliance to rain or moisture. EXPLANATION OF GRAPHIC SYMBOLS The lightning flash with arrowhead symbol, with in an equilateral triangle, is intended to alert user to the presence of uninsulated “ dangerous voltage” within the product enclosure that may be of sufficient magnitude to constitute a risk of electric shock to persons. CAUTION RISK OF ELECTRIC SHOCK DO NOT OPEN WARNING: TO REDUCE THE RISK OF ELECTRIC SHOCK. DO NOT REMOVE COVER. NO USER SERVICEABLE PARTS INSIDE. REFER SERVICING TO QUALIFIED SERVICE PERSONNEL. The exclamation point within an equilateral triangle is intended to alert the user to the presence of important operating and vaintenance ( servicing) instruction in the lliterature accompanying the appliance. HAZARD WARNING: TO REDUCE THE RISK OF FIRE OR ELECTRIC SHOCK, DO NOT EXPOSE THIS PRODUCT TO RAIN OR MOISTURE. CLASS 1 LASER PRODUCT CAUTION INVISIBLE LASER RADIATION WHEN OPEN AND INTERLOCK FAILED OR DEFEATED。AVOID DIRECT IXPOSURE TO LASER BEAM This product contains a low-power laser emitter. PRECAUTIONS FOR USE To ensure safe, appropriate use of your personal CD player, please follow the advice below: In the event of a problem, unplug the power cord and Contact a qualified repair technician. Location Do not use the product in extremely hot, cold, dusty or damp conditions. Place the product on a smooth, flast surface. Ensure that air is free to circulate through the product. Do not use it in a poorly ventilated place, cover it with a cloth or place it on carpet. Warning: Ventilation Your personal CD player has ventilation holes, which should never be obstructed. Power supply voltage Before using the product, check that its rated voltage is suitable for your mains supply. Liquid warning: Never allow liquids to splash or drip onto the product. Never place a liquid-filled container ( e.g. vase, jar, etc.) above it. Precautions : Safety precautions When you plug in or unplug the power cord, always hold the plug rather than the cable. Pulling the cord could damage it and create a hazard. Always unplug the product from the mains if you do not intend to use it for an extended period. The OFF position does not disconnect the product from the mains power supply. To disconnect the product from the power supply, you must unplug the power cord. This product should only be used in a horizontal position. Condensation Water droplets or condensation may form inside the CD player if it is left in a warm, damp atmosphere. The product may not operate correctly if condensation forms inside it. Leave the product in a warm, dry room for 1 to 2 hours to allow the condensation to evaporate. GB-28 The apparatus shall not be exposed to dripping or splashing and that no objects filled with liquids, such as vases, shall be placed on apparatus The mains plug is used as the disconnect device and it shall remain readily operable. To be completely disconnect the power input, the mains plug of apparatus shall be disconnected from the mains. The apparatus will be use in open area The ventilation should not be impedde by covering the ventilation openings with items such as newspaper, table-cloths, curtains etc No naked flame sources such as lighted candles should be placed on the apparatus; Attention should be drawn to the environmental aspects of battory disposal; The use of apparatus in moderate climates. The mains plug of apparatus should not be obstructed OR should be easily accessed during intended use. Excessive sound pressure from earphones and headphones can cause hearing loss. Battery shall not be exposed to excessive heat such as sunshine, fire or the like 1 15 1 2 3 4 5 6 7 8 9 10 11 12 13 14 20 CD/USB 24 21 22 23 16 18 17 GB-29 25 PL AY/ MODE +1 0 PROG. - 10 26 27 28 29 English CONTROLS POWER SUPPLY Top and front panels (See 1 ) Remote Control Handset ( See 1 ) 1. FUNCTION SELECTOR - Select source of sound USB/CD, OFF, AM or FM, 2. REMOTE CONTROL SENSORE - Receive the signal from the remote control. 3. CD DOOR - Press here to open / close the CD door. 4. DISPLAY - Show the CD functions. 5. DIAL POINTER WINDOW - Show the AM/FM dial frequency. 6. CD/USB Switch between USB and CD mode 7. FM STEREO INDICATOR - Show the FM stereo indication. 8. PALY MODE - Repeat, Repeat Album, Repeat All, Random 9. STEREO HEADPHONE JACK - 3.5mm stereo headphone jack. 10. SKIP , CD/MP3: - skips track backwards or forward. 11. STOP/FOLDER - Stop CD/MP3/USB playback / Folder + - Delete program playback. 12. PRESS TO PLAY/PAUSE - Start or pause CD/USB play. 13. TUNING CONTROL - Select FM/ AM stations. 14. VOLUME - Adjusts volume level. 15. USB INTERFACE - USB input host. 20. CD/USB Switch either CD or USB mode 21. SKIP / , / CD:- skips track backwards or forward. 22. - Folder up ( MP3 mode) 23. - Folder down ( MP3 mode) 24. PRESS TO PLAY/PAUSE - starts or pauses CD play. 25. STOP - stops CD playbacd; erases a CD program. 26. +10 - selects the CD tracks (+10). 27. PLAY/MODE - Repeat, Repeat 1, Random 28. -10 - selects the CD tracks (-10). 29. PROG CD: - programs and reviews programmed track numbers. Power Supply Using AC Power 1 . Check if the power voltage, as shown on the type plate located on the back of the set, corresponds to your local AC power supply. If it does not, consult your dealer or service centre 2 . Connect the power cord to the wall outlet. The power supply is now connected and ready for use. 3 . To switch off completely, unplug the power cord from the wall outlet. •Unplug the power cord from the wall outlet to protect your set during heavy thunderstorms. •If electric cable is damaged, it must be replaced by the manufacturer, or by the qualification persons, in order to avoid a danger. Back Panel (See 1 ) 16. SPEAKER TERMINAL - to connect the speaker wire. 17. .AC MAINS - Connect the AC power cord to the wall outlet. 18. FM ANTENNA - To improve FM reception. GB-30 BASIC FUNCTIONS RADIO Switching power on/off: Save energy To avoid unnecessary energy consumption always adjust the source selector to off position. – For FM, pull out the wired antenna. Incline and turn the antenna. Reduce its length if the signal is too strong (very close to a transmitter). – For AM the set is provided with a built-in antenna so the telescopic antenna is not needed. Direct the antenna by turning the whole set. General operation 1 . To select your sound source adjust the source selector to USB.CD/OFF/AM/FM. 2 . Adjust the sound with the VOLUME controls. 3. To switch off the set, adjust the source selector to OFF position. RADIO Radio reception 1. Slide the FUNCTION selector to a desired setting - FM or AM. 2. Rotate the TUNING control to find the desired stations. NOTE: If you have tuned to an FM stereo station, the FM stereo LED indicator will light. 3. When you have finished listening, slide the FUNCTION selector to the OFF position to shut the power off. USB PLAYBACK 1. Slide the function selector to USB.CD position. 2. Press the CD/USB button to switch USB mode (indicated in the LC dis-play). 3. Insert a USB memory stick into the USB port. 4. Display will show total track number 5. Press PLAY/PAUSE to start music playing 6. Press or to select tracks 7. Repeat function can be selected identical to CD/MP3 playback 8. Press STOP/FOLDER to end playback 9. Press STOP/FOLDER to select desired Album Note: Due to fast changing IT technology, this unit may not be compatible with some USB storage device. * USB support Specification: USB V1.1/V2.0 GB-31 CD/MP3 Player Playing a CD This CD-player can play Audio Discs, MP3, CD-R and CDRewritables. Do not try to play CD-ROM, CDi, VCD, DVD or computer CD. 1. Adjust the source selector to USB.CD. Display: shows - - - Briefly. 2. To open the CD door, press the CD door at the edge marked OPEN/CLOSE. 3. Insert a CD, CD-R or CD-RW with the printed side Facing up and press the CD door gently close. 4. Press on the device or remote control to start playback. 5. To pause playback press - To resume, press again. 6 To stop CD playback, press button. Note: CD play will also stop when: – you open the CD compartment; – you select the function switch to OFF ; – the CD has reached to the end. Selecting a different track During playback you can use or to select a particular track. Programming track numbers You may store up to 20 tracks in the desired sequence. If you like, store any track more than once. 1. In the PROG mode, press or for your desired track. 2. When your chosen track number appears, press PROG once to store the track. The display shows prog and prog briefly followed by your selected track number. 3. Repeat steps 1 to 2 to select and store all desired tracks in this way. 4. To play your program, press PLAY/PAUSE . Reviewing your set program • After playing at least one programmed track, press or , display will show your stored track numbers . Erasing a program You can erase the contents of the memory by: – opening the CD door; – slide the function selector to OFF source; Notice for CDR/CDRW/MP3 users: Depending on the type of CD burner, on the disc brand, MP3 compression level and the burning speed, some reading problems may occur. •If you have selected a track number in the stop or pause position, press or to start playback. •Press once briefly for the next track, or press repeatedly until the desired track number appears in the display. •Press once briefly to return to the beginning of a current track. •Press more than once briefly for a previous track. CD play mode : –REPEAT 1 > REPEAT ALL > RANDOM > NORMAL MP3 play mode : –REPEAT 1 > REPEAT ALBUM > REPEAT ALL > RANDOM > NORMAL GB-32 MAINTENANCE & SAFETY Precautions & General Maintenance •Place the set on a hard and flat surface so that the system does not tilt. •Do not expose the set, batteries or CDs to humidity, rain, sand or excessive heat caused by heating equipment or direct sunlight. •Do not cover the set. Adequate ventilation with a minimum gap of 6 inches between the ventilation holes and surrounding surfaces is necessary to prevent heat build-up. •The mechanical parts of the set contain selflubricating bearings and must not be oiled or lubricated. •To clean the set, use a soft dry cloth. Do not use any cleaning agents containing alcohol, ammonia, benzene or abrasives as these may harm the housing. CD player and CD handling •The lens of the CD player should never be touched! •Sudden changes in the surrounding temperature can cause condensation to form and the lens of your CD player to cloud over. Playing a CD is then not possible. Do not attempt to clean the lens but leave the set in a warm environment until the moisture evaporates. •Always close the CD door to keep the CD compartment dust-free. To clean, dust the compartment with a soft dry cloth. •To clean the CD, wipe in a straight line from the centre towards the edge using a soft, lint-free cloth. Do not use cleaning agents as they may damage the disc. •Never write on a CD or attach any stickers to it. X GB-33 TROUBLESHOOTING Troubleshooting If a fault occurs, first check the points listed below before taking the set for repair. Do not open the set as there is a risk of electric shock. If you are unable to remedy a problem by following these hints, consult your dealer or service center. WARNING: Under no circumstances should you try to repair the set yourself, as this will invalidate the warranty. – Problem • Solution No sound /power –Volume not adjusted •Adjust the VOLUME –power cord not securely connected •Connect the AC power cord properly –Batteries dead/ incorrectly inserted •Insert (fresh) batteries correctly Display does not function properly / No reaction to operation of any of the controls –Electrostatic discharge •Switch off and unplug the set. Reconnect after a few seconds USB no read –No file •To ensure your USB drive stored music file in Mp3 or wma format. •Reset the device no disc indication –No CD inserted •Insert a CD, CD-R or CD-RW –CD badly scratched or dirty •Replace/ clean CD, see Maintenance –Laser lens steamed up •Wait until lens has cleared –CD-R is blank or the disc is not finalized •Use a finalized CD-R CD playback does not work –CD badly scratched/ dirty •Replace/ clean CD (see maintenance) –Laser lens steamed up •Wait until lens has adjusted to room temperature The CD skips tracks –CD damaged or dirty •Replace or clean CD –Program is active •Quit Program mode(s) Environmental information We have done our best to reduce the packaging and make it easy to separate into 3 Materials: cardboard, paper pulp and expandable polyethylene. Your set consists of materials which can be recycled if disassembled by a specialized compacts. Please observe the local regulations regarding the disposal of packaging, dead batteries and old equipment. GB-34 Specifications : Power supply : AC 230 V~ 50 Hz Power consumption : 17 Watts Dimensions of unit Weight (Main Unit & Speaker Box ) : 458(W) X 275 (H) X 153 (D) mm. : 3.10 Kgs Frequency range : AM 540 - 1600 KHz. : FM 88 - 108 MHz. AUDIO SECTION Output Power (RMS) Speaker : : 1.5 W X 2 4 Ohms 5W SPECIFICATION Specification subjects to be changed without notice. Corrosion, oxidation, battery-leakage and any other gradually acidic defect of this nature will invalidate the guarantee. For more information and warranty conditions, please visit : www.akai.eu GB-35