1
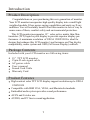
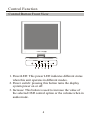
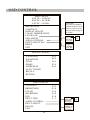
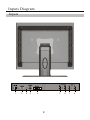
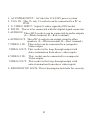
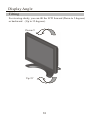
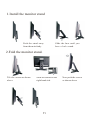
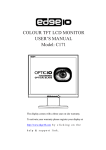
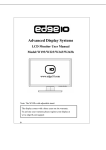
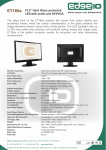
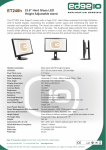
Advanced Display Systems
CHANNEL
LCD Display
Menu:
1.Introduction
Product Description .....................Page.1
Package Contents.........................Page.1
Product Features.......................... Page.1
Cleaning......................................Page.2
Precautions..................................Page.2
2.Control Function
OSD Button .................................Page.4
OSD Control................................Page.6
HOT Control................................Page.7
3.Inputs Diagram
Inputs..........................................Page.8
4.Display Angle....................................Page.10
5.Product Specification.........................Page.12
6.Display Modes...................................Page.13
7.Service Information............................Page.14
Introduction
Product Description
Congratulations on your purchasing this new generation of monitor.
Your LCD monitor incorporates high quality display into a small light
weighted module. It has power-saving capabilities and emits no X-ray
radiation. You will certainly benefit from this monitor in lots of way to
name some of them, comfort safety and environmental protection.
This LCD monitor incorporates 19" color active matrix thin-filmtransistor (TFT) liquid crystal display to provide superior display performance. A maximum resolution of SXGA 1280X1024 is ideal for
designs that enhance this LCD monitor’s performance are Plug & play
compatibility, audio system and OSD (On Screen Display) controls.
Package Contents
Included with your LCD monitor are following items:
19" TFT LCD monitor
15pin D-sub signal cable
AC power cable
,
User s m anual
Sound Card Cable
Warranty Card
Product Features
High contrast color TFT LCD display support resolution up to SXGA
1280X1024
Compatible with IBM VGA, VESA, and Macintosh standards.
Embedded audio system provides sound performance.
AV-IN and S-video use.
AUDIO, and PC line in sound application.
1
Cleaning
Gently wipe the screen with a clean camel hair lens brush, or a soft, clean,
lint-free cloth.
This removes dust and other particles that can scratch the screen,
Do not apply pressure to the screen surface when wiping it clean.
Do not pour or spray any liquid directly onto the screen or case of the
LCD monitor.
Chemical cleaners have been reported to damage the screen or the LCD
monitor.
Precautions
Read all these instructions and save them for later use.
Follow all warning and instructions on the product.
Product
Do not block the vent holes in the case.
Do not insert sharp objects or spill liquid into the LCD monitor through
cabinet slots.
It may cause accidental fire, electric shock or failure.
Disconnect the power plug from the AC outlet if you are not using it
for an indefinite period of time.
Do not attempt to service this product yourself, as opening or removing
covers may expose you to dangerous voltage points or other risks.
Do not touch the screen directly with your fingers. You may damage
the screen, and the oil from your skin is difficult to remove.
Do not apply pressure to screen. The LCD is very delicate.
Power
Use the type of power indicated on the marking label.
Plugs
,
Do not remove any of the prongs of the monitor s three-pronged power
plug.
Disconnect the power plug from the AC outlet under following
conditions:
If you are not using it for an indefinite period time.
When the power cord or plug is damaged or frayed.
If the product does not operate normally when the operating instructions
are followed.
2
If the product has been dropped or the cabinet has been damaged.
If the product exhibits a distinct change in performance, indicating a
need for service.
Power and extension cords
Do not allow anything to rest on the power cord.
Do not locate this product where persons will walk on the cord.
Use the proper power cord with correct attachment plug type. If the
power source is 120V AC, use a power cord that has UL and C-UL
approvals. If the power source is a 240V AC supply, use the tandem
(T blade) type attachment plug with ground conductor power cord that
,
meets the respective European country s safety regulations, such as
VDE for Germany.
.Do not overload wall outlets or power cords. Ensure that the total of all
units plugged into the wall outlet does not exceed 10 amperes.
Ensure that the total ampere ratings on
, all units plugged into the
extension cord is not above the cord s rating.
If the power supply cord, which came with your monitor, is to be
connected to the PC instead of the wall outlet, this equipment is to be
used with UL/TUV approved computers with receptacle rated
100~240V AC,50/60Hz,1.0A(minimum).
Environment
Place the monitor on a flat and level surface.
Place the monitor in a well-ventilated place.
Keep the monitor away from:
Overly hot, cold or humid places, places directly under sunlight, dusty
surroundings, equipment that generate strong magnetic fields.
3
Control Function
Control Button Front View
CHANNEL
1. PowerLED: This power LED indicates different status
when this unit operates in different modes.
2. Power switch: pressing this button turns the display
system power on or off.
3. Increase: This button is used to increase the value of
the selected OSD control option or the volume when in
audio mode.
4
4. Decrease:This button is used to decrease the value of
the selected OSD control option or the volume when
in audio mode.
5. OSD Menu/select: Pressing this button pops up the
OSD menus on the screen and used to select the OSD
control options on the screen.
6. Channel: Selects input mode: VGA>VIDEO>S-VIDEO
>VGA>.
5
OSD CONTROL
MAIN MEUN
VGA IN : 1024x768
H.SYNC: -48.3KHz
V.SYNC: -60.8Hz
ENGLISH
SPANISH/ESPANOL
GERMAN/DEUTSCH
ITALIAN/ITALIANO
FRENCH/FRANCAIS
RETURN
BRIGHTNESS
CONTRAST
DISPLAY ADJUST
COLOR TEMPERATURE
LANGUAGE
OSD ADJUST
AUDIO CONTROL
INPUT SELECTION
RESET
EXIT
MUTE
VOLUME
RECALL
RETURN
OFF
ON
VAG IN
VIDEO IN
S-VIDEO
RETURN
DISPLAY ADJUST
050
080
050
058
000
V-POSITION
H-POSITION
PITCH
PHASE
SHARPNESS
AUTO TUNING
RECALL
RETURN
VIDEO ADJUST
CONTRAST
BRIGHTNESS
COLOR
SHARPNESS
HUE
INPUT TYPE
AUDIO CONTROL
INPUT SELECT
RECALL
EXIT
6
053
050
050
000
050
4:3
MUTE
VOLUME
RECALL
RETURN
VAG IN
VIDEO IN
S-VIDEO
RETURN
OFF
ON
BRIGHTNESS: Adjusts background black level of the screen
image.
CONTRAST: Adjusts foreground white level of the screen image.
H.POSITION: Moves the screen image left or right.
V.POSITION: Moves the screen up and down.
PITCH: Adjusts image distortion appearing as vertical bars or “noise”
on the screen.
PHASE: Adjusts image distortion appearing as horizontal “noise” on
the screen.
SHARPNESS: Adjusts clarity and focus of the screen images.
COLOR TEMPERATURE: Adjusts color temperatures for users.
LANGUAGE: Allows you to choose from five languages as
English, Spanish, German, French, Italian
AUDIO CONTROL: Switch muting ON/OFF and Volume control.
INPUT SELECTION: Select VGA, VIDEO IN, S-VIDEO signal input.
RESET: Returns all controls back to factory setting
COLOR: Adjusts color saturation of the screen image.
HUE: Adjusts the phase of the color of the screen image.
INPUT TYPE: Selects display ratio of the screen image 4:3 or 16:9. .
HOT KEY CONTROL
1. VGA HOT KEY
DOWN KEY
UP KEY
BRIGHTNESS
CONTRAST
2. VGA+A HOT KEY
UP KEY
DOWN KEY
VOLUME INCREASE
VOLUME DECREASE
7
Inputs Diagram
Inputs
1
2
9
3
5
4
8
6
7
8
1.AC POWER INPUT : AC inlet for 110/220V power system.
2.VGA IN: This D-sub 15 sockets can be connected to a PC or
DVR.
3.S-VIDEO INPUT: Inputs S-video signal by DIN socket.
4. DVI IN: This is to be connected with the digital signal connector
5.AUDIO IN: Thess RCA sockets can be connected to audio outputs
(L---White terminal, R---Red terminal).
6.AUDIO OUT: These RCA sockets can output sound to other
speakers (L–-White terminal, R---Red terminal).
7.VIDEO-1 IN: This socket can be connected to a composite
Video output.
VIDEO-1 OUT: This socket is the loop-through output with
Auto-termination from above video inputs.
8.VIDEO-2 IN: This socket can be connected to a composite
Video output.
VIDEO-2 OUT: This socket is the loop-through output with
auto-termination from above video inputs.
9.KENSINGTON LOCK: This is kensington lock hole for security.
9
Display Angle
Tilting
For viewing clarity, you can tilt the LCD forward (Down to 5 degrees)
or backward (Up to 35 degrees).
Down:5。
Up:35。
10
1.Install the monitor stand
Push the stand away
from the main body
Slide the base until you
hear a lock sound.
2.Fold the monitor stand.
Tilt the screen as shown
above
Slide the button to the
right hand side
11
Now push the screen
as shown above
Product Specification
Model
Spec
LCD Display
Pixel pitch
Max Resolution
Dimensions
Packing Dimensions
Contrast Ratio
Brightness
Response Time
Display Color
Viewing Angle L/R
U/D
PC Interface Video
Sync
Display Mode
PC connector
Front Control
PC
19" active matrix TFT LCD panel
0.294(H)x0.294(V) mm
1280(H)x1024(V)SXGA
140(V)x500(H)x450(L) mm
220(V)x550(H)x520(L) mm
500:1
300cd/m 2
8ms
16.2M
150
130
RGB analog 0.7Vp p
VGA/SVGA/XGA/SXGA
15 pin D-sub
Power on/off with LED, Menu select,
Up/Down Adjustment, Auto tuning
OSD Adjustment Contrast, Brightness, Auto tuning, Phase, H-Position,
V-Position, Input selection, Audio control
Additional
Kensington Lock
function
Audio speaker
2W
Power input
Operating
Consumption
Operating
Conditions
Storage
Conditions
Certification
Weight
AC Input:100~240V/1.8A,50-60Hz
50W
Temperature:0℃-40℃
Humidity: 20%-80%
Temperature:-20℃-60℃
Humidity: 20%-80%
FCC(DOC), CE, CB , VCCI, UL, CSA, TUV
N/W:7.2Kgs G/W:9.8Kgs
12
Display Modes
Model
0
1
2
3
4
5
6
7
8
9
10
11
12
H Freq(kHz)
31.469
31.469
35.000
37.861
37.500
31.469
37.879
46.875
48.363
56.476
60.023
63.981
79.976
Resolution
720*350
640*480
640*480
640*480
640*480
720*400
800*600
800*600
1024*768
1024*768
1024*768
1280*1024
1280*1024
13
V Freq(Hz)
70.087
59.940
66.667
72.809
75.000
70.087
60.317
75.000
60.004
70.069
75.029
60.020
75.025
Service Information
Service
When you buy this excellent LCD Monitor, you are entitled to the
warranty provided by us, please contact us if you need any
information on our product.
Thank you again for buying our products .
14
www.edge10.com
P/ NO.: A0019FED00 REV: A