1
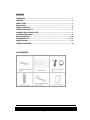
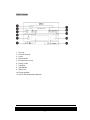
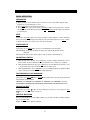
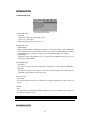
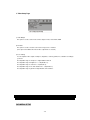
MDV-24
Home Cinema Set
FOREWORD
THANKS
Thank you for purchasing this product!
Your choice of the product sufficiently displays your expertise in acoustic equipment.
We are honored to provide you with more satisfactory products. To bring
the functionality of your device into full play, it is suggested that you try to find some time
To read this user manual before connecting and operating your system, so that you can
Grasp system connections and requirements in use, and get enhanced enjoyment and
Pleasure in using the product from the very beginning.
IMPORTANT NOTICE
Please unpack carefully, and keep all the accessories in the same place.
Please check any possibilities in shipping damage. If your devices are damaged or
cannot be operated, please notify your local dealers immediately. If the device is
shipped to your place directly, please contact the carrier as soon as possible. Only
the consignee (individual or company to receive the devices) is entitled to claim
indemnity to the carrier in the light of shipping damages. We recommend that you
keep the original cartons and packing materials soundly for future shipping.
SPECIAL NOTE
1. Minimum distances around the apparatus for sufficient ventilation;
2. The ventilation should not be impeded by covering the ventilation openings with items, such
as newspapers, table-clothes, curtains, etc;
3. No naked flame sources, such as lighted candles should not be placed on the apparatus;
4. Attention should be draw to the environmental aspects of battery disposal;
5. The use of apparatus in tropical and/or moderate climates;
6. Where the mains plug or an appliance coupler is used as the disconnect device, the
disconnect device shall remain readily operable.
7. This unit is controlled by micro-computer; it may cause error displaying when this unit is
posited in interferential place. In this case, please turn off the power exceed 10 seconds,
and the unit will resume normal after turning on.
-1-
CONTENT
FOREWORD……………………………………………………………………………………..1
CONTENT………………………………………………………………………………………...2
FRONT PANEL...………………………………………………………………………………..3
BACK PANEL……………………………………………………………………………………4
REMOTE CONTROL……………………………………………………………………………5
CONNTECTION WITH TV……………………………………………………………………...6
CONNECTION WITH AMPLIFIER………………………………………………………….….7
SYSTEM CONNECTION…………………………………………………………………….….8
BASIC OPERATION……………………………………………………………………..…..9-16
DVD MENU SETUP…..…………………………………………………………………….17-21
SPECIFICATION…………………………………………………………………………….….22
TROUBLE SHOOTING…………………………………………………………………………23
ACCESSORIES
-2-
FRONT PANEL
1.
2.
3.
4.
5.
6.
7.
8.
9.
10.
11.
Disc tray
Previous/ChannelPower
Next/Channel+
Remote control sensor
Display screen
Play/Enter
Stop/FM/AM
Open/Close
Volume up/down
Built-in USB, Multi-media card ports
-3-
BACK PANEL
1.
2.
3.
4.
5.
6.
7.
8.
9.
10.
11.
Scart output
Y, Pb/Cb, Pr/Cr component output
L/R front audio output
Coaxial output
S-video and Video outputs
Optical fiber output
FM antenna interface
AM antenna interface
Power supply input
L/R audio input
2.1 speaker output
-4-
REMOTE CONTROL
NOTE:
1. Place the batteries in the remote control and turn on the player, put the emitter against the sensor of
player for remote control.
2. The distance of remote control should not exceed 7 meters, or else, it will be invalid.
3. If the sensor or remote control emitter is stuck with foreign matters, it may result in the malfunction in
signal reception or not at all.
4. The remote control function may be affected under the strong interference signals, such as power
supply and other strong high-frequency signals.
REMARK: Remote Control Battery Type: Size: AAA
-5-
Standard Voltage: 1.5V
CONNECTION WITH TV
1.
If your TV-set has AV terminal, connect this unit to TV-set with A/V cables, and set TV-set to be AV
2.
If your TV-set has S-Video terminal, please use the S-Video connection cable to connect the
status after confirming the connection is correct. (Figure 1)
player and TV-set, to obtain a higher quality image. (Figure 2)
3.
If your TV-set has chromatics output terminal, please use three connection cables to connect the
4.
This unit has an output interface for SCART output, which can directly be connected with TV-set.
player and TV-set, to obtain a more vivid image. (Figure 3)
(Figure 4)
Note:
1.
Please turn off the both player and TV before they are connected to the power line from the socket.
2.
You may adjust the corresponding system according to your TV system while watching various
discs.
3.
If there are multiple connections between video player and TV, please select one and unplug
4.
Do not switch on /off or press power switch frequently, switching on and off each time must have an
others so as not to affect the quality of images and sound.
interval of 3 seconds.
5. Do not connect the digital optical or coaxial output jack of this player with the analogue signal input
terminal for reception.
-6-
CONNECTION WITH AMPLIFIER
Setup of Digital Audio Output
Connect the optical or coaxial output jack to the amplifier. While in of play or stop mode, press
the setup button on the remote control to open the system setup page, switch to audio setup
page by pressing the directional buttons, then move the cursor to Audio Out, select SPDIF/RAW
or SPDIF/PCM, press Play/Enter button to finish. Press setup button again to exit the setup.
-7-
SYSTEM CONNECTION
Please refer to the following figure to connect your acoustic equipment.
To keep all the connection correctly and firmly.
Power supply can be connected finally.
-8-
BASIC OPERATION
PREPARATIVE
1). Before turning on, check whether all the connection are correct and reliable. Plug the power
plug into the corresponding power socket.
2). Press Power button on the front panel to turn on.
3). Press Eject button on the remote control (or Open/Close button on the front panel) to carry the
disc tray outside, put the disc into the tray, press Eject or Open/Close button again, this unit starts
to read and play.
MUTE
In play status, If the Mute button is pressed, there will be no audio output, the sound is eliminated,
however the image will still be played normally. Then press the button again or press Vol.+/- button
to exit the mute status, the sound resumes to be its normal status.
STATUS DISPLAY
In play status, press Display button, the TV screen will display the following data:
VCD/CD display: single elapsed, TR (track remain), total elapsed, DR (directly remain),
display off.
DVD display: title elapsed, title remain, chapter elapsed, chapter remain, display off.
SOUNDTRACK SWITCH
1
While playing VCD or CD disc, press L/R button to select the multiple output modes such as
Mono L, Mono R, Stereo and Mix-mono. Press the button once to switch one soundtrack.
2
While playing Dolby Karaoke disc, press L/R button to select the different vocal effects: Vocal
1, Vocal 2, Both Vocal, No Vocal Assist, Voice Cancel and No Vocal.
3
While playing DVD disc, press LANG button can select multiple languages for playback. (Only
applies to the discs like DVD recorded in multiple languages.)
FAST FORWARD & FAST BACKWARD
In play status, press Tune-
button or Tune+
, there will be various speeds of fast forward and
fast backward, shown as follows,
FORWARD X 2, FORWARD X 4, FORWARD X 8, FORWARD X 16, FORWARD X 32, PLAY
BACKWARDX2, BACKWARDX4, BACKWARDX8, BACKWARDX16, BACKWARDX32, PLAY
PREVIOUS & NEXT
In play status, press CH-
button, the device will skip to the previous one for play, press CH+
button, the device will skip to the next one.
SUBTITLE SELECTION
When the played DVD disc records multiple subtitles, you can make selections of subtitle language
by pressing SUB button:
English, French, German, Spanish and Dutch.
-9-
BASIC OPERATION
TIME SELECTION
In play mode, press T/F button on the remote control, the TV screen displays
If you want to adjust the volume of the Treble or Bass. First press the Tone button, select the
corresponding item and press Vol+/- button on the remote control to increase or reduce the volume
of the Treble or Bass.
You can press ◄►directional buttons to move the cursor to the setting option according to the
above mentioned screen suggestions, then press Play/Enter to confirm and use number buttons to
input the corresponding time numbers. After it is done, DVD player will start to the next item in the
above screen.
There are 5 items in VCD screen: Track, Disc time, Track time, Repeat, Time DISP(Display);
There are 9 items in DVD screen: Title, Track, Audio, Subtitle, Angle, TT(Total) time,
CH(Chapter)time, Repeat, Time DISP(Display).
Note: The optional time range depends on the volume of discs.
CD Display:
--:--T:--/XX
MP3 Display:
MP4 Display:
--/XX
SELECT:--
--:--
GOTO:--:--
While playing CD, MP3 or MP4, press T/F button to switch between the “Time Selection (current
song/chapter)” and “Song/Chapter Selection”; then input the digital you want. The system begins
playing from the specified time/song/chapter.
REPEAT
In play status, repeatedly press Repeat button to separately select the different contents for
repetition.
1). As for DVD, repeatedly press Repeat button, the TV screen will separately display:
Chapter, Title, All.
2). As for CD, VCD, CD-R discs, Successively press this button, the screen will separately display:
Track, All.
3). As for MP3, JPEG and other media files, there are options: Single, Repeat one, Repeat folder,
Folder.
-10-
BASIC OPERATION
A-B REPEAT
In play status, press A-B REP button to realize the specific section repeat, that is, press this button
once at the beginning of the section (A), and press it again at the end of the section ( B), this player
will automatically return to A and starts to repeat playing the section from A to B. Press the button
again to exit.
TITLE
If the played DVD disc contains a directory column, press the Title button to take out the items
contained in this disc. Use the direction buttons to move the cursor to select the items you want to
play, or directly use the number button to select.
LOUDNESS
Press Loud button to set loudness on or off. When set loudness on, it can strength low sound signal.
SOUND FIELD
In play status, press DSP button, you can select different sound field effect: Live, Pop, Dance, Jazz and
Classic.
PAL/NTSC
Press the P/N button to switch TV system output from one of the following: PAL, MULTI, NTSC.
STOP
In play mode, press the Stop button, the TV screen will return to the startup screen, press
Play/Enter button, the player will begin to play where it left off. If you successively press Stop
button twice and then press Play/Enter button, the disc will be played from the beginning.
PAUSE
In play status, press Pause button, the player will pause, and press it again or press Play/Enter
button once to continue playing.
MENU
Pressing Menu button on the remote control opens or closes the PBC menu.
Note: 1). It will go into the Root menu when playing DVD discs.
2). Older discs or some copies don’t support this function.
-11-
BASIC OPERATION
ANGLE SELECTION
In play status, repeatedly press Angle button, you can enjoy the same action shot in different
angles. (The function depends on the discs.)
VOLUME ADJUSTMENT
You can press the VOL+/- button to turn up or down the volume of this unit.
DIRECTION BUTTONS
Press the Direction buttons ▲ ▼ ◄ ► to move the cursor to select pictures or menu.
PLAY/ENTER
Press the Play/Enter button to enable the selected items.
CLEAR
Press Clear button to cancel the digital you have inputted. For example: the setting of
programmed songs.
INPUT SELECTION
1) Correctly connect the outer equipment (e.g. PC computer) with this unit, then press the
AUDIO IN button on the remote control to enter Audio status to enjoy the outer audio source.
2) Press the FM/AM button on the remote control or front panel to select tuner. You can also
keep pressing the FM/AM button on front panel for a while to select the tuner.
3) Press the DVD IN button on the remote control to select DVD mode. The unit will start playing
if there is a disc inserted.
TONE
If you want to adjust the volume of Treble or Bass First to press the Tone button, select to the
corresponding item and press Vol+/- button on the remote control can increase or reduce the
volume of Treble or Bass.
ZOOM
In play status every time the Zoom button is pressed, the TV screen will be zoomed in or out
proportionally. In case of zoom proportion more than 1, pressing direction button is able to move
the picture, continuously press the button, the TV screen display will be zoomed in 2 times, 3
times, 4 times, 1/2 time, 1/3 time, 1/4 time.
-12-
BASIC OPERATION
SHORTCUT
When play DVD discs, press the Shortcut button to jump over the initial title, menu or warnings.
(Only for some discs, subject to the quality or recorded status of the played discs)
NUMERIC KEYS
1). While playing songs, press the Numeric Keys buttons to directly select the songs you need.
2). If the desired track number is # 10 or above, you can select it by pressing the 10+ button once, and then
pressing a Digital button (1--10). For example: If the 16th song is needed, you can press the 10+ button
followed by the 6 button.
PROGRAM
●In play VCD optional, CD,
press Program button, the TV
Screen shows:
1.
●In play DVD, press Program button
the TV screen shows:
If the player is in the PBC ON status, and the programmed songs are being play, this operation will
result in PBC turning off.
2.
Input the number that you want at the place of the cursor; move the cursor to START; press the
Play/Enter button, the songs will play in the specified order.
3.
4.
While programming, press the Clear button to eliminate the digitals that you input.
To cancel programmed play: press the Program button again, the cursor will move to EXIT
automatically, press Play/Enter again to cancel programmed play.
MP3 DISC PLAYING FUNCTION
1). Press the EJECT button on remote control (or Open/Close button on front panel) to open the
deck, put in an MP3 disc, then press the Eject or Open/Close button to close the deck. This unit
begins to read it, and the TV screen will display the following figure,
-13-
BASIC OPERATION
2). Press the directive keys ▲▼ to move the cursor to a certain directory, and press Play/Enter
button to enter the directory. Press the direction buttons to enter the subdirectory or the file area,
select a song with the cursor, press Play/Enter button to play the song.
During playing, press
or
button to select other songs under the current
directory.
During playing, press the left direction button, the icon will skip to the directory symbol ,
press the up/down direction button to select other directories, press Play/Enter buttons for
confirmation.
Note: When play MP3 discs, this unit also has the functions such as mute, pause, previous and
next selection. The operation is identical with CD playing.
MPEG4 JPEG PICTURE DISC PLAYING FUNCTION
1). Place the MPEG4/JPEG disc into the deck, this unit will begin to read, the main directory will
be displayed on the TV screen.
2). Press the direction button ▲▼ to move the cursor to the corresponding directory, press
Play/Enter button to enter the next layer, and so on, until the desired picture is found for play.
During play, number buttons or
JPEG pictures may distort at the edge to some TV sets, this is not a unit defect.
button can be used to select pictures.
This unit can play the digital photo discs with extension name .JPEG, and also
support the picture that made by Adobe Photoshop.
If you want to repeat playing some pictures, pressing the Repeat button is OK.
During browsing , press the Stop or Menu button to return the sub-menu, and then press
the Program button to return the main menu.
After go into the subdirectory in playing MPEG4 disc, also you can do the
operation such as fast backward, fast forward, pause. etc,.
-14-
BASIC OPERATION
DVD TITLE MENU SELECTION FUNCTION
DVD disc features high capacity, records more than one movie, background data and songs. It
is hereby given a name of TITLE, while more sections will be given under each TITLE, which are
called Chapters. There are some songs in one chapter. While playing DVD discs, press the Title
button, the TITLE menu will appear on the TV screen. (Available for DVD discs that contain
more than one title menu).
You can use the direction buttons to move the cursor to the desired title menu, press Play/Enter
button to play it. If the title menu is represented by numbers, then press the number buttons to
select directly.
USB/CARD/DVD
This is latest function only found in new generation multimedia DVD-players. Connecting the
USB or digital card while playing a disc does not influence the quality of playing. In order to view
the contents of the USB or digital card, following operations need to be performed.
1.
Press the USB/CARD/DVD button on the remote control once, the dialogue window will
appear on the screen. Use Up/Down direction button to select the required option.
2.
Press the Play/Enter button to switch on the selected option.
3.
If a disc is not loaded, the player will automatically check the presence of a USB or
Digital card. If one of these appliances is found, the player will automatically start playing its
content or displays screen menu of the appliance.
4. To exit the USB/CARD mode: Press USB/CARD/DVD button again, and move the cursor to
“DVD” item, and then press Play/Enter button.
NOTE: If you are using a USB extension cable, this cable should be limited to max. 0.5m.
-15-
BASIC OPERATION
FM/AM RADIO OPERATION
1.
Enter FM/AM Function
In the turn-on or playing status, press the FM/AM button on the remote control to enter FM/AM status.
2.
Select Bands
1)
Directly input frequency: press the T/F button on the remote control, input the frequency that you
want directly.
2)
Select band by pressing Tune- or Tune+ button: under some frequency, press the button, the
frequency will be up or down on the step. The step of FM is 0.05 MHz. The step of AM is 9 KHz.
3)
Select band by pressing number buttons: you may select the bands that have been saved by
pressing the number buttons. For example: press 10+ button twice, 5 button once, you may
select the 25th band. Press the CH- or CH+ button, the band will be switched up or down.
4)
Automatically search bands: press the Search button, this unit will start to search bands from the
lowest part to highest part automatically. Meanwhile the searched bands will be saved orderly.
Press the button again to stop searching.
3.
Save Bands
Press the Save button, that means saving the current frequency of band. For example: If you want to
save 99.3 MHz in 28th, please press 10+ button twice, 8 button once, then press T/F button to input
993, then press Save button to save this frequency.
4.
Soundtrack Selection
Press MO/ST button on the remote control, you may select Mono and Stereo soundtrack output in FM
status. If the signal is not strong enough, you can not select Stereo.
Note: Stereo is not available in AM mode.
5.
Exit FM/AM Status
1)
Press the AUDIO IN button on the remote control to exit FM/AM status, and switch to audio input
mode.
2)
Press the DVD IN button on the remote control to exit FM/AM status, and switch to DVD mode.
The player will start playing if there is a disc inserted.
Remark: FM Frequency range: 87.00-108.00MHz
AM Frequency range: 522-1620 KHz.
( Beyond the range, input is invalidity.)
NOTE: 1. You may adjust the best radio effect by adjusting the FM/AM antenna.
2. You can search further bands by pressing Search button when adjusted the FM/AM antenna
in a right position.
3. If the band is not clear by auto search, you choose the way manual search adjustment by press
Tune-/Tune+ button.
-16-
DVD MENU SETUP
Press the Setup button on the remote control to open the menu setup function, the TV screen will display
the following figures. Press ◄ ► buttons to move the different setup pages; Also press the direction
buttons to move cursor to the item you want, then press Play/Enter button again to enter the subdirectory.
1. General Setup Page
1) TV Display (4:3 PS, 4:3 LB, 16:9)
(1) No matter which format you select, if the screen is 4:3 display, the image is able to be display in 4:3.
(2) The DVD screen format is changeable.
(3) When the screen is displayed in 4:3, the display format of DVD is 16:9, the image will be compressed.
2) Angle Mark
If you select the angle mark, the multi-angle mark can be shown on the screen when the disc has the
multi-angle pictures.
3) OSD Language
You can select English, French, German, Spanish or Dutch for the entire setup page.
4) Closed Caption
When playing DVD disc, choose this OFF option to close caption, choose ON option to open the caption.
The effect is subject to the disc you are playing.
5) Screen Saver
This option is used to open/close screen saver program.
ON: in the status of stop or no disc, the screen saver program will be automatically turned on within the
setting time.
There will be a video setting image, and the device will turn to power saving mode, thus protecting your
electrical appliance and prolonging its lifespan. Press any button to cancel the screen saver.
OFF: the screen saver program will not be activated in any cases.
6) Last Memory
Select this OFF option to close memory function, choose ON option to open.
7) Version (Soft Version)
This option is used to display the model of this system and its factory name.
-17-
DVD MENU SETUP
2. Audio Setup Page
1) Analog Audio Setup
(1) Downmix
LT/RT: audio output from Left and Right channel
Stereo: stereo audio output
(2) Dialog: the dialog of this unit is set to be off.
2) Digital Audio Setup
(1) Digital Output
When playing the DOLBY, or MPEG disc, the optical or coaxial terminal will be output in SPDIF/RAW
format. Meanwhile the connected amplifier must be able to decode the DOLBY DIGITAL or MPEG.
SPDIF/PCM may be selected when the player is connected with 2CH digital stereo amplifier.
(2) LPCM Output
LPCM (Linear Pulse Code Modulation) is a non-compressed audio digital technology. There are tow
output modes: 48KHz, 96KHz.
3) Dolby Digital Setup
(1) Dual Mono
This option is used to set the mode of audio output, including Stereo, L-Mono, R-Mono and Mix-Mono.
(2) Dynamic
This option is chosen when Line output is selected for the compressing mode. Linear compressing ratio
is adjusted to acquire different compressing effects.
4) 3D Processing
Reverb Mode
This option has different reverb modes setting: Concert, Living Rom, Hall, Bathroom, Cave, Arena, and
Church.
5) HDCD
Filter
This option has three settings: OFF, 44.1KHz, 88.2KHz. Please set it according to the disc, and get more
clear and more exquisite sound.
DVD MENU SETUP
-18-
3. Video Setup Page
1) Video Output
This option is used to set the mode of video output: S-video, YUV/Y.Pb.Pr, RGB.
2) TV Mode
This option is used to select the scan mode to Progressive or Interlace.
(This option is unavailable when the S-video output mode is selected.)
3) Color Setting
You can adjust the video output of sharpness, brightness, contrast, gamma, hue, saturation according to
your favor.
The adjustable range of sharpness is: High, Medium and Low.
The adjustable range of brightness is: +/-20(default is 0).
The adjustable range of contrast is:+/-16(default is 0).
The adjustable range of hue and saturation are: +/-9(default is 0).
The adjustable range of gamma is: High, Medium, Low and None.
DVD MENU SETUP
-19-
4. Preference Setup Page
(This setup page only be available when the player in No Disc or Eject status; or in playing status, press the
STOP button twice.)
1) TV Type
Select the corresponding TV system to fit your system; PAL, MULTI, NTSC system are available of this
device.
2) PBC
This option is used to open or close PBC.
3) Audio (Language)
Select the desired audio language (English, French, German, Spanish and Dutch.)
Note: The DVD audio language must be recorded in the selected language; otherwise the default
language will be on.
4) Subtitle (Language)
Press the Subtitle key repeatedly to select a subtitle language (English, French, German, Spanish and
Dutch.)
5) Disc Menu (Language)
Select the desired menu language (English, French, German, Spanish and Dutch.) If there is no such and
option in the disk, the default language of the disc will be played.
6) Parental Control
This unit has 8 different age ratings for selecting. You can move the cursor to select one of them, then
press PLAY/ENTER button on the remote control to enter. Here DVD will remind you to input the
password.
7) Default
Select this option to reset all the preferences to the player’s original factory setting.
DVD MENU SETUP
-20-
5. Password Setup Page
Password
The original password of this unit is “138900” and you can change it to a new one.
6. Exit Setup Page
In this option, press the PLAY/ENTER button to exit the Setup menu; you can also pres the SETUP button
on the remote control to exit.
-21-
SPECIFICATION
Disc type
DVD, DVCD, VCD, SVCD, CD, CD-R, MP3,
MPEG-4
Video format
MPEG2 for DVD, and MPEG1 for VCD
Audio format
MPEG1, MPEG2, PCM, Stereo
Signal output
Video format: NTSC, PAL, AUTO
Video output: 1,0 Vp-p
Audio: stereo,2V (RMS)
Output Joint
Video-output,Audio-output,Chromatic
aberation output, S-video output,Optical fiber
output, Coaxial output, Scart output
Input Joint
USB, Multi-media card
Power supply
~230 V/ 50 Hz
Max. power
80 W
Frequency
20 Hz – 20 kHz, ±3 dB
S/N ratio for audio signal
>=80 dB, Weight A
Operation condition
Temperature: 5°C – 35°C
Installation: on the flat horizontal surface
Note: * Some MPEG 4 discs are in *. rm/ * . ra/ * . ram/ *.rmm etc format and are not supported by this
device. Please select carefully before purchase. The specification is for reference only, subject to change
without prior notice.
-22-
TROUBLESHOOTING
Please use the following methods to solve the following problems while using this unit.
Fault Phenomenon
Possible Cause
Handing
Power supply can not be
Power plug is not fully inserted into the
Insert the power plug into the
turned on
socket
socket securely
Battery is used up
Replace with a new battery
The remote control does not
The front end of the remote control is not
work
aimed at the infrared reception part of the
player
No video cables are connected or not
securely connected
No image on the TV screen
TV not set at video mode
The scanning mode of the device does
not match the TV scanning mode
No disk is placed into the guide slot
No disk is in
Play can not be realized
Please aim at the remote
control window
Perform
connection
according
to
system
connection diagram
Set the TV at the video mode
Press line by line/alternate
line key to convert scanning
mode
Place the disk into the guide
slot
Place in a disk
Be sure that the side with
Inverse placement of disk
pictures of the disk points
upwards
No sound from loudspeaker
Video cable not connected or not
Connect the cable as per the
connected securely
diagram
Wrong operations with external amplifier
sound
Invalid displayed on the TV
screen
Operation can not be done
of
cloth to clean the disk
and
distorted pictures
operations
amplifier
Use a piece of clean and soft
Disk not clean
Discontinuous
Correct
Disk scratched
Replace the disk with a new
Disk distorted
one
Please refer to the function
Wrong Operation
operation
description
for
more details
Embedded micro computer fails due to
Power OFF, and restart the
lightning, static or other interference
computer
-23-