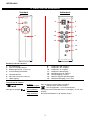
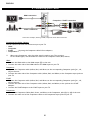
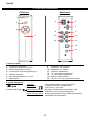
1
NEDERLANDS
Conceptronic CM3H
Gebruiksaanwijzing
Gefeliciteerd met uw nieuwe
Conceptronic Multi Media Player
In deze gebruiksaanwijzing vindt u stap-voor-stap instructies voor installatie en gebruik van de
Conceptronic Multi Media Player.
Bij problemen kunt u het beste naar onze support-site gaan (www.conceptronic.net - klik op ‘Support').
Daar vindt u een database met veel gestelde vragen (FAQ).
Als u een vraag over dit product heeft die niet op onze website wordt beantwoord, kunt u ons e-mailen op
[email protected].
Ga voor meer informatie over Conceptronic producten naar de Conceptronic website:
www.conceptronic.net.
Tip:
De firmware van de Conceptronic CM3H kan worden bijgewerkt. Om uw apparaat bij te werken
met de nieuwste firmware-versie gaat u naar de Conceptronic website.
Tip:
Ga naar www.conceptronic.net voor de nieuwste lijst met codecs voor de ondersteunde
bestandsindelingen.
1. Inhoud verpakking
U vindt de volgende items in de verpakking van de Conceptronic Multi Media Player:
•
•
•
•
•
•
•
•
•
Conceptronic CM3H Multi Media Player (in deze gebruiksaanwijzing aangeduid als ‘de speler').
Standaard voor CM3H.
Netvoeding (12 V, 2,5 A) met netsnoer.
Afstandsbediening.
2 batterijen (AAA) voor de afstandsbediening.
Composiet videokabel (met drie tulpstekkers: rood, wit en geel).
Scartadapter voor composiet videokabel.
USB-kabel.
Deze gebruiksaanwijzing.
1
NEDERLANDS
2. Eigenschappen
•
•
•
•
•
•
•
•
•
•
•
•
•
•
•
•
Meertalige bediening: Nederlands, Engels, Duits, Frans, Italiaans, Spaans, Portugees
Ondersteunt meer harddisk-partities.
Ondersteunt de bestandssystemen FAT32 en NTFS.
HDMI videouitgang tot 1080i.
Ondersteunt ondertitels (.SMI/.SRT/.SUB/.SSA) voor MPEG4 (AVI), resolutie D1.
Ondersteunt AVI (MPEG4), MPG (MPEG1, MPEG2), DAT (VCD), VOB (DVD), IFO (DVD), ISO, WAV, WMA, MP3,
JPG.
Ondersteunt diverse codecs. Zie onze website voor een lijst met alle ondersteunde codecs.
Uitgangen: HDMI/composiet video/component video/stereo geluidsuitgang met tulpstekkers/optische
geluidsuitgang.
Geschikt voor PAL/NTSC.
Diverse herhaalmethodes.
Screensaver.
14 overvloeimethodes voor foto's.
Diashow (automatische beeldwisseling) met achtergrondmuziek.
Instelbaar interval.
Functies voor zoomen en roteren.
Automatische omschakeling tussen mediaspeler en USB-opslagapparaat voor pc:
• Wanneer de speler met een pc verbonden is, gedraagt hij zich als USB-opslagapparaat.
• Wanneer hij niet met een pc verbonden is, gedraagt hij zich als mediaspeler.
NB:
De CM3H kan geen HD-films weergeven (720p, 1080i, 1080p).
3. Opmerkingen en voorzorgen
• Probeer de meegeleverde lichtnetadapter niet uit elkaar te halen. Dit kan leiden tot verwondingen door
elektriciteit met een hoge spanning. Als de adapter moet worden gerepareerd, neem dan contact op
met uw dealer of de helpdesk van Conceptronic.
• Houd de speler uit de buurt van te vochtige situaties.
• Stel de speler niet bloot aan vloeistoffen en voorkom dat hij wordt ondergedompeld.
• Verwijder de lichtnetadapter als u de speler langere tijd niet wilt gebruiken.
• Gebruik de speler niet in de buurt van brandbare stoffen.
• Vervang de batterij van de afstandsbediening door hetzelfde type wanneer hij leeg is. Lever oude
batterijen in voor hergebruik. Om corrosie te voorkomen, moet u de batterij verwijderen als de
afstandsbediening langere tijd niet gebruikt zal worden.
• Houd de afstandsbediening uit de buurt van te vochtige omstandigheden en laat hem niet vallen.
• Gebruik de afstandsbediening niet in fel zonlicht.
• Zorg dat de speler NOOIT valt of wordt gestoten of geschud.
• Om oververhitting te voorkomen, mag u de speler niet afdekken.
NB:
De gegevens op de interne harde schijf kunnen gefragmenteerd zijn. Dit kan invloed hebben op de
weergave van films. Het is een goed idee om de harde schijf af en toe te defragmenteren met uw
computer.
2
NEDERLANDS
4. Plaats van de onderdelen
Voorkant
Achterkant
1
5
2
6
7
3
4
8
9
10
11
12
13
14
15
Betekenis van de nummers:
1.
2.
3.
4.
Infraroodsensor
Aan/uit/standby-lampje
Bedieningstoetsen (zie hieronder)
Activiteitlampje harddisk
8.
9.
10.
11.
12.
13.
14.
15.
5. Hoofdschakelaar
6. Mini-USB-connector (naar pc)
7. HDMI-uitgang
Functie van de toetsen
Navigatietoetsen
( , , , )
Weergeven/stoppen ( / )
Component ‘Pb’ uitgang
Component ‘Pr’ uitgang
Component ‘Y’ uitgang
Composiet videouitgang
Geluidsuitgang ‘R’ (rechts)
Geluidsuitgang ‘L’(links)
Optische digitale geluidsuitgang
Gelijkstroomingang (12 V 2,5 A)
Door de menu's van de speler navigeren.
In menu:
Tijdens weergave:
,
Geluid harder/zachter zetten.
,
Snel terugspoelen / snel vooruitspoelen.
Kort indrukken:
Weergave van een bestand starten of stoppen, of een map
openen.
Lang indrukken:
De CM3H inschakelen of op standby zetten.
3
NEDERLANDS
5. Toetsen afstandsbediening
De speler kan worden bediend met de afstandsbediening. Op de binnenflap van deze gebruiksaanwijzing
vindt u een afbeelding van de afstandsbediening. De nummering van de toetsen verwijst naar de
onderstaande tabel, waarin de betreffende functies worden uitgelegd.
Nr.
Toets
Beschrijving
1
2
3
4
5
6
7
8
9
10
11
12.
13
14
15
16
17
18
19
20
21
22
23
24
25
26
27
28
29
30
31
32
33
34
35
36
37
38
POWER ( )
R/L
TOP
MUSIC (muziek)
FILE (bestand)
0–9
AUDIO (geluid)
SLIDE (dia)
SLOW (vertraagd)
A–B
REPEAT (herhalen)
VOLUME
VOLUME
BACK
, , ,
)
VORIG (
AFSPELEN/PAUZEREN
TERUGSPOELEN (
)
OUTPUT (uitvoer)
SETUP (instellen)
VOORUITSPOELEN (
)
STOP ( )
VOLGEND (
)
)
ENTER (
DISPLAY
PAGINA
PAGINA
MUTE (dempen)
ROTATE (roteren)
DELAY (wachttijd)
ZOOM
TRANS (overgang)
SUB-T
VIDEO
PHOTO (foto)
FUNC
P/N
MENU
39.
Aan/uitlampje
Omschakelen tussen mediaspeler- en standby-stand.
Geluidsuitvoer instellen (stereo, mono-L, mono-R).
Naar de bovenkant van de huidige bestandenlijst gaan.
Toets voor directe toegang tot de map ‘MUSIC’.
Bestandenbibliotheek tonen.
Numerieke keuzetoetsen 0-9.
Audiostream instellen of wijzigen (dvd-weergave).
Diashow met muziek of stapsgewijze videoweergave starten.
Vertraagde weergave.
Een ingesteld interval blijven herhalen.
Herhaalmethode of willekeurige volgorde kiezen.
Geluid harder zetten.
Geluid zachter zetten.
Terug naar vorige map.
Naar keuze in hoofdmenu of dvd-menu navigeren.
Terug naar vorig bestand of hoofdstuk.
Weergave van een bestand of dvd-map starten of pauzeren.
Terugspoelen met beeld tijdens weergave.
Video-uitgangsignaal instellen.
Naar instellingenmenu.
Vooruitspoelen met beeld tijdens weergave.
Weergave stoppen.
Verder naar volgend bestand of hoofdstuk.
Selectie bevestigen of weergave starten.
Weergaveinformatie tonen tijdens afspelen.
Naar de volgende pagina met bestanden.
Naar de vorige pagina met bestanden.
Geluid uit- of aanzetten.
Foto's draaien.
Interval voor diashow instellen (met of zonder achtergrondmuziek).
In- en uitzoomen (foto- en dvd-weergave).
Overgang voor diashow of equalizertype voor muziekweergave instellen.
Ondertitels instellen of wijzigen (mpeg4- en dvd-weergave).
Toets voor directe toegang tot de map ‘VIDEO’.
Toets voor directe toegang tot de map ‘PHOTO’.
Tijdens weergave naar een bepaald tijdstip in de film gaan.
Een tv-systeem selecteren (PAL / NTSC).
A.Apparatenlijst, partitielijst of bestandenbibliotheek tonen.
B.Terug naar dvd-menu (dvd-weergave).
Het aan/uitlampje knippert wanneer er op een toets wordt gedrukt.
4
NEDERLANDS
6. Uw CM3H aansluiten
HDMI aansluiting
Composiet + scart aansluiting
S/PDIF aansluiting
Aansluitvoorbeeld met HDMI, composiet en S/PDIF aansluiting.
Videokabel(s) aansluiten
U kunt de speler op vier manieren op uw tv aansluiten:
- HDMI
- Composiet
- SCART (met de composietkabel en de scartadapter)
- Component **
**
Bij gebruik van component gaat alleen het beeld naar uw tv of monitor. Voor het geluid moet u in dat
geval gebruik maken van de tulpaansluitingen van de composietkabel (rood en wit).
HDMI:
• Doe de HDMI-kabel in de HDMI-uitgang [7] van de speler.
• Doe de andere kant van de HDMI-kabel in de HDMI-ingang van uw tv.
Composiet:
• Doe de connectors van de composietkabel (geel, rood en wit) in de bijbehorende aansluitingen [11, 12,
13] van de speler.
• Doe de andere kant van de composietkabel (geel, rood en wit) in de composietingangen van uw tv.
SCART:
• Doe de connectors van de composietkabel (geel, rood en wit) in de bijbehorende composietaansluitingen
[11, 12, 13] van de speler.
• Doe de andere kant van de composietkabel (gele, rode en witte tulpstekker) in de connectors van de
scartadapter.
• Doe de scartadapter in de scartaansluiting van uw tv.
Component:
• Doe de connectors van de componentkabel (rood, groen en blauw) in de componentaansluitingen [8, 9,
10] van de speler.
• Doe de andere kant van de componentkabel in de componentingang van uw tv.
5
NEDERLANDS
Audiokabel(s) aansluiten
U kunt de speler op twee manieren op uw tv en/of home cinemasysteem aansluiten:
- Analoog, via de tulpaansluitingen van de speler.
- Digitaal, via de optische digitale S/PDIF uitgang van de speler.
Analoog:
• Doe de audio-connectors van de composietkabel (rood en wit) in de tulpaansluitingen [12, 13] van de
speler.
• Doe de andere kant van de composietkabel in de tulp-geluidsingangen (rood en wit) van uw tv of
versterker.
Digitaal:
• Doe de optische digitale kabel in de S/PDIF aansluiting [14] van de speler.
• Doe de andere kant van de optische digitale kabel in de optische digitale ingang van uw versterker.
Netvoeding aansluiten
Nadat u de speler heeft aangesloten op uw externe audio/video-aparatuur, kunt u hem op het lichtnet
aansluiten.
• Sluit de meegeleverde lichtnetadapter aan op de DC gelijkstroomingang [15] van de speler en op een
stopcontact.
• Zet de hoofdschakelaar aan de achterkant van de speler op ‘I’ om de speler aan te zetten.
De speler gaat aan.
Afstandsbediening voorbereiden
De afstandsbediening werkt op twee AAA-batterijen (meegeleverd).
Gebruik de afstandsbediening om de speler aan/uit te zetten.
NB:
-
De afstandsbediening werkt het best op een afstand tot ongeveer 5 meter.
Richt de afstandsbediening op de infraroodsensor op het frontpaneel van de speler.
De ontvangsthoek van de sensor is ±30 graden.
Vervang de batterijen (2x AAA) als ze zwak worden of leeg zijn.
6
NEDERLANDS
7. Basisgebruik CM3H
• Kies op de tv de ingang waarop de speler is aangesloten (HDMI, composiet, scart of component).
NB:
In de rest van deze gebruiksaanwijzing wordt ervanuit gegaan dat uw tv staat ingesteld op de
ingang waarop de speler is aangesloten. Alle beschreven stappen hebben betrekking op de
bediening van de speler.
• Kijk of de hoofdschakelaar aan de achterkant van de speler op ‘I’ staat.
• Zet de speler aan met de aan/uitknop aan de voorkant van de speler, of met de ‘Power’ toets (1) van de
afstandsbediening.
De speler gaat nu aan en het menu verschijnt op uw scherm.
NB:
Het uitgangsignaal van de speler staat standaard op composiet. Als er niets op uw scherm
verschijnt wanneer de speler wordt aangezet, kunt u op de ‘Output’ toets (19) van de
afstandsbediening drukken om tussen de verschillende uitgangen van de CM3H te wisselen (HDMI,
composiet, component).
NB:
De speler moet de harde schijf initialiseren nadat hij is aangezet. Dit kan enige tijd duren. Tijdens
deze initialisatie verschijnt de melding ‘LOADING...’ op uw scherm.
Als uw harde schijf is geformatteerd met 1 partitie verschijnt de ‘Bestandenbibliotheek’ op uw scherm
met de inhoud van uw harde schijf.
Als uw harde schijf is geformatteerd met meer dan één partitie verschijnt de ‘Partitielijst’ op uw scherm
met alle aanwezige partities. Maak uw keuze met de / toetsen (15) en druk op de ‘
/Enter’ (24)
toets om naar de ‘Bestandenbibliotheek’ te gaan, waar de inhoud van de geselecteerde partitie wordt
getoond.
[ Partitielijst ]
[ Bestandenbibliotheek ]
Andere partitie kiezen:
Als de harde schijf meer dan één partitie bevat, kunt u op de ‘Menu’ (38) toets van de afstandsbediening
drukken om naar de ‘Partitielijst’ terug te gaan en een andere partitie te kiezen.
7
NEDERLANDS
8. Mediaweergave
8.1 Uw films afspelen
De CM3H ondersteunt verschillende videoformaten, zoals MPEG1/2, MPEG 4 (inclusief XVID), VOB, IFO
(DVD) en ISO-weergave, met MP3, AC3, AAC of MPEG1/2 audiosporen en doorgifte van DTS via de SPDIFuitgang.
• Ga met de navigatietoetsen van de afstandsbediening naar het bestand dat u wilt afspelen.
• Druk op de ‘Enter’ (24) toets of de ‘Afspelen/pauzeren’ (17) toets van de afstandsbediening om het
geselecteerde bestand te starten.
Tijdens het afspelen kunt u met de afstandsbediening de volgende weergavefuncties gebruiken:
-
Afspelen/pauzeren (17)
Stop
(22)
Terugspoelen
(18)
Vooruitspoelen
(21)
Vorig
(16)
Volgend
(23)
Repeat (herhalen) (11)
-
Display
Func
A-B
Slow (langzaam)
Slide (diashow)
NB:
(25)
(36)
(10)
(9)
(8)
De weergave van het geselecteerde bestand starten of pauzeren.
De weergave stoppen.
Versnelde weergave achteruit.
Versnelde weergave.
Het voorgaande bestand in de huidige map starten.
Het volgende bestand in de huidige map starten.
Herhaalmethode of willekeurige volgorde instellen voor huidige
map/bestand.
Bestandsinfo tonen tijdens weergave.
Naar een bepaald tijdstip in uw film gaan.
Een geselecteerd deel van de film herhalen.
Vertraagde weergave.
Stap-voor-stap weergave.
De CM3H ondersteunt de meeste videocodecs (zoals XviD, AVI, MPEG2, etc.) maar het is mogelijk
dat u bestanden heeft waarvan de codec niet aanwezig is op de CM3H.
Als u een bestand met een niet ondersteunde codec probeert af te spelen, ziet u de melding
“CODEC NIET ONDERSTEUND”. In dat geval kunt u uw film wellicht opnieuw coderen met een
andere codec.
Weergave voortzetten
De CMH3 kan de weergave automatisch voortzetten. Als u de CM3H uitschakelt terwijl u een film, muziek of
een diashow weergeeft, gaat de CM3H automatisch verder met afspelen wanneer hij weer wordt aangezet.
Deze functie staat standaard aan, maar kan worden uitgezet in het instellingenmenu.
NB:
ISO en IFO (DVD) bestanden worden niet automatisch voortgezet.
Ondertitels weergeven
De Conceptronic CM3H ondersteunt .SMI, .SRT, .SUB en .SSA ondertitelbestanden.
Als het ondertitelbestand dezelfde naam heeft als het geselecteerde videobestand, (alleen de extensie na
de punt is anders) worden de ondertitels automatisch geladen wanneer het MPEG4-bestand wordt
afgespeeld, bijvoorbeeld:
Naam film:
Naam ondertitelbestand:
Mijn_film_met_ondertitels.AVI
Mijn_film_met_ondertitels.SRT
Wanneer het ondertitelbestand een andere naam heeft, moet u het ondertitelbestand handmatig
selecteren. Selecteer het ondertitelbestand en druk op de ‘Sub-t’ (33) toets van de afstandsbediening om
het ondertitelbestand te laden. Selecteer het filmbestand en druk op de ‘
/Enter’ (24) toets om de
film af te spelen.
8
NEDERLANDS
NB:
Als er een ondertitelbestand aanwezig is met dezelfde naam als het videobestand, en u een ander
ondertitelbestand probeert te selecteren, gebruikt de CM3H toch het bestand met dezelfde naam
in plaats van het geselecteerde bestand.
Dvd weergeven
Wanneer de CM3H dvd-bestanden van de harde schijf afspeelt, werkt hij hetzelfde als een dvd-speler. U
kunt door het dvd-menu navigeren, ondertitels kiezen en geluidssporen instellen.
NB:
De CM3H ondersteunt uitsluitend de weergave van niet beveiligde dvd-bestanden. CSS beveiliging
wordt niet ondersteund door de CM3H.
NB:
De CM3H ondersteunt alleen de bestanden van dvd's met regiocode 2 en regiocodevrije dvd's.
• Sluit de CM3H op uw computer aan. Zie hoofdstuk ‘10. Op computer aansluiten via USB’.
• Maak een map met de naam van uw dvd op de harde schijf van de CM3H (voorbeeld: ‘Film1').
• Kopieer de mappen ‘AUDIO_TS’ en ‘VIDEO_TS’ (met alle bestanden) van uw dvd naar de zojuist
gemaakte map (voorbeeld: ‘Film1’) op de CM3H.
Na het kopiëren moet de mapstructuur er als volgt uitzien:
- [harddisk van CM3H]
|-> Film1
|-> AUDIO_TS
|-> VIDEO_TS
(optioneel, staat niet op iedere dvd)
(met alle dvd-bestanden de hierin staan)
• Verbreek de verbinding tussen de CM3H en uw computer en sluit de speler op uw tv aan. Zet de CM3H
aan.
• Selecteer de map van de dvd die u wilt weergeven met de ‘ , , , ’ toetsen (15) van de
afstandsbediening.
• Druk op de ‘Afspelen/pauzeren’ (17) toets van de afstandsbediening om de geselecteerde dvd te
starten.
NB:
Druk niet op de ‘Enter’ (24) toets om de weergave te starten. Dan worden alleen de
bestanden/submappen getoond en wordt de dvd niet gestart.
Tijdens dvd-weergave kunt u met de afstandsbediening de volgende weergavefuncties gebruiken:
-
Afspelen/pauzeren (17)
Stop
(22)
Navigatietoetsen (15)
Enter
(24)
Terugspoelen
(18)
Vooruitspoelen
(21)
Vorig
(16)
Volgend
(23)
Sub-t
(33)
Audio
(7)
-
Zoom
Herhalen
A-B
Display
Func
Menu
(31)
(11)
(10)
(25)
(36)
(38)
De weergave van de geselecteerde dvd-map starten of pauzeren.
Dvd-weergave stoppen en teruggaan naar de filmlijst.
Door het dvd-menu navigeren.
Keuze bevestigen in dvd-menu.
Terugspoelen met beeld.
Vooruitspoelen met beeld.
Vorig hoofdstuk.
Volgend hoofdstuk.
Ondertitels van de dvd uitzetten of andere ondertitels kiezen.
Geluidsspoor van de dvd wijzigen (als de dvd meer geluidssporen/talen
bevat).
Film in/uitzoomen tijdens weergave.
De herhaalmethode voor het huidige hoofdstuk instellen.
Een geselecteerd deel van de film herhalen.
Bestandsinfo tonen tijdens weergave.
Naar een bepaald tijdstip in uw film gaan.
Terug naar dvd-menu.
9
NEDERLANDS
Tip: U kunt ook dvd's afspelen die in het ISO-formaat zijn vastgelegd. De weergavefuncties voor dvd's in
ISO-formaat zijn hetzelfde als hierboven vermeld voor dvd-bestanden.
Toets voor directe toegang tot uw videomap.
U kunt 1 videomap maken die rechtstreeks kan worden geopend met de ‘Video’ (34) toets van de
afstandsbediening. Maak in de hoofdmap van de harde schijf een map met de naam ‘VIDEO xx’ (gebruik in
plaats van ‘xx’ een aanduiding naar keus) en zet uw videobestanden in deze map. Wanneer de mediaspeler
wordt aangezet en op de ‘Video’ (34) toets wordt gedrukt, opent de speler automatisch deze map.
NB:
Als u meer dan 1 map maakt waarvan de naam met ‘VIDEO’ begint, opent de speler alleen de
eerste map.
Sommige MPEG2/VOB-bestanden bevatten twee of meer audiostreams. Met de ‘Audio’ (7) toets van de
afstandsbediening loopt u door de audiostreams. Als u een videobestand afspeelt maar geen geluid hoort,
kunt u met de ‘Audio’ (7) toets de gewenste audiostream selecteren.
Als u naar een volgend MPEG2/VOB bestand gaat, kunt u het geluid kwijtraken als dit niet de standaard
audiostream van het bestand is. Om dit te voorkomen, drukt u tijdens het afspelen van het eerste bestand
op de ‘Setup’ (20) toets om de huidige audiostream te vergrendelen. Hiermee zet u de geselecteerde
audiostream vast voor alle bestanden die u afspeelt.
8.2 Uw muziek afspelen
De Conceptronic CM3H heeft verschillende mogelijkheden voor het afspelen van muziek (WAV, MP3 en WMA
worden ondersteund).
• Ga met de navigatietoetsen van de afstandsbediening naar het bestand dat u wilt afspelen.
• Druk op de ‘Enter’ (24) toets of de ‘Afspelen/pauzeren’ (17) toets van de afstandsbediening om het
geselecteerde bestand te starten.
Tijdens het afspelen kunt u met de afstandsbediening de volgende weergavefuncties gebruiken:
-
Afspelen/pauzeren (17)
Stop
(22)
Terugspoelen
(18)
Vooruitspoelen
(21)
Vorig
(16)
Volgend
(23)
Herhalen
(11)
- Trans
(32)
De weergave van het geselecteerde bestand starten of pauzeren.
De weergave stoppen.
Versnelde weergave achteruit.
Versnelde weergave.
Het voorgaande bestand in de huidige map starten.
Het volgende bestand in de huidige map starten.
Herhaalmethode of willekeurige volgorde voor huidige map/bestand
instellen.
Het type equalizer selecteren.
Weergave voortzetten
De CMH3 kan de weergave automatisch voortzetten. Als u de CM3H uitschakelt terwijl u een film, muziek of
een diashow weergeeft, gaat de CM3H automatisch verder met afspelen wanneer hij weer wordt aangezet.
Deze functie staat standaard aan maar kan worden uitgezet in het instellingenmenu.
Toets voor directe toegang tot uw muziekmap
U kunt 1 muziekmap maken die rechtstreeks kan worden geopend met de ‘Music’ (4) toets van de
afstandsbediening. Maak in de hoofdmap van de harde schijf een map met de naam ‘MUSIC xx’ (gebruik in
plaats van ‘xx’ een aanduiding naar keus) en zet uw muziekbestanden in deze map. Wanneer de
mediaspeler wordt aangezet en op de ‘Music’ (4) toets wordt gedrukt, opent de speler automatisch deze
map.
NB:
Als u meer dan 1 map maakt waarvan de naam met ‘MUSIC’ begint, opent de speler alleen de
eerste map.
10
NEDERLANDS
8.3 Uw foto's en afbeeldingen afspelen
Met de CM3H kunt u uw foto's en afbeeldingen bekijken; deze kunnen worden opgeslagen op de harde schijf
van de speler.
• Ga met de navigatietoetsen van de afstandsbediening naar het bestand dat u wilt afspelen.
• Druk op de ‘Enter’ (24) toets of de ‘Afspelen/pauzeren’ (17) toets van de afstandsbediening om het
geselecteerde bestand te starten.
Tijdens het afspelen kunt u met de afstandsbediening de volgende weergavefuncties gebruiken:
- Afspelen/pauzeren (17)
- Stop
(22)
- Navigatietoetsen (11)
- Vorig
- Volgend
- Herhalen
-
Delay (interval)
Trans
Rotate (roteren)
Zoom
(16)
(23)
(11)
(30)
(32)
(29)
(31)
De diashow starten vanaf het geselecteerde bestand, of pauzeren.
De diashow stoppen.
, : De getoonde foto spiegelen.
,
: De getoonde foto draaien.
Het voorgaande bestand in de huidige map starten.
Het volgende bestand in de huidige map starten.
Herhaalmethode of willekeurige volgorde voor huidige map/bestand
instellen.
Wachttijd per foto instellen voor diashow.
De overgang tussen opeenvolgende foto's instellen.
De huidige foto draaien.
De huidige foto in/uitzoomen.
Weergave voortzetten
De CMH3 kan de weergave automatisch voortzetten. Als u de CM3H uitschakelt terwijl u een film, muziek of
een diashow weergeeft, gaat de CM3H automatisch verder met afspelen wanneer hij weer wordt aangezet.
Deze functie staat standaard aan, maar kan worden uitgezet in het instellingenmenu.
Diashow met muziek (foto's automatisch tonen, met achtergrondmuziek)
Selecteer een foto en druk op de ‘Slide’ (8) toets om de diashow met muziek te starten.
Als u niet op de ‘Slide’ (8) toets drukt, wordt er geen muziek weergegeven en wordt een normale diashow
gestart. Als de map geen muziek bevat, is een diashow met muziek niet mogelijk. U moet op de
‘
/Enter’ (24) toets drukken voor een diashow zonder geluid.
NB:
In deze stand zijn de zoom- en roteerfuncties niet beschikbaar.
U kunt de diashow pauzeren door de ‘Afspelen/pauzeren’ (17) toets een keer in te drukken (de muziek
blijft gewoon doorgaan). Druk opnieuw op de ‘Afspelen/pauzeren’ (17) toets om ook de muziek te
stoppen. Druk opnieuw op de ‘Afspelen/pauzeren’ (17) toets om de diashow met muziek voort te zetten.
Toets voor directe toegang tot uw fotomap
U kunt 1 fotomap maken die rechtstreeks kan worden geopend met de ‘Photo’ (35) toets van de
afstandsbediening. Maak in de hoofdmap van de harde schijf een map met de naam ‘PHOTO xx’ (gebruik in
plaats van ‘xx’ een aanduiding naar keus) en zet uw fotobestanden in deze map. Wanneer de mediaspeler
wordt aangezet en op de ‘Photo’ (35) toets wordt gedrukt, opent de speler automatisch deze map.
NB:
Als u meer dan 1 map maakt waarvan de naam met ‘PHOTO’ begint, opent de speler alleen de
eerste map.
11
NEDERLANDS
9. Systeem configureren
Als u op de ‘Setup’ (20) toets van uw afstandsbediening drukt, wordt het instellingenmenu van de speler
geopend.
Druk op de / / / toetsen om uw keuze te maken in het instellingenmenu en druk op de
/ ENTER
toets om uw keuze te bevestigen. Wanneer u klaar bent met de instellingen van de speler drukt u opnieuw
op de Setup toets om het menu te sluiten, of selecteert u de keuze ‘Exit Setup’ (Einde instellen) in het
instellingenmenu.
Het instellingenmenu bevat de volgende pagina's:
•
•
•
•
•
Pagina met algemene instellingen
Pagina met audio-instellingen
Pagina met video-instellingen
Pagina met diashow-instellingen
Einde instellen
Pagina met algemene instellingen:
OSD-taal
: Taal instellen voor de teksten op het scherm.
Screensaver
: Screensaver aan- of uitzetten.
Weergave voortzetten : Functie voor automatisch voortzetten in/uitschakelen.
Standaardinstellingen : De speler terugzetten op de standaard fabrieksinstellingen.
Autostart
: Automatisch alle mediabestanden op de CM3H afspelen als hij wordt aangezet.
Pagina met audio-instellingen:
Downmix
: De downmixstand instellen voor geluid met meer kanalen.
SPDIF-uitgang
: Uitvoer op SPDIF zetten.
LPCM-uitgang
: Uitvoer op LPCM zetten.
Pagina met video-instellingen:
TV-scherm
: Instellingen tv-weergave aanpassen.
TV-systeem
: Een videosysteem voor uw tv selecteren.
Video-uitgang
: De te gebruiken video-uitgang selecteren.
Pagina met diashow-instellingen:
Interval
: Instellen hoe lang iedere foto zichtbaar blijft.
Overgang
: Standaardtype instellen voor de overgang tussen de foto's.
12
NEDERLANDS
10. Op computer aansluiten via USB
De speler kan op uw computer worden aangesloten om gegevens van en naar de interne harde schijf van de
speler te kopiëren (films, muziek, foto's, documenten, etc.).
NB:
In het onderstaande voorbeeld wordt uitgegaan van een computer met Windows XP, maar de speler
kan worden verbonden met alle computers met USB-aansluiting die apparaten met het FAT32
bestandssysteem kunnen lezen en schrijven.
Speler op uw computer aansluiten
• Sluit de meegeleverde USB/mini-USB-kabel aan op de achterzijde van de speler en een vrije USB-poort
van uw computer.
• Zet de speler aan met de hoofdschakelaar aan de achterkant van de speler. Uw computer herkent de
speler en installeert deze automatisch, waarna hij als een verwisselbare harde schijf wordt aangegeven
op de computer.
De interne harde schijf van de speler wordt standaard als USB-opslagapparaat geïnitialiseerd.
Speler loskoppelen van uw computer
•
•
•
•
Klik op het pictogram ‘Veilig verwijderen’ in de systeembalk.
Selecteer ‘USB-massaopslagapparaat veilig verwijderen’ in de lijst die wordt getoond.
Wacht op de melding ‘U kunt de hardware nu veilig verwijderen’.
Verwijder de USB-kabel.
13
NEDERLANDS
11. Problemen oplossen en tips
Wanneer uw CM3H niet goed werkt, kunt u het probleem wellicht oplossen met de volgende tips:
Het aan/uitlampje gaat niet aan:
• De netvoeding is niet op de CM3H aangesloten. Sluit de netvoeding aan op de CM3H.
Er gebeurt niets op het scherm:
• De CM3H staat in de standby-stand. Druk op de ‘ ’ (1) toets van de afstandsbediening om de speler te
activeren.
• Verkeerde ingang geselecteerd op de tv. Kies een andere ingang op de tv.
• Verkeerd tv-systeem ingesteld. Druk op de ‘Output’ (19) toets van de afstandsbediening om naar het
gewenste uitgangssignaal te gaan.
• De videokabel is niet goed aangesloten. Kijk of de videokabel goed is aangesloten.
Wanneer de speler wordt aangezet, hoor ik een ‘bling’ geluid maar zie ik geen menu:
• Verkeerd tv-systeem ingesteld. Druk op de ‘Output’ (19) toets van de afstandsbediening om naar het
gewenste uitgangssignaal te gaan.
• De videokabel is niet goed aangesloten. Kijk of de videokabel goed is aangesloten.
• De audio-uitgang van de CM3H is op de versterker aangesloten, maar de tv staat niet op de juiste ingang
ingesteld. Selecteer op uw tv de juiste ingang.
Er is geen geluid:
• De audiokabel is niet goed aangesloten. Zorg ervoor dat de geluidskabel goed is aangesloten op uw tv of
versterker.
• De CM3H is aangesloten op een versterker, maar de versterker staat uit. Zet de versterker aan.
• De audiostream van het MPEG2- of VOB-bestand is niet geldig. Druk op de ‘Audio’ (7) toets van de
afstandsbediening om de juiste audiostream te kiezen.
• Het geluid staat uit (functie Dempen ingeschakeld). Druk opnieuw op de ‘Mute’ (28) toets van de
afstandsbediening om het geluid weer aan te zetten.
• De CM3H spoelt snel vooruit of achteruit. Druk opnieuw op de ‘Enter’ (24) toets van de
afstandsbediening om naar de normale weergavesnelheid te gaan.
Beeldstoringen:
• De CM3H spoelt snel vooruit of achteruit. Druk opnieuw op de ‘Enter’ (24) toets van de
afstandsbediening om naar de normale weergavesnelheid te gaan.
• Er wordt een PAL film weergegeven in de NTSC-stand of andersom. Druk op de ‘P/N’ (37) toets van de
afstandsbediening om van tv-systeem te wisselen.
Wanneer op de ‘Slide’ toets wordt gedrukt, loopt het systeem vast:
• De huidige map bevat teveel foto- of muziekbestanden. Het duurt daardoor lang voordat de diashow met
muziek wordt gestart. Wacht tot de weergave wordt gestart.
De afstandsbediening werkt niet:
• Richt de afstandsbediening recht op de infraroodsensor van de CM3H, onder een hoek van hoogstens ±30
graden.
• Gebruik de afstandsbediening op een afstand van maximaal 5 meter.
• De batterijen (2x AAA) van de afstandsbediening zijn leeg en moeten worden vervangen.
De ondertitels van de film die wordt afgespeeld, worden niet weergegeven:
• Er wordt een AVI-bestand afgespeeld maar het ondertitelbestand heeft een andere bestandsnaam. Zie
hoofdstuk 8.1 voor het weergeven van ondertitels.
• Het ondertitelbestand wordt niet ondersteund door de CM3H.
Wanneer een videobestand wordt gestart, verschijnt de melding “CODEC NIET ONDERSTEUND":
• Het videobestand is gemaakt met een codec die niet door de CM3H wordt ondersteund.
Ga naar www.conceptronic.net voor een lijst met codecs die door de CM3H worden ondersteund.
14
NEDERLANDS
De CM3H laat niet alle partities/inhoud van de harde schijf zien:
• De partitie op de harde schijf is niet primair. Partitioneer de harde schijf opnieuw en zorg ervoor dat
alle partities op "primair" staan (let op: alle bestanden op de schijf gaan hierbij verloren).
• De harde schijf is geformatteerd met een bestandssysteem dat niet wordt ondersteund door de CM3H.
Formatteer de harde schijf opnieuw met het FAT32 of NTFS bestandssysteem (let op: alle bestanden op
de schijf gaan hierbij verloren).
• De geselecteerde partitie bevat geen mediabestanden.
De dvd/ISO-weergave start niet als op de toets Afspelen/pauzeren wordt gedrukt:
• Zorg ervoor dat de mappen op de harde schijf de juiste structuur hebben. De mapstructuur wordt
beschreven in hoofdstuk 8.1.
• De dvd-bestanden zijn onvolledig of beschadigd. In dat geval start de CM3H de dvd-weergave niet.
Geen beeld tijdens de inleidende hoofdstukken van een DVD:
• Het huidige hoofdstuk eindigt met een leeg scherm of het is te kort om te kunnen worden weergegeven.
Druk op de ‘Volgend’ (23) toets om naar het volgende hoofdstuk te gaan.
Zwart/witbeeld op tv in plaats van kleur:
• Uw tv is niet geschikt voor de "Multi" stand van de CM3H voor het tv-systeem. Ga naar het
instellingenmenu en zet het tv-systeem op PAL (zie hoofdstuk 9). Nadat u het tv-systeem heeft
gewijzigd, moet u de CM3H uitzetten en vervolgens weer aanzetten.
15
ENGLISH
Conceptronic CM3H
User Manual
Congratulations on the purchase of your
Conceptronic Multi Media Player.
This User Manual gives you a step-by-step explanation how to install and use the Conceptronic Multi Media
Player.
When problems occur, we advise you to go to our support-site (go to www.conceptronic.net and click
‘Support’). Here you will find the Frequently Asked Questions Database.
When you have other questions about your product and you cannot find it at our website, contact us by email: [email protected]
For more information about Conceptronic products, please visit the Conceptronic Web Site:
www.conceptronic.net
Tip :
The Conceptronic CM3H is firmware upgradable. To upgrade your unit with the latest firmware
version, you can visit the Conceptronic Web Site.
Tip :
Please check www.conceptronic.net for the latest codec list of supported files.
1. Package Contents
The following items should be present in the package of the Conceptronic Multi Media Player:
•
•
•
•
•
•
•
•
•
Conceptronic CM3H Multi Media Player (described as ‘unit’ in the manual).
Product Stand for CM3H.
Power Supply (12V, 2.5A) with power cord.
Remote Control.
2 batteries (AAA) for the remote control.
Composite Video Cable (Red, White, Yellow RCA Jacks).
SCART Adapter for Composite Video Cable.
USB Cable.
This User Manual.
16
ENGLISH
2. Product Features
•
•
•
•
•
•
•
•
•
•
•
•
•
•
•
•
Multi-language user interface: English, Dutch, Spanish, French, Italian, German, Portuguese
Supports multiple hard disk partitions.
Support for FAT32 and NTFS file system.
HDMI Video output up to 1080i.
Supports text subtitle (.SMI/.SRT/.SUB/.SSA) for MPEG4 (AVI), D1 resolution.
Supports AVI (MPEG4), MPG (MPEG1, MPEG2), DAT (VCD), VOB (DVD), IFO (DVD), ISO, WAV, WMA, MP3,
JPG.
Various Codecs supported. Check our website for a full list of supported Codecs.
Outputs: HDMI / Composite video / Component video / RCA stereo audio / Optical audio.
Compliant with PAL/NTSC.
Various repeat modes.
Screen Saver.
14 transition modes for photos.
Slide show (slide photo playback) with background music.
Changeable display interval.
Zoom and rotation functions.
Auto switch between PC-USB and Media Player Mode:
• When connected to the PC, the unit acts as an USB Storage Device.
• When not connected to the PC, the unit acts as a Media Player.
Note : The CM3H is not capable in playing HD movies (720p, 1080i, 1080p).
3. Notes & Cautions
• Do not attempt to disassemble the included power adapter. This may cause high-voltage injuries. If the
adapter needs to be fixed, please contact your dealer or the helpdesk of Conceptronic.
• Keep the unit away from excessive moisture.
• Do not immerse or expose the unit to liquids.
• Disconnect the power adapter if you do not intend to use the unit for an extended period of time.
• Avoid using the unit in a location near combustibles.
• Change the battery of the remote control with the same kind when it is weak or dead. Recycle old
batteries where possible. To avoid corrosion, remove the battery when the remote will not be used for a
long time.
• Keep the remote away from excessive moisture; do not drop it.
• Do not operate the remote under intense sunlight.
• NEVER drop, shake or bump the unit.
• To prevent overheating, do not cover the unit.
Note : The data on the internal hard disk can be fragmented. This can affect the playback of movies. It is
recommended that you defragment the hard disk on your computer once in a while.
17
ENGLISH
4. Product Overview
Front View
Rear view
1
5
2
6
7
3
4
8
9
10
11
12
13
14
15
Description of the numbers:
1.
2.
3.
4.
Infrared Receiver
Power / Standby LED
Operation Buttons (see below)
hard disk Activity LED
8.
9.
10.
11.
12.
13.
14.
15.
5. Main Power Switch
6. Mini-USB Jack (To PC)
7. HDMI Output
Button Explanation
Navigation buttons
( , , , )
Play/stop button ( / )
Component ‘Pb’ Output
Component ‘Pr’ Output
Component ‘Y’ Output
Composite Video Output
Audio ‘R’(right) Output
Audio ‘L’(left) Output
Digital Optical Output
DC Input (12V, 2.5A)
Navigate through the menus of the unit.
In menu:
During playback: ,
Increase / decrease volume.
,
Fast rewind / fast forward.
Short press:
Start or stop the playback of a file, or to open a folder.
Long press:
Turn the CM3H on or set the CM3H to standby mode.
18
ENGLISH
5. Remote Control Explanation
The remote control is used to control the unit. On the inside cover of this manual you will find a picture of
the remote control. The numbers of the buttons correspond with the table below, to explain each function
of the remote control.
Nr
Button
Description
1
2
3
4
5
6
7
8
9
10
11
12
13
14
15
16
17
18
19
20
21
22
23
24
25
26
27
28
29
30
31
32
POWER ( )
R/L
TOP
MUSIC
FILE
0–9
AUDIO
SLIDE
SLOW
A–B
REPEAT
VOLUME
VOLUME
BACK
, , ,
)
PREVIOUS (
PLAY/PAUSE
REWIND (
)
OUTPUT
SETUP
FAST FORWARD (
STOP ( )
NEXT (
)
)
ENTER (
DISPLAY
PAGE
PAGE
MUTE
ROTATE
DELAY
ZOOM
TRANS
33
34
35
36
37
38
SUB-T
VIDEO
PHOTO
FUNC
P/N
MENU
39
Power LED
Switch between Media Player Mode or Standby Mode
Change the audio output (Stereo, Mono-L, Mono-R).
Go to the top of the current file list.
Direct access button to the ‘MUSIC’ folder.
Show the ‘File Library’.
Numeric selection keys 0-9.
Select or change the audio stream (DVD Playback).
Start a Music-slide-show mode or start video step-play.
Play back slowly.
Play a selected interval repeatedly.
Select a repeat / shuffle mode.
Increase the volume.
Decrease the volume.
Back to the previous folder.
Move the selection in the main menu or DVD menu.
Switch to previous file or chapter.
Start the playback of a file or DVD-Folder or pause a playback.
Fast Rewind during playback.
Select the Video Output Signal.
Open the Setup menu.
Fast forward during playback.
Stop playback.
Switch to next file or chapter.
Confirm selection or start playback.
Show playback information during playback.
Show the next page with files.
Show the previous page with files.
Mute or cancel mute.
Rotate photos.
Select the slide show (include music-slide-show) interval time.
Zoom in or out (Photos & DVD Playback).
Select a mode of transition during a slideshow or a type of music
equalizer during music playback.
Select or change movie Subtitle (MPEG4 & DVD Playback).
Direct access button to the ‘VIDEO’ folder.
Direct access button to the ‘PHOTO’ folder.
Jump to a specific playback time during movie playback.
Select a video system. (PAL / NTSC)
A. Show the ‘Partition List’ or ‘File List’
B. Return to the DVD Menu (DVD Playback).
The Power LED will blink when a button is pressed.
)
19
ENGLISH
6. Connecting your CM3H
HDMI connection
Composite + SCART connection
S/PDIF connection
Connection example, showing a HDMI, Composite and S/PDIF connection.
Connecting the Video Cable(s)
You can connect the unit in 4 different ways to your TV:
- HDMI
- Composite
- SCART
(by using the Composite cable & Scart adapter)
- Component **
**
When using Component, only the video signal is send to your TV or monitor.
For the audio signal, use the Audio RCA Jacks on the Composite cable (Red, White).
HDMI:
• Connect the HDMI cable to the HDMI output [7] on the unit.
• Connect the other side of the HDMI cable to the HDMI input on your TV.
Composite:
• Connect the Composite cable (Yellow, Red, and White) to the corresponding Composite jacks [11 , 12 ,
13] on the unit.
• Connect the other side of the Composite cable (Yellow, Red, and White) to the Composite input jacks on
your TV.
SCART:
• Connect the Composite cable (Yellow, Red, and White) to the corresponding Composite jacks [11 , 12 ,
13] on the unit.
• Connect the other side of the Composite cable (Yellow, Red, and White) to the jacks on the SCART
Adapter.
• Connect the SCART Adapter to the SCART input on your TV.
Component:
• Connect the Component Cable (Red, Green, and Blue) to the Component jacks [8, 9, 10] of the unit.
• Connect the other end of the Component cable to the Component input jacks on your TV.
20
ENGLISH
Connecting the Audio Cable(s)
You can connect the unit to your TV and/or your home cinema system in 2 different ways:
- Analog, through the RCA Audio Jacks of the unit.
- Digital, Through the Optical Digital S/PDIF output of the unit.
Analog:
• Connect the Audio jacks (Red, White) of the Composite cable to the RCA audio jacks [12 , 13] of the
unit.
• Connect the other end of the Composite cable to the RCA audio jacks of your TV or amplifier.
Digital:
• Connect the Digital optical cable to the S/PDIF output [14] of the unit.
• Connect the other end of the Digital optical cable to the Digital optical input of your amplifier.
Connecting the Power Supply
When the unit is connected to your Audio/Video equipment, you can connect the power supply to the unit.
• Connect the included power supply to the DC input [15] of the unit and to a free wall socket.
• Set the main power switch on the back of the unit to ‘I’ to power on the unit.
The unit will now turn on.
Preparing the Remote Control
The remote control is using 2x AAA batteries (provided with the package).
You need to use the remote control to turn on/off the unit.
Notes:
-
The best operational range of the remote control is about 5 meters.
Point the remote control to the IR receiver which is embedded in the front panel of the unit.
The receiving angle of the IR receiver is ±30 degrees.
Change the batteries (2x AAA) when they are weak or empty.
21
ENGLISH
7. Basic CM3H operation
• Select the correct input channel on your TV where the unit is connected to. (HDMI, Composite, SCART or
Component).
Note:
From this point, the manual is based on the fact that your TV is set to the input channel of the
unit. All steps described are related to the operation of the unit.
• Check if the main power switch on the back of the unit is set to ‘I’.
• Turn on the unit with the Play/Stop button on the front of the unit, or with the ‘Power’ button (1) on
the remote control.
The unit will turn on and display the menu on your screen.
Note:
The default output signal of the unit is Composite Video. If the unit is turned on and nothing is
shown on your screen, you can press the ‘Output’ button (19) on the remote control to switch
between the various outputs of the CM3H (HDMI, Composite, Component).
Note:
The unit needs to initialize the hard disk when it is turned on. This can take a little while. During
initializing, the message ‘LOADING...’ is shown on your screen.
When the hard disk is formatted with 1 partition, it will show the ‘File List’ on your screen, displaying the
contents of your hard disk.
When the hard disk is formatted with multiple partitions, the unit will show the ‘Partition List’ on your
screen with all the present partitions. Use / buttons (15) to move the selection, and press the
/Enter’ (24) button to go to the ‘File List’, showing the contents of the selected partition.
‘
[ Parition List ]
[ File List ]
Change the partition:
When the hard disk is formatted with multiple partitions, you can press the ‘Menu’ (38) button on the
remote control to go to back to the ‘Partition List’ and select a different partition.
22
ENGLISH
8. Media Playback options
8.1 Playback of your movies
The CM3H is supporting various video formats, like MPEG1/2, MPEG 4 (including XVID), VOB, IFO (DVD) and
ISO playback, including support for playing MP3, AC3, AAC and MPEG1/2 audio tracks within video and DTS
passthrough via the SPDIF output.
• Select the file you would like to play with the navigation buttons on the remote control.
• Press the ‘Enter’ (24) button or the ‘Play/Pause’ (17) button on the remote control to start the
playback of the selected file.
During playback, you can use the following playback options on the remote control:
Note:
Play/Pause
Stop
Rewind
Fast Forward
Previous
Next
Repeat
Display
Func
A-B
Slow
Slide
(17)
(22)
(18)
(21)
(16)
(23)
(11)
(25)
(36)
(10)
(9)
(8)
Play the selected file or pause the playback.
Stop the playback.
Rewind the playback.
Fast Forward the playback.
Play the previous file in the current folder.
Play the next file in the current folder.
Change the repeat / shuffle option of the current file/folder.
Display the playback details.
Jump to a specific time in your movie.
Repeat a selected part of the movie.
Slowmotion playback.
Step-play playback.
Most Video Codecs are supported on the CM3H (Like XviD, AVI, MPEG2, etc.) but it is possible that
you have files that require a Codec, which is not included with the CM3H.
If you try to playback a file with an unsupported Codec, you will see the message “CODEC NOT
SUPPORTED”. When this happens, we suggest you to use a different codec for your movie.
Playback resume functionality
The CM3H has a playback resume functionality. If you turn off the CM3H during the playback of your
movies, music or photo slideshow, the CM3H will continue the playback when it is turned on again.
This feature is enabled by default and can be turned off in the Setup Menu.
Note:
The resume function of ISO and IFO (DVD) files is not supported.
Subtitle Playback functionality
The Conceptronic CM3H can support .SMI, .SRT, .SUB or .SSA subtitle files.
If the subtitle file has the same name as the selected video file (only extension is different) the subtitle
file will be loaded automatically when the MPEG4 file is played, for example:
Movie name:
Subtitle name:
My_Movie_With_Sub.AVI
My_Movie_With_Sub.SRT
When the subtitle file has a different name then you need to select the subtitle file manually. Select the
subtitle file and press the ‘Sub-t’ (33) button on the remote control to select the subtitle. Select the
/Enter’ (24) button to play the movie.
movie and press the ‘
Note:
If there is a subtitle file available with the same name as the movie, and you try to select another
subtitle file, the CM3H will force the use of the subtitle file with the same name, instead of the
selected.
23
ENGLISH
DVD Playback functionality
The CM3H plays DVD’s from the hard disk as if they are a normal DVD. You can navigate through the DVD
Menu, choose subtitles or change audio languages.
Note:
The CM3H only supports the playback of unprotected DVD copies. CSS protection is not supported
by the CM3H.
Note:
The CM3H only supports Region 2 or Region free DVD copies.
• Connect the CM3H to your computer. See chapter ‘10. Computer USB Connectivity’.
• Create a folder on the CM3H hard disk with the name of your DVD movie (for example: 'Movie1').
• Copy the 'AUDIO_TS' and 'VIDEO_TS' (including content) from your DVD to the created folder (for
example: ‘Movie1’) on the CM3H.
After copying, the structure should be:
- [hard disk OF CM3H]
|-> Movie1
|-> AUDIO_TS
|-> VIDEO_TS
(optional, not available for every DVD)
(with all the DVD files inside)
• Disconnect the CM3H from your computer and connect it to your TV. Turn on the CM3H.
• Select the DVD you want to play with the ‘ , , , ’ buttons (15) on the remote control.
• Press the ‘Play/Pause’ (17) button on the remote control to start the playback of the selected DVD.
Note:
Do not use the ‘Enter’ (24) button to start. This will only show the files/subfolders and does not
start DVD Playback.
During DVD playback, you can use the following playback options on the remote control:
-
Play/Pause
Stop
Navigation keys
Enter
Rewind
Fast Forward
Previous
Next
Sub-t
Audio
(17)
(22)
(15)
(24)
(18)
(21)
(16)
(23)
(33)
(7)
-
Zoom
Repeat
A-B
Display
Func
Menu
(31)
(11)
(10)
(25)
(36)
(38)
Play the selected DVD folder or pause the playback.
Stop the playback of the DVD and return to the Movie browser.
Navigate through the DVD Menu.
Confirm DVD Menu selection(s).
Fast Rewind.
Fast Forward.
Previous Chapter.
Next Chapter.
Change or turn off the subtitle of the DVD.
Change the audio track of the DVD (when the DVD contains multiple
audio tracks).
Zoom on the played movie.
Change the Repeat option of the current chapter.
Repeat a selected part of the movie.
Display the playback details.
Jump to a specific time in your movie.
Return to the DVD Menu.
Tip: You can also play DVD movies which are in ISO format. The playback features for DVD’s in ISO format
are the same as above DVD playback features.
24
ENGLISH
Direct access button to your video folder
You can create 1 video folder, which can be directly accessed by pressing the ‘Video’ (34) button on the
remote control. Create a folder called ‘VIDEO xx’ (Where ‘xx’ can be changed to whatever you want) on
the root of the hard disk and place your video files in this folder. When the media player is started and you
press the ‘Video’ (34) button, the media player will automatically open the folder.
Note:
If you create more than 1 folder beginning with ‘VIDEO’, the unit will only open the first folder.
Some MPEG2/VOB files contain two or more audio streams. By pressing the ‘Audio’ (7) button on the
remote control, you can cycle between the audio streams. You can use the ‘Audio’ (7) button when the
video file you are playing does not have sound, so you can locate the proper audio stream.
If you switch from MPEG2/VOB file, you can loose the audio if it is not on the default stream. To prevent
this, press the ‘Setup’ (20) button during playback to “lock” the current audio stream. This option will
keep the selected audio stream for all files.
8.2 Playback of your Music
The Conceptronic CM3H has various modes in which you can play music (WAV, MP3 and WMA are supported).
• Select the file you would like to play with the navigation buttons on the remote control.
• Press the ‘Enter’ (24) button or the ‘Play/Pause’ (17) button on the remote control to start the
playback of the selected file.
During playback, you can use the following playback options on the remote control:
-
Play/Pause
Stop
Rewind
Fast Forward
Previous
Next
Repeat
Trans
(17)
(22)
(18)
(21)
(16)
(23)
(11)
(32)
Play the selected file or pause the playback.
Stop the playback.
Rewind the playback.
Fast Forward the playback.
Play the previous file in the current folder.
Play the next file in the current folder.
Change the repeat / shuffle option of the current file/folder.
Select a type of Equalizer.
Playback resume functionality
The CM3H has a playback resume functionality. If you turn off the CM3H during the playback of your
movies, music or photo slideshow, the CM3H will continue the playback when it is turned on again.
This feature is enabled by default and can be turned off in the Setup Menu.
Direct access button to your music folder
You can create 1 music folder, which can be directly accessed by pressing the ‘Music’ (4) button on the
remote control. Create a folder called ‘MUSIC xx’ (Where ‘xx’ can be changed to whatever you want) on
the root of the hard disk and place your music files in this folder. When the media player is started and you
press the ‘Music’ (4) button, the media player will automatically open the folder.
Note:
If you create more than 1 folder beginning with ‘MUSIC’, the unit will only open the first folder.
25
ENGLISH
8.3 Playback of your Photos & Picture
With the CM3H, you can view your photos and pictures, which can be stored on the hard disk of the unit.
• Select the file you would like to play with the navigation buttons on the remote control.
• Press the ‘Enter’ (24) button or the ‘Play/Pause’ (17) button on the remote control to start the
playback of the selected file.
During playback, you can use the following playback options on the remote control:
- Play/Pause
(17)
- Stop
- Navigation keys
(22)
(11)
-
Previous
Next
Repeat
Delay
Trans
Rotate
Zoom
(16)
(23)
(11)
(30)
(32)
(29)
(31)
Start a slideshow starting with the selected file, or pause the
slideshow.
Stop the slideshow.
, : Flip the shown photo.
,
: Rotate the shown photo.
Play the previous file in the current folder.
Play the next file in the current folder.
Change the repeat /shuffle option of the current file/folder.
Change the slideshow interval time.
Change the transition between 2 photos.
Rotate the current photo.
Zoom on the current photo.
Playback resume functionality
The CM3H has a playback resume functionality. If you turn off the CM3H during the playback of your
movies, music or photo slideshow, the CM3H will continue the playback when it is turned on again.
This feature is enabled by default and can be turned off in the Setup Menu.
Music slideshow (viewing photos with background music)
Select a photo and press the ‘Slide’ (8) button to start the music slideshow.
When you do not press the ‘Slide’ (8) button, the music is not played and the images will be displayed in a
non-music slideshow. When there is no music in the folder available the music slideshow functionality does
/Enter’ (24) button to have a slideshow of images without sound.
not work. You need to press the ‘
Note:
In this mode, the Rotate and Zoom function are not accessible.
You can pause viewing the slideshow by pressing the ‘Play/Pause’ (17) button once (the music will continue
playing). Press the ‘Play/Pause’ (17) button again to stop the music too. Press the ‘Play/ Pause’ (17)
button again time to resume the music slideshow.
Direct access button to your Photo folder
You can create 1 photo folder, which can be directly accessed by pressing the ‘Photo’ (35) button on the
remote control. Create a folder called ‘PHOTO xx’ (Where ‘xx’ can be changed to whatever you want) on
the root of the hard disk and place your photo files in this folder. When the media player is started and you
press the ‘Photo’ (35) button, the media player will automatically open the folder.
Note:
If you create more than 1 folder beginning with ‘PHOTO’, the unit will only open the first folder.
26
ENGLISH
9. System Configuration
You can press the ‘Setup’ (20) button on your remote control to open the Setup Menu of the unit.
/ ENTER button to
Press the / / / buttons to move the selection in the Setup Menu, and press the
confirm the selection. When you are finished with configuring your unit, press the Setup button again to
close the Setup Menu, or select the option ‘Exit Setup’ in the Setup Menu.
The Setup Menu contains the following pages:
•
•
•
•
General Setup Page
Audio Setup Page
Video Setup Page
Slideshow Setup Page
•
Exit Setup
General setup Page
OSD Lang
Screensaver
Play Resume
Defaults
Auto Start
:
:
:
:
:
Audio Setup Page:
Downmix
SPDIF Output
LPCM Output
: Set the downmix mode for multi-channel sound.
: Set the SPDIF output mode.
: Set the LPCM output mode.
Video Setup Page:
TV Display
TV System
Video Output
: Change the TV Display setting.
: Select a video system for your TV.
: Select the video output you are using.
Set the onscreen display language.
Enable or disable the Screen Saver.
Enable or disable the Play Resume functionality.
Reset the unit to the factory default settings.
Automatically play all media files on the CM3H when the unit is turned on.
Slideshow Setup Page:
Interval time
: Select the interval time between two photos.
Transition
: Select the default transition used between 2 photos.
27
ENGLISH
10. Computer USB Connectivity
The unit can be connected to your computer to copy data (movies, music, pictures, records, etc.) from and
to the internal hard disk.
Note:
In our example below, we are using a computer running Windows XP, but the unit can be used on
all computers with USB support and the capability of reading & writing FAT32 file systems.
Connect the unit to your computer
• Connect the delivered USB to Mini-USB cable to the backside of the unit and to a free USB port on your
computer.
• Turn the unit on with the main power switch on the backside of the unit. The unit will be recognized and
installed automatically and will be shown as an extra drive on your computer.
By default, the internal hard disk of the unit will be initialized as an USB storage device.
Disconnect the unit from your computer
•
•
•
•
Single-click the ‘Safe Removal’ icon on the system tray.
Select ‘Stop USB Mass Storage Device’ when prompted.
Wait for the message ‘Safe to remove Hardware’.
Disconnect the USB cable.
28
ENGLISH
11. Tips & Troubleshooting
Use the tips below for troubleshooting when your CM3H is not working properly:
The Power LED does not light up:
• The power supply is not connected to the CM3H. Reconnect the power supply to the CM3H.
There is no activity on the display:
• The CM3H is in standby state. Press the ‘ ’ (1) button on the remote control to activate it.
• The Wrong input source on your TV is selected. Change the input source.
• The Wrong video system is selected. Press the ‘Output’ (19) button on your remote control to switch to
the correct output signal.
• The Video cable is not connected properly. Check if the Video Cable is connected correctly.
When the unit is turned on, only a ‘bling’ sound can be heard, but no menu is shown:
• The Wrong video system is selected. Press the ‘Output’ (19) button on your remote o switch to the
correct output signal.
• The Video cable is not connected properly. Check if the Video Cable is connected correctly.
• The audio output of the CM3H is connected to the amplifier, but the wrong input is selected on the TV.
Select the correct input on your TV.
There is no sound:
• The Audio cable is not connected properly. Make sure the cable is connected correctly to your TV or
amplifier.
• The CM3H is connected with an amplifier, but the amplifier is turned off. Turn on the amplifier.
• The audio stream of the MPEG2 or VOB file is invalid. Press the ‘Audio’ (7) button on the remote control
to adjust to the proper audio stream.
• The Mute function is on. Press the ‘Mute’ (28) button on the remote control again to cancel mute.
• The CM3H is functioning in Fast Forward or Fast Rewind mode. Press the ‘Enter’ (24) button on the
remote control to return to normal playback.
The image on the display is distorted:
• The CM3H is functioning in Fast Forward or Fast Rewind mode. Press the ‘Enter’ (24) button on the
remote control to return to normal playback.
• A PAL movie is played at NTSC mode or vice versa. Press the ‘P/N’ (37) button on the remote to change
the display settings.
When pressing the ‘Slide’ button, the system freezes:
• There are too many photos or music in the current folder. It will take a long time to start Music-SlideShow. Please wait for playback.
The Remote control does not work:
• Point the remote control to the CM3H receiver in ±30 degrees and directly.
• Use the remote control in the range of 5 meters.
• The remote control batteries (AAA) are empty and should be replaced.
The subtitles of the played movie are not displayed:
• An AVI file is played, but the subtitle file contains a different filename. See chapter 8.1 how to display
the subtitles.
• The subtitle file is not supported by the CM3H.
When trying to play video, the message “CODEC NOT SUPPORTED” is displayed;
• The movie file is created with a non-supported codec for the CM3H.
Refer to the website www.conceptronic.net for a list of supported codecs for the CM3H.
29
ENGLISH
The CM3H does not display all hard disk partitions / content:
• The partition on the hard disk is not primary. Re-partition the hard disk again and make sure all
partitions are set to primary.
• The hard disk is formatted in a filesystem which is not supported by the CM3H. Reformat your harddisk
with the FAT32 or NTFS filesystem.
• There are no media files on the selected partition.
The DVD/ISO playback does not start when the Play/Pause button is pressed:
• Make sure you use the correct folder structure. The folder structure is described in chapter 8.1.
The DVD Files are incomplete, corrupt or damaged. When this happens, the CM3H does not start DVD
playback.
During the intro-movies of the DVD, the screen goes blank:
• The current chapter ends with a blank screen or is too short to playback. Press the ‘Next’ (23) button to
switch to the next chapter.
My TV shows a black/white picture instead of color:
• Your TV cannot handle the "Multi" TV-System of the CM3H. Use the Setup menu to change the TV System
to PAL. (See chapter 9). After changing the TV System, turn off and on the CM3H.
30
ESPAÑOL
CM3H de Conceptronic
Manual del usuario
Felicidades por la compra de su
reproductor multimedia de Conceptronic
Este manual de usuario le ofrece una descripción paso a paso acerca de cómo instalar y utilizar el
reproductor multimedia de Conceptronic.
En caso de surgir cualquier problema, visite nuestra página web de asistencia técnica (haga clic en el
apartado “Soporte” de www.conceptronic.net). En esa sección podrá consultar la base de datos de
Preguntas Frecuentes (F.A.Q.).
Si tiene otras preguntas sobre su producto y no las encuentra en nuestro sitio web, póngase en contacto
con nosotros por correo electrónico: [email protected]
Si desea información adicional sobre los productos de Conceptronic, visite nuestro sitio web:
www.conceptronic.net
Consejo: El CM3H de Conceptronic puede actualizarse mediante firmware. Para actualizar la unidad a la
última versión de firmware, visite el sitio web de Conceptronic.
Consejo: Compruebe en www.conceptronic.net la lista actualizada de códecs de los archivos
compatibles.
1. Contenido del paquete
El paquete del reproductor multimedia de Conceptronic debe incluir los siguientes artículos:
•
•
•
•
•
•
•
•
•
Reproductor multimedia CM3H de Conceptronic (descrito como “unidad” en el manual).
Base para el CM3H.
Fuente de alimentación (12 V, 2,5 A) con cable eléctrico.
Mando a distancia.
2 pilas tipo AAA para el mando a distancia.
Cable de vídeo Composite (conectores RCA rojo, blanco y amarillo).
Adaptador Euroconector para cable de vídeo Composite.
Cable USB.
Este manual de usuario.
31
ESPAÑOL
2. Características del producto
• Interfaz de usuario en varios idiomas: inglés, holandés, español, francés, italiano, alemán y
portugués.
• Compatible con múltiples particiones de disco duro.
• Compatible con los sistemas de archivos Fat32 y NTFS.
• Salida de vídeo HDMI de hasta 1080i.
• Compatible con subtítulos de texto (.SMI/.SRT/.SUB/.SSA) para MPEG4 (AVI), resolución D1.
• Compatible con los formatos AVI (MPEG4), MPG (MPEG1, MPEG2), DAT (VCD), VOB (DVD), IFO (DVD),
ISO, WAV, WMA, MP3 y JPG.
• Compatible con varios códecs. Visite nuestro sitio web para obtener la lista completa de los códecs
compatibles.
• Salidas: HDMI / vídeo Composite / vídeo Component / RCA de audio estéreo / óptica de audio.
• Compatible con los formatos PAL/NTSC.
• Varios modos de repetición.
• Salvapantalla.
• 14 modos de transición para fotos.
• Presentación de diapositivas (proyección de fotografías) con música de fondo.
• Intervalo de imágenes modificable.
• Funciones de zoom y rotación.
• Cambio automático de modo PC-USB a modo reproductor multimedia y viceversa:
• Cuando está conectada al PC, la unidad actúa como dispositivo de almacenamiento USB.
• Cuando no está conectada al PC, la unidad actúa como reproductor multimedia.
Nota:
El CM3H no puede reproducir películas en HD (720p, 1080i, 1080p).
3. Notas y avisos
• No intente desmontar el adaptador de corriente que incluye el producto. El alto voltaje puede causar
lesiones. Si hay que reparar el adaptador, póngase en contacto con su distribuidor o con el servicio de
atención de Conceptronic.
• Mantenga el dispositivo apartado de ambientes excesivamente húmedos.
• No moje o sumerja la unidad en líquidos.
• Desconecte el adaptador de corriente si no va a utilizar el dispositivo durante un largo período de
tiempo.
• Evite utilizar el dispositivo en lugares cercanos a sustancias combustibles.
• Cambie las pilas del mando a distancia por otras del mismo tipo cuando empiecen a agotarse o se hayan
agotado completamente. Recicle las pilas agotadas siempre que sea posible. Para evitar su corrosión,
retire las pilas del mando a distancia si no va a utilizarlo durante un largo período de tiempo.
• Mantenga el mando a distancia apartado de ambientes excesivamente húmedos; no lo deje caer al
suelo.
• No utilice ni exponga el mando a distancia a luz del sol intensa.
• Evite SIEMPRE que la unidad se caiga o sufra sacudidas o golpes.
• Para evitar su calentamiento, no cubra el dispositivo.
Nota:
Los datos del disco duro interno pueden estar fragmentados. Ello puede afectar a la reproducción
de películas. Se recomienda desfragmentar de vez en cuando el disco duro con la ayuda de su
ordenador.
32
ESPAÑOL
4. Descripción del producto
Vista frontal
Vista trasera
1
5
2
6
7
3
4
8
9
10
11
12
13
14
15
Descripción de los números:
1.
2.
3.
4.
Receptor de infrarrojos
LED de encendido / Standby
Botones de manejo (ver abajo)
LED de actividad del disco duro
8.
9.
10.
11.
12.
13.
14.
15.
5. Interruptor de alimentación
6. Conector Mini-USB (a PC)
7. Salida HDMI
Salida Component (Pb)
Salida Component (Pr)
Salida Component (Y)
Salida de vídeo Composite
Salida de audio (R-derecha)
Salida de audio (L-izquierda)
Salida óptica digital
Entrada de corriente CC (12 V, 2,5 A)
Descripción de los botones
Navegar por los menús de la unidad.
Botones de navegación
En menús:
( , , , )
Durante la reproducción:
,
Subir / bajar el volumen.
,
Rebobinado rápido / avance rápido.
Botón reproducir/stop ( / )Pulsación breve: Iniciar o detener la reproducción de un archivo, o abrir una
carpeta.
Pulsación larga: Encender el CM3H o situarlo en modo Standby.
33
ESPAÑOL
5. Descripción del mando a distancia
El mando a distancia se utiliza para manejar la unidad. Encontrará una representación del mando a
distancia detrás de la portada de este manual. Los números de los botones corresponden a los de la tabla
de abajo, en la cual se explica cada función del mando a distancia.
Nº
Botón
1
2
3
4
5
6
7
8
POWER (
R/L
TOP
MUSIC
FILE
0–9
AUDIO
SLIDE
Descripción
9
10
11
12
13
14
15
16
17
18
19
20
21
22
23
24
25
26
27
28
29
30
SLOW
A–B
REPEAT
VOLUME
VOLUME
BACK
, , ,
PREVIOUS (
)
PLAY/PAUSE
REWIND (
)
OUTPUT
SETUP
FAST FORWARD (
STOP ( )
)
NEXT (
ENTER (
)
DISPLAY
PAGE
PAGE
MUTE
ROTATE
DELAY
31
32
ZOOM
TRANS
33
SUB-T
34
35
36
37
38
VIDEO
PHOTO
FUNC
P/N
MENU
39
Power LED
)
)
Encender el reproductor multimedia o apagarlo en modo Standby.
Cambiar el modo de salida de audio (estéreo, Mono-L, Mono-R).
Ir a la parte superior de la lista actual.
Botón de acceso directo a la carpeta de música.
Mostrar la librería de archivos.
Botones numéricos 0-9.
Seleccionar o cambiar el canal de audio (durante reproducción de DVD).
Inicia una presentación de diapositivas con música o reproducción de
vídeo paso a paso.
Reproducción lenta.
Reproducir un intervalo seleccionado repetidamente.
Seleccionar un modo de repetición o de mezcla.
Subir el volumen.
Bajar el volumen.
Ir a la carpeta anterior.
Cambiar selección en el menú principal o en el menú de DVD.
Ir al archivo o capítulo anterior.
Iniciar o pausar la reproducción de un archivo o de una carpeta de DVD.
Rebobinado rápido durante la reproducción.
Seleccionar la señal de salida de vídeo.
Mostrar el menú de configuración.
Avance rápido durante la reproducción.
Detener la reproducción.
Ir al archivo o capítulo siguiente.
Confirmar la selección o iniciar reproducción.
Mostrar la información de la reproducción en curso.
Mostrar la página con archivos siguiente.
Mostrar la página con archivos anterior.
Activar o desactivar Mute (silencio).
Girar fotografías.
Seleccionar el tiempo de intervalo de presentación de diapositivas
(incluye opción con música).
Acercar o alejar la imagen (reproducción de fotografías y DVD).
Seleccionar un modo de transición durante una reproducción de
diapositivas o un tipo de ecualizador musical durante la reproducción de
música.
Seleccionar o cambiar los subtítulos de la película (reproducción de
MPEG4 y DVD).
Botón de acceso directo a la carpeta de vídeo.
Botón de acceso directo a la carpeta de fotos.
Ir a un punto concreto de la película durante su reproducción.
Seleccionar un sistema de vídeo (PAL / NTSC).
A. Muestra la lista de particiones o la lista de archivos
B. Volver al Menú de DVD (durante reproducción de DVD).
El LED de encendido parpadeará cuando pulse un botón.
34
ESPAÑOL
6. Conexiones del CM3H
Conexión HDMI
Conexión Composite +
Euroconector
Conexión S/PDIF
Ejemplo de conexión, con conexiones HDMI, Composite y S/PDIF.
Conectar el cable o cables de vídeo
Puede conectar la unidad a su televisor de 4 formas distintas:
- HDMI
- Composite
- Euroconector
(Utilizando el cable Composite y el adaptador a Euroconector)
- Component **
**
Cuando utilice Component, a su televisor o monitor sólo se enviará la señal de vídeo.
Para la señal de audio, use los conectores RCA de audio del cable Composite (rojo y blanco).
HDMI:
• Conecte el cable HDMI a la salida HDMI [7] de la unidad.
• Conecte el otro extremo del cable HDMI a la entrada HDMI de su televisor.
Composite:
• Conecte el cable Composite (amarillo, rojo y blanco) a los correspondientes conectores Composite [11,
12, 13] de la unidad.
• Conecte el otro extremo del cable Composite (amarillo, rojo y blanco) a los conectores de entrada
Composite de su TV.
Euroconector:
• Conecte el cable Composite (amarillo, rojo y blanco) a los correspondientes conectores Composite [11,
12, 13] de la unidad.
• Conecte el otro extremo del cable Composite (amarillo, rojo y blanco) a los conectores del adaptador a
Euroconector.
• Conecte el adaptador Euroconector a la entrada de Euroconector de su televisor.
Component:
• Conecte el cable Component (rojo, verde y azul) a los conectores Component [8, 9, 10] de la unidad.
• Conecte el otro extremo del cable Component a los conectores de entrada Component de su televisor.
35
ESPAÑOL
Conectar el cable o cables de audio
Puede conectar la unidad a su televisor o a su sistema de “home cinema” de 2 formas distintas:
- Analógica, mediante los conectores RCA de audio de la unidad.
- Digital, mediante la salida S/PDIF óptica digital de la unidad.
Analógica:
• Conecte los conectores de audio (rojo y blanco) del cable Composite a los conectores RCA de audio [12,
13] de la unidad.
• Conecte el otro extremo del cable Composite a los conectores RCA de audio de su televisor o
amplificador.
Digital:
• Conecte el cable óptico digital a la salida S/PDIF [14] de la unidad.
• Conecte el otro extremo del cable óptico digital a la entrada óptica digital de su amplificador.
Conectar la fuente de alimentación
Una vez la unidad esté conectada a su equipo de audio o vídeo, puede conectar la fuente de alimentación a
la unidad.
• Conecte la fuente de alimentación (suministrada) a la entrada de CC [15] de la unidad y a un enchufe
de pared disponible.
• Sitúe el interruptor de alimentación de la parte trasera de la unidad a la posición “I” para alimentar la
unidad.
La unidad se encenderá.
Preparar el mando a distancia
El mando a distancia utiliza 2 pilas AAA (suministradas con el producto).
Necesitará utilizar el mando a distancia para encender y apagar la unidad.
Notas:
-
El alcance operacional óptimo del mando llega hasta unos 5 metros.
Apunte el mando hacia el receptor de infrarrojos situado en el panel frontal de la unidad.
El ángulo de recepción del receptor infrarrojo es de ±30 grados.
Cambie las pilas (2 pilas AAA) cuando estén parcial o totalmente agotadas.
36
ESPAÑOL
7. Funcionamiento básico del CM3H
• Seleccione el canal correcto de entrada del televisor donde esté conectada la unidad (HDMI, Composite,
Euroconector o Component).
Nota:
A partir de este punto, en el manual se asume que en su televisor tiene seleccionado el canal de
entrada de señal de la unidad. Todos los pasos que se describen se refieren al modo de
funcionamiento de la unidad.
• Compruebe que el interruptor de alimentación de la parte trasera de la unidad está en posición ‘I’.
• Encienda la unidad con el botón “Play/Stop” de la parte frontal de la unidad, o con el botón “Power”
(1) del mando a distancia.
La unidad se encenderá y mostrará el menú en la pantalla.
Nota:
El tipo de señal de salida por defecto es vídeo Composite. Si la unidad está encendida y no se
muestra nada en pantalla, pulse el botón “Output” (Salida) (19) del mando a distancia para
cambiar entre los modos de salida del CM3H (HDMI, Composite, Component).
Nota:
Cuando se enciende, la unidad tiene que inicializar el disco duro. Esto puede tomar un poco de
tiempo. Durante la inicialización se mostrará el mensaje “CARGANDO...” en la pantalla.
Si el disco duro está formateado con una sola partición, mostrará en pantalla la lista de archivos, es decir,
el contenido del disco duro.
Si el disco duro está formateado con varias particiones, mostrará en pantalla la lista de todas las
particiones actuales. Utilice los botones / (15) para escoger una partición y pulse el botón
“
/Enter” (24) para ir a la lista de archivos, donde se mostrará el contenido de la partición
seleccionada.
[Lista de particiones]
[Lista de archivos]
Cambiar de partición:
Cuando el disco duro está formateado con varias particiones, puede pulsar el botón “Menú” (38) del
mando a distancia para volver a la lista de particiones y seleccionar otra partición.
37
ESPAÑOL
8. Opciones de reproducción
8.1 Reproducción de películas
El CM3H puede reproducir varios formatos de vídeo, como MPEG1/2, MPEG 4 (incluyendo XVID), VOB, IFO
(DVD) e ISO, e incluye soporte para reproducir las pistas de audio en MP3, AC3, AAC y MPEG1/2 de los
vídeos, y PassThrough a través de la salida SPDIF.
• Con los botones de navegación del mando a distancia, seleccione el archivo que desee reproducir.
• Pulse el botón “Enter” (24) o el botón “Play/Pause” (17) del mando a distancia para iniciar la
reproducción del archivo seleccionado.
Durante la reproducción, puede utilizar las siguientes opciones de reproducción del mando a distancia:
Nota:
Play/Pause
Stop
Rewind
Fast Forward
Previous
Next
Repeat
Display
Func
A-B
Slow
Slide
(17)
(22)
(18)
(21)
(16)
(23)
(11)
(25)
(36)
(10)
(9)
(8)
Reproducir el archivo seleccionado o pausar la reproducción.
Detener la reproducción.
Rebobinar la reproducción.
Avance rápido.
Reproducir el archivo anterior de la presente carpeta.
Reproducir el archivo siguiente de la presente carpeta.
Cambiar la opción de repetición o mezcla del presente archivo o carpeta.
Mostrar la información de reproducción.
Ir a un punto concreto de la película.
Repetir parte seleccionada de la película.
Reproducción lenta.
Reproducción paso a paso.
EL CM3H soporta la mayoría de códecs (como XviD, AVI, MPEG2, etc.). Sin embargo, es posible que
para sus archivos necesite algún códec que no esté incluido en el CM3H.
Si trata de reproducir un archivo con un códec no compatible, aparecerá el mensaje “CODEC NOT
SUPPORTED” (“CÓDEC NO COMPATIBLE”). Cuando esto suceda, le sugerimos que utilice un códec
diferente para reproducir el archivo.
Función de reanudar reproducción
El CM3H incluye la función de reanudar reproducción. Si apaga el CM3H mientras estaba reproduciendo
música, una película o una presentación de fotos, el CM3H continuará con esa reproducción cuando vuelva
a encenderlo.
Esta característica está activada por defecto y puede desactivarla en el menú de configuración.
Nota:
La función de reanudar reproducción no puede utilizarse con los archivos ISO e IFO (DVD).
Función de reproducción con subtítulos
El CM3H de Conceptronic puede reproducir los formatos .SMI, .SRT, .SUB y .SSA de archivos de subtítulos.
Si el archivo de subtítulos tiene el mismo nombre que el archivo de vídeo seleccionado (y sólo cambia la
extensión), el archivo de subtítulos se cargará automáticamente cuando se reproduzca el archivo MPEG4.
Por ejemplo:
Nombre de la película:
Nombre del archivo de subtítulos:
Mi_pelicula_con_subt.AVI
Mi_pelicula_con_subt.SRT
Cuando el archivo de subtítulos tenga un nombre diferente, tendrá que seleccionarlo manualmente.
Seleccione el archivo de subtítulos y pulse el botón “Sub-t” (33) del mando a distancia para seleccionarlo.
/Enter” (24) para reproducirla.
Seleccione la película y pulse el botón “
Nota:
Si hay disponible un archivo de subtítulos con el mismo nombre que la película e intenta
seleccionar un archivo de subtítulos diferente, el CM3H forzará el uso del archivo con el mismo
nombre en vez del seleccionado.
38
ESPAÑOL
Funcionalidad de reproducción de DVD
El CM3H reproduce DVDs grabados en el disco duro como si fuesen DVDs normales. Podrá navegar por el
menú del DVD, elegir subtítulos y cambiar el idioma de audio.
Nota:
El CM3H sólo puede reproducir DVDs que no estén protegidos. El CM3H no es compatible con la
protección CSS.
Nota:
El CM3H sólo puede reproducir DVDs correspondientes a la Región 2 o sin región.
• Conecte el CM3H a su ordenador. Consulte el capítulo 10: “Conexión al ordenador mediante USB”.
• Cree una carpeta en el disco duro del CM3H con el nombre de la película del DVD (por ejemplo:
“Película1”).
• Copie “AUDIO_TS” y “VIDEO_TS” (incluyendo su contenido) del DVD a la carpeta creada (por ejemplo:
“Película1”) en el CM3H.
Una vez realizado, la estructura debería ser:
- [disco duro del CM3H]
|-> Película1
|-> AUDIO_TS
|-> VIDEO_TS
(opcional, no presente en todos los DVD)
(con todos los archivos del DVD dentro)
• Desconecte el CM3H del ordenador y conéctelo al televisor. Encienda el CM3H.
• Con los botones de navegación “ , , , ” (15) del mando a distancia, seleccione el DVD que desee
reproducir.
• Pulse el botón “Play/Pause” (17) del mando a distancia para iniciar la reproducción del DVD
seleccionado.
Nota:
No utilice el botón “Enter” (24) para iniciar la reproducción, ya que sólo se mostrarían los
archivos y las subcarpetas y no se iniciaría la reproducción del DVD.
Durante la reproducción del DVD, puede utilizar las siguientes opciones de reproducción del mando a
distancia:
-
Play/Pause
Stop
Navigation keys
Enter
Rewind
Fast Forward
Previous
Next
Sub-t
Audio
(17)
(22)
(15)
(24)
(18)
(21)
(16)
(23)
(33)
(7)
-
Zoom
Repeat
A-B
Display
Func
Menu
(31)
(11)
(10)
(25)
(36)
(38)
Reproducir el DVD seleccionado o pausar la reproducción.
Detener la reproducción del DVD y volver al buscador de películas.
Navegar en el menú del DVD.
Confirmar el elemento o elementos seleccionados en el menú del DVD.
Rebobinado rápido.
Avance rápido.
Capítulo anterior.
Capítulo siguiente.
Cambiar el idioma de los subtítulos del DVD o desactivarlos.
Cambiar la pista de audio del DVD (si el DVD contiene múltiples pistas de
audio).
Acercar la imagen de la película.
Cambiar la opción de repetición del presente capítulo.
Repetir una parte seleccionada de la película.
Mostrar la información de reproducción.
Ir a un punto concreto de la película.
Volver al menú del DVD.
Consejo: También puede reproducir películas en DVD que estén en formato ISO. Las características de
reproducción de los DVD en formato ISO son las mismas que las descritas arriba.
39
ESPAÑOL
Botón de acceso directo a la carpeta de vídeo
Puede crear una carpeta de vídeo a la que puede accederse directamente presionando el botón “Video”
(34) del mando a distancia. Cree una carpeta con el nombre “VIDEO AA” (donde “AA” puede ser el nombre
que usted desee) en la raíz del disco duro y coloque sus archivos de vídeo en esta carpeta. Cuando el
reproductor multimedia esté encendido y usted pulse el botón “Video” (34), el reproductor multimedia
abrirá automáticamente la carpeta.
Nota:
Si crea más de una carpeta cuyo nombre empiece por “VIDEO”, el dispositivo sólo abrirá la
primera carpeta.
Algunos archivos MPEG2/VOB contienen dos o más pistas de audio. Pulsando el botón “Audio” (7) del
mando a distancia, puede alternar entre las diferentes pistas de audio. También pude utilizar el botón
“Audio” (7) cuando no se escuche el sonido del archivo de vídeo que esté reproduciendo, para seleccionar
la pista de audio correcta.
Si cambia de un archivo MPEG2 a VOB o viceversa, puede perder el sonido si éste se encuentra en otra
pista. Para evitarlo, pulse el botón “Setup” (20) durante la reproducción para “bloquear” la pista de audio
actual. Esta opción mantendrá la pista de audio seleccionada para todos los archivos.
8.2 Reproducción de música
El CM3H de Conceptronic puede reproducir música en varios formatos (es compatible con WAV, MP3 y WMA).
• Con los botones de navegación del mando a distancia, seleccione el archivo que desee reproducir.
• Pulse el botón “Enter” (24) o el botón “Play/Pause” (17) del mando a distancia para iniciar la
reproducción del archivo seleccionado.
Durante la reproducción, puede utilizar las siguientes opciones de reproducción del mando a distancia:
-
Play/Pause
Stop
Rewind
Fast Forward
Previous
Next
Repeat
Trans
(17)
(22)
(18)
(21)
(16)
(23)
(11)
(32)
Reproducir el archivo seleccionado o pausar la reproducción.
Detener la reproducción.
Rebobinar la reproducción.
Avance rápido.
Reproducir el archivo anterior de la presente carpeta.
Reproducir el archivo siguiente de la presente carpeta.
Cambiar la opción de repetición o mezcla del presente archivo o carpeta.
Seleccionar el tipo de ecualizador.
Función de reanudar reproducción
El CM3H incluye la función de reanudar reproducción. Si apaga el CM3H mientras estaba reproduciendo
música, una película o una presentación de fotos, el CM3H continuará con esa reproducción cuando vuelva
a encenderlo.
Esta característica está activada por defecto y puede desactivarla en el menú de configuración.
Botón de acceso directo a la carpeta de música
Puede crear una carpeta de música a la que puede accederse directamente presionando el botón “Music”
(4) del mando a distancia. Cree una carpeta con el nombre “MUSIC AA” (donde “AA” puede ser el nombre
que usted desee) en la raíz del disco duro y coloque sus archivos de música en esta carpeta. Cuando el
reproductor multimedia esté encendido y usted pulse el botón “Music” (4), el reproductor multimedia
abrirá automáticamente la carpeta.
Nota:
Si crea más de una carpeta cuyo nombre empiece por “MUSIC”, el dispositivo sólo abrirá la
primera carpeta.
40
ESPAÑOL
8.3 Reproducción de fotos e imágenes
Con el CM3H podrá ver sus fotos e imágenes, que pueden estar guardadas en el disco duro de la unidad.
• Con los botones de navegación del mando a distancia, seleccione el archivo que desee reproducir.
• Pulse el botón “Enter” (24) o el botón “Play/Pause” (17) del mando a distancia para iniciar la
reproducción del archivo seleccionado.
Durante la reproducción, puede utilizar las siguientes opciones de reproducción del mando a distancia:
- Play/Pause
(17)
- Stop
- Navigation keys
(22)
(11)
- Previous
- Next
- Repeat
(16)
(23)
(11)
Delay
Trans
Rotate
Zoom
(30)
(32)
(29)
(31)
-
Iniciar una presentación de imágenes a partir del archivo seleccionado
o pausar la presentación.
Detener la presentación.
, : Dar la vuelta a la foto mostrada.
,
: Girar la foto mostrada.
Reproducir el archivo anterior de la presente carpeta.
Reproducir el archivo siguiente de la presente carpeta.
Cambiar la opción de repetición o mezcla del presente archivo o
carpeta.
Cambiar el intervalo de tiempo de la presentación.
Cambiar el modo de transición entre fotos.
Girar la foto mostrada.
Acercar la imagen de la foto mostrada.
Función de reanudar reproducción
El CM3H incluye la función de reanudar reproducción. Si apaga el CM3H mientras estaba reproduciendo
música, una película o una presentación de fotos, el CM3H continuará con esa reproducción cuando vuelva
a encenderlo.
Esta característica está activada por defecto y puede desactivarla en el menú de configuración.
Presentación de diapositivas con música (visualización de fotografías con música de fondo)
Seleccione una foto y pulse el botón “Slide” (8) para iniciar la presentación con música.
Si no pulsa el botón “Slide” (8), la música no sonará y las imágenes se visualizarán en una presentación de
diapositivas sin música. Si en la carpeta no hay archivos de música, la función de presentación con música
no funcionará. Para realizar la presentación de imágenes sin sonido, pulse el botón “Enter” “
/Enter’
(24).
Nota:
En este modo, no se pueden activar las funciones Rotate y Zoom.
Puede pausar la visualización de imágenes pulsando una vez el botón "Play/Pause" (17) (la música seguirá
sonando). Pulse de nuevo el botón "Play/Pause" (17) para detener también la música. Para volver a activar
la reproducción con música, pulse de nuevo el botón "Play/Pause" (17).
Botón de acceso directo a la carpeta de fotos
Puede crear una carpeta de fotos a la que puede accederse directamente pulsando el botón “Photo” (35)
del mando a distancia. Cree una carpeta con el nombre “PHOTO AA” (donde “AA” puede ser el nombre
que usted desee) en la raíz del disco duro y coloque sus archivos de imagen en esta carpeta. Cuando el
reproductor multimedia esté encendido y usted pulse el botón “Photo” (35), el reproductor multimedia
abrirá automáticamente la carpeta.
Nota:
Si crea más de una carpeta cuyo nombre empiece por “PHOTO”, el dispositivo sólo abrirá la
primera carpeta.
41
ESPAÑOL
9. Configuración del sistema
Pulse el botón “Setup” (20) del mando a distancia para abrir el menú de configuración de la unidad.
Seleccione un elemento del menú de configuración con los botones de navegación / / / y pulse el botón
/ “Enter” para confirmar la selección. Para cerrar el menú de configuración una vez haya terminado
la configuración de la unidad, pulse de nuevo el botón “Setup”, o escoja la opción "Salir de la
configuración” del menú de configuración.
El menú de configuración contiene las siguientes
páginas:
•
•
•
•
Página de configuración general
Página de configuración de audio
Página de configuración de vídeo
Página de configuración de presentación de
diapositivas
•
Salir de la configuración
Página de configuración general
Idioma en pantalla
Salvapantallas
Reanudar la reproducción
Predeterminados
Autoinicio
:
:
:
:
:
Seleccionar el idioma de los menús y mensajes en pantalla.
Activar o desactivar el salvapantallas.
Activar o desactivar la función de Reanudar la reproducción.
Reestablecer la configuración que viene de fábrica.
Reproducir automáticamente todos los archivos multimedia del CM3H
cuando éste se encienda.
Página de configuración de audio:
Downmix
: Seleccionar el modo de fusión de canales (downmix) para canales múltiples de
sonido.
Salida SPDIF
: Seleccionar el modo de la salida SPDIF.
Salida LPCM
: Seleccionar el modo de la salida LPCM.
Página de configuración de vídeo:
Visualización de TV : Cambiar el tipo de visualización de TV.
Sistema de TV
: Seleccionar un sistema de imagen para su TV.
Salida de vídeo
: Seleccione la salida de vídeo que esté utilizando.
Página de configuración de presentación de diapositivas:
Intervalo de tiempo : Seleccione el intervalo de tiempo entre fotografías.
Transición
: Seleccionar el modo de transición predeterminado entre fotografías.
42
ESPAÑOL
10. Conexión al ordenador mediante USB
Puede conectar la unidad a su ordenador para copiar datos (películas, música, imágenes, grabaciones, etc.)
desde y hacia el disco duro interno.
Nota:
En el ejemplo siguiente se ha utilizado un ordenador con sistema operativo Windows XP, pero la
unidad puede ser utilizada en cualquier ordenador con entrada USB y la posibilidad de leer y
escribir archivos con el sistema FAT32.
Conectar la unidad a su ordenador
• Conecte el cable adaptador de USB a Mini-USB (suministrado) a la parte trasera de la unidad y a un
puerto USB libre en su ordenador.
• Encienda la unidad con el interruptor de alimentación de la parte trasera de la unidad. El ordenador
reconocerá e instalará automáticamente la unidad y la mostrará como una unidad extra en su listado de
unidades.
Por defecto, el disco duro interno de la unidad se inicializará como un dispositivo de almacenamiento USB.
Desconectar la unidad de su ordenador
• Haga clic una vez en el icono de “Extracción segura” de la barra del sistema.
• Cuando aparezca, seleccione la opción “Extracción segura del dispositivo de
almacenamiento masivo USB”.
• Espere a ver el mensaje “Es seguro retirar el hardware”.
• Desconecte el cable USB.
43
ESPAÑOL
11. Consejos y resolución de problemas
Aplique los consejos que indicamos a continuación para resolver los problemas que puedan surgir en caso
de que su CM3H no funcione correctamente:
El LED de encendido no se ilumina:
• El CM3H no está conectado a la fuente de alimentación. Conecte o vuelva a conectar el CM3H a la
fuente de alimentación.
No hay actividad en la pantalla:
• El CM3H está en modo Stand-by. Pulse el botón ‘ ’ (1) del mando a distancia para activarlo.
• En su televisor está seleccionada una fuente de entrada incorrecta. Cambie la fuente de entrada.
• Se ha seleccionado un sistema de vídeo incorrecto. Pulse el botón “Output” (19) del mando a distancia
para seleccionar el tipo de señal de salida correcto.
• El cable del vídeo no está bien conectado. Compruebe que el cable de vídeo esté conectado
correctamente.
Cuando la unidad está encendida, sólo se oye un sonido parecido a un tintineo, pero no se muestra
ningún menú:
• Se ha seleccionado un sistema de vídeo incorrecto. Pulse el botón “Output” (19) del mando a distancia
para seleccionar el tipo de señal de salida correcto.
• El cable del vídeo no está bien conectado. Compruebe que el cable de vídeo esté conectado
correctamente.
• La salida de audio del CM3H está conectada al amplificador, pero en el televisor se ha seleccionado el
tipo de entrada incorrecto. Seleccione el tipo de entrada correcto en su televisor.
El sonido no funciona:
• El cable de audio no está bien conectado. Compruebe que el cable esté conectado correctamente al
televisor o al amplificador.
• El CM3H está conectado a un amplificador, pero el amplificador está apagado. Encienda el amplificador.
• La pista de audio del archivo MPEG2 o VOB no es válida. Pulse el botón “Audio” (7) del mando a
distancia para seleccionar la pista de audio correcta.
• La función Mute (Silencio) está activada. Vuelva a pulsar el botón “Mute” (28) del mando a distancia
para cancelar esta función.
• El CM3H está reproduciendo en modo avance rápido o rebobinado. Pulse el botón “Enter” (24) del
mando a distancia para volver a la reproducción normal.
La imagen mostrada en pantalla está distorsionada:
• El CM3H está reproduciendo en modo avance rápido o rebobinado. Pulse el botón “Enter” (24) del
mando a distancia para volver a la reproducción normal.
• Una película en formato PAL se está reproduciendo en modo NTSC o viceversa. Pulse el botón “P/N” (37)
del mando a distancia para cambiar la configuración de pantalla.
Al pulsar el botón “Slide”, el sistema se bloquea:
• Hay demasiadas fotografías o música en la carpeta actual. La presentación de diapositivas con música
tardará cierto tiempo en empezar. Por favor, espere.
El mando a distancia no funciona:
• Apunte con el mando a distancia directamente hacia el receptor del CM3H en un ángulo de 30º
aproximadamente.
• Utilice el mando a distancia teniendo en cuenta su alcance operativo de 5 metros.
• Las pilas (AAA) del mando a distancia están agotadas y hay que cambiarlas.
No aparecen los subtítulos de la película que se está reproduciendo:
• Se está reproduciendo un archivo en formato AVI, pero el archivo de subtítulos tiene un nombre
diferente. Consulte el apartado 8.1 sobre la visualización de los subtítulos.
• El CM3H no es compatible con el tipo de archivo de subtítulos.
44
ESPAÑOL
Al intentar reproducir un vídeo, aparece el mensaje “CÓDEC NO COMPATIBLE”:
El archivo de vídeo fue creado con un códec no compatible con el CM3H.
Consulte el sitio web www.conceptronic.net donde encontrará una lista de los códecs compatibles con el
CM3H.
El CM3H no muestra todas las particiones de disco duro o todo su contenido:
• La partición del disco duro no es una partición primaria. Vuelva a hacer las particiones del disco duro y
asegúrese de que todas las particiones estén establecidas como primarias.
• El disco duro está formateado en un sistema de archivos no reconocido por el CM3H. Vuelva a formatear
el disco duro con sistema de archivos FAT32 o NTFS.
• No hay archivos multimedia en la partición seleccionada.
La reproducción de DVD/ISO no se inicia cuando se pulsa el botón “Play/Pause”:
• Asegúrese de que utiliza la estructura de carpetas correcta. La estructura de carpetas se describe en el
capítulo 8.1.
Los archivos de DVD están incompletos, deteriorados o dañados. En estos casos, el CM3H no inicia la
reproducción de DVD.
Durante la reproducción de los vídeos introductorios del DVD, la pantalla no muestra nada:
• El capítulo actual finaliza con la pantalla en negro o es demasiado corta para su reproducción. Pulse el
botón “Next” (23) para ir al siguiente capítulo.
El televisor muestra la imagen en blanco y negro en lugar de en color:
• Su televisor no es compatible con el sistema de TV “Multi” del CM3H. Utilice el menú de configuración
para cambiar el sistema de TV a PAL. (Véase el capítulo 9). Una vez cambiado el sistema de TV, apague
y vuelva a encender el CM3H.
45
DEUTSCH
Conceptronic CM3H
Benutzerhandbuch
Wir gratulieren Ihnen zum Kauf Ihres
Conceptronic Multi Media Players.
In dieser Bedienungsanleitung wird Ihnen Schritt für Schritt gezeigt, wie der Conceptronic Multi Media
Player installiert und verwendet wird.
Wenn Probleme auftreten sollten, besuchen Sie unsere Support-Seite (unter www.conceptronic.net) und
klicken Sie auf ‚Support’. Dort steht Ihnen unsere FAQ-Datenbank mit den häufig gestellten Fragen zur
Verfügung.
Wenn Sie weitere Fragen zu Ihrem Produkt haben, die Sie auf unserer Webseite nicht beantworten können,
kontaktieren Sie uns per E-Mail: [email protected].
Detaillierte Informationen über Conceptronic Produkte finden Sie auf unserer Webseite:
www.conceptronic.net
Tipp:
Die Firmware des Conceptronic CM3H kann upgegradet werden. Die neuste Firmware-Version für
das Gerät können Sie auf der Conceptronic-Webseite herunterladen.
Tipp:
Die aktuelle Codec-Liste der unterstützten Dateien finden Sie auf www.conceptronic.net.
1. Packungsinhalt
In der Verpackung des Conceptronic Multi Media Players ist Folgendes enthalten:
•
•
•
•
•
•
•
•
•
Conceptronic CM3H Multi Media Player (im Handbuch als ‚Gerät’ bezeichnet)
Produktständer für CM3H
Netzteil (12V, 2,5A) mit Anschlusskabel
Fernbedienung
2x Batterien (AAA) für Fernbedienung
Composite-Video-Kabel (roter, weißer, gelber RCA-Stecker)
SCART-Adapter für Composite-Videokabel
USB-Kabel
Dieses Benutzerhandbuch
46
DEUTSCH
2. Produkteigenschaften
• Mehrsprachige Benutzeroberfläche: Englisch, Niederländisch, Spanisch, Französisch, Italienisch, Deutsch,
Portugiesisch
• Unterstützt mehrere Festplattenpartitionen
• Unterstützt FAT32- und NTFS-Dateisysteme
• HDMI-Videoausgabe bis 1080i
• Unterstützt Text-Untertitel (.SMI/.SRT/.SUB/.SSA) für MPEG4 (AVI), D1-Auflösung
• Unterstützt AVI (MPEG4), MPG (MPEG1, MPEG2), DAT (VCD), VOB (DVD), IFO (DVD), ISO, WAV, WMA, MP3,
JPG
• Unterstützt verschiedene Codecs Eine vollständige Liste der unterstützten Codecs finden Sie auf unserer
Webseite.
• Ausgänge: HDMI / Composite-Video / Component-Video / RCA-Stereo-Audio / optisches Audio
• PAL/NTSC-kompatibel
• Verschiedene Wiederholfunktionen
• Bildschirmschoner
• 14 Übergangsmodi für Fotos
• Diashow (Slide Photo Play Back) mit Hintergrundmusik
• Einstellbares Anzeigeintervall
• Zoom- und Drehfunktionen
• Automatische Umschaltung zwischen PC-USB- und Media Player-Modus:
• Wenn das Gerät an einen PC angeschlossen ist, hat es die Funktion eines USB-Speichergeräts.
• Wenn es nicht an einen PC angeschlossen ist, hat das Gerät die Funktion eines Media Players.
Hinweis:
Der CM3H kann keine HD-Filme (720p, 1080i, 1080p) wiedergeben.
3. Hinweise und Warnungen
• Versuchen Sie nicht, das mitgelieferte Netzteil zu zerlegen. Dies könnte zu Verletzungen aufgrund von
Hochspannung führen. Wenn das Netzteil repariert werden muss, kontaktieren Sie bitte Ihren Händler
oder das Helpdesk von Conceptronic.
• Setzen Sie das Gerät nicht extremer Feuchtigkeit aus.
• Tauchen Sie das Gerät nicht in Flüssigkeiten und setzen Sie es keinen Flüssigkeiten aus.
• Trennen Sie das Netzteil von der Stromversorgung, wenn Sie das Gerät für längere Zeit nicht benutzen.
• Verwenden Sie das Gerät nicht in der Nähe von Brennstoffen.
• Ersetzen Sie die Batterie der Fernbedienung mit einer Batterie des gleichen Typs, wenn diese schwach
oder leer ist. Führen Sie die alten Batterien, wenn möglich, der Wiederverwertung zu. Wenn Sie die
Fernbedienung für längere Zeit nicht verwenden, entfernen Sie die Batterie, um Korrosion zu
verhindern.
• Setzen Sie die Fernbedienung nicht extremer Feuchtigkeit aus und lassen Sie sie nicht fallen.
• Verwenden Sie die Fernbedienung nicht bei intensiver Sonnenbestrahlung.
• Lassen Sie das Gerät NIEMALS fallen und setzen Sie es keinen Stößen oder Erschütterungen aus.
• Decken Sie das Gerät nicht ab, um eine Überhitzung zu vermeiden.
Hinweis:
Die Daten auf der integrierten Festplatte können fragmentiert werden. Dies kann einen Einfluss
auf die Wiedergabe von Filmen haben. Wir empfehlen Ihnen, die Festplatte auf Ihrem Computer
hin und wieder zu defragmentieren.
47
DEUTSCH
4. Gerätekomponenten
Vorderseite
Rückseite
1
5
2
6
7
3
4
8
9
10
11
12
13
14
15
Legende:
1.
2.
3.
4.
Infrarotempfänger
Power- / Standby-LED
Bedienungstasten (siehe unten)
Aktivitäts-LED der Festplatte
8.
9.
10.
11.
12.
13.
14.
15.
5. Haupt-Ein-Aus-Schalter
6. Mini-USB-Buchse (für Anschluss an PC)
7. HDMI-Ausgang
Erklärung der Tasten
Navigationstasten
( , , , )
Play-/Stoptaste ( / )
Component ‘Pb’-Ausgang
Component ‘Pr’-Ausgang
Component ‘Y’-Ausgang
Composite-Videoausgang
(Rechter) ‘R’ Audioausgang
(Linker) ‘L’ Audioausgang
Digitaler/optischer Ausgang
Gleichstromeingang (12V, 2,5A)
Im Menü:
Zur Navigation durch die Menüs des Geräts.
Während der Wiedergabe:
,
Lautstärke erhöhen / reduzieren
,
Schnellrücklauf / schnellvorlauf
Kurz drücken: Zum Starten/Stoppen der Wiedergabe einer Datei oder Öffnen
eines Ordners.
Lang drücken: Einschalten des CM3H oder Umschalten des CM3H in den
Standby-Modus
48
DEUTSCH
5. Erläuterungen zur Fernbedienung
Die Fernbedienung wird zur Steuerung des Geräts verwendet. Im inneren Einband dieses Handbuchs finden
Sie ein Bild der Fernbedienung. Die Zahlen der Tasten entsprechen denen der nachfolgenden Tabelle mit
Erklärungen aller Funktionen der Fernbedienung.
Nr.
Taste
1
2
3
4
5
6
7
8
POWER (
R/L
TOP
MUSIC
FILE
0–9
AUDIO
SLIDE
Beschreibung
9
10
11
12
13
14
15
16
17
SLOW
A–B
REPEAT
VOLUME
VOLUME
ZURÜCK
, , ,
PREVIOUS (
PLAY/PAUSE
18
19
20
21
22
23
24
25
26
27
28
29
30
31
32
REWIND (
)
OUTPUT
SETUP
FAST FORWARD (
STOP ( )
NEXT (
)
)
ENTER (
DISPLAY
PAGE
PAGE
MUTE
ROTATE
DELAY
ZOOM
TRANS
33
SUB-T
34
35
36
VIDEO
PHOTO
FUNC
37
38
P/N
MENU
39
Power LED-Anzeige
)
)
)
Zum Umschalten zwischen dem Media Player- und dem Standbymodus.
Zum Ändern der Audioausgabe (Stereo, Mono-L, Mono-R).
Zurück zum Anfang der aktuellen Dateiliste.
Taste für Direktzugriff auf ‚MUSIK’-Ordner.
Zum Anzeigen der ‚Dateibibliothek’.
Numerische Auswahltasten 0-9
Zur Auswahl oder Änderung des Audiostroms (DVD-Wiedergabe).
Zum Starten des Modus Musik-Diashow oder Video-Step-Play
[schrittweises Abspielen].
Langsame Wiedergabe.
Für die wiederholte Wiedergabe eines ausgewählten Abschnitts.
Zur Auswahl eines Wiederhol- / Shuffle-Modus.
Zum Erhöhen der Lautstärke.
Zum Reduzieren der Lautstärke.
Zurück zum vorherigen Ordner.
Zur Auswahl der gewünschten Option im Haupt- oder DVD-Menü.
Zurück zur vorherigen Datei oder zum vorherigen Kapitel.
Zum Starten der Wiedergabe einer Datei oder eines DVD-Ordners oder
Anhalten einer Wiedergabe.
Schnellrücklauf während der Wiedergabe.
Zur Auswahl des Video-Ausgabesignals.
Zum Öffnen des Einstellungsmenüs.
Schnellvorlauf während der Wiedergabe.
Zum Stoppen der Wiedergabe.
Vorwärts zur nächsten Datei oder zum nächsten Kapitel.
Zur Bestätigung der Auswahl oder zum Starten der Wiedergabe.
Zur Anzeige der Wiedergabeinformationen während der Wiedergabe.
Zur Anzeige der nächsten Seite mit Dateien.
Zur Anzeige der vorherigen Seite mit Dateien.
Zum Aktivieren/Deaktivieren der Stummschaltung.
Zum Drehen von Fotos.
Zur Auswahl der Intervallzeit für Diashows (inklusive Musik-Diashows).
Zum Vergrößern oder Verkleinern (Fotos und DVD-Wiedergabe).
Zur Auswahl eines Übergangsmodus während einer Diashow oder eines
Musik-Equalizers während der Musikwiedergabe.
Zur Auswahl oder Änderung der Filmuntertitel (MPEG4 und DVDWiedergabe).
Taste für Direktzugriff auf ‚VIDEO’-Ordner.
Taste für Direktzugriff auf ‚FOTO-Ordner.
Zum Springen zu einer bestimmten Wiedergabezeit während einer
Filmwiedergabe.
Zur Auswahl des Videosystems (PAL / NTSC).
A. Zur Anzeige der ‚Partitionsliste’ oder ‚Dateiliste’.
B. Zum Zurückkehren zum DVD-Menü (DVD-Wiedergabe).
Blinkt, wenn eine Taste gedrückt wird.
49
DEUTSCH
6. Anschluss des CM3H
HDMI-Verbindung
Composite- + SCART-Verbindung
S/PDIF-Verbindung
Anschlussbeispiel mit einer HDMI-, Composite- und S/PDIF-Verbindung.
Anschluss des/der Videokabel/s
Sie haben 4 Möglichkeiten, das Gerät an Ihren Fernseher anzuschließen:
- HDMI
- Composite
- SCART
(mithilfe des Composite-Kabels & Scart-Adapters)
- Component **
**
Wenn Sie Component verwenden, wird nur das Videosignal an Ihren Fernseher oder Monitor gesendet.
Verwenden Sie die RCA-Stecker des Composite-Kabels (rot, weiß) für das Audiosignal.
HDMI:
• Anschluss des HDMI-Kabels an den HDMI-Ausgang [7] des Geräts.
• Stecken Sie das andere Ende des HDMI-Kabels in einen freien HDMI-Eingang an Ihrem Fernseher ein.
Composite:
• Stecken Sie das Composite-Kabel (gelb, rot und weiß) in die entsprechenden Composite-Buchsen [11 ,
12 , 13] des Geräts ein.
• Stecken Sie die andere Seite des Composite-Kabels (gelb, rot und weiß) in die CompositeEingangsbuchsen an Ihrem Fernseher ein.
SCART:
• Stecken Sie das Composite-Kabel (gelb, rot und weiß) in die entsprechenden Composite-Buchsen [11 ,
12 , 13] des Geräts ein.
• Stecken Sie die andere Seite des Composite-Kabels (gelb, rot und weiß) in die Buchsen des SCARTAdapters ein.
• Schließen Sie den SCART-Adapter an den SCART-Eingang Ihres Fernsehers an.
Component:
• Schließen Sie das Component-Kabel (rot, grün und blau) an den Component-Buchsen [8, 9, 10] des
Geräts an.
• Stecken Sie das andere Ende des Component-Kabels in die Component-Buchsen an Ihrem Fernseher ein.
50
DEUTSCH
Anschluss des/der Audiokabel/s
Sie haben 2 Möglichkeiten für den Anschluss des Geräts an Ihren Fernseher / Ihr Heimkinosystem.
- Analog, über die RCA-Audiobuchsen des Geräts
- Digital, über den optisch-digitalen S/PDIF-Ausgang des Geräts
Analog:
• Schließen Sie die Audiostecker (rot, weiß) des Composite-Kabels an den RCA-Audiobuchsen [12 , 13] des
Geräts an.
• Schließen Sie das andere Ende des Composite-Kabels an die RCA-Audiobuchsen Ihres Fernsehers oder
Verstärkers an.
Digital:
• Schließen Sie das optisch-digitale Kabel an den S/PDIF-Ausgang [14] des Geräts an.
• Stecken Sie das andere Ende des optisch-digitalen Kabels im optisch-digitalen Eingang Ihres Verstärkers
ein.
Anschluss des Netzgeräts
Sobald das Gerät an Ihr Audio-/Videogerät angeschlossen ist, können Sie es an die Stromversorgung
anschließen.
• Schließen Sie das mitgelieferte Netzteil am Gleichstromeingang [15] des Geräts und an einer freien
Steckdose an.
• Stellen Sie den Haupt-Ein-Aus-Schalter auf der Rückseite des Geräts auf ‚I’, um das Gerät mit Strom zu
versorgen.
Daraufhin schaltet das Gerät ein.
Vorbereiten der Fernbedienung
Die Fernbedienung wird mit 2 AAA Batterien betrieben (im Lieferumfang enthalten).
Sie müssen zum Ein-/Ausschalten des Geräts die Fernbedienung verwenden.
Hinweise: -
Die Fernbedienung funktioniert am besten bei einem Abstand bis ca. 5 Meter.
Richten Sie die Fernbedienung auf den IR-Empfänger in der Frontblende des Geräts.
Der Empfangswinkel des IR-Empfängers beträgt ±30 Grad.
Ersetzen Sie die Batterien (2x AAA), wenn diese schwach oder leer sind.
51
DEUTSCH
7. Grundbetrieb des CM3H
• Wählen Sie den korrekten Eingangskanal an Ihrem Fernseher, an den das Gerät angeschlossen ist. (HDMI,
Composite, SCART oder Component).
Hinweis:
Von dieser Stelle an basiert das Handbuch auf der Annahme, dass Ihr Fernseher auf den
Eingangskanal des Geräts eingestellt ist. Alle beschriebenen Schritte beziehen sich auf den
Betrieb des Geräts.
• Stellen Sie sicher, dass der Haupt-Ein-Aus-Schalter auf der Rückseite des Geräts auf ‚I’ eingestellt ist.
• Schalten Sie das Gerät mit der Play-/Stop-Taste auf der Vorderseite des Geräts oder mit der ‚Power’Taste (1) auf der Fernbedienung ein.
Nachdem das Gerät eingeschaltet ist, wird das Menü auf dem Bildschirm angezeigt.
Hinweis:
Das Standardausgabesignal des Geräts ist Composite-Video. Wenn das Gerät eingeschaltet ist
und keine Anzeige auf Ihrem Bildschirm erscheint, können Sie die ‚Output’-Taste (19) auf der
Fernbedienung drücken, um zwischen den verschiedenen Ausgaben des CM3H (HDMI, Composite,
Component) umzuschalten.
Hinweis:
Das Gerät muss die Festplatte initialisieren, wenn es eingeschaltet wird. Dies kann eine Weile
dauern. Während der Initialisierung erscheint die Meldung ‚LÄDT...’ auf dem Bildschirm.
Wenn die Festplatte mit einer einzigen Partition formatiert ist, wird auf Ihrem Bildschirm die ‚Dateiliste’
mit dem Inhalt Ihrer Festplatte angezeigt.
Wenn die Festplatte mit mehreren Partitionen formatiert ist, zeigt das Gerät auf Ihrem Bildschirm die
‚Partitionsliste’ mit allen vorhandenen Partitionen an. Wählen Sie mithilfe der / -Tasten (15) das
gewünschte Gerät und drücken Sie die
‘
/Enter’-Taste (24), um die ‘Dateibibliothek’ zu öffnen und den Inhalt des gewählten Gerätes
anzuzeigen.
[ Partitionsliste ]
[ Dateiliste ]
Ändern der Partition:
Wenn die Festplatte mit mehreren Partitionen formatiert ist, können Sie durch Drücken der ‚Menu’-Taste
(38) auf der Fernbedienung wieder die ‚Partitionsliste’ aufrufen und eine andere Partition auswählen.
52
DEUTSCH
8. Optionen für die Wiedergabe von Medien
8.1 Wiedergabe von Filmen
Der CM3H unterstützt verschiedene Videoformate wie MPEG1/2, MPEG 4 (inklusive XVID), VOB, IFO (DVD)
und ISO-Wiedergabe und unterstützt auch über den SPDIF-Ausgang die Wiedergabe von MP3-, AC3-, AACund MPEG1-/2-Audiospuren in Video- und DTS-Passthrough.
• Wählen Sie mithilfe der Navigationstasten auf der Fernbedienung die Datei, die Sie wiedergeben
möchten.
• Drücken Sie die Taste ‚Enter’ (24) oder ‚Play/Pause’ (17) auf der Fernbedienung, um die Wiedergabe
der gewählten Datei zu starten.
Während der Wiedergabe können Sie die folgenden Wiedergabeoptionen auf der Fernbedienung verwenden:
-
Play/Pause
Stop
Rewind
Fast Forward
Previous
Next
Repeat
(17)
(22)
(18)
(21)
(16)
(23)
(11)
-
Display
Func
A-B
Slow
Slide
(25)
(36)
(10)
(9)
(8)
Hinweis:
Wiedergabe der gewählten Datei oder Anhalten der Wiedergabe.
Stoppen der Wiedergabe.
Rücklauf der Wiedergabe.
Schnellvorlauf der Wiedergabe.
Wiedergabe der vorherigen Datei im aktuellen Ordner.
Wiedergabe der nächsten Datei im aktuellen Ordner.
Ändern der Wiederholungs- / Shuffle-Option der aktuellen Datei/des
aktuellen Ordners.
Anzeige der Wiedergabedetails.
Springen zu einem bestimmten Zeitpunkt im Film.
Wiederholen eines ausgewählten Teils des Films.
Zeitlupenwiedergabe
Schrittweise Wiedergabe.
Der CM3H unterstützt die meisten Video-Codecs (wie XviD, AVI, MPEG2 usw.). Es ist jedoch
möglich, dass Sie Dateien haben, die einen Codec erfordern, der auf dem CM3H nicht vorhanden
ist.Wenn Sie versuchen, eine Datei mit einem nicht unterstützten Codec wiederzugeben,
erscheint die Meldung „CODEC NOT SUPPORTED [CODEC NICHT UNTERSTÜTZT]”. Wenn dies
geschieht, empfehlen wir Ihnen, einen anderen Codec für Ihren Film zu verwenden.
Wiederaufnahmefunktion für die Wiedergabe
Der CM3H hat eine Wiederaufnahmefunktion für die Wiedergabe. Wenn Sie den CM3H während der
Wiedergabe von Filmen, Musik oder Diashows ausschalten, setzt der CM3H mit der Wiedergabe an der Stelle
ein, an der er ausgeschaltet wurde.
Diese Funktion ist standardmäßig aktiviert und kann im Einstellungsmenü deaktiviert werden.
Hinweis:
Für ISO- und IFO (DVD)-Dateien wird die Wiederaufnahmefunktion nicht unterstützt.
Untertitelwiedergabefunktion
Der Conceptronic CM3H unterstützt .SMI-, .SRT-, .SUB- oder .SSA-Untertiteldateien.
Wenn die Untertiteldatei den selben Namen wie die ausgewählte Video-Datei hat (nur die Endung
unterscheidet sich), wird diese bei der Wiedergabe der MPEG4-Datei automatisch geladen. Zum Beispiel:
Name der Filmdatei:
Name der Untertiteldatei:
My_Movie_With_Sub.AVI
My_Movie_With_Sub.SRT
Wenn die Untertiteldatei einen anderen Namen hat, müssen Sie diese manuell auswählen. Wählen Sie die
Untertiteldatei und drücken Sie die ‘Sub-t’-Taste (33) auf der Fernbedienung, um den Untertitel
auszuwählen. Wählen Sie den Film und drücken Sie die ‘
/Enter’-Taste (24), um den Film
wiederzugeben.
Hinweis:
Wenn eine Untertiteldatei mit dem selben Namen wie der Film vorhanden ist und Sie versuchen,
eine andere Untertiteldatei zu wählen, forciert der CM3H die Verwendung der Untertiteldatei mit
dem selben Namen und verwendet nicht die ausgewählte Datei.
53
DEUTSCH
DVD-Wiedergabe-Funktion
Der CM3H gibt DVDs von der Festplatte wie normale DVDs wieder. Sie können durch das DVD-Menü
navigieren, Untertitel wählen oder die Audiosprache ändern.
Hinweis:
Der CM3H unterstützt ausschließlich die Wiedergabe ungeschützter DVD-Kopien. CSS-Schutz wird
vom CM3H nicht unterstützt.
Hinweis:
Der CM3H unterstützt ausschließlich DVD-Kopien der Region 2 oder regionsfreie DVD-Kopien.
• Schließen Sie den CM3H an Ihren Computer an. Siehe Kapitel ‘10. Computer-USB-Konnektivität’.
• Erstellen Sie auf der CM3H-Festplatte einen Ordner mit dem Namen Ihres DVD-Films (zum Beipiel:
'Movie1').
• Kopieren Sie ‚AUDIO_TS' und ‚VIDEO_TS' (mit Inhalt) von Ihrer DVD in den auf dem CM3H erstellten
Ordner (zum Beispiel: ‘Movie1’).
Nach dem Kopieren sollte folgende Struktur vorhanden sein:
- [Festplatte des CM3H]
|-> Movie1
|-> AUDIO_TS
|-> VIDEO_TS
(optional, nicht für jede DVD verfügbar)
(mit allen DVD-Dateien)
• Trennen Sie den CM3H von Ihrem Computer und schließen Sie ihn am Fernseher an. Schalten Sie den
CM3H ein.
• Wählen Sie mithilfe der ‘ , , , ’-Tasten (15) auf der Fernbedienung die DVD, die Sie wiedergeben
möchten.
• Drücken Sie die ‚Play/Pause’-Taste (17) auf der Fernbedienung, um die Wiedergabe der ausgewählten
DVD zu starten.
Hinweis:
Verwenden Sie nicht die ‘Enter’-Taste (24), um die Wiedergabe zu starten. Damit werden
lediglich die Dateien/Unterordner angezeigt und die DVD-Wiedergabe wird nicht gestartet.
Während der Wiedergabe der DVD können Sie die folgenden Wiedergabeoptionen auf der Fernbedienung
verwenden:
-
Play/Pause
Stop
Navigationstasten
Enter
Rewind
Fast Forward
Previous
Next
Sub-t
Audio
(17)
(22)
(15)
(24)
(18)
(21)
(16)
(23)
(33)
(7)
-
Zoom
Repeat
A-B
Display
Func
Menu
(31)
(11)
(10)
(25)
(36)
(38)
Wiedergabe der gewählten DVD-Datei oder Anhalten der Wiedergabe.
Stoppen der Wiedergabe der DVD und Zurückkehren zum Movie-Browser.
Navigieren durch das DVD-Menü.
Bestätigen der DVD-Menüauswahl.
Schnellrücklauf.
Schnellvorlauf
Vorheriges Kapitel.
Nächstes Kapitel.
Ändern oder Deaktivieren der Untertitel einer DVD.
Ändern der Audiospur der DVD (wenn eine DVD mehrere Audiospuren
enthält).
Zoomen des wiedergegebenen Films.
Ändern der Wiederholungsoption des aktuellen Kapitels.
Wiederholen eines ausgewählten Teils des Films.
Anzeige der Wiedergabedetails.
Springen zu einem bestimmten Zeitpunkt im Film.
Zurückkehren zum DVD-Menü.
Tipp: Sie können auch DVD-Filme im ISO-Format wiedergeben. Die Wiedergabefunktionen für DVDs im ISOFormat sind dieselben wie die oben angeführten DVD-Wiedergabefunktionen.
54
DEUTSCH
Taste für Direktzugriff auf Ihren Video-Ordner
Sie können einen Video-Ordner erstellen, auf den Sie durch Drücken der ‚Video’-Taste (34) auf der
Fernbedienung direkt zugreifen können. Erstellen Sie einen Ordner mit dem Namen „VIDEO xx” (wobei die
Eingabe für ‚xx’ frei wählbar ist) im Root der Festplatte und speichern Sie Ihre Video-Dateien in diesem
Ordner. Wenn der Media Player gestartet und die ‘Video’-Taste (34) gedrückt wird, öffnet der Media Player
automatisch diesen Ordner.
Hinweis:
Wenn Sie mehr als einen Ordner erstellen, der mit ‚VIDEO’ beginnt, öffnet das Gerät nur den
ersten Ordner.
Einige MPEG2-/VOB-Dateien enthalten zwei oder mehrere Audioströme. Mithilfe der ‚Audio’-Taste (7) auf
der Fernbedienung können Sie zwischen den Audioströmen umschalten. Sie können mithilfe der ‚Audio’Taste (7) den korrekten Audiostrom einstellen, wenn eine Videodatei ohne Ton wiedergegeben wird.
Wenn Sie von einer MPEG2- auf eine VOB-Datei umschalten, kann es sein, dass das Audio verloren geht,
wenn es sich nicht auf dem Standard-Strom befindet. Um dies zu verhindern, drücken Sie während der
Wiedergabe die ‚Setup’-Taste (20), um den gegenwärtigen Audiostrom zu „sperren“. Mit dieser Option
wird der gewählte Audiostrom für alle Dateien beibehalten.
8.2 Wiedergabe von Musik
Der Conceptronic CM3H bietet verschiedene Modi, in denen Sie Musik wiedergeben können (WAV, MP3 und
WMA werden unterstützt).
• Wählen Sie mithilfe der Navigationstasten auf der Fernbedienung die Datei, die Sie wiedergeben
möchten.
• Drücken Sie die Taste ‚Enter’ (24) oder ‚Play/Pause’ (17) auf der Fernbedienung, um die Wiedergabe
der gewählten Datei zu starten.
Während der Wiedergabe können Sie die folgenden Wiedergabeoptionen auf der Fernbedienung verwenden:
-
Play/Pause
Stop
Rewind
Fast Forward
Previous
Next
Repeat
- Trans
(17)
(22)
(18)
(21)
(16)
(23)
(11)
(32)
Wiedergabe der gewählten Datei oder Anhalten der Wiedergabe.
Stoppen der Wiedergabe.
Rücklauf der Wiedergabe.
Schnellvorlauf der Wiedergabe.
Wiedergabe der vorherigen Datei im aktuellen Ordner.
Wiedergabe der nächsten Datei im aktuellen Ordner.
Ändern der Wiederholungs- / Shuffle-Option der aktuellen Datei/des
aktuellen Ordners.
Auswahl eines Equalizer-Typs.
Wiederaufnahmefunktion für die Wiedergabe
Der CM3H hat eine Wiederaufnahmefunktion für die Wiedergabe. Wenn Sie den CM3H während der
Wiedergabe von Filmen, Musik oder Diashows ausschalten, setzt der CM3H mit der Wiedergabe an der Stelle
ein, an der er ausgeschaltet wurde.
Diese Funktion ist standardmäßig aktiviert und kann im Einstellungsmenü deaktiviert werden.
Taste für Direktzugriff auf Ihren Musik-Ordner
Sie können einen Musik-Ordner erstellen, auf den Sie durch Drücken der ‚Music-Taste (4) auf der
Fernbedienung direkt zugreifen können. Erstellen Sie einen Ordner mit dem Namen „MUSIC xx” (wobei die
Eingabe für ‚xx’ frei wählbar ist) im Root der Festplatte und speichern Sie Ihre Bilddateien in diesem
Ordner. Wenn der Media Player gestartet und die ‚Music’-Taste (4) gedrückt wird, öffnet der Media Player
automatisch diesen Ordner.
Hinweis: Wenn Sie mehr als einen Ordner erstellen, der mit ‚MUSIC’ beginnt, öffnet das Gerät nur den
ersten Ordner.
55
DEUTSCH
8.3 Wiedergabe von Fotos & Bildern
Mit dem CM3H können Sie Fotos und Bilder anschauen, die auf der Festplatte des Geräts gespeichert
werden können.
• Wählen Sie mithilfe der Navigationstasten auf der Fernbedienung die Datei, die Sie wiedergeben
möchten.
• Drücken Sie die Taste ‚Enter’ (24) oder ‚Play/Pause’ (17) auf der Fernbedienung, um die Wiedergabe
der gewählten Datei zu starten.
Während der Wiedergabe können Sie die folgenden Wiedergabeoptionen auf der Fernbedienung verwenden:
- Play/Pause
(17)
- Stop
(22)
- Navigationstasten (11)
- Previous
- Next
- Repeat
(16)
(23)
(11)
Delay
Trans
Rotate
Zoom
(30)
(32)
(29)
(31)
-
Starten einer Diashow mit der gewählten Datei, oder Anhalten der
Diashow.
Stoppen der Diashow.
, : Spiegeln des angezeigten Fotos.
,
: Drehen des angezeigten Fotos.
Wiedergabe der vorherigen Datei im aktuellen Ordner.
Wiedergabe der nächsten Datei im aktuellen Ordner.
Ändern der Wiederholungs- / Shuffle-Option der aktuellen Datei/des
aktuellen Ordners.
Ändern der Intervallzeit einer Diashow.
Ändern des Übergangs zwischen zwei Bildern.
Drehen des angezeigten Bildes.
Zoomen des angezeigten Bildes.
Wiederaufnahmefunktion für die Wiedergabe
Der CM3H hat eine Wiederaufnahmefunktion für die Wiedergabe. Wenn Sie den CM3H während der
Wiedergabe von Filmen, Musik oder Diashows ausschalten, setzt der CM3H mit der Wiedergabe an der Stelle
ein, an der er ausgeschaltet wurde.
Diese Funktion ist standardmäßig aktiviert und kann im Einstellungsmenü deaktiviert werden.
Musik-Diashow (Anzeige von Fotos mit Hintergrundmusik)
Wählen Sie ein Foto und drücken Sie die ‚Slide’-Taste (8), um die Musik-Diashow zu starten.
Wenn Sie die ‚Slide’-Taste (8) nicht drücken, wird die Musik nicht abgespielt und die Bilder werden als
normale Diashow ohne Musik wiedergegeben. Wenn in dem betreffenden Ordner keine Musikdateien
vorhanden sind, kann die Musik-Diashow-Funktion nicht verwendet werden. Um die Bilder in einer Diashow
ohne Ton anzuzeigen, müssen Sie die Enter’-Taste (24)
drücken.
Hinweis:
In diesem Modus können die Funktionen Rotate [Drehen] und Zoom nicht verwendet werden.
Sie können die Diashow anhalten, indem Sie einmal die ‚Play/Pause’-Taste (17) drücken (die Musik wird
weiterhin abgespielt). Wenn Sie die ‚Play/Pause’-Taste (17) erneut drücken, wird auch die Wiedergabe der
Musik angehalten. Um die Diashow fortzusetzen, drücken Sie die ‚Play / Pause’-Taste (17) erneut.
Taste für Direktzugriff auf Ihren Foto-Ordner
Sie können einen Foto-Ordner erstellen, auf den Sie durch Drücken der ‚Photo’-Taste (35) auf der
Fernbedienung direkt zugreifen können. Erstellen Sie einen Ordner mit dem Namen „PHOTO xx” (wobei die
Eingabe für ‚xx’ frei wählbar ist) im Root der Festplatte und speichern Sie Ihre Bilddateien in diesem
Ordner. Wenn der Media Player gestartet und die ‚Photo’-Taste (35) gedrückt wird, öffnet der Media
Player automatisch diesen Ordner.
Hinweis:
Wenn Sie mehr als einen Ordner erstellen, der mit ‚PHOTO’ beginnt, öffnet das Gerät nur den
ersten Ordner.
56
DEUTSCH
9. Systemkonfiguration
Sie können über die ‚Setup’-Taste (20)auf der Fernbedienung das Einstellungsmenü des Gerätes öffnen.
Wählen Sie mithilfe der / / / -Tasten die gewünschte Option im Setup-Menü und drücken Sie die ENTERTaste
, um die Auswahl zu bestätigen. Wenn Sie mit der Konfiguration Ihres Gerätes fertig sind,
drücken Sie die Setup-Taste erneut, um das Einstellungsmenü zu schließen oder wählen Sie die Option ‚Exit
Setup [Einstellungen schließen]’ im Einstellungsmenü.
Das Einstellungsmenü enthält die folgenden Seiten:
•
•
•
•
•
General Page [Seite mit den allgemeinen
Einstellungen]
Audio Setup Page [Seite mit den AudioEinstellungen]
Video Setup Page [Seite mit den VideoEinstellungen]
Setup Menu Slide Show [Seite mit den DiashowEinstellungen]
Exit Setup [Einstellungen schließen]
General Page [Seite mit den allgemeinen Einstellungen]
On-Screen-Display-Sprache
: Einstellen der On-Screen-Display-Sprache.
Screensaver [Bildschirmschoner]
: Aktivieren oder Deaktivieren des Bildschirmschoners.
Play Resume [Wiedergabe wiederaufnehmen]: Aktivieren oder Deaktivieren der Wiederaufnahmefunktion
der Wiedergabe.
Defaults [Werkseinstellungen]
: Zurücksetzen des Geräts auf die Werkseinstellungen.
Auto Start
: Automatische Wiedergabe aller Mediendateien auf dem
CM3H, wenn das Gerät eingeschaltet wird.
Audio Setup Page [Seite mit den Audio-Einstellungen]
Downmix
: Einstellen des Downmix-Modus für Multikanalsound.
SPDIF Output [SPDIF-Ausgabe] : Einstellen des SPDIF-Ausgabemodus.
LPCM Output [LPCM-Ausgabe] : Einstellen des LPCM-Ausgabemodus.
Video Setup Page [Seite mit den Video-Einstellungen]
TV Display [TV-Anzeige]
: Ändern der TV-Anzeige-Einstellung.
TV-System
: Auswahl eines Videosystems für Ihren Fernseher.
Video Output [Videoausgang]
: Auswahl des verwendeten Videoausgangs.
Setup Menu Slide Show [Seite mit den Diashow-Einstellungen]
Interval time [Intervallzeit]
: Auswahl der Intervallzeit zwischen zwei Bildern.
Übergang
: Auswahl des Übergangs zwischen zwei Bildern.
57
DEUTSCH
10. Computer-USB-Konnektivität
Das Gerät kann zum Kopieren von Daten (Filmen, Musik, Bildern, Aufzeichnungen usw.) von der und auf die
interne Festplatte an einen Computer angeschlossen werden.
Hinweis:
Das nachfolgende Beispiel bezieht sich auf einen Computer mit dem Betriebssystem Windows XP,
das Gerät kann jedoch mit allen Computern mit USB-Unterstützung und der Fähigkeit, FAT32Dateisysteme zu lesen und zu schreiben, verwendet werden.
Anschluss des Geräts an einen Computer
• Schließen Sie das mitgelieferte USB-an-Mini-USB-Kabel auf der Rückseite des Geräts und an einen freien
USB-Port Ihres Computers an.
• Schalten Sie das Gerät über den Hauptpowerschalter auf der Rückseite des Geräts ein. Das Gerät wird
automatisch erkannt und installiert und als zusätzliches Laufwerk Ihres Computers angezeigt.
Standardmäßig wird die interne Festplatte des Geräts als USB-Speichergerät initialisiert.
Trennen des Geräts von Ihrem Computer
•
•
•
•
Klicken Sie auf das Symbol ‚Sicher entfernen’ in der Kontrollleiste.
Wählen Sie ‚USB-Massenspeichergerät beenden’, wenn Sie dazu aufgefordert werden.
Warten Sie, bis die Meldung ‚Hardware sicher entfernen’ erscheint.
Stecken Sie das USB-Kabel aus.
58
DEUTSCH
11. Tipps zur Fehlerbeseitigung
Im Folgenden finden Sie Tipps zur Fehlerbeseitigung, wenn Ihr CM3H nicht ordnungsgemäß funktioniert:
Die Power-LED-Anzeige leuchtet nicht:
• Der CM3H ist nicht an die Stromversorgung angeschlossen. Schließen Sie den CM3H an die
Stromversorgung an.
Es erscheint keine Anzeige auf dem Display:
• Der CM3H befindet sich im Standby-Modus. Drücken Sie die ‚ -Taste (1) auf der Fernbedienung, um den
CM3H wieder zu aktivieren.
• Auf dem Fernseher wurde die falsche Eingangsquelle ausgewählt. Ändern Sie die Eingangsquelle.
• Das falsche Videosystem wurde ausgewählt. Drücken Sie die ‚Output’.Taste (19) auf Ihrer
Fernbedienung, um auf das korrekte Ausgabesignal umzustellen.
• Das Videokabel wurde nicht korrekt angeschlossen. Stellen Sie sicher, dass das Videokabel korrekt
angeschlossen ist.
Wenn das Gerät ausgeschaltet ist, ist lediglich ein ‚Pling’-Ton zu hören, es wird jedoch kein Menü
angezeigt:
• Das falsche Videosystem wurde ausgewählt. Drücken Sie die ‚Output’.Taste (19) auf Ihrer
Fernbedienung, um auf das korrekte Ausgabesignal umzustellen.
• Das Videokabel wurde nicht korrekt angeschlossen. Stellen Sie sicher, dass das Videokabel korrekt
angeschlossen ist.
• Der Audioausgang des CM3H ist an den Verstärker angeschlossen, auf dem Fernseher ist jedoch der
falsche Eingang ausgwählt. Wählen Sie den korrekten Eingang auf Ihrem Fernseher.
Kein Ton:
• Das Audiokabel wurde nicht korrekt angeschlossen. Vergewissern Sie sich, dass das Kabel korrekt an
Ihrem Fernseher oder Verstärker angeschlossen ist.
• Der CM3H ist an einen Verstärker angeschlossen, der Verstärker ist jedoch ausgeschaltet. Schalten Sie
den Verstärker ein.
• Der Audiostrom der MPEG2- oder VOB-Datei ist ungültig. Drücken Sie die ‚AUDIO’-Taste (7) auf der
Fernbedienung, um den korrekten Audiostrom einzustellen.
• Die Funktion Stummschaltung ist aktiviert. Drücken Sie die ‚MUTE’-Taste (28) auf der Fernbedienung,
um die Stummschaltung zu deaktivieren.
• Der CM3H läuft im Schnellvorlauf- oder Schnellrücklauf-Modus. Drücken Sie die ‚Enter’-Taste (24) auf
der Fernbedienung, um zur normalen Wiedergabegeschwindigkeit zurückzukehren.
Das Bild auf dem Display ist verzerrt:
• Der CM3H läuft im Schnellvorlauf- oder Schnellrücklauf-Modus. Drücken Sie die ‚Enter’-Taste (24) auf
der Fernbedienung, um zur normalen Wiedergabegeschwindigkeit zurückzukehren.
• Ein PAL-Film wird im NTSC-Modus wiedergegeben oder umgekehrt. Drücken Sie die ‚P/N’-Taste (37) auf
der Fernbedienung, um die Display-Einstellungen zu ändern.
Wenn die ‚Slide’-Taste gedrückt wird, blockiert das System:
• Im aktuellen Ordner befinden sich zu viele Foto- oder Musikdateien. Deshalb dauert es lange, bis die
Musik-Diashow gestartet wird. Warten Sie bitte, bis die Wiedergabe beginnt.
Die Fernbedienung funktioniert nicht:
• Richten Sie die Fernbedienung direkt oder in einem Winkel von ±30 Grad auf den Empfänger des CM3H.
• Verwenden Sie die Fernbedienung in einem Bereich von 5 Metern.
• Die Batterien (AAA) der Fernbedienung sind leer und sollten ersetzt werden.
Die Untertitel des wiedergegebenen Films werden nicht angezeigt:
• Es wird eine AVI-Datei wiedergegeben, die Untertitel-Datei hat jedoch einen anderen Dateinamen.
Informationen darüber, wie die Untertitel angezeigt werden können, finden Sie in Kapitel 8.1.
• Die Untertiteldatei wird vom CM3H nicht unterstützt.
59
DEUTSCH
Beim Versuch, ein Video abzuspielen, erscheint die Meldung “CODEC NOT SUPPORTED [CODEC NICHT
UNTERSTÜTZT]”:
• Die Filmdatei wurde mit einem Codec erzeugt, den der CM3H nicht unterstützt.
Eine Liste der vom CM3H unterstützten Codecs finden Sie auf unserer Webseite unter
www.conceptronic.net.
Der CM3H zeigt nicht alle Festplatten-Partitionen / nicht den gesamten Inhalt an:
• Die Partition auf der Festplatte ist keine Primärpartition. Partitionieren Sie die Festplatte erneut und
stellen Sie sicher, dass alle Partitionen primär sind.
• Die Festplatte ist mit einem Dateisystem formatiert, das vom CM3H nicht unterstützt wird. Formatieren
Sie Ihre Festplatte mit dem FAT32- oder NTFS-Dateisystem erneut.
• Die ausgewählte Partition enthält keine Mediendateien.
Die DVD-/ISO-Wiedergabe startet nicht, wenn die Play/Pause-Taste gedrückt wird:
• Vergewissern Sie sich, dass Sie die richtige Ordnerstruktur verwenden. Die Ordnerstruktur ist in Kapitel
8.1 beschrieben.
Die DVD-Dateien sind unvollständig, unbrauchbar oder beschädigt. In diesem Fall startet der CM3H die
DVD-Wiedergabe nicht.
Während den Intro-Movies der DVD zeigt der Bildschirm nichts an:
• Das aktuelle Kapitel endet mit einem leeren Bildschirm oder ist zu kurz zum Wiedergeben. Drücken Sie
auf die ‚Next’-Taste (23), um zum nächsten Kapitel zu wechseln.
Mein Fernseher zeigt ein Schwarz/Weiß-statt ein Farbbild:
• Ihr Fernseher unterstützt das „Multi” TV System des CM3H nicht. Ändern Sie das TV-System im SetupMenü auf PAL. (Siehe Kapitel 9). Nachdem Sie das TV-System geändert haben, schalten Sie den CM3H aus
und wieder ein.
60
FRANÇAIS
Conceptronic CM3H
Manuel d’Utilisateur
Nous vous félicitons d'avoir acheté votre
Lecteur Multimédia de Conceptronic.
Vous trouverez dans ce Manuel d'Utilisateur une explication détaillée de l'installation du Lecteur Multimédia
de Conceptronic.
En cas de problème, nous vous conseillons de vous rendre sur notre site de support technique (rendez-vous
sur le site de www.conceptronic.net et cliquez sur « Support »). Vous y trouverez la Base de données de la
Foire aux Questions.
En cas de questions concernant votre produit et si vous n’obtenez pas de réponse sur notre site Web,
n’hésitez pas à nous contacter par e-mail : [email protected]
Pour plus d'informations concernant les produits Conceptronic, veuillez consulter notre site Web :
www.conceptronic.net
Astuce :
Le microprogramme du CM3H de Conceptronic peut être mis à jour. Pour télécharger la dernière
version de microprogramme, rendez-vous sur le site Web de Conceptronic.
Astuce :
Visitez le site www.conceptronic.net pour connaître la liste de codecs la plus récente des
fichiers supportés.
1. Contenu du Coffret
Les éléments suivants sont fournis dans le paquet avec le Lecteur Multimédia de Conceptronic :
•
•
•
•
•
•
•
•
•
Lecteur Multimédia CM3H de Conceptronic (appelé "appareil" dans ce manuel).
Socle de support pour CM3H
Source d’alimentation électrique (12V, 2.5A) avec câble d’alimentation
Télécommande.
2 Piles AAA pour la télécommande.
Câble Vidéo Composite (Fiches RCA Rouge, Blanche, Jaune).
Adaptateur prise Péritel pour Câble vidéo composite
Câble USB
Ce Manuel d'Utilisateur.
61
FRANÇAIS
2. Caractéristiques du Produit
• Interface utilisateur en plusieurs langues Anglais, Hollandais, Espagnol, Français, Italien, Allemand,
Portugais.
• Supporte les multiples partitions du disque dur
• Supporte les systèmes de fichiers FAT32 et NTFS.
• Sortie vidéo HDMI jusqu'à 1080i.
• Supporte les sous -titres (.SMI/ .SRT/.SUB/.SSA) pour MPEG4 (AVI), résolution D1.
• Supporte AVI (MPEG4), MPG (MPEG1, MPEG2), DAT (VCD), VOB (DVD), IFO (DVD), ISO, WAV, WMA, MP3,
JPG.
• Supporte divers Codecs. Consultez notre site web pour obtenir la liste complète des Codecs supportés
• Sorties : HDMI/ Vidéo composite / Vidéo de composants / RCA audio stéréo / Audio optique
• Conforme PAL / NTSC.
• Modes répétition divers.
• Économiseur d’Écran
• 14 modes de transition pour photos.
• Présentation de diapositives (reproduction de photos en diapositives) avec musique de fond.
• Intervalle d’affichage modifiable.
• Fonctions zoom et de rotation.
• Un commutateur automatique entre Mode PC-USB et Mode Lecture :
• Lorsqu'il est connecté à un PC, cet appareil agit comme un Dispositif de Stockage USB.
• Lorsqu'il n'est pas connecté à un PC, cet appareil agit comme Lecteur Multimédia.
Remarque :
Le CM3H ne peut lire les films HD (720p, 1080i, 1080p).
3. Remarques et Avertissements
• N’essayez pas de démonter l’adaptateur électrique fourni. Vous pourriez provoquer des électrocutions à
haute tension. Si vous devez réparer l’adaptateur, veuillez prendre contact avec le revendeur ou avec le
service technique de Conceptronic.
• Conservez l’appareil à l’abri de l’humidité excessive.
• Ne plongez pas et n’exposez pas l’appareil dans du liquide.
• Débranchez l’adaptateur électrique si vous ne prévoyez pas d’utiliser l’appareil pendant longtemps.
• Évitez d’utiliser l’appareil à proximité de combustibles.
• Remplacez les piles de la télécommande par des piles du même type lorsqu’elles sont faibles ou
épuisées. Recyclez les piles usagées quand vous en avez la possibilité. Pour éviter la corrosion, enlevez
les piles quand vous n’allez pas utiliser la télécommande pendant longtemps.
• Conservez l’appareil à l’abri de l’humidité excessive ; ne le faites pas tomber.
• Ne faites pas fonctionner la télécommande dans des conditions d’ensoleillement intenses.
• Veillez à ne JAMAIS faire tomber l’appareil ; protégez-le des coups ou chocs.
• Pour éviter la surchauffe, ne couvrez pas l’appareil.
Remarque : Les données du disque dur interne peuvent être fragmentées. La lecture des films peut ne
pas être optimale. Il est recommandé de défragmenter le disque dur de votre ordinateur de
temps en temps.
62
FRANÇAIS
4. Aperçu du Produit
Vue de la façade avant.
Vue de la partie arrière.
1
5
2
6
7
3
4
8
9
10
11
12
13
14
15
Description des numéros :
1.
2.
3.
4.
Récepteur Infrarouge
LED d'Alimentation / Pause
Touches de commande (voir ci-après)
LED d’Activité disque dur
8.
9.
10.
11.
12.
13.
14.
15.
5. Interrupteur Principal
6. Prise Mini-USB (Vers le PC)
7. Sortie HDMI
Explication des Touches
Touches de navigation
( , , , )
Sortie Composant "Pb"
Sortie Composant "Pr"
Sortie Composant "Y"
Sortie Vidéo composite
Sortie Audio "R" (Droite)
Sortie Audio "L" (Gauche)
Sortie Numérique Optique
Entrée CC (12V, 2,5A)
Dans le menu :
Naviguez dans les menus de l’appareil.
Pendant la lecture :
,
Augmenter / baisser le volume.
,
Rembobinage rapide / avance rapide.
Touche marche / arrêt ( / ) Appui court :
Démarrer ou arrêter la lecture d’un fichier, ou ouvrir un
répertoire.
Appui prolongé :
Allumer le CM3H ou le mettre en mode pause.
63
FRANÇAIS
5. Explication de la Télécommande
La télécommande est utilisée pour commander l'appareil. Vous trouverez dans la page de couverture
intérieure de ce manuel une illustration graphique de la télécommande. Les chiffres indiqués sur les
boutons correspondent au tableau ci-après, pour expliquer chaque fonction de la télécommande.
Nº
Touche
1
2
3
4
5
6
7
8
POWER (
R/L
TOP
MUSIC
FILE
0–9
AUDIO
SLIDE
Description
9
10
11
12
13
14
15
16
17
SLOW
A-B
REPEAT
VOLUME
VOLUME
BACK
, , ,
)
PREVIOUS (
PLAY / PAUSE
18
19
20
21
22
23
24
25
26
27
28
29
30
REWIND (
)
OUTPUT
SETUP
FAST FORWARD (
STOP ( )
NEXT (
)
)
ENTER (
DISPLAY
PAGE
PAGE
MUTE
ROTATE
DELAY
31
32
ZOOM
TRANS
33
34
35
36
37
38
SUB-T
VIDEO
PHOTO
FUNC
P/N
MENU
39
Led d'Alim.
)
)
Passer du Mode Lecteur Multimédia au Mode Pause et vice-versa
Modifier la sortie audio (Stéréo, Mono-L, Mono-R).
Aller en haut de la liste de fichiers en cours.
Touche d'accès direct au répertoire "MUSIC"
Afficher la Bibliothèque de Fichiers.
Touches de sélection numérique 0-9.
Sélectionner ou modifier le flux audio (Lecture DVD)
Entrer en mode présentation de diapositives en musique ou lancer la
lecture vidéo en mode pas à pas.
Reproduction lente
Reproduit un intervalle sélectionné de manière répétée.
Sélectionner le mode répétition / aléatoire.
Augmenter le volume.
Réduire le volume.
Revenir au répertoire précédent.
Déplacer la sélection dans le menu principal ou dans le menu DVD.
Passer au fichier précédent ou chapitre précédent.
Commencer la lecture d'un fichier ou d'un répertoire DVD, ou mettre une
lecture en pause
Rembobinage rapide pendant la lecture.
Sélectionner le Signal de Sortie Vidéo.
Ouvrir le Menu de Configuration.
Avance rapide pendant la lecture.
Arrête la lecture.
Passer au fichier ou chapitre suivant.
Confirmer la sélection ou lancer la lecture.
Afficher les informations du fichier pendant la lecture.
Afficher la page suivante avec les fichiers.
Afficher la page précédente avec les fichiers.
Passer en mode muet ou annuler le mode muet.
Faire tourner les photos.
Sélectionner le débit de la présentation de diapositives (y compris la
présentation de diapositives en musique)
Zoom + ou – (Photos & Lecture DVD)
Sélectionner un mode de transition pendant la présentation de
diapositives ou un type d'égalisateur de musique pendant la lecture de
musique.
Sélectionner ou modifier le Sous-titrage du film (MPEG4 & Lecture DVD)
Touche d'accès direct au répertoire "VIDÉO"
Touche d'accès direct au répertoire "PHOTO".
Passer à une durée de lecture déterminée pendant la lecture du film.
Sélectionner le système vidéo. (PAL / NTSC)
A. Afficher la "Partition List" [Liste de Partitions]" ou la "File List"
[Bibliothèque de Fichiers}
B. Retour au Menu DVD (Lecture DVD)
La LED d'alimentation clignote lorsqu'une touche est enfoncée.
64
FRANÇAIS
6. Comment connecter votre CM3H ?
Connexion HDMI
Connexion Composite + PERITEL
Connexion S/PDIF
Exemple de connexion, avec connexions HDMI, Composite et S/ PDIF.
Connexion du/des Câble/s Vidéo
Vous pouvez connecter l'appareil de 4 manières différentes sur votre TV :
- HDMI
- Composite
- PÉRITEL
(en utilisant le Câble composite et l'adaptateur Péritel)
**
- Composant
**
Lorsque vous utilisez Composant, seul le signal vidéo est envoyé à votre TV ou écran.
Pour le signal audio, utilisez les connecteurs Audio RCA du câble Composite (Rouge, Blanc).
HDMI:
• Branchez la câble HDMI sur la sortie HDMI [7] sur l'appareil.
• Branchez l'autre extrémité du câble HDMI sur une entrée HDMI de votre TV.
Composite :
• Branchez le câble Composite (Jaune, Rouge et Blanc) sur les connecteurs Composite correspondants [11,
12, 13] de l'appareil.
• Branchez l'autre extrémité du câble Composite (Jaune, Rouge et Blanc) sur les connecteurs de l’entrée
de composite sur votre TV.
PÉRITEL :
• Branchez le câble Composite (Jaune, Rouge et Blanc) sur les connecteurs Composite correspondants [11,
12, 13] de l'appareil.
• Branchez l'autre extrémité du câble Composite (Jaune, Rouge et Blanc) sur les connecteurs de
l'adaptateur Péritel.
• Branchez l'Adaptateur Péritel sur l'entrée Péritel de votre TV.
Composant :
• Branchez la Câble de Composant (Rouge, Vert et Bleu) sur les connecteurs de Composant [8, 9, 10] de
l’appareil.
• Branchez l'autre extrémité du câble Composant sur les connecteurs d’entrée de Composant de votre TV.
65
FRANÇAIS
Connexion du/des Câble/s Audio
Vous pouvez connecter l'appareil sur votre TV et/ou votre système de Home Cinema de 2 manières
différentes :
- Analogique, par les Connecteurs Audio RCA de l'appareil.
- Numérique, Par la sortie S/PDIF Digitale Numérique de l'appareil.
Analogique :
• Branchez les connecteurs Audio (Rouge, Blanc) du câble Composite sur les connecteurs audio RCA [12,
13] de l'appareil.
• Branchez l'autre extrémité du câble Composite sur les connecteurs audio RCA de votre TV ou
amplificateur.
Numérique :
• Branchez le câble optique Numérique sur la sortie S/PDIF [14] de l'appareil.
• Branchez l'autre extrémité du câble optique Numérique sur une entrée optique Numérique de votre
amplificateur.
Connexion de la Source d’Alimentation Électrique
Lorsque l'appareil est branché sur votre équipement Audio/Vidéo, vous pouvez brancher la source
d’alimentation électrique de l’appareil.
• Branchez la source d'alimentation électrique fournie sur l'entrée CC de l’appareil [15] et sur une prise
murale libre.
• Mettez l’interrupteur d’alimentation principale à l’arrière de l’appareil sur "I" pour allumer l’appareil.
L'appareil s'allume.
Préparation de la Télécommande.
La télécommande utilise 2 piles AAA (fournies).
Vous aurez besoin de la télécommande pour allumer/éteindre l'appareil.
Remarques : -
La portée optimale de la télécommande est d’environ 5 mètres.
Dirigez la télécommande vers le récepteur IR intégré dans la façade avant de l'appareil.
L'angle de réception du récepteur IR est de ±30 degrés.
Remplacez les piles (2xAAA) lorsqu’elles sont faibles ou épuisées.
66
FRANÇAIS
7. Fonctionnement de base du CM3H
• Sélectionnez le canal d'entrée correct sur la TV à laquelle l'appareil est connecté. (HDMI, Composite,
Péritel ou Composant).
Remarque : À partir d'ici, le manuel est basé sur l'hypothèse que votre poste de TV est configurée su
chaîne d'entrée de l'appareil. Toutes les opérations décrites ci-après concernent le
fonctionnement de l'appareil.
• Vérifiez si l'interrupteur d’alimentation principal à l'arrière de l’appareil est sur "I".
• Allumez l'appareil avec le bouton Marche/Arrêt sur la façade avant de l'appareil, ou avec la touche
"Power" (1) de la télécommande.
L’appareil va s’allumer et afficher le menu sur votre écran.
Remarque : Le signal de sortie par défaut de l’appareil est Composite Vidéo. Si l’appareil est allumé et
que rien n’apparaît à l’écran, appuyez sur la touche "Output" (19) de la télécommande pour
choisir entre les différentes sorties du CM3H (HDMI, Composite, Composant.
Remarque : L’appareil doit réinitialiser le disque dur lorsqu’il est allumé. Ceci peut prendre quelques
instants. Pendant l’initialisation, le message “LOADING…” [Chargement en cours] s'affiche
sur l'écran.
Lorsque le disque dur est formaté avec 1 partition, il affiche la "File List" [Bibliothèque de Fichiers] sur
votre écran, et indique les contenus de votre disque dur.
Lorsque le disque dur est formaté avec de multiples partitions, l'appareil affiche la "Partition List" [Liste
de Dispositif] sur votre écran avec toutes les partitions présentes. Utilisez les touches / (15) pour
déplacer la sélection, puis appuyez sur la touche
‘
"Enter" (24) pour passer à la "File List" [Bibliothèque de Fichiers], et afficher le contenu de la
partition sélectionnée.
[Liste de Partition]
[Bibliothèque de Fichiers]
Changer de partition :
Lorsque le disque dur est formaté avec de multiples partitions, vous pouvez appuyer sur la touche "Menu"
(38) pour revenir à la "Partition List" [Liste de Partition] et sélectionner une partition différente.
67
FRANÇAIS
8. Options de Lecture Multimédia
8.1 Lecture de vos films
Le CM3H supporte différents formats de vidéo, comme MPEG1/2, MPEG 4 (y compris XVID), VOB, IFO (DVD)
et lecture ISO ; il supporte également les pistes son MP3, AC3, AAC et MPEG1/2 dans la vidéo et le
passthrough DTS par la sortie SPDIF.
• Sélectionnez le fichier que vous voulez mettre en route à l’aide des touches de navigation de la
télécommande.
• Appuyez sur la touche “Enter” (24) ou sur la touche "Play/Pause" (17) de la télécommande pour
démarrer la lecture du fichier choisi.
Pendant la lecture, vous pouvez utiliser les options de lecture suivantes de la télécommande :
-
Play/Pause
Stop
Rewind
Fast Forward
Previous
Next
Repeat :
Écran
Func
A-B
Slow
Slide
(17)
(22)
(18)
(21)
(16)
(23)
(11)
(25)
(36)
(10)
(9)
(8)
Lire les fichiers sélectionnés ou mettre la lecture en pause.
Mettre la lecture en pause.
Retour rapide pendant la lecture.
Avance rapide pendant la lecture.
Lecture du fichier précédent dans le répertoire actuel.
Lecture du fichier suivant dans le répertoire actuel.
Changer l’option répétition / aléatoire du fichier/répertoire actuel.
Afficher les détails de lecture.
Passer à un moment précis de votre film.
Répéter une partie sélectionnée du film.
Lecture au ralenti.
Lecture en mode pas à pas.
Remarque : Le CM3H (comme XviD, AVI, MPEG2, etc.….) supporte la plupart des Codecs Vidéo mais il se
peut que vous ayez un fichier demandant un Codec non compris dans le CM3H.
Si vous tentez de lire un fichier avec un Codec qui n’est pas supporté, le message "CODEC
NOT SUPPORTED" [CODEC NON SUPPORTÉ] apparaît. Lorsque cela se produit, nous vous
suggérons d’utiliser un codec différent pour votre film.
Fonction de reprise de lecture
Le CM3H possède une fonction de reprise de lecture. Si vous éteignez le CM3H pendant la lecture de vos
films, musique, ou présentation de photos, le CM3H reprendra la lecture lorsque vous le rallumerez.
Cette fonction est activée par défaut et peut être désactivée dans le Menu de Configuration.
Remarque : La fonction de reprise de ISO et IFO (DVD) n’est pas supportée.
Fonction de Lecture des sous-titres
Le CM3H de Conceptronic peut supporter les fichiers de sous-titres en format .SMI, .SRT, .SUB ou .SSA.
Si le fichier de sous-titre a le même nom que le fichier de vidéo sélectionné (seule l’extension change), le
fichier de sous-titre sera automatiquement chargé lorsque le fichier MPEG4 sera reproduit, par exemple:
Nom du film :
My_Movie_With_Sub.AVI
Nom du sous-titrage : My_Movie_With_Sub.SRT
Quand le fichier sous-titre a un autre nom, il faut sélectionner le fichier sous-titre manuellement.
Sélectionnez le fichier sous-titre et appuyer sur la touche “Sub-t" (33) sur la télécommande pour
sélectionnez le sous-titre. Sélectionnez le film et appuyez sur la touche "
/Enter" (24) pour lire le
film.
Remarque :
Si un fichier sous-titre ayant le même nom que le film est disponible, et que vous essayez de
sélectionner un autre fichier sous-titre, le CM3H utilisera systématiquement le fichier soustitre qui porte le même nom, au lieu du fichier sélectionné.
68
FRANÇAIS
Fonction Lecture de DVD
Le CM3H lit les DVD à partir du disque dur comme s'il s'agissait de DVD normaux. Vous pouvez naviguer dans
le Menu DVD, choisir les sous-titres ou modifier les langues.
Remarque : Le CM3H supporte uniquement la lecture de copies DVD non protégées. La protection CSS
n’est pas supportée par le CM3H.
Remarque : Le CM3H supporte uniquement les copies DVD de Region 2 ou Region-free.
• Branchez le CM3H sur votre ordinateur. Voir chapitre “10. Connectivité USB d’ordinateur”.
• Créez un répertoire sur le disque dur CM3H avec le nom de votre film DVD (par exemple : 'Movie1').
• Copiez les "AUDIO_TS" et "VIDEO_TS" (y compris le contenu) de votre DVD sur le répertoire créé (par
exemple : ‘Movie1’) sur le CM3H.
Lorsque vous les avez copiés, la structure doit être la suivante :
- [hard disk OF CM3H]
|-> Movie1
|-> AUDIO_TS
|-> VIDEO_TS
(en option, non disponible pour tous les DVD)
(qui contient tous les fichiers DVD)
• Débranchez le CM3H de votre ordinateur et connectez-le sur votre poste de TV. Allumez le CM3H.
• Sélectionnez le DVD que vous voulez lire avec les touches" , , , " (15) de la télécommande.
• Utilisez la touche "Play/Pause" (17) de la télécommande pour commencer à lire le DVD sélectionné.
Remarque : N'utilisez pas la touche "Enter" (24) pour démarrer. Elle ne sert qu'à afficher les fichiers /sous
répertoires mais pas à lancer la lecture du DVD.
Pendant la lecture du DVD, vous pouvez utiliser les options de lecture suivantes de la télécommande :
-
Play/Pause
Stop
Navigation keys:
Enter
Rewind
Fast Forward
Previous
Next
Sub-t
Audio
(17)
(22)
(15)
(24)
(18)
(21)
(16)
(23)
(33)
(7)
-
Zoom
Repeat :
A-B
Écran
Func
Menu
(31)
(11)
(10)
(25)
(36)
(38)
Astuce :
Lire les fichiers sélectionnés ou mettre la lecture en pause.
Arrêter la lecture du DVD et revenir au Navigateur du répertoire de films.
Naviguer dans le menu DVD
Confirmer la/les sélection/s du Menu DVD
Retour Rapide
Avance rapide.
Chapitre Précédent
Chapitre Suivant
Changer ou désactiver le sous-titrage du DVD.
Passer à une autre piste audio du DVD (lorsque le DVD contient plusieurs
pistes audio).
Zoomer sur le film reproduit.
Changer l’option Répétition du chapitre en cours.
Répéter une partie sélectionnée du film.
Afficher les détails de lecture.
Passer à un moment précis de votre film.
Retour au Menu DVD
Vous pouvez également lire les films DVD qui sont en format ISO. Les fonctions de lecture pour
les DVD en format ISO sont les mêmes que les fonctions de lecture de DVD ci-dessus.
69
FRANÇAIS
Touche d'accès direct au répertoire de vidéo.
Vous pouvez créer 1 répertoire vidéo, auquel vous pouvez accéder en appuyant sur la touche "Vidéo" (34)
de la télécommande. Créez un répertoire appelé “VIDEO xx” (vous pouvez remplacer "xx" par ce que vous
voulez) sur la racine du disque dur et placez vos fichiers vidéo dans ce répertoire. Quand le lecteur média
est en marche et que vous appuyez la touche “Vidéo" (34), le lecteur média ouvre automatiquement le
répertoire.
Remarque :
Si vous créez plus d’un répertoire commençant par le mot "VIDEO", l'appareil ouvrira
uniquement le premier fichier.
Quelques fichiers MPEG2/VOB contiennent deux flux audio ou plus. En appuyant sur la touche “Audio” (7)
sur la télécommande, vous pouvez passer d’un flux audio à l’autre. Vous pouvez utiliser sur la touche
"Audio" (7) quand le fichier vidéo que vous lisez n’a pas de son, afin de pouvoir localiser le bon flux audio.
Si vous partez du fichier MPEG2/VOB, il se peut que vous perdiez le flux audio s’il n’est pas sur le flux audio
par défaut. Pour éviter cela, appuyez sur la touche “Setup” (20) `pendant la lecture pour "verrouiller" le
flux audio actuel. Cette option gardera le flux audio sélectionné pour tous les fichiers.
8.2 Lecture de votre Musique
Le CM3H de Conceptronic possède divers modes dans lesquels vous pouvez écouter de la musique (WAV, MP3
sont supportés).
• Sélectionnez le fichier que vous voulez mettre en route à l’aide des touches de navigation de la
télécommande.
• Appuyez sur la touche “Enter” (24) ou sur la touche "Play/Pause" (17) de la télécommande pour
démarrer la lecture du fichier choisi.
Pendant la lecture, vous pouvez utiliser les options de lecture suivantes de la télécommande :
-
Play/Pause
Stop
Rewind
Fast Forward
Previous
Next
Repeat
Trans
(17)
(22)
(18)
(21)
(16)
(23)
(11)
(32)
Lire les fichiers sélectionnés ou mettre la lecture en pause.
Mettre la lecture en pause.
Retour rapide pendant la lecture.
Avance rapide pendant la lecture.
Lecture du fichier précédent dans le répertoire actuel.
Lecture du fichier suivant dans le répertoire actuel.
Changer l’option répétition / aléatoire du fichier/répertoire actuel.
Sélectionner un type d’Égalisateur.
Fonction de reprise de lecture
Le CM3H possède une fonction de reprise de lecture. Si vous éteignez le CM3H pendant la lecture de vos
films, musique, ou présentation de photos, le CM3H reprendra la lecture lorsque vous le rallumerez.
Cette fonction est activée par défaut et peut être désactivée dans le Menu de Configuration.
Touche d'accès direct au répertoire de musique.
Vous pouvez créer 1 répertoire musique, auquel vous pouvez accéder en appuyant sur la touche "Musique"
(4) de la télécommande. Créez un répertoire appelé “MUSIQUE xx” (vous pouvez remplacer "xx" par ce que
vous voulez) sur la racine du disque dur et placez vos fichiers vidéo dans ce répertoire. Quand le lecteur
multimédia est en marche et que vous appuyez la touche “Musique" (4), le lecteur multimédia ouvre
automatiquement le répertoire.
Remarque : Si vous créez plus d’un répertoire commençant par le mot "MUSIQUE", l'appareil ouvrira
uniquement le premier fichier.
70
FRANÇAIS
8.3 Lecture de vos Photos et Images
Avec le CM3H, vous pouvez regarder vos photos et vos images, qui peuvent être enregistrées sur le disque
dur de votre appareil.
• Sélectionnez le fichier que vous voulez mettre en route à l’aide des touches de navigation de la
télécommande.
• Appuyez sur la touche “Enter” (24) ou sur la touche "Play/Pause" (17) de la télécommande pour
démarrer la lecture du fichier choisi.
Pendant la lecture, vous pouvez utiliser les options de lecture suivantes de la télécommande :
- Play/Pause
(17)
- Stop
- Touches de
(22)
(11)
-
(16)
(23)
(11)
(30)
(32)
(29)
(31)
Navigation
Previous
Next
Repeat :
Delay
Trans
Rotate
Zoom
Démarrer une présentation de diapositives avec le fichier sélectionné,
ou mettre la présentation en pause.
Arrêter la présentation des diapositives.
, : Retourner la photo en cours.
,
: Faire pivoter la photo en cours.
Lecture du fichier précédent dans le répertoire actuel.
Lecture du fichier suivant dans le répertoire actuel.
Changer l’option répétition / aléatoire du fichier/répertoire actuel.
Changer le débit de présentation de diapositives.
Changer la transition entre deux photos.
Faire pivoter la photo en cours.
Zoomer sur la photo en cours.
Fonction de reprise de lecture
Le CM3H possède une fonction de reprise de lecture. Si vous éteignez le CM3H pendant la lecture de vos
films, musique, ou présentation de photos en diapositives, le CM3H reprendra la lecture lorsque vous le
rallumerez.
Cette fonction est activée par défaut et peut être désactivée dans le Menu de Configuration.
Présentation diapositives en musique (reproduction de diapositives avec musique de fond).
Sélectionner une photo et appuyez la touche “Slide” (8) pour démarrer la présentation de
Lorsque vous n’appuyez pas sur la touche "Slide" (8), la musique n’est pas reproduite et les images sont
reproduites dans une présentation sans musique de fond. Lorsqu’il n’y a pas de musique disponible dans le
répertoire, la fonction de présentation de diapositives en musique ne fonctionne pas. Vous devez appuyer
sur le bouton "
/Enter" (24) pour avoir une présentation en diapositives des images sans le son.
Remarque : Dans ce mode, les fonctions Rotate et Zoom ne sont pas accessibles.
Vous pouvez interrompre la présentation de photos en diapositives en appuyant sur la touche “Play/Pause”
(17) une fois (la musique sera reproduite). Appuyez de nouveau sur la touche “Play/Pause” (17) pour
interrompre aussi la musique. Appuyez sur la touche "Play /Pause" (17) pour reprendre la lecture des
diapositives en musique.
Touche d'accès direct au répertoire de Photo.
Vous pouvez créer 1 répertoire photo, auquel vous pouvez accéder en appuyant sur la touche "Photo" (35)
de la télécommande. Créez un répertoire appelé “PHOTO xx” (vous pouvez remplacer "xx" par ce que vous
voulez) sur la racine du disque dur et placez vos fichiers vidéo dans ce répertoire. Quand le lecteur média
est en marche et que vous appuyez la touche “Photo" (35), le lecteur média ouvre automatiquement le
répertoire.
Remarque : Si vous créez plus d’un répertoire commençant par le mot "PHOTO", l'appareil ouvrira
uniquement le premier fichier.
71
FRANÇAIS
9. Configuration du Système
Appuyez sur la touche “Setup” (20) de votre télécommande pour ouvrir le Menu de Configuration de
l’appareil.
Appuyez sur les touches / / / pour déplacer la sélection dans le Menu de Configuration, et appuyez sur
la touche
/ ENTER pour confirmer la sélection. Quand vous avez terminé la configuration de votre
appareil, appuyez de nouveau sur la touche Setup pour fermer le Menu de Configuration, ou sélectionner
l’option "Exit Setup" dans le Menu de Configuration.
Le Menu de Configuration contient les pages suivantes:
•
•
•
•
•
General Setup Page [Page de Configuration
Générale]
Audio Setup Page [Page de Configuration Audio]
Video Setup Page [Page de Configuration Vidéo]
Slideshow Setup Page [Page de Configuration de
Diapositives]
Exit Setup [Quitter la Configuration]
General setup Page [Page de Configuration Générale]
OSD Lang
: Définir la langue affichée à l’écran.
Screen saver [Économiseur d'écran]
: Activer ou désactiver l’Économiseur d’Écran.
Play Resume [Reprise de la Lecture]
: Activer ou désactiver la fonction reprise de Lecture.
Defaults [Paramètres par Défauts]
: Pour restituer les paramètres par défaut de l'appareil.
Auto Start
: Lecture automatique des fichiers multimédias sur le CM3H
lorsque l'appareil est en marche.
Audio Setup Page [Page de Configuration Audio]
Downmix [sous-mixage]
: Régler le mode sous-mixage pour son multicanal.
Sortie SPDIF
: Régler le mode de sortie SPDOF.
LPCM Output [Sortie LPCM]
: Régler le mode de sortie LPCM.
Video Setup Page [Page de Configuration Vidéo]
TV Display
: Changer les paramètres d’Affichage sur l'écran TV.
TV System [Système de TV]
: Choisir un système vidéo pour votre TV.
Video Output [Sortie Vidéo]
: Sélectionner la sortie vidéo que vous utilisez.
Slideshow Setup Page [Page de Configuration de Diapositives]
Interval Time [Débit]
: Sélectionner le débit entre deux photos.
Transition
: Sélectionner la transition par défaut entre 2 photos.
72
FRANÇAIS
10. Connectivité USB de l’Ordinateur
L’appareil peut être connecté à votre ordinateur pour copier des données (films, musique, images,
enregistrements, etc.….) depuis et vers le disque dur interne.
Remarque : Dans l’exemple décrit ci-après, nous utilisons un ordinateur fonctionnant sous Windows XP,
mais l’appareil peut être utilisé sur tous les ordinateurs qui supportentUSB et qui peuvent lire
et écrire les fichiers FAT32.
Branchez l’appareil à votre ordinateur.
• Connectez l'USB fourni au câble Mini-USB à l'arrière de l'appareil et à un port USB libre de votre
ordinateur.
• Allumez l’appareil avec l’interrupteur d’alimentation principal situé à l’arrière de l’appareil. L’appareil
sera reconnu et installé automatiquement, et sera affiché sur votre ordinateur en tant que lecteur
supplémentaire.
Le disque dur interne de l’appareil sera initialisé en tant que système de stockage USB par défaut.
Débrancher l’appareil de votre ordinateur
•
•
•
•
Cliquez une fois sur l'icône "Retrait en Toute Sécurité" de votre barre d'état du système.
Sélectionnez l'option "Arrêter le Dispositif de Stockage de Masse USB" dans la fenêtre pop-up.
Attendez le message "Vous pouvez retirer le Dispositif".
Débranchez le câble USB.
73
FRANÇAIS
11. Astuces et Dépannages
Utilisez les astuces décrites ci-dessous pour vous dépanner lorsque votre CM3H ne fonctionne pas
correctement :
La LED d'alimentation ne s'allume pas:
• L’alimentation électrique n’est pas connectée au CM3H. Rebranchez l’alimentation électrique au CM3H.
Il
•
•
•
n’y a aucun signe d’activité sur l’écran :
Le CM3H est en mode standby. Appuyez sur la touche ‘ ’ (1) de la télécommande pour l’activer.
L’entrée sélectionnée sur votre TV n’est pas la bonne. Changez la source d’entrée.
Le système vidéo sélectionné n’est pas le bon. Appuyez sur la touche “Output” (19) de votre
télécommande pour passer sur le bon signal de sortie.
• Le câble vidéo n'est pas bien connecté. Vérifiez si le Câble Vidéo est bien connecté.
Quand l’appareil est en marche, on entend seulement un bruit, mais aucun menu n’apparaît.
• Le système vidéo sélectionné n’est pas le bon. Appuyez sur la touche “Output” (19) de votre
télécommande pour passer sur le bon signal de sortie.
• Le câble vidéo n'est pas bien connecté. Vérifiez si le Câble Vidéo est bien connecté.
• La sortie audio du CM3H est connectée à l'amplificateur, mais la sortie sélectionnée sur la TV n'est pas la
bonne. Sélectionnez la bonne sortie sur votre TV.
Il n’y a pas de son.
• Le câble Audio n'est pas bien connecté. Assurez-vous que le câble est bien connecté à votre TV ou à
votre amplificateur.
• Le CM3H est connecté à un amplificateur, mais l’amplificateur est éteint. Allumez l’amplificateur.
• Le flux audio du MC3H ou du VOB n’est pas le bon. Appuyez sur la touche “Audio” (7) sur la
télécommande pour passer sur le bon flux audio.
• La fonction mode Muet est en marche. Appuyez de nouveau sur la touche “Mute” (28) de la
télécommande pour annuler cette fonction.
• Le CM3H fonctionne en mode Avance Rapide ou Retour Rapide. Appuyez sur la touche “Enter” (24) de la
télécommande pour retourner à une lecture normale.
L’image qui apparaît à l’écran est déformée :
• Le CM3H fonctionne en mode Avance Rapide ou Retour Arrière Rapide. Appuyez sur la touche “Enter”
(24) de la télécommande pour retourner à une lecture normale.
• Un film en format PAL est reproduit en mode NTSC ou vice-versa. Appuyez sur le bouton "P/N" (37) de la
télécommande pour modifier les paramètres d'affichage.
Le système se bloque lorsque l’on appuie sur la touche “Slide”:
• Il y a trop de photos ou de musique dans le répertoire actuel. Le démarrage de la présentation de
diapositives en musique prend un peu plus de temps. Attendez un peu pour la lecture.
La télécommande ne fonctionne pas:
• Dirigez directement la télécommande vers le récepteur CM3H selon un angle de +/- 30 degrés.
• Utilisez la télécommande à moins de 5 mètres.
• Les piles de la télécommande (AAA) sont épuisées et devraient être remplacées.
Les sous-titres du film reproduit ne s'affichent pas :
• Un fichier AVI est reproduit, mais le fichier de sous-titrage a un nom de fichier différent. Voyez le
paragraphe 8.1 pour savoir comment afficher les sous-titres.
• Le fichier de sous-titrage n’est pas supporté par le CM3H.
Lorsque vous essayez de lire une vidéo, le message "CODEC NOT SUPPORTED" [CODEC NON SUPPORTÉ]
s'affiche ;
• Le fichier de film est créé avec un codec non supporté par le CM3H.
Consultez le site web www.conceptronic.net pour obtenir la liste des codecs supportés par le CM3H.
74
FRANÇAIS
Le CM3H ne lit pas toutes les partitions / contenus du disque dur :
• La partition du disque dur n'est pas primaire. Fragmentez à nouveau le disque dur et vérifiez que toutes
les partitions sont bien primaires.
• Le disque dur est formaté dans un système de fichier non supporté par le CM3H. Reformatez votre disque
dur avec le système de fichier FAT32 ou NTFS.
• Aucun fichier multimédia n'est présent sur la partition sélectionnée.
La lecture de DVD/ISO ne commence pas lorsque vous appuyez sur la touché Play/Pause :
• Vérifiez que la structure de fichiers est bien correcte. La structure de fichiers est décrite au chapitre
8.1.
Les Fichiers DVD sont incomplets, corrompus ou endommagés. Dans ce cas, le CM3H ne commence pas à
lire le DVD.
Pendant les films intro du DVD, l'écran est vide :
• Le chapitre en cours s'arrête sur un écran vide ou est trop court pour être lu. Appuyez sur la touche
NEXT (23) pour passer au chapitre suivant.
Mon écran de TV affiche une image en noir et blanc et pas en couleurs :
• Votre TV ne supporte pas le Système TV "Multi" du CM3H. Utilisez le menu de Configuration pour
transformer le Système TV en PAL. (Voir chapitre 9). Après voir modifié le Système TV, éteignez et
rallumez le CM3H.
75
ITALIANO
Conceptronic CM3H
Manuale d’uso
Vi ringraziamo per aver acquistato il
Lettore Multimediale di Conceptronic.
Il presente Manuale d’uso spiega passo a passo come installare e usare il Lettore Multimediale di
Conceptronic.
In caso di problemi, vi consigliamo di visitare il nostro sito di supporto (collegandovi su
www.conceptronic.net e facendo clic su “Support”), dove si trova il database delle FAQ (Risposte alle
domande più frequenti).
In caso di domande di altro tipo riguardanti il prodotto, che non appaiono nel nostro sito web, vi preghiamo
di mettervi in contatto con noi attraverso l”indirizzo di posta elettronica: [email protected]
Per ulteriori informazioni sui prodotti Conceptronic, potete visitare il sito web Conceptronic:
www.conceptronic.net
Consiglio: Il firmware del CM3H di Conceptronic è aggiornabile; a tale fine si consiglia di visitare il sito
web di Conceptronic.
Consiglio: Consultare il sito www.conceptronic.net per conoscere gli ultimi aggiornamenti sulla lista di
Codec dei file supportati.
1. Contenuto della confezione
La confezione contenente il Lettore Multimediale di Conceptronic è composta dai seguenti elementi:
•
•
•
•
•
•
•
•
•
Lettore multimediale CM3H di Conceptronic (descritto nel presente manuale come “unità”)
Supporto per il CM3H
Alimentatore di corrente (12V, 5A) con cavo
Telecomando
2 batterie tipo AAA per il telecomando
Cavo video composito (jack RCA rosso, bianco e giallo)
Adattatore Scart per il cavo video composito
Cavo USB
??
Il presente Manuale d’uso
76
ITALIANO
2. Caratteristiche del prodotto
•
•
•
•
•
•
•
•
•
•
•
•
•
•
•
•
Interfaccia utente multilingue: inglese, olandese, spagnolo, francese, italiano, tedesco e portoghese.
Supporta partizioni multiple del disco rigido
Supporto per file system FAT32 e NTFS
Uscita video HDMI fino a un massimo di 1080i
Supporta sottotitoli (.SMI/.SRT/.SUB/.SSA) per MPEG4 (AVI), risoluzione D1
Supporta AVI (MPEG4), MPG (MPEG1, MPEG2), DAT (VCD), VOB (DVD), IFO (DVD), ISO, WAV, WMA, MP3,
JPG
Vengono supportati diversi Codec. Consultare il sito web per ottenere una lista completa dei Codec
supportati
Uscite: HDMI / video composita / video componente / audio stereo RCA / audio ottica
Conforme con PAL/NTSC
Diverse modalità di ripetizione
Salvaschermo
14 modalità di transizione per le foto
Presentazione diapositive (riproduzione di immagini) con musica di fondo
Intervallo display modificabile
Funzioni di zoom e rotazione
Commutazione automatica fra la modalità PC e la modalità Lettore Multimediale:
• Quando è connesso al PC, il dispositivo funge da dispositivo di archiviazione USB
• Quando non è connesso al PC, il dispositivo funge da lettore multimediale
Nota:
il CM3H non è in gradi di riprodurre film HD (720p, 1080i, 1080p).
3. Note e avvisi
•
•
•
•
•
•
•
•
•
•
Nota:
Non cercare di smontare l’adattatore di corrente accluso, poiché ciò potrebbe provocare danni dovuti
all’alto voltaggio. Nel caso in cui sia necessario riparare l’adattatore, rivolgersi al servizio di
assistenza clienti di Conceptronic.
Mantenere il dispositivo lontano da fonti di estrema umidità
Non immergere il dispositivo o esporlo a liquidi
Nel caso in cui il dispositivo non venga utilizzato per un lungo periodo di tempo, scollegare
l’adattatore di corrente
Astenersi dall’usare il dispositivo in luoghi nelle vicinanze di combustibili
Quando non più funzionanti, sostituire le batterie del telecomando con altre pile dello stesso tipo.
Smaltire opportunamente le batterie scariche, e se possibile riciclarle. Per evitare problemi di
corrosione, estrarre le batterie dal telecomando nel caso in cui questo non venga utilizzato per un
lungo periodo di tempo
Mantenere il telecomando lontano da fonti di estrema umidità e non farlo cadere
Non utilizzare il telecomando se esposto a intensa luce solare
NON far cadere, urtare o colpire MAI il dispositivo
Per evitarne il surriscaldamento, non coprire mai il dispositivo
i dati contenuti nel disco rigido interno si possono frammentare, però ciò potrebbe influire sulla
riproduzione dei film. Si consiglia di deframmentare il disco rigido del computer di tanto in tanto.
77
ITALIANO
4. Spiegazione del prodotto
Vista frontale
Vista posteriore
1
5
2
6
7
3
4
8
9
10
11
12
13
14
15
Descrizione dei numeri:
1.
2.
3.
4.
Ricevitore a infrarossi
LED Alimentazione / Standby
Pulsanti di navigazione (vedi più in basso)
LED di attività del disco rigido
8.
9.
10.
11.
12.
13.
14.
15.
5. Pulsante di accensione principale
6. Presa jack Mini-USB (verso PC)
7. Uscita HDMI
Spiegazione dei pulsanti
Pulsanti di navigazione
Nel Menu:
( , ,
Durante la riproduzione:
,
)
Pulsante Play/stop ( / )
Premuto brevemente:
Premuto più a lungo:
78
Uscita componente ‘Pb’
Uscita componente ‘Pr’
Uscita componente ‘Y’
Uscita video composita
Uscita Audio ‘R’(destra)
Uscita Audio ‘L’(sinistra)
Uscita digitale ottica
Ingresso DC (12V, 2.5A)
Servono per navigare all’interno dei menu
dell’unità.
, Servono per alzare o abbassare il volume.
, Riavvolgimento veloce / avanzamento rapido.
Serve per avviare o interrompere la riproduzione
di un file o per aprire una cartella
Serve per accendere il CM3H o per mandarlo in
modalità standby.
ITALIANO
5. Descrizione del telecomando
Il telecomando serve per controllare l’unità. Nella copertina interna del presente manuale viene riportata
un’immagine del telecomando. I numeri dei pulsanti corrispondono a quelli della tabella che appare qui di
seguito, dove viene spiegata ogni funzione del telecomando.
N.
Pulsante
Descrizione
1.
2
3
4
5
6
7
8
POWER (
R/L
TOP
MUSIC
FILE
0–9
AUDIO
SLIDE
9
10
11
12
13
14
15
16
17
SLOW
A–B
REPEAT
VOLUME
VOLUME
BACK
, , ,
PREVIOUS (
PLAY/PAUSE
18
19
20
21
22
23
24
25
REWIND (
)
OUTPUT
SETUP
FAST FORWARD (
STOP ( )
)
NEXT (
ENTER (
)
DISPLAY
26
27
28
29
30
PAGE
PAGE
MUTE
ROTATE
DELAY
31
32
ZOOM
TRANS
33
SUB-T
34
35
36
37
38
VIDEO
PHOTO
FUNC
P/N
MENU
39
LED di Alimentazione
)
)
)
Serve per accendere il dispositivo o metterlo in modo standby
Serve per cambiare l’uscita audio (Stereo, Mono-L, Mono-R).
Serve per tornare al principio della lista file aperta.
Pulsante di accesso diretto alla cartella “MUSICA”.
Serve per mostrale la “Biblioteca file”.
Tasti di selezione numerica 0-9.
Serve per selezionare o cambiare la traccia audio del DVD
Serve per avviare una presentazione con diapositive e musica di fondo o
per ottenere un fermo immagine del video.
La riproduzione viene realizzata lentamente.
Serve per riprodurre ripetutamente un intervallo selezionato.
Serve per selezionare una modalità di ripetizione o la modalità aleatoria.
Serve per alzare il volume.
Serve per abbassare il volume.
Serve per tornare alla cartella precedente.
Servono per poter navigare nel menu principale o nel menu DVD.
Va al file o al capitolo precedente.
Serve per avviare la riproduzione di un file o una cartella DVD o mettere
in pausa una riproduzione.
Riavvolgimento veloce durante la riproduzione.
Serve per selezionare il segnale video in uscita.
Serve per aprire il menu di configurazione.
Avanzamento rapido durante la riproduzione.
Serve per interrompere la riproduzione.
Va al file o al capitolo successivo.
Conferma la selezione o avvia una riproduzione.
Mostra le informazioni relative alla riproduzione durante la riproduzione
stessa.
Mostra la pagina successiva con i relativi file.
Mostra la pagina precedente con i relativi file.
Mette in silenzio l’audio o riattiva l’audio.
Serve per ruotare foto.
Serve per selezionare l’intervallo durante la presentazione (compresa
presentazione con musica di fondo).
Zoom avanti o indietro (foto e riproduzione DVD).
Serve per selezionare una modalità di transizione durante una
presentazione o un tipo di equalizzatore audio durante la riproduzione di
un brano musicale.
Serve per selezionare o modificare il sottotitolo del film (MPEG4 e
riproduzione DVD).
Pulsante di accesso diretto alla cartella “VIDEO”.
Pulsante di accesso diretto alla cartella “FOTO”.
Serve per saltare a un punto specifico durante la riproduzione di un film.
Serve per selezionare un sistema video (PAL / NTSC).
A. Mostra la “Lista Partizioni” o la “File List”
B. Serve per tornare al Menu DVD (riproduzione DVD).
Il LED di alimentazione lampeggerà ogni volta che si premerà un
pulsante.
79
ITALIANO
6. Come collegare il CM3H
Connessione HDMI
Connessione composita + SCART
Connessione S/PDIF
Esempio di connessione con collegamenti HDMI, composito e S/PDIF.
Come collegare il/i cavo/i video
È
-
possibile collegare l’unità alla TV in quattro modi diversi:
HDMI
Composito
SCART
(usando il cavo composito e l’adattatore SCART)
Componente **
**
Se viene prescelto il modo componente, alla TV o al monitor verrà inviato solo il segnale video.
Per il segnale audio, usare le prese audio jack RCA del cavo composito (rosso e bianco).
HDMI:
• Collegare il cavo HDMI all’uscita HDMI [7] dell’unità.
• Collegare l’altro estremo del cavo HDMI all’ingresso HDMI della TV.
Composito:
• Collegare il cavo composito (giallo, rosso e bianco) alle corrispondenti prese jack composite [11, 12,
13] dell’unità.
• Collegare l’altro estremo del cavo composito (giallo, rosso e bianco) agli ingressi jack compositi della TV.
SCART:
• Collegare il cavo composito (giallo, rosso e bianco) alle corrispondenti prese jack composite [11, 12,
13] dell’unità.
• Collegare l’altro estremo del cavo composito (giallo, rosso e bianco) alle prese jack dell’adattatore
SCART.
• Collegare l’adattatore SCART all’ingresso SCART della TV.
Componente:
• Collegare il cavo componente (rosso, verde e blu) alle prese jack componenti [8, 9, 10] dell’unità.
• Collegare l’altro estremo del cavo componente agli ingressi jack componenti della TV.
80
ITALIANO
Come collegare il/i cavo/i audio
È possibile collegare l’unità alla TV e/o al sistema home cinema in due modi diversi:
- Analogico, mediante le prese audio jack RCA dell’unità
- Digitale, mediante l’uscita digitale ottica S/PDIF dell’unità
Analogico:
• Collegare le prese jack audio (rossa e bianca) del cavo composito alle prese audio jack RCA [12, 13]
dell’unità.
• Collegare l’altro estremo del cavo composito alle prese audio jack RCA della TV o dell’amplificatore.
Digitale:
• Collegare il cavo digitale ottico all’uscita S/PDIF [14] dell’unità.
• Collegare l’altro estremo del cavo digitale ottico all’ingresso digitale ottico dell’amplificatore.
Come collegare il cavo di alimentazione
Dopo aver collegato l’unità all’impianto audio/video, sarà possibile collegare l’unità con l’alimentatore di
corrente.
• Collegare l’alimentatore di corrente in dotazione all’ingresso DC [15] dell’unità e a una presa a muro
disponibile.
• Impostare l’interruttore di alimentazione principale nella zona posteriore dell’unità su ‘I’ per
accenderlo.
L’unità si accenderà
Come preparare il telecomando
Il telecomando utilizza 2 batterie tipo AAA (incluse nella confezione).
È necessario usare il telecomando per accendere o spegnere l’unità.
Note:
-
Il miglior range operativo del telecomando è di cinque metri circa.
Dirigere il telecomando verso il ricevitore a infrarossi del pannello frontale del dispositivo.
L’angolo di ricezione del ricevitore a infrarossi è di ±30 gradi.
Cambiare le batterie (2x AAA) quando non funzionano bene o sono scariche
81
ITALIANO
7. Operazioni di base del CM3H
• Selezionare il canale d’ingresso corretto della TV al quale è collegata l’unità (HDMI, composito, SCART o
componente).
Nota:
A partire da questo punto, il manuale parte dal principio che la TV è stata impostata sul canale
d’ingresso dell’unità. Tutti i passi qui di seguito descritti fanno riferimento all’operatività
dell’unità.
• Verificare che l’interruttore di alimentazione principale nella zona posteriore dell’unità si trova su ‘I’.
• Accendere l’unità con pulsante Play/Stop posto nella zona frontale, o con il pulsante “Power” (1) del
telecomando.
L’unità si accenderà e mostrerà il menu sullo schermo.
Nota:
il segnale di uscita di default è Video composito. Se, una volta accesa l’unità, non appare nulla
sullo schermo, premere il pulsante “Output” (19) sul telecomando per commutare fra i diversi
segnali del CM3H (HDMI, composito, componente).
Nota:
quando è accesa, l’unità deve inizializzare il disco rigido, operazione per la quale è necessario un
certo periodo di tempo. Durante il processo di inizializzazione apparirà sullo schermo il messaggio
“LOADING…” (Caricamento in corso...)
Quando il disco rigido verrà formattato con una sola partizione, sullo schermo apparirà la “Lista file” dove
verrà mostrato il contenuto del disco rigido.
Quando invece il disco rigido verrà formattato con molteplici partizioni, l’unità mostrerà sullo schermo la
“Lista partizioni” con tutte le partizioni esistenti. Usare i pulsanti / (15) per realizzare la selezione,
/Enter” (24) per accedere alla “Lista file” dove verrà mostrato il
dopo di che premere il pulsante “
contenuto della partizione selezionata.
[ Lista partizioni ]
[ Lista file ]
Come cambiare la partizione:
Quando il disco rigido viene formattato con molteplici partizioni, basta premere il pulsante “Menu” (38)
del telecomando per tornare alla “Lista partizioni” e selezionare una partizione diversa.
82
ITALIANO
8. Opzioni di riproduzione dell’unità
8.1 Riproduzione di film
Il CM3H supporta diversi formati video, come ad esempio MPEG1/2, MPEG4 (compreso XVID), VOB, IFO
(DVD) e la riproduzione ISO, compreso il supporto per la riproduzione di tracce audio MP3, AC3, AAC e
MPEG1/2 all’interno di un video e passthrough DTS mediante l’uscita SPDIF.
• Selezionare il file che si desidera riprodurre utilizzando i pulsanti di navigazione del telecomando.
• Premere il pulsante “Enter” (24) o il pulsante “Play/Pause” (17) del telecomando per avviare la
riproduzione del file selezionato.
Durante la riproduzione, è possibile utilizzare le seguenti opzioni di riproduzione del telecomando:
-
Play/Pause
Stop
Rewind
Fast Forward
Previous
Next
Repeat
(17)
(22)
(18)
(21)
(16)
(23)
(11)
-
Display
Func
A-B
Slow
Slide
(25)
(36)
(10)
(9)
(8)
Nota:
Serve per riprodurre il file selezionato mettere in pausa la riproduzione.
Serve per interrompere la riproduzione.
Riavvolgimento della riproduzione.
Avanzamento veloce della riproduzione.
Serve per riprodurre il file precedente della cartella aperta.
Serve per riprodurre il file successivo della cartella aperta.
Serve per cambiare la modalità di ripetizione / aleatoria del file o della
cartella aperti.
Serve per mostrare i dettagli della riproduzione.
Serve per saltare a un punto specifico durante la riproduzione.
Serve per ripetere una parte selezionata del film.
Serve per riprodurre l’immagine più lentamente.
Serve per riprodurre fermo immagine per fermo immagine.
sebbene il CM3H supporti la maggior parte dei Codec Video (come ad esempio XviD, AVI, MPEG2,
ecc.) potrebbe darsi che alcuni file richiedano un Codec non incluso nel CM3H.
Se si cerca di riprodurre un file con un Codec non supportato, apparirà il messaggio “CODEC NOT
SUPPORTED” (Codec non supportato). In tal caso, si consiglia di usare un Codec diverso per
visualizzare il film.
Funzione di recupero riproduzione
Il CM3H dispone della funzione di Recupero riproduzione. Se viene spenta l’unità durante la riproduzione di
film, musica o presentazioni fotografiche, il CM3H riprenderà la riproduzione dallo stesso punto, quando
verrà accesso di nuovo.
Si tratta di un’opzione attivata per default e che si può disattivare accedendo al Menu di Configurazione.
Nota:
non è supportata la funzione di recupero riproduzione nel caso di file ISO e IFO (DVD).
Funzione di riproduzione sottotitoli
Il CM3H di Conceptronic supporta file sottotitoli .SMI, .SRT, .SUB o .SSA.
Nel caso in cui il file sottotitoli abbia lo stesso nome del file video selezionato (solo l’estensione è diversa)
il file sottotitoli verrà caricato automaticamente quando verrà riprodotto il file MPEG4, come nell’esempio
riportato qui di seguito:
Nome film:
Nome sottotitoli:
Il_Film_Con_Sott.AVI
Il_Film_Con_Sott.SRT
Se invece il file sottotitoli ha un nome diverso, sarà necessario selezionarlo manualmente. Selezionare il
file sottotitoli e premere il pulsante “Sub-t” (33) del telecomando per selezionare i sottotitoli. Selezionare
il film e premere il pulsante “
/Enter” (24) per riprodurre il film
83
ITALIANO
Nota:
nel caso in cui esista un file sottotitoli con lo stesso nome del film, e si cerca di selezionare un
altro file sottotitoli, il CM3H obbligherà a usare il file sottotitoli con lo stesso nome, invece di
quello selezionato.
Funzione di riproduzione DVD
Il CM3H riproduce DVD contenuti nel disco rigido come se si trattasse di DVD normali. È possibile aprire il
Menu DVD, selezionare i sottotitoli o modificare la lingua audio.
Nota:
Il CM3H supporta esclusivamente la riproduzione di copie di DVD non protette. Il CM3H non
supporta la protezione CSS.
Nota:
Il CM3H supporta esclusivamente copie di DVD della Regione 2 o Regione libera.
• Collegare il CM3H al computer. Consultare il capitolo 10 “Connettività USB del computer”.
• Creare una cartella nel disco rigido del CM3H con lo stesso nome del film DVD (ad esempio: “Film1”).
• Copiare “AUDIO_TS” e “VIDEO_TS” (con tutto il loro contenuto) dal DVD nella cartella creata (ad
esempio: “Film1”) nel CM3H.
Dopo la copia, la struttura dovrebbe essere come questa:
- [Disco rigido del CM3H]
|-> Film1
|-> AUDIO_TS
|-> VIDEO_TS
(opzionale, non disponibile per tutti i DVD)
(contenente tutti i file DVD)
• Scollegare il CM3H dal computer e collegarlo alla TV. Accendere di nuovo il CM3H.
• Selezionare il DVD che si desidera riprodurre utilizzando i pulsanti “ , , , “ (15) del telecomando.
• Premere il pulsante “Play/Pause” (17) del telecomando per avviare la riproduzione del DVD selezionato.
Nota:
Non usare il pulsante “Enter” (24) per avviare la riproduzione, perché in questo modo verranno
mostrati solo i file e le sottocartelle e non verrà iniziata la riproduzione DVD.
Durante la riproduzione del DVD, è possibile utilizzare le seguenti opzioni di riproduzione del telecomando:
-
Play/Pause
Stop
Pulsanti di navig.
Enter
Rewind
Fast Forward
Previous
Next
Sub-t
Audio
(17)
(22)
(15)
(24)
(18)
(21)
(16)
(23)
(33)
(7)
-
Zoom
Repeat
A-B
Display
Func
Menu
(31)
(11)
(10)
(25)
(36)
(38)
Riproduce la cartella DVD selezionata o mette in pausa la riproduzione.
Interrompe la riproduzione del DVD e tornare al navigatore film.
Servono per muoversi all’interno del Menu DVD.
Serve per confermare la selezione nel Menu DVD.
Riavvolgimento rapido.
Avanzamento veloce.
Capitolo precedente.
Capitolo successivo.
Serve per cambiare o per disattivare i sottotitoli del DVD.
Serve per modificare la traccia audio del DVD (nel caso in cui il DVD
contenga più di una sola traccia audio).
Fa uno zoom sul film riprodotto.
Serve per cambiare la modalità di ripetizione del capitolo visualizzato.
Serve per ripetere una parte selezionata del film.
Serve per mostrare i dettagli della riproduzione.
Serve per saltare a un punto specifico durante la riproduzione.
Serve per tornare al Menu DVD.
Consiglio: è anche possibile riprodurre film in DVD con formato ISO. Le opzioni di riproduzione
di DVD in formato ISO sono uguali a quelle riportate qui in alto per qualsiasi altro DVD.
84
ITALIANO
Pulsante di accesso diretto alla cartella video
È possibile creare una cartella video alla quale si può accedere direttamente premendo il pulsante “Video”
(34) del telecomando. Creare una cartella chiamata “VIDEO xx” (in cui “xx” si può sostituire con qualsiasi
altra cosa) nella radice del disco rigido e introdurvi i file video. Quando viene aperto il lettore
multimediale e si preme il pulsante “Video” (34), l’unità aprirà automaticamente la cartella.
Nota:
se si crea più di una cartella che inizia con la parola “VIDEO”, l’unità aprirà solo la prima cartella.
Alcuni file MPEG2/VOB contengono due o più tracce audio. Premendo il pulsante “Audio” (7) del
telecomando, si può commutare da una traccia audio all’altra. Il pulsante “Audio” (7) si può usare quando
il file video in riproduzione non ha audio, e in questo modo è possibile localizzare la traccia audio corretta.
Se si commuta tra file MPEG2/VOB, si potrebbe perdere la pista audio nel caso in cui non sia quella
stabilita di default. Per evitare questa situazione, premere il pulsante “Setup” (20) durante la
riproduzione per “bloccare” la pista audio in uso. In questo modo la pista audio selezionata verrà
mantenuta per tutti i file.
8.2 Riproduzione di Musica
Il CM3H di Conceptronic dispone di diverse modalità per riprodurre musica (sono supportati WAV, MP3 e
WMA).
• Selezionare il file che si desidera riprodurre utilizzando i pulsanti di navigazione del telecomando.
• Premere il pulsante “Enter” (24) o il pulsante “Play/Pause” (17) del telecomando per avviare la
riproduzione del file selezionato.
Durante la riproduzione, è possibile utilizzare le seguenti opzioni di riproduzione del telecomando:
- Play/Pause
-
Stop
Rewind
Fast Forward
Previous
Next
Repeat
- Trans
(17)
(22)
(18)
(21)
(16)
(23)
(11)
(32)
Serve per riprodurre il file selezionato o mettere in pausa la
riproduzione.
Serve per interrompere la riproduzione.
Riavvolgimento della riproduzione.
Avanzamento veloce della riproduzione.
Serve per riprodurre il file precedente della cartella aperta.
Serve per riprodurre il file successivo della cartella aperta.
Serve per cambiare la modalità di ripetizione / aleatoria del file o della
cartella aperti.
Serve per selezionare il tipo di equalizzatore.
Funzione di recupero riproduzione
Il CM3H dispone della funzione di Recupero riproduzione. Se viene spenta l’unità durante la riproduzione di
film, musica o presentazioni fotografiche, il CM3H riprenderà la riproduzione dallo stesso punto, quando
verrà accesso di nuovo.
Si tratta di un’opzione attivata per default e che si può disattivare accedendo al Menu di Configurazione.
Pulsante di accesso diretto alla cartella musica
È possibile creare una cartella musica alla quale si può accedere direttamente premendo il pulsante
“Music” (4) del telecomando. Creare una cartella chiamata “MUSIC xx” (in cui “xx” si può sostituire con
qualsiasi altra cosa) nella radice del disco rigido e introdurvi i file audio. Quando viene aperto il lettore
multimediale e si preme il pulsante “Music” (4), l’unità aprirà automaticamente la cartella.
Nota:
se si crea più di una cartella che inizia con la parola “MUSIC”, l’unità aprirà solo la prima cartella.
85
ITALIANO
8.3 Riproduzione di foto e immagini
Il CM3H consente di visualizzare foto e immagini che si possono memorizzare nel disco rigido dell’unità.
• Selezionare il file che si desidera riprodurre utilizzando i pulsanti di navigazione del telecomando.
• Premere il pulsante “Enter” (24) o il pulsante “Play/Pause” (17) del telecomando per visualizzare il file
selezionato.
Durante la visualizzazione, è possibile utilizzare le seguenti opzioni di riproduzione del telecomando:
- Play/Pause
(17)
- Stop
(22)
- Pulsanti di navig. (11)
- Previous
- Next
- Repeat
(16)
(23)
(11)
- Delay
- Trans
(30)
(32)
(29)
(31)
-
Rotate
Zoom
Serve per avviare una presentazione con il file selezionato o mettere in
pausa la presentazione.
Serve per interrompere la presentazione.
, : Gira la foto mostrata.
, : Ruota la foto mostrata.
Serve per riprodurre il file precedente della cartella aperta.
Serve per riprodurre il file successivo della cartella aperta.
Serve per cambiare la modalità di ripetizione / aleatoria del file o della
cartella aperti.
Serve per cambiare l’intervallo di tempo fra una foto e l’altra.
Serve per cambiare la transizione fra due foto.
Serve per ruotare la foto visualizzata.
Serve per zoomare sulla foto visualizzata.
Funzione di recupero riproduzione
Il CM3H dispone della funzione di Recupero riproduzione. Se viene spenta l’unità durante la riproduzione di
film, musica o presentazioni fotografiche, il CM3H riprenderà la riproduzione dallo stesso punto, quando
verrà accesso di nuovo.
Si tratta di un’opzione attivata per default e che si può disattivare accedendo al Menu di Configurazione.
Presentazione con musica (visualizzazione di foto con musica di fondo)
Selezionare una foto e premere il pulsante “Slide” (8) per avviare la presentazione con musica.
Se non viene premuto il pulsante“Slide” (8), la musica non verrà riprodotta e le immagini verranno
mostrate senza traccia audio di fondo. Nel caso in cui nella cartella disponibile non vi sia musica, la
finzione di presentazione con musica non funzionerà. È necessario premere il pulsante “
/Enter” (24)
per ottenere una presentazione di immagini senza pista audio.
Nota:
in questa modalità, le funzioni di Rotazione e Zoom non sono attive.
È possibile mettere in pausa la riproduzione premendo una sola volta il pulsante “Play/Pause” (17) (la
musica continuerà a funzionare). Premere di nuovo il pulsante “Play/Pause” (17) per interrompere anche
la musica. Premere di nuovo il pulsante “Play/Pause” (17) per riprendere la presentazione con musica.
Pulsante di accesso diretto alla cartella Foto
È possibile creare una cartella foto alla quale si può accedere direttamente premendo il pulsante “Photo”
(35) del telecomando. Creare una cartella chiamata “PHOTO xx” (in cui “xx” si può sostituire con qualsiasi
altra cosa) nella radice del disco rigido e introdurvi i file immagine. Quando viene aperto il lettore
multimediale e si preme il pulsante “Photo” (35), l’unità aprirà automaticamente la cartella.
Nota:
se si crea più di una cartella che inizia con la parola “PHOTO”, l’unità aprirà solo la prima
cartella.
86
ITALIANO
9. Configurazione del sistema
Premendo il pulsante “Setup” (20) del telecomando si può accedere al Menu di Configurazione dell’unità.
Premere i pulsanti / / / per muoversi all’interno del Menu di Configurazione, dopo di che premere il
pulsante
/ Enter per confermare la selezione. Dopo aver terminato di configurare l’unità, premere di
nuovo il pulsante “Setup” per chiudere il Menu di Configurazione, o selezionare l’opzione “Exit Setup” nel
Menu di Configurazione.
Il Menu di Configurazione contiene le seguenti pagine:
•
•
•
•
General Setup Page (Configurazione generale)
Audio Setup Page (Configurazione audio)
Video Setup Page (Configurazione video)
Slideshow Setup Page (Configur. presentazione)
•
Exit Setup (Uscire dalla configurazione)
General setup Page (Pagina di configurazione generale):
OSD Lang
: Serve per impostare la lingua che appare sullo schermo.
Screensaver
: Serve par attivare o disattivare il salvaschermo.
Play Resume
: Serve per attivare o disattivare la funzione di recupero riproduzione.
Defaults
: Serve per riportare l’unità sui parametri di default.
Auto Start
: Serve per riprodurre automaticamente tutti i file media sul CM3H quando è acceso.
Audio Setup Page (Pagina di configurazione audio):
Downmix
: Serve per impostare la modalità downmix per audio multicanale.
SPDIF Output
: Serve per impostare l’uscita SPDIF output.
LPCM Output
: Serve per impostare l’uscita LPCM.
Video Setup Page (Pagina di configurazione video):
TV Display
: Serve per modificare i parametri di configurazione di visualizzazione TV.
TV System
: Serve per selezionare un sistema video per la TV.
Video Output
: Serve per selezionare l’uscita video usata.
Slideshow Setup Page (Pagina di configurazione presentazione:
Interval time
: Serve per selezionare l’intervallo di tempo che intercorre fra due foto.
Transition
: Serve per selezionare la transizione di default usata fra due foto.
87
ITALIANO
10. Connettività USB del computer
L’unità si può collegare al computer per copiare dati (film, musica, foto, registrazioni, ecc.) da e verso il
disco rigido interno.
Nota:
nell’esempio riportato qui di seguito, viene usato un computer con sistema operativo Windows XP,
sebbene l’unità possa essere usata con qualsiasi computer con supporto USB e capacità per leggere
e scrivere il file system FAT32.
Come collegare l’unità al computer
• Collegare il cavo USB to Mini-USB in dotazione alla parte posteriore dell’unità e a una porta USB
disponibile del computer.
• Accendere l’unità con l’interruttore di accensione principale posto nella zona posteriore dell’unità.
Questa verrà rilevata e installata automaticamente e verrà mostrata come unità extra del computer.
Per default, il disco rigido interno dell’unità verrà inizializzato come dispositivo di archiviazione USB.
Come scollegare l’unità dal computer
•
•
•
•
Fare un solo clic sull’icona “Rimozione sicura” nel vassoio di sistema.
Selezionare “Periferica archiviazione di massa USB” quando richiesto.
Aspettare che appaia il messaggio “Rimozione sicura hardware”.
Scollegare il cavo USB.
88
ITALIANO
11. Consigli e soluzione di problemi
Usate ii consigli riportati qui di seguito per risolvere eventuali dovuti a un funzionamento anomalo del
CM3H:
Il LED di alimentazione non si accende:
• L’alimentatore di corrente non è collegato al CM3H. Ricollegarlo al CM3H.
Il
•
•
•
display non mostra nessun tipo di attività:
Il CM3H è in modo standby. Premere il pulsante “ “ (1) del telecomando per attivarlo.
È stata selezionata una sorgente di ingresso erronea nella TV. Modificare la sorgente di ingresso.
È stato selezionato un sistema video erroneo. Premere il pulsante “Output” (19) del telecomando per
selezionare il segnale in uscita corretto.
• Il cavo del video non è collegato correttamente. Verificare che sia connesso correttamente.
Quando viene accesa l’unità si sente solo un “bling” ma non appare nessun menu:
• È stato selezionato un sistema video erroneo. Premere il pulsante “Output” (19) del telecomando per
selezionare il segnale in uscita corretto.
• Il cavo del video non è collegato correttamente. Verificare che sia connesso correttamente.
• L’uscita audio del CM3H [e collegata all’amplificatore, ma è stato selezionato un ingresso erroneo nella
TV. Selezionare l’ingresso corretto nella TV.
Non si sente niente:
• Il cavo audio non è collegato correttamente. Verificare che sia connesso correttamente alla TV o
all’amplificatore
• Il CM3H è collegato a un amplificatore, ma l’amplificatore è spento. Accendere l’amplificatore.
• Il flusso audio del file MPEG2 o VOB non è valido. Premere il pulsante “Audio” (7) del telecomando per
selezionare il flusso audio corretto.
• È stata attivata la funzione Mute. Premere di nuovo il pulsante “Mute” (28) del telecomando per
disattivarla.
• Il CM3H sta funzionando in modo Avanzamento Veloce o Riavvolgimento Rapido. Premere il pulsante
“Enter” (24) del telecomando per tornare alla riproduzione normale.
L’immagine mostrata è distorta:
• Il CM3H sta funzionando in modo Avanzamento Veloce o Riavvolgimento Rapido. Premere il pulsante
“Enter” (24) del telecomando per tornare alla riproduzione normale.
• Si sta riproducendo un film PAL in modo NTSC o viceversa. Premere il pulsante “P/N” (37) del
telecomando per cambiare i parametri di configurazione di visualizzazione.
Quando premo il pulsante“Slide”, il sistema si blocca:
• Ci sono troppe foto o brani audio nella cartella aperta. Ci vorrà più tempo per avviare la presentazione
con musica. Attendere che la riproduzione abbia inizio.
Il telecomando non funziona:
• Dirigere il telecomando direttamente verso il ricevitore del CM3H a ±30 gradi.
• Usare il telecomando a una distanza di cinque metri.
• Le batterie del telecomando (AAA) sono scariche e si devono sostituire.
Non appaiono i sottotitoli del film riprodotto:
• Si sta riproducendo un file AVI, ma il file sottotitoli file possiede un nome diverso. Consultare il capitolo
8.1 per sapere come visualizzare i sottotitoli.
• Il file sottotitoli non è supportato dal CM3H.
Quando cerco di riprodurre un video, appare il messaggio “CODEC NOT SUPPORTED”:
• Il file contenente il film è stato creato con un Codec non supportato dal CM3H.
Consultare il sito www.conceptronic.net per conoscere la lista di Codec supportati dal CM3H.
89
ITALIANO
Il CM3H non mostra tutte le partizioni o tutto il contenuto del disco rigido:
• La partizione del disco rigido non è primaria. Partizionare di nuovo il disco rigido e accertarsi che tutte
le partizioni siano configurate come primarie.
• Il disco rigido è stato formattato con un file system non supportato dal CM3H. Riformattare il disco
rigido utilizzando i file system FAT32 o NTFS.
• Non esistono file multimediali nella partizione selezionata.
La riproduzione DVD/ISO non inizia quando premo il pulsante Play/Pause:
• Accertarsi di usare la struttura di cartella corretta. La struttura di cartella è decritta nel capitolo 8.1.
I file DVD non sono completi, sono guasti o rovinati. In tal caso il CM3H non avvia la riproduzione del
DVD.
Durante i film di introduzione del DVD, lo schermo resta in bianco:
• Il capitolo mostrato finisce con uno schermo in bianco o è troppo breve per essere riprodotto. Premere il
pulsante “Next” (23) per passare al capitolo successivo.
La TV mostra un’immagine un bianco e nero invece di un’immagine a colori:
• La TV utilizzata non è in grado di gestire il sistema “Multi-TV” del CM3H. Usare il Menu di Configurazione
per cambiare il sistema TV e impostarlo su PAL (vedi capitolo 9). Dopo aver modificato il sistema TV,
spegnere il CM3H e accenderlo di nuovo.
90
PORTUGUÊS
Conceptronic CM3H
Manual do utilizador
Parabéns pela compra do seu
Leitor Multimédia da Conceptronic.
Este manual de Utilizador fornece-lhe uma explicação passo-a-passo sobre como instalar e usar o Leitor
Multimédia da Conceptronic.
Quando tiver algum problema, aconselhamo-lo a consultar a nossa página de suporte (vá a
www.conceptronic.net e clique em ‘Support’ (Suporte)). Aí vai encontrar a Base de Dados das Perguntas
Mais Frequentes.
Quando tiver outras questões sobre o seu produto e não encontrar resposta para elas na nossa página,
contacte-nos por e-mail: [email protected]
Para mais informações sobre os produtos da Conceptronic, visite a página web da Conceptronic em:
www.conceptronic.net
Recomendação: Pode actualizar o firmware do CM3H da Conceptronic. Para actualizar a sua unidade com
a versão mais recente de firmware, pode consultar a página na Internet da Conceptronic.
Recomendação: Por favor, consulte a página www.conceptronic.net para obter a mais recente lista de
codecs dos ficheiros suportados.
1. Conteúdo da embalagem
Devem existir os seguintes elementos na embalagem do Leitor Multimédia da Conceptronic:
•
•
•
•
•
•
•
•
•
Conceptronic CM3H Leitor Multimédia (descrito como ‘unidade’ no manual).
Suporte de produto para o CM3H.
Fonte de alimentação (12 V, 2,5 A) com cabo.
Comando.
2 pilhas (AAA) para o comando.
Cabo de vídeo composto (fichas RCA vermelha, branca e amarela).
Adaptador SCART para o cabo de vídeo Composto.
Cabo USB.
Este Manual do Utilizador.
91
PORTUGUÊS
2. Características do produto
•
•
•
•
•
•
•
•
•
•
•
•
•
•
•
•
Interface de utilizador multilingue: Inglês, Holandês, Espanhol, Francês, Italiano, Alemão e Português
Suporta várias partições do disco rígido.
Suporta sistemas de ficheiros Fat32 e NTFS.
Saída de vídeo HDMI até 1080i.
Suporta legendas (.SMI/.SRT/.SUB/.SSA) para MPEG4 (AVI), resolução D1.
Suporta AVI (MPEG4), MPG (MPEG1, MPEG2), DAT (VCD), VOB (DVD), IFO (DVD), ISO, WAV, WMA, MP3,
JPG.
Suporta vários codecs. Consulte a nossa página web para uma lista completa dos codecs suportados.
Saídas: HDMI / vídeo Composto / vídeo Componente / áudio estéreo RCA / áudio óptico.
Compatível com PAL/NTSC.
Vários modos de repetição.
Protecção de ecrã.
14 modos de transição para fotografias.
Apresentação de diapositivos (reprodução de fotografias) com música de fundo.
Intervalo de visualização variável.
Funções de zoom e rotação.
Mudança automática entre o modo PC-USB e leitor multimédia:
• Quando ligada ao PC, a unidade funciona como um dispositivo de armazenamento USB.
• Quando não está ligada ao PC, a unidade funciona como um leitor multimédia.
Nota:
O CM3H não consegue reproduzir filmes HD (720p, 1080i, 1080p).
3. Notas e Precauções
• Não tente desmontar o transformador incluído na embalagem. Isso pode causar ferimentos por alta
tensão. Se o transformador precisar de ser reparado, contacte por favor o seu fornecedor ou o helpdesk
da Conceptronic.
• Mantenha a unidade afastada da humidade excessiva.
• Não introduza nem exponha a unidade a líquidos.
• Desligue o transformador se não pretender usar a unidade por um longo período de tempo.
• Evite usar a unidade num local próximo de combustíveis.
• Mude a pilha do comando sempre que esta estiver fraca ou gasta por uma do mesmo tipo. Recicle as
pilhas gastas sempre que possível. Para evitar a corrosão, retire a pilha sempre que não usar o comando
por um longo período de tempo.
• Mantenha o comando afastado da humidade excessiva; não o deixe cair.
• Não use o comando com luz solar intensa.
• NUNCA deixe cair, abane ou bata com a unidade.
• Para evitar um sobreaquecimento, não cubra a unidade.
Nota:
Os dados do disco rígido interno podem ser fragmentados. Isto pode afectar a reprodução de
filmes. Recomenda-se desfragmentar o disco rígido do seu computador de vez em quando.
92
PORTUGUÊS
4. O produto
Parte da frente
Parte de trás
1
5
2
6
7
3
4
8
9
10
11
12
13
14
15
Descrição dos números:
1.
2.
3.
4.
Receptor de infravermelhos
LED indicador de estado
Teclas direccionais (ver abaixo)
Luz de Actividade do disco rígido
8.
9.
10.
11.
12.
13.
14.
15.
5. Interruptor principal
6. Ficha Mini USB (para PC)
7. Saída de HDMI
Descrição dos botões
Botões de navegação
( , , , )
No menu:
Durante a reprodução:
Botão de reprodução/ paragem ( / )
,
,
Pressão breve:
Pressão longa:
93
Saída Componente ‘Pb’
Saída Componente ‘Pr’
Saída Componente ‘Y’
Saída de vídeo Composto
Saída de áudio ‘R’ (direita)
Saída de áudio ‘L’ (esquerda)
Saída óptica digital
Entrada CC (12 V, 2,5 A)
Para percorrer os menus da unidade.
Para aumentar / diminuir o volume.
Recuo rápido / avanço rápido.
Para começar ou parar a reprodução de um
ficheiro ou para abrir uma pasta.
Liga o CM3H ou coloca o CM3H no modo
standby.
PORTUGUÊS
5. O comando
O comando usa-se para controlar a unidade. Na parte de dentro da capa deste manual pode ver uma
imagem do comando. Os números dos botões correspondem aos da tabela abaixo apresentada, a qual
exemplifica a função de cada número das teclas do comando.
Nº
Tecla
1
2
3
4
5
6
7
8
POWER (
R/L
TOP
MUSIC
FILE
0–9
AUDIO
SLIDE
Descrição
9
10
11
12
13
14
15
16
17
SLOW
A–B
REPEAT
VOLUME
VOLUME
BACK
, , ,
PREVIOUS (
PLAY/PAUSE
18
19
20
21
22
23
24
25
26
27
28
29
30
REWIND (
)
OUTPUT
SETUP
FAST FORWARD (
STOP ( )
NEXT (
)
)
ENTER (
DISPLAY
PAGE
PAGE
MUTE
ROTATE
DELAY
31
32
ZOOM
TRANS
33
34
35
36
SUB-T
VIDEO
PHOTO
FUNC
37
38
P/N
MENU
39
Luz de alimentação
)
)
)
Muda entre o modo de leitor multimédia e o modo de standby.
Muda a saída de áudio (Estéreo, Mono-L, Mono-R).
Vai para o topo da lista de ficheiros actual.
Botão de acesso directo à pasta ‘MUSIC’ (Música).
Mostra a ‘File Library’ (Biblioteca de ficheiros).
Teclas de selecção numérica 0-9.
Selecciona ou muda a transmissão de áudio (reprodução de DVD).
Inicia o modo de apresentação de dispositivos com música ou inicia a
reprodução de um vídeo.
Reprodução lenta.
Reproduz repetidamente um determinado intervalo.
Para seleccionar um modo de repetição / mistura.
Aumenta o volume.
Diminui o volume.
Regressar à pasta anterior.
Move a selecção no menu principal ou no menu DVD.
Muda para o ficheiro ou capítulo anterior.
Inicia a reprodução de um ficheiro ou de uma pasta de DVD ou faz pausa
numa reprodução.
Recuo rápido da reprodução.
Selecciona o sinal de saída de vídeo.
Abre o menu de configuração.
Avanço rápido durante a reprodução.
Pára a reprodução.
Muda para o ficheiro ou capítulo seguinte.
Confirma a selecção ou começa a reprodução.
Mostra informação sobre a reprodução durante a mesma.
Mostra a página seguinte com ficheiros.
Mostra a página anterior com ficheiros.
Activar ou desactivar o modo de silêncio.
Rodar fotografias.
Selecciona o tempo de intervalo da apresentação de diapositivos
(incluindo apresentação de diapositivos com música).
Aumenta ou diminui o zoom (reprodução de DVDs e fotografias).
Selecciona o modo de transição durante uma apresentação de
diapositivos ou um tipo de equalizador de música durante a reprodução.
Selecciona ou muda as legendas do filme (Reprodução de DVD e MPEG4).
Botão de acesso directo à pasta ‘VIDEO’ (Vídeo).
Botão de acesso directo à pasta ‘PHOTO’ (Fotografia).
Ir para um determinado tempo na reprodução durante a reprodução de
um filme.
Selecciona um sistema de vídeo. (PAL / NTSC)
A. Mostra a ‘Partition List’ (Lista de partições) ou a ‘File List’ (Lista de
ficheiros).
B. Regressa ao menu do DVD (reprodução de DVD).
A Luz de alimentação pisca quando se carrega num botão.
94
PORTUGUÊS
6. Ligar o CM3H
Ligação HDMI
Ligação Composto + SCART
Ligação S/PDIF
Exemplo de uma ligação vídeo HDMI, vídeo Composto e S/PDIF.
Ligar o(s) cabo(s) de vídeo
Pode ligar a unidade à sua televisão de 4 maneiras diferentes:
- HDMI
- Composto
- SCART
(usando o cabo de vídeo Composto e o adaptador Scart)
- Vídeo Componente **
**
Quando usar o vídeo Componente, apenas o sinal de vídeo é enviado para a sua televisão.
Para o sinal de áudio, use as fichas RCA Áudio do cabo Composto (vermelho, branco).
HDMI:
• Ligue o cabo HDMI à saída de HDMI [7] da unidade.
• Ligue a outra extremidade do cabo HDMI à entrada HDMI da sua televisão.
Vídeo Composto:
• Ligue o cabo de vídeo Composto (amarelo, vermelho e branco) às fichas de vídeo Composto
correspondentes [11, 12, 13] na unidade.
• Ligue a outra extremidade do cabo Composto (amarelo, vermelho e branco) às fichas de Entrada de
vídeo Composto da sua televisão.
SCART:
• Ligue o cabo de vídeo Composto (amarelo, vermelho e branco) às fichas de vídeo Composto
correspondentes [11, 12, 13] na unidade.
• Ligue a outra extremidade do cabo de vídeo Composto (amarelo, vermelho e branco) às fichas do
adaptador Scart.
• Ligue o adaptador SCART à entrada SCART da sua televisão.
Vídeo Componente:
• Ligue o cabo Componente (vermelho, verde e azul) às fichas de vídeo Componente [8, 9, 10] da
unidade.
• Ligue a outra extremidade do cabo de vídeo Componente às fichas de entrada de vídeo Componente da
sua televisão.
95
PORTUGUÊS
Ligar o(s) cabo(s) de áudio
Pode ligar a unidade à sua televisão e/ou ao seu sistema de home cinema de 2 formas diferentes:
- Analógica, através das fichas Áudio RCA da unidade.
- Digital, através da saída S/PDIF digital óptica da unidade.
Analógica:
• Ligue as fichas áudio (vermelho e branco) do cabo de vídeo composto às fichas áudio RCA [12, 13] da
unidade.
• Ligue a outra extremidade do cabo de vídeo Composto às fichas áudio RCA da sua televisão ou
amplificador.
Digital:
• Ligue o cabo digital óptico à saída de S/PDIF [14] da unidade.
• Ligue a outra extremidade do cabo digital óptico à entrada digital óptica do seu amplificador.
Ligar a fonte de alimentação
Quando a unidade estiver ligada ao seu equipamento de áudio/ vídeo, pode ligar a fonte de alimentação à
unidade.
• Ligue a fonte de alimentação [15] incluída na embalagem à entrada CC da unidade e a uma tomada que
esteja livre.
• Coloque o interruptor de alimentação principal na parte de trás da unidade em ‘I’ para ligá-la.
A unidade liga-se.
Preparação do comando
O comando usa duas pilhas AAA (incluídas na embalagem).
Tem de usar o comando para ligar e desligar a unidade.
Notas:
-
O melhor alcance de funcionamento do comando é de cerca de 5 metros.
Aponte o comando para o receptor de infravermelhos do painel frontal da unidade.
O ângulo de recepção do receptor de infravermelhos é de ± 30 graus.
Mude as pilhas (2 pilhas AAA) quando estiverem fracas ou tiverem terminado.
96
PORTUGUÊS
7. Funcionamento básico do CM3H
• Seleccione na televisão o canal de entrada correcto ao qual está ligado o dispositivo. (HDMI, vídeo
Composto, SCART ou vídeo Componente).
Nota:
A partir daqui, o manual baseia-se no facto de a sua televisão estar sintonizada no canal de
entrada da unidade. Todos os passos descritos referem-se ao funcionamento da unidade.
• Verifique se o interruptor principal de alimentação na parte de trás da unidade está em ‘I’.
• Ligue a unidade com o botão Play/Stop (Reproduzir / Parar) na parte da frente da mesma ou com o
botão ‘Power’ (1) do comando.
A unidade liga-se e apresenta o menu no ecrã.
Nota:
O sinal de saída predefinido da unidade é o de vídeo Composto. Se a unidade estiver ligada e não
aparecer nada no ecrã, carregue no botão ‘Output’ (Saída) (19) do comando para mudar entre as
diferentes saídas do CM3H (HDMI, vídeo Composto, vídeo Componente).
Nota:
A unidade tem de inicializar o disco rígido quando é ligada. Isto pode demorar algum tempo.
Durante a inicialização, aparece a mensagem ‘LOADING...’ (A carregar...) no seu ecrã.
Quando o disco rígido estiver formatado com uma partição, vai mostrar a ‘File List’ (Lista de ficheiros) no
seu ecrã, apresentando o conteúdo do seu disco rígido.
Quando o disco rígido estiver formatado com várias partições, a unidade vai mostrar a ‘Partition List’ (Lista
de partições) no ecrã com todas as partições existentes. Use os botões / (15) para movimentar a
/Enter’ (24) para ir para a ‘File List’ (Lista de ficheiros), mostrando o
selecção, e carregue no botão ‘
conteúdo da partição seleccionada.
[ Partition List ] (Lista de partições)
[ File List ] (Lista de ficheiros)
Mudar de partição:
Quando o disco rígido estiver formatado com várias partições, pode carregar no botão ‘Menu’ (38) do
comando para voltar à ‘Partition List’ (Lista de partições) e seleccionar uma partição diferente.
97
PORTUGUÊS
8. Opções de reprodução multimédia
8.1 Reprodução de filmes
O CM3H suporta vários formatos de vídeo, como reprodução de MPEG1/2, MPEG 4 (incluindo XVID), VOB,
IFO (DVD) e ISO, incluindo suporte para reprodução de faixas de áudio MP3, AC3, AAC e MPEG1/2 dentro da
transmissão de vídeo e DTS através da saída SPDIF.
• Seleccione o ficheiro que deseja reproduzir com os botões de navegação do comando.
• Carregue no botão ‘Enter’ (24) ou no botão ‘Play/Pause’ (17) do comando para começar a reprodução
do ficheiro seleccionado.
Durante a reprodução pode usar as seguintes opções de reprodução do comando:
-
Play/Pause
Stop
Rewind
Fast Forward
Previous
Next
Repeat
(17)
(22)
(18)
(21)
(16)
(23)
(11)
-
Display
Func
A-B
Slow
Slide
(25)
(36)
(10)
(9)
(8)
Nota:
Reproduz o ficheiro seleccionado ou faz pausa na reprodução.
Parar a reprodução.
Rebobinar a reprodução.
Avançar rapidamente a reprodução.
Reproduz o ficheiro anterior da pasta actual.
Reproduz o ficheiro seguinte da pasta actual.
Muda a opção Repeat / Shuffle (Repetir / Misturar) do ficheiro/ pasta
actual.
Mostra os detalhes da reprodução.
Salta para um tempo específico do seu filme.
Repete uma determinada parte do filme.
Reprodução em modo lento.
Reprodução passo a passo.
A maioria dos codecs de vídeo é suportada no CM3H (tais como XviD, AVI, MPEG2, etc.), mas é
possível que o utilizador tenha ficheiros que necessitem de um codec que não esteja incluído no
CM3H.
Se tentar reproduzir um ficheiro que tenha um Codec não suportado, vai ver a mensagem “CODEC
NOT SUPPORTED” (CODEC NÃO SUPORTADO). Quando isto acontecer, sugerimos-lhe que use um
codec diferente para o seu filme.
Função de retomar a reprodução
O CM3H tem uma função que permite retomar a reprodução. Se desligar o CM3H durante a reprodução dos
seus filmes, música ou apresentação de fotografias, o CM3H vai continuar a reprodução quando for
novamente ligado.
Esta função está activada por defeito e pode ser desactivada no Menu de Configuração.
Nota:
A função para retomar a reprodução de ficheiros ISO e IFO (DVD) não é suportada.
Função de reprodução com legendas
O CM3H da Conceptronic pode suportar ficheiros de legendas .SMI, .SRT, .SUB ou .SSA.
Se o ficheiro das legendas tiver o mesmo nome que o ficheiro de vídeo seleccionado (apenas sendo
diferente a extensão), o ficheiro das legendas é carregado automaticamente quando o ficheiro MPEG4 for
reproduzido, por exemplo:
Nome do filme:
Nome das legendas:
My_Movie_With_Sub.AVI
My_Movie_With_Sub.SRT
Quando o ficheiro das legendas tiver um nome diferente, precisa então de seleccionar o ficheiro das
legendas manualmente. Seleccione o ficheiro das legendas e carregue no botão ‘Sub-t’ (33) do comando
/Enter’ (24) para o reproduzir.
para seleccionar as legendas. Seleccione o filme e carregue no botão ‘
98
PORTUGUÊS
Nota:
Se existir um ficheiro de legendas disponível com o mesmo nome do filme e você tentar
seleccionar outro ficheiro de legendas, o CM3H vai forçar a utilização do ficheiro de legendas com
o mesmo nome, em vez daquele que você tiver seleccionado.
Função de reprodução de DVD
O CM3H reproduz DVDs a partir do disco rígido como se fossem DVDs normais. Pode navegar pelo menu do
DVD, escolher legendas ou mudar o idioma de áudio.
Nota:
O CM3H apenas suporta a reprodução de cópias de DVD desprotegidas. A protecção CSS não é
suportada pelo CM3H.
Nota:
O CM3H apenas suporta cópias de DVD para a Região 2 ou multi-região.
• Ligue o CM3H ao seu computador. Consulte o capítulo 10 ‘Ligação USB ao computador’.
• Crie uma pasta no disco rígido do CM3H com o nome do seu filme em DVD (por exemplo: 'Filme1').
• Copie os ficheiros 'AUDIO_TS' e 'VIDEO_TS' (incluindo o seu conteúdo) do seu DVD para a pasta que criou
(por exemplo: ‘Filme1’) no CM3H.
Depois de copiar, a estrutura deverá ser a seguinte:
- [disco rígido do CM3H]
|-> Filme1
|-> AUDIO_TS
|-> VIDEO_TS
(opcional, não disponível para todos os DVDs)
(com todos os ficheiros do DVD dentro)
• Desligue o CM3H do seu computador e ligue-o à sua televisão. Ligue o CM3H.
• Seleccione o DVD que quer reproduzir com os botões ‘ , , , ’ (15) do comando.
• Carregue no botão ‘Play/Pause’ (17) do comando para começar a reprodução do DVD seleccionado.
Nota:
Não use o botão ‘Enter’ (24) para começar. Isto só vai apresentar os ficheiros/ subpastas e não
inicia a reprodução do DVD.
Durante a reprodução do DVD pode usar as seguintes opções de reprodução no comando:
-
Play/Pause
(17)
Stop
(22)
Teclas de navegação
Enter
(24)
Rewind
(18)
Fast Forward
(21)
Previous
(16)
Next
(23)
Sub-t
(33)
Audio
(7)
Zoom
(31)
Repeat
(11)
A-B
(10)
Display
(25)
Func
(36)
Menu
(38)
Recomendação:
Reproduz a pasta de DVD seleccionada ou faz pausa na reprodução.
Pára a reprodução do DVD e regressa ao explorador de filmes.
(15)
Navegam pelo menu do DVD.
Confirma a selecção que fez no menu do DVD.
Rebobinar rápido.
Avanço rápido.
Capítulo anterior.
Capítulo seguinte.
Muda ou desliga as legendas do DVD.
Muda a faixa de áudio do DVD (quando o DVD tiver várias faixas áudio).
Faz zoom no filme que se está a reproduzir.
Muda a opção de Repetição do capítulo actual.
Repete uma determinada parte do filme.
Mostra os detalhes da reprodução.
Salta para um tempo específico do seu filme.
Regressa ao Menu do DVD.
Também pode reproduzir filmes em DVD que estejam em formato ISO. As funções de
reprodução de DVDs em formato ISO são as mesmas que as funções de reprodução de
DVD anteriores.
99
PORTUGUÊS
Botão de acesso directo à sua pasta de vídeos
Pode criar uma pasta de vídeos à qual pode aceder directamente carregando no botão ‘Video’ (34) do
comando. Crie uma pasta chamada ‘VIDEO xx’ (em que ‘xx’ pode ser substituído por aquilo que quiser) na
raiz do disco rígido e coloque os seus ficheiros de vídeo nesta pasta. Quando o leitor multimédia estiver a
funcionar e carregar no botão ‘Video’ (34), o leitor multimédia vai abrir automaticamente a pasta.
Nota:
Se criar mais do que uma pasta cujo nome comece por ‘VIDEO’, a unidade só vai abrir a primeira
pasta.
Alguns ficheiros MPEG2/VOB contêm dois ou mais streams de áudio. Se carregar no botão ‘Audio’ (7) do
comando, pode alternar entre esses streams de áudio. Pode usar o botão ‘Audio’ (7) quando o ficheiro de
vídeo que está a ser reproduzido não emitir som, para poder assim localizar o stream de áudio apropriado.
Se mudar de ficheiro MPEG2/VOB, pode perder o áudio se este não estiver no stream predefinido. Para
prevenir esta situação, pressione no botão ‘Setup’ (20) durante a reprodução para “bloquear” o stream de
áudio actual. Esta opção vai manter o stream de áudio que seleccionou para todos os ficheiros.
100
PORTUGUÊS
8.2 Reprodução de música
O CM3H da Conceptronic tem vários modos para reproduzir música (são suportados ficheiros WAV, MP3 e
WMA).
• Seleccione o ficheiro que deseja reproduzir com os botões de navegação do comando.
• Carregue no botão ‘Enter’ (24) ou no botão ‘Play/Pause’ (17) do comando para começar a reprodução
do ficheiro seleccionado.
Durante a reprodução pode usar as seguintes opções de reprodução do comando:
-
Play/Pause
Stop
Rewind
Fast Forward
Previous
Next
Repeat
- Trans
(17)
(22)
(18)
(21)
(16)
(23)
(11)
(32)
Reproduz o ficheiro seleccionado ou faz pausa na reprodução.
Parar a reprodução.
Rebobinar a reprodução.
Avançar rapidamente a reprodução.
Reproduz o ficheiro anterior da pasta actual.
Reproduz o ficheiro seguinte da pasta actual.
Muda a opção Repeat / Shuffle (Repetir / Misturar) do ficheiro/ pasta
actual.
Selecciona um tipo de equalizador.
Função de retomar a reprodução
O CM3H tem uma função que permite retomar a reprodução. Se desligar o CM3H durante a reprodução dos
seus filmes, música ou apresentação de fotografias, o CM3H vai continuar a reprodução quando for
novamente ligado.
Esta função está activada por defeito e pode ser desactivada no Menu de Configuração.
Botão de acesso directo à sua pasta de música
Pode criar uma pasta de música à qual pode aceder directamente carregando no botão ‘Music’ (4) do
comando. Crie uma pasta chamada ‘MUSIC xx’ (em que ‘xx’ pode ser substituído por aquilo que quiser) na
raiz do disco rígido e coloque os seus ficheiros de música nesta pasta. Quando o leitor multimédia estiver a
funcionar e carregar no botão ‘Music’ (4), o leitor multimédia vai abrir automaticamente a pasta.
Nota:
Se criar mais do que uma pasta cujo nome comece por ‘MUSIC’, a unidade só vai abrir a primeira
pasta.
101
PORTUGUÊS
8.3 Reproduzir as suas Fotografias e Imagens
Com o CM3H pode ver as suas fotografias e imagens, que pode guardar no disco rígido da unidade.
• Seleccione o ficheiro que deseja reproduzir com os botões de navegação do comando.
• Carregue no botão ‘Enter’ (24) ou no botão ‘Play/Pause’ (17) do comando para começar a reprodução
do ficheiro seleccionado.
Durante a reprodução pode usar as seguintes opções de reprodução do comando:
- Play/Pause
(17)
- Stop
(22)
- Teclas de navegação (11)
- Previous
- Next
- Repeat
(16)
(23)
(11)
Delay
Trans
Rotate
Zoom
(30)
(32)
(29)
(31)
-
Inicia uma apresentação de diapositivos a começar no ficheiro que
seleccionou ou faz pausa na apresentação.
Pára a apresentação de diapositivos.
, : Inverte a fotografia apresentada.
,
: Roda a fotografia apresentada.
Reproduz o ficheiro anterior da pasta actual.
Reproduz o ficheiro seguinte da pasta actual.
Muda a opção Repeat / Shuffle (Repetir / Misturar) do ficheiro/ pasta
actual.
Muda o intervalo do tempo de apresentação.
Muda a transição entre duas fotografias.
Roda a fotografia apresentada.
Aumenta a fotografia actual.
Função de retomar a reprodução
O CM3H tem uma função que permite retomar a reprodução. Se desligar o CM3H durante a reprodução dos
seus filmes, música ou apresentação de fotografias, o CM3H vai continuar a reprodução quando for
novamente ligado.
Esta função está activada por defeito e pode ser desactivada no Menu de Configuração.
Apresentação de diapositivos com música (visualizar fotografias com música de fundo)
Seleccione uma fotografia e carregue no botão ‘Slide’ (8) para iniciar a apresentação com música.
Quando não carregar no botão ‘Slide’ (8), a música não é reproduzida e as imagens serão apresentadas
numa apresentação de diapositivos sem música. A função de apresentação de diapositivos com música não
/Enter’ (24) para ver
funciona se não houver música disponível na pasta. Tem de carregar no botão ‘
uma apresentação de imagens sem som.
Nota:
Neste modo, as funções Zoom e Rotate não estão disponíveis.
Pode fazer pausa na apresentação de diapositivos carregando no botão ‘Play/Pause’ (17) uma vez (a
música continuará a ser reproduzida). Carregue novamente no botão ‘Play / Pause’ (17) para parar
também a reprodução de música. Carregue novamente no botão ‘Play / Pause’ (17) para retomar a
apresentação com música.
Botão de acesso directo à sua pasta de fotografias
Pode criar uma pasta de fotografias à qual pode aceder directamente carregando no botão ‘Photo’ (35) do
comando. Crie uma pasta chamada ‘PHOTO xx’ (em que ‘xx’ pode ser substituído por aquilo que quiser) na
raiz do disco rígido e coloque os seus ficheiros de fotografias nesta pasta. Quando o leitor multimédia
estiver a funcionar e carregar no botão ‘Photo’ (35), o leitor multimédia vai abrir automaticamente a
pasta.
Nota:
Se criar mais do que uma pasta cujo nome comece por ‘PHOTO’, a unidade só vai abrir a primeira
pasta.
102
PORTUGUÊS
9. Configuração do sistema
Pode carregar no botão ‘Setup’ (20) do seu comando para abrir o Menu de Configuração da unidade.
/
Pressione nos botões / / / para mover a selecção no Menu de Configuração e carregue no botão
ENTER para confirmar essa selecção. Quando acabar de configurar a sua unidade carregue novamente no
botão de configuração para fechar o Menu de Configuração ou seleccione a opção ‘Exit Setup’ (sair do
menu de configuração) no Menu de Configuração.
O Menu de Configuração tem as seguintes opções:
•
•
•
•
Página da Configuração Geral
Página de Configuração Áudio
Página de configuração de video
Página de Configuração de Apresentação de
Diapositivos
•
Exit Setup (Sair do menu de configuração)
Página da Configuração Geral
OSD Lang
Screensaver
Play Resume
Defaults
Auto Start
: Estabelece o idioma de apresentação dos menus.
: Activa ou desactiva a protecção de ecrã.
: Activa ou desactiva a função de Retomar a Reprodução.
: Repõe as configurações predefinidas de fábrica.
: Reproduz automaticamente todos os ficheiros de multimédia do CM3H quando se
liga a unidade.
Página de Configuração Áudio:
Downmix
: Define o modo downmix para som multi-canal.
SPDIF Output
: Define o modo de saída SPDIF.
LPCM Output
: Define o modo de saída LPCM.
Página de Configuração de Vídeo:
TV Display
: Altera o tipo de visualização na televisão.
TV System
: Selecciona um sistema de vídeo para a sua televisão.
Video Output
: Selecciona a saída de vídeo que está a usar.
Página de Configuração de Apresentação de Diapositivos:
Interval Time
: Selecciona o intervalo de tempo entre duas fotografias.
Transition
: Selecciona a velocidade de transição predefinida entre duas fotografias.
103
PORTUGUÊS
10. Ligação USB ao computador
Pode ligar a unidade ao seu computador para copiar dados (filmes, música, imagens, registos, etc.) de e
para o disco rígido interno.
Nota:
No nosso exemplo abaixo, estamos a usar um computador com o Windows XP, mas a unidade pode
ser usada em todos os computadores que suportem USB e a função de leitura e escrita em sistemas
de ficheiros FAT32.
Ligue a unidade ao seu computador
• Ligue o cabo USB para Mini USB fornecido à parte de trás da unidade e a uma porta USB livre do seu
computador.
• Ligue a unidade no interruptor principal de alimentação da parte de trás da unidade. A unidade vai ser
automaticamente reconhecida e instalada e aparece como unidade extra no seu computador.
Por defeito, o disco rígido interno da unidade vai ser inicializado como dispositivo de armazenamento USB.
Desligar a unidade do seu computador
• Clique uma vez no ícone ‘Safe Removal’ (Remover o hardware com segurança) da bandeja do sistema.
• Seleccione ‘Stop USB Mass Storage Device’ (Parar Dispositivo de Armazenamento de Massa USB) quando
aparecer.
• Espere pela mensagem ‘Safe to remove Hardware’ (É seguro remover o hardware).
• Desligue o cabo USB.
104
PORTUGUÊS
11. Sugestões e Resolução de problemas
Use as sugestões abaixo indicadas para resolver problemas quando o seu CM3H não estiver a funcionar
devidamente:
O LED indicador de estado não acende:
• A fonte de alimentação não está ligada ao CM3H. Volte a ligar a fonte de alimentação ao CM3H.
Não há qualquer actividade no visor:
• O CM3H está no modo de standby. Carregue no botão ‘ ’ (1) do comando para activá-lo.
• Está seleccionada uma entrada errada na sua televisão. Altere a entrada.
• Está seleccionado o sistema de vídeo errado. Carregue no botão ‘Output’ (19) do seu comando para
mudar para o sinal de saída correcto.
• O cabo de vídeo não está devidamente ligado. Verifique se o cabo de vídeo está bem ligado.
Quando a unidade está ligada, só se ouve um som breve mas não aparece qualquer menu:
• Está seleccionado o sistema de vídeo errado. Carregue no botão ‘Output’ (19) do seu comando para
mudar para o sinal de saída correcto.
• O cabo de vídeo não está devidamente ligado. Verifique se o cabo de vídeo está bem ligado.
• A saída de áudio do CM3H está ligada ao amplificador, Mas está seleccionada a entrada errada na
televisão. Seleccione a entrada correcta na sua televisão.
Não há som:
• O cabo de áudio não está devidamente ligado. Certifique-se de que o cabo está devidamente ligado à
sua televisão ou amplificador.
• O CM3H está ligado com um amplificador, mas o amplificador está desligado. Ligue o amplificador.
• A corrente de áudio do ficheiro MPEG2 ou VOB não é válida. Carregue no botão ‘Audio’ (7) do comando
para ajustar a corrente de áudio adequada.
• A função de Silêncio está ligada. Carregue novamente no botão ‘Mute’ (28) (Silêncio) do comando para
cancelar essa função.
• O CM3H está a funcionar em modo de Avanço Rápido ou em Recuo Rápido. Carregue no botão ‘Enter’
(24) do comando para voltar ao modo de reprodução normal.
A imagem do ecrã está distorcida:
• O CM3H está a funcionar em modo de Avanço Rápido ou em Recuo Rápido. Carregue no botão ‘Enter’
(24) do comando para voltar ao modo de reprodução normal.
• Um filme PAL é exibido no modo NTSC ou vice-versa. Carregue no botão ‘P/N’ (37) do comando para
alterar as definições de visualização.
Ao carregar no botão ‘Slide’ o sistema congela:
• Existem demasiadas fotografias ou músicas na pasta actual. Vai demorar bastante a começar a
Apresentação de Slides ou Música. Aguarde o início da reprodução.
O comando não funciona:
• Aponte o comando para o receptor do CM3H a cerca de ±30 graus e directamente.
• Use o comando dentro de um alcance de 5 metros.
• As pilhas (AAA) do comando terminaram e devem ser substituídas.
As legendas do filme exibido não aparecem:
• É reproduzido um ficheiro AVI, mas o ficheiro das legendas tem um nome de ficheiro diferente. Consulte
o Capítulo 8.1 para saber como visualizar as legendas.
• O ficheiro de legendas não é suportado pelo CM3H.
105
PORTUGUÊS
Quando tenta reproduzir um vídeo, aparece a mensagem “CODEC NOT SUPPORTED” (CODEC NÃO
SUPORTADO):
• O ficheiro de filme foi criado com um codec não suportado pelo CM3H.
Entre na página web www.conceptronic.net para obter uma lista de codecs suportados para o CM3H.
O CM3H não mostra todas as partições/ conteúdo do disco rígido:
• A partição no disco rígido não é principal. Volte a fazer a repartição do disco rígido e assegure-se de que
todas as partições são definidas como principais.
• O disco rígido está formatado com um sistema de ficheiros que não é suportado pelo CM3H. Volte a
formatar o seu disco rígido com o sistema de ficheiros FAT32 ou NTFS.
• Não existem ficheiros multimédia na partição seleccionada.
A reprodução de DVD/ISO não inicia quando se carrega no botão Play/Pause (Reproduzir/ Pausa):
• Assegure-se de que usa a estrutura de pastas correcta. A estrutura de pastas descreve-se no capítulo
8.1.
Os ficheiros de DVD estão incompletos, corrompidos ou danificados. Quando isso acontece, o CM3H não
inicia a reprodução do DVD.
Durante o filme de introdução do DVD o ecrã fica branco:
• O capítulo actual termina com um ecrã em branco ou é demasiado pequeno para reproduzir. Carregue
em ‘Next’ (23) para passar ao capítulo seguinte.
A minha televisão mostra uma imagem a preto e branco em vez de a cores:
• A sua televisão não suporta o "Multi" TV-System do CM3H. Use o Menu de Configuração para mudar o
Sistema de TV para PAL. (ver capítulo 9). Depois de alterar o Sistema de TV, desligue e volte a ligar o
CM3H.
106
MAGYAR
Conceptronic CM3H
Használati utasítás
Köszönjük, hogy a Conceptronic multimédia lejátszóját választotta.
Ez a kezelési utasítás lépésről lépésre elmagyarázza, miként kell a Conceptronic multimédia lejátszóját
telepítenie.
Ha probléma jelentkezne, azt tanácsoljuk, hogy keresse fel terméktámogatást nyújtó webhelyünket
(látogasson el a www.conceptronic.net honlapra, majd kattintson a „Support”-ra). Ott található ugyanis a
gyakran ismétlődő kérdések (GYIK) adatbázisa.
Ha a termékkel kapcsolatban további kérdése volna, és arra választ honlapunkon nem talál, e-mailben is
fordulhat hozzánk: [email protected]
A Conceptronic termékekkel kapcsolatos további tájékozódás végett látogasson el a Conceptronic
honlapjára: www.conceptronic.net
Ötlet:
A Conceptronic CM3H típusú berendezés a firmware szempontjából bővíthető. Ha a berendezést a
legújabb firmware-verzióval kívánja frissíteni, látogasson el a Conceptronic honlapjára.
Ötlet:
A támogatott fájlok legfrissebb kodeklistája végett keresse fel a www.conceptronic.net honlapot.
1. A csomag tartalma
A Conceptronic multimédia lejátszóját tartalmazó csomagban az alábbiak találhatók:
•
•
•
•
•
•
•
•
•
Conceptronic CM3H multimédia lejátszó (a leírásban „berendezésként” hivatkozunk rá).
Tartóállvány a CM3H-hoz.
(12 V-os, 2,5 A-es) tápegység hálózati kábellel.
Távirányító.
2 (AAA) elem a távirányítóhoz.
Összetett videokábel (piros, fehér, sárga RCA-dugaszokkal).
SCART-adapter az összetett videokábelhez.
USB-kábel.
Ez a használati utasítás.
107
MAGYAR
2. A termék jellemzői
•
•
•
•
•
•
•
•
•
•
•
•
•
•
•
•
Többnyelvű felhasználói felület: angol, holland, spanyol, francia, olasz, német, portugál.
Támogatja, ha a merevlemez többpartíciós.
Támogatja az FAT32-es, illetve NTFS-fájlrendszert.
HDMI-videokimenete akár 1080i is lehet.
Támogatja a (.SMI/.SRT/.SUB/.SSA) szövegfeliratozást az MPEG4 (AVI), D1 felbontáshoz.
A következőket támogatja: AVI (MPEG4), MPG (MPEG1, MPEG2), DAT (VCD), VOB (DVD), IFO (DVD), ISO,
WAV, WMA, MP3, JPG.
Különböző kodekeket támogat. A támogatott kodekek teljes listájához tekintse meg honlapunkat.
Kimenetek: HDMI/összetett videó/komponens videó/RCA sztereó audió/optikai audió.
Kompatibilis a PAL-lal/NTSC-vel.
Adottak a különböző ismétlési módok.
Képernyővédő.
14 átmeneti üzemmód a fényképekhez.
Diavetítés (diafelvételek lejátszása) háttérzenével.
Változtatható megjelenítési időtartam.
Nagyítási és forgatási funkció.
Automatikus kapcsoló a PC-USB és a médialejátszó üzemmód között:
• Ha PC-hez van csatlakoztatva, a berendezés USB-tárolóeszközként működik.
• Ha nem a PC-hez van csatlakoztatva, a berendezés médialejátszóként működik.
Megjegyzés: A CM3H a HD-filmek (720p, 1080i, 1080p) lejátszására nem képes.
3. Megjegyzések és óvintézkedések
• Ne próbálkozzon a mellékelt hálózati adapter szétszerelésével. Ez ugyanis a nagyfeszültség miatt
sérülésekhez vezethet. Ha az adaptert meg kell javítani, forduljon az eladóhoz vagy a Conceptronic
információs szolgálatához.
• Tartsa távol a berendezéstől a túlzott nedvességet.
• Ne merítse folyadékba, illetve ne tegye ki folyadék hatásának a berendezést.
• Húzza ki a hálózati adaptert, ha huzamosabb ideig nem kívánja használni a berendezést.
• Ne használja a berendezést gyúlékony anyagok közelében.
• Ha lemerülőben van vagy lemerült, ugyanolyan típusúra cserélje ki a távirányító elemét. Ahol
lehetséges, gondoskodjon a régi elemek újrahasznosításáról. A korrózió megelőzésére vegye ki az
elemet, ha a távirányítót huzamosabb ideig nem használja.
• Tartsa távol a távirányítót a túlzott nedvességtől; ne ejtse le.
• Ne üzemeltesse a távirányítót erős napfényben.
• SOHA ne ejtse le, ne rázogassa, illetve ne üsse neki semminek a berendezést.
• A túlmelegedés megelőzésére ne takarja le a berendezést.
Megjegyzés: A belső merevlemezen lévő adatok töredezettek is lehetnek. Mindez befolyásolhatja a filmek
lejátszását. Javasoljuk, hogy időnként végezze el a merevlemez töredezettség-mentesítését
a számítógépen.
108
MAGYAR
4. A termék áttekintése
Elölnézet
Hátulnézet
1
5
2
6
7
3
4
8
9
10
11
12
13
14
15
A számok feloldása:
1.
2.
3.
4.
Infravörös vevőkészülék
Áramellátás-/készenlétjelző LED
Üzemeltetőgombok (lásd lentebb)
A merevlemez tevékenységjelző LED-je
8.
9.
10.
11.
12.
13.
14.
15.
5. Hálózati főkapcsoló
6. Mini USB-dugaszhüvely (a PC-hez)
7. HDMI-kimenet
A gombok magyarázata
Navigációs gombok
( , , , )
A menün:
Lejátszáskor:
,
,
Lejátszó-/leállítógomb ( / )Rövid ideig lenyomva:
Hosszú ideig lenyomva:
Komponens „Pb” kimenet
Komponens „Pr” kimenet
Komponens „Y” kimenet
Összetett videokimenet
„R” (jobb oldali) hangkimenet
„L” (bal oldali) hangkimenet
Digitális optikai kimenet
(12 V-os, 2,5 A-es) egyenáramú bemenet
A berendezés menüin történő navigálásra.
A hangerő növelésére/csökkentésére.
Gyors vissza / gyors előre.
Egy adott fájl lejátszásának elindítására vagy
leállítására, illetve mappa megnyitására.
A CM3H bekapcsolására vagy a CM3H-nak készenléti
üzemmódba való beállítására.
109
MAGYAR
5. A távirányító ismertetése
A távirányítót a berendezés irányítására használják. Ennek a kezelési utasításnak a belső borítóján látható
a távirányító képe. A gombok száma megfelel az alábbi táblázatnak, amelyen a távirányító egyes funkcióit
magyarázzuk el.
Sz.
Gomb
1.
ÁRAMELLÁTÁS (
Leírás
2.
3.
4.
5.
6.
7.
R/L
TOP
MUSIC
FILE
0–9
AUDIO
8.
SLIDE
9.
10.
11.
12.
13.
14.
15.
16.
17.
SLOW
A–B
REPEAT
VOLUME
VOLUME
BACK
, , ,
PREVIOUS (
PLAY/PAUSE
18.
19.
20.
21.
22.
23.
24.
25.
26.
27.
28.
29.
30.
REWIND (
)
OUTPUT
SETUP
FAST FORWARD (
STOP ( )
NEXT (
)
ENTER (
)
DISPLAY
PAGE
PAGE
MUTE
ROTATE
DELAY
31.
32.
ZOOM
TRANS
33.
SUB-T
34.
35.
36.
37.
38.
VIDEO
PHOTO
FUNC
P/N
MENU
39.
Power LED
)
)
)
A médialejátszós üzemmód vagy a készenléti üzemmód között való
váltásra.
A hangkimenet (sztereó, bal oldali monó, jobb oldali monó) váltására.
Az aktuális fájllista tetejéhez való lépésre.
A „Music” mappához való közvetlen hozzáférésre szolgáló gomb.
A „fájlkönyvtár” megjelenítésére.
Numerikus kijelölőbillentyűk 0-tól 9-ig.
A hangadatfolyam kijelölésére vagy megváltoztatására (DVD
lejátszásakor).
Zenés diavetítés üzemmódnak az elindítására vagy videofelvétel
léptetéses lejátszásának az elindítására.
Lassú lejátszásra.
Kijelölt időköz ismételt lejátszására.
Ismétlési/keverési üzemmód kijelölésére.
A hangerő növelésére.
A hangerő csökkentésére.
Vissza az előző mappához.
A kijelölésnek a főmenün vagy a DVD-menün történő mozgatására.
Átváltás az előző fájlra vagy fejezetre.
Fájl- vagy DVD-mappa lejátszásának az elindítására vagy lejátszás
szüneteltetésére.
Gyors vissza, lejátszáskor.
A kimenő videojel kijelölésére.
A Beállítások menüjének megnyitására.
Gyors előre, lejátszáskor.
Lejátszás leállítására.
Átváltás a következő fájlra vagy fejezetre.
Kijelölés megerősítésére vagy lejátszás elindítására.
Lejátszási adatok megjelenítésére a lejátszás során.
A fájlokat tartalmazó következő oldal megjelenítésére.
A fájlokat tartalmazó előző oldal megjelenítésére.
Elnémításra vagy elnémítás törlésére.
Fényképek forgatására.
A diavetítés időtartamának a kijelölésére (beleértve a zenés diavetítést
is).
Nagyításra vagy kicsinyítésre (fényképeknél és DVD lejátszásánál).
Diavetítés alatt az átmeneti üzemmódnak, illetve zene lejátszása alatt a
zenei hangszínkiemelő típusának a kijelölésére.
Filmfelirat kijelölésére vagy megváltoztatására (MPEG4 és DVD
lejátszásánál).
A „VIDEO” mappához való közvetlen hozzáférésre szolgáló gomb.
A „PHOTO” mappához való közvetlen hozzáférésre szolgáló gomb.
Ugrás egy meghatározott lejátszási időponthoz film lejátszásakor.
Videorendszer kijelölésére (PAL/NTSC).
A.„Partition List”(partíciólista) vagy a „File List” (fájllista)
megjelenítésére.
B. Vissza a DVD-menühöz (DVD lejátszásakor).
Az áramellátásjelző LED villog, amikor egy gombot megnyomnak.
110
MAGYAR
6. A CM3H csatlakoztatása
HDMI-csatlakozás
Összetett + SCART-csatlakozás
S/PDIF-csatlakozás
Példa a csatlakoztatásra, ahol HDMI-, összetett, illetve S/PDIF-csatlakoztatás látható.
A videokábel(ek) csatlakoztatása
A berendezés négyféleképpen csatlakoztatható a tévékészülékhez:
- HDMI
- Összetett
- SCART
(amelynek során az összetett kábelt és a Scart-adaptert használják)
- Komponens**
**
Komponens használatakor csak a videojel továbbítódik a tévének vagy a monitornak.
Hangfrekvenciás jelnél használja az audió RCA-dugaszokat az összetett kábelen (piros, fehér).
HDMI:
• Csatlakoztassa a HDMI-kábelt a HDMI-kimenethez [7] a berendezésen.
• Csatlakoztassa a HDMI-kábel másik végét a HDMI-bemenethez a tévékészüléken.
Összetett:
• Csatlakoztassa az összetett kábelt (sárga, piros és fehér) a megfelelő összetett dugaszhüvelyekhez [11 ,
12 , 13] a berendezésen.
• Csatlakoztassa az összetett kábel másik végét (sárga, piros és fehér) az összetett bemeneti
dugaszhüvelyekhez a tévékészüléken.
SCART:
• Csatlakoztassa az összetett kábelt (sárga, piros és fehér) a megfelelő összetett dugaszhüvelyekhez [11 ,
12 , 13] a berendezésen.
• Csatlakoztassa az összetett kábel másik végét (sárga, piros és fehér) a SCART-adapteren lévő
dugaszhüvelyekhez.
• Csatlakoztassa a SCART-adaptert a SCART-bemenethez a tévékészüléken.
Komponens:
• Csatlakoztassa a komponens kábelt (piros, zöld és kék) a komponens dugaszhüvelyekhez [8, 9, 10] a
berendezésen.
• Csatlakoztassa a komponens kábel másik végét a bemeneti komponens dugaszhüvelyekhez a
tévékészüléken.
111
MAGYAR
A hangkábel(ek) csatlakoztatása
A berendezés kétféleképpen is csatlakoztatható a tévékészülékhez és/vagy a házimozirendszerhez:
- Analóg módon, a berendezés RCA audió dugaszhüvelyein keresztül.
- Digitálisan, a berendezésnek az optikai digitális S/PDIF-kimenetén keresztül.
Analóg módon:
• Csatlakoztassa az összetett kábel audió dugaszait (piros, fehér) a berendezésnek az RCA audió
dugaszhüvelyeihez [12 , 13].
• Csatlakoztassa az összetett kábel másik végét az RCA audió dugaszhüvelyekhez a tévékészüléken vagy az
erősítőn.
Digitális:
• Csatlakoztassa a digitális optikai kábelt az S/PDIF-kimenethez [14] a berendezésen.
• Csatlakoztassa a digitális optikai kábel másik végét a digitális optikai dugaszhüvelyekhez az erősítőn.
A tápegység csatlakoztatása
Ha ezt a berendezést audio-/videoberendezéshez csatlakoztatja, a tápegységet csatlakoztathatja magához
a berendezéshez.
• Csatlakoztassa a mellékelt tápegységet a berendezés egyenáramú bemenetéhez [15], valamint szabad
falicsatlakozóhoz.
• A berendezés bekapcsolásához állítsa a hálózati főkapcsolót a berendezés hátoldalán az „I”-re.
A berendezés ezután bekapcsol.
A távirányító előkészítése
A távirányítóhoz 2x AAA elem szükséges (ezek is részét képezik a csomagnak).
A távirányító segítségével kell a berendezést be-/kikapcsolni.
Megjegyzések:
-
A távirányító legjobban kb. 5 m-ig használható.
Irányítsa a távirányítót az infravörös vevőkészülékre, amely a berendezés
homlokfalába lett beépítve.
Az infravörös vevőkészülék vételi szöge ±30°.
Ha lemerülőben vannak vagy már lemerültek, cserélje ki az elemeket (2x AAA).
112
MAGYAR
7. A CM3H alapműködése
• Jelölje ki a megfelelő bemeneti csatornát a tévékészüléken, ahová a berendezést csatlakoztatta (HDMI,
összetett, SCART vagy komponens).
Megjegyzés: Innentől fogva a kézikönyv abból indul ki, hogy tévékészüléke a berendezés bemeneti
csatornájára lett beállítva. Minden ismertetett lépés a berendezés működtetésére
vonatkozik.
• Ellenőrizze, vajon a berendezés hátoldalán lévő hálózati főkapcsoló „I”-re van-e állítva.
• Kapcsolja be a berendezést a Play/Stop gombbal a berendezés elején, vagy a „Power” gomb (1)
segítségével a távirányítón.
A berendezés bekapcsol, majd a képernyőn megjeleníti a menüt.
Megjegyzés: A berendezés alapértelmezett kimenőjele az összetett videó. Ha a berendezés be van
kapcsolva, és a képernyőn semmi sem látható, nyomja meg az „Output” gombot (19) a
távirányítón, amennyiben váltogatni kívánja a CM3H különböző (HDMI, összetett, komponens)
kimeneteit.
Megjegyzés: A berendezésnek, amikor bekapcsolják, inicializálnia kell a merevlemezt. Ez eltarthat egy
ideig. Inicializálás alatt a képernyőn a következő üzenet látható: „LOADING...” (BETÖLTÉS).
Ha a merevlemez egy partícióval lett formázva, akkor a képernyőn „File List” jelenik meg, amely a
merevlemez tartalmát mutatja.
Ha a merevlemezt több partícióval formázták, a berendezés — az összes meglévő partícióval egyetemben —
a „Partition List”-et jeleníti meg a képernyőn. A kijelölés mozgatására használja a / gombokat (15),
/Enter” (24) gombot, ha a „File List”-hez kíván lépni, amelyen a kijelölt
majd nyomja meg a „
partíció tartalma látható.
[ Partíciólista ]
[ Fájllista ]
Partícióváltás:
Ha a merevlemezt több partícióval formázták, nyomja meg a „Menu” (38) gombot a távirányítón,
amennyiben vissza kíván lépni a „Partition List”-hez, majd jelöljön ki másik partíciót.
113
MAGYAR
8. Médialejátszási opciók
8.1 Saját filmek lejátszása
A CM3H különböző videoformátumokat támogat: MPEG1/2-, MPEG 4-(beleértve az XVID-t), VOB-, IFO- (DVD)
valamint ISO-lejátszás beleértve az MP3-, AC3-, AAC-, valamint MPEG1/2-hangsávok lejátszását a videón
belül, valamint a DTS-átadást az SPDIF-kimeneten keresztül.
• Jelölje ki a lejátszani kívánt fájlt a távirányító navigációs gombjai segítségével.
• Nyomja meg az „Enter” (24) gombot, illetve a „Play/Pause” (17) gombot a távirányítón, ha el kívánja
indítani a kijelölt fájl lejátszását.
Lejátszáskor a távirányítón az alábbi lejátszási opciók állnak rendelkezésére:
-
Play/Pause
Stop
Rewind
Fast Forward
Previous
Next
Repeat
(17)
(22)
(18)
(21)
(16)
(23)
(11)
-
Display
Func
A-B
Slow
Slide
(25)
(36)
(10)
(9)
(8)
A kijelölt fájl lejátszására vagy a lejátszás szüneteltetésére.
A lejátszás leállítására.
Lejátszás visszacsévélésre.
Gyors lejátszásra előrefelé.
Az aktuális mappa előző fájljának a lejátszására.
Az aktuális mappa következő fájljának a lejátszására.
Az aktuális fájl/mappa ismétlési/keverési opciójának a
megváltoztatására.
A lejátszási részletek megjelenítésére.
Az egy megadott időponthoz történő ugrásra saját filmnél.
A film kijelölt részének az ismétlésére.
Lassított lejátszásra.
Lépésenkénti lejátszásra.
Megjegyzés: A legtöbb videokodeket a CM3H támogatja (XviD, AVI, MPEG2 stb.), de lehet, hogy az adott
fájlok olyan kodeket igényelnek, amellyel a CM3H nem rendelkezik.
Ha támogatatlan kodekű fájlt próbál lejátszani, a következő üzenet jelenik meg: „CODEC
NOT SUPPORTED” (A KODEK NEM TÁMOGATOTT). Ilyenkor azt javasoljuk, hogy használjon
másik kodeket a filmhez.
A lejátszás folytatásának funkciója
A CM3H-nál adott a lejátszás folytatásának a lehetősége. Ha saját filmek, zenés vagy fényképes diavetítés
lejátszásakor kikapcsolja a CM3H-t, a CM3H folytatja a lejátszást, amikor ismét bekapcsolták.
Ezt a funkciót az alapértelmezés teszi lehetővé, és ez a Beállítások menüjén kikapcsolható.
Megjegyzés: Az ISO- és IFO-(DVD) fájlok folytatási funkciója nem támogatott.
A feliratozott lejátszás funkciója
A Conceptronic CM3H berendezése az .SMI, .SRT, .SUB vagy .SSA feliratfájlokat támogatja.
Ha a feliratfájlnak ugyanaz a neve, mint a kijelölt videofájlnak (csak a kiterjesztése más), az MPEG4-fájl
lejátszásakor a feliratfájl automatikusan betöltődik; például:
Filmnév:
Feliratnév:
My_Movie_With_Sub.AVI
My_Movie_With_Sub.SRT
Ha a feliratfájlnak más a neve, akkor manuálisan kell a feliratfájlt kijelölni. Jelölje ki a feliratfájlt, majd
nyomja meg a „Sub-t” (33) gombot a távirányítón a felirat kijelölésére. Jelölje ki a filmet, majd nyomja
/Enter” (24) gombot a film lejátszására.
meg a „
Megjegyzés: Ha ugyanolyan nevű feliratfájl is van, mint maga a film, és Ön másik feliratfájlt próbál
kijelölni, a CM3H az ugyanolyan nevű feliratfájl alkalmazását fogja kikényszeríteni a kijelölt
helyett.
114
MAGYAR
DVD-lejátszás funkciója
A CM3H a DVD-ket úgy játssza le a merevlemezről, mintha azok szokványos DVD-k volnának. A DVD-menün
navigálhat, kiválaszthatja a feliratozást, illetve meg is változtathatja a hanganyag nyelvét.
Megjegyzés:
A CM3H csak a nem védett DVD-másolatok lejátszását támogatja. A CSS-védelmet a CM3H
nem támogatja.
Megjegyzés:
A CM3H csak a Region 2 (2. régiójú) vagy a Region free (szabad régiójú) DVD-másolatokat
támogatja.
• Csatlakoztassa a CM3H-t a számítógéphez. Lásd a következő című fejezetet: „10. A számítógép USB-s
csatlakoztathatósága”.
• Állítson elő mappát a CM3H merevlemezén az adott DVD-film nevével (például: „Movie 1”).
• Másolja át az „AUDIO_TS”-t és a „VIDEO_TS”-t (beleértve annak tartalmát is) a DVD-ről az előállított
mappába (például: „Movie1”) a CM3H-n.
Másolás után a struktúra a következő legyen:
- [a CM3H merevlemeze]
|-> Movie1
|-> AUDIO_TS
|-> VIDEO_TS
(tetszőleges, nem áll rendelkezésre minden DVD esetében).
(a benne lévő összes DVD-fájllal együtt).
• Húzza ki a CM3H-t a számítógépből, majd csatlakoztassa a tévékészülékéhez. Kapcsolja be a CM3H-t.
• Jelölje ki a lejátszani kívánt DVD-t a „ , , , ” gombok (15) segítségével a távirányítón.
• Nyomja meg a „Play/Pause” (17) gombot a távirányítón a kijelölt DVD lejátszásának az elindítására.
Megjegyzés:
Indításra ne használja az „Enter” (24) gombot. Ezzel csak a fájlokat/almappákat fogja
megjeleníteni, viszont nem indítja el a DVD lejátszását.
DVD lejátszásakor a következő lejátszási opciók vehetők igénybe a távirányítón:
- Play/Pause
- Stop
(17)
(22)
A kijelölt DVD-mappa lejátszására vagy a lejátszás szüneteltetésére.
A DVD lejátszásának a leállítására és a filmböngészőhöz való
visszatérésre.
A DVD-menün történő navigálásra.
A DVD-menün történt kijelölés(ek) megerősítésére.
Gyors vissza.
Gyors előre.
Előző fejezet.
Következő fejezet.
A DVD feliratozásának a megváltoztatására vagy kikapcsolására.
A DVD hangsávjának a megváltoztatására (amikor a DVD több hangsávot is
tartalmaz).
A lejátszott film kinagyítására.
Az aktuális fejezet ismétlési opciójának a megváltoztatására.
A film kijelölt részének az ismétlésére.
A lejátszási részletek megjelenítésére.
A filmen belül az egy meghatározott időponthoz történő ugrásra.
A DVD-menühöz történő visszatérésre.
-
Navigációs
billentyűk
Enter
Rewind
Fast Forward
Previous
Next
Sub-t
Audio
(15)
(24)
(18)
(21)
(16)
(23)
(33)
(7)
-
Zoom
Repeat
A-B
Display
Func
Menu
(31)
(11)
(10)
(25)
(36)
(38)
Ötlet:
Az ISO-formátumú DVD-filmek is lejátszhatók. Az ISO-formátumú DVD-k esetében a lejátszási
funkciók ugyanazok, mint a DVD lejátszásával kapcsolatban fentebb közölt funkciók.
115
MAGYAR
Az adott videomappa közvetlen hozzáférését biztosító gomb
Előállíthat egy videomappát, amely közvetlenül hozzáférhető a „Video” (34) gomb megnyomásával a
távirányítón. Állítson elő egy „VIDEO xx” nevü mappát (ahol az „xx” megváltoztatható bármire) a
merevlemez gyökérkönyvtárában, majd helyezze el videofájljait ebben a mappában. Ha a médialejátszót
elindította és utána megnyomja a „Video” (34) gombot, a médialejátszó automatikusan megnyitja a
mappát.
Megjegyzés:
Ha egynél több „VIDEO”-val kezdődő mappát állít elő, a berendezés csak az első mappát
fogja megnyitni.
Bizonyos MPEG2-/VOB-fájlok két vagy több hangadatfolyamot is tartalmazhatnak. A távirányítón az „Audio”
(7) gomb megnyomásával ciklikusan váltogathatja a hangadatfolyamokat. Ha az éppen lejátszott
videofájlnak nincs hangja, használhatja az „Audio” (7) gombot, tehát megkeresheti a megfelelő
hangadatfolyamot.
Ha MPEG2-/VOB-fájlról kapcsol át, elveszhet a hangforrás, amennyiben az nincs rajta az alapértelmezett
adatfolyamon. Ennek megelőzésére nyomja meg lejátszáskor a „Setup” (20) gombot, hogy az adott
hangadatfolyamot „reteszelhesse”. Ez az opció minden fájl esetében megőrzi a kijelölt hangadatfolyamot.
8.2 Saját zene lejátszása
A Conceptronic CM3H berendezése esetében különböző üzemmódok adottak, amelyek segítségével a zene
lejátszható (a WAV, az MP3 és a WMA a támogatott).
• Jelölje ki a lejátszani kívánt fájlt a távirányító navigációs gombjainak a segítségével.
• Nyomja meg az „Enter” (24) gombot vagy a „Play/Pause” (17) gombot a távirányítón, ha a kijelölt fájl
lejátszását el kívánja indítani.
Lejátszáskor az alábbi lejátszási opciók adottak a távirányítón:
-
Play/Pause
Stop
Rewind
Fast Forward
Previous
Next
Repeat
- Trans
(17)
(22)
(18)
(21)
(16)
(23)
(11)
(32)
A kijelölt fájl lejátszására vagy a lejátszás szüneteltetésére.
A lejátszás leállítására.
Lejátszás visszacsévélésére.
A gyorsan előre történő lejátszásra.
Az aktuális mappa előző fájljának a lejátszására.
Az aktuális mappa következő fájljának a lejátszására.
Az aktuális fájl/mappa ismétlési/keverési opciójának a
megváltoztatására.
A hangszínszabályozó típusának a kijelölésére.
A lejátszás folytatásának funkciója
A CM3H-nál adott a lejátszás folytatásának a funkciója. Ha a CM3H-t saját filmek, zene vagy fényképekből
összeállított diavetítés lejátszása során kikapcsolták, a CM3H folytatni fogja a lejátszást, amikor ismét
bekapcsolják.
Ez a funkció alapértelmezésben engedélyezett és a Beállítások menüben kikapcsolható.
A zenei mappa közvetlen elérését biztosító gomb
Előállíthat egy zenei mappát, amely közvetlenül hozzáférhető a „Music” (4) gomb megnyomásával a
távirányítón. Állítson elő egy „MUSIC xx” nevü mappát (ahol az „xx” megváltoztatható bármire) a
merevlemez gyökérkönyvtárában, majd helyezze el zenei fájljait ebben a mappában. Ha a médialejátszót
már elindította és utána megnyomja a „Music” (4) gombot, a médialejátszó automatikusan megnyitja a
mappát.
Megjegyzés:
Ha egynél több „MUSIC”-kal kezdődő mappát állított elő, a berendezés csak az első
mappát fogja megnyitni.
116
MAGYAR
8.3 Saját fényképek és képek lejátszása
A CM3H segítségével megtekinthetők azok a saját fényképek és képek, amelyeket a berendezés
merevlemezén tárolnak.
• Jelölje ki a lejátszani kívánt fájlt a távirányító navigációs gombjainak a segítségével.
• Nyomja meg az „Enter” (24) gombot vagy a „Play/Pause” (17) gombot a távirányítón, ha a kijelölt fájl
lejátszását el kívánja indítani.
Lejátszáskor a következő lejátszási opciók adottak a távirányítón:
- Play/Pause
(17)
- Stop
- Navigációs
- billentyűk
(22)
(11)
- Previous
- Next
- Repeat
(16)
(23)
(11)
Delay
Trans
Rotate
Zoom
(30)
(32)
(29)
(31)
-
A diavetítésnek a kijelölt fájllal történő elindítására, vagy a diavetítés
szüneteltetésére.
A diavetítés leállítására.
, : A megjelenített fénykép tükrözéses forgatására.
,
: A megjelenített fénykép forgatására.
Az aktuális mappa előző fájljának a lejátszására.
Az aktuális mappa következő fájljának a lejátszására.
Az aktuális fájl/mappa ismétlési/keverési opciójának a
megváltoztatására.
A diavetítés időtartamának a megváltoztatására.
A két fénykép közötti átmenetnek a megváltoztatására.
Az aktuális fénykép elforgatására.
Az aktuális fénykép nagyítására.
A lejátszás folytatásának funkciója
A CM3H-nál adott a lejátszás folytatásának a funkciója. Ha a CM3H-t saját filmek, zene vagy fényképekből
összeállított diavetítés lejátszása során kikapcsolták, a CM3H folytatni fogja a lejátszást, amikor ismét
bekapcsolják.
Ez a funkció alapértelmezésben engedélyezett, és a Beállítások menüben kikapcsolható.
Zenés diavetítés (fényképek megtekintése háttérzenével)
Jelöljön ki egy fényképet és nyomja meg a „Slide” (8) gombot a zenés diavetítés elindításához.
Ha nem nyomja meg a „Slide” (8) gombot, a zene nem kerül lejátszásra, a képek pedig zene nélküli
diavetítés során jelenítődnek meg. Ha nem áll rendelkezésre zene a mappában, a zenés diavetítés
funkciója nem működik. A képekből álló diavetítésnek a hang nélküli megjelenítéséhez a „
/Enter”
(24) gombot kell megnyomnia.
Megjegyzés:
Ebben az üzemmódban a forgatás és a nagyítás funkció nem áll rendelkezésre.
A diavetítés megtekintése szüneteltethető a „Play/Pause” (17) gomb egyszeri megnyomásával (a zene
továbbra is hallható). Ha a zenét is le kívánja állítani, nyomja meg ismét a „Play/Pause” (17) gombot. Ha
a zenés diavetítést folytatni akarja, nyomja meg ismét a „Play/ Pause” (17) gombot.
A fényképmappa közvetlen elérését biztosító gomb
Előállíthat egy fényképmappát, amely közvetlenül hozzáférhető a „PHOTO” (35) gomb megnyomásával a
távirányítón. Állítson elő egy „PHOTO xx” nevü mappát (ahol az „xx” megváltoztatható bármire) a
merevlemez gyökérkönyvtárában, majd helyezze el fényképfájljait ebben a mappában. Ha a médialejátszót
elindította és utána megnyomja a „PHOTO” (35) gombot, a médialejátszó automatikusan megnyitja a
mappát.
Megjegyzés: Ha egynél több „PHOTO”-val kezdődő mappát állít elő, a berendezés csak az első mappát
fogja megnyitni.
117
MAGYAR
9. A rendszer konfigurálása
A berendezés Beállítások menüjének megnyitásához nyomja meg a „Setup” (20) gombot a távirányítón.
A kijelölésnek a Beállítások menün történő mozgatásához nyomja meg a / / / gombokat, majd a
megjelölés megerősítéséhez nyomja meg a
/ENTER gombot. Amikor végzett a berendezés
konfigurálásával, a Beállítások menü bezárásához ismét nyomja meg a Setup gombot, illetve jelölje ki az
„Exit Setup” opciót a Beállítások menün.
A Beállítások menü az alábbi oldalakból áll:
•
•
•
•
General Setup Page
Audio Setup Page
Video Setup Page
Slideshow Setup Page
•
Exit Setup
(General Setup Page)
Általános beállítások oldala:
OSD Lang
: A képernyőn megjelenő kijelzés nyelvének a beállítására.
Screensaver
: A képernyővédő be-, illetve kikapcsolására.
Play Resume
: A lejátszásfolytatás funkciónak a be-, illetve kikapcsolására.
Defaults
: A berendezésnek a gyári alapértelmezett beállításokra történő visszaállítására.
Auto Start
: A CM3H-n lévő összes médiafájl automatikus lejátszására, ha a berendezést
bekapcsolják.
(Audio Setup Page)
A hangbeállítások oldala:
Downmix
: A lekeverés üzemmód beállítására többcsatornás hangnál.
SPDIF Output
: Az SPDIF kimeneti üzemmód beállítására.
LPCM Output
: Az LPCM kimeneti üzemmód beállítására.
(Video Setup Page)
Videobeállítások oldala:
TV Display
: A tévé kijelzésbeállításának a megváltoztatására.
TV System
: Videorendszer kijelölésére az adott tévékészülékhez.
Video Output
: Az éppen használt videokimenet kijelölésére.
(Slideshow Setup Page)
A diavetítés-beállítások oldala:
Interval time
: A két fénykép közötti időköz kijelölésére.
Transition
: A két fénykép között használt, alapértelmezett átmenet kijelölésére.
118
MAGYAR
10. A számítógép USB-s csatlakoztathatósága
A berendezés számítógéphez csatlakoztatható, ha Ön adatokat (filmek, zene, fényképek, hangfelvételek
stb.) kíván átmásolni a belső merevlemezről, illetve a belső merevlemezre.
Megjegyzés:
Az alábbi példa esetében éppen egy Windows XP-t futtató számítógépet használnak, de
a berendezés alkalmazható minden olyan számítógépen, ahol adott az USB
támogatottsága, illetve az FAT32-es fájlrendszerek olvasásának, valamint írásának a
képessége.
A berendezés csatlakoztatása számítógéphez
• Csatlakoztassa a mellékelt USB — mini-USB kábelt a berendezés hátoldalához, valamint a számítógép
valamelyik szabad USB-portjához.
• Kapcsolja be a berendezést a hálózati főkapcsolóval a berendezés hátoldalán. A berendezést a
számítógép automatikusan felismeri és telepíti, majd az újabb meghajtóként jelenik meg a
számítógépen.
Alapértelmezésben a berendezés belső merevlemeze USB-tárolóeszközként inicializálódik.
A berendezés leválasztása a számítógépről
• Kattintson egyszer a „Safe Removal” ikonra a tálcán.
• Ha erre üzenetben kérik, jelölje ki a „Stop USB Mass Storage Device”-t.
• Várjon a következő üzenetre: „Safe to remove Hardware”.
• Húzza ki az USB-kábelt.
119
MAGYAR
11. Ötletek és hibaelhárítás
Ha a CM3H nem működik megfelelően, hibaelhárításhoz használja fel az alábbi ötleteket:
Az áramellátásjelző LED nem világít:
• A tápegység nincs csatlakoztatva a CM3H-hoz. Csatlakoztassa újból a tápegységet a CM3H-hoz.
Nincs semmilyen tevékenység a kijelzőn:
• A CM3H készenléti állapotban van. Annak bekapcsolásához nyomja meg a „ ” (1) gombot a távirányítón.
• A tévékészüléken rossz bemeneti forrást jelöltek ki. Változtassa meg a bemeneti forrást.
• Rossz videorendszert jelöltek ki. A megfelelő kimenőjelre történő átváltáshoz nyomja meg az „Output”
(19) gombot a távirányítón.
• A videokábel nincs megfelelően csatlakoztatva. Ellenőrizze, vajon a videokábel megfelelően lett-e
csatlakoztatva.
Amikor a berendezést bekapcsolják, csak egy csilingelésszerű hang hallható, de nem látszik semmilyen
menü:
• Rossz videorendszert jelöltek ki. A megfelelő kimenőjelre való átváltáshoz nyomja meg az „Output”
(19) gombot a távirányítón.
• A videokábel nincs megfelelően csatlakoztatva. Ellenőrizze, vajon a videokábelt megfelelően
csatlakoztatták-e.
• A CM3H-nak a hangkimenete csatlakoztatva van ugyan az erősítőhöz, de a tévékészüléken rossz
bemenetet jelöltek ki. Jelöljön ki jó bemenetet a tévékészüléken.
Nincs semmilyen hang:
• A hangkábel nincs megfelelően csatlakoztatva. Bizonyosodjon meg róla, hogy a kábel megfelelően van
csatlakoztatva a tévékészülékhez vagy az erősítőhöz.
• A CM3H csatlakoztatva van ugyan az erősítőhöz, de az erősítő ki van kapcsolva. Kapcsolja be az erősítőt.
• Az MPEG2-, illetve VOB-fájl hangadatfolyama érvénytelen. A megfelelő hangadatfolyamhoz való igazodás
érdekében nyomja meg az „Audio” (7) gombot a távirányítón.
• Be van kapcsolva az elnémítás funkció. Az elnémítás törléséhez ismét nyomja meg a „Mute” (28)
gombot a távirányítón.
• A CM3H gyors előre vagy gyors vissza üzemmódban működik. Ha vissza kíván térni a normál lejátszáshoz,
nyomja meg az „Enter” (24) gombot a távirányítón.
A kijelzőn a kép torz:
• A CM3H gyors előre vagy gyors vissza üzemmódban működik. Ha vissza kíván térni a normál lejátszáshoz,
nyomja meg az „Enter” (24) gombot a távirányítón.
• PAL-filmet NTSC-üzemmódban akarnak lejátszani, illetve fordítva. Ha át kívánja állítani a kijelzés
beállításait, nyomja meg a „P/N” (37) gombot a távirányítón.
A „Slide” gomb megnyomásakor a rendszer lefagy:
• Túl sok fénykép vagy zene van az aktuális mappában. Eltart egy ideig, amíg a zenés diavetítés
elindítható. Várjon a lejátszásra.
A távirányító nem működik:
• Irányítsa ±30°-os szögben közvetlenül a CM3H vevőkészülékre a távirányítót.
• A távirányítót 5 m-es körzetben használja.
• A távirányító elemei (AAA) lemerültek és azokat ki kell cserélni.
A lejátszott film feliratozása nem jelenik meg:
• AVI-fájl lejátszására kerül sor, de a feliratfájl másik fájlnevet tartalmaz. A feliratozás megjelenítésével
kapcsolatban lásd a 8.1. fejezetet.
120
MAGYAR
• A feliratfájlt a CM3H nem támogatja.
Ha videó lejátszásával próbálkozik, a következő üzenet jelenik meg: „CODEC NOT SUPPORTED” (A
KODEK NEM TÁMOGATOTT):
• A filmfájlt a CM3H esetében nem támogatott kodekkel állították elő.
A CM3H esetében támogatott kodekek listájával kapcsolatban lásd a következő honlapot:
www.conceptronic.net.
A CM3H nem jelenít meg minden partíciót/tartalmat a merevlemezről:
• A merevlemez partíciója nem elsődleges. Partícionálja újra a merevlemezt, majd bizonyosodjon meg
róla, hogy minden partíció az elsődlegesre van beállítva.
• A merevlemezt olyan fájlrendszerben formázták, amelyet a CM3H nem támogat. Formázza újra a
merevlemezt az FAT32-, illetve NTFS-fájlrendszerrel.
• Nincsenek médiafájlok a kijelölt partíción.
A DVD-/ISO-lejátszás nem indul, amikor a Play/Pause gombot megnyomják:
• Bizonyosodjon meg róla, hogy a megfelelő mappastruktúrát használja. A mappastruktúra ismertetése a
8.1. fejezetben található.
A DVD-fájlok hiányosak, sérültek vagy rontottak. Ilyenkor a CM3H nem indítja el a DVD lejátszását.
A DVD bevezetőfilmjei alatt a képernyő üres:
• Az aktuális fejezet üres képernyővel fejeződik be, vagy túl rövid a lejátszáshoz. A következő fejezetre
való átváltáshoz nyomja meg a „Next” (23) gombot.
A tévékészülék fekete-fehér a színes helyett:
• A tévékészülék nem tudja kezelni a CM3H-nak a „Multi” tévérendszerét. Ha át kívánja állítani a
tévérendszert PAL-ra, használja a Beállítások menüt. (Lásd a 9. fejezetet.) A tévérendszer átállítása
után kapcsolja ki, majd újra be a CM3H-t.
121
TÜRKÇE
Conceptronic CM3H
Kullanıcı Kılavuzu
Conceptronic Multi Media Player
Satın Aldığınız İçin Tebrikler.
Bu Kullanım Kılavuzu, Conceptronic Multi Media Player’ın adım adım nasıl kurulacağı ve kullanılacağı
konusunda bilgi içermektedir.
Problem ortaya çıkması halinde, destek sitemizi (www.conceptronic.net adresine gidin ve ‘Support’
sayfasına tıklayın) ziyaret etmenizi tavsiye ederiz. Burada Sıkça Sorulan Sorular Veritabanını bulacaksınız.
Ürününüzle ilgili başka sorularınız varsa ve bunların yanıtlarını web sitemizde bulamıyorsanız, bize e-posta
ile ulaşın: [email protected]
Conceptronic ürünleri ile ilgili daha fazla bilgi için, lütfen Conceptronic Web Sitesini ziyaret edin:
www.conceptronic.net
İpucu: Conceptronic CM3H ürün bilgisi (firmware) yükseltilebilmektedir. Ünitenizi güncel ürün bilgisi
sürümüne yükseltmek için, Conceptronic Web Sitesini ziyaret edebilirsiniz.
İpucu: Lütfen desteklenen dosyaların güncel codec listesi için www.conceptronic.net adresini ziyaret
edin.
1. Paket İçeriği
Conceptronic Multi Media Player paketinin içeriği aşağıdaki gibi olmalıdır:
•
•
•
•
•
•
•
•
•
Conceptronic CM3H Multi Media Player (bu kılavuzda ‘ünite’ olarak tanımlanmıştır).
CM3H için ürün ayaklığı.
Güç Kaynağı (12V, 2.5A), güç kablosu ile birlikte.
Uzaktan Kumanda.
Uzaktan kumanda için 2 adet AAA pil
Kompozit Video Kablosu (Kırmızı, Beyaz, Sarı RCA Jaklar).
Kompozit Video Kablosu için SCART Adaptör.
USB Kablo.
Bu Kullanıcı Kılavuzu.
122
TÜRKÇE
2. Ürün Özellikleri
•
•
•
•
•
•
•
•
•
•
•
•
•
•
•
•
Çok dilli kullanıcı kılavuzu: İngilizce, Hollandaca, İspanyolca, Fransızca, İtalyanca, Almanca, Portekizce
Çoklu sabit disk bölümlerini destekler.
FAT32 ve NTFS dosya sistemlerini destekler.
1080i’ye kadar HDMI Video çıkışı.
MPEG4 (AVI) için metin alt yazı (.SMI/.SRT/.SUB/.SSA), D1 çözünürlük desteği vardır.
AVI (MPEG4), MPG (MPEG1, MPEG2), DAT (VCD), VOB (DVD), IFO (DVD), ISO, WAV, WMA, MP3, JPG desteği
vardır.
Çeşitli Codec (Kodlayıcı-Kod çözücü) desteği vardır. Desteklenen Codec listesi için web sitemizi kontrol
edin.
Çıkışlar: HDMI / Kompozit video / Komponent video / RCA stereo ses / Optik ses.
PAL/NTSC uyumlu.
Çeşitli tekrar modları.
Ekran Koruyucu.
Fotoğraflar için 14 geçiş modu.
Arka plan müziği eşliğinde slayt gösterisi (fotoğraflı slayt gösterisi).
Değiştirilebilir ekran aralığı.
Yakınlaştırma ve döndürme fonksiyonları.
PC-USB ve Media Player Modu arasında Otomatik Geçiş:
• PC bağlantısı yapıldığında, ünite USB Depolama Aygıtı olarak çalışır.
• PC bağlantısı yokken, ünite Media Player olarak çalışır.
Not:
CM3H, HD filmleri (720p, 1080i, 1080p) oynatamamaktadır.
3. Notlar ve Uyarılar
• Birlikte verilen güç adaptörünü demonte etmeye çalışmayın. Yüksek voltaj yaralanmalarına neden
olabilir. Adaptörün tamir edilmesi gerekiyorsa, lütfen bayinizle ya da Conceptronic helpdesk (yardım
masası) ile temasa geçin.
• Üniteyi aşırı nemden uzak tutun.
• Üniteyi sıvı maddelere batırmayın ya da sıvı maddelere maruz bırakmayın.
• Üniteyi uzun süre kullanmayı planlamıyorsanız güç adaptörünü çıkarın.
• Üniteyi kolay tutuşan maddelerin yakınında kullanmaktan kaçının.
• Uzaktan kumanda pili zayıflamış ya da bitmiş ise bunu aynı tip pil ile değiştirin. Mümkün olduğunda pilin
geri dönüşümünü sağlayın. Kumanda uzun bir süre kullanılmayacaksa korozyonu önlemek için pilini
çıkarın.
• Kumandayı aşırı nemden uzak tutun; yere düşürmeyin.
• Kumandayı aşırı güneş ışığı altında çalıştırmayın.
• Üniteyi ASLA düşürmeyin, sallamayın ya da çarpmayın.
• Aşırı ısınmayı önlemek için ünitenin üzerini örtmeyin.
Not:
Dahili sabit disk üzerindeki veri bölümlendirilebilir. Bu da film oynatma işlemini etkileyebilir.
Bilgisayarınızdaki sabit diski ara sıra birleştirmeniz tavsiye edilir.
123
TÜRKÇE
4. Ürüne Genel Bakış
Ön Görünüm
Arka Görünüm
1
5
2
6
7
3
4
8
9
10
11
12
13
14
15
Rakamların açıklaması:
1.
2.
3.
4.
Kızılötesi Alıcı
Güç / Hazırda Bekleme LED’i
İşlem Düğmeleri (aşağıya bakın)
Sabit disk İşlem LED’i
8.
9.
10.
11.
12.
13.
14.
15.
5. Ana Güç Düğmesi
6. Mini-USB Jak (Bilgisayara)
7. HDMI Çıkışı
Düğmelerin Açıklaması
Gezinti düğmeleri
( , , , )
Oynatma
/durdurma düğmesi ( / )
Komponent ‘Pb’ Çıkışı
Komponent ‘Pr’ Çıkışı
Komponent ‘Y’ Çıkışı
Kompozit Video Çıkışı
Ses ‘R’ (sağ) Çıkışı
Ses ‘L’ (sol) Çıkışı
Dijital Optik Çıkış
DC Giriş (12V, 2.5A)
Menüde:
Ünitenin menülerinde gezinmek için kullanılır.
Oynatma sırasında: ,
Sesi artırır / azaltır.
,
Oynatma sırasında / oynatma işlemi.
Kısa basış:
Bir dosyayı oynatır, durdurur ya da bir klasörü açar.
Uzun basış:
CM3H’yi açar ya da hazırda bekleme moduna getirir.
124
TÜRKÇE
5. Uzaktan Kumandanın Açıklaması
Uzaktan kumanda, üniteyi kontrol etmek için kullanılır. Bu kılavuzun iç kapağında uzaktan kumandanın bir
resmini bulacaksınız. Uzaktan kumandanın fonksiyonlarını açıklamak için bu resimdeki düğme numaraları
aşağıdaki tabloda bulunan numaralara karşılık gelmektedir.
Nr
Düğme
Tanım
1
2
3
4
5
6
7
8
9
10
11
12
13
14
15
16
17
18
19
20
21
22
23
24
25
26
27
28
29
30
POWER ( )
R/L
TOP
MUSIC
FILE
0–9
AUDIO
SLIDE
SLOW
A-B
REPEAT
VOLUME
VOLUME
BACK
, , ,
)
PREVIOUS (
PLAY/PAUSE
REWIND (
)
OUTPUT
SETUP
FAST FORWARD (
STOP ( )
)
NEXT (
ENTER (
)
DISPLAY
PAGE
PAGE
MUTE
ROTATE
DELAY
31
32
ZOOM
TRANS
33
34
35
36
SUB-T
VIDEO
PHOTO
FUNC
37
38
P/N
MENU
39
Güç LED’i
Media Player Modu ya da Hazırda Bekleme Modu arasında geçiş yapar.
Ses çıkışını değiştirir (Stereo, Mono-L, Mono-R).
Geçerli dosya listesinin en başına gider.
‘MUSIC’ klasörüne doğrudan erişim düğmesi.
‘Dosya Kütüphanesini’ gösterir.
Sayısal seçim tuşları 0-9.
Ses akışını seçer ya da değiştirir (DVD Oynatma).
Müzik slayt gösterisi modunu başlatır ya da adım adım video oynatır.
Yavaş oynatma yapar.
Seçili aralığı tekrar tekrar oynatır.
Bir tekrar / karışık modu seçer.
Sesi artırır.
Sesi azaltır.
Önceki klasöre gitmek için kullanılır.
Ana menü veya DVD menüsünde seçimi hareket ettirir.
Önceki dosya ya da bölüme geçiş yapar.
Bir dosya ya da DVD klasörü oynatma işlemini başlatır ya da duraklatır.
Oynatma sırasında Hızlı Geri Sarar.
Video Çıkış Sinyalini seçer.
Ayar menüsünü açar.
Oynatma işlemi sırasında hızlı ileri sarar.
Oynatma işlemini durdurur.
Sonraki dosya ya da bölüme geçiş yapar.
Seçimi onaylar ya da oynatma işlemini başlatır.
Oynatma sırasında dosya bilgilerini gösterir.
Dosya içeren bir sonraki sayfayı gösterir.
Dosya içeren bir önceki sayfayı gösterir.
Sessize alma ya da sessizi iptal etme düğmesi.
Fotoğrafları çevirir.
Slayt gösterisi (müzik slayt gösterisi dahil) resimler arası geçiş süresini
seçer.
Yakınlaştırır ya da uzaklaştırır (Fotoğraf ve DVD Oynatma).
Bir slayt gösterisi sırasında geçiş modu ya da müzik çalma sırasında müzik
ekolayzır türü seçer.
Film Altyazısını seçer ya da değiştirir (MPEG4 ve DVD Oynatma).
‘VIDEO’ klasörüne doğrudan erişim düğmesi.
‘PHOTO’ klasörüne doğrudan erişim düğmesi.
Film oynatma sırasında belirli bir oynatma zamanına atlamak için
kullanılır.
Bir video sistemi seçer. (PAL / NTSC)
A. ‘Disk Bölümü Listesi’ ya da ‘Dosya Listesi’ni gösterir
B. DVD Menüsüne döner (DVD Oynatma).
Bir düğmeye basıldığında Güç LED’i yanıp sönecektir.
)
125
TÜRKÇE
6. CM3H Bağlantıları
HDMI bağlantısı
Kompozit + SCART bağlantısı
S/PDIF bağlantısı
HDMI, Kompozit ve S/PDIF bağlantılarını gösteren bağlantı örneği
Video kablosunun/kablolarının bağlanması
Ünitenin televizyon bağlantısını 4 farklı şekilde yapabilirsiniz:
- HDMI
- Kompozit
- SCART
(Kompozit kablo ve Scart adaptör kullanarak)
- Komponent **
**
Komponent kullanırken, televizyon ya da monitöre sadece video sinyali gönderilir.
Ses sinyali için Kompozit kablodaki Ses RCA Jaklarını (Kırmızı, Beyaz) kullanın.
HDMI:
• HDMI kabloyu ünitenin HDMI çıkışına [7] bağlayın.
• HDMI kablonun diğer ucunu TV üzerinde bulunan HDMI girişine takın.
Kompozit:
• Kompozit kabloyu (Sarı, Kırmızı ve Beyaz) ünitede karşılık gelen Kompozit jaklarına [11 , 12 , 13]
bağlayın.
• Kompozit kablonun diğer ucunu (Sarı, Kırmızı ve Beyaz) televizyonun Kompozit giriş jaklarına takın.
SCART:
• Kompozit kabloyu (Sarı, Kırmızı ve Beyaz) ünitede karşılık gelen Kompozit jaklarına [11 , 12 , 13] takın.
• Kompozit kablonun diğer ucunu (Sarı, Kırmızı ve Beyaz) SCART Adaptör üzerindeki jaklara takın.
• SCART Adaptörünü televizyonun SCART girişine takın.
Komponent:
• Komponent Kablosunu (Kırmızı, Yeşil ve Mavi) ünitedeki Komponent jaklarına [8, 9, 10] takın.
• Komponent kablonun diğer ucunu TV üzerindeki Komponent giriş jaklarına takın.
126
TÜRKÇE
Ses kablosunun/kablolarının bağlanması
Üniteyi TV ve/veya ev sinema sistemine 2 farklı şekilde bağlayabilirsiniz:
- Analog, ünitenin RCA Ses Jakları üzerinden
- Dijital, ünitenin Optik Dijital S/PDIF çıkışı üzerinden.
Analog:
• Kompozit kablonun Ses Jaklarını (Kırmızı, Beyaz) ünitenin RCA ses jaklarına [12 , 13] takın.
• Kompozit kablonun diğer ucunu TV ya da amplifikatörün RCA ses jaklarına takın.
Dijital:
• Dijital optik kabloyu ünitenin S/PDIF çıkışına [14] takın.
• Dijital optik kablonun diğer ucunu amplifikatörün Dijital optik girişine takın.
Güç Kaynağının Bağlanması
Ünite Ses/Video cihazınıza bağlı iken, güç kaynağını üniteye bağlayabilirsiniz.
• Birlikte verilen güç kaynağını ünitenin DC girişine [15] ve boş bir prize takın.
• Üniteye enerji vermek için ünitenin arkasındaki güç anahtarını ‘I’ konumuna getirin.
Ünite açılacaktır.
Uzaktan Kumandanın Hazırlanması
Uzaktan kumanda için 2x AAA pil (ürünle birlikte verilmiştir) kullanılmaktadır.
Üniteyi açmak/kapatmak için uzaktan kumadayı kullanmanız gerekir.
Notlar:
-
Uzaktan kumandanın en iyi çalışma mesafesi yaklaşık 5 metredir.
Uzaktan kumandayı ünitenin ön paneline yerleştirilmiş olan IR alıcıya yönlendirin.
IR alıcının alma açısı ±30 derecedir.
Piller zayıfladığında ya da bittiğinde yenisiyle (2x AAA) değiştirin.
127
TÜRKÇE
7. Temel CM3H İşlemleri
• Ünitenin televizyonda bağlı olduğu doğru giriş kanalını seçin. (HDMI, Kompozit, SCART ya da Komponent).
Not:
Bu noktadan itibaren televizyonun ünite giriş kanalına ayarlı olduğu kabul edilecektir. Açıklanan
adımların tümü ünitenin çalışıyor olması durumuna göre yapılmıştır.
• Ünitenin arkasındaki ana güç anahtarının ‘I’ konumunda olup olmadığını kontrol edin.
• Ünitenin önünde bulunan Play/Stop (Oynat/Durdur) düğmesi ya da uzaktan kumandada bulunan ‘Power’
düğmesi (1) ile üniteyi açın.
Ünite açılacak ve ekranda menü gösterilecektir.
Not:
Ünitenin varsayılan çıkış sinyali Kompozit Video’dur. Ünite açılır ve ekranda hiçbir şey görünmezse,
CM3H çıkışları (HDMI, Kompozit, Komponent) arasında geçiş yapmak için uzaktan kumanda
üzerindeki ‘Output’ düğmesine (19) basabilirsiniz.
Not:
Ünite açıldığında sabit diski ilk kullanıma hazırlaması gerekir. Bu işlem kısa bir zaman sürebilir. İlk
kullanıma hazırlık sırasında ekranda “LOADING...(YÜKLÜYOR...)” mesajı çıkar.
Sabit disk sadece 1 disk bölümü ile biçimlendirildiğinde, ekranınızda sabit diskin içeriğini gösteren ‘File List
(Dosya Listesi)’ görünecektir.
Sabit disk birden fazla disk bölümü ile biçimlendirildiğinde, ‘Partition List (Disk Bölümü Listesi)’ ekrana
gelecek ve mevcut tüm disk bölümleri gösterilecektir. Seçimi hareket ettirmek için / düğmelerini (15)
kullanın ve ‘
/Enter’ (24) düğmesine basarak seçilen disk bölümünün içeriğini gösteren ‘File List’
(Dosya Listesi)’ne gidin.
[ Disk Bölümü Listesi ]
[ Dosya Listesi ]
Disk bölümünü değiştirme:
Sabit disk birden fazla disk bölümü ile biçimlendirildiğinde, uzaktan kumanda üzerindeki ‘Menu’ (38)
düğmesine basarak ‘Disk Bölümü Listesi’ne geri dönebilir ve farklı bir disk bölümü seçebilirsiniz.
128
TÜRKÇE
8. Ortam Oynatma Seçenekleri
8.1 Filmlerinizin Oynatılması
CM3H tarafından MPEG1/2, MPEG 4 (XVID dahil), VOB, IFO (DVD) ve ISO gibi çeşitli video formatları
desteklenmekte olup video ve SPDIF çıkışı üzerinden DTS düz geçiş içindeki MP3, AC3, AAC ve MPEG1/2 ses
dosyaları da çalınabilmektedir.
• Uzaktan kumanda üzerindeki gezinti düğmeleri ile oynatmak istediğiniz dosyayı seçin.
• Seçilen dosyayı oynatmaya başlamak için uzaktan kumanda üzerindeki ‘Enter’ düğmesine (24) ya da
‘Play/Pause’ düğmesine (17) basın.
Oynatma işlemi sırasında uzaktan kumanda üzerinde aşağıdaki oynatma seçeneklerini kullanabilirsiniz:
Not:
Play/Pause
Stop
Rewind
Fast Forward
Previous
Next
Repeat
Display
Func
A-B
Slow
Slide
(17)
(22)
(18)
(21)
(16)
(23)
(11)
(25)
(36)
(10)
(9)
(8)
Seçili dosyayı oynatır ya da oynatma işlemini duraklatır.
Oynatma işlemini durdurur.
Geriye doğru hızlı oynatır.
İleriye doğru hızlı oynatır.
Geçerli klasörde önceki dosyayı oynatır.
Geçerli klasörde sonraki dosyayı oynatır.
Geçerli dosya/klasörün tekrar/karışık seçeneğini değiştirir.
Oynatma detaylarını gösterir.
Filmde belirli bir noktaya (zamana) gitmek için kullanılır.
Filmin seçilen bir bölümünü tekrarlar.
Yavaşlatılmış oynatma için kullanılır.
Adım adım oynatma için kullanılır.
CM3H’de çoğu Video Codec desteklenmektedir (XviD, AVI, MPEG2, vb.) fakat CM3H’de olmayan bir
Codec gerektiren dosyalara sahip olabilirsiniz.
Desteklenmeyen Codec ile bir dosya çalmaya çalışırsanız “CODEC NOT SUPPORTED (CODEC
DESTEKLENMİYOR)” mesajını göreceksiniz. Bu durumda film için farklı bir codec kullanmanızı
öneririz.
Oynatmaya kaldığı yerden devam etme özelliği
CM3H, oynatma işlemine kaldığı yerden devam edebilmektedir. Film oynatma, müzik çalma veya fotoğraf
slayt gösterisi sırasında CM3H’yi kapatırsanız, tekrar açtığınızda oynatma/çalma işlemini devam
ettirecektir.
Bu özellik varsayılan olarak etkindir ve Ayar Menüsünden kapatılabilir.
Not:
ISO ve IFO (DVD) dosyalarında bu fonksiyon çalışmaz.
Altyazı Oynatma özelliği
Conceptronic CM3H; .SMI, .SRT, .SUB ya da .SSA altyazı dosyalarını destekleyebilmektedir.
Altyazı dosyası, seçilen video dosyası ile aynı ada sahipse (sadece uzantısı farklı) MPEG4 dosyası
oynatıldığında altyazı dosyası otomatik olarak yüklenir, örneğin:
Film adı:
Altyazı adı:
My_Movie_With_Sub.AVI
My_Movie_With_Sub.SRT
Altyazı dosyası farklı bir ada sahip olduğunda altyazı dosyasını manuel olarak seçmeniz gerekir. Altyazı
dosyasını seçin ve altyazıyı seçmek için uzaktan kumanda üzerindeki ‘Sub-t’ (33) düğmesine basın. Filmi
/Enter’ (24) düğmesine basın.
seçin ve oynatmak için ‘
Not:
Film ile aynı ada sahip bir altyazı dosyası varsa ve başka bir altyazı dosyası seçmeye çalışıyorsanız,
CM3H tarafından seçilen dosya yerine aynı ada sahip altyazı dosyası kullanılacaktır.
129
TÜRKÇE
DVD Oynatma özelliği
CM3H normal bir DVD gibi sabit diskten DVD oynatır. DVD Menüsü içinde gezinebilir, altyazı seçebilir ya da
ses dillerini değiştirebilirsiniz.
Not:
CM3H sadece koruması olmayan DVD kopyalarını oynatmayı destekler. CSS koruması CM3H
tarafından desteklenmemektedir.
Not:
CM3H sadece Region 2 ya da Region free DVD kopyalarını destekler.
• CM3H’yi bilgisayarınıza bağlayın. Bkz. bölüm ‘10. Bilgisayar USB Bağlantısı’.
• CM3H sabit diski üzerinde DVD film ile aynı ada sahip bir klasör oluşturun (örneğin: 'Movie1').
• DVD’nizden 'AUDIO_TS' ve 'VIDEO_TS'yi (içerik dahil) oluşturulan klasöre kopyalayın (örneğin: ‘Movie1’).
Kopyaladıktan sonra yapı şöyle olmalıdır:
- [CM3H sabit diski]
|-> Movie1
|-> AUDIO_TS
|-> VIDEO_TS
(isteğe bağlı, her DVD’de bulunmaz)
(içindeki tüm DVD dosyaları ile)
• CM3H’yi bilgisayardan çıkarıp televizyonunuza bağlayın. CM3H’yi açın.
• Uzaktan kumanda üzerindeki ‘ , , , ’ düğmeleri (15) ile oynatmak istediğiniz DVD’yi seçin.
• Seçilen DVD’yi oynatmaya başlamak için uzaktan kumanda üzerindeki ‘Play/Pause’ düğmesine (17)
basın.
Not:
Başlatmak için ‘Enter’ (24) düğmesini kullanmayın. Bu sadece dosyaları/alt klasörleri gösterir ve
DVD Oynatmayı başlatmaz.
DVD oynatma işlemi sırasında uzaktan kumanda üzerinde aşağıdaki oynatma seçeneklerini kullanabilirsiniz:
-
Play/Pause
Stop
Navigation keys
Enter
Rewind
Fast Forward
Previous
Next
Sub-t
Audio
Zoom
Repeat
A-B
Display
Func
Menu
İpucu:
(17)
(22)
(15)
(24)
(18)
(21)
(16)
(23)
(33)
(7)
(31)
(11)
(10)
(25)
(36)
(38)
Seçili DVD klasörünü oynatır ya da oynatma işlemini duraklatır.
DVD oynatma işlemini durdurur ve Film tarayıcısına döner.
DVD Menüsü içinde gezinmek için kullanılır.
DVD Menü seçim(ler)ini onaylar.
Geri Sarar.
İleri Sarar.
Önceki Bölüm.
Sonraki Bölüm.
DVD’nin altyazısını değiştirir ya da kapatır.
DVD’nin ses parçasını değiştirir (DVD birçok ses parçası içerdiğinde).
Oynatılan filmi yakınlaştırır.
Geçerli bölümün Tekrar seçeneğini değiştirir.
Filmin seçilen bir bölümünü tekrarlar.
Oynatma detaylarını gösterir.
Filmde belirli bir noktaya (zaman) gitmek için kullanılır.
DVD Menüsüne döner.
ISO formatındaki DVD filmlerini de oynatabilirsiniz. ISO formatındaki DVD’lerin oynatma
özellikleri yukarıdaki DVD oynatma özellikleri ile aynıdır.
130
TÜRKÇE
Video klasörüne doğrudan erişim düğmesi
Uzaktan kumanda üzerindeki ‘Video’ (34) düğmesine basarak doğrudan erişilebilen 1 video klasörü
oluşturabilirsiniz. Sabit disk kök dizininde ‘VIDEO xx’ (burada ‘xx’ yerine istediğinizi yazabilirsiniz) adında
bir klasör oluşturun ve video dosyalarını bu klasöre yerleştirin. Media player başladığında ve ‘Video’ (34)
düğmesine bastığınızda media player klasörü otomatik olarak açacaktır.
Not:
‘VIDEO’ ile başlayan 1’den fazla klasör oluşturursanız ünite sadece ilk klasörü açacaktır.
Bazı MPEG2/VOB dosyaları iki ya da daha fazla akıcı ses içermektedir. Uzaktan kumanda üzerindeki ‘Audio’
(7) düğmesine basarak akıcı sesler arasında geçiş yapabilirsiniz. Oynattığınız video dosyasında ses olmadığı
zaman ‘Audio’ (7) düğmesini kullanabilir, böylece uygun akıcı sesi belirleyebilirsiniz.
MPEG2/VOB dosyasına geçerseniz, ses varsayılan akımda değilse sesi kaybedebilirsiniz. Bunu önlemek için
geçerli ses akımını “kilitlemek” üzere oynatma işlemi sırasında ‘Setup’ (20) düğmesine basın. Bu seçenek
seçili ses akımını tüm dosyalar için muhafaza edecektir.
8.2 Müzik Çalma
Conceptronic CM3H müzik çalabileceğiniz çeşitli modlara sahiptir (WAV, MP3 ve WMA desteği vardır).
• Uzaktan kumanda üzerindeki gezinti düğmeleri ile çalmak istediğiniz dosyayı seçin.
• Seçilen dosyayı çalmaya başlamak için uzaktan kumanda üzerindeki ‘Enter’ düğmesine (24) ya da
‘Play/Pause’ düğmesine (17) basın.
Çalma işlemi sırasında uzaktan kumanda üzerinde aşağıdaki çalma seçeneklerini kullanabilirsiniz:
-
Play/Pause
Stop
Rewind
Fast Forward
Previous
Next
Repeat
Trans
(17)
(22)
(18)
(21)
(16)
(23)
(11)
(32)
Seçili dosyayı çalar ya da çalma işlemini duraklatır.
Çalma işlemini durdurur.
Geriye doğru hızlı çalar.
İleriye doğru hızlı çalar.
Geçerli klasörde önceki dosyayı çalar.
Geçerli klasörde sonraki dosyayı çalar.
Geçerli dosya/klasörün tekrar/karışık seçeneğini değiştirir.
Bir Ekolayzır türü seçer.
Çalmaya kaldığı yerden devam etme özelliği
CM3H, çalma işlemine kaldığı yerden devam edebilmektedir. Film oynatma, müzik çalma veya fotoğraf slayt
gösterisi sırasında CM3H’yi kapatırsanız, tekrar açtığınızda oynatma/çalma işlemini devam ettirecektir. Bu
özellik varsayılan olarak etkindir ve Ayar Menüsünden kapatılabilir.
Music klasörüne doğrudan erişim düğmesi
Uzaktan kumanda üzerindeki ‘Music’ (4) düğmesine basarak doğrudan erişilebilen 1 müzik klasörü
oluşturabilirsiniz. Sabit disk kök dizininde ‘MUSIC xx’ (burada ‘xx’ yerine istediğinizi yazabilirsiniz) adında
bir klasör oluşturun ve müzik dosyalarını bu klasöre yerleştirin. Media player başladığında ve ‘Music’ (4)
düğmesine bastığınızda media player klasörü otomatik olarak açacaktır.
Not:
‘MUSIC’ ile başlayan 1’den fazla klasör oluşturursanız ünite sadece ilk klasörü açacaktır.
131
TÜRKÇE
8.3 Fotoğraf ve Resim Oynatma
CM3H ile ünitenin sabit diskinde kayıtlı fotoğraf ve resimleri görüntüleyebilirsiniz.
• Uzaktan kumanda üzerindeki gezinti düğmeleri ile oynatmak istediğiniz dosyayı seçin.
• Seçilen dosyayı oynatmaya başlamak için uzaktan kumanda üzerindeki ‘Enter’ düğmesine (24) ya da
‘Play/Pause’ düğmesine (17) basın.
Oynatma işlemi sırasında uzaktan kumanda üzerinde aşağıdaki oynatma seçeneklerini kullanabilirsiniz:
- Play/Pause
(17)
- Stop
- Navigation keys
(22)
(11)
-
Previous
Next
Repeat
Delay
Trans
Rotate
Zoom
(16)
(23)
(11)
(30)
(32)
(29)
(31)
Seçili dosya ile başlayan bir slayt gösterisi başlatır ya da slayt
gösterisini duraklatır.
Slayt gösterisini durdurur.
, : Gösterilen fotoğrafı çevirir.
,
: Gösterilen fotoğrafı döndürür.
Geçerli klasörde önceki dosyayı oynatır.
Geçerli klasörde sonraki dosyayı oynatır.
Geçerli dosya/klasörün tekrar/karışık seçeneğini değiştirir.
Slayt gösterisinin resimler arası süresini değiştirir.
2 fotoğraf arasındaki geçişi değiştirir.
Geçerli fotoğrafı döndürür.
Geçerli fotoğrafı yakınlaştırır.
Oynatmaya kaldığı yerden devam etme özelliği
CM3H, oynatma işlemine kaldığı yerden devam edebilmektedir. Film oynatma, müzik çalma veya fotoğraf
slayt gösterisi sırasında CM3H’yi kapatırsanız, tekrar açtığınızda oynatma/çalma işlemini devam
ettirecektir. Bu özellik varsayılan olarak etkindir ve Ayarlar Menüsünden kapatılabilir.
Müzikli slayt gösterisi (arka plan müziği ile fotoğraf görüntüleme)
Bir fotoğraf seçin ve müzikli slayt gösterisini başlatmak için ‘Slide’ (8) düğmesine basın.
‘Slide’ (8) düğmesine basmazsanız müzik çalmaz ve resimler müziksiz slayt gösterisi şeklinde görüntülenir.
Klasörde kullanılabilir müzik olmadığı takdirde müzikli slayt gösterisi fonksiyonu çalışmaz. Sessiz resim slayt
gösterisi için ‘
/Enter’ (24) düğmesine basmanız gerekir.
Not:
Bu modda Rotate ve Zoom fonksiyonlarına erişilemez.
‘Play/Pause’ (17) düğmesine bir kez basarak slayt gösterisini duraklatabilirsiniz (müzik çalmaya devam
edecektir). Müziği de durdurmak için ‘Play/Pause’ (17) düğmesine tekrar basın. Müzikli slayt gösterisine
kaldığı yerden devam etmek için ‘Play/ Pause’ (17) düğmesine tekrar basın.
Fotoğraf klasörüne doğrudan erişim düğmesi
Uzaktan kumanda üzerindeki ‘Photo’ (35) düğmesine basarak doğrudan erişilebilen 1 fotoğraf klasörü
oluşturabilirsiniz. Sabit disk kök dizininde ‘PHOTO xx’ (burada ‘xx’ yerine istediğinizi yazabilirsiniz) adında
bir klasör oluşturun ve fotoğraf dosyalarını bu klasöre yerleştirin. Media player başladığında ve ‘Photo’ (35)
düğmesine bastığınızda media player klasörü otomatik olarak açacaktır.
Not:
‘PHOTO’ ile başlayan 1’den fazla klasör oluşturursanız ünite sadece ilk klasörü açacaktır.
132
TÜRKÇE
9. Sistem Yapılandırması
Ünitenin Setup (Ayar) Menüsünü açmak için uzaktan kumanda üzerindeki ‘Setup’ (20) düğmesine
basabilirsiniz.
Setup Menüsünde seçimi hareket ettirmek için / / / düğmelerine basın ve seçimi onaylamak için
/ ENTER düğmesine basın. Ünite yapılandırmasını bitirdiğinizde, Setup Menüsünü kapatmak için tekrar
Setup düğmesine basın ya da Setup Menüsünden ‘Exit Setup’ seçeneğini seçin.
Setup Menüsü aşağıdaki sayfaları içerir:
•
•
•
•
General Setup (Genel Ayarlar) Sayfası
Audio Setup (Ses Ayarları) Sayfası
Video Setup (Video Ayarları) Sayfası
Slideshow Setup (Slayt Gösterisi Ayarları) Sayfası
•
Exit Setup
General Setup (Genel Ayarlar) Sayfası
OSD Lang
: Ekran dilini belirler.
Screensaver
: Ekran Koruyucuyu etkinleştirir ya da devre dışı bırakır.
Play Resume
: Oynatmaya kaldığı yerden devam etme fonksiyonunu etkinleştirir ya da devre dışı
bırakır.
Defaults
: Üniteyi fabrika varsayılan ayarlarına sıfırlar.
Auto Start
: Ünite açıldığında CM3H üzerindeki tüm ortam dosyalarını otomatik olarak çalar.
Audio Setup (Ses Ayarları) Sayfası:
Downmix
: Çoklu kanal sesi için downmix modunu ayarlar.
SPDIF Output
: SPDIF çıkış modunu ayarlar.
LPCM Output
: LPCM çıkış modunu ayarlar.
Video Setup (Video Ayarları) Sayfası:
TV Display
: TV Ekran ayarlarını değiştirir.
TV System
: TV için bir video sistemi seçer.
Video Output
: Kullandığınız video çıkışını seçer.
Slideshow Setup (Slayt Gösterisi Ayarları) Sayfası:
Interval time
: İki fotoğraf arasındaki süreyi seçer.
Transition
: 2 fotoğraf arasında kullanılan varsayılan geçişi seçer.
133
TÜRKÇE
10. Bilgisayar USB Bağlantısı
Üniteyi bilgisayarınıza bağlayarak dahili Sabit diskten ya da dahili Sabit diske veri (film, müzik, resim,
kayıtlar vb.) kopyalayabilirsiniz.
Not:
Aşağıdaki örnekte Windows XP ile çalışan bir bilgisayar kullanılmıştır ancak üniteyi USB desteği ve
FAT32 dosya sistemlerini okuma ve yazma özelliği olan tüm bilgisayarlarda kullanmak mümkündür.
Ünitenin bilgisayarınıza bağlanması
• Birlikte verilen, bir ucu USB diğer ucu Mini-USB olan kabloyu ünitenin arkasına ve bilgisayarınızda boş bir
USB porta bağlayın.
• Ünitenin arkasında bulunan açma kapama anahtarı ile üniteyi açın. Ünite otomatik olarak algılanacak,
yüklenecek ve bilgisayarınızda ilave bir sürücü olarak gösterilecektir.
Varsayılan olarak, ünitedeki dahili sabit disk bir USB depolama aygıtı gibi başlatılacaktır.
Ünitenin bilgisayardan kaldırılması
•
•
•
•
Sistem tepsisinden “Safe Removal” simgesine tıklayın.
“Stop USB Mass Storage Device” seçeneğini seçin.
“Safe to remove Hardware” mesajını bekleyin.
USB kabloyu çıkarın.
134
TÜRKÇE
11. İpuçları ve Sorun Giderme
CM3H düzgün bir şekilde çalışmadığında aşağıdaki sorun giderme ipuçlarını kullanın:
Güç LED’i yanmıyor:
• Güç kaynağı CM3H’ye bağlı değil. Güç kaynağını CM3H’ye yeniden bağlayın.
Ekranda hareket yok:
• CM3H hazırda bekleme durumundadır. Etkinleştirmek için uzaktan kumanda üzerindeki ‘ ’ (1) düğmesine
basın.
• TV üzerinde yanlış giriş kaynağı seçilidir. Giriş kaynağını değiştirin.
• Yanlış video sistemi seçilidir. Doğru çıkış sinyaline geçiş yapmak için uzaktan kumanda üzerindeki
‘Output’ (19) düğmesine basın.
• Video kablosu düzgün bir şekilde bağlı değildir. Video Kablosunun doğru bir şekilde bağlı olup olmadığını
kontrol edin.
Ünite açıldığında sadece bir ‘bling’ sesi duyuluyor fakat herhangi bir menü ekrana gelmiyor:
• Yanlış video sistemi seçilidir. Doğru çıkış sinyaline geçiş yapmak için uzaktan kumanda üzerindeki
‘Output’ (19) düğmesine basın.
• Video kablosu düzgün bir şekilde bağlı değildir. Video Kablosunun doğru bir şekilde bağlı olup olmadığını
kontrol edin.
• CM3H ses çıkışı amplifikatöre bağlıdır fakat TV üzerinde yanlış giriş seçilidir. Televizyonunuzda doğru
girişi seçin.
Ses yok:
• Ses kablosu düzgün bir şekilde bağlı değildir. Kablonun TV ya da amplifikatöre doğru bir şekilde bağlı
olduğundan emin olun.
• CM3H amplifikatöre bağlı fakat amplifikatör kapalıdır. Amplifikatörü açın.
• MPEG2 ya da VOB dosyasının ses akışı geçersizdir. Uygun ses akışı ayarı için uzaktan kumanda üzerindeki
‘Audio’ (7) düğmesine basın.
• Mute (Sessiz) fonksiyonu açıktır. Sessiz fonksiyonunu iptal etmek için uzaktan kumanda üzerindeki ‘Mute’
(28) düğmesine basın.
• CM3H Hızlı İleri ya da Hızlı Geri modunda çalışıyor.
• Normal çalmaya dönmek için uzaktan kumanda üzerindeki ‘Enter’ (24) düğmesine basın.
Ekran görüntüsü bozuk:
• CM3H Hızlı İleri ya da Hızlı Geri modunda çalışıyor. Normal çalmaya dönmek için uzaktan kumanda
üzerindeki ‘Enter’ (24) düğmesine basın.
• NTSC modunda bir PAL film ya da tersi oynatılıyor. Ekran ayarlarını değiştirmek için kumanda üzerindeki
‘P/N’ (37) düğmesine basın.
‘Slide’ düğmesine basıldığında sistem kilitleniyor:
• Geçerli klasörde çok sayıda fotoğraf ya da müzik var. Müzik-Slayt-Gösterisini başlatmak çok zaman
alacaktır. Lütfen oynatma işlemini bekleyin.
Uzaktan kumanda çalışmıyor:
• Uzaktan kumandayı CM3H alıcısına ±30 derece içinde doğrudan yönlendirin.
• Uzaktan kumandayı 5 metre mesafe içinde kullanın.
• Uzaktan kumanda pilleri (AAA) boşalmıştır ve değiştirilmelidir.
Oynatılan filmin alt yazısı görüntülenmiyor:
• Bir AVI dosyası oynatılıyor fakat alt yazı dosyası farklı bir dosya adına sahiptir. Alt yazıların nasıl
görüntüleneceği hakkında bölüm 8.1’e müracaat edin.
• Altyazı dosyası CM3H tarafından desteklenmiyor olabilir.
135
TÜRKÇE
Video oynatmaya çalışırken “CODEC NOT SUPPORTED” mesajı çıkıyor;
• Film dosyası CM3H için desteklenmeyen bir codec ile oluşturulmuştur.
CM3H destekli codec listesi için www.conceptronic.net web sitesini ziyaret edin.
CM3H tüm sabit disk bölümlerini / içeriğini göstermiyor:
• Sabit disk üzerindeki disk bölümü birincil değildir. Sabit diski yeniden bölümlendirin ve tüm disk
bölümlerinin birincil olduğundan emin olun.
• Sabit disk CM3H tarafından desteklenmeyen bir dosya sisteminde biçimlendirilmiştir. Sabit diskinizi FAT32
veya NTFS dosya sistemi ile yeniden biçimlendirin.
• Seçilen disk bölümünde ortam dosyası yoktur.
Play/Pause düğmesine basıldığında DVD/ISO oynatma fonksiyonu çalışmıyor:
• Doğru klasör yapısını kullandığınızdan emin olun. Klasör yapısı bölüm 8.1’de açıklanmıştır.
DVD dosyaları eksik, bozuk ya da hasarlıdır. Böyle bir durumda CM3H tarafından DVD oynatılmaz.
DVD giriş filmi sırasında ekran kararıyor:
• Mevcut bölüm siyah ekranla son buluyor ya da oynatılamayacak kadar kısadır. Sonraki bölüme geçmek
için ‘Next’ (23) düğmesine basın.
TV’de renkli değil siyah beyaz resim görüntüleniyor:
• TV’niz CM3H’nin “Multi” TV Sistemini kullanamıyordur. TV Sistemini PAL’a değiştirmek için Setup
menüsünü kullanın. (Bkz. bölüm 9). TV Sistemini değiştirdikten sonra CM3H’yi kapatıp açın.
136