1
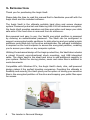
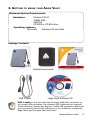
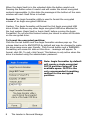
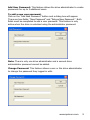
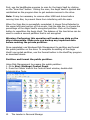
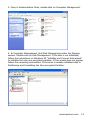
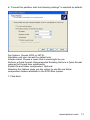
AEGIS VAULT
HARDWARE ENCRYTPED PORTABLE HARD DRIVE
User Guide
T he L eader
in
P ersonal S torage
Copyright © Apricorn, Inc. 2007. All rights reserved.
Windows and MS-DOS are registered trademarks of Microsoft Corporation.
All other trademarks and copyrights referred to are the property of their
respective owners.
Distribution of substantively modified versions of this document is prohibited
without the explicit permission of the copyright holder.
Distribution of the work or derivative work in any standard (paper) book form
for commercial purposes is prohibited unless prior permission is obtained
from the copyright holder.
DOCUMENTATION IS PROVIDED AS IS AND ALL EXPRESS OR IMPLIED
CONDITIONS, REPRESENTATIONS AND WARRANTIES, INCLUDING ANY
IMPLIED WARRANTY OF MERCHANTABILITY, FITNESS FOR A PARTICULAR
PURPOSE OR NON-INFRINGEMENT, ARE DISCLAIMED, EXCEPT TO THE
EXTENT THAT SUCH DISCLAIMERS ARE HELD TO BE LEGALLY INVALID.
The Leader in Personal Storage
TABLE OF CONTENTS
1. Introduction .............................................................. 4
B. Software Included ............................................... 4
2. Getting to know your Aegis Vault .................................. 5
System Requirements ................................................... 5
Package Contents ....................................................... 5
3. Specifications ............................................................. 6
4. Aegis Vault Software ................................................... 7
To start the Vault Tray program ................................... 7
Lock/Unlock .............................................................. 7
Format .................................................................... 8
To Format the Encrypted Partition ....................................8
Add User Password ..................................................... 9
Change Password ...................................................... 9
Reset Vault ................................................................10
5. Vault Console Program ............................................. 10
6. Vault Resize Program ................................................... 11
Partition & Format the Public Partition ...................... 12
Initializing Nonencrypted Partition ................................14
6. Administrator Tools & Procedures ................................ 19
Adding Vault Console Program to Public Partition ............ 19
Using Vault Reset Console ............................................ 20
7. Contacting Technical Support ....................................... 21
RMA Policy .............................................................. 21
Warranty Conditions .................................................. 22
8. FAQs ....................................................................... 23
www.apricorn.com
1. Introduction
Thank you for purchasing the Aegis Vault.
Please take the time to read this manual first to familiarize yourself with the
Aegis Vault and the included software.
The Aegis Vault is the ultimate portable hard drive and secure storage
system. Password protected and featuring AES-128 bit hardware encryption,
the Aegis Vault provides seamless real-time encryption and keeps your data
safe even if the hard drive is removed from its enclosure.
Bus powered and easy to use, the Vault’s encrypted partition is accessed
by entering an authenticated password. The Vault can be configured to
support unencrypted public partitions for data sharing and encrypted private
partitions controlled only by the drive administrator. No software installation
is required on the host computer to access the encrypted partition, enabling
you to access your data on any computer system.
Utilizing the advanced design of the Aegis product line, the Vault also includes
a robust 16-point omni-directional shock mounting, and USB integrated
cable. The Aegis Vault is the ideal hard drive to add additional capacity to
your system. Perfect for storing photos, music and video files in addition to
work documents.
Compatible with Windows PCs, the Aegis Vault’s sleek, slim, self-powered
design makes it the perfect traveling companion. Providing the ultimate in
flexibility and security, the Vault gives you the option of storing your sensitive
files in the encrypted partition of the drive and keeping your public files open
for access.
The Leader in Personal Storage
2. Getting to know your Aegis Vault
Minimum System Requirements
Hardware:
Pentium CPU II
32MBs RAM
USB Port
CD ROM or CD-RW drive
Operating systems:
Microsoft:
Windows XP and Vista
Package Contents
Aegis Vault
USB Y-cable
Padded travel pouch
Quick Start Guide
Aegis Vault Software CD
USB Y-cable: In the rare case that the Aegis Vault does not power up
on a single USB connection, the included USB Y-cable may be required
(Pictured above). Simply plug the two Y-cable USB connectors (black and
grey connectors) into the two USB ports on your notebook, connect the
Aegis Vault, and the Aegis Vault will power.
www.apricorn.com
3. Specifications
Encryption
Benefits
Real-time AES 128-Bit
hard drive encryption
Encrypts your data real-time and
keeps your data safe even if the hard
drive is removed from the enclosure
Create unencrypted and
encrypted partitions
Resize tool allows user to create
public partitions for sharing data and
resize public and private partitions as
needed
Resets encrypted data fast
Reset Vault tool allows administrator
to quickly reset the drive encryption
for Aegis Vault redeployment
No software required to access
encrypted data
Software not required to be installed
on host to access encrypted partition
Features
Benefits
LED for visual indicator of locked
& unlocked state
Red LED indicates Locked state
Green LED indicates unlocked state
Ultra-portable design
Ideal to take between home and the
office or on trips
Integrated cable
Integrated USB 2.0 cable
Bus Powered
Bus powered from standard USB port
Extensive Shock Mounting
Protects the drive with a 16-point
omnidirectional shock mounting
system
Specifications
Data Transfer Rates
USB 2.0 - Up to 480Mbps
Power Supply
100% bus powered
Interface Hi-Speed USB 2.0
Buffer Size
8MB
RPM
5400
Average seek time
12 ms
Shock - non operating
1000G 1ms
Shock - operating
300G 2ms
The Leader in Personal Storage
4. Aegis Vault Software
The Aegis Vault software installs two programs into the All Programs|
Apricorn|Aegis Vault Software menu, the VaultTray and VaultResize.
The VaultTray program allows the drive administrator to complete the
initial setup and format of the hard drive, as well as create and manage
additional user passwords. The VaultResize program allows the drive
administrator to resize the private partition, as well as reset the encryption
on the drive. A third program, the VaultConsole, can be used to gain
access to the drive on a system that does not have the Aegis Vault
software installed.
To start the VaultTray program:
Go to Start|All Programs|Apricorn|Aegis Vault Software and
click on VaultTray. If the program is already running, click on the Aegis
Vault icon in the system tray. During the installation process, VaultTray is
configured to automatically start when Windows boots up. The VaultTray
program has 5 buttons; Lock/Unlock, Format, Add User Password , Change
Password and Reset Vault. These buttons may be active or inactive
depending on the user level.
Lock/Unlock: This button locks and unlocks the drive. The button title
changes depending on drive state
When the Aegis Vault is in the locked state the button reads Unlock. The
user or drive administrator need to check the appropriate radio button
(User or Administrator) and enter a password to unlock the drive. In this
state the message field at the bottom of the window will read: Vault Drive
is Unlocked. Once the Aegis Vault is unlocked the encrypted data on the
drive may be accessed.
www.apricorn.com
When the Aegis Vault is in the unlocked state the button reads Lock.
Pressing the button when it reads Lock will render the drive’s encrypted
contents inaccessible. In this state the message at the bottom of the main
window will read: Vault Drive is Locked.
Format: The Aegis formatter utility is used to format the encrypted
volume of an Aegis encrypted USB drive.
Caution: The Aegis Formatter will format the first Aegis encrypted USB
drive it finds. Remove any other Aegis encrypted USB drive attached to
the host system (Aegis Vault or Aegis Vault) before running the Aegis
Formattter. Do not use this feature unless you intend to erase all the data
on the encrypted drive.
To format the encrypted partition:
Click the Format button and the Aegis Formatter window pops up. The
volume label is set to ENCRYPTED by default and may be changed to make
the drive name more user friendly. Click Format button and a WARNING:
Formatting will erase ALL data on this drive... message will appear. To
format, click OK. To quit, click Cancel. This feature is only active when the
drive is unlocked using the administrator password.
Note: Aegis Formatter by default
will create a single encrypted
FAT32 partition using all the
available space. FAT32 is the
only recommended formatting
method for the encrypted
partition.
The Leader in Personal Storage
Add User Password: This feature allows the drive administrator to create
passwords for up to 3 additional users.
To add a new user password:
Click on the “Add New Password” button and a dialog box will appear.
There are two fields; “New Password” and “Retype New Password.” Both
fields must be completed to add a user password. This feature is only
active when the drive is unlocked using the administrator password.
Note: There is only one drive administrator and a second drive
administrator password cannot be added.
Change Password: This feature allows a user or the drive administrator
to change the password they logged in with.
www.apricorn.com
To change the password:
Click on the “Change Password” button and a dialog box will appear.
There are three fields “New Password”, “Retype New Password” and “Old
Password”. All three fields must be completed to change the password.
Reset Vault: This feature resets the Aegis Vault’s encrypted partition.
All the data and passwords associated with the encrypted partition will be
irrevocably lost. This feature is only active when the drive is unlocked using
the administrator password.
To reset the Vault:
Click on the Reset Vault button and a warning window will appear.
Click OK to continue or Cancel to Quit and exit the program. Click Add
Admin Password to add a new administrator password . Follow the Aegis
Formatter instructions to format the drive.
5. VaultConsole Program
The VaultConsole is a stand alone program (located in the C:\Program
Files\Apricorn\VaultDrive folder) that allows users and the drive
administrator to unlock and lock the Aegis Vault on a system that does not
have the Aegis Vault software installed. Simply run VaultConsole.exe on
any PC to access your Aegis Vault.
The VaultConsole program has 2 buttons; Lock/Unlock and Rescan.
Lock/Unlock: This button locks and unlocks the drive. The button title
10
The Leader in Personal Storage
changes depending on drive state
When the Aegis Vault is in the locked state the button reads Unlock. The
user or drive administrator needs to check the appropriate radio button
(User or Administrator) and enter a password to unlock the drive. In this
state the message field at the bottom of the window will read: Vault Drive
is Unlocked. Once the Aegis Vault is unlocked the encrypted data on the
drive may be accessed.
When the Aegis Vault is in the unlocked state the button reads Lock.
Pressing the button when it reads Lock will render the drive’s encrypted
contents inaccessible. In this state the message at the bottom of the main
window will read: Vault Drive is Locked.
Note: Closing the Vault Program or Exiting the Vault Tray DOES NOT
LOCK THE DRIVE. Removing the drive or using the Lock button are the
only two ways to lock the drive.
Rescan: Will scan your computer to detect the presence of an Aegis Vault.
If you start the VaultConsole program without the drive attached click
the “Rescan” button to locate the Aegis Vault and then choose user or
administrator and enter the password to unlock the Aegis Vault.
6. VaultResize Program
To start the VaultResize program, go to:
Start|All Programs|Apricorn|Aegis Vault Software and click on
VaultResize.
Note: If you try to run the VaultResize program when VaultTray is running,
you will receive the following error: Another instance of Vault Software
is running. Program will now exit. The VaultTray icon in the system tray
indicates the program is running. To exit the VaultTray program right click
on the VaultTray icon and select Exit. www.apricorn.com
11
First, use the VaultResize program to scan for the Aegis Vault by clicking
on the “Scan Bus” button. During the scan, the Aegis Vault is ejected and
reinitialized as the program tries to get exclusive access to the drive.
Note: It may be necessary to remove other USB hard drives before
running Scan Bus, to prevent them from interfering with the scan.
When the Scan Bus is successfully completed, it shows Drive Detected in
the upper left-hand portion of the screen. Use the slide bar, to choose the
percentage of the Aegis Vault’s encrypted partition. Click on the Resize
button to repartition the Aegis Vault. The balance of the hard drive can be
used to create a second partition that is not encrypted.
Warning: Performing this operation will render any data on the
drive inaccessible. Make sure you backup any important data
before resizing the private partition.
Once completed, use Windows Disk Management to partition and format
the public partition on the drive. To complete formatting of the Aegis
Vault’s encrypted partition, use the Format button in the VaultTray program
as described above.
Partition and format the public partition.
Using Disk Management to prepare the public partition:
1. Go to Start|Settings|Control Panel.
2. From the Classic View in the Control Panel window, double-click
Administrative Tools.
12
The Leader in Personal Storage
3. Once in Administrative Tools, double-click on Computer Management.
4. In Computer Management, find Disk Management under the Storage
section. Double-click on Disk Management. If the disk is not initialized,
follow the instructions on Windows XP “Initialize and Convert disk wizard”
to initialize the new non-encrypted partition. If the wizard does not appear,
follow the remaining instructions. If the drive is already initialized skip to
Partitioning and Formatting the Non-encrypted Partition.
www.apricorn.com
13
Initializing the Non-encrypted partition using Disk Management
5. Identify the new drive in Disk Management, the drive will show up as
Unknown and Unallocated with a Red No Entry Sign/Not Initialized on the
disk number.
6. Right click on the section to the left where the drive number and red no
entry sign are located. Select Initialize Disk.
7. Select Basic Storage as the type of disk storage.
Partitioning and Formatting the Non-encrypted partition
1. Right-click the unallocated region of the basic disk and select New
Partition.
14
The Leader in Personal Storage
2. A Partition Wizard will initiate. Click Next.
3. Select Primary partition and click Next.
www.apricorn.com
15
4. You will then need to decide on a partition size. Enter a partition size in
the box provided. Click Next.
5. Select Assign the following drive letter. Fill in the drive letter. Be sure to
select a drive letter that is not in use. Click Next.
16
The Leader in Personal Storage
6. “Format this partition with the following settings” is selected by default.
File System: Choose NTFS or FAT32.
Allocation unit size: Accept the default size
Volume Label: Choose a name that is meaningful to you.
Perform a Quick Format: Recommended Enabling Perform a Quick Format
reduces the format time significantly.
Enable file and folder compression: Optional
Selecting this feature gives you the option to use file and folder
compression feature available to the NTFS files system.
7. Click Next.
www.apricorn.com
17
8. Verify the settings you have chosen and click “Finish” to start the
formatting. Formatting time may vary depending on the size of the
partition and the file system.
When completed, the new volume will show “Healthy” and have a solid
blue bar at the top of the drive properties box.
18
The Leader in Personal Storage
6. Administrator Tools & Procedures
Adding VaultConsole Program to a Public Partition
The VaultConsole is a stand alone program that allows users and the drive
administrator to unlock and lock the Aegis Vault on a system that does
not have the Aegis Vault software installed. The VaulConsole is available
from the menu on the Aegis Vault software CD. Alternately, you may
want to add the VaultConsole program to a public partition on the Aegis
Vault. Public partitions are not encrypted and will be accessible on most
computers with a USB port. With the VaultConsole program on a public
partition, you will always have access to the Aegis Vault without having to
carry the Aegis Vault Software CD.
The first step is to create a public partition and an encrypted partition with
the VaultResize program. You will find detailed instructions to resize
and format the partitions in section 6. VaultResize Program on page 11.
Once the public partition is created on the Aegis Vault go to: C:\Program
Files\Apricorn\VaultDrive folder and copy VaultConsole.exe to the
new public partition on the Aegis Vault. To access the encrypted data on
a computer that does not have the Aegis Vault software installed, simply
connect the Aegis Vault to any computer and open the public partition
then click on the VaultConsole.exe file, enter your password to access the
encrypted portion of the drive.
www.apricorn.com
19
Using the VaultResetConsole.exe
The AegisResetConsole.exe program does not show up on any menus
and is only available as an executable program from the CD. The
VaultResetConsole.exe program will completely destroy all of the data
from the Aegis Vault with no possibility of recovery. Extreme caution
should be used when running this program.
To use the VaultResetConsole.exe, go to the Vault drive folder on the
Aegis Vault software CD and double click it. You will see the following
WARNINGS:
WARNING: By resetting the encryption information you will destroy the
data in the encrypted partition. Press ‘Y’ to reset Drive E: or any other key
to Exit
Are you sure?
Again, resetting the encryption information will destroy the data in the
encrypted partition. Press ‘Y’ to reset Drive E: or any other key to Exit
The Vault Drive was reset successfully
Press any key to exit program
20
The Leader in Personal Storage
7.Contacting Technical Support
Apricorn provides the following helpful resources for you:
1. Hardware Installation Section of the User’s Guide.
2. Apricorn’s Website (http://www.apricorn.com)
This gives you the ability to check for up-to-date information.
3. Email us at [email protected].
4. Or call the Technical Support Department at 1-800-458-5448.
Apricorn’s Technical Support Specialists are available from 8:00 a.m.
to 5:00 p.m., Pacific Time from Monday through Friday.
8.RMA Policy
An RMA (Return Merchandise Authorization) tracking number must be issued
by Apricorn. If you need to return or replace your Apricorn product, Apricorn
requires that you perform the following steps:
1. Simply call Apricorn’s technical support department with your Apricorn
product part number and a description of the problem(s) you are
experiencing.
2. If the Apricorn representative finds cause for a return, they will issue an
RMA number. Please write this number down.
3. Fill out an RMA authorization form with your package. The RMA form is
available on-line at http://www.apricorn.com/support/rma.php.
4. Please send the prepaid package to the following address, make sure
the RMA# is written on the exterior of the package:
Apricorn
RMA#: __________
12191 Kirkham Road
Poway, CA 92064
The purchaser shall be responsible for any loss or damage to the returned
product until it is received by Apricorn. Purchaser should consider obtaining
insurance with respect to shipping the product.
www.apricorn.com
21
Warranty Condiditons
Three-Year Warranty:
Apricorn offers a 3-year warranty on the Aegis Vault against defects in
materials and workmanship under normal use. The warranty period is
effective from the date of purchase either directly from Apricorn or an
authorized reseller.
Disclaimer and terms of the warranties:
The warranty becomes effective on the date of purchase and
must be verified with your sales receipt or invoice displaying
the date of product purchase.
Apricorn will, at no additional charge, repair or replace
defective parts with new parts or serviceable used parts that
are equivalent to new in performance. All exchanged parts
and products replaced under this warRanty will become the
property of Apricorn.
This warranty does not extend to any product not purchased
directly from Apricorn or to any product that has been
damaged or rendered defective: 1. As a resulT of accident,
misuse, Neglect, abuse or failure and/or inability to follow
the written instructions provided in this instruction guide:
2. By the use of parts not manufactured or sold by Apricorn;
3. By modification of the product; or 4. As a result of service,
alteration or repaIR by anyone other than Apricorn and shall
be void. This warranty does not cover normal wear and tear.
No other warranty, either express or implied, including any
warranty or merchantability and fitness for a particular
purpose, has been or will be made by or on behalf of Apricorn
or by operation of law with respect to the product or its
installation, use, operation, replacement or repair.
Apricorn shall not be liable by virtue of this warranty, or
otherwise, for any incidental, special or consequential damage
including any loss of data resulting from the use or operation
of the product, whether or not Apricorn was apprised of the
possibility of such damages.
22
The Leader in Personal Storage
FAQ’s
Why am I getting an Error Code with passwords?
The password error codes can be confusing because the same code is used
for two completely different reasons.
You will receive the following error if you enter the wrong password (or
enter a correct password but with the wrong radio button chosen.)
“The Vault Drive returned an error “Bad Data” please ensure you enter
your password correctly.” Once you choose the correct password or radio
button and click on the Unlock button again, the drive will unlock.
You will receive the same error if you exceed 3 user passwords. When you
add the 4th password you will receive the same error message.
What does the LED light indicate?
The LED light acts as a visual indicator to show when the Aegis Vault is
locked or unlocked.
When the red LED light is glowing, it indicates the Aegis Vault is locked.
When the Green LED light is glowing it indicates the Aegis Vault is
unlocked.
www.apricorn.com
23
12191 Kirkham Road
Poway, CA, U.S.A. 92064
1-858-513-2000