1
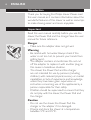
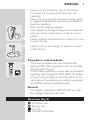
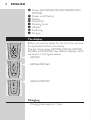
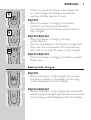
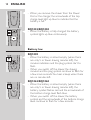
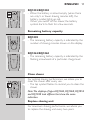
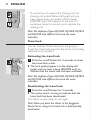
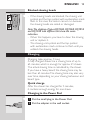
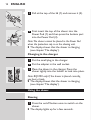
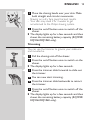
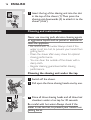
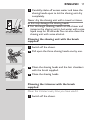
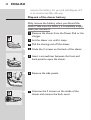
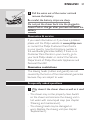
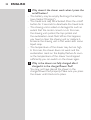
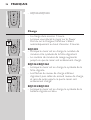
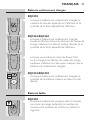
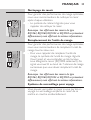
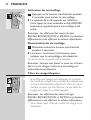
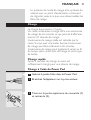
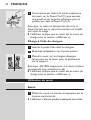
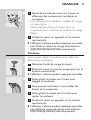
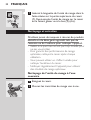
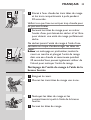
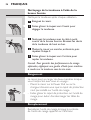
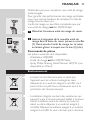
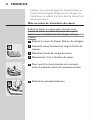
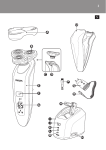
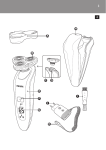
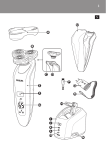
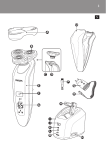
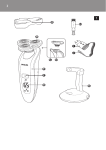
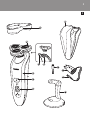
3
5
H
A
B
C
D
I
J
E
F
K
G
L
4
RQ1090, RQ1062, RQ1060, RQ1052, RQ1050 with charger
English 6
Français 23
6
English
Introduction
Thank you for buying this Philips shaver. Please read
this user manual, as it contains information about the
wonderful features of this shaver as well as some tips
to make shaving easier and more enjoyable.
Important
Read this user manual carefully before you use the
shaver, the Power Pod and the charger. Save the user
manual for future reference.
Danger
-- Make sure the adapter does not get wet.
Warning
-- Be careful with hot water. Always check if the
water is not too hot, to prevent your hands from
getting burnt.
-- The adapter contains a transformer. Do not cut
off the adapter to replace it with another plug, as
this causes a hazardous situation.
-- The shaver, the Power Pod and the charger
are not intended for use by persons (including
children) with reduced physical, sensory or mental
capabilities, or lack of experience and knowledge,
unless they have been given supervision or
instruction concerning use of the appliances by a
person responsible for their safety.
-- Children should be supervised to ensure that they
do not play with the shaver, the Power Pod and
the charger.
Caution
-- Do not use the shaver, the Power Pod, the
charger or the adapter if it is damaged.
-- Charge and store the shaver at a temperature
between 5°C and 35°C.
English
7
-- Always put the protection cap on the shaver
to protect the shaving heads when you are
travelling.
-- Never use scouring pads, abrasive cleaning agents
or aggressive liquids such as petrol or acetone to
clean the appliance.
-- Only use the adapter supplied.
-- If the adapter is damaged, always have it replaced
with one of the original type in order to avoid a
hazard.
-- Never immerse the Power Pod in water, nor rinse
it under the tap.
-- Never immerse the charger in water, nor rinse it
under the tap.
Compliance with standards
-- The shaver complies with the internationally
approved IEC safety regulations and can be safely
cleaned under the tap.
-- These Philips appliances comply with all standards
regarding electromagnetic fields (EMF). If handled
properly and according to the instructions in this
user manual, the appliances are safe to use based
on scientific evidence available today.
General
-- The adapter transforms 100-240 volts to a safe
low voltage of less than 24 volts.
Overview (Fig. 5)
A Protection cap
B Shaving unit
C Trimmer
D Trimmer on/off slide
8
English
E Shaver (RQ1090/RQ1062/RQ1060/RQ1052/
RQ1050)
F Shaver on/off button
G Display
H Power Pod
I Cleaning brush
J Adapter
K Small plug
L Charger
The display
Before you use the shaver for the first time, remove
the protective foil from the display.
The five shaver types (RQ1090, RQ1062, RQ1060,
RQ1052 and RQ1050) have different displays, which
are shown in the figures below.
-- RQ1090
-- RQ1062/RQ1060
-- RQ1052/RQ1050
Charging
-- Charging takes approx. 1 hour.
English
9
-- When you place the shaver in the Power Pod
or in the charger, the display automatically
switches off after approx. 5 hours.
RQ1090
-- When the shaver is charging, the minutes
indication and the plug symbol flash.
-- The shaving minutes increase until the shaver is
fully charged.
RQ1062/RQ1060
-- When the shaver is charging, the plug
symbol flashes.
-- First the arrowheads of the bottom charge level
flash, then the arrowheads of the second level
flash, and so on until the shaver is fully charged.
RQ1052/RQ1050
-- When the shaver is charging, the battery symbol
flashes blue.
Battery fully charged
RQ1090
-- When the battery is fully charged, the minutes
indication is visible on the display and the plug
symbol disappears from the display.
RQ1062/RQ1060
-- When the battery is fully charged, all arrowheads
and all charge level lights light up blue continuously
and the plug symbol disappears from the display.
10
English
-- When you remove the shaver from the Power
Pod or the charger, the arrowheads of the top
charge level light up blue to indicate that the
battery is full.
RQ1052/RQ1050
-- When the battery is fully charged, the battery
symbol lights up blue continuously.
Battery low
RQ1090
-- When the battery is almost empty (when there
are only 5 or fewer shaving minutes left), the
minutes indication and the plug symbol start to
flash.
-- When you switch off the shaver, the shaving
minutes and the plug symbol continue to flash for
a few more seconds. You hear a beep when there
are no minutes left.
RQ1062/RQ1060
-- When the battery is almost empty (when there
are only 5 or fewer shaving minutes left), the
battery symbol flashes red and the arrowheads of
the bottom charge level flash blue.
-- When you switch off the shaver, the battery
symbol and the arrowheads of the bottom charge
level continue to flash for a few seconds.
English 11
RQ1052/RQ1050
-- When the battery is almost empty (when there
are only 5 or fewer shaving minutes left), the
battery symbol lights up red.
-- When you switch off the shaver, the battery
symbol starts to flash for a few seconds.
Remaining battery capacity
RQ1090
-- The remaining battery capacity is indicated by the
number of shaving minutes shown on the display.
RQ1062/RQ1060
-- The remaining battery capacity is indicated by the
flashing arrowheads of a particular charge level
Clean shaver
For optimal shaving performance, we advise you to
clean the shaver after every use.
-- The tap symbol flashes to remind you to clean the
shaver.
Note:The displays of types RQ1062, RQ1060, RQ1052
and RQ1050 look different but show the same
indication.
Replace shaving unit
For maximum shaving performance, we advise you
to replace the shaving unit every two years.
12
English
-- To remind you to replace the shaving unit, the
shaving unit symbol flashes (all types) and you
hear a beep when you switch off the shaver
(RQ1090 only). This happens at the end of 7
successive shaves to remind you to replace the
shaving unit.
Note:The displays of types RQ1062, RQ1060, RQ1052
and RQ1050 look different but show the same
indication.
Travel lock
You can lock the shaver when you are going to
travel. The travel lock prevents the shaver from being
switched on by accident.
Activating the travel lock
1 Press the on/off button for 3 seconds to enter
the travel lock mode.
,, The lock symbol appears on the display (all
types) and you hear a beep (RQ1090 only) to
indicate that the travel lock has been activated.
Note:The displays of types RQ1062, RQ1060, RQ1052
and RQ1050 look different but show the same
indication.
Deactivating the travel lock
1 Press the on/off button for 3 seconds.
,, The motor starts running to indicate that the
travel lock has been deactivated.
The shaver is now ready for use again.
Note:When you place the shaver in the plugged-in
Power Pod or charger, the travel lock is automatically
deactivated.
English 13
Blocked shaving heads
-- If the shaving heads are blocked, the shaving unit
symbol and the tap symbol with exclamation mark
flash. In this case, the motor cannot run because
the shaving heads are soiled or damaged.
Note:The displays of types RQ1062, RQ1060, RQ1052
and RQ1050 look different but show the same
indication.
-- When this happens, you have to clean the shaving
unit or replace it.
-- The shaving unit symbol and the tap symbol
with exclamation mark continue to flash until you
unblock the shaving heads.
Charging
Charging takes approx. 1 hour.
A fully charged shaver has a shaving time of up to
65 minutes, which is enough for approx. 21 shaves.
The actual shaving time is calculated by the shaver.
If you have a heavy beard, the shaving time may be
less than 65 minutes. The shaving time may also vary
over time, depending on your shaving behaviour and
beard type.
Quick charge
After the shaver has charged for 5 minutes,
it contains enough energy for one shave.
Charging in the Power Pod
1 Put the small plug in the Power Pod.
2 Put the adapter in the wall socket.
14
English
3 Pull at the top of the lid (1) and remove it (2).
4 First insert the top of the shaver into the
Power Pod (1) and then press the bottom part
into the Power Pod (2).
Note:The shaver cannot be placed in the Power Pod
when the protection cap is on the shaving unit.
,, The display shows that the shaver is charging
(see chapter ‘The display’).
Charging in the charger
1 Put the small plug in the charger.
2 Put the adapter in the wall socket.
3 Place the shaver in the charger. Press the
shaver tightly into the holder to lock into place.
Note: RQ1090 only: If the shaver is placed correctly,
you hear a beep.
,, The display shows that the shaver is charging
(see chapter ‘The display’).
Using the shaver
Shaving
1 Press the on/off button once to switch on the
shaver.
,, The display lights up for a few seconds.
English 15
2 Move the shaving heads over your skin. Make
both straight and circular movements.
-- Shaving on a dry face gives the best results.
-- Your skin may need 2 or 3 weeks to get
accustomed to the Philips shaving system.
3 Press the on/off button once to switch off the
shaver.
,, The display lights up for a few seconds and then
shows the remaining battery capacity (RQ1090/
RQ1062/RQ1060 only).
Trimming
You can use the trimmer to groom your sideburns
and moustache.
1 Pull the shaving unit off the shaver.
2 Press the on/off button once to switch on the
shaver.
,, The display lights up for a few seconds.
3 Press the trimmer slide forwards to slide out
the trimmer.
4 You can now start trimming.
5 Press the trimmer slide backwards to retract
the trimmer.
6 Press the on/off button once to switch off the
shaver.
,, The display lights up for a few seconds and then
shows the remaining battery capacity (RQ1090/
RQ1062/RQ1060 only).
16
English
7 Insert the lug of the shaving unit into the slot
in the top of the shaver (1). Then press the
shaving unit downwards (2) to attach it to the
shaver (‘click’).
Cleaning and maintenance
Never use scouring pads, abrasive cleaning agents
or aggressive liquids such as petrol or acetone to
clean the appliance.
-- Be careful with hot water. Always check if the
water is not too hot, to prevent your hands from
getting burnt.
-- Clean the shaver after every shave for optimal
shaving performance.
-- You can clean the outside of the shaver with a
damp cloth.
-- Regular cleaning guarantees better shaving
performance.
Cleaning the shaving unit under the tap
1 Switch off the shaver.
2 Pull open the three shaving heads one by one.
3 Rinse all three shaving heads and all three hair
chambers under a hot tap for 30 seconds.
Be careful with hot water. Always check if the
water is not too hot, to prevent your hands from
getting burnt.
English 17
4 Carefully shake off excess water and leave the
shaving heads open to let the shaving unit dry
completely.
Never dry the shaving unit with a towel or tissue,
as this may damage the shaving heads.
,, For thorough cleaning, switch on the shaver and
immerse the shaving unit in hot water with some
liquid soap for 30 seconds.You can also clean the
shaving unit with some alcohol.
Cleaning the shaving unit with the brush
supplied
1 Switch off the shaver.
2 Pull open the three shaving heads one by one.
3 Clean the shaving heads and the hair chambers
with the brush supplied.
4 Close the shaving heads.
Cleaning the trimmer with the brush
supplied
Clean the trimmer every time you have used it.
1 Switch off the shaver.
18
English
2 Press the trimmer slide forwards to slide out
the trimmer.
3 Clean the trimmer with the short-bristled side
of the brush supplied. Brush up and down along
the trimmer teeth.
4 Switch the shaver on and off and repeat step 3.
5 Press the trimmer slide backwards to retract
the trimmer.
Tip: For optimal trimmer performance, lubricate the
trimmer teeth with a drop of sewing machine oil every
six months.
Storage
There are two ways to store the shaver or to take it
with you when you travel:
-- put the shaver in the Power Pod or in the charger.
Make sure the protection cap is not on the
shaving unit.
-- slide the protection cap onto the shaving unit to
prevent damage to the shaving heads.
Replacement
Replace the shaving unit when the shaving unit
symbol appears on the display. Replace a damaged
shaving unit right away.
For maximum shaving performance, we advise you
to replace the shaving unit every two years.
English 19
Only replace the shaving unit with an original RQ10
Philips arcitec Shaving Unit.
1 Pull the old shaving unit off the shaver.
2 Insert the lug of the new shaving unit into the
slot in the top of the shaver (1). Then press the
shaving unit downwards (2) to attach it to the
shaver (‘click’).
Ordering parts
The following parts are available:
-- HQ8500 adapter
-- RQ10 Philips arcitec Shaving Unit
-- HQ110 Philips Shaving Head Cleaning Spray (not
available in China)
Environment
-- Do not throw away the appliances with the
normal household waste at the end of their life,
but hand them in at an official collection point for
recycling. By doing this, you help to preserve the
environment.
-- The built-in rechargeable shaver battery contains
substances that may pollute the environment.
Always remove the battery before you discard or
hand in the shaver at an official collection point.
Dispose of the battery at an official collection
point for batteries. If you have trouble removing
the battery, you can also take the appliance to a
Philips service centre. The staff of this centre will
20
English
remove the battery for you and will dispose of it
in an environmentally safe way.
Disposal of the shaver battery
Only remove the battery when you discard the
shaver. Make sure the battery is completely empty
when you remove it.
1 Remove the shaver from the Power Pod or the
charger.
2 Let the shaver run until it stops.
3 Pull the shaving unit off the shaver.
4 Undo the 2 screws on the back of the shaver.
5 Insert a screwdriver between the front and
back panel to open the shaver.
6 Remove the side panels.
7 Unscrew the 3 screws on the inside of the
shaver and remove the back cover.
English 21
8 Pull the wires out of the motor unit and
remove the battery.
Be careful, the battery strips are sharp.
Do not put the shaver back into the plugged-in
Power Pod or charger after you have removed the
battery.
Guarantee & service
If you need information or if you have a problem,
please visit the Philips website at www.philips.com
or contact the Philips Customer Care Centre
in your country (you find its phone number in
the worldwide guarantee leaflet). If there is no
Customer Care Centre in your country, go to
your local Philips dealer or contact the Service
Department of Philips Domestic Appliances and
Personal Care BV.
Guarantee restrictions
The shaving heads (cutters and guards) are not
covered by the terms of the international guarantee
because they are subject to wear.
Frequently asked questions
1 Why doesn’t the shaver shave as well as it used
to?
-- The shaver may not be properly clean. Switch
on the shaver and immerse the shaving unit in
hot water with some liquid soap (see chapter
‘Cleaning and maintenance’).
-- The shaving heads may be damaged or
worn. Replace the shaving unit (see chapter
‘Replacement’).
22
English
2 Why doesn’t the shaver work when I press the
on/off button?
-- The battery may be empty. Recharge the battery
(see chapter ‘Charging’).
-- The travel lock may be activated. Press the on/off
button for 3 seconds to deactivate the travel lock.
-- The shaving unit is soiled or damaged to such an
extent that the motor cannot run. In this case,
the shaving unit symbol, the tap symbol and
the exclamation mark flash. When this happens,
you have to clean the shaving unit or replace it.
Immerse the shaving unit in hot water with some
liquid soap.
-- The temperature of the shaver may be too high.
In this case, the shaver does not work and the
exclamation mark on the display flashes. As soon
as the temperature of the shaver has dropped
sufficiently, you can switch on the shaver again.
3 Why is the shaver not fully charged after I
charged it in the charger/Power Pod?
-- You may not have placed the shaver in the
charger/Power Pod properly. Make sure you press
the shaver until it locks into place.
Français 23
Introduction
Merci d’avoir acheté ce rasoir Philips. Veuillez lire ce
mode d’emploi, qui contient des informations sur
les fonctionnalités remarquables de ce rasoir, ainsi
que des conseils pour un rasage plus facile et plus
agréable.
Important
Lisez ce mode d’emploi attentivement avant d’utiliser
le rasoir, le Power Pod et le chargeur. Conservez-le
pour un usage ultérieur.
Danger
-- Veillez à ce que l’adaptateur ne soit pas en contact
avec de l’eau.
Avertissement
-- Veillez à ce que l’eau ne soit pas trop chaude pour
ne pas vous brûler.
-- L’adaptateur contient un transformateur. Afin
d’éviter tout accident, n’essayez pas de remplacer
la fiche de l’adaptateur.
-- Le rasoir, le Power Pod et le chargeur ne sont
pas destinés à être utilisés par des personnes
(notamment des enfants) dont les capacités
physiques, sensorielles ou intellectuelles sont
réduites, ou par des personnes manquant
d’expérience ou de connaissances, à moins que
celles-ci ne soient sous surveillance ou qu’elles
aient reçu des instructions quant à l’utilisation de
ces appareils par une personne responsable de
leur sécurité.
-- Veillez à ce que les enfants ne puissent pas jouer
avec le rasoir, le Power Pod ou le chargeur.
24
Français
Attention
-- N’utilisez pas le rasoir, le Power Pod, le chargeur
ou l’adaptateur s’il est endommagé.
-- Chargez et conservez le rasoir à une température
comprise entre 5 °C et 35 °C.
-- Placez toujours le capot de protection sur le
rasoir afin de protéger les têtes de rasoir lorsque
vous êtes en voyage.
-- N’utilisez jamais de tampons à récurer, de produits
abrasifs ou de détergents agressifs tels que de
l’essence ou de l’acétone pour nettoyer l’appareil.
-- Utilisez exclusivement l’adaptateur fourni.
-- Si l’adaptateur est endommagé, remplacez-le
toujours par un adaptateur de même type pour
éviter tout accident.
-- Ne plongez jamais le Power Pod dans l’eau et ne
le rincez pas sous le robinet.
-- Ne plongez jamais le chargeur dans l’eau et ne le
rincez pas sous le robinet.
Conformité aux normes
-- Ce rasoir est conforme aux normes
internationales CEI et peut être nettoyé à l’eau en
toute sécurité.
-- Ces appareils Philips sont conformes à toutes les
normes relatives aux champs électromagnétiques
(CEM). Ils répondent aux règles de sécurité
établies sur la base des connaissances scientifiques
actuelles s’ils sont manipulés correctement et
conformément aux instructions de ce mode
d’emploi.
Français 25
Général
-- L’adaptateur transforme la tension de 100-240 V
en une tension de sécurité de moins de 24 V.
Aperçu (fig. 5)
A Coque de protection
B Unité de rasage
C Tondeuse
D Bouton coulissant marche/arrêt de la tondeuse
E Rasoir (RQ1090/RQ1062/RQ1060/RQ1052/
RQ1050)
F Bouton marche/arrêt du rasoir
G Afficheur
H Power Pod
I Brosse de nettoyage
J Adaptateur
K Petite fiche
L Chargeur
Afficheur
Avant d’utiliser le rasoir pour la première fois, retirez
le film de protection de l’afficheur.
Les cinq types de rasoir (RQ1090, RQ1062,
RQ1060, RQ1052 et RQ1050) possèdent des
afficheurs différents, illustrés sur les figures cidessous.
-- RQ1090
-- RQ1062/RQ1060
26
Français
-- RQ1052/RQ1050
Charge
-- La charge dure environ 1 heure.
-- Lorsque vous placez le rasoir sur le Power
Pod ou sur le chargeur, l’afficheur s’éteint
automatiquement au bout d’environ 5 heures.
RQ1090
-- Lorsque le rasoir est en charge, le nombre de
minutes et le symbole de la fiche clignotent.
-- Le nombre de minutes de rasage augmente
jusqu’à ce que le rasoir soit entièrement chargé.
RQ1062/RQ1060
-- Lorsque le rasoir est en charge, le symbole de la
fiche clignote.
-- Les flèches du niveau de charge inférieur
clignotent, puis celles du second niveau de charge,
et ainsi de suite jusqu’à ce que le rasoir soit
entièrement chargé.
RQ1052/RQ1050
-- Lorsque le rasoir est en charge, le symbole de la
batterie clignote en bleu.
Français 27
Batterie entièrement chargée
RQ1090
-- Lorsque la batterie est entièrement chargée, le
nombre de minutes apparaît sur l’afficheur et le
symbole de la fiche disparaît de l’afficheur.
RQ1062/RQ1060
-- Lorsque la batterie est entièrement chargée,
toutes les flèches et tous les témoins de niveau de
charge s’allument en bleu et restent allumés, et le
symbole de la fiche disparaît de l’afficheur.
-- Lorsque vous retirez le rasoir du Power Pod
ou du chargeur, les flèches du niveau de charge
supérieur s’allument en bleu pour indiquer que la
batterie est entièrement chargée.
RQ1052/RQ1050
-- Lorsque la batterie est entièrement chargée, le
symbole de la batterie s’allume en bleu et reste
allumé.
Batterie faible
RQ1090
-- Lorsque la batterie est presque vide (5 minutes
ou moins de rasage restantes), le nombre de
minutes et le symbole de la fiche se mettent à
clignoter.
28
Français
-- Lorsque vous éteignez le rasoir, le nombre de
minutes de rasage et le symbole de la fiche
continuent à clignoter pendant quelques secondes.
Vous entendez un bip lorsque le nombre de
minutes de rasage arrive à zéro.
RQ1062/RQ1060
-- Lorsque la batterie est presque vide (5 minutes
ou moins de rasage restantes), le symbole de la
batterie clignote en rouge et les flèches du niveau
de charge inférieur clignotent en bleu.
-- Lorsque vous éteignez le rasoir, le symbole de
la batterie et les flèches du niveau de charge
inférieur continuent à clignoter pendant quelques
secondes.
RQ1052/RQ1050
-- Lorsque la batterie est presque vide (5 minutes
ou moins de rasage restantes), le symbole de la
batterie s’allume en rouge.
-- Lorsque vous éteignez le rasoir, le symbole de
la batterie se met à clignoter pendant quelques
secondes.
Niveau de charge de la batterie
RQ1090
-- Le niveau de charge de la batterie est indiqué par
le nombre de minutes de rasage restantes figurant
sur l’afficheur.
RQ1062/RQ1060
-- Le niveau de charge de la batterie est indiqué
par les flèches clignotantes d’un niveau de charge
donné.
Français 29
Nettoyage du rasoir
Pour garantir des performances de rasage optimales,
nous vous recommandons de nettoyer le rasoir
après chaque utilisation.
-- Le symbole du robinet clignote pour vous
rappeler de nettoyer le rasoir.
Remarque : Les afficheurs des rasoirs de type
RQ1062, RQ1060, RQ1052 et RQ1050 se présentent
différemment, mais affichent les mêmes informations.
Remplacement de l’unité de rasage
Pour garantir des performances de rasage optimales,
nous vous recommandons de remplacer l’unité de
rasage tous les deux ans.
-- Pour vous rappeler de remplacer l’unité de
rasage, le symbole de l’unité de rasage clignote
(tous types) et vous entendez un bip lorsque
vous éteignez le rasoir (RQ1090 seulement). Ce
signal vous avertit au bout de 7 séances de rasage
successives que vous devez remplacer l’unité de
rasage.
Remarque : Les afficheurs des rasoirs de type
RQ1062, RQ1060, RQ1052 et RQ1050 se présentent
différemment, mais affichent les mêmes informations.
Système de verrouillage pour voyage
Vous pouvez verrouiller le rasoir si vous partez en
voyage. Le verrouillage empêche le rasoir de se
mettre en marche accidentellement.
30
Français
Activation du verrouillage
1 Appuyez sur le bouton marche/arrêt pendant
3 secondes pour activer le verrouillage.
,, Le symbole de la clé apparaît sur l’afficheur
(tous types) et vous entendez un bip (RQ1090
seulement), signalant que le verrouillage a été
activé.
Remarque : Les afficheurs des rasoirs de type
RQ1062, RQ1060, RQ1052 et RQ1050 se présentent
différemment, mais affichent les mêmes informations.
Désactivation du verrouillage
1 Maintenez enfoncé le bouton marche/arrêt
pendant 3 secondes.
,, Le moteur commence à fonctionner pour
indiquer que le verrouillage a été désactivé.
Le rasoir est de nouveau prêt à l’emploi.
Remarque : Lorsque vous placez le rasoir sur le Power
Pod ou sur le chargeur branché, le verrouillage est
automatiquement désactivé.
Têtes de rasage bloquées
-- Si les têtes de rasage sont bloquées, le symbole
de l’unité de rasage et le symbole du robinet avec
un point d’exclamation clignotent. Dans ce cas, le
moteur ne peut pas fonctionner car les têtes de
rasage sont sales ou endommagées.
Remarque : Les afficheurs des rasoirs de type
RQ1062, RQ1060, RQ1052 et RQ1050 se présentent
différemment, mais affichent les mêmes informations.
-- Vous devez alors nettoyer l’unité de rasage ou la
remplacer.
Français 31
-- Le symbole de l’unité de rasage et le symbole du
robinet avec un point d’exclamation continuent
de clignoter jusqu’à ce que vous déverrouilliez les
têtes de rasage.
Charge
La charge dure environ 1 heure.
Un rasoir entièrement chargé offre une autonomie
de rasage de 65 minutes, ce qui permet d’effectuer
environ 21 séances de rasage.
L’autonomie de rasage réelle est calculée par le
rasoir. Si vous avez une barbe fournie, l’autonomie
de rasage peut être inférieure à 65 minutes.
L’autonomie de rasage peut également varier au fil
du temps, selon votre style de rasage et votre type
de barbe.
Charge rapide
Après 5 minutes de charge, le rasoir est
suffisamment chargé pour une séance de rasage.
Charge à l’aide du Power Pod
1 Insérez la petite fiche dans le Power Pod.
2 Branchez l’adaptateur sur la prise secteur.
3 Tirez sur la partie supérieure du couvercle (1)
et retirez-le (2).
32
Français
4 Commencez par insérer la partie supérieure
du rasoir sur le Power Pod (1), puis exercez
une pression sur la partie inférieure pour la
positionner dans le Power Pod (2).
Remarque : Le rasoir ne doit pas être placé sur le
Power Pod tant que le capot de protection est installé
sur l’unité de rasage.
,, L’afficheur indique que le rasoir est en cours de
charge (voir la section « Afficheur »).
Charge à l’aide du chargeur
1 Insérez la petite fiche dans le chargeur.
2 Branchez l’adaptateur sur la prise secteur.
3 Placez le rasoir sur le chargeur. Appuyez
fermement sur le rasoir pour le positionner
sur le support.
Remarque : RQ1090 uniquement : si le rasoir est placé
correctement, vous entendrez un bip.
,, L’afficheur indique que le rasoir est en cours de
charge (voir la section « Afficheur »).
Utilisation du rasoir
Rasoir
1 Mettez le rasoir en marche en appuyant sur le
bouton marche/arrêt.
,, L’afficheur s’allume pendant quelques secondes.
Français 33
2 Déplacez les têtes de rasoir sur la peau en
effectuant des mouvements rectilignes et
circulaires.
-- Vous obtiendrez de meilleurs résultats de rasage
sur peau sèche.
-- Votre peau pourrait avoir besoin de 2 ou
3 semaines pour s’habituer au système de rasage
Philips.
3 Arrêtez le rasoir en appuyant sur le bouton
marche/arrêt.
,, L’afficheur s’allume pendant quelques secondes,
puis affiche le niveau de charge de la batterie
(RQ1090/RQ1062/RQ1060 uniquement).
Tondeuse
Vous pouvez utiliser la tondeuse pour tailler les
favoris et la moustache.
1 Détachez l’unité de rasage du rasoir.
2 Mettez le rasoir en marche en appuyant sur le
bouton marche/arrêt.
,, L’afficheur s’allume pendant quelques secondes.
3 Faites glisser le taquet vers l’avant pour
dégager la tondeuse.
4 Vous pouvez commencer à vous tailler les
favoris et la moustache.
5 Faites glisser le taquet vers l’arrière pour
replier la tondeuse.
6 Arrêtez le rasoir en appuyant sur le bouton
marche/arrêt.
,, L’afficheur s’allume pendant quelques secondes,
puis affiche le niveau de charge de la batterie
(RQ1090/RQ1062/RQ1060 uniquement).
34
Français
7 Insérez la languette de l’unité de rasage dans la
fente située sur la partie supérieure du rasoir
(1). Fixez ensuite l’unité de rasage sur le rasoir
en la faisant glisser vers le bas (2) (clic).
Nettoyage et entretien
N’utilisez jamais de tampons à récurer, de produits
abrasifs ou de détergents agressifs tels que de
l’essence ou de l’acétone pour nettoyer l’appareil.
-- Veillez à ce que l’eau ne soit pas trop chaude pour
ne pas vous brûler.
-- Pour garantir des performances de rasage
optimales, nettoyez le rasoir après chaque
utilisation.
-- Vous pouvez utiliser un chiffon humide pour
nettoyer l’extérieur du rasoir.
-- Nettoyez régulièrement l’appareil pour obtenir
des résultats de rasage optimaux.
Nettoyage de l’unité de rasage à l’eau
courante
1 Éteignez le rasoir.
2 Ouvrez les trois têtes de rasage une à une.
Français 35
3 Rincez à l’eau chaude les trois têtes de rasage
et les trois compartiments à poils pendant
30 secondes.
Veillez à ce que l’eau ne soit pas trop chaude pour
ne pas vous brûler.
4 Secouez les têtes de rasage pour en retirer
l’excès d’eau, puis laissez-les sécher à l’air libre
pour obtenir une unité de rasage parfaitement
sèche.
Ne séchez jamais l’unité de rasage à l’aide d’une
serviette au risque d’endommager les têtes de
rasoir.
,, Pour un nettoyage en profondeur, mettez le
rasoir en marche et plongez l’unité de rasage
dans une eau chaude et savonneuse pendant
30 secondes.Vous pouvez également utiliser de
l’alcool pour nettoyer l’unité de rasage.
Nettoyage de l’unité de rasage à l’aide de la
brosse fournie
1 Éteignez le rasoir.
2 Ouvrez les trois têtes de rasage une à une.
3 Nettoyez les têtes de rasage et les
compartiments à poils à l’aide de la brosse
fournie.
4 Fermez les têtes de rasage.
36
Français
Nettoyage de la tondeuse à l’aide de la
brosse fournie
Nettoyez la tondeuse après chaque utilisation.
1 Éteignez le rasoir.
2 Faites glisser le taquet vers l’avant pour
dégager la tondeuse.
3 Nettoyez la tondeuse avec le côté à poils
courts de la brosse fournie. Brossez les dents
de la tondeuse de haut en bas.
4 Mettez le rasoir en marche, arrêtez-le, puis
répétez l’étape 3.
5 Faites glisser le taquet vers l’arrière pour
replier la tondeuse.
Conseil : Pour garantir des performances de rasage
optimales, appliquez une goutte d’huile pour machine
à coudre sur la tondeuse sous les six mois.
Rangement
Le rasoir peut se ranger de deux manières lorsque
vous l’emportez avec vous en voyage :
-- Placez le rasoir sur le Power Pod ou sur le
chargeur. Assurez-vous que le capot de protection
n’est pas installé sur l’unité de rasage.
-- Faites glisser le capot de protection sur l’unité de
rasage pour éviter d’endommager les têtes de
rasage.
Remplacement
Remplacez l’unité de rasage lorsque le symbole
de l’unité de rasage apparaît sur l’afficheur.
Français 37
N’attendez pas pour remplacer une unité de rasage
endommagée.
Pour garantir des performances de rasage optimales,
nous vous recommandons de remplacer l’unité de
rasage tous les deux ans.
L’unité de rasage ne peut être remplacée que par
une unité de rasage arcitec RQ10 Philips.
1 Détachez l’ancienne unité de rasage du rasoir.
2 Insérez la languette de la nouvelle unité de
rasage dans la fente du rasoir prévue à cet effet
(1). Fixez ensuite l’unité de rasage sur le rasoir
en faisant glisser le taquet vers le bas (2) (clic).
Commande de pièces
Les pièces suivantes sont disponibles :
-- Adaptateur HQ8500
-- Unité de rasage arcitec RQ10 Philips
-- Spray Philips Shaving Head Cleaner HQ110 (non
disponible en Chine)
Environnement
-- Lorsqu’il ne fonctionnera plus, ne jetez pas
l’appareil avec les ordures ménagères, mais
déposez-le à un endroit assigné à cet effet, où il
pourra être recyclé. Vous contribuerez ainsi à la
protection de l’environnement.
-- La batterie intégrée contient des substances qui
peuvent nuire à l’environnement. Veillez à toujours
retirer la batterie avant de mettre le rasoir au
rebut ou de le déposer à un endroit assigné à
cet effet. Déposez la batterie usagée à un endroit
assigné à cet effet. Si vous n’arrivez pas à retirer la
38
Français
batterie, vous pouvez apporter l’appareil dans un
Centre Service Agréé Philips qui se chargera de
l’opération en veillant à le faire dans le respect de
l’environnement.
Mise au rebut de la batterie du rasoir
Retirez la batterie uniquement lorsque vous
mettez le rasoir au rebut. Assurez-vous que la
batterie est complètement déchargée lorsque vous
la jetez.
1 Retirez le rasoir du Power Pod ou du chargeur.
2 Laissez le rasoir fonctionner jusqu’à l’arrêt du
moteur.
3 Détachez l’unité de rasage du rasoir.
4 Dévissez les 2 vis à l’arrière du rasoir.
5 Pour ouvrir le rasoir, insérez un tournevis
entre le panneau avant et le panneau arrière.
6 Retirez les panneaux latéraux.
Français 39
7 Dévissez les 3 vis situées à l’intérieur du rasoir
et retirez la plaque de protection arrière.
8 Sortez les fils du bloc moteur et retirez la
batterie.
Soyez prudent car les languettes de la batterie sont
coupantes.
Ne replacez pas le rasoir sur le Power Pod ou sur
le chargeur après avoir retiré la batterie.
Garantie et service
Si vous souhaitez obtenir des informations
supplémentaires ou si vous rencontrez un
problème, visitez le site Web de Philips à l’adresse
www.philips.com ou contactez le Service
Consommateurs Philips de votre pays (vous
trouverez le numéro de téléphone correspondant
sur le dépliant de garantie internationale). S’il n’existe
pas de Service Consommateurs Philips dans votre
pays, renseignez-vous auprès de votre revendeur
Philips local ou contactez le « Service Department
of Philips Domestic Appliances and
Personal Care BV ».
Limites de la garantie
Étant susceptibles de s’user, les têtes de rasoir (lames
et grilles) ne sont pas couvertes par la garantie
internationale.
40
Français
Foire aux questions
1 Pourquoi les résultats de rasage ne sont-ils pas
aussi satisfaisants que d’habitude ?
-- Le rasoir n’est peut-être pas complètement
propre. Mettez le rasoir en marche et plongez
l’unité de rasage dans de l’eau chaude savonneuse
(voir le chapitre « Nettoyage et entretien »).
-- Les têtes de rasage sont peut-être endommagées
ou usées. Remplacez l’unité de rasage (voir le
chapitre « Remplacement »).
2 Pourquoi le rasoir ne fonctionne-t-il pas
lorsque j’appuie sur le bouton marche/arrêt ?
-- La batterie est peut-être vide. Rechargez la
batterie (voir le chapitre « Charge »).
-- Le verrouillage est peut-être activé. Appuyez sur
le bouton marche/arrêt pendant 3 secondes pour
désactiver le verrouillage.
-- L’unité de rasage est sale ou endommagée et
le moteur ne peut pas fonctionner. Dans ce cas,
le symbole de l’unité de rasage, le symbole du
robinet et le point d’exclamation clignotent. Dans
ce cas, nettoyez l’unité de rasage ou remplacez-la.
Plongez l’unité de rasage dans de l’eau chaude
savonneuse.
-- La température du rasoir est peut-être trop
élevée. Dans ce cas, le rasoir ne fonctionne pas et
le point d’exclamation clignote sur l’afficheur. Dès
que la température du rasoir est suffisamment
basse, vous pouvez rallumer le rasoir.
3 Pourquoi le rasoir n’est-il pas entièrement
chargé lorsqu’il vient d’être chargé à l’aide du
Power Pod/chargeur ?
Français 41
-- Vous n’avez peut-être pas placé le rasoir
correctement sur le Power Pod/chargeur. Assurezvous que le rasoir y est bien enclenché.
42
4222.002.5154.1