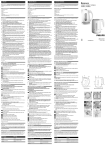
1
Toaster
HD2567
1
2
3
4
5
6
7
8
9
10
11
B
ENGLISH
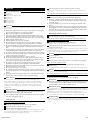
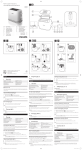
General description (fig. 1)
.
A Crumb tray
B Warming rack
C Dust cover (specific types only)
D Toasting lever
E Stop button
F Warming setting
G Defrost function
H Browning control
Important
.
Read these instructions for use carefully before using the appliance and save them for
future reference.
◗ Check if the voltage indicated on the bottom of the appliance corresponds to
the local mains voltage before you connect the appliance.
◗ Only connect the appliance to an earthed wall socket.
◗ If the mains cord is damaged, it must be replaced by Philips, a service centre
authorised by Philips or similarly qualified persons in order to avoid a hazard.
◗ Do not immerse the appliance or the mains cord in water or any other liquid.
◗ Always unplug the appliance after use.
◗ Keep the appliance out of the reach of children.
◗ Do not let the mains cord hang over the edge of the table or worktop on
which the appliance is standing and keep the cord away from hot surfaces.
◗ Do not let the appliance operate unattended. Do not operate it under or near
curtains or other flammable materials or under wall cabinets, as bread may
burn.
◗ Avoid touching the metal parts of the toaster as they become very hot during
toasting. Only touch the controls and lift the appliance by its plastic body.
◗ The toaster is intended for household use only and may only be used indoors.
◗ To avoid the risk of fire, frequently remove crumbs from the crumb tray. Make
sure the crumb tray is correctly placed.
◗ Immediately unplug the toaster if fire or smoke is observed.
◗ If a slice of bread gets stuck inside the toaster, unplug the appliance and let it
cool down before trying to remove the bread. Do not use a knife or a sharp
tool, as these may cause damage to the heating elements.
◗ The appliance is only meant for toasting bread. Do not put any other
ingredients in the appliance, as this may lead to a hazardous situation.
◗ Oversized foods and metal foil packages must not be inserted into the toaster,
as this may cause fire or electric shock.
◗ Do not place the toaster on a hot surface.
◗ The warming rack is only intended for warming up rolls or croissants. Do not
put any other ingredients on the warming rack, as this may lead to a hazardous
situation.
◗ Specific types only: Do not place the dust cover on top of the toaster when it
is switched on or when it is still hot, as this could lead to damage.
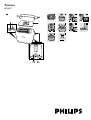
Before first use
The metal parts of the toaster will get hot during toasting. Be careful not to touch
them.
5 When the toast is ready, it pops up and the toaster switches off.
◗ The toaster will switch off automatically. You can stop the toasting process
and pop the bread up at any time by pressing the stop button on the side of
the toaster (fig. 6).
◗ To remove smaller items, you can move the toasting lever upwards a little
further.
◗ If bread gets stuck inside the toaster, remove the plug from the wall socket,
let the appliance cool down completely and carefully remove the bread from
the toaster. Do not use a knife or another sharp metal tool to do this and do
not touch the metal internal parts of the toaster.
Warming up rolls and croissants
1 Place the warming rack on top of the toaster (fig. 7).
Never put the rolls to be heated up directly on top of the toaster without the
warming rack to avoid damaging the toaster.
2 Put the rolls or croissants on top of the warming rack.
Do not warm up more than 2 items at a time.
3 (1)Turn the browning control to the warming setting (¬) and (2) push the
toasting lever down (fig. 8).
If you want to warm the rolls or croissants on both sides, turn them after the toaster
has switched itself off. Leave the browning control on the warming setting (¬) and
switch the toaster on again by pushing the toasting lever down.
Cleaning
.
1 Unplug the appliance.
2 Let the appliance cool down.
3 Clean the appliance with a damp cloth. Do not use abrasive cleaning agents.
Never immerse the appliance in water.
4 Remove crumbs from the appliance by sliding the crumb tray out of the
appliance (fig. 9).
Do not hold the appliance upside down and do not shake it to remove the crumbs.
Storage
.
Placing the dust cover (specific ypes only).
Do not place the dust cover on top of the toaster when it is switched on or when
it is still hot, as this could lead to damage.
◗ Place the dust cover on top of the toaster after use (fig. 10).
.
Remove any stickers and wipe the body of the toaster with a damp cloth.
Before using the appliance for the first time, we advise you to let the appliance
complete a few toasting cycles without slices of bread on the highest browning
setting in a properly ventilated room. This will burn off any dust that may have
accumulated on the heating elements and will prevent unpleasant smells when
toasting bread.
Using the appliance
4 Push the toasting lever down to switch the appliance on (fig. 5).
The toasting lever will only stay down if the appliance has been connected to the
mains.
.
1 Put the appliance on a stable and flat surface, away from curtains and other
combustible materials. Put the plug in the wall socket.
◗ You can adjust the length of the cord by winding part of it round the brackets
in the base of the appliance (fig. 2).
Toasting bread
Never let the toaster operate unattended.
Environment
.
◗ Do not throw the appliance away with the normal household waste at the end
of its life, but hand it in at an official collection point for recycling. By doing
this you will help to preserve the environment (fig. 11).
Guarantee & service
.
If you need information or if you have a problem, please visit the Philips website at
www.philips.com or contact the Philips Customer Care Centre in your country (you
will find its phone number in the worldwide guarantee leaflet). If there is no
Customer Care Centre in your country, turn to your local Philips dealer or contact
the Service Department of Philips Domestic Appliances and Personal Care BV.
Troubleshooting
.
If problems should arise with your toaster and you are unable to solve them by
means of the information below, contact the Philips Customer Care Centre in your
country.
1 Specific types only: Remove the dust cover from the appliance.
2 Put one or two slices of bread in the toaster (fig. 3).
3 Select the desired browning setting (fig. 4).
Select a low setting (1-2) for lightly toasted bread and a high setting (5-7) for darkly
toasted bread. Select the defrost function — (settings 6 to 7, depending on the
desired browning degree) for toasting frozen bread.
4222.200.0001.1
2/13
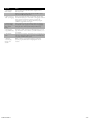
Problem
Solution
1. The toaster does Check if the plug has been properly inserted into the wall
not work.
socket.
If the toaster still does not work, take it to a service centre
authorised by Philips for examination.
2. Bread gets stuck
in the appliance.
Unplug the appliance and let it cool down. Carefully remove
the slice or slices from the toaster. Take care not to damage
the heating elements while removing the slice or slices of
bread. Never use a metal object for this purpose.
3. The toast is too
dark/too light.
Check the browning setting selected for toasting. Select a
lower setting next time if your toast is too dark and a higher
setting if your toast is too light.
4. Smoke comes
out of the toaster.
You have selected a too high setting for the type of bread
inserted. Press the stop button to stop the toasting process.
5. The mains cord
is damaged.
If the mains cord of this appliance is damaged, it must always
be replaced by Philips, a service centre authorised by Philips or
similarly qualified persons in order to avoid a hazard.
6. Only one side of Turn your roll or croissant over and warm it up again. Follow
my roll or croissant the instructions in section 'Warming up rolls and croissants'.
is warm.
4222.200.0001.1
3/13
Toasten
DEUTSCH
Übersicht (Abb.1)
Lassen Sie das eingeschaltete Gerät niemals unbeaufsichtigt.
.
A Krümelschublade
B Brötchenaufsatz
C Staubabdeckung (Nur bestimmte Gerätetypen)
D Schiebeschalter
E Stopptaste
E Aufbackeinstellung
G Auftaufunktion
H Röstgradkontrolle
Wichtig
.
Lesen Sie diese Bedienungsanleitung vor dem ersten Gebrauch des Geräts sorgfältig
durch, und bewahren Sie sie für eine spätere Verwendung auf.
◗ Prüfen Sie vor Inbetriebnahme, ob die Spannungsangabe auf der Unterseite des
Geräts mit der örtlichen Netzspannung übereinstimmt.
◗ Schließen Sie das Gerät nur an eine geerdete Steckdose an.
◗ Wenn das Netzkabel defekt oder beschädigt ist, darf es nur von einem Philips
Service-Center oder einer von Philips autorisierten Werkstatt durch ein
Original-Ersatzkabel ausgetauscht werden, um Gefährdungen zu vermeiden.
◗ Tauchen Sie das Gerät und das Netzkabel nicht in Wasser oder andere
Flüssigkeiten.
◗ Ziehen Sie nach jedem Gebrauch den Netzstecker aus der Steckdose.
◗ Halten Sie das Gerät außerhalb der Reichweite von Kindern.
◗ Lassen Sie das Netzkabel nicht über die Kante der Tisch- oder Arbeitsplatte
hängen, auf der das Gerät steht. Achten Sie darauf, dass das Netzkabel nicht in
Berührung mit heißen Oberflächen kommt.
◗ Lassen Sie das eingeschaltete Gerät nicht unbeaufsichtigt. Verwenden Sie es
nicht unter Wandschränken oder in der Nähe von Gardinen oder anderen
leicht brennbaren Materialien, da Brot in Brand geraten kann.
◗ Vermeiden Sie jede Berührung mit den Metallteilen des Geräts, da diese beim
Toasten sehr heiß werden. Berühren Sie nur die Tasten und Griffe, und heben
Sie das Gerät am Kunststoffgehäuse an.
◗ Der Toaster ist ausschließlich für den häuslichen Gebrauch vorgesehen und
darf nicht im Freien verwendet werden.
◗ Brotkrümel sollten regelmäßig aus der Krümelschublade entfernt werden, um
das Risiko eines Brandes zu vermeiden. Achten Sie darauf, die
Krümelschublade wieder richtig in das Gerät zu schieben.
◗ Ziehen Sie sofort den Netzstecker aus der Steckdose, wenn Sie Rauch oder
Feuer bemerken.
◗ Wenn eine Scheibe Brot im Toaster klemmt: Ziehen Sie den Netzstecker aus
der Steckdose und lassen Sie das Gerät völlig abkühlen. Entfernen Sie dann das
eingeklemmte Brot aus dem Toaster. Verwenden Sie hierzu keine Teile aus
Metall, weil dies die Heizelemente des Toasters beschädigen könnte.
◗ Verwenden Sie dieses Gerät ausschließlich zum Toasten von Brot. Bei anderem
Toastgut könnte es zu Brand, Stromschlag und anderen Unfällen kommen.
◗ Übergroße Brotscheiben und Verpackungen aus Metallfolie dürfen nicht in den
Toaster eingeführt werden, da dies zu Bränden und Stromschlägen führen
kann.
◗ Stellen Sie den Toaster nicht auf heiße Flächen.
◗ Der Brötchenaufsatz ist nur zum Aufbacken von Brötchen und Croissants
vorgesehen. Legen Sie keine anderen Lebensmittel auf den Brötchenaufsatz, da
dies zu Brand und Geräteschaden führen kann.
◗ Nur bestimmte Gerätetypen: Setzen Sie die Staubabdeckung nicht auf den
Toaster, solange das Gerät eingeschaltet oder noch heiß ist, da dies zu
Beschädigungen führen könnte.
Vor dem ersten Gebrauch
1 Nur bestimmte Gerätetypen: Entfernen Sie die Staubabdeckung vom Gerät.
2 Geben Sie eine oder zwei Scheiben Brot in den Toaster (Abb. 3).
3 Stellen Sie den gewünschten Röstgrad ein (Abb. 4).
Wählen Sie eine niedrige Einstellung (1 - 2) für hellen Toast und eine hohe
Einstellung (5 - 7) für dunkelbraunen Toast. Wählen Sie die Auftaufunktion —
(Einstellung 6 oder 7, je nach gewünschtem Röstgrad) zum Toasten von gefrorenem
Brot.
4 Drücken Sie den Schiebeschalter nach unten, um das Gerät einzuschalten
(Abb. 5).
Nur wenn das Gerät an das Stromnetz angeschlossen ist, rastet der Schiebeschalter
in der unteren Position ein.
Die Metallteile werden während des Toastens heiß. Vermeiden Sie jede
Berührung.
5 Wenn der Toast fertig ist, wird er ausgeworfen, und der Toaster schaltet sich
aus.
◗ Der Toaster schaltet sich automatisch aus. Sie können den Toastvorgang
jederzeit abbrechen, indem Sie die Stopptaste an der Seite des Toasters
drücken. Das Brot wird sofort ausgeworfen (Abb. 6).
◗ Zum Entnehmen von kleinen Brotscheiben können Sie den Schiebeschalter
etwas weiter nach oben heben.
◗ Wenn eine Scheibe Brot im Toaster zerbrochen ist und klemmt, ziehen Sie
den Netzstecker aus der Steckdose und lassen Sie das Gerät vollständig
abkühlen. Entfernen Sie dann vorsichtig das eingeklemmte Brot aus dem
Toaster. Verwenden Sie hierzu kein Messer oder andere scharfe Teile aus
Metall, und vermeiden Sie jede Berührung mit den inneren Metallteilen des
Toasters.
Brötchen und Croissants aufbacken
1 Setzen Sie den Brötchenaufsatz fest auf den Toaster (Abb. 7).
Legen Sie niemals Brötchen ohne den Brötchenaufsatz auf den Toaster, da
andernfalls das Gerät beschädigt werden kann.
2 Legen Sie die Brötchen/Croissants auf den Brötchenaufsatz.
Wärmen Sie nicht mehr als 2 Brötchen/Croissants gleichzeitig auf.
3 (1) Stellen Sie den Röstgrad auf die Aufbackeinstellung (¬), und (2) drücken
Sie den Schiebeschalter nach unten (Abb. 8).
Wenn Sie Brötchen oder Croissants von beiden Seiten aufbacken möchten, wenden Sie
sie, nachdem sich der Toaster ausgeschaltet hat. Ändern Sie die Aufbackeinstellung
(¬) nicht, und schalten Sie das Gerät durch Drücken des Schiebeschalters wieder ein.
Reinigung
.
1 Ziehen Sie den Netzstecker aus der Steckdose.
2 Lassen Sie das Gerät vollständig abkühlen.
3 Reinigen Sie das Gerät mit einem feuchten Tuch. Verwenden Sie keine
Scheuermittel.
Tauchen Sie das Gerät niemals in Wasser!
4 Entfernen Sie die Brotkrümel, indem Sie die Krümelschublade aus dem Gerät
herausziehen (Abb. 9).
Schütteln Sie die Brotkrümel nicht aus dem umgekehrt gehaltenen Gerät.
.
Entfernen Sie alle Aufkleber, und reinigen Sie das Gehäuse des Toasters mit einem
feuchten Tuch.
Vor dem ersten Gebrauch des Geräts empfiehlt es sich, den Toaster in einem gut
belüfteten Raum mehrmals ohne Brot auf der höchsten Röststufe zu betreiben.
Dadurch werden Staubpartikel verbrannt, die sich möglicherweise auf den
Heizelementen angesammelt haben und einen unangenehmen Geruch beim Toasten
von Brot verursachen können.
Das Gerät verwenden
.
1 Stellen Sie den Toaster auf eine stabile, ebene Fläche. Achten Sie auf
ausreichende Entfernung zu Gardinen und anderen leicht brennbaren
Materialien. Stecken Sie den Netzstecker in die Steckdose.
Aufbewahrung
.
Aufsetzen der Staubabdeckung (nur bestimmte Gerätetypen).
Setzen Sie die Staubabdeckung nicht auf den Toaster, solange das Gerät
eingeschaltet oder noch heiß ist, da dies zu Beschädigungen führen könnte.
◗ Setzen Sie die Staubabdeckung auf den Toaster, nachdem Sie ihn benutzt
haben (Abb. 10).
Umweltschutz
.
◗ Werfen Sie das Gerät am Ende der Lebensdauer nicht in den normalen
Hausmüll. Bringen Sie es zum Recycling zu einer offiziellen Sammelstelle. Auf
diese Weise helfen Sie, die Umwelt zu schonen (Abb. 11).
Garantie und Kundendienst
.
◗ Überschüssiges Netzkabel lässt sich um die Vorsprünge an der Unterseite des
Geräts aufwickeln (Abb. 2).
4222.200.0001.1
Benötigen Sie weitere Informationen oder treten Probleme auf, wenden Sie sich
4/13
bitte an Ihren Philips-Händler oder setzen Sie sich mit einem Philips Service-Center
in Ihrem Land in Verbindung (Tel. Nr. 0180/5356767). Besuchen Sie auch die Philips
Website (www.philips.com).
Fehlerbehebung
.
Sollten Sie mit Ihrem Toaster Probleme haben, die sich mithilfe der nachstehenden
Informationen nicht beheben lassen, wenden Sie sich bitte an das Philips ServiceCenter in Ihrem Land.
Problem
Lösung
1. Der Toaster
funktioniert nicht.
Überprüfen Sie, ob der Netzstecker richtig in der Steckdose
sitzt.
Wenn der Toaster dann immer noch nicht funktioniert, sollten
Sie ihn von einem Philips Service Center überprüfen lassen.
2. Brot bleibt im
Gerät stecken.
Ziehen Sie den Stecker aus der Steckdose, und lassen Sie das
Gerät abkühlen. Entfernen Sie die Brotscheibe(n) vorsichtig
aus dem Toaster. Achten Sie darauf, die Heizelemente nicht
zu beschädigen. Verwenden Sie zu diesem Zweck keine
Gegenstände aus Metall.
3. Der Toast ist zu Überprüfen Sie die gewählte Röstgradeinstellung. Wählen Sie
dunkel bzw. zu hell. beim nächsten Mal einen niedrigeren Röstgrad, wenn der
Toast zu dunkel ist, bzw. einen höheren Röstgrad, wenn der
Toast zu hell ist.
4. Aus dem Toaster Sie haben einen zu hohen Röstgrad für die betreffende
tritt Rauch aus.
Brotsorte gewählt. Drücken Sie die Stopptaste, um den
Toastvorgang abzubrechen.
5. Das Netzkabel ist Ist das Netzkabel defekt, darf es nur von einem Philips Servicebeschädigt.
Center oder einer von Philips autorisierten Werkstatt durch
ein Original-Ersatzkabel ausgetauscht werden, um ein
Sicherheitsrisiko zu vermeiden.
Wenden Sie das Brötchen bzw. Croissant, und backen Sie es
6. Nur eine Seite
erneut auf. Befolgen Sie die Anleitungen im Abschnitt
des Brötchens/
Croissants ist warm. "Brötchen und Croissants aufbacken".
4222.200.0001.1
5/13
Pilih setelan rendah (1-2) untuk roti panggang ringan dan setelan tinggi (5-7) untuk
roti panggang yang agak hangus. Pilih fungsi defrost — (setelan 6 hingga 7,
tergantung tingkat kecokelatan yang dikehendaki) untuk memanggang roti beku.
INDONESIA
Keterangan umum (gbr. 1)
.
4 Tekan tuas panggang ke bawah untuk menghidupkan pemanggang (gbr. 5).
Tuas panggang hanya akan tetap tertekan apabila alat sudah tersambung ke listrik.
A Baki serpihan
B Rak penghangat
C Pelindung debu (hanya tipe tertentu)
D Tuas panggang
E Tombol Stop
F Setelan hangat
G Fungsi Defrost [mencairkan]
H Kontrol Browning [Kematangan]
Ketika memanggang, bagian logam pada pemanggang akan panas. Hati-hati jangan
sampai menyentuhnya.
5 Setelah matang, roti akan keluar sendiri dan pemanggang pun mati.
Penting
.
Bacalah petunjuk penggunaan ini dengan saksama sebelum menggunakan alat dan
simpanlah untuk referensi jika dibutuhkan kelak.
◗ Sebelum menghubungkan alat, periksa apakah tegangan listrik (voltase) yang
ditunjukkan pada alat sesuai dengan tegangan listrik setempat.
◗ Alat hanya boleh dihubungkan ke stopkontak yang memiliki arde.
◗ Jika kabel listrik rusak, maka harus diganti oleh Philips, pusat servis resmi Philips
atau orang yang mempunyai keahlian sejenis agar terhindar dari bahaya.
◗ Jangan merendam alat ini atau alasnya dalam air atau cairan lain.
◗ Selalu mencabut steker setiap kali selesai menggunakan alat.
◗ Jauhkan alat dari jangkauan anak.anak.
◗ Kabel listrik jangan sampai menjuntai dari meja atau dari tempat pemanggang
ditaruh dan jauhkan kabel dari permukaan yang panas.
◗ Jangan meninggalkan alat yang sedang dioperasikan tanpa ada yang mengawasi.
Jangan menggunakan alat di bawah atau di dekat gorden atau bahan lain yang
mudah terbakar atau di bawah lemari gantung, karena roti bisa terbakar.
◗ Jangan menyentuh bagian logam pada pemanggang karena sangat panas pada
saat digunakan. Hanya sentuh kontrolnya dan angkat pemanggang pada bagian
plastiknya.
◗ Pemanggang digunakan hanya untuk kebutuhan rumah tangga dan hanya boleh
dipakai di dalam rumah.
◗ Untuk menghindari kebakaran, baki harus sering dibersihkan dari serpihan
makanan. Pastikan baki penampung serpihan dipasang dengan benar.
◗ Segera cabut pemanggang apabila timbul api atau asap.
◗ Apabila sekerat roti menempel di dalam pemanggang, cabut pemanggang lalu
biarkan dingin sebelum roti dikeluarkan. Jangan menggunakan pisau atau alat
yang tajam, karena akan merusak elemen-elemen pemanas.
◗ Alat ini hanya untuk memanggang roti. Jangan masukkan bahan-bahan lain ke
dalam pemanggang, karena dapat membahayakan.
◗ Jangan memasukkan makanan yang terlalu besar dan yang dibungkus kertas foil
ke dalam pemanggang, karena dapat menyebabkan kebakaran atau kejutan
listrik.
◗ Jangan menyimpan pemanggang pada permukaan yang panas.
◗ Rak penghangat hanya untuk menghangatkan roll atau croissant. Jangan
menyimpan bahan-bahan lain di rak penghangat ini, karena bisa menimbulkan
bahaya.
◗ Hanya tipe tertentu: Jangan menaruh pelindung debu di atas pemanggang pada
saat menyala atau masih panas, karena bisa menimbulkan kerusakan.
Sebelum menggunakan alat pertama kali.
.
Cabut semua stiker dan lap permukaan pemanggang dengan kain lembab.
Sebelum pertama kali menggunakan pemanggang, sebaiknya lakukan beberapa kali
pembakaran tanpa diisi roti dengan setelan browning paling tinggi di ruangan yang
berventilasi cukup memadai. Cara ini akan menghilangkan semua debu yang
menempel di elemen-elemen pemanas serta mencegah timbulnya bau tak sedap saat
memanggang roti.
Menggunakan alat
.
1 Tempatkan pemanggang pada permukaan yang stabil dan rata, jauh dari gorden
dan bahan lain yang mudah terbakar. Pasang steker ke stopkontak.
◗ Panjang kabel dapat diatur dengan menggulungnya sebagian ke kaitan di bawah
pemanggang (gbr. 2).
Memanggang roti
Jangan sekali-kali mengoperasikan pemanggang tanpa diawasi.
◗ Pemanggang secara otomatis akan mati. Anda dapat menghentikan proses
memanggang dan mengangkat roti kapan saja dengan cara menekan tombol
stop di samping pemanggang (gbr. 6).
◗ Untuk membersihkan serpihan, Anda dapat menggerakkan tuas panggang lebih
ke atas.
◗ Apabila roti menempel di dalam pemanggang, cabut steker dari stopkontak,
biarkan pemanggang benar-benar dingin lalu keluarkan roti dengan hati-hati.
Untuk mengeluarkannya jangan menggunakan pisau atau alat tajam lainnya dan
jangan menyentuh logam di bagian dalam pemanggang.
Memanaskan roll dan croissant
1 Tempatkan rak penghangat di bagian atas pemanggang (gbr. 7).
Agar pemanggang tidak rusak, jangan sekali-kali menaruh roll yang akan dipanaskan
langsung di atas pemanggang tanpa menggunakan rak penghangat.
2 Taruh roll atau croissant di atas rak penghangat.
Jangan menghangatkan lebih dari 2 potong makanan setiap kali.
3 (1) Putar kontrol browning ke setelan hangat (¬) dan (2) tekan tuas
panggang ke bawah (gbr. 8).
Jika Anda ingin menghangatkan roll dan croissant bolak-balik, balikkan makanan
setelah pemanggang mati sendiri. Biarkan kontrol browning [kematangan] pada
setelan hangat (¬) kemudian hidupkan kembali pemanggang dengan menekan tuas
panggang ke bawah.
Membersihkan
.
1 Cabut steker alat dari listrik.
2 Biarkan alat mendingin.
3 Bersihkan pemanggang dengan kain lembab. Jangan menggunakan bahan
pembersih yang keras.
Jangan merendam alat di dalam air.
4 Bersihkan serpihan makanan dengan menyorong baki serpihan keluar alat (gbr.
9).
Jangan membalikkan pemanggang atau mengguncangnya untuk mengeluarkan
serpihan.
Penyimpanan
.
Memasang pelindung debu (hanya tipe tertentu)
Jangan menaruh pelindung debu di atas pemanggang pada saat menyala atau masih
panas, karena bisa menimbulkan kerusakan.
◗ Taruh pelindung debu di bagian atas pemanggang setelah selesai menggunakan.
(gbr. 10).
Lingkungan
.
◗ Jangan membuang alat bersama limbah rumah tangga biasa jika alat sudah tidak
bisa dipakai lagi, tetapi serahkan ke tempat pengumpulan barang bekas yang
resmi untuk didaur ulang. Dengan melakukan hal ini, Anda ikut membantu
melestarikan lingkungan (gbr. 11).
Garansi & servis
.
Jika Anda memerlukan informasi atau mengalami masalah, silakan kunjungi situs web
Philips di www.philips.com atau hubungi Pusat Layanan Pelanggan Philips di negara
Anda (Anda dapat memperoleh nomor teleponnya dalam leaflet garansi yang berlaku
di seluruh dunia). Jika tidak ada Pusat Layanan Pelanggan di negara Anda, silakan
datang ke dealer Philips setempat atau hubungi Bagian Servis dari Philips Domestic
Appliances and Personal Care BV.
Mengatasi Masalah
.
1 Bukalah tutup pelindung dari alat (hanya tipe tertentu).
2 Masukkan satu atau dua kerat roti ke dalam pemanggang (gbr. 3).
3 Pilih setelan browning yang dikehendaki (gbr. 4).
4222.200.0001.1
Jika timbul masalah pada pemanggang dan Anda tidak dapat menyelesaikannya
dengan mengikuti petunjuk di bawah ini, hubungi Pusat Layanan Pelanggan Philips di
negara Anda.
6/13
Masalah
Solusi
1. Pemanggang
tidak bekerja.
Periksa apakah steker telah dimasukkan dengan benar ke
dalam stopkontak.
Apabila pemanggang tetap tidak bekerja, bawalah ke pusat
servis resmi Philips untuk diperiksa.
2. Roti menempel Cabut pemanggang lalu biarkan sampai dingin. Dengan hatidalam pemanggang. hati, keluarkan potongan roti dari dalam pemanggang. Hati-hati
jangan sampai merusak elemen-elemen pemanas saat
mengeluarkan potongan roti. Untuk melakukannya jangan
sekali-kali menggunakan benda logam.
3. Hasil panggang
warnanya terlalu
gelap/ terlalu
terang.
Periksa setelan browning [kematangan] untuk memanggang.
Lain kali, pilih setelan yang lebih rendah jika hasil panggangan
terlalu gelap atau naikkan apabila hasilnya terlalu terang.
4. Pemanggang
Anda telah memilih setelan yang terlalu tinggi untuk jenis roti
mengeluarkan asap. yang dimasukkan. Tekan tombol stop untuk mematikan proses
memanggang.
5. Kabel listrik
rusak.
Agar tidak membahayakan, kabel listrik pada pemanggang yang
rusak harus diganti oleh Philips, pusat servis resmi Philips atau
orang yang memiliki keahlian sejenis.
6. Roll atau
croissant yang
hangat cuma
sebelah.
Balikkan roll atau croissant lalu hangatkan kembali. Ikuti
petunjuk yang diuraikan dalam 'Menghangatkan roll dan
croissant'.
4222.200.0001.1
7/13
$22$!2
24 ->!2: 2;
ü28ü'(üM%
< $
!",-'-./%0
ü ( 1).
A 1 ü*$+!2:
->!2: (0 7).
B C ( !")
D $%&
2;
$
2 %
->!2: %2;2ü*$+!2: 1
ü%$%
E '&
2 "
.+
F "(')*+'
7$2+ 2 .+" 2/&2
G ,-.//&0"1
3 (1) +2
+2
2$ + (¬) (2) %!2: (0 8).
H $2!$$2'/3!
@@ '@%/'3$2H$65" 2 5 /!5'/B$3< /&B"
2$2!$7'5&I"' (¬) /52$3<$"%&$%&$3</
.
$2$*34 .5" '5/& .5(6 /1!$*3"725 .55+ )&'/
◗
ü.1.
1 5 &
üü !
"#
$ ◗
◗
2 %$
%6 ü% &!ü%'%% (
3 *
2ü
%8+3($24 $2ü*
2ü2PQ'R
)ü%$ '*+ü%$% $*' %ü%$ ',- 'ü.
$/0%.'( $+
(%', 1$ %
%'!#(
◗
◗
◗
◗
$2+2
3(
4 */,!2:% 5/,!2:
(0 9).
2
*
$ü%+2 3($!$ 4
5 &+
($ '
'5$24$3</ /&
'@B$3
6
$126
2 3 .
2
%$ü%$% 2!7$!1(
(%0 %$ü%%0 1(8'ü!
◗
% %$
*%22
+20 2
$ 82,5+4
$0'8 1!2: +$2
◗
2;
ü28üü< $!
1
2!)* $ü28
ü ( !").
2
ü-A+
!)
* *$
%%0 1*$
ü%
◗
ü-A+
2 ' (0 10).
ü=1+2
+2 %
%=1'(ü<1 ü'(
◗
◗
◗
◗
4- .!ü%'1-.
->!2:$2ü*$
( =1(
1$ %'1 '$2 /,!2:5'(+
( 5!'2$50
$12 +$2 $'
5 &
◗
$2'(
2!%
2
$2%+ '( 5!%ü*$
* $2 ("
' ) 1%,üMü' 2 (0 11).
$!2:'%0
-> $5 & $%6!2:( 2
2$
5+2
2 1*$'(ü*
2ü%
◗
◗
◗
◗
. "'-. .
=1->!2:;( 2
*%!
1$'%
'$(K''35!5*/ %5.21!7H6,/+ü675 www.philips.com
2
*$ $$$+2%8% .2!$?'ü ->!2:
'3+*&6!+*//*$5!+
,/+ü6 $( ('&/%6*&6!+L &* ü:
1*$'$2$ !&2!!2%/) ' $(7*&6!+ %+2B4'&:/+)(M6!+
2
->!2:')2
2
,/+ü6 '3+:!+!+
Philips Domestic Appliances and Personal Care BV
+!2:=1+; ;4 "
.
2
*%(1$'%
◗
' +56.
=1+(: 2
ü-A+
!)
* *$
%%0
'K'+C"!$3<$( /$(7ü .@2+A 2+A'C5/"57K'/275
1*$
ü%
%+*&6!+/*$5,/+ü6 $(
!"#$%"&%'
.
/ü+962$3 / .5:5.!0"'; .14$2ü
+56
7 ' +56
1. $3<74
* '@ B2ü&!/9!5ü&!+:/52
$"+ .5 $($2/<%&7( 2-3 ! '@& %&/3
5$3<&74 '54$372Bü!*&6!+75
!KB!+
,/+ü6
!$2'/3!ü*ü 2+A"B4B:B+&*!.+"ü24$25 /.2&B
/+7Cü$63<7
2. +&* $3
/9$3 /52 '5$3&1/ $&; B$3
(2& '5.+"ü24$25ü&'& /'5 .52
I%/' "
3. &+7 /
5&+7
2B*!$2'/3! </3725 5&7 '5/
!/3/ 5&5&+7 '5!!ü*C"
4. $2B$3
$(/3$725ü*+7ü4'!.+" '5'&43'&<
5. ü&7,.4
'ü&7,.4 $247/&!+
,/+ü6, *&6!+!75!K
'3!$$/75!"B,/+ü6 3@+&
6. %//$
2H$65&5&2
/!%//$2H$6!$" *$44 ! "%//$2H$6"
#$(%".
1 ->1(8'% %$$82 5+4 ü% &!ü%
◗
ü25
2%!ü%%1ü%ü4 !(%0C!
(0 2).
)*%"+%
2;
;%$
->!2:* %2;2
+20
1
=1+(: 5-A+
.
2 ü!2: 1-2 8; ->!2: (0 3).
3 2$ (0 4).
/3$254 (1-2) ü4'!&5& /$25ü* (5-7) ü4'!& /3,-.
//&0"1 — ($ 6 C 7 C"!!$2'/3!5) ü4'!<.1
4 %!2: 1$
'2* (0 5).
$%&B&*@/ü 3+ .5
ü< $!
2!)
* 2$ü28üü(
5 2
->!2:ü6 !2:!#(212
-*
◗
->!2:-*2' +)ü25$%+-> *!2:
+2
%+2$%+*!!
(0 6).
◗ 2*!2:'( 62
+)1%%
%!#( 6%
◗ 5!2:'
$5 &ü%'8 $
%6 %4 *!2:
4222.200.0001.1
8/13
A
B
C
D
E
F
G
H
—
◗
◗
◗
◗
◗
◗
◗
◗
◗
◗
◗
¬
◗
¬
◗
◗
◗
◗
◗
◗
◗
◗
◗
◗
◗
◗
4222.200.0001.1
9/13
2007/04/17
4222.200.0001.1
10/13
◗
◗
A
B
C
D
E
F
G
H
¬
◗
◗
◗
¬
◗
◗
◗
◗
◗
◗
◗
◗
◗
◗
◗
◗
◗
◗
◗
◗
◗
◗
—
◗
4222.200.0001.1
11/13
—
A
B
C
D
E
F
G
H
◗
◗
◗
◗
◗
◗
◗
◗
◗
◗
¬
◗
¬
◗
◗
◗
◗
◗
◗
◗
◗
◗
◗
◗
◗
◗
4222.200.0001.1
12/13
4222.200.0001.1
13/13