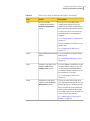
1
Altiris™ Deployment Solution
7.1 SP1a MR1 from
Symantec™ User Guide
Altiris™ Deployment Solution 7.1 SP1a from Symantec™
User Guide
The software described in this book is furnished under a license agreement and may be used
only in accordance with the terms of the agreement.
Legal Notice
Copyright © 2011 Symantec Corporation. All rights reserved.
Symantec and the Symantec Logo, Altiris, and any Altiris or Symantec trademarks are
trademarks or registered trademarks of Symantec Corporation or its affiliates in the U.S.
and other countries. Other names may be trademarks of their respective owners.
This Symantec product may contain third party software for which Symantec is required
to provide attribution to the third party (“Third Party Programs”). Some of the Third Party
Programs are available under open source or free software licenses. The License Agreement
accompanying the Software does not alter any rights or obligations you may have under
those open source or free software licenses. Please see the Third Party Legal Notice Appendix
to this Documentation or TPIP ReadMe File accompanying this Symantec product for more
information on the Third Party Programs.
See “Altiris™ Deployment Solution 7.1 SP1a MR1 from Symantec™ Third-Party Legal Notices”
on page 137.
The product described in this document is distributed under licenses restricting its use,
copying, distribution, and decompilation/reverse engineering. No part of this document
may be reproduced in any form by any means without prior written authorization of
Symantec Corporation and its licensors, if any.
THE DOCUMENTATION IS PROVIDED "AS IS" AND ALL EXPRESS OR IMPLIED CONDITIONS,
REPRESENTATIONS AND WARRANTIES, INCLUDING ANY IMPLIED WARRANTY OF
MERCHANTABILITY, FITNESS FOR A PARTICULAR PURPOSE OR NON-INFRINGEMENT,
ARE DISCLAIMED, EXCEPT TO THE EXTENT THAT SUCH DISCLAIMERS ARE HELD TO
BE LEGALLY INVALID. SYMANTEC CORPORATION SHALL NOT BE LIABLE FOR INCIDENTAL
OR CONSEQUENTIAL DAMAGES IN CONNECTION WITH THE FURNISHING,
PERFORMANCE, OR USE OF THIS DOCUMENTATION. THE INFORMATION CONTAINED
IN THIS DOCUMENTATION IS SUBJECT TO CHANGE WITHOUT NOTICE.
The Licensed Software and Documentation are deemed to be commercial computer software
as defined in FAR 12.212 and subject to restricted rights as defined in FAR Section 52.227-19
"Commercial Computer Software - Restricted Rights" and DFARS 227.7202, "Rights in
Commercial Computer Software or Commercial Computer Software Documentation", as
applicable, and any successor regulations. Any use, modification, reproduction release,
performance, display or disclosure of the Licensed Software and Documentation by the U.S.
Government shall be solely in accordance with the terms of this Agreement.
Symantec Corporation
350 Ellis Street
Mountain View, CA 94043
http://www.symantec.com
Technical Support
Symantec Technical Support maintains support centers globally. Technical
Support’s primary role is to respond to specific queries about product features
and functionality. The Technical Support group also creates content for our online
Knowledge Base. The Technical Support group works collaboratively with the
other functional areas within Symantec to answer your questions in a timely
fashion. For example, the Technical Support group works with Product Engineering
and Symantec Security Response to provide alerting services and virus definition
updates.
Symantec’s support offerings include the following:
■
A range of support options that give you the flexibility to select the right
amount of service for any size organization
■
Telephone and/or Web-based support that provides rapid response and
up-to-the-minute information
■
Upgrade assurance that delivers software upgrades
■
Global support purchased on a regional business hours or 24 hours a day, 7
days a week basis
■
Premium service offerings that include Account Management Services
For information about Symantec’s support offerings, you can visit our Web site
at the following URL:
www.symantec.com/business/support/
All support services will be delivered in accordance with your support agreement
and the then-current enterprise technical support policy.
Contacting Technical Support
Customers with a current support agreement may access Technical Support
information at the following URL:
www.symantec.com/business/support/
Before contacting Technical Support, make sure you have satisfied the system
requirements that are listed in your product documentation. Also, you should be
at the computer on which the problem occurred, in case it is necessary to replicate
the problem.
When you contact Technical Support, please have the following information
available:
■
Product release level
■
Hardware information
■
Available memory, disk space, and NIC information
■
Operating system
■
Version and patch level
■
Network topology
■
Router, gateway, and IP address information
■
Problem description:
■
Error messages and log files
■
Troubleshooting that was performed before contacting Symantec
■
Recent software configuration changes and network changes
Licensing and registration
If your Symantec product requires registration or a license key, access our technical
support Web page at the following URL:
www.symantec.com/business/support/
Customer service
Customer service information is available at the following URL:
www.symantec.com/business/support/
Customer Service is available to assist with non-technical questions, such as the
following types of issues:
■
Questions regarding product licensing or serialization
■
Product registration updates, such as address or name changes
■
General product information (features, language availability, local dealers)
■
Latest information about product updates and upgrades
■
Information about upgrade assurance and support contracts
■
Information about the Symantec Buying Programs
■
Advice about Symantec's technical support options
■
Nontechnical presales questions
■
Issues that are related to CD-ROMs or manuals
Support agreement resources
If you want to contact Symantec regarding an existing support agreement, please
contact the support agreement administration team for your region as follows:
Asia-Pacific and Japan
[email protected]
Europe, Middle-East, and Africa
[email protected]
North America and Latin America
[email protected]
Contents
Technical Support ............................................................................................... 4
Chapter 1
Introducing Deployment Solution .................................... 11
About Deployment Solution ..........................................................
What's new in Deployment Solution 7.1 SP1a MR1 .............................
Components of Deployment Solution ...............................................
What you can do with Deployment Solution ......................................
Where to get more information .......................................................
Chapter 2
Setting up Deployment Solution
11
12
13
18
20
..................................... 23
Setting up Deployment Solution .....................................................
Preinstallation requirements for Deployment Solution .......................
Installing Deployment Plug-in ........................................................
Installing an automation folder ......................................................
Installing Deployment site server components ..................................
Setting up ACC ......................................................................
Configuring the preboot environment ..............................................
Configuring the PXE Server ......................................................
Creating a preboot configuration ..............................................
Adding drivers to a driver database .................................................
Adding drivers to the DeployAnywhere database .........................
Adding drivers to the Preboot database ......................................
Configuring multicast options to deploy image ..................................
About Image Multicasting options .............................................
Configuring the initial deployment settings ......................................
Adding OS files ............................................................................
Importing OS files ........................................................................
Adding OS licenses .......................................................................
Importing predefined computers ....................................................
Configuring the Sysprep imaging ....................................................
Creating system configuration settings ............................................
System Configuration: Create System Configuration dialog
box ................................................................................
Adding tokens .............................................................................
24
26
27
28
29
31
31
32
33
36
37
38
39
40
40
41
42
43
44
44
45
46
49
8
Contents
Chapter 3
Managing tasks and jobs ................................................... 51
About deployment tasks and jobs ....................................................
Creating a deployment task ............................................................
Combining tasks into a job .............................................................
Scheduling a deployment task ........................................................
Verifying the task status ...............................................................
Changing network settings ............................................................
Chapter 4
Rebooting client computers .............................................. 59
About rebooting client computers ...................................................
About automation environment ......................................................
About Pre-boot eXecution Environment (PXE) ...................................
About Production environment ......................................................
Creating a Reboot to task ...............................................................
Chapter 5
59
59
60
62
62
Imaging computers ............................................................. 65
About Imaging client computers .....................................................
About images ..............................................................................
About image resources ..................................................................
About disk image packages ............................................................
Preparing to capture an image ........................................................
Creating an image ........................................................................
Setting advanced Create Image options ......................................
Importing an existing image ..........................................................
Creating a Deploy Image task .........................................................
Setting advanced Deploy Image options .....................................
Restoring a backup image ..............................................................
Deploying an image to new computers ............................................
Creating an Apply System Configuration task ....................................
Setting Advanced Deploy Image Options for multicasting ....................
Chapter 6
51
54
55
55
56
57
65
68
68
69
70
71
73
75
75
77
79
79
80
82
Performing an OS installation .......................................... 83
About OS Files installation .............................................................
Sample scripted OS job ..................................................................
Erasing a Disk .............................................................................
About the Erase Disk task ........................................................
Creating disk partitions .................................................................
About the Partition Disk task ...................................................
Performing a Windows OS installation .............................................
About Install Windows OS task .................................................
Performing a LINUX OS installation ................................................
83
84
85
85
87
87
88
89
91
Contents
About Install Linux OS task ...................................................... 92
Chapter 7
Capturing and distributing computer
personalities ................................................................... 95
About capturing and distributing personalities ..................................
About personality templates ..........................................................
About migration settings ...............................................................
Capturing computer personality .....................................................
Distributing computer personality ..................................................
Chapter 8
95
96
97
98
99
Copying files and folders ................................................. 101
About copying files and folders ..................................................... 101
Copying files and folders .............................................................. 101
Copying files and folders options ................................................... 102
Chapter 9
Predefining computers ..................................................... 105
About predefined computers ........................................................ 105
Referencing a sample CSV file ....................................................... 106
Booting predefined computers ...................................................... 106
Chapter 10
Removing unwanted packages/resources .................... 109
About removing unwanted packages and resources ..........................
Deleting an image package ...........................................................
Deleting an image resource ..........................................................
Deleting a scripted install package ................................................
Deleting a copy file contents package .............................................
Appendix A
109
110
110
111
112
Command-line switches ................................................... 113
About command-line switches ...................................................... 113
Appendix B
Troubleshooting ................................................................. 127
Troubleshooting ......................................................................... 127
Appendix C
Altiris™ Deployment Solution 7.1 SP1a MR1 from
Symantec™ Third-Party Legal Notices .................... 137
Third-Party Legal Notices ............................................................
Zlib ..........................................................................................
Unzip .......................................................................................
Generic Set Data Structure, C# Class ..............................................
138
138
138
140
9
10
Contents
Waterloo TCP - TCP/IP library routines ..........................................
Linux kernel version 2.6.27.7-9 from the OpenSUSE project ..............
STLPort ...................................................................................
TinyXML ...................................................................................
Apache Xerces ...........................................................................
ncurses ....................................................................................
Microsoft Silverlight 3 Toolkit ......................................................
WDOSX ....................................................................................
DOS/32a ...................................................................................
Editline ....................................................................................
Zlib ..........................................................................................
145
146
153
154
154
156
156
158
159
160
161
Index ................................................................................................................... 163
Chapter
1
Introducing Deployment
Solution
This chapter includes the following topics:
■
About Deployment Solution
■
What's new in Deployment Solution 7.1 SP1a MR1
■
Components of Deployment Solution
■
What you can do with Deployment Solution
■
Where to get more information
About Deployment Solution
Deployment Solution lets you integrate standard deployment features with
Symantec Management Platform. It helps reduce the cost of deploying and
managing servers, desktops, and notebooks from a centralized location in your
environment. The solution offers OS deployment, configuration, PC personality
migration, and software deployment across hardware platforms and OS types.
The following are the key features of Deployment Solution:
■
Lets you mass-deploy hardware-independent images to new systems and
existing systems using Symantec Ghost and RapiDeploy imaging tools.
■
Lets you migrate to the latest Windows version; migrates user data, personality
settings, and OS and application settings to the new operating system.
■
Lets you configure each system based on standardized criteria, such as job
function, user type, or location.
■
Lets you change the system and the network settings.
12
Introducing Deployment Solution
What's new in Deployment Solution 7.1 SP1a MR1
■
Supports the deployment of heterogeneous client and server operating systems,
including Windows and Linux.
■
Supports the deployment of heterogeneous client and server operating systems
such as Windows and Linux on client and server computers.
■
Lets you easily create the jobs and tasks that automate deployment and
migration functions such as imaging, scripted OS installations, configurations,
and software deployments.
■
Supports industry-standard hardware-management capabilities such as Intel
vPro, Pre-boot eXecution Environment (PXE), and Wake on LAN technologies.
■
Lets you use role- and scope-based security to secure management features
from unauthorized personnel.
■
Supports the WinPE and the Linux preboot environments.
■
Integrates with many Symantec products built on Symantec Management
Platform: for example, Altiris solutions and security, backup and recovery,
virtualization, data loss prevention, vulnerability assessment, and and other
products.
The following are the key benefits of Deployment Solution:
■
Reduces the costs that are associated with deploying, migrating, and
provisioning desktops, laptops, and servers throughout the organization.
■
Saves time and reduces human error over traditional PC deployments.
■
Reduces end-user downtime by automating the deployment process.
■
Increases IT efficiency through automated, repeatable deployment tasks.
■
Provides tools for zero-touch migrations to reduce the costs that are associated
with moving to a new operating system.
See “What you can do with Deployment Solution” on page 18.
See “About Imaging client computers” on page 65.
See “Setting up Deployment Solution ” on page 24.
See “About OS Files installation” on page 83.
See “About capturing and distributing personalities” on page 95.
What's new in Deployment Solution 7.1 SP1a MR1
The Deployment Solution 7.1 SP1a MR1 contains the following enhancements:
Introducing Deployment Solution
Components of Deployment Solution
Table 1-1
List of supported features
Feature
Description
Deploy Image with Ghost Partition Deployment Solution now supports Ghost partition
Deployment
deployment.
See “Setting advanced Deploy Image options”
on page 77.
Predefined computers import with Predefined computers can be imported with only
MAC address only
MAC address.
See “About predefined computers” on page 105.
Install Windows OS with Domain
Join option
The Install Windows OS task supports the domain
join option. Client computer can also join domain
without an inventory but inventory data option must
be selected.
FQDN must be used as domain credential. For
example, Symantec.com\User and not
Symantec\user.
See “Performing a Windows OS installation”
on page 88.
Install Windows OS for Windows 7 The Install Windows OS task is supported for
SP1
Windows 7 SP1.
Apply System Configuration
supports tokens for hostname
Tokens can also be used to change the hostname
using Apply System Confuguration. for example
%Customtoken%,%Serialnumber% .
See “Creating an Apply System Configuration task”
on page 80.
Components of Deployment Solution
When you install Deployment Solution on Symantec Management Platform, the
Deployment Solution components get integrated with Symantec Management
Platform. The Deployment Solution leverages the platform capabilities to execute
and schedule tasks, jobs, and policies, and set up site servers, use filters, and
generate reports. The components of Deployment Solution help you manage the
client computers in your environment.
13
14
Introducing Deployment Solution
Components of Deployment Solution
Table 1-2
Deployment Solution components
Component
Description
Deployment Plug-in
The Deployment Plug-in is installed on client
computers to manage deployment tasks. This
plug-in enables you to create and deploy disk
images, perform remote OS installation, change
your system settings, and migrate the personality
settings.
The Deployment Plug-in replaces the former
Deployment Solution 6.X agents, such as AClient,
DAgent, or ADLAgent. If you need them, AClient
and DAgent can coexist with the Deployment
Plug-in.
You can enable the Symantec firewall on the client
computer and enable the Windows firewall on
Notification Server. However, to install the
Deployment Plug-in by pushing it to computers, you
need to disable one of these firewalls.
See “Installing Deployment Plug-in” on page 27.
Introducing Deployment Solution
Components of Deployment Solution
Table 1-2
Deployment Solution components (continued)
Component
Description
Deployment site server component
Deployment site server components let you offload
some of the traffic and workload from your primary
Symantec Management Platform. You can set up
multiple task servers and Deployment site server
components to handle your jobs and tasks. Symantec
Management Agent then uses the assigned
Deployment site server components for all
deployment processes. These processes include
imaging, scripted OS installation, Copy file, and the
tasks that are associated with packages.
See “Installing Deployment site server components”
on page 29.
Deployment site server components can be installed
on the site servers that are configured with both
Package Services and Task Services. For more
information, search for task server topics in the
Symantec Management Platform Help.
The components also include all of the tools that
Deployment Solution needs. These tools include
RapiDeploy, Ghost, and Boot Disk Creator.
A Deployment share is created when the
Deployment site server component is installed on
a site server. The Deployment share is the location
where all the tools, such as Ghost and RapiDeploy,
other utilities, and images that are created are
stored.
The site server components also include the PXE
service.
See “About Pre-boot eXecution Environment (PXE)”
on page 60.
15
16
Introducing Deployment Solution
Components of Deployment Solution
Table 1-2
Deployment Solution components (continued)
Component
Description
Automation folder
Automation folder stores the preboot environment.
With the help of the preboot environment (WinPE
and Linux PE) the client computers are rebooted to
the automation environment. The PXE server and
automation folder can be used to reboot the client
computer to the automation environment to
perform deployment tasks.
See “Installing an automation folder” on page 28.
The preboot environment (WinPE) contains the
Boot.wim file. This file is used to execute
Deployment tasks.
To reboot the client computer to an automation
environment, the DNS should be configured on the
network. Also, all computers in the network should
be able to perform a Name Server Lookup.
WinPE 2.1 and Linux are the only automation
operating systems that Deployment Solution
supports. Both preboot operating systems are
installed with Deployment Solution.
See “Setting up Deployment Solution ” on page 24.
PXE server
The PXE server can be configured on Symantec
Management Platform and the site server. This
configuration helps to reboot the client computers
to WinPE and Linux PE environments using the
network interface.
See “About Pre-boot eXecution Environment (PXE)”
on page 60.
Introducing Deployment Solution
Components of Deployment Solution
Table 1-2
Deployment Solution components (continued)
Component
Description
Imaging tools
Ghost and RapiDeploy are two disk imaging tools
that run on the Windows (x86,x64)and
Linux(x86)operating systems. These tools can also
be used for creating backup disk images and image
of disk partitions.
These tools support NTFS,FAT(16,32),EXT2/3,and
RAW file system,and HTTP and multicast imaging
options. These tools support Windows only
hardware-independent disk imaging which can be
deployed to diverse client computers by using
drivers from a centrally managed driver database.
Although backup images are not
hardware-independent and intended to be deployed
on the same client.
Boot Disk Creator
Boot Disk Creator creates a boot disk using Windows
and Linux preboot environment. Boot Disk Creator
is run on the client computer to boot it in WinPE or
LinuxPE. It can also create a bootable CD or USB.
See “Creating a preboot configuration” on page 33.
Resource Import Tool
The Resource Import tool is used for importing
existing Windows and Linux images. It is also used
for adding Windows-scripted OS installation files.
See “Importing an existing image” on page 75.
Driver Manager
Driver Manager provides the interface to perform
driver operations such as adding and deleting data
from the DeployAnywhere driver database and the
Boot Disk Creator driver database.
See “Adding drivers to a driver database”
on page 36.
DeployAnywhere
Deploy Anywhere enables you to deploy the
Windows operating system image to dissimilar
hardware. It also enables you to perform a
Windows-scripted installation on bare metal
hardware.
See “Creating a Deploy Image task” on page 75.
See “About Install Windows OS task” on page 89.
17
18
Introducing Deployment Solution
What you can do with Deployment Solution
See “Setting up Deployment Solution ” on page 24.
What you can do with Deployment Solution
You can use Deployment Solution to handle many of your deployment needs.
From the Settings menu, select Deployment to view the options to configure
Deployment Solution settings for the first time.
You can enable and disable policies by using the Settings > All Settings menu.
Then, from the left pane expand Settings > Agents/Plug-ins > Deployment and
Migration and select the operating system for which you want to enable the policy.
You can manage your tasks and jobs by using the Manage > Jobs and Tasks menu.
Table 1-3
What you can do with Deployment Solution
Task
Description
Enable policies to install
the Deployment plug-in,
automation folder, and
Deployment site server
component.
You can enable the policies that install the Deployment plug-in,
automation folder, and Deployment site server component to the
computers that you select. You need to enable these policies to
complete the Deployment Solution installation.
See “Installing Deployment Plug-in” on page 27.
See “Installing an automation folder” on page 28.
See “Installing Deployment site server components” on page 29.
Configure the
deployment settings
You can configure the following to set up Deployment Solution:
■
Configure the preboot environment.
■
Add OS licenses.
■
Add OS files.
■
Add drivers to diver database.
■
Configure multicast settings.
■
Configure initial deployment settings.
■
Configure system settings.
■
Configure Sysprep imaging.
■
Import predefined computers.
See “Setting up Deployment Solution ” on page 24.
Reboot the client
computers
You can reboot the client computers to an automation, a
production, and the Pre-boot eXecution Environment (PXE) to
perform deployment-related tasks and manage the client
computers.
See “About rebooting client computers” on page 59.
Introducing Deployment Solution
What you can do with Deployment Solution
Table 1-3
What you can do with Deployment Solution (continued)
Task
Description
Image client computers You can create disk images to deploy to multiple client computers.
You can also create backup images to copy the contents of a single
computer.
See “About Imaging client computers” on page 65.
Perform scripted OS
installations
You can create a package that contains the source files you specify
for a scripted OS installation.
See “About OS Files installation” on page 83.
Capture and distribute You can migrate a computer’s settings and user preferences to
computer personalities another computer using personalities.
See “About capturing and distributing personalities” on page 95.
Install executable
through Copy file
option
You can copy the installation .msi or .exe file by using the Copy
file option.
Import predefined
computers
You can predefine computers in a CSV file and then import the
predefined computers to your environment.
See “About copying files and folders” on page 101.
See “About predefined computers” on page 105.
Manage jobs and tasks
You can choose from several task types to create deployment
tasks. For example, you can create a task that captures or deploys
a disk image.
See “About deployment tasks and jobs” on page 51.
See “Creating a deployment task” on page 54.
You can combine several tasks or jobs into one job to run
sequentially. You can also specify condition statements for your
job. Your tasks execute only if they meet the conditions that you
specify.
See “Combining tasks into a job” on page 55.
You can schedule a task to run immediately or at a later time that
you specify. You can also choose the computers that the task
runs on.
See “Scheduling a deployment task” on page 55.
You can check the status of your deployment tasks by running
a report.
See “Verifying the task status” on page 56.
19
20
Introducing Deployment Solution
Where to get more information
Table 1-3
What you can do with Deployment Solution (continued)
Task
Description
View Deployment
reports
Deployment Solution provides the following reports that you can
access from the Reports > All Reports > Deployment and
Migration menu:
Computers with Deployment Plug-in Installed - A list of all
of the managed computers that have the Deployment Plug-in
installed on them.
■ Computers with Deployment Tasks Execution Status - A list
of details about all of the Deployment tasks that executed so
far.
■
Remove unwanted
You can remove the packages and resources that are not required
packages and resources in your environment.
See “About removing unwanted packages and resources”
on page 109.
Where to get more information
Use the following documentation resources to learn about and use this product.
Table 1-4
Documentation resources
Document
Description
Location
Release Notes
Information about new
features and important
issues.
The Supported Products A-Z page, which is available at the following
URL:
http://www.symantec.com/business/support/index?page=products
Open your product's support page, and then under Common Topics,
click Release Notes.
User Guide
Information about how
to use this product,
including detailed
technical information
and instructions for
performing common
tasks.
The Documentation Library, which is available in the Symantec
Management Console on the Help menu.
■ The Supported Products A-Z page, which is available at the
following URL:
http://www.symantec.com/business/support/index?page=products
Open your product's support page, and then under Common Topics,
click Documentation.
■
Introducing Deployment Solution
Where to get more information
Table 1-4
Documentation resources (continued)
Document
Description
Location
Help
Information about how
to use this product,
including detailed
technical information
and instructions for
performing common
tasks.
The Documentation Library, which is available in the Symantec
Management Console on the Help menu.
Context-sensitive help is available for most screens in the Symantec
Management Console.
You can open context-sensitive help in the following ways:
■
The F1 key when the page is active.
Help is available at the ■ The Context command, which is available in the Symantec
Management Console on the Help menu.
solution level and at the
suite level.
This information is
available in HTML help
format.
In addition to the product documentation, you can use the following resources to
learn about Symantec products.
Table 1-5
Symantec product information resources
Resource
Description
Location
SymWISE
Support
Knowledgebase
Articles, incidents, and
issues about Symantec
products.
http://www.symantec.com/business/theme.jsp?themeid=support-knowledgebase
Symantec
Connect
An online resource that http://www.symantec.com/connect/endpoint-management
contains forums, articles,
blogs, downloads, events,
videos, groups, and ideas
for users of Symantec
products.
21
22
Introducing Deployment Solution
Where to get more information
Chapter
Setting up Deployment
Solution
This chapter includes the following topics:
■
Setting up Deployment Solution
■
Preinstallation requirements for Deployment Solution
■
Installing Deployment Plug-in
■
Installing an automation folder
■
Installing Deployment site server components
■
Configuring the preboot environment
■
Adding drivers to a driver database
■
Configuring multicast options to deploy image
■
Configuring the initial deployment settings
■
Adding OS files
■
Importing OS files
■
Adding OS licenses
■
Importing predefined computers
■
Configuring the Sysprep imaging
■
Creating system configuration settings
■
Adding tokens
2
24
Setting up Deployment Solution
Setting up Deployment Solution
Setting up Deployment Solution
From the Settings > Deployment menu, an administrator can perform several
tasks, such as managing package, configuring deployment-specific settings, and
managing OS licenses.
As a prerequisite to setting up Deployment Solution, ensure that the package
server is installed on Symantec Management Platform and on all remote site
servers. This installation helps you to perform the replication of packages and
Deployment Solution tasks successfully.
The tasks to set up Deployment Solution are listed in sequential order in the
following table. Follow this sequence when you configure Deployment Solution
for the first time. However, you can also complete these tasks in the order that
you need them.
See “Configuring the initial deployment settings” on page 40.
Table 2-1
Process for setting up Deployment Solution
Step
Action
Description
Step 1
Enable predefined install
policies.
Enable the predefined policies to install
the Deployment Plug-in, the
automation folder, and the Deployment
site server.
See “Installing Deployment Plug-in”
on page 27.
See “Installing an automation folder”
on page 28.
See “Installing Deployment site server
components” on page 29.
Step 1
Step 2
Configure your Sysprep
options using the Sysprep
Imaging Configuration
option.
You can browse to and upload the
Deploy.cab file.
Add a license using the OS
Licenses option.
You can track all of your licenses for all
of your operating systems. You can also
add licenses on this page.
See “Configuring the Sysprep imaging”
on page 44.
See “Adding OS licenses” on page 43.
Setting up Deployment Solution
Setting up Deployment Solution
Table 2-1
Process for setting up Deployment Solution (continued)
Step
Action
Description
Step 3
Create your PXE
configuration using the
Preboot Configurations
option.
You can create your PXE preboot
configuration settings. From your
configuration settings, a PXE image is
also created through a task-based policy
at a site server level. You can also set
up a PXE image for an unmanaged
computer.
See “Creating a preboot configuration”
on page 33.
You can configure your PXE server in
another step.
See “Configuring the PXE Server”
on page 32.
Step 4
(Optional) Install automation You can install an automation folder
folders.
using a policy.
See “Installing an automation folder”
on page 28.
Step 5
Configure your PXE server
using the PXE Server
Configuration option.
You can configure your PXE server and
select the PXE boot image to use. You
can also limit the bandwidth that is
used and how many computers receive
the automation at one time.
See “Configuring the PXE Server”
on page 32.
Step 6
Add drivers to the driver
database using the Driver
Management option.
You can view the drivers that are in
your deployment environment. You can
manage the driver's database package
that is stored in the DeployAnywhere
and the preboot database. By default,
the package replicates to all of the site
servers in your environment.
See “Adding drivers to the Preboot
database” on page 38.
25
26
Setting up Deployment Solution
Preinstallation requirements for Deployment Solution
Table 2-1
Process for setting up Deployment Solution (continued)
Step
Action
Step 7
Configure multicast settings You can configure the multicast options
for deploying images using to simultaneously deploy images to
the Image Multicasting
multiple computers.
option.
See “About Image Multicasting options”
on page 40.
Step 8
Determine what Deployment
jobs or tasks run when an
unknown computer performs
a PXE Boot using the Initial
Deployment option.
Step 9
Description
You can set the task list for a new
computer that boots to the network.
See “Configuring the initial deployment
settings” on page 40.
Import predefined computers You can predefine computers in a CSV
using the Predefined
file. Then, you can import this file to
computers option.
add the predefined computers to your
environment.
See “Importing predefined computers”
on page 44.
Step 10
Set up system settings using You can configure the domain and the
the System Configurations network adapters to be used for the
option.
client computers.
See “Creating system configuration
settings” on page 45.
See “Components of Deployment Solution” on page 13.
Preinstallation requirements for Deployment Solution
Before you start the Deployment Solution installation, you must verify the
following:
■
Symantec Installation Manager (SIM) is installed.
■
Symantec Management Platform is installed.
■
Symantec Management Agent for UNIX and Windows is preinstalled on the
client computers.
■
Symantec Management Agent for Unix, Linux, and MAC is installed if you plan
to use UNIX and Mac client computers.
■
JRE 1.5 or later enabled browser is required.
Setting up Deployment Solution
Installing Deployment Plug-in
■
Symantec Administrator Software Development Kit (SASDK) is installed if you
plan to use the Web Services API.
■
Client computers have Pre-boot eXecution Environment (PXE) enabled on
them.
■
DHCP is up and running with PXE support
■
Silverlight 4 is installed.
■
The storage and the network drivers in your environment are collected.
■
The remote site server is configured on the supported platform if you plan to
manage clients in different subnet. For a remote site server to be configured,
a package server and a task server should be installed on the supported
platform.
■
The package server is installed on Symantec Management Platform and on all
remote site servers.
■
DNS is properly configured. Clients computers inside different subnets should
be able to ping to Symantec Management Platform and the remote site server
using FQDN.
See “Components of Deployment Solution” on page 13.
Installing Deployment Plug-in
Deployment Solution is installed on Symantec Management Platform and
Deployment Plug-in is a component of Deployment Solution. Deployment Plug-in
is installed on client computers to manage deployment tasks. This plug-in enables
you to create and deploy disk images, perform remote OS installation, change
your system settings, and migrate the personality settings.
Predefined policies to install, upgrade, and uninstall the Deployment plug-in are
provided with Deployment Solution. It provides installation policies for 32-bit
and 64-bit client computers. Hence, it supports Windows x64, Windows x86, and
Linux x86. You can install the policy on your target computer.
If you plan to install Deployment Plug-in on a Linux operating system that has a
static IP environment, ensure that you have manually entered the site server's
and Symantec Management Platform server's name, and their IP addresses in
/etc/hosts file.
You cannot install the Deployment Solution plug-in in a maintenance window by
using the Run once ASAP in maintenance window only option. You are required
to schedule the installation using the Add Schedule option.
See “What you can do with Deployment Solution” on page 18.
27
28
Setting up Deployment Solution
Installing an automation folder
To install Deployment Plug-in
1
In the Symantec Management Console, on the Settings menu, click
Agent/Plug-ins > All Agents/Plug-ins.
2
In the left pane, expand the Agents/Plug-ins > Deployment and Migration
folders.
3
Choose either a Linux or Windows installation and expand the corresponding
folder.
4
Click the Deployment Plug-in - Install policy.
5
In the right pane, in the Program name box, ensure that the correct policy
is selected.
6
Under Applied to, select the computers that you want to install the plug-in
on.
7
(Optional) Under Schedule, select when you want to install the plug-in.
8
(Optional) Click Advanced to check if the computers you selected are available
at the exact time that you scheduled.
You can also select start and end dates on this page.
9
Under Extra schedule options, select the options that you want.
10 Ensure that the policy is enabled.
A green On symbol shows in the top right corner.
11 Click Save changes.
Installing an automation folder
An automation folder stores the preboot operating system. With the help of the
preboot operating system (WinPE and Linux PE) the client computers are rebooted
to the automation environment. Both the PXE server and the automation folder
can be used to reboot the client computer to the automation environment to
perform deployment tasks.
Predefined policies to install, upgrade, and uninstall the automation folder are
provided with Deployment Solution. The automation folder is supported on
Windows x64, Windows x86, and Linux x86. You can create your own 64-bit
automation packages and policies using the preboot configuration options.
See “Configuring the preboot environment” on page 31.
Ensure that proper filters are set while installing the Deployment Plug-in and
Automation Folder. Ensure that a 64-bit policy gets installed on 64-bit clients and
32-bit policies gets installed on 32-bit clients.
Setting up Deployment Solution
Installing Deployment site server components
To install an automation folder
1
In the Symantec Management Console, on the Settings menu, click
Agent/Plug-ins > All Agents/Plug-ins.
2
In the left pane, expand the Agents/Plug-ins > Deployment and Migration
folders.
3
Choose either a Linux or Windows installation and expand the corresponding
folder.
4
Click the Automation Folder - Install policy.
5
In the right pane, in the Program name box, ensure that the correct policy
is selected.
6
Under Applied to, select the computers that you want to install the plug-in
on.
7
Under Schedule, select when you want to install the plug-in.
8
(Optional) Click Advanced to check if the computers you selected are available
at the exact time that you scheduled.
You can also select start and end dates on this page.
9
Under Extra schedule options, select the options that you want.
10 Ensure that the policy is enabled.
A green On symbol shows in the top right corner.
11 Click Save changes.
See “Installing Deployment Plug-in” on page 27.
Installing Deployment site server components
Deployment site server component lets you offload some of the traffic and
workload from your primary Symantec Management Platform. You can set up
multiple task servers and Deployment site server components to handle your jobs
and tasks. Symantec Management Agent then uses the assigned Deployment site
server components for all deployment tasks. These tasks include imaging, scripted
OS installation, copy file, and the tasks that are associated with packages. The
tasks can be scheduled to run immediately or at a later specified time. This process
improves scalability.
Before installing the Deployment components on a site server, you should install
the Package Service and Task Service on that site server.
The following are the supported operating systems for Deployment site server
components:
29
30
Setting up Deployment Solution
Installing Deployment site server components
■
Windows Server 2003 SP2
■
Windows Server 2003 R2 SP2
■
Windows Server 2008
■
Windows Server 2008 R2
■
Windows Server 2008 R2 SP1
For the Linux operating system, if there is no domain controller present in the
environment, then ensure that the Agent Connectivity Credential (ACC)
configuration is set up as expected. Also, ensure that ACC is enabled on every site
server that is configured in the environment. Ensure that user credentials for site
server and the Symantec Management Platform server are the same.
See “Setting up ACC” on page 31.
All Deployment computer images and Personality Packages are created on the
task server that each managed computer works with. To deploy an image that
was created on a different task server, you must replicate that image to your task
server. You can replicate the image using the package replication that is contained
in Symantec Management Platform. You can also configure specific replication
rules for disk image packages.
You must install the site server components before you can replicate packages,
including driver packages. After the components are installed, your packages
become valid and can then be replicated.
You can uninstall and upgrade the components by choosing the appropriate policy.
For more information, search for site server and task server topics in the Symantec
Management Platform Help.
To install Deployment site server components
1
In the Symantec Management Console, on the Settings menu, click
Agent/Plug-ins > All Agents/Plug-ins.
2
In the left pane, expand the Agents/Plug-ins > Deployment and Migration
> Windows folders.
3
Click the Deployment Site Server Components - Install policy.
4
In the right pane, in the Program name box, ensure that the correct policy
is enabled.
5
(Optional) Under Schedule, select when you want to install the components.
6
(Optional) Click Advanced to check if the computers you selected are available
at the exact time that you scheduled.
7
Under Extra schedule options, select the options that you want.
Setting up Deployment Solution
Configuring the preboot environment
8
Ensure that the policy is enabled.
A green On symbol shows in the top right corner.
9
Click Save changes.
See “Setting up ACC” on page 31.
Setting up ACC
For Linux operating system if there is no domain controller present in the
environment, then ensure that the Agent Connectivity Credential (ACC)
configuration is set up as expected. Also, ensure that ACC is enabled on every site
server that is configured in the environment.
To set up ACC
1
In the Symantec Management Console, select Settings > Agent/Plug-in >
Global settings.
2
Click the Authentication tab.
3
Select Use these credentials and enter the Symantec Management Platform
user name and password.
4
Click Save changes.
5
In the Symantec Management Console, select Settings > Notification Server
> Site Server Settings.
6
On the right pane, expand Site Management > Settings > Package Service
> Package Service Settings.
7
On the left pane, under Security Settings select Create the Agent
Connectivity Credential on Package Servers (provided the ACC is not a
domain account) check box.
8
Click Save changes.
After the site server retrieves the updated policies from Notification Server,
an ACC account is created on the site server for package download and task
server connectivity.
See “Installing Deployment site server components” on page 29.
Configuring the preboot environment
You can configure the preboot environment to use for the tasks to perform in
Deployment Solution. The process for configuring the preboot environment
includes the following tasks
31
32
Setting up Deployment Solution
Configuring the preboot environment
Configure the PXE server
You can configure the PXE server that was automatically
installed when you installed Deployment Solution. By
configuring the PXE server, you can respond to unknown
and to predefined computers. By configuring the PXE
server, you can also set a threshold for the number of
client computer connections and the bandwidth to be used.
See “Configuring the PXE Server” on page 32.
Create a preboot configuration You can create a preboot configuration for creating a PXE
image and a preboot installation file.
See “Creating a preboot configuration” on page 33.
See “Editing and deleting Preboot configurations” on page 35.
See “Configuring the initial deployment settings” on page 40.
Configuring the PXE Server
You can configure the PXE server that was automatically installed when you
installed Deployment Solution.
See “About Pre-boot eXecution Environment (PXE)” on page 60.
You can choose to respond to the unknown and to the predefined computers when
you configure the PXE server. You can also select the PXE boot image to use for
the unknown and the predefined computers. You can set the threshold on the
number of computers that receive the automation simultaneously. You can also
set the amount of bandwidth to use during the PXE process.
You can install multiple PXE servers by installing and configuring the site server
components on a computer that is running Site Services.
Ensure that you start the Symantec services to start the PXE server.
For more information, search for site server topics in the Symantec Management
Platform Help.
After entering some inputs, ensure that you do not leave the page idle for more
than 20 minutes. Otherwise, you receive an error. You have to restart the browser
or refresh the page to save the changes.
To configure the PXE server
1
In the Symantec Management Console, on the Settings menu, click
Deployment > PXE Server Configurations.
2
Choose any of the following options.
Setting up Deployment Solution
Configuring the preboot environment
3
Predefined Computers
Select the Respond to predefined
computers check box and select the
relevant PXE boot image from the
drop-down list.
Unknown Computers
Select the Respond to unknown
computers check box and select the
relevant PXE boot image from the
drop-down list.
Connectivity
■
Logging
Select the Enable logging check box to
enable log creation.
Select the Limit client connections
check box and specify the number of
client connections you want.
■ Select the Limit bandwidth check box
and specify the bandwidth to use
during the PXE process.
■ Specify the MTU packet size.
Click Save changes.
See “Creating a preboot configuration” on page 33.
See “Setting up Deployment Solution ” on page 24.
See “Configuring the initial deployment settings” on page 40.
Creating a preboot configuration
You can create a preboot configuration for creating a PXE image. Tasks can then
access and use that specific preboot configuration-based image. The preboot
configuration can also be used to create preboot installation files.
See “About Pre-boot eXecution Environment (PXE)” on page 60.
You can select the operating system and the preboot environment into which you
want to reboot the selected operating system. You can use the resource that is
created to reboot to any job that requires you to reboot to the PXE or the
automation folder, or both. If the preboot configuration is added, the server starts
building the PXE image after the server requests an updated configuration.
You can also choose to edit or delete a preboot configuration.
See “Editing and deleting Preboot configurations” on page 35.
If a preboot configuration that you already created needs a new driver, you must
recreate that preboot configuration with the newly added driver. If you create a
33
34
Setting up Deployment Solution
Configuring the preboot environment
preboot image before a remote site server is configured, then it is not registered
with new remote site server. You can either recreate the preboot environment for
the selected image or create a new image.
Symantec recommends against executing the bootwiz.exe. If you do so, the PXE
images are not known to PXE and the task to reboot the client computers to PXE
fails.
To use the preboot configuration, you must have administrative rights and the
UAC settings must be disabled.
To create Preboot configurations
1
In the Symantec Management Console, on the Settings menu, click
Deployment > Create Preboot Configurations.
2
On the Preboot Configurations page, click Add.
3
On the Add Preboot Configuration page, enter a name and description for
your preboot configuration.
4
Select either the WinPE or Linux operating system.
5
For Windows, select the x86 or x64 architecture.
You can also select both x86 and x64 architectures.
For Linux, only the x86 architecture is supported.
6
Select the OEM extension to use.
7
Select the preboot environment to build.
8
■
PXE
This preboot configuration can be accessed only from the PXE server.
Only the client computers that are configured to boot to and from their
network card can access the configuration.
■
Automation folder
This preboot configuration can be installed on the client computer by
using policies.
■
Both PXE and Automation folder
This option builds both types of configurations.
Click OK.
Setting up Deployment Solution
Configuring the preboot environment
9
Click Save changes.
Once the PXE image is created, you can then use it to perform deployment
tasks.
When a client computer is booted to the PXE image, which has both the
architectures selected, the client computer boots to x64 architecture only.
10 (Optional) If you have selected PXE, verify that the PXE image is created in
the following path:
C:\Program Files\Altiris\Altiris Agent\Agents\Deployment\Task
Handler\SBS\Images
To recreate a preboot environment
1
In the Symantec Management Console, on the Settings menu, click
Deployment > Create Preboot Configurations.
2
On the Preboot Configurations page, select the preboot configuration to edit
from the available list.
3
Click the Recreate Preboot Environment link. This will display a message
of caution.
Clicking Recreate Preboot Environment automatically saves your
changes.Clicking Save changes after clicking Recreate Preboot Environment,
resets the Recreate settings you have made for the Preboot Environment.
Clicking Save changes is not required when recreating a preboot environment.
See “Configuring the PXE Server” on page 32.
See “Setting up Deployment Solution ” on page 24.
Editing and deleting Preboot configurations
Deployment Solution lets you edit or delete the preboot configurations that you
have created.
To edit preboot configurations
1
In the Symantec Management Console, on the Settings menu, click Settings
> Deployment >Create Preboot Configurations.
2
On the Preboot Configurations page, select the preboot configuration to edit
from the listed configurations and click the edit icon.
3
On the Edit Preboot Configuration page, make the required changes.
Consider the following while editing the preboot configurations:
■
If Both PXE and Automation folder option was selected earlier, then the
options to select PXE and Automation folder is disabled.
35
36
Setting up Deployment Solution
Adding drivers to a driver database
4
■
If both the Architecture, x86 and x64, were selected earlier, then the
options to select a single architecture is disabled.
■
The operating system once selected cannot be edited.
Click OK to save the changes.
To delete preboot configurations
1
In the Symantec Management Console, on the Settings menu, click Settings
> Deployment > Create Preboot Configurations.
2
On the Preboot Configurations page, select the preboot configuration to
delete from the listed configurations and click the delete icon.
3
Click OK to confirm to delete the preboot configuration.
4
Click Save changes.
See “Creating a preboot configuration” on page 33.
See “Configuring the preboot environment” on page 31.
Adding drivers to a driver database
Deployment Solution lets you add drivers to the driver database to ensure the
successful completion of Windows OS installation and Windows image deployment
tasks. By adding drivers to the driver database, you eliminate the need for manual
driver installations. When you add drivers to the driver database, missing drivers
and newly discovered drivers are automatically added to the image.
You can add drivers to the following driver databases:
DeployAnywhere
Adding drivers to the DeployAnywhere driver database helps in
making the task of imaging and scripted OS installation hardware
independent. Hence, deploying of image to client computers and
performing an OS installation do not fail due to hardware
dependencies.
The DeployAnywhere driver database supports only the Windows
operating system.
See “Adding drivers to the DeployAnywhere database” on page 37.
Setting up Deployment Solution
Adding drivers to a driver database
Preboot
Adding drivers to the Preboot database helps the preboot images
to support mass storage devices (MSDs) and network interface cards
(NICs). These drivers are added to the preboot images. These preboot
images are deployed through the preboot environment. It ensures
that you can reboot the client computers successfully to automation
or to PXE.
The Preboot driver database supports the Windows and Linux
operating systems.
You cannot add non-critical drivers to preboot database.
See “Adding drivers to the Preboot database” on page 38.
Driver databases lets you perform the following functionalities:
■
List drivers for DeployAnywhere and Preboot databases.
■
Add drivers to DeployAnywhere and Preboot databases by folder.
■
Delete drivers from the DeployAnywhere database only.
■
Search for drivers in DeployAnywhere and Preboot databases.
The search does not display any results if you use \ in your search string. The
search option lets you search based on the driver name, applicable OS, type
of driver, and device ID.
■
View device details of the selected driver by clicking More Info.
See “Creating system configuration settings” on page 45.
Adding drivers to the DeployAnywhere database
The DeployAnywhere driver database helps make image deployment and scripted
operating system installation tasks hardware-independent. DeployAnywhere
focuses on the device drivers that are critical because the retargeted system has
to be managed remotely. During a Windows scripted operating system installation,
if any required driver is missing, it takes the missing drivers from the
DeployAnywhere driver database.
See “Adding drivers to a driver database” on page 36.
DeployAnywhere supports only the Windows operating system.
DeployAnywhere supports the following critical driver types:
■
Mass storage device (MSD)
■
Network interface card (NIC)
The MSDs are critical because they allow the resident operating system to boot
while network drivers ensure that the retargeted node is managed remotely.
37
38
Setting up Deployment Solution
Adding drivers to a driver database
DeployAnywhere supports the following non-critical driver types:
■
Graphics
■
Audio
■
Keyboard
■
Mouse
■
USB
■
CD-ROM
■
Printer
■
Bluetooth
■
Multimedia
■
Modem
To add a new driver to the DeployAnywhere driver database
1
In the Symantec Management Console, on the Settings menu, click
Deployment > Driver Management.
2
Click the DeployAnywhere tab.
3
(Optional) To view details of a driver, select the driver from the list and click
More Info.
4
Click Add.
5
Browse to select the driver to add .
6
Click OK.
See “Adding drivers to the Preboot database” on page 38.
See “About OS Files installation” on page 83.
Adding drivers to the Preboot database
You can add drivers to the Preboot database. You can use these drivers for your
preboot PXE configurations needs.
See “About Pre-boot eXecution Environment (PXE)” on page 60.
BootWiz.exe is stored in the <install directory>\Altiris
Agent\Agents\Deployment\Task Handler\bootwiz directory.
See “Setting up Deployment Solution ” on page 24.
If a preboot configuration that you already created needs a new driver, you must
regenerate that preboot configuration.
Setting up Deployment Solution
Configuring multicast options to deploy image
See “Creating a preboot configuration” on page 33.
You can also add drivers to the DeployAnywhere database.
See “Adding drivers to the DeployAnywhere database” on page 37.
To add drivers to the Preboot database
1
In the Symantec Management Console, on the Settings menu, click
Deployment > Driver Management.
2
Click the Preboot tab.
3
(Optional) To view details of a driver, select the driver from the list and click
More Info.
4
Click Add.
5
Browse to select the required the driver to add.
6
Select the relevant operating system: WinPE, or Linux.
7
Select the relevant architecture: x86 or x64.
8
Click OK.
The new driver is used when you create a new configuration.
See “Adding drivers to a driver database” on page 36.
Configuring multicast options to deploy image
Deployment Solution uses the multicasting abilities of the RapiDeploy and Ghost
imaging tools to simultaneously deploy images to a group of computers. You use
the options on the Image Multicasting page to specify the IP range, port range,
and other settings to use with multicasting.
See “About images” on page 68.
To configure multicast options
1
In the Symantec Management Console, on the Settings menu, click
Deployment > Image Multicasting.
2
Select the required options or click Restore defaults to use the default
settings.
See “About Image Multicasting options” on page 40.
3
Click Save changes.
See “About Imaging client computers” on page 65.
39
40
Setting up Deployment Solution
Configuring the initial deployment settings
About Image Multicasting options
Deployment Solution uses the multicasting abilities of the RapiDeploy and Ghost
imaging tools to simultaneously deploy images to a group of computers.
You can configure the image multicasting settings through the following options:
■
Settings > Deployment > Image Multicasting menu
■
Settings > All Settings > Deployment and Migration > Image Multicasting
option
The fields and descriptions of the Image Multicasting dialog box are as follows:.
See “About images” on page 68.
Table 2-2
Image Multicasting options
Option
Description
IP range
The range of IP addresses to use for image
deployment.
Port range
The range of port numbers to use for image
deployment.
Threshold
The minimum number of clients that need to be part
of the group before multicasting is used.
Speed
The maximum speed to use when multicasting to
avoid flooding the network with too much traffic. As
this number increases, there is a greater chance for
dropped packets and slower speeds to occur.
Timeout
The maximum number of seconds to wait for the
specified number of clients to join the group. If this
number is reached, your images are deployed
separately.
See “About Imaging client computers” on page 65.
See “Configuring multicast options to deploy image” on page 39.
Configuring the initial deployment settings
The initial deployment menu is loaded from the Symantec Management Platform
and allows for the selection of a task or job to run on the computer.
The unmanaged computer boots from a network card and asks for a PXE server.
The PXE server receives this request and compares the computer against its list
Setting up Deployment Solution
Adding OS files
of known computers. After the server determines that the computer is unknown
it sends a preboot image to the computer. This preboot image is the image that
you configured in the PXE Server Configuration page to respond to the unknown
computers.
After the unknown computer receives the preboot PXE image, the pre-OS runs
and requests a task server. Because the computer is unknown, it receives an initial
deployment menu that contains a preconfigured job or task. According to the
default job or the task set for the initial deployment, the task is scheduled on the
client computers. It also specifies how long those tasks display on the new
computer.
See “Setting up Deployment Solution ” on page 24.
To configure the initial deployment settings
1
In the Symantec Management Console, on the Settings menu, click
Deployment > Initial Deployment .
2
Select how long to display the task menu before the default task is performed.
3
Select whether to run a default task or job, or to turn off the computer after
the initial deployment menu is displayed for the specified time.
4
Click Add to add any tasks that you want to display in the Initial Deployment
menu.
5
Select the default task for the initial deployment menu.
The selected default task execution starts after the lapse of time specified.
During the specified time, you can choose to run any other tasks that are
displayed in the menu.
6
Click Save changes.
See “What you can do with Deployment Solution” on page 18.
See “Configuring the PXE Server” on page 32.
Adding OS files
You can add files to your package in Deployment Solution. You can configure the
import parameters for your package. Ensure that JRE 1.5 or later installed to add
files to your package.
After you add the OS Files from the Symantec Management Console , the files are
added to the following location:
Program Files\Altiris\Altiris Agent\Agents\Deployment\Task Handler\SOI
directory.
41
42
Setting up Deployment Solution
Importing OS files
See “About OS Files installation” on page 83.
To add OS files
1
From the Settings menu, select Deployment > OS Files.
2
Click Add files.
3
Enter a name that you want assigned to your file package in the Name field.
4
Enter a description that you want assigned to your file package in the
Description field.
5
Under the OS Type section, select the platform for the operating system from
the Platform drop-down list.
6
Under the OS source section, click Add Files to add files to be used during
the scripted OS installation.
For 32-bit Windows XP and 2003, select I386 folder. For 64-bit Windows XP
and 2003, select both AMD64 and I386 folders. For Windows Vista and later
versions of the operating systems, select the Sources folder.
Deployment Solution also provides the option to import the OS files. For more
information, see
See “Importing OS files” on page 42.
Importing OS files
You can use the Deployment Solution Resource Import Tool to import OS files
from the OS sources.
To import OS files
1
Browse to \C:\Program Files\Altiris\Altiris
Agent\Agents\Deployment\Task Handler\Tools” or [Altiris Agent
Install Dir]\Agents\Deployment\Task Handler\Tools and execute the
ResourceImportTool.exe.
You can execute this tool from Symantec Management Platform or from Site
Server.
Ensure that you run this tool only from Symantec Management Platform.
2
On the Deployment Solution Resource Import Tool, click the OS file Import
tab.
3
Enter a name for the OS file in the Name of OS file package field.
4
Enter a description for the OS file package.
Setting up Deployment Solution
Adding OS licenses
5
Select the OS platform from the OS Platform drop-down list.
6
Click Add OS Folder to browse and select the sources for the selected OS
platform.
7
Click Import.
8
A message indicating the successful upload of OS file is displayed.
Acknowledge the message and close the Deployment Solution Resource
Import Tool.
See “Adding OS files” on page 41.
See “Setting up Deployment Solution ” on page 24.
Adding OS licenses
Before you use Sysprep with a Deployment job or task, you need to select the OS
and the corresponding OS license for the job. This information must be configured
before the job is created.
See “Configuring the Sysprep imaging” on page 44.
The OS Licenses list stores the Volume License Keys (VLKs) that deploy the
Sysprep-enabled images.
To add OS licenses
1
In the Symantec Management Console, on the Settings menu, click
Deployment > OS Licenses.
2
Click Add.
3
Choose the operating system from the drop-down list.
4
Type the product key.
5
(Optional) Type a description for the license.
6
Click OK.
Your new license displays in the OS Licenses list.
See “Setting up Deployment Solution ” on page 24.
See “What you can do with Deployment Solution” on page 18.
See “Adding OS files” on page 41.
43
44
Setting up Deployment Solution
Importing predefined computers
Importing predefined computers
You can import a predefined computer to assign jobs to unmanaged computers.
An unmanaged computer does not yet have the Symantec Management Agent or
the Deployment plug-in installed on it.
When a computer performs a PXE Boot, the PectAgent sends the basic inventory
from preboot environment of the imported computer in form of the new computer’s
name and MAC address. Hence name and MAc address are mandatory fields.
See “About predefined computers” on page 105.
Ensure that you have set the preboot image to respond to predefined computers.
In case the preboot image is not set, an error is displayed when you import the
predefined computers.
See “Configuring the PXE Server” on page 32.
To import predefined computer
1
In the Symantec Management Console, on the Settings menu, click
Deployment > Predefined Computers.
2
Click Import Computers, and then navigate to the.txt or the .csv file
containing the information about the computers to import.
You can copy a sample Pre-DefinedComputers.csv file from the \Program
Files\Altiris\Notification
Server\NSCap\bin\Win32\X86\Deployment\Sample\PreDefinedComputers
folder.
3
From the Manage menu, select Computers to view the details of imported
predefined computers.
See “Booting predefined computers” on page 106.
See “About deployment tasks and jobs” on page 51.
Configuring the Sysprep imaging
Sysprep is the Microsoft utility that prepares computers for Windows deployments.
All Windows platforms after Windows XP and Windows 2003 include Sysprep
files as part of the OS installation.
When you use the Prepare for Image capture task, Deployment Solution
automatically uses the Sysprep files. However, for that task to work on Windows
XP, you must upload its deploy.cab file into Deployment Solution using the
SysprepImagingConfiguration option. Sysprep imaging is supported for Windows
x86 and x64 only.
Setting up Deployment Solution
Creating system configuration settings
When you work with Microsoft domains, each computer must use a unique
Windows SID. SIDs are security IDs that are used with Windows NT and later
operating systems. Before you deploy Windows images, you should remove the
existing SID from a computer to avoid causing network problems. The Prepare
for Image capture task automatically strips the SIDs from each computer using
Sysprep.
You can then create an image using the Create image task and deploy the resulting
image to multiple computers.
Sysprep also disables the built-in administrator account and clears the
administrator password when it prepares a computer for imaging. You might need
to change the password on the client computer before logging on for the first time
after deploying an image.
See “Setting up Deployment Solution ” on page 24.
To configure Sysprep imaging
1
In the Symantec Management Console, on the Settings menu, click
Deployment > Sysprep Imaging Configuration.
2
Based on your platform, under x86 Deploy.cab or x64 Deploy.cab, click
Upload to browse and upload the relevant .cab file.
3
Click Save changes.
See “Preparing to capture an image” on page 70.
Creating system configuration settings
The system configuration settings contain the network, domain, and other settings
that are applied to computers after they are imaged. You can create or update
system configuration settings. These settings are applied to computers after you
deploy a disk image or apply a system configuration using a task server.
See “Creating a Deploy Image task” on page 75.
When you distribute a generic Sysprep-enabled image, the system configuration
settings are applied to the computer for the initial setup. The same configuration
settings can be applied to multiple computers using the name range feature.
You can create a backup image or distribute a Sysprep-enabled image to computers
that have the Deployment plug-in installed on them. In this case, you can choose
to retain and restore all existing configuration settings. You can also choose to
reconfigure these settings.
After the image is deployed, you are required to create the System Configurations
to bring the client computers to domain in the following scenarios.
45
46
Setting up Deployment Solution
Creating system configuration settings
■
Client computers are bare metal computers
■
Client computers were not on domain before the image was deployed.
The credentials are either a local administrator account or a domain account if
you join the computer to a domain.
To create system configuration settings
1
In the Symantec Management Console, on the Settings menu, click
Deployment > System Configurations.
2
Click New system configuration.
3
In the System Configuration Editor dialog box, type a name and description
for the new configuration settings.
4
5
On the Computer Information tab and the Network Adapters tab, select and
enter the required information.
6
Click OK.
See “What you can do with Deployment Solution” on page 18.
System Configuration: Create System Configuration dialog box
The Create System Configuration dialog box lets you create or update system
configuration settings through the configuration editor. These settings are applied
to computers after you deploy a disk image or apply a system configuration using
the task service.
The credentials are either a local administrator account or a domain account if
you connect the computer to a domain. You can configure the system configuration
editor options through the Computer Information tab and the Network Adapters
tab.
The fields and descriptions of the Create System Configuration dialog box are as
follows:
Table 2-3
Create System Configuration
Field
Description
Name
Lets you specify a name for the system
configuration task that you create.
Description
Lets you specify a description for the task
that you create.
Setting up Deployment Solution
Creating system configuration settings
The fields and descriptions of the Computer Information tab are as follows:
Table 2-4
Computer Information tab
Options
Description
Computer name or Name Select Computer name and enter a computer name or select
range
Name range and click Define range to specify a new computer
range.
For computer names, you can use tokens. For example,
%CustomerToken%, %SERIALNUMBER%.
If you select Computer name, you can select Leave existing for
a computer that is not stored in the database. In this instance,
the default name that the Windows installation generates is
used.
If you select Name range you can use the same configuration
for multiple computers. Computers are named using a fixed
string and a value. Additionally, if you use a name range with
a static IP address on the Network Adapter tab, the IP address
you specify is incremented as well.
The fixed text appears before the number range. If the append
option is selected, the text appears after the number range.
The range is the number that you want to start with. This string
increment is by 1 for each computer that receives the
configuration.
Workgroup or Domain
Select Workgroup and enter a workgroup name for the new
configuration or select Domain and enter the domain name. If
you select Domain, you have to also specify the following:
■
Organizational unit
■
Administrative domain user name and password
The fields and descriptions of the Network Adapter tab are as follows:
Table 2-5
Network Adapter tab
Options
Description
Domain Suffix
Lets you specify the domain suffix of the
network.
Select Leave existing if you want to retain
the existing domain suffix.
47
48
Setting up Deployment Solution
Creating system configuration settings
Table 2-5
Network Adapter tab (continued)
Options
Description
Network adapter
Lets you select a network adapter from the
drop-down list.
Click Add to add a network adapter to the
configuration. Click Remove to remove a
network adapter from the configuration.
Select one of the following options:
Leave existing
Select this option if you want to use the
existing default DHCP or IP address.
■ Use DHCP to obtain IP address
Select this option if you want to create
interfaces, gateway, and DNS. Click
Advanced to create the IP interfaces,
gateway, and DNS.
■ Assign a static IP address
Select this option to assign a static IP
address.
Specify the following after you select this
option:
■ Name Range
■
■
IP Address
■
Subnet mask
■
Default gateway
■
DNS1
■
DNS2
If you change an IP address from DHCP
to static, you must supply the subnet
mask and gateway. Even if they are the
same as they were when you use DHCP,
you must supply these numbers. These
values are not stored when you use
DHCP.
You can add multiple NIC, but it is not
supported for SUSE client computers.
See “Creating system configuration settings” on page 45.
Setting up Deployment Solution
Adding tokens
Adding tokens
Deployment Solution provides you with the option to create tokenized scripts. It
also provides you with some predefined tokens that you can use.
To add tokens
1
In the Symantec Management Console, on the Settings menu, click
Deployment > Token.
2
Click New token.
3
Enter a name for the token in the Token name filed.
4
Enter the SQL statement for the token.
5
Click Validate SQL to validate the SQL statement.
6
Click Save changes.
See “Setting up Deployment Solution ” on page 24.
49
50
Setting up Deployment Solution
Adding tokens
Chapter
3
Managing tasks and jobs
This chapter includes the following topics:
■
About deployment tasks and jobs
■
Creating a deployment task
■
Combining tasks into a job
■
Scheduling a deployment task
■
Verifying the task status
■
Changing network settings
About deployment tasks and jobs
Deployment Solution manages computers using tasks and jobs. Tasks are individual
processes, such as creating an image or capturing a computer’s personality. Each
task can be scheduled and run.
Jobs are a combination of tasks. Each job can be assigned to specific computer,
and each job specifies the order in which each task runs.
You must create each task before it appears in your Manage > Jobs and Tasks >
System Jobs and Tasks > Deployment and Migration list.
If a computer does not yet have the Symantec Management Agent or the
Deployment plug-in installed, you can import a predefined computer. Predefined
computers let you assign jobs to unmanaged computers.
See “Importing predefined computers” on page 44.
You can create Client Jobs and Server Jobs in Symantec Management Platform.
These two job types are identical with one exception. Server Jobs guarantee that
the exact same task sequence and execution path is followed for all nodes. For
52
Managing tasks and jobs
About deployment tasks and jobs
example, the logic for a job specifies that the job stops if one of the tasks fails.
When that task fails or times out in one node, that job stops for all of the nodes.
Deployment Solution provides the following predefined tasks.
Table 3-1
Predefined deployment tasks
Task
Description
Apply System Configuration
Applies the new configurations to a computer.
See “Creating system configuration settings”
on page 45.
Capture Personality
Uses PC Transplant to capture a computer’s settings
and files (personality).
See “Capturing computer personality” on page 98.
Copy File
Copies the specified files and folders to a destination
computer.
See “Copying files and folders options” on page 102.
Create Image
Creates disk images and backup images.
See “Creating an image” on page 71.
Deploy Image
Deploys the disk image files (not the backup image
files).
See “Creating a Deploy Image task” on page 75.
Capture Personality
Capture's the personality of the computer.
See “Capturing computer personality” on page 98.
Distribute Personality
Installs a previously captured computer personality.
See “Distributing computer personality” on page 99.
Erase Disk
Cleans a disk. You can configure this task to meet
DoD standards.
See “Erasing a Disk” on page 85.
Install Linux OS
Performs a scripted OS install of Linux.
See “Performing a LINUX OS installation”
on page 91.
Install Windows OS
Performs a scripted OS install of Windows.
See “Performing a Windows OS installation”
on page 88.
Managing tasks and jobs
About deployment tasks and jobs
Table 3-1
Predefined deployment tasks (continued)
Task
Description
Partition Disk
Creates the disk partitions on a hard drive.
See “Creating disk partitions” on page 87.
Prepare for Image capture
Runs Microsoft Sysprep.
See “Configuring the Sysprep imaging” on page 44.
See “Preparing to capture an image” on page 70.
Reboot To
Instructs a computer to boot to the production OS,
PXE, or automation folder.
See “Creating a Reboot to task” on page 62.
Restore BackUp Image
Deploys the backup image files (not the disk image
files).
See “Restoring a backup image” on page 79.
You can also create many other types of tasks that work with Deployment Solution
to add more functionality. For example, you can create the following types of
tasks:
■
A Run Script task that lets you use a scripting language such as Perl or Python.
The Run Script task supports many scripting languages and predefined tokens.
For more information, search for run script task topics in the Symantec
Management Platform Help.
■
An inventory task that gathers much more information than the Deployment
Solution reports provide. The inventory tasks are listed in the Symantec
Management Console on the Create New Task page under Discovery and
Inventory.
■
A Power Control task that provides many of the capabilities that were included
in previous versions of the Deployment Solution product.
For more information, search for power control task topics in the Symantec
Management Platform Help.
■
A Power Management task that integrates out-of-bounds (OOB) management
capabilities with traditional Deployment Solution tasks.
For more information, search for power management topics in the Real-Time
Console Infrastructure Help.
See “Creating a deployment task” on page 54.
See “Combining tasks into a job” on page 55.
53
54
Managing tasks and jobs
Creating a deployment task
See “Scheduling a deployment task” on page 55.
See “Verifying the task status” on page 56.
Creating a deployment task
You can create many kinds of deployment tasks, such as changing the Windows
system settings or applying a predefined system configuration setting. You can
also capture or deploy a disk image or personality and create or restore a backup
image.
See “About deployment tasks and jobs” on page 51.
After a deployment task is created, it is listed under the Jobs and Tasks >
Deployment and Migration folder. Click any task to view the properties of that
task. You can drag and drop tasks to other folders and manually create folders.
Any folders that you create do not display until you create a task or job in that
folder. Several tasks can also be combined into one job.
See “Combining tasks into a job” on page 55.
A task cannot be deleted if it is currently in use by a job or policy. You can use the
Jobs and Tasks view to see what jobs and policies use each task.
Tasks can be renamed, deleted, cloned, moved, and scheduled by right-clicking
the task and selecting the corresponding option.
See “Changing network settings” on page 57.
To create a deployment task
1
In the Symantec Management Console, on the Manage menu, click Jobs and
Tasks.
2
In the right pane, click Create a new job or task.
3
On the Create New Task page, in the left page, expand the Deployment and
Migration folder.
4
Click one of the task types.
5
Add any necessary information, and choose the options you want.
Make sure that you give your task a unique and meaningful name.
6
Click OK.
7
Schedule the task.
See “Scheduling a deployment task” on page 55.
See “What you can do with Deployment Solution” on page 18.
Managing tasks and jobs
Combining tasks into a job
Combining tasks into a job
You can use jobs to group several tasks together, so that they all run consecutively.
You can combine deployment-specific tasks with other tasks in a single job.
Jobs also have the condition statements that you can specify. Your tasks are then
executed only if they meet the conditions that you specify.
Jobs can be renamed, deleted, cloned, moved, and scheduled by right-clicking the
job and selecting the corresponding option.
You can drag and drop jobs to other folders and manually create folders. Any
folders that you create do not display until you create a task or job in that folder.
See “Creating a deployment task” on page 54.
For more information, search for topics on creating a job in the Symantec
Management Platform Help.
To combine tasks into a job
1
In the Symantec Management Console, on the Manage menu, click Jobs and
Tasks.
2
In the left pane, right-click the folder where you want the job to be stored in,
and then click New Client Job or New Server Job.
3
In the right pane, create or add the tasks you want.
You can click New to add new jobs or tasks to your job. You can also click Add
Existing to add existing jobs or tasks to your job.
You can use the arrows to order the tasks.
See “Creating a deployment task” on page 54.
4
Select whether the job should fail if any task fails.
5
Click OK.
You can edit, order, and add or delete the tasks in a job. Right-clicking selects the
job that you want to change, and then you can use the options in the right pane.
See “What you can do with Deployment Solution” on page 18.
See “About deployment tasks and jobs” on page 51.
Scheduling a deployment task
You can schedule a task to run immediately or at a time that you specify. You can
also choose the computers that the task runs on.
55
56
Managing tasks and jobs
Verifying the task status
To schedule a task
1
In the Symantec Management Console, on the Manage menu, click Jobs and
Tasks.
2
In the left pane, expand the Jobs and Tasks > System Jobs and Tasks >
Deployment and Migration folders.
3
Click the job that you want to schedule.
4
(Optional) If you want the task to run immediately, in the right pane, click
Quick Run. Select the name of the computer that you want the task to run
on, and then click Run.
You can schedule the task to run on only one computer using the Quick Run
option.
5
If you want to schedule the task to run at a later time or you want to schedule
multiple computers, click New Schedule.
6
Choose the date and time that you want the task to run.
You can also select the task to run at specific intervals.
7
Select the Run Options that you want.
8
Select the computers that you want the task to run on.
9
Click Schedule.
See “What you can do with Deployment Solution” on page 18.
See “Creating a deployment task” on page 54.
Verifying the task status
You can check the state of any tasks that previously ran.
See “About deployment tasks and jobs” on page 51.
You can choose different options for your report, and then click Refresh to see
the updated results.
To verify the task status
1
In the Symantec Management Console, on the Reports menu, click All
Reports.
2
In the right pane, expand the Reports > Deployment and Migration folders.
3
Click Computers with Deployment Tasks Execution Status.
4
Select the name of the tasks that you want to check the status of.
5
Select a status.
Managing tasks and jobs
Changing network settings
6
Select an image name.
7
Select a time frame.
The report runs, and the right pane is updated with the information that you
requested.
See “What you can do with Deployment Solution” on page 18.
See “Creating a deployment task” on page 54.
See “Scheduling a deployment task” on page 55.
Changing network settings
You can apply a system configuration to a computer. You can update a computer
name, join a domain, or change network settings.
See “Creating a deployment task” on page 54.
To change network settings
1
In the Symantec Management Console, on the Manage menu, click Jobs and
Tasks.
2
In the right pane, click Create a new job or task.
3
On the Create New Task page, in the left pane, expand the Deployment and
Migration folder.
4
Click Apply System Configuration.
5
(Optional) In the right pane, select a predefined configuration.
You can click Edit configuration to edit an existing configuration.
See “Creating an Apply System Configuration task” on page 80.
You can also choose to restore the system configuration by using the inventory
data.
6
If the target computer is in a Domain, select the corresponding check box.
Enter the credentials for the Domain.
7
Click OK.
8
Schedule the task.
See “Scheduling a deployment task” on page 55.
57
58
Managing tasks and jobs
Changing network settings
Chapter
4
Rebooting client computers
This chapter includes the following topics:
■
About rebooting client computers
■
About automation environment
■
About Pre-boot eXecution Environment (PXE)
■
About Production environment
■
Creating a Reboot to task
About rebooting client computers
Before you perform any deployment tasks, you are required to reboot the client
computer to an automation environment or the Pre-boot eXecution Environment.
After the deployment task is completed, you reboot the client computer back to
the production environment to resume live operations.
See “About automation environment” on page 59.
To reboot the client computers to an automation environment, the Pre-boot
eXecution Environment , or the production environment, you have to create and
execute a Reboot to task.
See “Creating a Reboot to task” on page 62.
See “About Pre-boot eXecution Environment (PXE)” on page 60.
See “About Production environment” on page 62.
About automation environment
Deployment Solution has the ability to set up client computers before the normal
operating system loads. The managed client computers are prebooted into an
60
Rebooting client computers
About Pre-boot eXecution Environment (PXE)
environment in which they can communicate with Deployment Solution. This
environment is known as an automation environment and you can reboot the
client computers to an automation environment only when you have enabled the
Deployment Automation Folder - Install policy.
See “Installing an automation folder” on page 28.
To reboot the client computers to an automation environment, you have to create
and execute a Reboot to task.
See “Creating a Reboot to task” on page 62.
A client computer with a 64-bit Linux operating system cannot be rebooted to an
automation environment.
Reboot the client computers to an automation environment to perform the
following deployment tasks:
■
Create an image.
■
Deploy an image.
■
Restore a backup image.
■
Copy a file.
■
Erase a disk.
■
Install Windows or Linux OS.
■
Partition a disk.
See “About Pre-boot eXecution Environment (PXE)” on page 60.
About Pre-boot eXecution Environment (PXE)
The Pre-boot eXecution Environment (PXE) is an environment that you can use
to reboot computers using a network interface. This process is independent of
your hard disks or installed operating systems.
Deployment site server components include PXE. You cannot uninstall PXE from
a computer without uninstalling all of the deployment components.
See “Components of Deployment Solution” on page 13.
You can configure PXE by using the PXE server configuration option. However,
changing the PXE configuration automatically affects PXE on all Deployment site
servers in your environment.
See “Configuring the PXE Server” on page 32.
The preboot configuration policy also affects all Deployment site servers. After
each Deployment site server processes this policy, PXE offers the same bootstrap
Rebooting client computers
About Pre-boot eXecution Environment (PXE)
menu and images to the clients that boot to PXE. Each Deployment site server
receives this policy from Symantec Management Platform and implements the
policy settings in a preboot image. The site server creates new preboot images
each time it receives new preboot policy configurations. If you remove
configurations from the preboot policy, the site server removes the corresponding
preboot images.
See “Creating a preboot configuration” on page 33.
Warning: You should not try to clone the PXE policies. If you make changes to a
cloned policy copy, unknown consequences might occur. You cannot determine
what version of the policy Deployment Solution implemented.
You can add drivers for a preboot image. The addition of drivers ensures that the
PXE image supports new hardware.
See “Adding drivers to the Preboot database” on page 38.
You can have more than one Deployment site server on a broadcast domain.
However, you must ensure that all Deployment site servers on this kind of domain
are assigned to the same Symantec Management Platform site.
For example, if a client on this domain sends a PXE request, you cannot tell which
Deployment site server might respond. If the responding server does not know
that a PXE reboot task exists, the server instructs the client to boot from the next
available device. Usually that device is the hard drive. All client computers with
a PXE reboot task must receive a PXE reboot image, no matter which site server
responds. All Deployment site servers that are assigned to the same Symantec
Management Platform site receive instructions to supply the corresponding
preboot image.
See “Creating a Reboot to task” on page 62.
Warning: Before you reboot to PXE, ensure that you have started the Windows
firewall service and opened the ports 4011 and 69. Otherwise, rebooting to PXE
might fail.
Reboot the client computers to PXE to perform the following deployment tasks if
you plan to use the PXE image:
■
Create an image.
■
Deploy an image.
■
Restore a backup image.
■
Copy a file.
61
62
Rebooting client computers
About Production environment
■
Erase a disk.
■
Install Windows or Linux OS.
■
Partition a disk.
See “About automation environment” on page 59.
About Production environment
To resume live operations after completing deployment tasks or maintenance
tasks, you must reboot the client computers back to the production environment.
During this process, you must use the operating system of the computer, also
known as DiskOS. You are required to execute the Reboot to task to reboot the
client computer to the production environment.
See “Creating a Reboot to task” on page 62.
Creating a Reboot to task
You can start computers in an automation environment to run tasks, such as
scripts. You can choose to reboot to a PXE or a production environment.
Do not mix PXE with automation partitions or folders on a client. You can use
PXE or automation partitions or folders but not both environments together.
Assign this task only if you want to perform a custom automation task.
See “About deployment tasks and jobs” on page 51.
To create a Reboot to task
1
In the Symantec Management Console, on the Manage menu, click Jobs and
Tasks.
2
In the right pane, right-click Jobs and Tasks > New > Task.
3
On the Create New Task page, under Deployment and Migration, click Reboot
to.
4
Enter a name for the task.
5
Select one of the following:
Rebooting client computers
Creating a Reboot to task
Automation
Select this environment to reboot client computers to perform
any deployment tasks.
A client computer with 64-bit Linux operating system cannot
be rebooted to an automation environment.
If you reboot the Linux client computer that has a static IP
environment, ensure that you manually enter the following
information:
PXE
■
site server's name
■
Symantec Management Platform server's name
■
site server and Symantec Management Platform server's IP
addresses in /etc/hosts file in automation folder package.
Select this environment if you plan to use PXE images. Select
the image and the architecture from the drop-down lists.
Warning: Before you reboot to PXE, ensure that you have started
the Windows firewall service and opened the ports 4011 and
69. Otherwise, rebooting to PXE might fail.
Production
6
Click OK.
7
Schedule the task.
Select this environment if you have completed the deployment
task and now want to resume live operations.
See “Scheduling a deployment task” on page 55.
See “About Production environment” on page 62.
63
64
Rebooting client computers
Creating a Reboot to task
Chapter
5
Imaging computers
This chapter includes the following topics:
■
About Imaging client computers
■
About images
■
About image resources
■
About disk image packages
■
Preparing to capture an image
■
Creating an image
■
Importing an existing image
■
Creating a Deploy Image task
■
Restoring a backup image
■
Deploying an image to new computers
■
Creating an Apply System Configuration task
■
Setting Advanced Deploy Image Options for multicasting
About Imaging client computers
Imaging is the copying of the contents of a computer's hard disk into a single
compressed file or a set of files. The single compressed file or set of files is referred
to as an image. By creating an image the contents of the hard disk, including
configuration information and applications can be copied to the hard disk of other
computers. Imaging is useful where one system has to be replicated on a number
of computers as the users need the same system and applications.
66
Imaging computers
About Imaging client computers
For Windows, the images that are deployed to multiple computers are prepared
using Microsoft Sysprep to remove drivers, the security ID (SID), and other
computer-specific settings. Sysprep also disables the built-in administrator account
and clears the administrator password. You can also use the Prepare for Image
Capture task on Linux to remove all configuration-specific settings, such as host
name, IP address, and so on. You can perform this task before you reboot to
automation environment using the preimage script.
Before performing the imaging tasks configure the following settings:
■
Configure the Sysprep imaging.
See “Configuring the Sysprep imaging” on page 44.
■
Configure image multicasting. Configure this option if you want to
simultaneously deploy an image to multiple computers.
See “About Image Multicasting options” on page 40.
■
Manage driver database. Add drivers to DeployAnywhere database and to
Preboot database to ensure that images are deployed successfully.
See “Adding drivers to a driver database” on page 36.
You should also ensure that the package server is installed on the Symantec
Management Platform, where the remote site server are installed. This lets you
perform the task replication and package replication successfully.
Table 5-1
Process for creating and deploying an image
Step
Action
Description
Step 1
Prepare a reference
computer for imaging.
The reference computer contains the core
software and settings that you want to use on each
computer.
Step 2
(XP and Windows 2003
only) Install Sysprep
files on the reference
computer.
You need to copy the
support\tools\deploy.cab file from your
Windows XP installation disk or service pack to
the c:\sysprep\deploy.cab file on the source
computer.
See “Configuring the Sysprep imaging”
on page 44.
Step 3
Add an operating
system license.
The operating system license is used to re-license
your reference computer after Sysprep runs.
See “Adding OS licenses” on page 43.
For Linux, this step is optional.
Imaging computers
About Imaging client computers
Table 5-1
Process for creating and deploying an image (continued)
Step
Action
Description
Step 4
Reboot to Automation
folder or PXE
Reboot the client computer to Automation folder
or if you to use a PXE image, reboot to PXE.
See “About rebooting client computers”
on page 59.
Step 5
(Optional) Prepare for
image capture
Perform this task if you want to perform a sysprep
imaging and use the Include DeployAnywhere
for hardware independent imaging option. If you
deploy a disk image using the Include
DeployAnywhere for hardware independent
imaging option and you have not preformed the
Prepare for Image capture task, the client
computer image gets corrupted.
See “Configuring the Sysprep imaging”
on page 44.
See “Preparing to capture an image” on page 70.
Step 6
Create an image.
You can create disk images and backup images.
See “Creating an image” on page 71.
Step 7
Deploy an image
You can deploy an image that you previously
created. Perform this step if you created a disk
image.
See “Creating a Deploy Image task” on page 75.
Step 8
(Optional) Restore the
backup image that you
previously created.
You can restore the exact state that a computer
was in when it was imaged. Perform this step if
you created a backup image.
See “Restoring a backup image” on page 79.
Step 9
Deploy images to new
computers.
You can use Initial Deployment to image the new
computers in your environment.
See “Deploying an image to new computers ”
on page 79.
Step 10
Reboot to Production
After completing the imaging task, reboot the
client computer to Production to resume live
operations.
See “About rebooting client computers”
on page 59.
67
68
Imaging computers
About images
See “About images” on page 68.
See “About deployment tasks and jobs” on page 51.
About images
Computer images contain the entire content of a computer’s hard drive. These
contents include the operating system, applications, and user data. For Windows
and Linux, you can create images using either Ghost or RapiDeploy. Both are
included in Deployment Solution.
See “About Image Multicasting options” on page 40.
You can create disk images or backup images.
When you run a task to create an image, the following steps occur:
■
An image file is created.
■
A Notification Server package is created (for disk images only).
See “About disk image packages” on page 69.
■
A resource for the image is added to the CMDB.
See “About image resources” on page 68.
A new folder and image file is created each time that you run a task to capture an
image. If you run the same task on the same computer three times, you have three
different folders and image files for that computer.
You can do one of the following things to avoid the duplication problem:
■
Edit the disk creation task to use a unique image name.
■
Create a new task that you configure to use a different image name.
Images are created on the task server that the source computer is configured to
work with.
See “Creating an image” on page 71.
About image resources
When an image is created, a Symantec Management Platform resource for that
image is also created. The image resource is used when you build tasks to deploy
the images.
See “About images” on page 68.
The Symantec Management Console uses the resource list to display what images
can be deployed. However, the console does not verify if the image file already
Imaging computers
About disk image packages
exists. If your image file is deleted from the server, it is still possible to create a
task to deploy the deleted image. In this case, the task fails.
You can view a list of your image resources from the Manage > All Resources >
Default > All Resources > Software Component > Image Resource menu. You
can also right-click a resource to access the Resource Manager.
If you delete the image resource name using the Resource Manager, it does not
delete the physical image file from the server. After you delete the image resource
name, you must remove the image file from the server.
See “Deleting an image package” on page 110.
See “Preparing to capture an image” on page 70.
About disk image packages
A Symantec Management Platform package is created for all disk images when
you run the Disk Image task. You can then use this package to distribute the image
to other package servers.
See “About images” on page 68.
Disk images are stored on the Deployment share of the Deployment site server.
Each image is stored in a separate folder that is specified by a GUID. Information
about the image is also stored in the CMDB as an image resource.
You can view your disk image packages from the Manage > Computers menu or
from the Manage > All Resources > Default > All Resources > Package menu.
You can also view them from the Settings > All Settings > Deployment and
Migration > Disk Images menu.
You can configure how the image package is distributed to additional package
servers using the Settings > All Settings menu. After you select the package you
want, you can then select what servers get the image from the Package Servers
tab.
You can choose from the following package distribution options:
■
All package servers.
■
Individual package servers.
■
Package servers by site.
■
Package servers automatically with manual pre-staging.
You can also delete packages.
See “Deleting an image package” on page 110.
See “About image resources” on page 68.
69
70
Imaging computers
Preparing to capture an image
Preparing to capture an image
You can run the Prepare for Image Capture task to get ready to capture a disk
image.
See “About Imaging client computers” on page 65.
For Windows, this task uses Sysprep to remove the computer name (SID), the
operating system license, and some hardware-dependent drivers. You should
always run this task before creating a disk image and if you want to use
DeployAnywhere for hardware independent imaging. Sysprep also disables the
built-in administrator account and clears the admin password. For Linux, this
task runs a preimage script to remove the configuration-related settings and
prepare the computer for imaging.
See “Configuring the Sysprep imaging” on page 44.
You can choose several options while creating this task.
See “Preparing to capture an image” on page 70.
You must create a deployment task before you can run it.
To prepare for image capture
1
In the Symantec Management console, from the Manage menu select Jobs
and tasks.
2
On the right pane, right-click Jobs and tasks and select New > Task.
3
On the Create new task page, select Prepare for Image Capture.
Imaging computers
Creating an image
4
Specify a name for the task on the first field.
5
Under the Pre-Imaging section, select Windows (using sysprep) or Linux
operating system.
If you select Windows (using sysprep), enter the following information:
OS type
Select the type of operating system the task is run on from the
drop-down list.
Product key
Select an operating system license that can be used to restore the
computer back to its original state after the task runs. If the license
has not been added to Deployment Solution, you can add one by
clicking New.
Enter
credentials to
rejoin a
domain after
capture is
complete
Enter the user name and password that the computer needs to join
the domain again. Enter the password again in the Confirm password
field.
Reboot to
Select the preboot type to use to start the image creation process.
You can either select Automation or PXE. If you select PXE you also
need to select the PXE image and the architecture from the
drop-down lists.
See “Creating an image” on page 71.
See “About deployment tasks and jobs” on page 51.
Creating an image
You can create disk images and backup images with the Create Image task.
You can deploy disk images to multiple computers. This process removes all of
the Windows operating system settings from any captured images. Your computer
restarts multiple times during this process.
See “About Imaging client computers” on page 65.
Backup images retain the data and software of a specific computer. A backup
image contains a snapshot of the hard disk of a computer. A backup image can be
restored only to the computer that it was captured from. The image has the same
name as the computer from which it was captured.
By default, the first disk in the system is imaged using Ghost in optimize for speed
mode. Other imaging tools are also available.
71
72
Imaging computers
Creating an image
You can also choose advanced imaging options for this task.
See “Setting advanced Create Image options” on page 73.
To create an image
1
In the Symantec Management Console, from the Manage menu select Jobs
and tasks.
2
On the right pane, right-click Jobs and tasks and select New > Task.
3
On the Create new task page, select Create Image.
4
Specify a name for the task on the first field.
5
Enter the following information:
Image name
Enter a name for the image to be created.
Image name supports only ASCII characters. If you use a token
for image name, ensure that it is a valid predefined token.
Otherwise, an image package with a blank name is created, which
is difficult to locate when you want to deploy the image.
Description
Enter a description, if required.
Imaging tool
Select the tool you want to use the create the image. You can
choose from the following:
■
Ghost
■
RapiDeploy
Imaging computers
Creating an image
Image type
You can select from the following two types of computer images:
■
Disk Image
■
Back-Up Image
Disk Image can be deployed to multiple computers (provisioning).
These images are saved in a Notification Server package and can
be distributed to other package servers.
If you intend to deploy a disk image using the option Include
DeployAnywhere for hardware independent imaging, ensure
that the Prepare for Image capture task was executed before
the image was created. Otherwise, the client computer on which
this disk image is deployed might get corrupted.
See “Configuring the Sysprep imaging” on page 44.
Back-Up Image is used to back up a single computer. These
images should be deployed only to the same computer where
they were created from. They should not be deployed to multiple
computers. These images are not saved in a package and cannot
be distributed to other package servers through the replication
process. In case you want to image only a data disk (disk without
operating system) or partition of a data disk, select the Backup
image option.
Note: Windows Vista onwards RapiDeploy backup image requires
BCDEdit.
Advanced
Lets you select from advanced imaging options, such as media
spanning, command-line operations, and HTTP imaging.
See “Setting advanced Create Image options” on page 73.
6
Click OK.
See “Creating a Deploy Image task” on page 75.
Setting advanced Create Image options
The Advanced option on the Create Image task lets you configure additional
options.
You can choose several other options while creating this task.
See “Creating an image” on page 71.
73
74
Imaging computers
Creating an image
Table 5-2
Advanced Create Image options
Option
Description
Media
Determines at what point an image file is split into multiple
files. The maximum size depends on the imaging tool (Ghost
or RapiDeploy).
If you use the RapiDeply imaging tool and select Unlimited
option for maximum file size, Deployment Solution takes
the maximum file size as 2 GB. 2 GB refers to zero split
value. Otherwise, the split value that you entered is
considered as the maximum file size. If the split value is
less than 2 GB, the spans of the requested size are created.
For IIS Web servers, by default spans of 2 GB are created.
For the servers that are not IIS Web servers, by default the
split size is unlimited. If you specify the split size as 0 or -,
then no spans are created. Only a single image is created on
the Web server.
In case you are aware of any upload file size limit, you must
specify that as maximum file size.
Command-line
Lets you add command-line options for the imaging tool.
HTTP
Lets you upload and download images via HTTP Web server.
You need to set up the Internet Information Services (IIS)
Manager to get HTTP imaging to work. Otherwise, if you
try to use HTTP with the Create Image task, the job fails
and returns a message that the file could not be created.
For more information on setting up the web server in IIS:
www.symantec.com/business/support/
For Ghost imaging tool, add the following Mime type:
■
File Name Extension: .gho and MIME Type:
application/octet-stream
■
File Name Extension: .ghs and MIME Type:
application/octet-stream
For RapiDeploy imaging tool, add File Name Extension:
.img and MIME Type: application/octet-stream.
Ghost tool supports the HTTP web server configured on
Windows 2008 IIS 7.5 and on Windows 2003 server IIS 6.0.
However, RapiDeploy tool supports the HTTP configured
only on Windows 2003 server IIS 6.0.
Imaging computers
Importing an existing image
Importing an existing image
You can use the Deployment Solution Resource Import Tool to import an existing
image. You can import images and then use them to deploy on client computers.
Deployment Solution Resource Import Tool needs all the splitted files for a
RapiDeploy image to be selected for the effectual import of the RapiDeploy image.
Partial selection of files would show up as successful import, but will not lead to
a valid image. If you want to import a splitted Ghost image, selection of one split
automatically selects the other splits also.
Deployment Solution Resource Import Tool lets you import images that are
located on HTTP Web server. User credentials are not required to access the
located on HTTP Web server.
You can also import OS packages using the Deployment Solution Resource Import
Tool.
See “Importing OS files” on page 42.
To import an existing image
1
Browse to \C:\Program Files\Altiris\Altiris
Agent\Agents\Deployment\Task Handler\Tools” or [Altiris Agent
Install Dir]\Agents\Deployment\Task Handler\Tools and execute the
ResourceImportTool.exe.
You can execute this tool from Symantec Management Platform or from Site
Server.
Ensure that you run this tool only from Symantec Management Platform.
2
On the Deployment Solution Resource Import Tool, click browse to
C:\DS_Resources\Win7 Image, and open required .gho or .img file.
3
From the Select OS, select Windows 7 Professional.
4
Click Import.
5
A message indicating the successful upload of image is displayed. Acknowledge
the message and close the Deployment Solution Resource Import Tool.
See “About Imaging client computers” on page 65.
See “Creating an image” on page 71.
Creating a Deploy Image task
You can restore a computer and deploy a standard, Sysprep-enabled disk image
with the Deploy Image task. All of the existing data and applications on the client
are lost, and the computer is restored to the state of the standard image.
75
76
Imaging computers
Creating a Deploy Image task
To create a deploy image task
1
From the Manage menu, select Jobs and tasks.
2
On the right pane, right-click Jobs and tasks and select New > Task.
3
On the Create new task page, select Deploy Image.
The Create or Deploy image task can only be executed in the Automation
environment.
4
Specify a name for the task on the first field.
5
Enter the following from the Imaging section:
Image Name
Enter the name of the image file to deploy.
For Linux, only the Name and Image Name fields are necessary.
All of the other fields are optional.
Product Key
Select an operating system license that can be used to boot the
computer back to a working state after the task runs. If the
license has not been added to Deployment Solution, you can add
one by clicking New.
The Current Key option is available only for Windows Vista
and later versions of the Windows operating system.
6
Select Include DeployAnywhere for hardware independent imaging check
box to use DeployAnywhere.
Selecting this check box runs DeployAnywhere after the image is deployed.
DeployAnywhere runs while the computer is still running the WinPE preboot
operating system. This option discovers what type of hardware is on the
destination computer and creates a new HAL, which is deployed to boot the
computer successfully.
If you intend to deploy a disk image using the option Include
DeployAnywhere for hardware independent imaging, ensure that the
Prepare for Image capture task was executed before the image was created.
Otherwise, the client computer on which this disk image is deployed might
get corrupted.
DeployAnywhere works only from within a WinPE preboot operating system.
Imaging computers
Creating a Deploy Image task
7
Select one of the following options from the Sysprep Configuration section:
Generate Sysprep
The required information is obtained from the CMDB.
configuration file
using inventory data
Custom Sysprep
configuration file
Click Browse to select the custom Sysprep file that you created.
Ensure that the built in administrator is enabled if you want to perform
sysprep imaging on Windows 7. By default, on Windows 7 the built in
administrator is disabled.
8
Enter the credentials that are needed to join the client computer to a domain.
If the client computer was not on domain before the image was deployed, it
does not come to domain even after the image is deployed. To bring the client
computer to domain, you have to create the System Configuration settings.
See “Creating system configuration settings” on page 45.
9
Click the Advanced tab to set the following:
■
Partition
■
Command-line
■
File Preservation
■
Multicasting
■
HTTP
See “Setting advanced Deploy Image options” on page 77.
10 Click OK.
If you deploy an image on a Linux client computer, you must reinstall the
Automation folder on that client computer.
See “Deploying an image to new computers ” on page 79.
Setting advanced Deploy Image options
The Advanced option on the Deploy Image task lets you configure additional
options.
You can also set up other imaging options for this task.
77
78
Imaging computers
Creating a Deploy Image task
Table 5-3
Advanced Deploy Image options
Option
Description
Partition
This setting determines what partitions are deployed.
You can change the destination partition size by clicking
the partition number.
Note: For Data Partition or System reserve partition
deployment do not use DeployAnywhere.
For Linux, only Data Partition deployment is supported.
To deploy Windows 7 with system reserved partition,
create a job to run deploy system reserved partition and
system partition in same Preboot environment.
Command-line
Lets you add command-line options for the imaging
tool.
For Ghost partition deployment, following command
lines should not be used:
MODE,Size,SRC and DST values should not
be used for command line.
Multicasting
You can configure the number of computers on which
you want to multicast the image. You can override the
default multicast settings that were set in Settings >
Deployment > Image Multicasting . If the threshold
count is 2, there must be at least two client computers
and one master computer before multicasting is used
in this session.
Deployment Solution does not support Multicast and
Unicast options simultaneously if you use the Ghost
imaging tool.
File Preservation
You can specify the files and folders that you want to
preserve when the image is restored. This option is not
supported if the client computer has Linux operating
system.
HTTP
Adds the credentials that are needed to deploy an image
that was obtained from an HTTP site.
See “Creating a Deploy Image task” on page 75.
Imaging computers
Restoring a backup image
Restoring a backup image
The computers that you image are restored to the exact state they were in when
the image was created. A backup disk image can be restored only to the computer
from which it was captured.
Deployment Solution uses %computername% as the default name of the backup
image.
You can use the Advanced settings to preserve any files that are on the disk.
See “About Imaging client computers” on page 65.
To restore a backup image:
1
In the Symantec Management Console, on the Manage menu, click Jobs and
Tasks.
2
On the right pane, right-click Jobs and tasks and select New > Task.
3
On the Create New Task page, click Restore Backup Image.
4
Select the image name to restore.
5
(Optional) Click Advanced to specify additional parameters.
The additional parameters include the following options:
■
Partition resizing settings
■
Command-line switches for the imaging engine (Ghost or RapiDeploy)
■
Files and folders to preserve in the target computer during an image
restore
■
HTTP server settings
Click OK to save your options.
6
Click OK.
7
Schedule the task.
See “Scheduling a deployment task” on page 55.
See “About deployment tasks and jobs” on page 51.
See “Deploying an image to new computers ” on page 79.
Deploying an image to new computers
You can set up new computers using a standard image. You can then start those
computers with an automation disk that loads the software to execute a predefined
task server task. The predefined task can deploy a disk image and install software.
79
80
Imaging computers
Creating an Apply System Configuration task
Table 5-4
Process for deploying new computers
Step
Action
Description
Step 1
Capture a Sysprep-enabled
image for distribution to
multiple computers.
For Windows, you can use Microsoft
Sysprep to prepare images.
Create a Deploy Image task.
You can specify the Sysprep-enabled image
that you captured and the system
configuration that you want to apply to
new computers.
Step 2
See “About Imaging client computers”
on page 65.
See “Creating a Deploy Image task”
on page 75.
See “Creating system configuration
settings” on page 45.
Step 3
Add the Deploy Image task to You can add tasks to the start menu of a
your initial deployment menu. new computer.
See “Configuring the initial deployment
settings” on page 40.
Step 4
Reboot the client using PXE.
You can boot computers with PXE using a
network interface. This process is
independent of your hard disks or installed
operating systems.
See “About Pre-boot eXecution
Environment (PXE)” on page 60.
Step 5
Start the new computer using
the automation disk, and select
the task that you created from
the Initial Deployment menu.
A new computer is defined as a computer
that is not known to the database. An
Initial Deployment task can be used only
on new computers.
See “Restoring a backup image” on page 79.
Creating an Apply System Configuration task
You can create or update system configuration settings with the configuration
editor. These settings are applied to computers after you deploy a disk image or
apply a system configuration using a task server.
For computer names, host name can also use tokens. For
example:%CustomerToken, %SERIALNUMBER%.
Imaging computers
Creating an Apply System Configuration task
The credentials are either a local administrator account or a domain account (if
you join the computer to a domain).
See “Creating system configuration settings” on page 45.
To create an Apply System Configuration task
1
In the Symantec Management Console, from the Manage menu select Jobs
and tasks.
2
On the right pane, right-click Jobs and tasks and select New > Task.
3
On the Create new task page, select Apply System Configuration.
4
Specify a name for the task on the first field.
5
Select one of the following options:
Use a predefined Select the relevant configuration from the drop-down list or click
system
New to create a new configuration. You can also click edit to edit
configuration
the system configurations.
For more information on System Configuration settings:
See “System Configuration: Create System Configuration dialog
box” on page 46.
Restore system
configuration
using inventory
data
If you select this option you have to provide the following
credentials if the client computer is a member of a domain.
■
Domain Name
■
User name
■
Password
■
Confirm Password
6
Click OK.
7
Schedule the task.
See “Scheduling a deployment task” on page 55.
If you execute this task on a Linux client computer, ensure that you run the
send basic inventory command on the client computer. This command updates
the inventory details on the Symantec Management Platform.
See “Deploying an image to new computers ” on page 79.
81
82
Imaging computers
Setting Advanced Deploy Image Options for multicasting
Setting Advanced Deploy Image Options for
multicasting
You can override the default settings for a single task. You can use the options
that are specified under Advanced tab to specify the customized settings. The
advanced option on the Deploy image lets you add the settings.
You can use the Manage view to change the settings.
Setting Advanced Deploy Image Options
1
In the Symantec Management Console, on the Manage menu, click Jobs and
Tasks.
2
In the left pane, right-click Jobs and Taskand click New >Task.
3
On the create new task page, in the right pane, expand the Deployment and
Migration folder.
4
ClickDeploy Image in the task pane.
5
Click the Advanced tab
6
In the Multicasting tab, checkTo override the default multicast settings,
change the values below to change the settings for multicast
7
Set the values for the options and click OK.
Chapter
6
Performing an OS
installation
This chapter includes the following topics:
■
About OS Files installation
■
Sample scripted OS job
■
Erasing a Disk
■
Creating disk partitions
■
Performing a Windows OS installation
■
Performing a LINUX OS installation
About OS Files installation
Deployment Solution provides the option to perform the automated OS installation
for Windows and Linux executed over the network. This installation allows
operating system to be installed in a remote and an unattended fashion, reducing
the costs, and complexity of deployments. Users can remotely provision any
desktop, laptop, or server with a single scripted installation regardless of computer
hardware configuration. Scripted installations provide a reliable and a
customizable method for deployment in heterogeneous hardware environments
and an efficient way to build and maintain gold master configurations. Applications
and files can also be integrated with scripted installations, enabling complete
systems provisioning.
Client computer can also join domain without having inventory but inventory
data option must be selected.FQDN must be used as domain credential. For example
Symantec.com\user and not Symantec\user.
84
Performing an OS installation
Sample scripted OS job
You can create an operating system package and decide what source files are
included in that package. The source files include all of the files that are needed
for a scripted install. You can use the Install Windows OS or Install Linux OS
tasks to perform a scripted install for Windows or Linux.
See “About Install Windows OS task” on page 89.
See “Performing a LINUX OS installation” on page 91.
You can add files to your package using the OS Files option in the Settings menu.
You can provide a name, provide a description, and choose the platform for your
package.
See “Adding OS files” on page 41.
You can also delete files from your package. Only the package that is in the
database is deleted. If your physical files exist in other places, the files are not
deleted from those locations.
See “About removing unwanted packages and resources” on page 109.
If after performing an OS installation duplicate resources are created, this is due
to MAC address and name of the computer being changed simultaneously. This
generally occurs for virtual computers as by default they use randomly generated
MAC addresses, which can change. To avoid this, ensure that all virtual computers
have statically defined MAC addresses before changing the Computer name or
domain name.
See “Creating disk partitions” on page 87.
Sample scripted OS job
You can create an OS installation job, which contains the deployment tasks.
The following sample task list assumes that the disk contained data previously
that is stored in the CMDB:
■
Reboot to PXE
Loads a preboot operating system so that other tasks can run.
See “Creating a Reboot to task” on page 62.
■
Erase Disk
Wipes the disk clean, ensuring that all data and all partitions are erased.
See “Erasing a Disk” on page 85.
■
Partition Disk
Configures the clean drive with a partition.
See “About the Partition Disk task” on page 87.
■
Install Windows OS/Install Linux OS
Performing an OS installation
Erasing a Disk
Runs the scripted install for the Windows or Linux operating system.
See “About Install Windows OS task” on page 89.
See “About Install Linux OS task” on page 92.
See “About OS Files installation” on page 83.
Erasing a Disk
You can use the Erase Disk task to wipe a disk clean. Hence, the partitions along
with data are removed from the client computer.
When you reallocate hardware, you can use this task to ensure that none of the
old data can be retrieved.You cannot perform an Erase Disk task if you on a disk
that is connected through a USB or FireWire interface.
See “About deployment tasks and jobs” on page 51.
To erase a disk
1
In the Symantec Management console, from the Manage menu select Jobs
and tasks.
2
On the right pane, right-click Jobs and tasks and select New > Task.
3
On the Create new task page, select Erase Disk.
4
Specify a name for the task on the first field.
5
Select one of the following options:
Remove partitions Select the partition you want to delete from the disk selection
drop-down list. This selection deletes the partition table. Select
Erase data check box to delete the partition table with data.
Erase Disk
Select System disk for WinPE environment. Otherwise, select
All disk to erase all the disks present. You must select the Secure
erase check box.
See “About the Erase Disk task” on page 85.
6
Click Ok.
See “Creating disk partitions” on page 87.
About the Erase Disk task
The Erase Disk task lets you erase a disk to reallocate the hardware. You can
either delete the partitions of the disk, erase the system disk, or configure the
85
86
Performing an OS installation
Erasing a Disk
task to erase all the disks. The Erase Disk task does not operate on any disk that
is connected through an USB or through an FireWire interface.
You access the Erase Disk task from Manage > Jobs and Tasks menu. In the Jobs
and Tasks window, expand System Jobs and Tasks and right-click Deployment
and Migration > New > Task option. In the Create New Task dialog box, access
Deployment and Migration > Erase Disk.
The fields and descriptions of the Erase Disk task are as follows:
Table 6-1
Erase Disk task
Field
Description
Task name icon
Lets you specify the name of the erase disk task.
Remove partitions
Lets you remove the selected partitions of the disk.
Select the disk partition from the drop-down list of the Disk
selection option and check the Erase data check box.
Erase disk
Lets you select from the following options to erase disk:
System disk
Select this option if you want to erase system disk of the
WinPE environment.
■ All disks
Select this option if you want to erase all disks.
■ Secure erase
Select this option to erase data more than once.
The following group of operations is performed on the hard
drive six times:
■ All addressable locations are overwritten with 0x35.
■
■
All addressable locations are overwritten with 0xCA.
All addressable locations are overwritten with a
pseudo-random character.
■ All addressable locations are verified in hardware using
the Verify Sectors command to the disk.
■
Note: Using the Secure erase option, this task has a 36-hour
timeout value on the task server. If this task runs on a client
that has a hard disk larger than 375 GB, the task reports as failed
on the task server. However, the task continues to run on the
client until it completes.
Advanced Options
Displays advanced options such as Reboot.
Lets you reboot the computer after the erase task completes.
Performing an OS installation
Creating disk partitions
See “Erasing a Disk” on page 85.
Creating disk partitions
You can use Partition Disk option to create partitions on your disk.
Before you perform a scripted OS installation, your drive must have partitions.
See “About OS Files installation” on page 83.
The drive that you want to partition must not contain any previous partitions on
it. If the drive was previously used and contains partitions, you can use the Erase
Disk task to delete those partitions.
See “Erasing a Disk” on page 85.
To create disk partitions
1
In the Symantec Management console, from the Manage menu select Jobs
and tasks.
2
On the right pane, right-click Jobs and tasks and select New > Task.
3
On the Create new task page, select Partition Disk.
4
Specify a name for the task on the first field.
5
Click Add.
6
On the Add Partition dialog box, select and enter the required information
and click OK.
See “About the Partition Disk task” on page 87.
7
On the Create New Task page, click OK.
See “About Install Windows OS task” on page 89.
See “About Install Linux OS task” on page 92.
About the Partition Disk task
You can run the Partition Disk task to create partitions on a disk drive.
See “About deployment tasks and jobs” on page 51.
You access the Partition Disk task from Manage > Jobs and Tasks menu. In the
Jobs and Tasks window, expand System Jobs and Tasks and right-click
Deployment and Migration > New > Task option. In the Create New Task dialog
box, access Deployment and Migration > Partition Disk.
You must create a deployment task before you can run it.
You can configure the following options while creating this task.
87
88
Performing an OS installation
Performing a Windows OS installation
Table 6-2
Partition Disk task
Field
Description
Task name icon
Lets you specify the Partition Disk task that you
create.
Add
Lets you configure the partition disk task in the
Add Partition dialog box.
The fields and descriptions of the Add Partition dialog box are as follows:
Table 6-3
Add Partition dialog box
Field
Description
Is Secondary disk
Select this option if you want to partition the disk as a
secondary disk.
Select the following settings if you select this option:
Disk Number
Select the disk drive for which the partition is created.
■ Format
Select the format of the partition as Fat32, NTFS, and
EXT.
■ Partition
Select the type of partition to create such as Extended,
Logical, and Primary. By default, Extended is selected.
■ Mark Partition as Active
This option is selected automatically for Primary
partitions. For Extended and Logical, this option is
disabled. If there are more than one primary partitions,
then only one partition can be active at a time.
■
Size - Percent
The size of the partition as a percentage of the total drive.
Size - Fixed Size
The size of the partition as a specific size.
See “Creating disk partitions” on page 87.
Performing a Windows OS installation
Before you perform the Windows OS installation task on bare metal computer,
your hard drive must have the proper partitions. You might need to run the
Partition Disk task first to create partitions on your hard drive.
Performing an OS installation
Performing a Windows OS installation
Before you perform the Windows OS installation task on the managed computer,
perform the Erase Disk task and follow it with the Partition Disk task. Also,
ensure that the architecture of the Automation Folder on the managed client
computer and the operating system to be installed is the same.
For more information:
See “Erasing a Disk” on page 85.
See “Creating disk partitions” on page 87.
To perform Windows OS installation
1
In the Symantec Management console, from the Manage menu select Jobs
and tasks.
2
On the right pane, right-click Jobs and tasks and select New > Task.
3
On the Create new task page, select Install Windows OS.
4
Specify a name for the task on the first field.
5
Select and enter the required information.
See “About Install Windows OS task” on page 89.
6
Click OK
See “About Install Linux OS task” on page 92.
About Install Windows OS task
You can run the Install Windows OS task to install the Windows operating system.
See “Performing a Windows OS installation” on page 88.
You access the Install Windows OS task from Manage > Jobs and Tasks menu. In
the Jobs and Tasks window, expand System Jobs and Tasks and right-click
Deployment and Migration > New > Task option. In the Create New Task dialog
box, access Deployment and Migration > Install Windows OS.
The fields and descriptions of the Install Windows OS task are as follows:
Table 6-4
Install Windows OS task
Option
Description
Task name icon
Lets you specify the name of the task tht you
want to create in the text box.
89
90
Performing an OS installation
Performing a Windows OS installation
Table 6-4
Install Windows OS task (continued)
Option
Description
System Files - OS source
Lets you select the source of the previously
installed operating system files from the
drop-down list.
Click Add to add a new OS package in the Add
OS Packages dialog box.
See “Adding OS files” on page 41.
System Files - Product Key
Lets you select a previously added license from
the drop-down list.
ClickAdd to add licenses in the Add OS License.
Install drivers
Check Install drivers from Driver Database
during OS installation to install the missing
drivers required for a successful installation.
Configuration
Lets you configure the settings to install the
Windows OS.
The configuration options are as follows:
Use Inventory data to reconfigure computer
Uses the information that is stored in the
CMDB to configure the computer for name
and to join domain. Client computer can also
join domain without an inventory but
inventory data option must be selected.
FQDN must be used as domain credential.
For example, Symantec.com\User and not
Symantec\user.
■ Use default configuration settings
Uses the default settings.
■ Configuration file
Uses a custom answer file.
■
The Advanced options include a specific drive to install on the operating system.
The fields and descriptions of the Configuration file tab of the Advanced dialog
box are as follows:
Performing an OS installation
Performing a LINUX OS installation
Table 6-5
Install Windows OS - Advanced
Field
Description
Drive
Lets you specify the following:
Regional
Video
■
Disk number
■
Partition
Lets you specify the following:
■
Language
■
Keyboard
Lets you specify the following:
■
Screen resolution
■
Color quality
See “Performing a Windows OS installation” on page 88.
See “Adding OS files” on page 41.
Performing a LINUX OS installation
Before you run a Linux OS installation task, your hard drive must have the proper
partitions. You might need to run the Partition Disk task first to create partitions
on your hard drive.
See “About the Partition Disk task” on page 87.
You must create a deployment task before you can run it.
For this task, the OS packages are fetched and retrieved from the anonymous
HTTP server or the FTP server. You must ensure that the anonymous HTTP server
or FTP server is accessible and is setup with the OS packages to fetch them for
the client computers that are in the Linux preboot environment.
Linux OS installation supports SCSI and SATA devices as Linux preboot recognizes
SCSI and SATA devices only.
To perform a Linux OS installation
1
In the Symantec Management console, from the Manage menu select Jobs
and tasks.
2
On the right pane, right-click Jobs and tasks and select New > Task.
3
On the Create new task page, select Install Linux OS.
4
Specify a name for the task on the first field.
91
92
Performing an OS installation
Performing a LINUX OS installation
5
Select and enter the required information.
See “About Install Linux OS task” on page 92.
6
Click OK.
7
Schedule the task.
See “Scheduling a deployment task” on page 55.
After performing the OS installation if due to network issues or any other reason
the client computer is not able to connect to Symantec Management Platform,
the Symantec Management Agent is not installed. In this case, you have to
manually install the Symantec Management Agent.
By default, the password of the client computer on which you have installed the
Linux OS is set to altiris.
See “Performing a Windows OS installation” on page 88.
See “Creating disk partitions” on page 87.
About Install Linux OS task
You can run the Install Linux OS task to install the Linux operating system. Linux
OS installation supports SCSI devices only.
You access the task from Manage > Jobs and Tasks menu. In the Jobs and Tasks
window, expand SystemJobsandTasks and right-click DeploymentandMigration
> New > Task option.
In the Create New Task dialog box, access Deployment and Migration > Install
Linux OS.
The fields and descriptions of the Install Linux OS task are as follows:
Table 6-6
Install Linux OS task
Option
Description
Task name
icon
Lets you specify the task name.
OS Flavor
Lets you select the OS versions for the operating system from the
drop-down list.
OS File
location
Lets you specify the location where the OS file is stored.
You can choose from FTP or HTTP location and enter the path. If you
provide an HTTP location, ensure that Anonymous access is enabled else
the task fails.
Performing an OS installation
Performing a LINUX OS installation
Table 6-6
Option
Install Linux OS task (continued)
Description
Configuration Lets you browse for the configuration file that you want to use for the
File
installation.
Installation
code
Lets you specify the code required for the installation.
See “Performing a LINUX OS installation” on page 91.
93
94
Performing an OS installation
Performing a LINUX OS installation
Chapter
7
Capturing and distributing
computer personalities
This chapter includes the following topics:
■
About capturing and distributing personalities
■
About personality templates
■
About migration settings
■
Capturing computer personality
■
Distributing computer personality
About capturing and distributing personalities
You capture and distribute a computer’s personality. Personalities are the files
that contain the user data and application settings. Personalities contain the
documents, the registry settings, and the configuration files that are associated
with applications. They also contain many other windows settings. Personalities
are usually captured as part of an operating system migration or as a backup.
Capture and distributing of personalities is not supported on Linux operating
system.
You can choose what settings to transplant.
See “About migration settings” on page 97.
Capturing and distributing of personalities is only supported for Windows XP,
Windows Vista, and Windows 7. Both 64-bit operating systems and 32-bit operating
systems are supported.
See “Capturing computer personality” on page 98.
96
Capturing and distributing computer personalities
About personality templates
See “Distributing computer personality” on page 99.
You can distribute a personality through a self-extracting executable file that is
called a Personality Package. You create the Personality Packages that can be
used for multiple purposes.
Packages can include the desktop, printer, network, application settings (such as
favorites and contacts), and entire directory structures for your computers. You
can create the packages that contain the most used directories, documents, and
settings for a group of computers. You can also create packages for individual
users on a shared computer. A user can then install the Personality Package on a
computer. After you complete the work, each user can then uninstall the package
so the computer is ready for another user.
You can also perform a real-time migration from one computer to another. In
real-time migrations, you can map users and their properties, create user accounts,
and install applications.
Personality Packages are based on the templates that you can run from
command-line instructions to automate operating system migrations. You can
build and edit your own templates to define the settings, file, and options that
you want for your Personality Packages.
See “About personality templates” on page 96.
Note: In a hierarchy, the Deployment Solution license must be installed on each
Notification Server to manage personalities. Licenses for PC Transplant are not
replicated to child Notification Servers.
See “Setting up Deployment Solution ” on page 24.
About personality templates
Before you create a Personality Package, you must specify what type of information
to migrate. You can provide this type of information in a personality template
file.
See “About capturing and distributing personalities” on page 95.
A template file is a blue print to what needs to be captured. It contains information
about the settings and files that you want to migrate. Using a template reduces
errors and allows deployment jobs to automatically create packages.
See “About migration settings” on page 97.
Capturing and distributing computer personalities
About migration settings
When you create a job to capture personalities, you must use a template. If you
haven’t created a template yet, you can use one of the default templates that are
included with Deployment Solution.
You can use one of the following files to create a template:
■
Template.exe, located in the PCT subfolder of the Deployment share.
■
PCTEdit.exe, located in the PCT subfolder of the Deployment share. Selecting
the Tools > Template Builder option from the editor’s menu lets you edit an
existing template or create a new one.
The first template option is to select the type of users to migrate.
You can specify either local users or domain users.
■
Capture Local Users
Migrates the settings for local users. By adding the domain to the Redirect to
domain field, you can also migrate users to pre-existing domain accounts.
■
Capture Domain Users
You can migrate all of the users in a domain by selecting the Capture domain
users option. You can also choose to migrate specific users by adding the user
in the source fields and the destination fields.
You can use your templates as a separate utility or as part of a Deployment Solution
job.
See “About deployment tasks and jobs” on page 51.
A deployment job might automatically modify the following template settings:
■
-qm switch
The quiet minimized switch is used unless a token is specified for the name
of the package.
■
Advanced users
The users that are specified in the job’s Advanced option and the template’s
users are both used.
■
Package path
The path in the deployment job is used for the package instead of the path in
the template.
See “Capturing computer personality” on page 98.
About migration settings
You can choose what settings to migrate.
You can choose to migrate settings from the following categories:
97
98
Capturing and distributing computer personalities
Capturing computer personality
■
Computer desktop settings
These settings include Control Panel settings, desktop colors, and background
information.
■
Individual files and folders
■
Specific file types
■
Network settings
These settings include the computer and domain name, folder and drive share
assignments, and drive mappings for Windows.
■
Application settings
These settings include the unique menu bar options for a particular application.
However, you cannot migrate applications. A2i text files determine the
application settings that can be migrated and include the Word.a2i, MS
Outlook.a2i, and WinZip.a2i files. Over 65 A2i files are included with
Deployment Solution. You can also create custom A2i files using the A2i Builder
utility.
Personality templates determine the individual files and folders to migrate. The
computer that you use to build the Personality Package registers the file types
that you can choose to migrate.
See “About personality templates” on page 96.
You determine what desktop and network settings to migrate based on the text
files that are called Settings Files. These files are included with Deployment
Solution and include the Dsktop*.ini and Ntwrk*.ini files.
See “About capturing and distributing personalities” on page 95.
Capturing computer personality
You can capture a computer’s personality with the Capture Personality task. You
can also choose how much data to capture, whether the files are compressed in
your package, and where to store your package.
See “About capturing and distributing personalities” on page 95.
Personality Packages are stored in the Program Files\Altiris\Altiris
Agent\Agents\Deployment\Task Handler\PCTPackages directory. This directory
contains several folders that are named with GUIDs. After you create a personality,
the package is located in one of these folders.
Deployment Solution includes templates for many common applications. It also
provides tools to help you create templates for new and custom applications.
See “About deployment tasks and jobs” on page 51.
Capturing and distributing computer personalities
Distributing computer personality
To capture user settings
1
In the Symantec Management Console, on the Actions menu, click
Deployment > Capture Personality.
2
On the Capture Personality page, enter a name for the task.
3
Type a unique personality name and a description.
If you capture multiple personalities, you can use the %COMPNAME% token as
the personality name. This token creates a unique name for each personality
based on managed client computer name .
4
Browse to select a template for your personality.
See “About personality templates” on page 96.
5
Select Create Vista compatible file (pkg) check box if you want to distribute
personality to a computer with Windows Vista operating and above mentioned
operating system.
6
Enter the credentials to secure the personality.
7
Click OK.
8
Schedule the task.
See “Scheduling a deployment task” on page 55.
See “Distributing computer personality” on page 99.
Distributing computer personality
You can restore or distribute a personality that you previously captured by using
the Distribute Personality task. .
See “About capturing and distributing personalities” on page 95.
Personality Packages are stored in the Program Files\Altiris\Altiris
Agent\Agents\Deployment\Task Handler\PCTPackages directory. This directory
contains several folders that are named with GUIDs. After you create a personality,
the package is located in one of these folders.
See “About deployment tasks and jobs” on page 51.
To restore user settings
1
In the Symantec Management Console, on the Actions menu, click
Deployment > Distribute Personality.
2
On the Distribute Personality page, type the name for the task.
99
100
Capturing and distributing computer personalities
Distributing computer personality
3
Type the name of the personality that you want to use.
If you distribute multiple personalities, you can use the %COMPNAME% token as
the personality name. This token creates a unique name for each personality.
You can also browse to the personality file that you want to use.
4
Type the command-line to distribute the personality to.
5
Type the password if the personality is password protected.
6
Click OK.
7
Schedule the task.
See “Scheduling a deployment task” on page 55.
See “Capturing computer personality” on page 98.
Chapter
8
Copying files and folders
This chapter includes the following topics:
■
About copying files and folders
■
Copying files and folders
■
Copying files and folders options
About copying files and folders
Deployment Solution provides you with the option to copy files and folders from
local and UNC locations to one or more computers. You can also use this option
to install copied files, such as .msi, .exe, .vbs, and so on. The copy file feature is
supported in automation and in production environments.
See “Copying files and folders” on page 101.
See “Copying files and folders options” on page 102.
Copying files and folders
Copy file and folder options let you copy files and folders from one UNC and local
computer location to client computers. When you copy a file that already exists
on a client computer, the earlier version of the file is overwritten. It also provides
you the option to install executables using the command line switch.
To copy files and folders
1
In the Symantec Management Console, on the Manage menu click Jobs and
Tasks.
2
In the left pane, right-click Jobs and Tasks and select New > Task.
102
Copying files and folders
Copying files and folders options
3
On the Create New Task page, in the right pane, expand Deployment and
Migration folder and select Copy File.
4
Type a name for the task in the first field.
5
Select the required options.
See “Copying files and folders options” on page 102.
6
Click OK.
7
Schedule the task.
See “Scheduling a deployment task” on page 55.
See “About copying files and folders” on page 101.
Copying files and folders options
You can use the Copy File task to copy files and folders and install files and
applications. You can copy the installation .msi or .exe file by running this task.
Then, you can install the application by using command-line switches.
See “About deployment tasks and jobs” on page 51.
You must create a deployment task before you can run it.
See “Copying files and folders” on page 101.
You can configure the following options while creating this task:
Table 8-1
Options on the Copy File page
Option
Description
Copy file or Copy folder
The item that is copied. You can include subfolders.
Copying files and folders
Copying files and folders options
Table 8-1
Options on the Copy File page (continued)
Option
Description
Source
The source of the file to copy. You can provide a local
path or select an existing file from the Deployment
share.
If you want to copy a file that is not on Notification
Server, make sure that you provide the credentials for
the file. For the UNC option to work, you must provide
the domain (or computer name) with the user name in
the domain\username format.
Any changes you make to a local file are not
automatically updated in the Copy File task. For
example, you copy a local file using this task and then
make changes to that file. If you rerun the task, the
same file that you previously copied is used. You must
modify your task first and select the same file to ensure
that your changes are correctly copied.
Location
The location to the files to upload or the location of
files that are already uploaded.
User name, Password, and
Confirm password
The credentials that you need to obtain the source files.
Destination
The location where the files are copied to.
Command Line
The command-line instructions to execute the copied
file on the client computer. You can execute the *.msi,
*.vbs, *.cmd, *.bat, *.vbe, *.wsf, and *.exe files using the
command-line switch.
User name, Password, and
Confirm password
The credentials that are needed to execute the
command-line instructions.
See “About copying files and folders” on page 101.
103
104
Copying files and folders
Copying files and folders options
Chapter
9
Predefining computers
This chapter includes the following topics:
■
About predefined computers
■
Referencing a sample CSV file
■
Booting predefined computers
About predefined computers
Computers that are either not connected in a network or are not managed by
Symantec Management Platform (SMP) are known as predefined computers. To
configure a client computer as a predefined computer, you must import the
computer details into the Symantec Management Platform (SMP). You import the
client computer details into Symantec Management Platform (SMP) through a
TEXT (.txt) or CSV (comma-separated values) file.
.You can add or update the computer resources into Symantec Management
Platform through a CSV (comma-separated values) file. If you remove or change
the order of the columns in the sample CSV file, the execution of the predefined
computer task fails.
The computer resource can be any of the following computers:
■
Bare metal computer.
■
Computer not on network.
■
Computer that Symantec Management Platform does not discover.
After the computers are predefined, you can then import them and boot for
deployment and maintenance tasks.
See “Importing predefined computers” on page 44.
106
Predefining computers
Referencing a sample CSV file
When the predefined computers are booted to the automation environment, you
can perform the tasks of imaging and system configuration. Then, you can reboot
the predefined computers to the production environment to resume live operations.
See “Referencing a sample CSV file” on page 106.
See “Booting predefined computers” on page 106.
Referencing a sample CSV file
When you create a CSV file, use the predefinedComputerTemplate.csv file in the
C:\Program Files\Altiris\Notification
Server\NSCap\bin\Win32\X86\Deployment\Sample\PreDefinedComputers folder.
The predefinedComputerTemplate.csv file provides a sample import template
you can access to test the predefined feature.
Predefined computer supports MAC address only import for client computers.
To reference a sample CSV file
1
Open the predefinedComputerTemplate.csv file using a Microsoft Excel
spreadsheet that lets you add values to each identified column.
2
Save the file as a CSV file to import to the Symantec Management Platform
Configuration Management Database (CMDB).
3
Open and edit the CSV file in English locale only.
See “Importing predefined computers” on page 44.
See “Booting predefined computers” on page 106.
Booting predefined computers
After you have imported the predefined computers you can boot them to perform
various deployment tasks. Once the predefined computers are booted, the basic
inventory of the computers is sent to Symantec Management Platform. The booted
predefined computer's entry is removed from the Settings > Deployment >
Predefined computers grid.
You can perform the following deployment tasks after booting the predefined
computers:
■
Copy file.
■
Create image.
■
Deploy image.
Predefining computers
Booting predefined computers
■
Restore backup image.
■
Erase disk.
■
Partition disk.
■
Install Windows OS and Linux OS.
■
Reboot to PXE.
■
Reboot to automation.
■
Reboot to production.
After booting the predefined computer, you are required to update its inventory
details on the Symantec Management Platform server. To update the inventory
details, you have to manually send the inventory from the booted predefined
computer.
To boot predefined computers
1
Set a PXE image to respond to predefined computers.
See “Configuring the PXE Server” on page 32.
2
Import the predefined computers.
See “Importing predefined computers” on page 44.
3
Restart the imported predefined computers.
The imported predefined computer is booted to the PXE Boot image that is
specified in the PXE Server Configurations page.
See “About predefined computers” on page 105.
107
108
Predefining computers
Booting predefined computers
Chapter
10
Removing unwanted
packages/resources
This chapter includes the following topics:
■
About removing unwanted packages and resources
■
Deleting an image package
■
Deleting an image resource
■
Deleting a scripted install package
■
Deleting a copy file contents package
About removing unwanted packages and resources
Removing unwanted packages and resources helps you to maintain and manage
the storage location. It also eliminates the occurrence of an error when you select
and execute a task on a client computer.
Deployment Solution lets you delete the disk images that you have created. When
a disk image is created, an image package and an image resource for that disk
image are also created. Hence, when you delete a disk image you also have to
delete the image package and the image resource associated with it. You can
remove the unwanted packages and resources by using the options available in
the menu.
See “Deleting an image package” on page 110.
Deployment Solution also lets you delete the scripted install packages and the
copy file contents package.
See “ Deleting a scripted install package ” on page 111.
110
Removing unwanted packages/resources
Deleting an image package
See “Deleting a copy file contents package” on page 112.
See “Deleting an image resource” on page 110.
Deleting an image package
Image packages are created when you create a disk image. Both an image package
and an image resource are created in addition to the actual image file.
See “About disk image packages” on page 69.
To delete all image references from the database, you also need to delete the image
resource or personality resource.
See “Deleting an image resource” on page 110.
To delete an image package
1
In the Symantec Management Console, on the Settings menu, click All
Settings.
2
In the left pane, expand the Settings and the Deployment and Migration
folders.
3
Click Disk Images.
4
Right-click the image package that you want to delete and click Delete.
5
On the Delete Item dialog box, click OK.
The package is deleted.
See “About removing unwanted packages and resources” on page 109.
Deleting an image resource
You must remove the image resource or personality resource to completely delete
an image reference. These steps also apply to backup images and captured
computer personalities.
To delete all image references from the database, you need to delete the image
package first.
See “Deleting an image package” on page 110.
To delete an image resource or personality resource
1
In the Symantec Management Console, on the Manage menu, click Resource.
2
From the Group drop-down menu, select Image Resource under Software
Component..
Removing unwanted packages/resources
Deleting a scripted install package
3
On the Select Resource page, click the image that you want to delete.
4
Click OK.
The Resource Manager displays some of the details of the image that you
selected. The path to the image file is not listed.
5
On the left pane, click Delete.
The resource link is deleted from the database, but the actual image file is
not deleted from disk. You need to delete the image file manually.
See “About removing unwanted packages and resources” on page 109.
Deleting a scripted install package
You can delete the scripted install packages that are no longer required. These
packages can be the ones with an incorrect operating system assigned to them.
They can also be the ones for which all the scripted files were not saved due to
system load.
Before you delete a scripted install package, ensure that there are no tasks
associated with that package. Also, ensure that the jobs or tasks that are currently
running are not associated with that scripted install package.
To completely remove a scripted install package, first delete it from the Symantec
Management Platform, and then manually delete it from the Deployment Share.
After deleting the scripted install package, update all the site servers to reflect
the updated list of packages.
To delete a scripted install file
1
In the Symantec Management Console, on the Manage menu, click Settings
> All Settings.
2
In the left pane, expand Deployment and Migration > Scripted Install Files.
3
Right-click the file you want to delete and select Delete.
4
Click OK on the confirmation message box.
5
On the Deployment Share, go to the following folder:
\\localhost\Deployment\Task Handler\SOI
6
Delete the relevant scripted install package.
See “Deleting a copy file contents package” on page 112.
See “About removing unwanted packages and resources” on page 109.
111
112
Removing unwanted packages/resources
Deleting a copy file contents package
Deleting a copy file contents package
You can delete the copy file contents packages that are no longer valid or required.
Before you delete a copy file contents package, ensure that there are no tasks
associated with that package. If there are any associated tasks, delete them.
To completely remove a copy file contents package, first delete it from the
Symantec Management Platform, and then manually delete it from the Deployment
Share. After deleting the copy file contents package, update all the site servers to
reflect the updated list of packages.
To delete a copy file contents package
1
In the Symantec Management Console, on the Manage menu, click Settings
> All Settings.
2
In the left pane, expand Deployment and Migration > Copy File Contents.
3
Right-click the file you want to delete and select Delete.
4
Click OK on the confirmation message box.
5
On the Deployment Share, go to the following folder:
\\localhost\Deployment\Task Handler\CopyFile
6
Delete the relevant copy file contents package.
See “ Deleting a scripted install package ” on page 111.
See “About removing unwanted packages and resources” on page 109.
Appendix
A
Command-line switches
This appendix includes the following topics:
■
About command-line switches
About command-line switches
The command-line switches are used during deployment of an image with Ghost
and RapiDeploy imaging tools. In most cases, these switches apply to all versions
of the Ghost executable. Any exceptions are noted in the switch description.
Table A-1
Ghost command line switches
Command-line switch
Description
-align = chs
Lets you override the way in which the partitions are aligned
when an individual partition or disk full of partitions is
restored. This switch aligns the partition to the boundary as
follows:
-align = 1mb
1
CHS: Aligns to a track or cylinder boundary
2
1MB: Aligns with a boundary of 1 MB
By default, a partition is aligned on the destination computer
as it was on the source computer.
Note: The 1MB alignment option supports Windows Vista.
-bfc
Handles bad FAT clusters when writing to disk. If this switch
is set and the target partition is FAT, Symantec Ghost checks
for and works around bad sectors, and all free sectors are
verified.
This option may slow Symantec Ghost operation substantially.
114
Command-line switches
About command-line switches
Table A-1
Ghost command line switches (continued)
Command-line switch
Description
-cns
Reverts the naming of spanned files to the system used by
versions of Symantec Ghost prior to Symantec Ghost 6.5. If
this switch is not used, then the naming of spanned files
conforms to Microsoft application guidelines. You do not need
to use this switch when reading an existing file. Use this switch
when the first five characters in a file name must be unique.
Note: Symantec Ghost supports long file names.
-fdsp
Preserves the signature bytes on the destination disk when
performing a disk-to-disk or image-to-disk cloning operation
-fdsz
Clears the signature bytes on the destination disk. This is the
default for disk-to-disk and image-to-disk operations.
-fis
Uses all available disk space when creating partitions. By
default, Symantec Ghost often leaves a small amount of free
space at the end of the disk. Because partitions must be aligned
to cylinder boundaries, Symantec Ghost may leave up to 8 MB
free even when -fis is specified.
-fmbr
Forces the disk to restore to a MBR-based disk.
-fro
Forces Symantec Ghost to continue cloning even if the source
contains bad clusters
-ia
The image all switch forces Symantec Ghost to perform a
sector-by-sector copy of all partitions. By default, when copying
a partition from a disk to an image file or to another disk,
Symantec Ghost examines the source partition and decides
whether to copy just the files and directory structure or to do
a sector-by-sector copy. If it understands the internal format
of the partition, it defaults to copying the files and directory
structure. Generally, this is the best option. However, if a disk
has been set up with special hidden security files that are in
specific positions on the partition, the only way to reproduce
them accurately on the target partition is through a
sector-by-sector copy. If you use this switch to create an image
of a dynamic disk, then the image must be restored to a disk
with identical geometry.
-ial
Forces a sector-by-sector copy of Linux partitions. Other
partitions are copied normally
Command-line switches
About command-line switches
Table A-1
Ghost command line switches (continued)
Command-line switch
Description
-ib
The image boot switch copies the entire boot track, including
the boot sector, when creating a disk image file or copying
disk-to-disk. Use this switch when installed applications, such
as boot-time utilities, use the boot track to store information.
By default, Symantec Ghost copies only the boot sector and
does not copy the remainder of the boot track. You cannot
perform partition-to-partition or partition-to-image functions
with the -ib switch
-id
The image disk switch is similar to -ia (image all), but also copies
the boot track, as in -ib (image boot), extended partition tables,
and unpartitioned space on the disk. When looking at an image
with -id, you see the unpartitioned space and extended
partitions in the list of partitions. The -id switch is primarily
used by law enforcement agencies that require forensic images.
-ir
The image raw switch copies the entire disk, ignoring the
partition table. This is useful when a disk does not contain a
partition table in the standard PC format, or you do not want
partitions to be realigned to track boundaries on the destination
disk. Some operating systems may not be able to access
unaligned partitions. Partitions cannot be resized during
restore and you need an identical or larger disk
-limitswap
Limits the Linux swap space to 2GB.
-locktype= Type
Lets you lock an image file for use with a specific set of
computers defined by the type chosen and the source computer.
For example, ghost -locktype=P creates an image that can be
used only on systems that have the same product name type
as the source computer. On computers with multiple processors,
the processorID bios lock option does not work as intended
when running Ghost32.exe. In this situation, do not create or
restore images with the -locktype parameter set to I. Other
-locktype values work as intended.
-noindex
Prevents Symantec Ghost from creating an index when creating
an image file. This slightly reduces the size of the image file
and saves memory, but Ghost Explorer is much slower in
reading the image file. This switch is useful if you are saving
an image file from a large disk with very little memory.
115
116
Command-line switches
About command-line switches
Table A-1
Ghost command line switches (continued)
Command-line switch
Description
-noOSlayout
Prevents Ghost from updating the OS after a restore. By default,
Ghost passes information about the restore to Windows, which
then makes updates. This switch disables that function and
preserves the disk exactly as restored
-ntc-
Disables NTFS contiguous run allocation.
-ntchkdsk
Sets the CHKDSK bit set on a copied NTFS volume. This causes
Windows NT to check the integrity of the volume when it is
started.
-ntexact
Attempts to arrange the restored NTFS volume in the same
way as the source volume.
-pmbr
Specifies that the master boot record of the destination disk is
to be preserved when performing a disk-to-disk or image-to-disk
operation.
-preserveifexists
Preserves the specified files if they exist. The task does not fail
if the specified files do not exist. To preserve files or directories
other than the image file, the syntax is as follows:
-preserveifexists=filepath[=newpath] [,filepath[=newpath]...]
Each filepath can refer to an individual file or a directory. All
files and subdirectories of a specified directory are preserved.
If a file does not exist, then the restore fails. After a Clone step
in a task, all preserved files are added back to the destination
specified by the -preservedest=n switch, renaming them to
newpath where specified. You must use the -preserveifexists
switch with -preservedest.
-pwd and -pwd=x
Specifies that password protection be used when creating an
image file. Use of a password does not securely encrypt the
contents of the image. x indicates the password for the image
file. If no password is given in the switch, Symantec Ghost
prompts for one. You can enter a maximum of 10 alphanumeric
characters.
Command-line switches
About command-line switches
Table A-1
Ghost command line switches (continued)
Command-line switch
Description
-split=x
Splits image file into x MB spans. Use this switch to create a
forced-size volume set. For example, if you want to force smaller
image files from a 1024-MB drive, you could specify 200-MB
segments. For example: ghost.exe -split=200 This divides the
image into 200-MB segments. If this switch is not used then an
image is split at 2 GB in the following operations: • GhostCast
• Peer-to-peer • Creating an image on a mapped-network drive
If the operation runs locally on a FAT partition, then the image
splits at 4 GB.
-sze
Sets the size for the destination partitions for either a disk
restore or disk copy operation. When numbering partitions in
the -sze switch, do not include the hidden Ghost partition. This
switch is intended to be used in the Additional command line
in the Console. All functionality of -sze switches is supported.
-szee
Forces Symantec Ghost to keep the sizes of all destination
partitions the same size as in the source partition (no resizing).
This switch can be used with or without the -clone switch.
-szef
Forces Symantec Ghost to keep the sizes of all destination
partitions, except for the first one, the same size as in the
source partition. The first partition uses the remaining disk
space. This switch can be used with or without the -clone switch.
-szel
Forces Symantec Ghost to keep the sizes of all destination
partitions, except for the last one, the same size as in the source
partition. The last partition uses the remaining disk space. This
switch can be used with or without the -clone switch.
-z
Runs compression when saving a disk or partition to an image
file. The greater the compression, the slower the transmission,
as follows: • -z or -z1: Low compression (fast transmission) •
-z2: High compression (medium transmission) • -z3 through
-z9: Higher compression (slower transmission)
Table A-2
Command line switches with or without -cns
With-CNS
Without -CNS
Filename .gho
Filename .gho.
Filename .001
Filen001.ghs
Filename .002
Filen002.ghs
117
118
Command-line switches
About command-line switches
Table A-3
RapiDeploy Command-line Switches
Command Line Switch
Description
-?
Shows command-line help.
-bsl:[maximum
bandwidth]
Determines the maximum bandwidth to be used by the
multicasting session. Example To limit the bandwidth to 5
Megabits per second, type rdeploy -bsl:5
-c[compression mode]
Sets the compression mode for image creation. Default
balanced Modes • off (turn compression off) • size (make
smallest image size with slight speed penalty) • speed (make a
less compressed image in less time) • balanced (make a
reasonable compressed image with a reduced speed penalty).
Example To optimize image creation for speed, type rdeploy
-mu -f[filename] -cspeed
-cfgfile:[filename]
Sets the configuration filename (default is lastrun.cfg). The
configuration file provides information for post configuration.
The default configuration file is lastrun.cfg that can be edited
in a text editor with the specific information needed for the
computer. This command is useful if you want to run imaging
in a batch file using configuration information saved previously
by the RapiDeploy program. (If you select the option to save
settings in the RapiDeploy program, a configuration file will
be created with the name lastrun.cfg.) You can rename
lastrun.cfg and specify it in your batch file to apply
configuration settings. Example If you have run RapiDeploy
and have chosen the option to save configuration settings, you
could rename lastrun.cfg to laptop1.cfg and use it in a batch
file by typing the following: rdeploy -md -f[filename]
-cfgfile:laptop1.cfg You can also put configuration files in a
shared directory and load them from the network. See also
-m[mode], -f[path & file name]
-checkdisk
Marks the partitions dirty so that checkdisk will run after the
image is restored (works on all file systems). Note Post
configuration will fail when this switch is used. Example
rdeploy -mu -f[filename] -checkdisk See also -m[mode], -f[path
& file name]
Command-line switches
About command-line switches
Table A-3
RapiDeploy Command-line Switches (continued)
Command Line Switch
Description
-d[hard disk number]
Specifies which hard disk to read from or write to, depending
on whether you are uploading or downloading. This switch is
used for computers that have more than one hard disk. Default
Disk 1 Examples To download an image to disk 2, combine with
the -md switch and type rdeploy -d2 -md -f[filename] To create
an image from disk 2, combine with the -mu switch and type
rdeploy -d2 -mu -f[filename] See also -m[mode], -f[path & file
name]
-f[path & file name]
Used with the -m switch. In upload mode, it specifies the
filename and location for storing an image file. In download
mode it specifies which image file to restore. To create (upload)
a regular image file, use an .img extension. To create a
self-extracting executable image file, use an .exe extension
Examples To upload an image file to disk g:, type rdeploy -mu
-fg:\images\win98.img To upload a self-extracting executable
image file, type rdeploy -mu -fg:\images\win98.exe See also
-m[mode], -f[path & file name]
-forcebw
Forces the BootWorks partition to be restored. Use this switch
when using PXE or to overwrite an existing BootWorks
partition on the hard disk with the BootWorks partition in the
image. Example To restore an image and have the BootWorks
partition in the image replace an existing BootWorks partition
on the hard disk, type rdeploy -md -f[filename] -forcebw See
also -m[mode], -f[path & file name]
-forcegui
Forces the wizard to appear even if it doesn’t have to. Use this
switch to force the wizard to appear so that you can view or
edit settings for each computer. Example To restore an image
but first view or make changes in the settings, type rdeploy
-md -f[filename] -forcegui See also -m[mode], -f[path & file
name]
-forceoem
Forces the OEM partition to be restored. Use this switch to
overwrite an OEM partition on the hard disk with an OEM
partition in the image. Example To restore an image and have
the OEM partition in the image replace an existing OEM
partition on the hard disk, type rdeploy -md -f[filename]
-forceoem See also -m[mode], -f[path & file name]
119
120
Command-line switches
About command-line switches
Table A-3
RapiDeploy Command-line Switches (continued)
Command Line Switch
Description
-frm:[name]
Specifies a FIRM file that contains a list of FIRM commands
to be executed after a restore. A FIRM file is a text file
containing FIRM commands to execute. Example After a
computer has received an image, you can copy a file that is not
in the image to the computer. For example, you may want to
copy a .cfg file that a computer needs but is not in an image.
rdeploy -md -f[filename] -frm:firm.txt In this example, you
would have two files: • The FIRM file that includes the FIRM
command to perform the copy, firm.txt • The file that you want
copied to a computer, sample.cfg Both of these files must be
in the RapiDeploy/FIRM application folder. The FIRM file,
firm.txt, could have the following FIRM command: copy
sample.cfg c:\sample.cfg In this example, after the image has
been received, sample.cfg is copied from the RapiDeploy
application folder on the server to the computer in the specified
folder.
-h
Shows command-line help.
-i:[20..25]
Sets screen resolution. For information on setting VESA modes,
see -ve:[31.34] Example To set screen resolution to VGA mode
23 (640x480x16), type rdeploy -i:23
-i[IDnumber]
Sets session ID when sending an image file to more than one
computer. Use this switch with multicast sessions so the Master
PC can identify Client PCs in the same session. Example To
send an image to 10 Client PCs, type rdeploy -mdb -f[filename]
-s9 -i5000001 Note -i500001 is given as an example. This value
is an example of what the Deployment Server console would
send for a session ID. See also -m[mode], -s[number of Client
PCs], -f[path & file name]
-ip:[n.n.n.n:p]
Sets the multicast IP address and port. This can be used for
two purposes: 1) To allow multicasting through a router that
is set up to use a different multicast IP address, and 2) to
separate multiple multicasting sessions more efficiently. If
you are manually running multiple multicast sessions, you can
specify a different multicast IP address for each session to
allow the NIC itself to filter out unwanted packets from other
sessions. This speeds up all sessions involved. Important
Remember to put the port number at the end of the IP address
after a colon. Example rdeploy -mdb -f[filename] -s9
-ip:224.2.0.3:401 See also -m[mode], -s[number of Client PCs],
-f[path & file name]
Command-line switches
About command-line switches
Table A-3
RapiDeploy Command-line Switches (continued)
Command Line Switch
Description
-kap
Prevents rdeploy.exe from overwriting any existing partitions
on the hard disk.
-kp[1-31]
(Download only) Prevents rdeploy.exe from overwriting a
specified partition. n=partition 1 - 31 Example To keep
partition 2 from being overwritten during imaging, type
rdeploy -md -f[filename] -kp2 See also -m[mode], -f[path & file
name]
-m[mode]
Sets the operating mode. Modes • u (Upload image) • d
(Download image) • b (Multicast only) • ub (Upload and
multicast image) • db (Download and multicast image) • client
(Client mode) Examples To upload an image, type rdeploy -mu
-f[filename] To designate a computer as a Client PC, type
rdeploy -mclient See also -f[path & file name], -i[IDnumber]
-makeimx
Minimizes the number of disk swaps that occur when restoring
a hard disk image that has been split across multiple CDs or
other storage media. This switch causes RapiDeploy to create
an .imx (IMage IndeX) file which contains data that may reside
on other CDs. If RapiDeploy has access to the .imx file, it will
not prompt you to insert any CD more than once. Use the
-makeimx switch when you create an image. However, no
switches are needed when restoring the image. Once the split
image file has been created and you are ready to burn the image
to CDs, put the .imx file on the CD with the first .img split image
file. Subsequent split image files do not require the .imx file
to be placed on the CD.
-mconv
Used with the -f switch to convert an existing image file (.img)
to a self-extracting .exe file. (Does not upload or download; just
converts the file.) Example To convert a file named WIN98.IMG,
type rdeploy -mconv -fwin98.img See also -f[path & file name]
-mig:[filename]
Used to specify a migration file. Prompts before overwriting
the drive. This is used mainly by PC Transplant Pro.
-nobw
Makes sure that a BootWorks partition does not exist in the
destination, is not on the disk when restoring, and is not in the
image when creating. Example To remove an existing
BootWorks partition from a hard disk and exclude the
BootWorks partition from being downloaded with an image,
type rdeploy -md -f[filename] -nobw See also -m[mode], -f[path
& file name]
121
122
Command-line switches
About command-line switches
Table A-3
RapiDeploy Command-line Switches (continued)
Command Line Switch
Description
-nocancel
Doesn’t allow the user to cancel the imaging task.
-nooem
Makes sure that an OEM partition does not exist in the
destination, is not on the disk when restoring, and is not in the
image when creating. Example To remove an existing OEM
partition from a hard disk and exclude the OEM partition in
an images from being restored, type rdeploy -md -f[filename]
-nooem See also -m[mode], -f[path & file name]
-noprompt
Prevents any need for user interaction, for example, clicking
OK after an error occurs. This is very useful in scripting
situations where there won't be a user present to hit a key.
-nt64k (Download only)
(NT computers only) Enables a 64K cluster size with a FAT16
partition. This allows you to resize a FAT16 partition up to 4
GB rather than the normal 2 GB limit. Example To change the
size, type rdeploy -md -f[filename] -nt64k See also -m[mode],
-f[path & file name]
-p[partition]
Specifies which partition to process. Parameters • n Number
(1-31) uploads the partition (each partition must be designated
separately) • b images the BootWorks partition (works for both
hidden and embedded types) • oem images the oem partition
Examples To upload an image of partition 2, type rdeploy -mu
-p2 -f[filename] To upload multiple partitions, type rdeploy
-mu -p2 -p3 -p4 -f[filename] To upload the BootWorks partition,
type rdeploy -mu -pb -f[filename] To upload the oem partition,
type rdeploy -mu -poem -f[filename] See also -m[mode], -f[path
& file name]
-password:[pwd]
Specifies the image password. Passwords are case sensitive.
Example To create a password-protected image file, type
rdeploy -mu -f[filename] -password:Altiris To restore that file,
type rdeploy -md -f[filename] -password:Altiris See also
-m[mode], -f[path & file name]
-raw
Treats all partitions as raw. The Master PC reads and images
a partition by sectors rather than by files. This switch makes
the image drive geometry dependent (must have the same
heads, cylinders, and tracks as the image source). Used mostly
by Altiris Technical Support for troubleshooting, or it could
be used to make sure that any extra data residing outside of
the file system is included in the image.
Command-line switches
About command-line switches
Table A-3
RapiDeploy Command-line Switches (continued)
Command Line Switch
Description
-restoresig
Causes RapiDeploy to restore the unique disk signature in the
MBR of the hard disk from which the image was created.
Normally, RapiDeploy does not transfer the disk signature to
the target computer when deploying an image. This switch can
be used when restoring an image to the same or similar
systems. The -szf switch may be needed in combination with
the -restoresig switch. Example One This -restoresig switch
has been added to the Distribute Disk Image job in the XP
Embedded folder in the Samples folder to protect the Write
Filter Partition. It is required for all Restore Image jobs for XPe
Thin Clients. Example Two The -restoresig switch is needed
when restoring an image to a Citrix Metaframe Server to
preserve the alternate drive mappings. In this situation the
-szf switch is also required. Note This switch will function only
if no production partitions are being preserved on the hard
drive when deploying the disk image.
-s[number of Client PCs]
Specifies the number of Client PCs included in a multicast
session. When the Master PC detects the specified number of
Client PCs, it automatically starts the multicast session. The
number specified does not count the Master PC. Example To
set the number of Client PCs that will be connecting to the
Master PC in a multicast session to 9 computers, type rdeploy
-mdb -f[filename] -s9 See also -m[mode], -f[path & file name]
-span
Prompts between each piece of an image file (if set when using
the -split command), allowing you to insert new media. Example
To prompt between each file in the image set, type rdeploy
-mu -f[filename] -split:500 -span See also -m[mode], -f[path &
file name]
-split:[n]
Breaks an image into multiple files of a specified size during
an upload (in megabytes). Example To set the file size to 500
MB, type rdeploy -mu -f[filename] -split:500 See also -m[mode],
-f[path & file name]
-szf
Use this switch to set fixed sizing for all partitions. By using
this switch, RapiDeploy will use the original sizes that existed
on the computer from which the image was created. Example
If the original size of the partition to be downloaded was 250
MB and you want the destination partition to remain 250 MB,
use the -szf switch. If the target disk has 500 MB of free space,
you’ll have a 250 MB fixed partition and 250 MB of free space.
123
124
Command-line switches
About command-line switches
Table A-3
RapiDeploy Command-line Switches (continued)
Command Line Switch
Description
-sz[parameter]
Resizes partitions during imaging. Syntax rdeploy
-sz[#]:[x{m|p}] where # is the partition number and x is the size
based on the number of megabytes or a percentage. Parameters
• [x]m (Resize partitions in megabytes) • [x]p (Resize partitions
as a percentage of hard disk size for primary partitions or the
percentage of the extended partition for logical drives)
Examples If the size of partition 2 being downloaded is 300 MB
and you want it to fit in half of the 500 MB of disk space on the
client disk, type rdeploy -sz2:50p -md -f[filename] This resizes
the 300 MB partition to 250 MB, leaving the other 250 MB
unused. You can set the target size for multiple partitions on
the same command-line by including multiple instances of the
switch: rdeploy -sz1:200m -sz2:50p -md -f[filename] See also
-m[mode], -f[path & file name]
-text
Run in text mode instead of GUI mode. To use this switch, all
settings must be specified at the command-line. Examples
rdeploy -md -f[filename] -text or rdeploy -mu -f[filename] -text
If you want to save a list of command-line parameters to a text
file, you can use the -text parameter rdeploy -? -text >
rdparams.txt See also -m[mode], -f[path & file name]
Command-line switches
About command-line switches
Table A-3
RapiDeploy Command-line Switches (continued)
Command Line Switch
Description
-threshold:[n]
This option applies only to the “Restore and Send” (-mdb)
mode. We have found that when using a small number of
clients, it is faster to perform individual downloads on each
client than it is to multicast to all of them. There is a point
where it becomes more efficient to multicast than it is to
perform individual downloads. This “threshold” is where it
becomes faster to multicast than to do individual downloads
and can be specified by the -threshold:[n] command line
parameter. Depending upon the network environment, this
number may vary. You should perform a few tests to pick a
good threshold value for your network. It may be a small
number, like four, or it could be much larger, like 15. Once you
have found this threshold value, you can specify this number
on the command line and then RapiDeploy will, depending on
the number of clients that connect, have them do individual
downloads or have them multicast. The number [n] specifies
the minimum number of clients that will need to connect to
the master in order for it to multicast. For example, if you
specify -threshold=5, and four or fewer clients connect to the
master PC, it will have them all do individual downloads of the
image. If five or more clients connect to that master, it will
multicast to them. This becomes more important when
multicasting across subnets with a router that does not support
multicasting. If you start one master and nine clients (10 PCs
total), three of which are on one side of the router and seven
of which are on the other side, RapiDeploy will detect that
there are only three on one side of the router and do individual
downloads to them. It will also detect that seven are on the
other side and multicast to them. RapiDeploy does all of this
automatically. All you must supply is the threshold value to
let RapiDeploy determine when it should multicast or not.
Example Suppose you have determined that the threshold
value for your network is five. In other words, you have found
that multicasting from one master to five or more clients is
faster than doing individual downloads to those clients and
the master. You could then specify the following threshold
value on the command line: rdeploy -mdb -f[filename] -s9
-threshold:5 See also -m[mode], -f[path & file name], -s[number
of Client PCs]
-ve:[31.34]
Set VESA screen resolution. Example To set screen resolution
to VESA mode 31 (640x480x256), type rdeploy -ve:31
125
126
Command-line switches
About command-line switches
Table A-3
RapiDeploy Command-line Switches (continued)
Command Line Switch
Description
-w[n]
When multicasting, specifies the maximum number of minutes
to wait for Client PCs to connect. If all Client PCs connect, it
will start right away. Default: 5 minutes (or until the specified
number of Client PCs is connected). Example To set the timeout
to wait for PC Clients to 10 minutes, type rdeploy -w10 -mdb
-f[filename] -s9 See also -m[mode], -s[number of Client PCs]
-x
Causes the image to be saved as a self-extracting file. This
setting will automatically be set if the image file name specified
by the -f parameter ends with .EXE.
See “Setting up Deployment Solution ” on page 24.
Appendix
B
Troubleshooting
This appendix includes the following topics:
■
Troubleshooting
Troubleshooting
Table B-1
Troubleshooting
Issue
The
following
error
message occurs when you
create an image over HTTP
with the -ID switch:
Description
Workaround
When you create a sector- ■ Use -split switch when you
by- sector image over HTTP,
create image, where -split
where HTTP is configured
size is less than 2GB.
on Windows 2003 32-bit, IIS ■ Configure HTTP on 64-Bit
6.0 displays the error
Windows.
Not enough space on
message:
destination
drive.
Spanning
is
not Not enough space on
supported on this destination drive. Spanning
supported on this drive.
drive.
128
Troubleshooting
Troubleshooting
Table B-1
Troubleshooting (continued)
Issue
Description
Workaround
Device in the Device
Manager
shows
an
exclamation mark after
DA-SOI
When DA-SOI for Non
critical
drivers
is
executed,all
the
DeployAnywhere
and
scripted OS installations are
performed. However when
the operating system is up,
the devices in the device
manager appear with an
exclamation mark and
cannot be used. When the
same drivers are applied to
the device manually , the
following warning/error
message occurs:
If the unsigned drivers show an
exclamation mark for the
devices, use the following tag
entry in the unattended answer
file:
DriverSigningPolicy
driver failed in windows
logo test
An error occurs when you You clone a Vista computer Join the computer to a domain
join a Vista computer to a using an image that you using a different task after the
domain
prepared with Sysprep.
Clone task.
Apply
configuration
changes. When you try to
join the computer to a
domain, the following error
occurs:
Windows can't complete the
installation
Preserved files on Vista Windows Explorer (Vista)
computers have incorrect may not show the correct
names
name for a folder that is
preserved and renamed
after a Clone task. This
problem occurs if the
renamed folder contains a
copy of desktop.ini.
Find and delete the hidden file
named desktop.ini inside the
affected
folders.
Windows
Explorer should then correctly
display the folder name.
Troubleshooting
Troubleshooting
Table B-1
Issue
Troubleshooting (continued)
Description
CRC files created by By default, Symantec Ghost
Symantec Ghost return a informs the operating
false result
system about the disk
layout after a clone.
However, that might cause
the CRC files created by
Symantec Ghost to return a
false result. The false result
could be that disks are not
identical when they are
identical.
For example, after an image
-to-disk restore, a CRC32
verify that operation might
return an inaccurate CRC
result
because
under
WinPE, the source disk
remains
mounted
by
windows.
Therefore, a CRC create on
the source disk and then a
verification
on
the
destination disk may return
an inaccurate CRC result
because WinPE can change
the source drive.
The -noOs switch prevents
ghost from updating the
operating system with the
destination disk changes.
The source is mounted by
Windows and therefore the
CRC value may change due
to system file changes by
Windows and therefore the
CRC value may change due
to system file changes by
Windows.
Workaround
If the source image and
destination disk have similar
partition layouts, then be sure
the system from mounting a file
system driver once the clone is
complete. This can happen on
similarly partitioned disks even
when you use the -nooslayout
switch.
129
130
Troubleshooting
Troubleshooting
Table B-1
Troubleshooting (continued)
Issue
Description
Workaround
In IE8 native mode, the
credentials on the Deploy
Image task disappear when
you type the credentials on
the Deploy Image task and
click Advanced.
In IE8 native mode, if a user
types the credentials on
Deploy image task, and
clicks on Advanced tab, the
credentials on Deploy image
task does not appear.
Use the IE7 compatibility view
in an IE8 Web browser. The
credentials appear even after
you click Advanced.
Troubleshooting
Troubleshooting
Table B-1
Issue
The WHOAMI
Troubleshooting (continued)
Description
PXE is not binding to the
given IP address when the
does not get overwritten
Symantec Boot Services
and PXE listens on the IP
server has two NIC cards
addresses that it picks up
installed on it.
at startup.
Workaround
131
132
Troubleshooting
Troubleshooting
Table B-1
Issue
Troubleshooting (continued)
Description
Workaround
This workaround is based on the
following conditions:
Symantec boot services
server is running on
win2k8R2.
■ Symantec
boot services
server has two active NICs.
■ DHCP server and Symantec
boot services server are
bound on the same NIC.
■
Assuming that the two NICs are
A and B, perform the following
to make the Symantec boot
services server operational:
If you want to use the NIC B
for SBS, you need to check
the binding preference of this
card. Perform the following
steps on 2k8 R2 computer:
Go to Network > Properties>
Change
Adapter
SettingsBoth A and B NICs
are present here.
■ On this window (network
connections), press Alt
(keyboard option).Then the
file menu options are visible.
Select the Advanced menu
and click Advanced Settings
. Change the connections
order so that NIC B is set to
the first row in the list. Click
Ok to save the changes.
You have changed the
binding order of the NIC on
your computer.
■ Now check the binding of the
DHCP server and clicking the
DHCP server by Start > Run
> dhcpmgmt.msc.
Click on the + option in the
■
Troubleshooting
Troubleshooting
Table B-1
Troubleshooting (continued)
Issue
Description
Workaround
left pane so that the ipv4 and
ipv6 options are visible.
Then, right-click on the host
name and click on the
Add/Remove bindings menu.
You can see the server
Bindings properties window.
Click on NIC B so that the
binding can be set to IP of
NIC B only. Then, click Ok to
save the changes.
During Installation for
Plug-in, a package is rolled
out
before
the
maintenance
window
starts on the client
computer when Run once
ASAP in maintenance
window only is checked in
You cannot install the You are required to create a
Deployment
Solution schedule using the Add
plug-in in a maintenance Schedule option.
window by using the Run
once ASAP in maintenance
window only option.
133
134
Troubleshooting
Troubleshooting
Table B-1
Troubleshooting (continued)
Issue
Description
PXE-E77 error is received If PXE images were created
when the client computer when SBS services were not
is booted to a PXE image
running, you receive an
error when you boot the
client computer to that PXE
image. The error that is
received is PXE-E77.
Workaround
Verify that all SBS services are
running. If any of the following
four services is not running,
then start it manually:
■
Symantec netBoot interface
■
Symantec netBoot mtftp
■
Symantec netBoot NSiSignal
■
Symantec netBoot Server
When the services are started,
on the Deployment Solution
console, click Settings >
Deployment > Create Preboot
Configurations. Select all the
PXE images that were created
when the SBS services were not
running and click Recreate
Preboot
environment
to
recreate them.
To prevent this issue from
occurring, ensure that the PXE
services are started and set to
automatic before you create any
preboot configurations.
The Deploy Image task
gets error during the XP
GHO image import when
the Windows XP operating
system
boots
with
DeployAnywhere
When you execute the You are required to connect to a
DeployImage task with the different USB keyboard to
DeployAnywhere option continue with the installation.
enabled on a Windows XP
computer, you encounter a
non-functioning of the
keyboard and mouse when
booting the operating
system. This problem does
not recur frequently
The computer does not
connect to the domain
when Join Domain option
is used from the OS install
page
The computer does not Join Domain task can be
connect
to
t h e performed using Apply system
DeployAnywhere domain configuration task.
when Join Domain option
is used from the operating
system install page.
Troubleshooting
Troubleshooting
Table B-1
Issue
Troubleshooting (continued)
Description
Workaround
The Create Image task fails The Create Image on HTTP The image name must not
on Linux preos
server fails if the image contain any space.
name contains space.
computer if the image
name contains space
135
136
Troubleshooting
Troubleshooting
Appendix
Altiris™ Deployment
Solution 7.1 SP1a MR1
from Symantec™
Third-Party Legal Notices
This appendix includes the following topics:
■
Third-Party Legal Notices
■
Zlib
■
Unzip
■
Generic Set Data Structure, C# Class
■
Waterloo TCP - TCP/IP library routines
■
Linux kernel version 2.6.27.7-9 from the OpenSUSE project
■
STLPort
■
TinyXML
■
Apache Xerces
■
ncurses
■
Microsoft Silverlight 3 Toolkit
■
WDOSX
■
DOS/32a
C
138
Altiris™ Deployment Solution 7.1 SP1a MR1 from Symantec™ Third-Party Legal Notices
Third-Party Legal Notices
■
Editline
■
Zlib
Third-Party Legal Notices
This Symantec product may contain third party software for which Symantec is
required to provide attribution (“Third Party Programs”). Some of the Third Party
Programs are available under open source or free software licenses. The License
Agreement accompanying the Software does not alter any rights or obligations
you may have under those open source or free software licenses. This appendix
contains proprietary notices for the Third Party Programs and the licenses for
the Third Party Programs, where applicable.
Zlib
Jean-loup Gailly and Mark Adler
Copyright (C) 1995-2005 Jean-loup Gailly and Mark Adler
zlib/libpng License
Copyright (c) <year> <copyright holders>
This software is provided 'as-is', without any express or implied warranty. In no
event will the authors be held liable for any damages arising from the use of this
software.
Permission is granted to anyone to use this software for any purpose, including
commercial applications, and to alter it and redistribute it freely, subject to the
following restrictions:
■
The origin of this software must not be misrepresented; you must not claim
that you wrote the original software. If you use this software in a product, an
acknowledgment in the product documentation would be appreciated but is
not required.
■
Altered source versions must be plainly marked as such, and must not be
misrepresented as being the original software
■
This notice may not be removed or altered from any source distribution.
Unzip
Info-ZIP
Copyright (c) 1990-2005 Info-ZIP. All rights reserved.
Altiris™ Deployment Solution 7.1 SP1a MR1 from Symantec™ Third-Party Legal Notices
Unzip
InfoZip License License
License
In December 1999, with the release of Zip 2.3, Info-ZIP switched from its old, ad
hoc license (embodied in the COPYING file) to a new, more standard version based
on the BSD license. Here is the text of the new license, which applies to all source
files in Zip 2.3 and later, UnZip 5.41 and later, WiZ 5.0 and later, and MacZip 1.05
and later, except where explicitly stated otherwise:
This is version 2005-Feb-10 of the Info-ZIP copyright and license. The definitive
version of this document should be available at
ftp://ftp.info-zip.org/pub/infozip/license.html indefinitely.
Copyright (c) 1990-2005 Info-ZIP. All rights reserved.
For the purposes of this copyright and license, 'Info-ZIP' is defined as the following
set of individuals:
Mark Adler, John Bush, Karl Davis, Harald Denker, Jean-Michel Dubois, Jean-loup
Gailly, Hunter Goatley, Ed Gordon, Ian Gorman, Chris Herborth, Dirk Haase, Greg
Hartwig, Robert Heath, Jonathan Hudson, Paul Kienitz, David Kirschbaum, Johnny
Lee, Onno van der Linden, Igor Mandrichenko, Steve P. Miller, Sergio Monesi,
Keith Owens, George Petrov, Greg Roelofs, Kai Uwe Rommel, Steve Salisbury,
Dave Smith, Steven M. Schweda, Christian Spieler, Cosmin Truta, Antoine
Verheijen, Paul von Behren, Rich Wales, Mike White.
This software is provided 'as is,' without warranty of any kind, express or implied.
In no event shall Info-ZIP or its contributors be held liable for any direct, indirect,
incidental, special or consequential damages arising out of the use of or inability
to use this software.
Permission is granted to anyone to use this software for any purpose, including
commercial applications, and to alter it and redistribute it freely, subject to the
following restrictions:
Redistributions of source code must retain the above copyright notice, definition,
disclaimer, and this list of conditions.
Redistributions in binary form (compiled executables) must reproduce the above
copyright notice, definition, disclaimer, and this list of conditions in documentation
and/or other materials provided with the distribution. The sole exception to this
condition is redistribution of a standard UnZipSFX binary (including SFXWiz) as
part of a self-extracting archive; that is permitted without inclusion of this license,
as long as the normal SFX banner has not been removed from the binary or
disabled.
Altered versions--including, but not limited to, ports to new operating systems,
existing ports with new graphical interfaces, and dynamic, shared, or static library
139
140
Altiris™ Deployment Solution 7.1 SP1a MR1 from Symantec™ Third-Party Legal Notices
Generic Set Data Structure, C# Class
versions--must be plainly marked as such and must not be misrepresented as
being the original source. Such altered versions also must not be misrepresented
as being Info-ZIP releases--including, but not limited to, labeling of the altered
versions with the names 'Info-ZIP' (or any variation thereof, including, but not
limited to, different capitalizations), 'Pocket UnZip,' 'WiZ' or 'MacZip' without the
explicit permission of Info-ZIP. Such altered versions are further prohibited from
misrepresentative use of the Zip-Bugs or Info-ZIP e-mail addresses or of the
Info-ZIP URL(s).
Info-ZIP retains the right to use the names 'Info-ZIP,' 'Zip,' 'UnZip,' 'UnZipSFX,'
'WiZ,' 'Pocket UnZip,' 'Pocket Zip,' and 'MacZip' for its own source and binary
releases.
Generic Set Data Structure, C# Class
Leon Finker
License
This article, along with any associated source code and files, is licensed under
The Code Project Open License (CPOL)
The Code Project Open License (CPOL) 1.02
Preamble
This License governs Your use of the Work. This License is intended to allow
developers to use the Source Code and Executable Files provided as part of the
Work in any application in any form.
The main points subject to the terms of the License are:
Source Code and Executable Files can be used in commercial applications;
Source Code and Executable Files can be redistributed; and
Source Code can be modified to create derivative works.
No claim of suitability, guarantee, or any warranty whatsoever is provided. The
software is provided 'as-is'.
The Article accompanying the Work may not be distributed or republished without
the Author's consent
This License is entered between You, the individual or other entity reading or
otherwise making use of the Work licensed pursuant to this License and the
individual or other entity which offers the Work under the terms of this License
('Author').
License
Altiris™ Deployment Solution 7.1 SP1a MR1 from Symantec™ Third-Party Legal Notices
Generic Set Data Structure, C# Class
THE WORK (AS DEFINED BELOW) IS PROVIDED UNDER THE TERMS OF THIS
CODE PROJECT OPEN LICENSE ('LICENSE'). THE WORK IS PROTECTED BY
COPYRIGHT AND/OR OTHER APPLICABLE LAW. ANY USE OF THE WORK OTHER
THAN AS AUTHORIZED UNDER THIS LICENSE OR COPYRIGHT LAW IS
PROHIBITED.
BY EXERCISING ANY RIGHTS TO THE WORK PROVIDED HEREIN, YOU ACCEPT
AND AGREE TO BE BOUND BY THE TERMS OF THIS LICENSE. THE AUTHOR
GRANTS YOU THE RIGHTS CONTAINED HEREIN IN CONSIDERATION OF YOUR
ACCEPTANCE OF SUCH TERMS AND CONDITIONS. IF YOU DO NOT AGREE TO
ACCEPT AND BE BOUND BY THE TERMS OF THIS LICENSE, YOU CANNOT MAKE
ANY USE OF THE WORK.
Definitions.
'Articles' means, collectively, all articles written by Author which describes how
the Source Code and Executable Files for the Work may be used by a user.
'Author' means the individual or entity that offers the Work under the terms of
this License.
'Derivative Work' means a work based upon the Work or upon the Work and other
pre-existing works.
'Executable Files' refer to the executables, binary files, configuration and any
required data files included in the Work.
'Publisher' means the provider of the website, magazine, CD-ROM, DVD or other
medium from or by which the Work is obtained by You.
'Source Code' refers to the collection of source code and configuration files used
to create the Executable Files.
'Standard Version' refers to such a Work if it has not been modified, or has been
modified in accordance with the consent of the Author, such consent being in the
full discretion of the Author.
'Work' refers to the collection of files distributed by the Publisher, including the
Source Code, Executable Files, binaries, data files, documentation, whitepapers
and the Articles.
'You' is you, an individual or entity wishing to use the Work and exercise your
rights under this License.
Fair Use/Fair Use Rights. Nothing in this License is intended to reduce, limit, or
restrict any rights arising from fair use, fair dealing, first sale or other limitations
on the exclusive rights of the copyright owner under copyright law or other
applicable laws.
License Grant. Subject to the terms and conditions of this License, the Author
hereby grants You a worldwide, royalty-free, non-exclusive, perpetual (for the
141
142
Altiris™ Deployment Solution 7.1 SP1a MR1 from Symantec™ Third-Party Legal Notices
Generic Set Data Structure, C# Class
duration of the applicable copyright) license to exercise the rights in the Work as
stated below:
You may use the standard version of the Source Code or Executable Files in Your
own applications.
You may apply bug fixes, portability fixes and other modifications obtained from
the Public Domain or from the Author. A Work modified in such a way shall still
be considered the standard version and will be subject to this License.
You may otherwise modify Your copy of this Work (excluding the Articles) in any
way to create a Derivative Work, provided that You insert a prominent notice in
each changed file stating how, when and where You changed that file.
You may distribute the standard version of the Executable Files and Source Code
or Derivative Work in aggregate with other (possibly commercial) programs as
part of a larger (possibly commercial) software distribution.
The Articles discussing the Work published in any form by the author may not
be distributed or republished without the Author's consent. The author retains
copyright to any such Articles. You may use the Executable Files and Source Code
pursuant to this License but you may not repost or republish or otherwise
distribute or make available the Articles, without the prior written consent of the
Author.
Any subroutines or modules supplied by You and linked into the Source Code or
Executable Files this Work shall not be considered part of this Work and will not
be subject to the terms of this License.
Patent License. Subject to the terms and conditions of this License, each Author
hereby grants to You a perpetual, worldwide, non-exclusive, no-charge,
royalty-free, irrevocable (except as stated in this section) patent license to make,
have made, use, import, and otherwise transfer the Work.
Restrictions. The license granted in Section 3 above is expressly made subject to
and limited by the following restrictions:
You agree not to remove any of the original copyright, patent, trademark, and
attribution notices and associated disclaimers that may appear in the Source Code
or Executable Files.
You agree not to advertise or in any way imply that this Work is a product of Your
own.
The name of the Author may not be used to endorse or promote products derived
from the Work without the prior written consent of the Author.
You agree not to sell, lease, or rent any part of the Work. This does not restrict
you from including the Work or any part of the Work inside a larger software
Altiris™ Deployment Solution 7.1 SP1a MR1 from Symantec™ Third-Party Legal Notices
Generic Set Data Structure, C# Class
distribution that itself is being sold. The Work by itself, though, cannot be sold,
leased or rented.
You may distribute the Executable Files and Source Code only under the terms of
this License, and You must include a copy of, or the Uniform Resource Identifier
for, this License with every copy of the Executable Files or Source Code You
distribute and ensure that anyone receiving such Executable Files and Source
Code agrees that the terms of this License apply to such Executable Files and/or
Source Code. You may not offer or impose any terms on the Work that alter or
restrict the terms of this License or the recipients' exercise of the rights granted
hereunder. You may not sublicense the Work. You must keep intact all notices
that refer to this License and to the disclaimer of warranties. You may not
distribute the Executable Files or Source Code with any technological measures
that control access or use of the Work in a manner inconsistent with the terms
of this License.
You agree not to use the Work for illegal, immoral or improper purposes, or on
pages containing illegal, immoral or improper material. The Work is subject to
applicable export laws. You agree to comply with all such laws and regulations
that may apply to the Work after Your receipt of the Work.
Representations, Warranties and Disclaimer. THIS WORK IS PROVIDED 'AS IS',
'WHERE IS' AND 'AS AVAILABLE', WITHOUT ANY EXPRESS OR IMPLIED
WARRANTIES OR CONDITIONS OR GUARANTEES. YOU, THE USER, ASSUME
ALL RISK IN ITS USE, INCLUDING COPYRIGHT INFRINGEMENT, PATENT
INFRINGEMENT, SUITABILITY, ETC. AUTHOR EXPRESSLY DISCLAIMS ALL
EXPRESS, IMPLIED OR STATUTORY WARRANTIES OR CONDITIONS, INCLUDING
WITHOUT LIMITATION, WARRANTIES OR CONDITIONS OF MERCHANTABILITY,
MERCHANTABLE QUALITY OR FITNESS FOR A PARTICULAR PURPOSE, OR
ANY WARRANTY OF TITLE OR NON-INFRINGEMENT, OR THAT THE WORK (OR
ANY PORTION THEREOF) IS CORRECT, USEFUL, BUG-FREE OR FREE OF
VIRUSES. YOU MUST PASS THIS DISCLAIMER ON WHENEVER YOU DISTRIBUTE
THE WORK OR DERIVATIVE WORKS.
Indemnity. You agree to defend, indemnify and hold harmless the Author and the
Publisher from and against any claims, suits, losses, damages, liabilities, costs,
and expenses (including reasonable legal or attorneys’ fees) resulting from or
relating to any use of the Work by You.
Limitation on Liability. EXCEPT TO THE EXTENT REQUIRED BY APPLICABLE
LAW, IN NO EVENT WILL THE AUTHOR OR THE PUBLISHER BE LIABLE TO YOU
ON ANY LEGAL THEORY FOR ANY SPECIAL, INCIDENTAL, CONSEQUENTIAL,
PUNITIVE OR EXEMPLARY DAMAGES ARISING OUT OF THIS LICENSE OR THE
USE OF THE WORK OR OTHERWISE, EVEN IF THE AUTHOR OR THE PUBLISHER
HAS BEEN ADVISED OF THE POSSIBILITY OF SUCH DAMAGES.
Termination.
143
144
Altiris™ Deployment Solution 7.1 SP1a MR1 from Symantec™ Third-Party Legal Notices
Generic Set Data Structure, C# Class
This License and the rights granted hereunder will terminate automatically upon
any breach by You of any term of this License. Individuals or entities who have
received Derivative Works from You under this License, however, will not have
their licenses terminated provided such individuals or entities remain in full
compliance with those licenses. Sections 1, 2, 6, 7, 8, 9, 10 and 11 will survive any
termination of this License.
If You bring a copyright, trademark, patent or any other infringement claim
against any contributor over infringements You claim are made by the Work, your
License from such contributor to the Work ends automatically.
Subject to the above terms and conditions, this License is perpetual (for the
duration of the applicable copyright in the Work). Notwithstanding the above,
the Author reserves the right to release the Work under different license terms
or to stop distributing the Work at any time; provided, however that any such
election will not serve to withdraw this License (or any other license that has been,
or is required to be, granted under the terms of this License), and this License will
continue in full force and effect unless terminated as stated above.
Publisher. The parties hereby confirm that the Publisher shall not, under any
circumstances, be responsible for and shall not have any liability in respect of the
subject matter of this License. The Publisher makes no warranty whatsoever in
connection with the Work and shall not be liable to You or any party on any legal
theory for any damages whatsoever, including without limitation any general,
special, incidental or consequential damages arising in connection to this license.
The Publisher reserves the right to cease making the Work available to You at
any time without notice
Miscellaneous
This License shall be governed by the laws of the location of the head office of the
Author or if the Author is an individual, the laws of location of the principal place
of residence of the Author.
If any provision of this License is invalid or unenforceable under applicable law,
it shall not affect the validity or enforceability of the remainder of the terms of
this License, and without further action by the parties to this License, such
provision shall be reformed to the minimum extent necessary to make such
provision valid and enforceable.
No term or provision of this License shall be deemed waived and no breach
consented to unless such waiver or consent shall be in writing and signed by the
party to be charged with such waiver or consent.
This License constitutes the entire agreement between the parties with respect
to the Work licensed herein. There are no understandings, agreements or
representations with respect to the Work not specified herein. The Author shall
not be bound by any additional provisions that may appear in any communication
Altiris™ Deployment Solution 7.1 SP1a MR1 from Symantec™ Third-Party Legal Notices
Waterloo TCP - TCP/IP library routines
from You. This License may not be modified without the mutual written agreement
of the Author and You.
Waterloo TCP - TCP/IP library routines
Erick Engelke/University of Waterloo Copyright (C) 1990, 1991, University of
Waterloo Portions Copyright (C) 1990, National Center for Supercomputer
Applications Portions Copyright (C) 1990, Clarkson University Portions Copyright
(C) 1983, 1986, Imagen Corporation * Waterloo TCP - TCP/IP library routines * *
Copyright (C) 1990, 1991, University of Waterloo * * Portions Copyright (C) 1990,
National Center for Supercomputer Applications * Portions Copyright (C) 1990,
Clarkson University * Portions Copyright (C) 1983, 1986, Imagen Corporation * *
This software is distributed in the hope that it will be useful,
* but without any warranty; without even the implied warranty of
* merchantability or fitness for a particular purpose.
* You may freely use this library to produce programs which you may give
* away or sell in source format, or as compiled executables, or both.
*
* You may not sell this library or a portion thereof or distribute modified
* versions the library code in either source or OBJect or LIBrary format
* without written permission from the author.
*
* A programmer's reference is available please consult the documentation
* or send E-mail for details
* Erick Engelke [email protected]
* Faculty of Engineering
* University of Waterloo (519) 885-1211 Ext. 2965
* 200 University Ave.,
* Waterloo, Ont., Canada
* N2L 3G1
#define WATTCP_C 'Copyright 1990, 1991, University of Waterloo\n'
145
146
Altiris™ Deployment Solution 7.1 SP1a MR1 from Symantec™ Third-Party Legal Notices
Linux kernel version 2.6.27.7-9 from the OpenSUSE project
Linux kernel version 2.6.27.7-9 from the OpenSUSE
project
http://www.altiris.com/Products/DeploymentSolution/ds_linux.aspx
GNU GENERAL PUBLIC LICENSE
Version 2, June 1991
Copyright (C) 1989, 1991
Free Software Foundation, Inc.
51 Franklin St, Fifth Floor
Boston, MA 02110-1301 USA
Everyone is permitted to copy and distribute verbatim
Linux Kernel Sources Linus Torvalds & Others NOTE! This copyright does *not*
cover user programs that use kernel services by normal system calls - this is
merely considered normal use of the kernel, and does *not* fall under the heading
of 'derived work'. Also note that the GPL below is copyrighted by the Free Software
Foundation, but the instance of code that it refers to (the Linux kernel) is
copyrighted by me and others who actually wrote it. Also note that the only valid
version of the GPL as far as the kernel is concerned is _this_ particular version
of the license (ie v2, not v2.2 or v3.x or whatever), unless explicitly otherwise
stated
The GNU General Public License (GPL)
Version 2, June 1991
Copyright (C) 1989, 1991 Free Software Foundation, Inc.
59 Temple Place, Suite 330, Boston, MA 02111-1307 USA
Everyone is permitted to copy and distribute verbatim copies of this license
document, but changing it is not allowed.
Preamble
The licenses for most software are designed to take away your freedom to share
and change it. By contrast, the GNU General Public License is intended to guarantee
your freedom to share and change free software--to make sure the software is
free for all its users. This General Public License applies to most of the Free
Software Foundation's software and to any other program whose authors commit
to using it. (Some other Free Software Foundation software is covered by the GNU
Library General Public License instead.) You can apply it to your programs, too.
When we speak of free software, we are referring to freedom, not price. Our General
Public Licenses are designed to make sure that you have the freedom to distribute
Altiris™ Deployment Solution 7.1 SP1a MR1 from Symantec™ Third-Party Legal Notices
Linux kernel version 2.6.27.7-9 from the OpenSUSE project
copies of free software (and charge for this service if you wish), that you receive
source code or can get it if you want it, that you can change the software or use
pieces of it in new free programs; and that you know you can do these things.
To protect your rights, we need to make restrictions that forbid anyone to deny
you these rights or to ask you to surrender the rights. These restrictions translate
to certain responsibilities for you if you distribute copies of the software, or if you
modify it.
For example, if you distribute copies of such a program, whether gratis or for a
fee, you must give the recipients all the rights that you have. You must make sure
that they, too, receive or can get the source code. And you must show them these
terms so they know their rights.
We protect your rights with two steps: (1) copyright the software, and (2) offer
you this license which gives you legal permission to copy, distribute and/or modify
the software.
Also, for each author's protection and ours, we want to make certain that everyone
understands that there is no warranty for this free software. If the software is
modified by someone else and passed on, we want its recipients to know that what
they have is not the original, so that any problems introduced by others will not
reflect on the original authors' reputations.
The precise terms and conditions for copying, distribution and modification follow.
TERMS AND CONDITIONS FOR COPYING, DISTRIBUTION AND MODIFICATION
0. This License applies to any program or other work which contains a notice
placed by the copyright holder saying it may be distributed under the terms of
this General Public License. The "Program", below, refers to any such program or
work, and a "work based on the Program" means either the Program or any
derivative work under copyright law: that is to say, a work containing the Program
or a portion of it, either verbatim or with modifications and/or translated into
another language. (Hereinafter, translation is included without limitation in the
term "modification".) Each licensee is addressed as "you".
Activities other than copying, distribution and modification are not covered by
this License; they are outside its scope. The act of running the Program is not
restricted, and the output from the Program is covered only if its contents
constitute a work based on the Program (independent of having been made by
running the Program). Whether that is true depends on what the Program does.
147
148
Altiris™ Deployment Solution 7.1 SP1a MR1 from Symantec™ Third-Party Legal Notices
Linux kernel version 2.6.27.7-9 from the OpenSUSE project
1. You may copy and distribute verbatim copies of the Program's source code as
you receive it, in any medium, provided that you conspicuously and appropriately
publish on each copy an appropriate copyright notice and disclaimer of warranty;
keep intact all the notices that refer to this License and to the absence of any
warranty; and give any other recipients of the Program a copy of this License
along with the Program.
You may charge a fee for the physical act of transferring a copy, and you may at
your option offer warranty protection in exchange for a fee.
2. You may modify your copy or copies of the Program or any portion of it, thus
forming a work based on the Program, and copy and distribute such modifications
or work under the terms of Section 1 above, provided that you also meet all of
these conditions:
a) You must cause the modified files to carry prominent notices stating that you
changed the files and the date of any change.
b) You must cause any work that you distribute or publish, that in whole or in part
contains or is derived from the Program or any part thereof, to be licensed as a
whole at no charge to all third parties under the terms of this License.
c) If the modified program normally reads commands interactively when run, you
must cause it, when started running for such interactive use in the most ordinary
way, to print or display an announcement including an appropriate copyright
notice and a notice that there is no warranty (or else, saying that you provide a
warranty) and that users may redistribute the program under these conditions,
and telling the user how to view a copy of this License. (Exception: if the Program
itself is interactive but does not normally print such an announcement, your work
based on the Program is not required to print an announcement.)
These requirements apply to the modified work as a whole. If identifiable sections
of that work are not derived from the Program, and can be reasonably considered
independent and separate works in themselves, then this License, and its terms,
do not apply to those sections when you distribute them as separate works. But
when you distribute the same sections as part of a whole which is a work based
on the Program, the distribution of the whole must be on the terms of this License,
whose permissions for other licensees extend to the entire whole, and thus to
each and every part regardless of who wrote it.
Thus, it is not the intent of this section to claim rights or contest your rights to
work written entirely by you; rather, the intent is to exercise the right to control
the distribution of derivative or collective works based on the Program.
In addition, mere aggregation of another work not based on the Program with the
Program (or with a work based on the Program) on a volume of a storage or
distribution medium does not bring the other work under the scope of this License.
Altiris™ Deployment Solution 7.1 SP1a MR1 from Symantec™ Third-Party Legal Notices
Linux kernel version 2.6.27.7-9 from the OpenSUSE project
3. You may copy and distribute the Program (or a work based on it, under Section
2) in object code or executable form under the terms of Sections 1 and 2 above
provided that you also do one of the following:
a) Accompany it with the complete corresponding machine-readable source code,
which must be distributed under the terms of Sections 1 and 2 above on a medium
customarily used for software interchange; or,
b) Accompany it with a written offer, valid for at least three years, to give any
third party, for a charge no more than your cost of physically performing source
distribution, a complete machine-readable copy of the corresponding source code,
to be distributed under the terms of Sections 1 and 2 above on a medium
customarily used for software interchange; or,
c) Accompany it with the information you received as to the offer to distribute
corresponding source code. (This alternative is allowed only for noncommercial
distribution and only if you received the program in object code or executable
form with such an offer, in accord with Subsection b above.) The source code for
a work means the preferred form of the work for making modifications to it. For
an executable work, complete source code means all the source code for all modules
it contains, plus any associated interface definition files, plus the scripts used to
control compilation and installation of the executable. However, as a special
exception, the source code distributed need not include anything that is normally
distributed (in either source or binary form) with the major components (compiler,
kernel, and so on) of the operating system on which the executable runs, unless
that component itself accompanies the executable.
If distribution of executable or object code is made by offering access to copy from
a designated place, then offering equivalent access to copy the source code from
the same place counts as distribution of the source code, even though third parties
are not compelled to copy the source along with the object code.
4. You may not copy, modify, sublicense, or distribute the Program except as
expressly provided under this License. Any attempt otherwise to copy, modify,
sublicense or distribute the Program is void, and will automatically terminate
your rights under this License. However, parties who have received copies, or
rights, from you under this License will not have their licenses terminated so long
as such parties remain in full compliance.
5. You are not required to accept this License, since you have not signed it.
However, nothing else grants you permission to modify or distribute the Program
or its derivative works. These actions are prohibited by law if you do not accept
this License. Therefore, by modifying or distributing the Program (or any work
based on the Program), you indicate your acceptance of this License to do so, and
all its terms and conditions for copying, distributing or modifying the Program
or works based on it.
149
150
Altiris™ Deployment Solution 7.1 SP1a MR1 from Symantec™ Third-Party Legal Notices
Linux kernel version 2.6.27.7-9 from the OpenSUSE project
6. Each time you redistribute the Program (or any work based on the Program),
the recipient automatically receives a license from the original licensor to copy,
distribute or modify the Program subject to these terms and conditions. You may
not impose any further restrictions on the recipients' exercise of the rights granted
herein. You are not responsible for enforcing compliance by third parties to this
License.
7. If, as a consequence of a court judgment or allegation of patent infringement
or for any other reason (not limited to patent issues), conditions are imposed on
you (whether by court order, agreement or otherwise) that contradict the
conditions of this License, they do not excuse you from the conditions of this
License. If you cannot distribute so as to satisfy simultaneously your obligations
under this License and any other pertinent obligations, then as a consequence
you may not distribute the Program at all. For example, if a patent license would
not permit royalty-free redistribution of the Program by all those who receive
copies directly or indirectly through you, then the only way you could satisfy both
it and this License would be to refrain entirely from distribution of the Program.
If any portion of this section is held invalid or unenforceable under any particular
circumstance, the balance of the section is intended to apply and the section as a
whole is intended to apply in other circumstances.
It is not the purpose of this section to induce you to infringe any patents or other
property right claims or to contest validity of any such claims; this section has
the sole purpose of protecting the integrity of the free software distribution
system, which is implemented by public license practices. Many people have made
generous contributions to the wide range of software distributed through that
system in reliance on consistent application of that system; it is up to the
author/donor to decide if he or she is willing to distribute software through any
other system and a licensee cannot impose that choice.
This section is intended to make thoroughly clear what is believed to be a
consequence of the rest of this License.
8. If the distribution and/or use of the Program is restricted in certain countries
either by patents or by copyrighted interfaces, the original copyright holder who
places the Program under this License may add an explicit geographical
distribution limitation excluding those countries, so that distribution is permitted
only in or among countries not thus excluded. In such case, this License
incorporates the limitation as if written in the body of this License.
9. The Free Software Foundation may publish revised and/or new versions of the
General Public License from time to time. Such new versions will be similar in
spirit to the present version, but may differ in detail to address new problems or
concerns.
Altiris™ Deployment Solution 7.1 SP1a MR1 from Symantec™ Third-Party Legal Notices
Linux kernel version 2.6.27.7-9 from the OpenSUSE project
Each version is given a distinguishing version number. If the Program specifies
a version number of this License which applies to it and "any later version", you
have the option of following the terms and conditions either of that version or of
any later version published by the Free Software Foundation. If the Program does
not specify a version number of this License, you may choose any version ever
published by the Free Software Foundation.
10. If you wish to incorporate parts of the Program into other free programs whose
distribution conditions are different, write to the author to ask for permission.
For software which is copyrighted by the Free Software Foundation, write to the
Free Software Foundation; we sometimes make exceptions for this. Our decision
will be guided by the two goals of preserving the free status of all derivatives of
our free software and of promoting the sharing and reuse of software generally.
NO WARRANTY
11. BECAUSE THE PROGRAM IS LICENSED FREE OF CHARGE, THERE IS NO
WARRANTY FOR THE PROGRAM, TO THE EXTENT PERMITTED BY APPLICABLE
LAW. EXCEPT WHEN OTHERWISE STATED IN WRITING THE COPYRIGHT
HOLDERS AND/OR OTHER PARTIES PROVIDE THE PROGRAM "AS IS" WITHOUT
WARRANTY OF ANY KIND, EITHER EXPRESSED OR IMPLIED, INCLUDING, BUT
NOT LIMITED TO, THE IMPLIED WARRANTIES OF MERCHANTABILITY AND
FITNESS FOR A PARTICULAR PURPOSE. THE ENTIRE RISK AS TO THE QUALITY
AND PERFORMANCE OF THE PROGRAM IS WITH YOU. SHOULD THE PROGRAM
PROVE DEFECTIVE, YOU ASSUME THE COST OF ALL NECESSARY SERVICING,
REPAIR OR CORRECTION.
12. IN NO EVENT UNLESS REQUIRED BY APPLICABLE LAW OR AGREED TO IN
WRITING WILL ANY COPYRIGHT HOLDER, OR ANY OTHER PARTY WHO MAY
MODIFY AND/OR REDISTRIBUTE THE PROGRAM AS PERMITTED ABOVE, BE
LIABLE TO YOU FOR DAMAGES, INCLUDING ANY GENERAL, SPECIAL,
INCIDENTAL OR CONSEQUENTIAL DAMAGES ARISING OUT OF THE USE OR
INABILITY TO USE THE PROGRAM (INCLUDING BUT NOT LIMITED TO LOSS
OF DATA OR DATA BEING RENDERED INACCURATE OR LOSSES SUSTAINED
BY YOU OR THIRD PARTIES OR A FAILURE OF THE PROGRAM TO OPERATE
WITH ANY OTHER PROGRAMS), EVEN IF SUCH HOLDER OR OTHER PARTY
HAS BEEN ADVISED OF THE POSSIBILITY OF SUCH DAMAGES.
END OF TERMS AND CONDITIONS
How to Apply These Terms to Your New Programs
If you develop a new program, and you want it to be of the greatest possible use
to the public, the best way to achieve this is to make it free software which everyone
can redistribute and change under these terms.
To do so, attach the following notices to the program. It is safest to attach them
to the start of each source file to most effectively convey the exclusion of warranty;
151
152
Altiris™ Deployment Solution 7.1 SP1a MR1 from Symantec™ Third-Party Legal Notices
Linux kernel version 2.6.27.7-9 from the OpenSUSE project
and each file should have at least the "copyright" line and a pointer to where the
full notice is found.
One line to give the program's name and a brief idea of what it does. Copyright
(C) <year> <name of author>
This program is free software; you can redistribute it and/or modify it under the
terms of the GNU General Public License as published by the Free Software
Foundation; either version 2 of the License, or (at your option) any later version.
This program is distributed in the hope that it will be useful, but WITHOUT ANY
WARRANTY; without even the implied warranty of MERCHANTABILITY or
FITNESS FOR A PARTICULAR PURPOSE. See the GNU General Public License for
more details.
You should have received a copy of the GNU General Public License along with
this program; if not, write to the Free Software Foundation, Inc., 59 Temple Place,
Suite 330, Boston, MA 02111-1307 USA
Also add information on how to contact you by electronic and paper mail.
If the program is interactive, make it output a short notice like this when it starts
in an interactive mode:
Gnomovision version 69, Copyright (C) year name of author Gnomovision comes
with ABSOLUTELY NO WARRANTY; for details type `show w'. This is free software,
and you are welcome to redistribute it under certain conditions; type `show c' for
details.
The hypothetical commands `show w' and `show c' should show the appropriate
parts of the General Public License. Of course, the commands you use may be
called something other than `show w' and `show c'; they could even be mouse-clicks
or menu items--whatever suits your program.
You should also get your employer (if you work as a programmer) or your school,
if any, to sign a "copyright disclaimer" for the program, if necessary. Here is a
sample; alter the names:
Yoyodyne, Inc., hereby disclaims all copyright interest in the program
`Gnomovision' (which makes passes at compilers) written by James Hacker.
signature of Ty Coon, 1 April 1989
Ty Coon, President of Vice
This General Public License does not permit incorporating your program into
proprietary programs. If your program is a subroutine library, you may consider
it more useful to permit linking proprietary applications with the library. If this
is what you want to do, use the GNU Library General Public License instead of
this License.
Altiris™ Deployment Solution 7.1 SP1a MR1 from Symantec™ Third-Party Legal Notices
STLPort
STLPort
Boris Fomitchev
Copyright 1999,2000 Boris Fomitchev Copyright 1994 Hewlett-Packard Company
Copyright 1996,97 Silicon Graphics Computer Systems, Inc. Copyright 1997
Moscow Center for SPARC Technology.
License Agreement
Boris Fomitchev grants Licensee a non-exclusive, non-transferable, royalty-free
license to use STLport and its documentation without fee.
By downloading, using, or copying STLport or any portion thereof, Licensee agrees
to abide by the intellectual property laws and all other applicable laws of the
United States of America, and to all of the terms and conditions of this Agreement.
Licensee shall maintain the following copyright and permission notices on STLport
sources and its documentation unchanged :
Copyright 1999,2000 Boris Fomitchev
This material is provided 'as is', with absolutely no warranty expressed or implied.
Any use is at your own risk. Permission to use or copy this software for any purpose
is hereby granted without fee, provided the above notices are retained on all copies.
Permission to modify the code and to distribute modified code is granted, provided
the above notices are retained, and a notice that the code was modified is included
with the above copyright notice. The Licensee may distribute binaries compiled
with STLport (whether original or modified) without any royalties or restrictions.
The Licensee may distribute original or modified STLport sources, provided that:
The conditions indicated in the above permission notice are met; The following
copyright notices are retained when present, and conditions provided in
accompanying permission notices are met : Copyright 1994 Hewlett-Packard
Company
Copyright 1996,97 Silicon Graphics Computer Systems, Inc.
Copyright 1997 Moscow Center for SPARC Technology.
Permission to use, copy, modify, distribute and sell this software and its
documentation for any purpose is hereby granted without fee, provided that the
above copyright notice appear in all copies and that both that copyright notice
and this permission notice appear in supporting documentation. Hewlett-Packard
Company makes no representations about the suitability of this software for any
purpose. It is provided 'as is' without express or implied warranty.
Permission to use, copy, modify, distribute and sell this software and its
documentation for any purpose is hereby granted without fee, provided that the
above copyright notice appear in all copies and that both that copyright notice
153
154
Altiris™ Deployment Solution 7.1 SP1a MR1 from Symantec™ Third-Party Legal Notices
TinyXML
and this permission notice appear in supporting documentation. Silicon Graphics
makes no representations about the suitability of this software for any purpose.
It is provided 'as is' without express or implied warranty.
Permission to use, copy, modify, distribute and sell this software and its
documentation for any purpose is hereby granted without fee, provided that the
above copyright notice appear in all copies and that both that copyright notice
and this permission notice appear in supporting documentation. Moscow Center
for SPARC Technology makes no representations about the suitability of this
software for any purpose. It is provided 'as is' without express or implied warranty.
TinyXML
Lee Thomson Original code (2.0 and earlier )
copyright (c) 2000-2006 Lee Thomason (www.grinninglizard.com)
zlib/libpng License
Copyright (c) <year> <copyright holders>
This software is provided 'as-is', without any express or implied warranty. In no
event will the authors be held liable for any damages arising from the use of this
software.
Permission is granted to anyone to use this software for any purpose, including
commercial applications, and to alter it and redistribute it freely, subject to the
following restrictions:
1. The origin of this software must not be misrepresented; you must not claim
that you wrote the original software. If you use this software in a product, an
acknowledgment in the product documentation would be appreciated but is not
required.
2. Altered source versions must be plainly marked as such, and must not be
misrepresented as being the original software.
3. This notice may not be removed or altered from any source distribution.
Apache Xerces
Apache Software Foundation
Copyright (c) 1999-2003 The Apache Software Foundation. All rights reserved.
This product includes software developed by the Apache Software Foundation
(http://www.apache.org/).
The Apache Software License, Version 1.1
Altiris™ Deployment Solution 7.1 SP1a MR1 from Symantec™ Third-Party Legal Notices
Apache Xerces
Copyright (c) 1999-2001 The Apache Software Foundation. All rights reserved.
Redistribution and use in source and binary forms, with or without modification,
are permitted provided that the following conditions are met:
1. Redistributions of source code must retain the above copyright notice, this list
of conditions and the following disclaimer.
2. Redistributions in binary form must reproduce the above copyright notice, this
list of conditions and the following disclaimer in the documentation and/or other
materials provided with the distribution.
3. The end-user documentation included with the redistribution, if any, must
include the following acknowlegement: 'This product includes software developed
by the Apache Software Foundation (http://www.apache.org/).' Alternately, this
acknowlegement may appear in the software itself, if and wherever such
third-party acknowlegements normally appear.
4. The names 'The Jakarta Project', 'Commons', and 'Apache Software Foundation'
must not be used to endorse or promote products derived from this software
without prior written permission. For written permission, please contact
[email protected].
5. Products derived from this software may not be called 'Apache' nor may 'Apache'
appear in their names without prior written permission of the Apache Group.
THIS SOFTWARE IS PROVIDED ``AS IS'' AND ANY EXPRESSED OR IMPLIED
WARRANTIES, INCLUDING, BUT NOT LIMITED TO, THE IMPLIED WARRANTIES
OF MERCHANTABILITY AND FITNESS FOR A PARTICULAR PURPOSE ARE
DISCLAIMED. IN NO EVENT SHALL THE APACHE SOFTWARE FOUNDATION
OR ITS CONTRIBUTORS BE LIABLE FOR ANY DIRECT, INDIRECT, INCIDENTAL,
SPECIAL, EXEMPLARY, OR CONSEQUENTIAL DAMAGES (INCLUDING, BUT NOT
LIMITED TO, PROCUREMENT OF SUBSTITUTE GOODS OR SERVICES; LOSS OF
USE, DATA, OR PROFITS; OR BUSINESS INTERRUPTION) HOWEVER CAUSED
AND ON ANY THEORY OF LIABILITY, WHETHER IN CONTRACT, STRICT
LIABILITY, OR TORT (INCLUDING NEGLIGENCE OR OTHERWISE) ARISING IN
ANY WAY OUT OF THE USE OF THIS SOFTWARE, EVEN IF ADVISED OF THE
POSSIBILITY OF SUCH DAMAGE.
==========================================================================================
This software consists of voluntary contributions made by many individuals on
behalf of the Apache Software Foundation. For more information on the Apache
Software Foundation, please see http://www.apache.org/.
============================================================================================
155
156
Altiris™ Deployment Solution 7.1 SP1a MR1 from Symantec™ Third-Party Legal Notices
ncurses
ncurses
Thomas E. Dickey
Copyright © 1997-2008,2009 by Thomas E. Dickey. All Rights Reserved. Copyright
Copyright © 1997-2008,2009 by Thomas E. Dickey [[email protected]].
All Rights Reserved.
This code is licensed under the license terms below, granted by the copyright
holder listed above. The terms “owner” and “organization” in the license below
mean the copyright holder listed above.
Copyright (c) <YEAR>, <OWNER>
All rights reserved.
Redistribution and use in source and binary forms, with or without modification,
are permitted provided that the following conditions are met:
■
Redistributions of source code must retain the above copyright notice, this
list of conditions and the following disclaimer.
■
Redistributions in binary form must reproduce the above copyright notice,
this list of conditions and the following disclaimer in the documentation and/or
other materials provided with the distribution.
■
Neither the name of the <ORGANIZATION> nor the names of its contributors
may be used to endorse or promote products derived from this software without
specific prior written permission.
THIS SOFTWARE IS PROVIDED BY THE COPYRIGHT HOLDERS AND
CONTRIBUTORS "AS IS" AND ANY EXPRESS OR IMPLIED WARRANTIES,
INCLUDING, BUT NOT LIMITED TO, THE IMPLIED WARRANTIES OF
MERCHANTABILITY AND FITNESS FOR A PARTICULAR PURPOSE ARE
DISCLAIMED. IN NO EVENT SHALL THE COPYRIGHT HOLDER OR
CONTRIBUTORS BE LIABLE FOR ANY DIRECT, INDIRECT, INCIDENTAL, SPECIAL,
EXEMPLARY, OR CONSEQUENTIAL DAMAGES (INCLUDING, BUT NOT LIMITED
TO, PROCUREMENT OF SUBSTITUTE GOODS OR SERVICES; LOSS OF USE, DATA,
OR PROFITS; OR BUSINESS INTERRUPTION) HOWEVER CAUSED AND ON ANY
THEORY OF LIABILITY, WHETHER IN CONTRACT, STRICT LIABILITY, OR TORT
(INCLUDING NEGLIGENCE OR OTHERWISE) ARISING IN ANY WAY OUT OF THE
USE OF THIS SOFTWARE, EVEN IF ADVISED OF THE POSSIBILITY OF SUCH
DAMAGE.
Microsoft Silverlight 3 Toolkit
Microsoft Corporation
Altiris™ Deployment Solution 7.1 SP1a MR1 from Symantec™ Third-Party Legal Notices
Microsoft Silverlight 3 Toolkit
Copyright (C) Microsoft Corporation. All rights reserved.
Microsoft Public License (Ms-PL)
This license governs use of the accompanying software. If you use the software,
you accept this license. If you do not accept the license, do not use the software.
1. Definitions
The terms "reproduce," "reproduction," "derivative works," and "distribution"
have the same meaning here as under U.S. copyright law. A "contribution" is the
original software, or any additions or changes to the software. A "contributor" is
any person that distributes its contribution under this license. "Licensed patents"
are a contributor's patent claims that read directly on its contribution.
2. Grant of Rights
(A) Copyright Grant- Subject to the terms of this license, including the license
conditions and limitations in section 3, each contributor grants you a
non-exclusive, worldwide, royalty-free copyright license to reproduce its
contribution, prepare derivative works of its contribution, and distribute its
contribution or any derivative works that you create. (B) Patent Grant- Subject to
the terms of this license, including the license conditions and limitations in section
3, each contributor grants you a non-exclusive, worldwide, royalty-free license
under its licensed patents to make, have made, use, sell, offer for sale, import,
and/or otherwise dispose of its contribution in the software or derivative works
of the contribution in the software.
3. Conditions and Limitations
(A) No Trademark License- This license does not grant you rights to use any
contributors' name, logo, or trademarks.
(B) If you bring a patent claim against any contributor over patents that you claim
are infringed by the software, your patent license from such contributor to the
software ends automatically.
(C) If you distribute any portion of the software, you must retain all copyright,
patent, trademark, and attribution notices that are present in the software.
(D) If you distribute any portion of the software in source code form, you may do
so only under this license by including a complete copy of this license with your
distribution. If you distribute any portion of the software in compiled or object
code form, you may only do so under a license that complies with this license.
(E) The software is licensed "as-is." You bear the risk of using it. The contributors
give no express warranties, guarantees or conditions. You may have additional
consumer rights under your local laws which this license cannot change. To the
extent permitted under your local laws, the contributors exclude the implied
157
158
Altiris™ Deployment Solution 7.1 SP1a MR1 from Symantec™ Third-Party Legal Notices
WDOSX
warranties of merchantability, fitness for a particular purpose and
non-infringement.
WDOSX
Michael Tippach
COPYRIGHT (C) 1996-2005 MICHAEL TIPPACH, ALL RIGHTS RESERVED.
WDOSX license agreement
THIS SOFTWARE IS PROVIDED 'AS IS'. IN NO EVENT SHALL I, THE AUTOR, BE
LIABLE FOR ANY KIND OF LOSS OR DAMAGE ARISING OUT OF THE USE, ABUSE
OR THE INABILITY TO USE THIS SOFTWRAE, NEITHER SHALL CO-AUTHORS
AND CONTRIBUTORS. USE IT AT YOUR OWN RISK!
THIS SOFTWARE COMES WITHOUT ANY KIND OF WARRANTY, EITHER
EXPRESSED OR IMPLIED, INCLUDING, BUT NOT LIMITED TO THE IMPLIED
WARRANTIES OF MERCHANTABILITY OR FITNESS FOR A PARTICULAR
PURPOSE.
THIS SOFTWARE IS FREEWARE. NON- EXCLUSIVE PERMISSION TO USE THIS
SOFTWARE IN ITS UNMODIFIED FORM FOR THE SOLE PURPOSE OF BUILDING
PROTECTED MODE DOS APPLICATIONS HEREBY GRANTED.
YOU MAY FURTHER REDISTRIBUTE COPIES OF THIS SOFTWARE PROVIDED
YOU INCLUDE ALL OF THE FILES THAT CAME WITH THE ORIGNAL PACKAGE.
YOU ARE NOT ALLOWED TO REDISTRIBUTE MODIFIED COPIES OF THE
SOFTWARE OR MERE PARTS OF IT.
YOU MAY FURTHER SELL APPLICATIONS USING A DOS EXTENDER STUB FROM
THIS PACKAGE, BUT YOU ARE NOT ALLOWED TO SELL THIS SOFTWARE AS
A STAND ALONE PRODUCT OR AS PART OF A SOFTWARE COMPILATION,
EXCEPT FOR A SMALL, USUAL FEE COVERING THE REDISTRIBUTION ITSELF.
THE SOURCE CODE CONTAINED IN THIS PACKAGE MAY BE MODIFIED FOR
YOUR OWN USE. HOWEVER, MODIFIED VERSIONS OF THE SOURCE CODE OR
BINARIES COMPILED FROM MODIFIED VERSIONS OF THE SOURCE CODE MUST
NOT BE REDISTRIBUTED WITHOUT PRIOR PERMISSION, WITH ONE EXCEPTION:
YOU MAY REDISTRIBUTE BINARIES OBTAINED FROM MODIFIED VERSIONS
OF THE SOURCE CODE AS PART OF AN APPLICATION THAT USES WDOSX AS
ITS DOS EXTENDER IF MODIFICATIONS WERE NECESSARY TO FIX BUGS OR
ADD MISSING FUNCTIONALITY FOR THE NEEDS OF YOUR PARTICULAR
APPLICATION.
EITHER WAY, THE PREFERRED APPROACH IS THAT YOU CONTACT THE
AUTHOR (ME) IF YOU FEEL THE CHANGES YOU MADE TO THE SOURCE CODE
SHOULD BE INCORPORATED INTO FUTURE VERSIONS.
Altiris™ Deployment Solution 7.1 SP1a MR1 from Symantec™ Third-Party Legal Notices
DOS/32a
IF YOU DON'T AGREE WITH THIS TERMS OR IF YOUR JURISTDICTION DOES
NOT ALLOW THE EXCLUSION OF WARRANTY AND LIABILITY AS STATED
ABOVE YOU ARE NOT ALLOWED TO USE THIS SOFTWARE AT ALL.
THIS SOFTWARE IS COPYRIGHT (C)1996-2005 MICHAEL TIPPACH, ALL RIGHTS
RESERVED.
ENGLISH: IF YOU MAKE ME WISH I NEVER HAD RELEASED IT, YOU SHOULD
ROT IN HELL!
Author contact:
Michael Tippach
Alpenrosenstrasse 25
86179 Augsburg
Germany
e-mail: [email protected]
DOS/32a
Supernar Systems Ltd.
Copyright (C) 1996-2002
BSD with Advertising Clause
Redistribution and use in source and binary forms, with or without modification,
are permitted provided that the following conditions are met:
1. Redistributions of source code must retain the above copyright notice, this list
of conditions and the following disclaimer.
2. Redistributions in binary form must reproduce the above copyright notice, this
list of conditions and the following disclaimer in the documentation and/or other
materials provided with the distribution.
3. The end-user documentation included with the redistribution, if any, must
include the following acknowledgment:
'This product uses [name of applicable open source component to be inserted
here].
Alternately, this acknowledgment may appear in the software itself, if and
wherever such third-party acknowledgments normally appear.
4. Products derived from this software may not be called by the same name as the
open source component licensed under this license.
159
160
Altiris™ Deployment Solution 7.1 SP1a MR1 from Symantec™ Third-Party Legal Notices
Editline
THIS SOFTWARE AND DOCUMENTATION IS PROVIDED 'AS IS' AND ANY
EXPRESSED OR IMPLIED WARRANTIES, INCLUDING, BUT NOT LIMITED TO,
THE IMPLIED WARRANTIES OF MERCHANTABILITY AND FITNESS FOR A
PARTICULAR PURPOSE ARE DISCLAIMED. IN NO EVENT SHALL THE AUTHORS
OR COPYRIGHT HOLDERS BE LIABLE FOR ANY DIRECT, INDIRECT, INCIDENTAL,
SPECIAL, EXEMPLARY, OR CONSEQUENTIAL DAMAGES (INCLUDING, BUT NOT
LIMITED TO, PROCUREMENT OF SUBSTITUTE GOODS OR SERVICES; LOSS OF
USE, DATA, OR PROFITS; OR BUSINESS INTERRUPTION) HOWEVER CAUSED
AND ON ANY THEORY OF LIABILITY, WHETHER IN CONTRACT, STRICT
LIABILITY, OR TORT (INCLUDING NEGLIGENCE OR OTHERWISE) ARISING IN
ANY WAY OUT OF THE USE OF THIS SOFTWARE, EVEN IF ADVISED OF THE
POSSIBILITY OF SUCH DAMAGE.
Editline
Simmule turner and Rich Salz
Copyright 1992 and 1993.
Editline License
Rich Salz e-mail: [email protected]
Copyright 1992,1993 Simmule Turner and Rich Salz. All rights reserved.
This software is not subject to any license of the American Telephone and
Telegraph Company or of the Regents of the University of California.
Permission is granted to anyone to use this software for any purpose on any
computer system, and to alter it and redistribute it freely, subject to the following
restrictions:
1. The authors are not responsible for the consequences of use of this software,
no matter how awful, even if they arise from flaws in it.
2. The origin of this software must not be misrepresented, either by explicit claim
or by omission. Since few users ever read sources, credits must appear in the
documentation.
3. Altered versions must be plainly marked as such, and must not be
misrepresented as being the original software. Since few users ever read sources,
credits must appear in the documentation.
4. This notice may not be removed or altered.
Altiris™ Deployment Solution 7.1 SP1a MR1 from Symantec™ Third-Party Legal Notices
Zlib
Zlib
Zlib Jean-loup Gailly and Mark Adler Copyright (C) 1995-2003 Jean-loup Gailly.
Copyright (C) 1995-2005 Jean-loup Gailly and Mark Adler Copyright (C) 1998-2005
Gilles Vollant Copyright (C) 1995-2003 Mark Adler License /* zlib.h -- interface
of the 'zlib' general purpose compression library version 1.2.3, July 18th, 2005
Copyright (C) 1995-2005 Jean-loup Gailly and Mark Adler
http://zlib.net/zlib_license.html
zlib/libpng License
Copyright (c) <year> <copyright holders>
This software is provided 'as-is', without any express or implied warranty. In no
event will the authors be held liable for any damages arising from the use of this
software.
Permission is granted to anyone to use this software for any purpose, including
commercial applications, and to alter it and redistribute it freely, subject to the
following restrictions:
1. The origin of this software must not be misrepresented; you must not claim
that you wrote the original software. If you use this software in a product, an
acknowledgment in the product documentation would be appreciated but is not
required.
2. Altered source versions must be plainly marked as such, and must not be
misrepresented as being the original software.
3. This notice may not be removed or altered from any source distribution.
161
162
Altiris™ Deployment Solution 7.1 SP1a MR1 from Symantec™ Third-Party Legal Notices
Zlib
Index
A
About
remove packages and resources 109
about
automation folder 16
copy files and folders 101
create and deploy image 66
delete packages and resources 109
deployment tasks and jobs 51
image resources 68–69
imaging 66
initial deployment 40
migration personality settings 97
personality migration settings 97
personality templates 96
production 62
PXE 60
reboot 59
add
drivers for preboot configuration 38
OS files 41
add drivers
DeployAnywhere 37
adding
licenses 43
system configuration 45
advanced deploy options 77
advanced image options 73
advanced task options
Create Image 73
Deploy Image 77
align switch 113
align partitions 113
assign jobs and tasks
predefined computer 44
unmanaged computer 44
automation environment
about 59
reboot 59
automation folder
about 16
automation mode
starting a computer in 62
B
backup image
creating a 71
for a single computer 71, 79
restoring a 79
bad sectors 113
bfc switch 113
boot
predefined computers 106
Boot Disk Creator
adding drivers 38
C
capture
disk image 71
personality 98
preparing a disk image 70
user settings 98
clean
disk 85
cns switch 114
combining
task into job 55
command-line
advanced deploy options 77
advanced image options 73
computer
deploying new 79
configuration
Sysprep image 44
configuration driver
adding 38
configure
preboot environment 31
PXE server 32
context-sensitive help 20
copy
files 102
164
Index
Copy File
task 102
copy file contents package
delete 112
remove 112
copy files and folder
procedure 101
copy files and folders
about 101
create
backup image 71
create and deploy image
process 66
Create Image
advanced task options 73
task options 72
create image
about 66
Create sysprep image
about 44
creating
deployment task 54
OEM extension 33
PXE preboot image 33
creating package
for scripted OS install 84
CSV file
boot predefined computers 106
D
delete
copy file contents package 112
disk image 110
image package 110
resource 110
delete packages and resources
about 109
deploy
computers 79
disk image 75
new computers 79
Deploy Image
advanced task options 77
task options 75
deploy image
about 66
process for 66
DeployAnywhere
add drivers 37
DeployAnywhere driver database
add 37
deployment
settings 24
deployment handler
about 15
deployment handlers
installing 29
Deployment settings
configuring 41
Deployment Solution
about 11
about Automation Folder 13
about Deployment Plug-in component 13
about PXE 60
about site server components 13
about task server handler 13
getting started with 18
installer components 13
installing plug-in 27, 29
policy for installing site server 29
preinstallation requirements 26
process for 18
reports 20
settings 24
deployment task
creating 54
disk
clean 85
erasing 85
partitioning 87
wiping 85
disk image
capturing 71
deleting 110
deploying 75
Prepare for Image Capture 70
preparing to capture 70
documentation 20
drive
partitioning 87
driver
adding with Boot Disk Creator 38
settings 38
driver database
DeployAnywhere 37
Index
E
erase
disk 85
Erase Disk
task 85
ESX OS
scripted installation 91
F
FAT
clusters 113
files
copying 102
G
Ghost
capturing image 71
imaging
HTTP connection 73
Import OS files
creating a package 84
initial deployment
about 40
settings 41
Initial Deployment menu
adding tasks to 41
install
software 102
Windows scripted OS 88, 91
installation
Deployment plug-in 27
Windows scripted OS 88, 91
installation prerequisities
Deployment Solution 26
J
H
hard drive
partition 87
help
context-sensitive 20
HTTP
advanced deploy options 77
HTTP connection
imaging 73
I
image
about 68
about deployment images 68
capturing 71
create 66
deploy multicasting 39
deploying a disk image 75
for multiple computers 75
preparing to capture 70
image file
spanned 114
image package
deleting 110
Image preparation
about 44
image resource
about 68–69
deleting 110
job
creating 55
L
license
adding 43
settings 43
Linux
scripted OS installation 92
Linux OS
scripted installation 91
M
migration
settings 24
migration settings
about personality 97
multicast
image deployment 39
multicasting
advanced deploy options 77
N
network
changing network settings 57
165
166
Index
O
OEM extension
creating PXE preboot image with 33
Operating system license
adding 43
options
advanced Create Image task 73
advanced Deploy Image task 77
Create Image task 72
Deploy Image task 75
OS files
add 41
creating a package 84
OS install
creating a package for scripted 84
OS license
adding 43
P
partition
advanced deploy options 77
aligning 113
disk drive 87
Partition Disk
task 87
personality
capturing 98
restoring 99
personality resource
deleting 110
personality settings
about 97
personality template
about 96
policy
for installing Deployment plug-in 29
preboot configuration
creating PXE preboot image 33
preboot configuration driver
adding 38
preboot environment
configure 31
preboot mode
starting a computer in 62
predefined computer
assigning jobs and tasks 44
predefined computers
about 105
boot 106
predefined computers (continued)
reference sample file 106
preinstallation requirements
Deployment Solution 26
prepare
capturing a disk image 70
Prepare for image
about 44
procedure
copy files and folder 101
process
for Deployment Solution 18
getting started with Deployment Solution 18
production
reboot 62
production mode
starting a computer in 62
PXE
about 60
PXE boot service
settings 33
PXE preboot
creating 33
recreate 33
PXE server
configuring 32
R
RapiDeploy
capturing image 71
image deployment 39
reboot
about 59
automation environment 59
production 62
Release Notes 20
remove
copy file contents package 112
remove packages and resources
about 109
Remove SID
about 44
report
Computers with Deployment Plug-in
Installed 20
Computers with Deployment Tasks Execution
Status 20
Deployment Solution 20
Index
resource
about image 68–69
deleting 110
restore
backup image 79
personality 99
user settings 99
S
sample csv file
reference 106
schedule
a task 55
scripted install
add OS files 41
scripted OS
installation 89
Linux installation 92
scripted OS install
creating a package 84
sector
bad 113
settings
about personality migration 97
changing network settings 57
DeployAnywhere driver 38
drivers 38
for deployment and migration 24
initial deployment 41
licenses 43
OS licenses 43
PXE boot services 33
Sysprep imaging 44
system configuration 80
task list 41
SID
about 44
site server
about task server handler 15
site server component
about 15
site servers
installing task server handlers 29
managing deployment tasks 29
spanning
naming 114
start
automation mode 62
preboot mode 62
start (continued)
production mode 62
state
checking a task 56
Sysprep image
about 44
configuration 44
settings 44
System configuration
adding 45
settings 45
system configuration
changing network settings 57
editor 80
settings 80
T
task
advanced Create Image options 73
advanced Deploy Image options 77
checking the state of a 56
combining jobs into 55
Copy File 102
Create Image options 72
creating a deployment 54
Deploy Image options 75
Erase Disk 85
Partition Disk 87
scheduling a 55
task list
settings 41
task options
advanced Create Image 73
advanced Deploy Image 77
Create Image 72
Deploy Image 75
task server handler
about 15
task server handlers
installing 29
tasks and jobs
about deployment 51
template
about personality 96
U
unmanaged computer
assigning jobs and tasks 44
167
168
Index
user settings
capturing 98
restoring 99
V
Vista
support 113
Volume License Keys
adding 43
W
Windows
scripted OS installation 89
Windows OS
scripted installation 89
wipe
disk 85