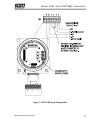
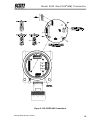
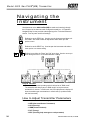
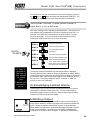
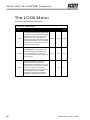
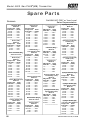
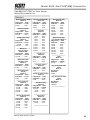
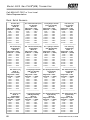
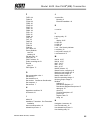
1
4600 MB Gas Transmitter
Operation & Maintenance Manual
ESC
ENT
®
SERIES
4600MB
Rev:
Date:
ECN:
Part#:
4600MB(D)
4/11/08
129032
087-0014
M od el 4 6 0 0 Ga s PLUS® ( M B) Tr a n sm i t t er
Co n t e n t s
General Instrument Overview Map __________________ 1
I n t r o d u ct i o n
SCOTT HEALTH & SAFETY Ga s Sen so r _________________________
Overview of Sensor Operation ________________________________
The Sensor and Battery _______________________________________
Gas Specificity ________________________________________________
Sensor Accuracy ______________________________________________
Sensor Response Times _______________________________________
Sensor Life ___________________________________________________
Environmental Influences to the Sensor _______________________
Sensor Oxygen Requirements_________________________________
Sensor Intrinsic Safety ________________________________________
Sensor Handling and Disposal ________________________________
3
3
3
4
4
4
4
5
5
6
6
Installation
Location Considerations ______________________________________
Physical Installation and Wiring _______________________________
Remote Sensor Junction Box Mounting ________________________
Pow ering the Transmitter _____________________________________
Sensor Installation ____________________________________________
Tw ist and Lock Accessories____________________________________
7
7
8
9
20
21
Transmitter Operation
N a v i g a t i n g t h e I n st r u m en t ____________________________________
RUN Mode _________________________________________________
How to Adjust Transmitter Parameters _______________________
Acknowledging Latched Alarms _____________________________
Inhibiting Output __________________________________________
Calibration Frequency ______________________________________
Remote Sensor Calibration __________________________________
Storing Sensors ____________________________________________
Zero Calibration ___________________________________________
Span Calibration ___________________________________________
Important Notes of Calibration of Sensors ___________________
Weekly Operational Response Checks _______________________
Adjusting the Loop Output Parameters ______________________
Optional Alarm Relays ______________________________________
Relay N.O./N.C. Status _____________________________________
Tr a n sm i t t er Secu r i t y ________________________________________
Toggling Parameter Security On/Off (LK.ON) _________________
Changing the Password (LK.PW) _____________________________
Auto-Lock Timer (LK.tM) ____________________________________
I n st r u m en t Pa r a m et er Ch a n g e Ex a m p l e ___________________
Sen so r Sel f Test Op t i o n _____________________________________
24
24
24
25
25
26
27
28
28
29
31
33
33
34
36
37
37
37
37
38
39
Serial Communications
Overview ___________________________________________________
Set t i n g Up f o r Ser i a l Co m m u n i ca t i o n s _____________________
Modbus® RTU Pr o t o co l ______________________________________
Rep o r t Ge n er a t i o n _________________________________________
Manual #087-0014D, 4/2008
42
42
44
49
i
M od el 4 6 0 0 Ga s PLUS® ( M B) Tr a n sm i t t er
Pa r a m e t e r Re f e r e n ce
Menus _______________________________________________________
Th e USER M en u _____________________________________________
Alarm Relay Parameters ____________________________________
Sensor Parameters _________________________________________
Th e LOCK M en u _____________________________________________
Th e COM M M en u ___________________________________________
Loop Current Parameters ___________________________________
Report Generator Parameters _______________________________
Serial Communication Parameters ___________________________
The FACT Menu ____________________________________________
Troubleshooting ____________________________________________
Tech n i ca l Sp eci f i ca t i o n s ____________________________________
Co n t a ct i n g SCOTT HEALTH & SAFETY _______________________
52
53
53
55
56
57
57
58
60
62
65
66
66
APPENDIX 1 - Modbus® Registers Addressing _______ 66
APPEN DI X 2 - ( FSR) Co m m a n d Fu n ct i o n s _________ 71
APPEN DI X 3 - M o d b u s® Re g i st e r Ta b l e __________ 75
Re co r d Yo u r Pa r a m e t e r s! _________________________ 78
Wa r r a n t y ___________________________________________ 79
St a t e m e n t o f Ye a r 2 0 0 0 Co m p l i a n ce _____________ 79
Sp a r e Pa r t s ________________________________________ 80
I n d e x _______________________________________________ 84
ii
Manual #087-0014D, 4/2008
M od el 4 6 0 0 Ga s PLUS® ( M B) Tr a n sm i t t er
Gen er a l I n st r um en t
Over vi ew M a p
Alphanumeric Display - Used for displaying decimal values in the range -999 to -0.00 and 0.000
to 9999, hexadecimal values in the range 0000 to FFFF, and text labels representing parameters
during user setup.
Gas Concentration Units - Parameters can be set to display gas concentration in %V/V, PPM,
and PPB.
Security Indicator (Lock) - Appears when software security is active, prohibiting parameter
editing. When the security parameter is "locked" parameters may be reviewed, but not changed.
Alarm Indicators - Visible when alarm, fault, inhibit, or maintenance conditions exist.
ESC
ENT
®
SERIES
4600MB
Figure 1 - Instrument Overview Map
Manual #087-0014D, 4/2008
1
M od el 4 6 0 0 Ga s PLUS® ( M B) Tr a n sm i t t er
2
Manual #087-0014D, 4/2008
M od el 4 6 0 0 Ga s PLUS® ( M B) Tr a n sm i t t er
I n t r o d u ct i o n
The 4600 GasPlus(MB) is a 24 VDC powered toxic gas transmitter and a
microprocessor-controlled 4-20 mA device. It allows any of the Series 4600
toxic gas "smart" sensors (excluding the Model 88 combustible sensor) to be
used for the detection of a specific target gas. When properly installed, nonintrusive operation of the transmitter and an intrinsically safe sensor permit the
4600 GasPlus(MB) to be operated and calibrated within potentially explosive
environments without having to declassify such areas.
The 4600 GasPlus(MB) has been designed to provide many useful features
required for such a device in today's industrial applications:
• Coated internal circuitry for protection against moisture and corrosion
• Three internal alarm relays (option)
• Selectable calibration inhibit levels
• Self diagnostics
• Modbus® RTU protocol
Sco t t H e a l t h &
Sa f e t y
Ga s Se n so r
Overview of Sensor Operation
Electrochemical gas sensors detect target gasses for which they were
designed through a series of electrochemical reactions. Gas passes through a
gas permeable membrane where it then contacts an electrolyte-saturated
membrane. The gas is then oxidized or reduced (depending on the gas) at the
sensing electrode, and the reaction is balanced at the counter electrode. In
most sensors a third electrode acts as a reference to maintain a fixed potential
at the sensing electrode. As gas concentration
increases, a corresponding increase in current output
occurs. The current output is measured, amplified,
then converted by the transmitter to a signal on the 420 mA loop where it is used to read gas
concentration.
The Sensor and Battery
Each "smart" sensor contains circuitry with an
EEPROM and lithium battery. The EEPROM retains
specific sensor data including gas measuring range,
alarm setpoints, and sensor useful life value. When
connected to the transmitter, the sensor data is
uploaded to the transmitter. Upon disconnection of
the sensor from the transmitter assembly, the bias
potential (required by electrochemical sensors)
across the sensor's electrodes will be maintained via
the integral battery. The battery is capable of
providing up to a total of 9 months of "off-line" power
Manual #087-0014D, 4/2008
3
M od el 4 6 0 0 Ga s PLUS® ( M B) Tr a n sm i t t er
(because the battery is not rechargeable, "off-line" time is cumulative),
providing proper storage procedures are followed.
When storing the sensor "off-line", block the sensor gas hole by placing a
small piece of electrical tape over the front of the sensor (do not touch the
membrane as this will cause damage to the sensor) and store the sensor in a
cool dry place (like a refrigerator).
Should the sensor be kept off-line for a cumulative period of time exceeding 9
months, the sensor will continue to operate! Sensor battery failure does not
mean the sensor has failed and will not operate, only that it will require a 4-8
hour warm-up time upon installation. Once the sensor has "warmed-up" and
has become stable, calibration may occur as normal.
Sensor battery
failure does not
render the
sensor useless but it will require
a 4-8 hour
warm-up time
upon installation.
Gas Specificity
Each gas sensor is engineered and designed to be gas specific; however, the
very nature of electrochemical gas detection is such that the presence of
certain gases may act as an interferant to certain sensors. Each sensor can
have its own interferant(s), causing the sensor to respond electrochemically.
Scott Health & Safety has tested and documented some of the known
interferant. These values represent averages and will vary from sensor to
sensor for a specific gas sensor. These are listed in an addendum located in
the back of the manual.
Sensor Accuracy
The accuracy of a toxic gas sensing system is limited by the accuracy of the
standard used to calibrate the system. For many toxic gases, obtaining a high
accuracy standard that is suitable for field calibration use may be difficult
(about the best accuracy of gas concentration achievable is 5%, using a
permeation system with good temperature control). For this reason, no fixed
accuracy statement is possible. The accuracy of the sensor cannot be better
than the accuracy of the calibration gas. The best accuracy to be expected,
assuming a perfect standard, is limited by the repeatability which is ±2% of
span (full scale).
Sensor Response Times
Electrochemical gas sensors are optimized to give the fastest possible
response time while maintaining excellent zero stability and minimum drift
(approximate sensor response times are listed in an Addendum in the back of
the manual). These response time values are an average. Each sensor has
its own unique response time which may be slower or faster than the average.
If the response time appears to be excessively slow, refer to the "Weekly
Operational Response Checks" within the TRANSMITTER OPERATION
section.
Sensor Life
Because applications are of such a variable nature, only experience on a given
application can truly tell what the sensor life will be. The 4600 GasPlus(MB)
sensors will generally provide a minimum of 12 months of service in ambient air
gas detection applications. Extremes of humidity and temperature, and
exposure to dirty atmospheres containing particulate matter or oily vapors will
decrease sensor life. In addition, extended exposure to target or other active
gases may shorten sensor life.
In applications where only trace levels of target gas exist, except under leak
conditions, sensor life will most likely be over 18 months. While sensors may
4
Manual #087-0014D, 4/2008
M od el 4 6 0 0 Ga s PLUS® ( M B) Tr a n sm i t t er
have some, or even substantial life remaining, it is recommended that sensors
be replaced at a convenient interval between 12 and 18 months. Experience in
a given application or plant condition will determine the best replacement
frequency.
Environmental Influences to the Sensor
Although the 4600 GasPlus(MB) transmitter is designed to operate at
temperatures from -40° to 149°F (-40° to 65°C), the operating temperature is
dictated by which gas sensor has been installed. The "Gas Detection
Capabilities" sheet (see back of manual) shows the operating temperature
ranges for each sensor type. Extreme temperatures and exposure to dirty
atmospheres containing particulate matter or oily vapors can effect sensor
response and decrease sensor life.
Humidity (%RH) has the potential to affect the performance of electrochemical
sensors. Gas sensors are designed to provide stable output over a range of
humidity conditions. Intermediate exposure to relative humidity conditions from
0% to 99% non-condensing RH (70% RH nominal) will not affect operation of
most sensors.
Extremely dry air has the potential to adversely affect the operation of
electrochemical sensors. At relative humidities continuously below 25%*,
sensors can exhibit an early loss of sensitivity after a few days to a week of
operation. This is caused by a slow loss of water from the internal sensor
electrolyte. Suspending the sensor over a jar of water for 24 hours will usually
restore sensitivity.
*The operation of H2S and HCl sensors will be affected by continuous
exposure to relative humidity conditions below 50%RH; therefore, Models
4654 and 4672 low humidity sensors, respectively, are offered and should
be used when operating under these conditions.
Extremely humid or wet conditions can affect these sensors which rely on
an unobstructed gas diffusion path into the sensor. If the gas stream or
ambient air allows humidity to condense on the sensor, the water on the
membrane will cause loss of sensitivity, or slow response, or both. Once the
sensor has had a chance to dry out, normal operation should be restored. If
the source of moisture is a result of water spray or rain, a rain shield may be
installed on the sensor module to protect the sensing membrane. Continuous
exposure to high humidity will cause the sensor to oversaturate and will
shorten sensor life. Normal ambient monitoring applications will not see a
continuous high humidity. Keep in mind that the some gases may chemically
react with water vapor and be converted to other species (e.g., ammonia
hydrolyzes to form ammonium hydroxide when exposed to water vapor). In
addition, other gases such as hydrogen fluoride are very reactive and may be
absorbed on the inner surfaces of flow tubing before reaching the sensor during
calibration. Such questions should be referred to chemists or industrial
hygienists.
Sensor Oxygen Requirements
Gas sensors require a minimum of 5% oxygen for continuous operation
under ambient conditions (except the Model 80 Oxygen sensor).
Sensors operating in conditions of less than 5% oxygen will provide erroneous
or unstable concentration data.
Manual #087-0014D, 4/2008
5
M od el 4 6 0 0 Ga s PLUS® ( M B) Tr a n sm i t t er
Beyond the 5% minimum oxygen concentration requirement, all Hydride
sensors (Arsine, Diborane, Germane, Hydrogen Selenide, Phosphine, Silane)
require constant oxygen concentration when performing sensor calibration.
Fluctuating oxygen concentrations during calibration will result in erroneous
concentration readings during system operation.
Sensor Intrinsic Safety
An intrinsically safe circuit is simply defined as "...an electrical circuit which
does not contain, or store, enough energy to cause ignition of a given explosive
atmosphere". Sensors are designed as intrinsically safe and, with the
transmitter incorporating built-in safety barrier circuitry, can be removed from
the transmitter housing within explosive environments.
Sensor Handling and Disposal
Do not attempt to disassemble the sensor in any way. The sensor contains
various chemicals/electrolytes. Skin and eye contact should be avoided and
should be considered hazardous. The sensor can be disposed of as ordinary
trash with no special precautions. Incineration in a municipal/commercial
incinerator poses no hazard.
6
Manual #087-0014D, 4/2008
M od el 4 6 0 0 Ga s PLUS® ( M B) Tr a n sm i t t er
I n st a l l a t i o n
Location Considerations
* Sensors
Manufact ured aft er
Oct ober 20 0 1
(S/N 10 0 1-XXXX) can
also be mount ed
horizont ally. Do not
mount on a 45
degree angle.
Prior to installing the transmitter, consideration should be given to the following
items when choosing its location:
1. * Orientation - Always mount the sensor pointing downwards.
2. Gas Density - For gases heavier than air, the sensor is recommended to
be installed approximately 18" from floor level. In these applications care
should be taken to protect the sensors from physical damage. For
gases that are lighter than air, sensors should be installed at a high level
or close to the potential leak source.
3. Potential Gas Sources - The location and nature of potential vapor/gas
sources (e.g., pressure, amount, source, temperature, and distance)
need to be assessed.
4. Ambient Temperature - Insure that the system is located within an area
that complies with the specified operating temperature range.
5. Vibration - Mount the transmitter and sensor in a manner that minimizes
vibration.
6. Accessibility - When determining mounting location, consider future
maintenance and calibration requirements.
7. Avoid water. Droplets adhering to the outer membrane of the sensor will
reduce or negate sensor performance. A rain shield is recommended for
outdoor installations.
8. Avoid strong electromagnetic fields. Mounting the gas transmitter
near power transformers or other strong EM fields may cause
undesirable results.
9. Avoid pressure and excessive air velocity. 4600 GasPlus sensors are
designed to measure gas concentration under normal atmospheric
conditions with up to 1 LPM air flow (only true with the flowcell). High air
velocities will result in inaccurate measurement and reduce sensor life.
10. Conduit Seals. Protect the transmitter electronics from moisture by
thoroughly sealing the conduit entries and tightening the cover of the
transmitter housing.
Physical Installation and Wiring
Installation of the transmitter requires the physical mounting of the enclosure
(see Figures 1-3) and connection of the power/output lines (see Figures 4-7).
The transmitter enclosure is provided with bolt holes in the mounting flange for
mounting. Follow these steps after first ensuring that the area of installation is
declassified if required:
STEP 1 - Make all physical connections (i.e., conduits, pipes, enclosure,
plastic spacer block, junction box, etc.)
STEP 2 - Unscrew transmitter cover and turn power switch to the "OFF"
position.
STEP 3 - Grasp the top display board, and pull outward while gently rocking it
from top to bottom. Both the top display board and the center CPU
board will remove, exposing the electrical connectors on the Power
Manual #087-0014D, 4/2008
7
M od el 4 6 0 0 Ga s PLUS® ( M B) Tr a n sm i t t er
Supply board in the bottom of the housing. The terminal blocks pull
out for easy access. Be sure power switch is in the "OFF" position.
The power switch is located on the display board.
STEP 4 - Make wire connections (16 to 22 AWG wire is recommended for
electrical connections) in accordance with Figures 4-7 as
applicable. Ensure that proper wire gauge is used and that all wire,
electrical grounds, and sensor connections are secure and intact.
STEP 5 - Replace transmitter stack assembly and return power switch to
"ON".
STEP 6 - Screw transmitter cover on, ensuring a tight seal.
STEP 7 - Remove red label from the bottom of the sensor end cap.
Remote Sensor Junction Box Mounting
If the application requires that the sensor be mounted remote from the
transmitter, care should be taken to insure that all code and regulatory
requirements are met. In these applications, it is recommended that the
sensor be separated from the transmitter no more than 50'. Additional items
needed will be a junction box and sensor cable (see Figure 8). These items
can be ordered from the factory. Conduit must be obtained from your local
vendor.
Maximum Wire Length
AWG wire size requirements are dependent upon power supply voltage and
wire length.
The maximum distance between the transmitter and its power supply is
determined by the maximum allowable interconnecting loop-voltage drop. If the
voltage drop is exceeded, the transmitter will not operate. To determine the
maximum loop-voltage drop, subtract the transmitter's minimum operating
voltage (18 VDC) from the power supply's minimum output voltage. For
example; if the power supply's minimum output voltage is 24 VDC, then the
maximum voltage drop across the power supply is 6 volts.
To determine actual maximum wire length, divide the maximum allowable
voltage drop by the transmitter's maximum current draw, then by the resistance
of the wire (ohms/foot), then divide by 2.
S ta nd-Alone 24 V DC P ow e r S upply
V M IN S ource V oltage
24 V DC
V M IN Transm itter
18 V DC
Minimum Operating Voltage
Power Supply Voltage
Max allowable volt drop (MAV)
IM A X Transitter
50 m A w/relays
100 m A w/o relays
(MAV ÷ Max Current draw)
RM A X of W ire
24 Ohm s
÷ Ohms per ft
W ire Ohm s/ft
M a x Le ngth Ft (M )
18 A W G (0.00639 Ohm /ft)
1878 (572)
20 A W G (0.01015 Ohm /ft)
1182 (360)
22 A W G (0.01614 Ohm /ft)
743 (227)
÷2
= Max Wire Length
Switches and Circuit Breakers: UL and EN Requirements
EN 61010-1, 1995 edition and UL 3111-1, 1994 edition (Safety Requirements
for Electrical Equipment for Measurement, Control and Laboratory Use - Part 1:
General Requirements) contain the following requirement:
8
Manual #087-0014D, 4/2008
M od el 4 6 0 0 Ga s PLUS® ( M B) Tr a n sm i t t er
Except as specified in 6.12.1.1, equipment shall be provided with a means
for disconnecting it from each operating energy supply source, whether
external or internal to the equipment. The disconnecting means shall
disconnect all current-carrying conductors.
For the transmitter to comply with EN 61010-1, 1995 edition and UL 3111-1,
1994 edition:
1. A switch or circuit breaker must be included in the 4600 GasPlus(MB)
installation,
2. The switch or circuit breaker must be in close proximity to the
equipment and within easy reach of the operator, and
3. The switch or circuit breaker must be marked as the disconnecting
device for the transmitter.
Current Sourcing and Sinking Modes
The transmitter may be wired in a current sourcing or a current sinking mode.
As the names suggest, these 2 modes describe the direction of current flow in
the 4-20 mA loop connecting the 4600 MB transmitter and its receiver.
Principally, this is dictated by which end of the loop is connected to the
positive supply voltage (the source).
Current sourcing mode. When the transmitter is wired in current sourcing
mode, a positive voltage supply is connected to the transmitter’s mA+
terminal [TB1-3]. Note that this may be the same supply powering the
instrument or a different one (see Isolated and Non-Isolated Loop Power).
Current flows into the mA terminal [TB1-3] and out of the mA- terminal
[TB1-4], controlled by the virtual resistance of the instrument. From the
transmitter’s mA- terminal [TB1-4], current flows into the receiver’s +
terminal, and then out of the receiver’s - terminal to the power supply
negative (common).
Current sinking mode. When the transmitter is wired in the current
sinking mode, the positive supply voltage is connected to the receiver’s +
terminal. Note that this may be the same supply powering the instrument
or a different one (see Isolated and Non-Isolated Loop Power). Current
flows through the receiver and out of the - terminal to the transmitter’s mA+
terminal [TB1-3]. Controlled by the virtual resistance of the instrument,
current flows out of the transmitter’s mA- terminal [TB1-4] to the supply
negative (common).
Isolated and Non-Isolated Loop Power
When the current loop power supply is different than the one used to power the
transmitter, the loop is “isolated.” When the same power supply is used for
both the current supply and the instrument, the loop is “non-isolated.” Many
PLCs require an isolated loop.
The transmitter can be wired with either isolated or non-isolated power. Note
from Figures 4B/D that isolated power requires 4 wires, whereas non-isolated
power can use a 3-wire configuration.
Powering The Transmitter
When power is applied to the transmitter, all segments and indicators on the
display will turn on for 2 seconds, then will turn off for 2 seconds. The
transmitter will subsequently enter a 30 second warmup period (countdown
shown on the display).
Manual #087-0014D, 4/2008
9
M od el 4 6 0 0 Ga s PLUS® ( M B) Tr a n sm i t t er
Figure 1 - GasPlus Dimensions
Figure 2 - GasPlus Assembly
10
Manual #087-0014D, 4/2008
M od el 4 6 0 0 Ga s PLUS® ( M B) Tr a n sm i t t er
IMPORTANT
Opt ional silver
dot , used on
Rock Solid
Sensors only,
must be
orient at ed as
shown.
Optional Silver
Dot
4600 Rock Solid
Sensor
Figure 3 - Optional Duct Mount Installation
Figure 4 - 4-20 Current Loop Connections
Manual #087-0014D, 4/2008
11
M od el 4 6 0 0 Ga s PLUS® ( M B) Tr a n sm i t t er
Current Source with Non-Isolated Loop Power
Figure 4A - Alternate 4-20 mA Current Loop Connections
Current Source with Isolated Loop Power
Figure 4B - 4-20 mA Current Loop Connections
12
Manual #087-0014D, 4/2008
M od el 4 6 0 0 Ga s PLUS® ( M B) Tr a n sm i t t er
Current Sink with Non-Isolated Loop Power
Figure 4C - Alternate 4-20 mA Current Loop Connections
Current Sink with Isolated Loop Power
Figure 4D - Alternate 4-20 mA Current Loop Connections
Manual #087-0014D, 4/2008
13
M od el 4 6 0 0 Ga s PLUS® ( M B) Tr a n sm i t t er
Required Connections When Not Using Current Loop Output
Figure 4E - Alternate 4-20 mA Connections
Figure 4F - Connection to 6004/6104 Quad-Scan
14
Manual #087-0014D, 4/2008
M od el 4 6 0 0 Ga s PLUS® ( M B) Tr a n sm i t t er
7 6 5 4 3 2 1
CUSTOMER SUPPLIED INTERCONNECT CABLE
3 COND., 20AWG, SHIELDED CABLE
TB1
MODULE 1
CH1
CH2
+24V
INPUT
INPUT
GND
JUMPER
+
0 - 1V
V
- OUT OR
0 - 5V
+
I OUT 4 - 20mA
SERIES 6800
BACK PLANE
Figure 4G - Connection to Model 6800
! EMI/RFI ALERT !
When installing
transmitters equipped with
internal relays, all power
lines should be shielded.
The best practice is to run
relay power wiring in
separate conduit from DC
power wiring and away from
other 110VAC power lines or
sources of EMI/RFI such as
variable speed drive
controls.
NOTE: Normally open/normally closed status assumes the concentration relays are
programmed as non-failsafe and the fail relay as fail safe.
Figure 5 - Alarm Wiring
Manual #087-0014D, 4/2008
15
M od el 4 6 0 0 Ga s PLUS® ( M B) Tr a n sm i t t er
Figure 6 - RS-485 Wiring & Configuration
16
Manual #087-0014D, 4/2008
M od el 4 6 0 0 Ga s PLUS® ( M B) Tr a n sm i t t er
Figure 7 - RS-232 Wiring & Configuration
Manual #087-0014D, 4/2008
17
M od el 4 6 0 0 Ga s PLUS® ( M B) Tr a n sm i t t er
Figure 8 - Junction Box Electrical Installation
18
Manual #087-0014D, 4/2008
M od el 4 6 0 0 Ga s PLUS® ( M B) Tr a n sm i t t er
Figure 9 - RS-232/RS-485 Connections
Manual #087-0014D, 4/2008
19
M od el 4 6 0 0 Ga s PLUS® ( M B) Tr a n sm i t t er
! IMPORTANT !
The sensor should
always be facing
downward. Sensors
manufactured after
October 2001 (S/N
1001-XXXX) may
also be mounted
horizontally.
Sensors should
never point at any
angle.
Note: Transmitters are supplied with a ¼turn Twist and Lock End cap. See "¼
Turn Calibration Accessories" under
"Spare Parts".
Figure 10 - Installing The GasPlus Sensor
Sensor Installation
Figure 10 depicts the 4600 GasPlus sensor installation. Be sure to include
the elastomeric connection pad when installing the sensor into the sensor
housing. Rotate the sensor until it locks into the alignment pin. The gas
name/range will be visible through the housing front. To ensure proper
connection between the sensor and the sensor housing, tighten the threaded
sensor end cap hand tight - do not over-tighten as this could damage the
elastomeric connector or the sensor housing!
20
Manual #087-0014D, 4/2008
M od el 4 6 0 0 Ga s PLUS® ( M B) Tr a n sm i t t er
Twist and Lock Accessories
Designed for quick, easy installation and removal from your 4600 GasPlus(MB)
Transmitter, Twist-and-Lock accessories connect directly to the standard end
cap and help make your gas detection system easier to use.
Figure 11A
Rain Shield/Splash Guard (Part #074-0305)
Sensor
Transmitter
Electronics
Provides protection from wet weather and hose-downs. Teflon®
construction permits use with both reactive (such as hydrogen
fluoride, hydrogen chloride, and ammonia) and non-reactive
gases. Lab tested hole geometry protects sensors from stray
water droplets.
1.362"
Internal Pin
Sensor
End Cap
Calibration Adaptor (Part # 096-2101)
Deliver calibration gas directly to the sensor face without dilution
from environmental interferences such as wind. Barb fitting
provided for tube connection to the calibration gas source (gas
cylinder, permeation device, generator).
Duct-Mount Adaptor
(Part # 096-2118-6/8 [6’ to 8” Duct]
or #096-2118-F [Flat Duct])
Figure 11B
Monitor airflow in exhaust or ventilation ducts without drying out
your sensor. Able to handle flow velocities from 350 to 1000 fpm.
Available for use on flat ducts or 6” to 8” diameter ducts (custom
sizes also available). For use only with transmitters configured
for remote sensor and without junction-box.
Flowcell (Part # 096-2102)
Designed for sample draw configurations.
Rain Shield
P/N 074-0305
Figure 11E
Figure 11C
Calibration Adaptor
P/N 096-2101
Flowcell
Order Part
# 096-2102
P/N 096-2118-6/8
Figure 11D
Duct Adaptor
096-2118-F (Flat Duct)
Manual #087-0014D, 4/2008
21
M od el 4 6 0 0 Ga s PLUS® ( M B) Tr a n sm i t t er
22
Manual #087-0014D, 4/2008
M od el 4 6 0 0 Ga s PLUS® ( M B) Tr a n sm i t t er
Tr a n sm i t t er
Op e r a t i o n
Manual #087-0014D, 4/2008
23
M od el 4 6 0 0 Ga s PLUS® ( M B) Tr a n sm i t t er
Navi gat i ng t he
I n st r u m en t
All adjustments on the 4600 GasPlus(MB) are made non-intrusively through
the front panel of the instrument with a magnetic screwdriver. A "Parameter
Navigation Map" is also provided at the beginning of the "Technical Reference"
section. Four keys are used for all settings:
ESC
Referred to as the Z/ESC key. Used to zero the instrument and place unit
into inhibit. Also used to abort an adjustment and/or back up to the
previous menu.
Referred to as the S/ENT key. Used to span the instrument and select a
menu option or to enter a setting.
Referred to as either the "Down" and "Up" arrow keys. Used to move up or
down through a menu or to increase/decrease a setting.
RUN Mode
The transmitter's normal operating mode is referred to as "RUN mode".
The transmitter will always return to RUN mode if no keys have been
activated for 2 minutes. In RUN mode, the LCD's alphanumeric display will
show the ambient gas concentrations or a fault code (if a problem exists
with the instrument)
How to Adjust Transmitter Parameters
Parameters are located in 5 main menu groups:
• USER (Alarm and Sensor Parameters)
• LOCK (Security)
• COMM (Communications)
• FACT (Factory)
• HELP (Scrolling help message on each parameter)
24
Manual #087-0014D, 4/2008
M od el 4 6 0 0 Ga s PLUS® ( M B) Tr a n sm i t t er
From RUN mode, the user can access the menus by touching the magnet to
the
(Up) or
(Down) arrow key then selecting the S/ENT key. The
Z/ESC key is used to back out of the menu and return to RUN mode.
The inst rument cont inues t o sense gas and t ransmit a
signal when it is not in RUN mode.
Each menu contains a set of logically grouped parameters. After a menu has
been selected, the first parameter in the menu is displayed on the LCD. For
example, if the USER menu is selected, A1.SP (alarm setpoint 1) will be
shown on the display. The user can scroll through the parameter list by
touching the magnet to either the Up or Down arrow keys.
Scroll through menus.
STEP 1
Access the selected menu.
STEP 2
QUICK
GLANCE
STEP 3
Scroll through the menu's
parameters.
STEP 4
Access the selected parameter.
STEP 5
Scroll to select parameter value.
STEP 6
Store the selected parameter
value. Verify “SEt” is displayed.
STEP 7
A form is
pr ovided in
t he back of
t his manual
t o r ecor d
your
t ransmit t er's
par amet er
set up.
Z
Return to the previous menu level
(3x returns to the main display).
Touching the magnet to the S/ENT key while the parameter is displayed
(selecting the parameter) causes its value to be displayed for editing. Editing
is done by placing the magnet over the Up and Down arrow key to increment or
decrement its value, and then placing the magnet on the S/ENT key to store
the new value. The display changes to “SEt” if successful, or “ERR” if a
memory or other error is detected.
Acknowledging Latched Alarms
Latched alarms may be reset only after conditions have returned to normal
(concentration is below the alarm reset point). To reset a latched alarm,
momentarily apply the magnet to any key. Observe that the specific alarm
indication has cleared from the main display.
Inhibiting Output
The 4600 GasPlus(MB) transmitter's INHIBIT function prevents activation of
alarm relays in addition to holding loop output at the programmed inhibit level.
NOTE: Alarms are inhibited automatically at power on (for 30 seconds).
When INHIBIT is toggled ON, it will automatically toggle OFF after 9 minutes
unless a key is activated. The inhibit time-out period is reinitialized after
touching any of the 4 keys with the magnet. To activate the inhibit function,
Manual #087-0014D, 4/2008
25
M od el 4 6 0 0 Ga s PLUS® ( M B) Tr a n sm i t t er
place the magnet over the Z/ESC key for 2 seconds, then remove. Observe
the LCD displays INHIBIT. The inhibit mode can be toggled OFF by again
reapplying the magnet over the Z/ESC key for 2 seconds, then removing. The
period may be reprogrammed by changing the value of the AL.IP parameter in
the USER menu.
Calibration Frequency
All GasPlus transmitters require calibration upon receipt from the factory, after
which the calibration interval for each transmitter should be independently
established through a documented procedure which maintains a calibration log.
Calibration frequencies will vary depending upon individual applications. Harsh
environments will generally require more frequent calibration.
At a minimum, the following calibration frequencies are recommended:
Zero Calibration: Upon system power-up or sensor installation, not to
exceed 30 days. Oxygen Transmitter exception - every 90 days.
Span Calibration: Upon system power-up (unless sensor has been precalibrated); every 90 days or less. Oxygen Transmitter exception - every 30
days.
Calibration Reminder...
Document your calibration schedule requirements.
Maintain an organized system to prevent confusion
between calibrated and un-calibrated sensors.
Properly store all spare sensors.
Contact the sales or service departments at the factory to learn more about the
CAL PLUS calibration service.
26
Manual #087-0014D, 4/2008
M od el 4 6 0 0 Ga s PLUS® ( M B) Tr a n sm i t t er
Required Calibration
Equipment :
Calibration adaptor
Gas compatible
tubing (Teflon®
recommended for
acid gases (HF,
HCL, etc.)
500 cc/min flow
regulator
Calibration gas
Zero air (Nitrogen
for Oxygen Sensor)
Figure 12 - Calibration Equipment
Remote Sensor Calibration
The 4600 GasPlus(MB) transmitter is designed so that the sensor may be
removed and calibrated at a remote location. Fixed gas detection installations
using this feature should utilize a documented calibration log (see "Calibration
Frequency") to determine sensor rotation schedules. In addition, spare
sensor(s) will be required so that continuous monitoring of the detection point
is assured and a spare "powered" transmitter will be required to conduct the
calibration at a remote site. Prevent accidental installation of uncalibrated
sensors by marking all calibrated sensors with their last calibration date or
maintain them in an otherwise appropriate manner.
To remove and replace the 4600 GasPlus sensor:
STEP 1 - Inhibit the transmitter alarms and 4-20 mA output by momentarily
placing the magnet over the Z/ESC key. Observe the LCD indicates
INHIBIT.
STEP 2 - Unscrew the sensor end cap and remove the sensor requiring
calibration. Note that the fault alarm relay is unaffected and the
current loop output remains at the programmed inhibit level.
Manual #087-0014D, 4/2008
27
M od el 4 6 0 0 Ga s PLUS® ( M B) Tr a n sm i t t er
STEP 3 - Replace the sensor with a pre-calibrated sensor and reinstall the
sensor end cap. Ensure proper electrical connection between the
sensor and the transmitter has been made (the fault indicator will
disappear).
STEP 4 - Take the transmitter out of inhibit mode by momentarily placing the
magnet over the Z/ESC key. Observe the LCD turns off the INHIBIT
indicator. The transmitter is now active.
Storing Sensors
Proper storage of the pre-calibrated sensor is critical to ensure long term
functionality of the (spare) sensor. It is important to remember that upon
disconnection of the sensor from the transmitter assembly, the bias potential
(required by electrochemical sensors) across the sensor's electrodes will be
maintained via the integral battery. The battery is capable of providing up to a
total of 9 months of "off-line" power (because the battery is not rechargeable,
"off-line" time is cumulative), providing proper storage procedures are followed.
When storing the sensor "off-line", block the sensor gas hole by placing a
small piece of electrical tape over the front of the sensor (do not touch the
membrane as this will cause damage to the sensor) and store the sensor in a
cool dry place (a refrigerator for example).
Should the sensor be kept off-line for a cumulative period of time
exceeding 9 months, the sensor will continue to operate! Battery failure
of the sensor does not mean the overall sensor has failed and will not operate,
only that it will require a 4-8 hour warm-up time upon installation. Once the
sensor has "warmed-up" and has become stable, calibration may occur as
normal. An AC-powered sensor keeper (P/N 096-2197) is available for
extending the battery life of up to 10 sensors.
Zero Calibration
The transmitter's zero function sets the loop output to 4 mA while the sensor is
exposed to air which is free of the gas being detected (and any interferant
gases which may be present).
Zero Calibration Using Ambient Air
Ambient air may only be used for the zeroing process if it is certain to be free
of both the target gas and any possible interferant; otherwise, a source zero
grade air should be used (except when zeroing an Oxygen transmitter,
which uses Nitrogen for this procedure).
! IMPORTANT !
If using the
transmitter with an
Scott Health &
Safety Hydrogen
Sulfide Scrubber
(P/N 096-2141), the
scrubber MUST be
in place prior to
calibration !
28
Zero Calibration Procedure
To zero the 4600 GasPlus(MB), proceed as follows:
STEP 1 - Inhibit alarms and the 4-20 mA output by momentarily placing the
magnet over the Z/ESC key. Observe the LCD indicates INHIBIT.
STEP 2 - If using a zero air or nitrogen cylinder, attach the calibration adaptor
or flow cell to the transmitter. Make all appropriate tubing
connections per manufacturer recommendations. Turn on the air
flow at a rate of 500 cc/min and let circulate over the sensor for 5
minutes.
Manual #087-0014D, 4/2008
M od el 4 6 0 0 Ga s PLUS® ( M B) Tr a n sm i t t er
STEP 3 - Zero the transmitter by using the magnet and placing it over the over
the Z/ESC key on the transmitter body for approximately 5 seconds.
Remove the magnet. The display will read "SEt" then "0.0" (the
display will vary with range 0, 0.0, or 0.00).
STEP 4 - If spanning the instrument, proceed to "Span Calibration-STEP 2"
or take the transmitter out of inhibit mode by momentarily placing
the magnet over the Z/ESC key. Observe that the INHIBIT indicator
is not visible on the LCD. (The transmitter will automatically
deactivate inhibit mode after 9 minutes.)
Span Calibration
When span calibrating the transmitter, the concentration of gas to be used
should be at least 50% (BUT NOT IN EXCESS OF 90%) of the transmitter's
range. In addition, if the calibration gas is not in an air balance (nitrogen for
example), do not allow the gas to flow across the sensor for more than 5
minutes. This will deplete oxygen to the sensor and may cause erroneous
readings and slow recovery to normal operation (most sensors require a
minimum of 5% oxygen for proper operation).
Special Span Calibration Requirements
! TUBING ALERT !
Ensure t he proper
t ubing is used
when perf orming
span calibrat ion.
Tef lon® t ubing
should be used
when calibrat ing
wit h chlorine,
chlorine dioxide,
acid gases, or
ammonia.
Hydrides Calibration: Hydride sensors (AsH 3 / Arsine, PH3 / Phosphine,
B2H6 / Diborane, SiH4 / Silane, GeH4 / Germane) exhibit a significant transient
response to changes of oxygen concentration. This response will not effect
the sensor's usefulness when operating in normal atmospheric breathing air.
However, when calibrating a hydride sensor, hydride gases bottled in
backgrounds other than 20.9% oxygen should not be used, as the sensor will
see a change in oxygen background. For this reason, permeation tube devices
are recommended with normal air as a diluent.
Ammonia (NH3) Note: It is acceptable to use ammonia sensors in reduced
oxygen environments (down to 2%) providing that the sensor is stored within
the environment for 24 hours prior to calibration in the same environment.
Span Calibration Procedure
To span the 4600 GasPlus(MB) transmitter proceed as follows:
STEP 1 - Inhibit alarms and the 4-20 mA output by momentarily placing the
magnet over the Z/ESC key. Observe the LCD indicates INHIBIT.
STEP 2 - If using the hydrogen sulfide scrubber (part# 096-2141), ensure that it
is in place.
STEP 3 - Verify that the span gas being used has not exceeded its expiration
date. Expired or improperly stored calibration gases can cause
inaccurate calibration. A gas concentration of 50 to 90% of full
scale is recommended. However, a minimum concentration of 15%
of full scale is required.
STEP 4 - Assemble the specific calibration kit to be used (i.e., permeation
tube device, bottled gas, gas generator, etc.) and make the
appropriate connections to the transmitter's calibration adaptor.
Attach the calibration adaptor to the transmitter's sensor assembly.
STEP 5 - Initiate gas flow and allow the span gas to flow for approximately 5
minutes at a rate of 500 cc/min. NOTE: When calibrating outdoors
on a windy day, it will be necessary to temporarily cover the holes
around the circumference of the rain shield. Otherwise, rapid air flow
caused by wind will dilute the gas standard as it enters the sensor
area. The holes need not be tightly sealed. The transmitter should
begin to respond to the calibration gas immediately. The indicated
gas concentration should slowly level off to a value (usually close to
that of the span gas concentration) and remain stable.
Manual #087-0014D, 4/2008
29
M od el 4 6 0 0 Ga s PLUS® ( M B) Tr a n sm i t t er
STEP 6 - Once the displayed concentration has stabilized, hold the magnet
over the S/ENT key until "SPAN" appears in the display
(approximately 5 seconds), then remove the magnet. The gas
concentration will then reappear in the display and begin to blink,
indicating that it may be adjusted. Place the magnet over the Up
arrow (or Down arrow) key to increment (or decrement) the value
until it matches the known gas concentration flowing to the sensor.
Once the concentration has been adjusted, touch the magnet to the
S/ENT key to accept the value, or Z/ESC to abort the calibration
without saving any changes. Immediately upon touching the magnet
to the S/ENT key:
NOTE! Use only
dedicat ed st ainless
st eel regulat ors for
chlorine gas, as prior
use of H2S can
cont aminat e t he
regulat or and reduce
t he concent rat ion of
Cl2 as much as 50%.
The display shows:
Comments:
WAIT
Compute the calibration
factor and update the nonvolatile memories.
SET
Memory update was
successful.
100-1550
Calibration Factor
RUN
Return to normal display.
The calibration factor has a direct relationship to the output of the
sensor. Sensors having a calibration factor of 150 or less are
approaching the end of their useful life and should be
replaced soon.
STEP 7 - Once the displayed concentration has returned to 0, take the
transmitter out of inhibit mode by momentarily applying the magnet
to the Z/ESC key. Observe that the INHIBIT indicator is no longer
visible. (NOTE: The transmitter will automatically return to run
mode about 9 minutes after the last adjustment). After calibration is
complete, disconnect the calibration system. The unit should now
be operating properly and displaying the current gas concentration.
Using A Permeation Tube Device
When using a permeation tube device during a calibration session, it is
recommended that constant flow of zero air be established for at least 10
minutes before being hooked up to the calibration adaptor on the sensor. This
ensures that any analyte gas which may have been present from a previous
span calibration is flushed from the tubing and adaptor.
Optional Sensor Functional Test
Transmitters are designed to operate in many different environments. In some
extreme conditions, the sensor may become unresponsive to the target gas
due to continuous or excessive exposure to dust or dirt on the membrane, or
very high/low humidity conditions.
To ensure a unit continues to function, a sensor test should be considered.
Functional tests can be conducted by exposing the sensor to the target gas.
Follow all necessary safety precautions while conducting this test. The
frequency and necessity of this check is dependent upon the specific
characteristics of the site in which the sensor is located and should be
determined by the user.
30
Manual #087-0014D, 4/2008
M od el 4 6 0 0 Ga s PLUS® ( M B) Tr a n sm i t t er
Important Notes on Calibration of Sensors
Calibration of 0-1000 PPM Methyl Iodide Sensor (CH3I)
Please note that as of March 30, 1999 Scott Health & Safety has released a
new high range CH3I sensor. There is an important calibration method that
MUST be adhered to when calibrating this sensor. Upon multiple exposures to
high concentrations of gas (>500 PPM) it begins to show increased sensitivity
for a duration of approximately 5 days. In other words, it provides a higher
output when exposed to the same concentration of gas. The increased
sensitivity varies from sensor to sensor, but is typically on the order of 30%.
After 5 days, the sensor once again shows the same sensitivity as that seen
prior to the high gas exposure. This increased sensitivity does not occur for
exposure concentrations less than or equal to 200 PPM. Therefore 3
recommendations are being made:
1. The 0-1000 PPM range sensor should not be calibrated any more
frequently than once per week.
2. The sensor should be calibrated with actual methyl iodide with a
concentration of less than 500 PPM.
3. If the sensor is exposed to a high concentration of gas it should be allowed
a recovery period of 7 days before recalibration. Alternatively, it is
suggested that a spare GasPlus sensor be kept to swap out any sensor
exposed to concentrations greater than 500 PPM. This will allow the
“exposed” sensor time to recover.
Keep in mind that exposure concentrations greater than 500 PPM methyl
iodide will be unusual. Even if the sensor were to be exposed to a high
concentration, the only side effect is increased sensitivity for 3-5 days. If
another gas leak occurs, then the sensor will simply overrespond to the gas
leak, which is safe-sided.
If you have any questions, please feel free to contact your local Regional Sales
Manager or your inside sales support contact at Scott Health & Safety.
New Mandatory Calibration Method of HF Sensors
When spanning HF sensors, using a surrogate gas such as HCl and Cl2 might
be preferred by the operator. When doing this, keep in mind that the crosscalibration factor used to adjust the span is an estimate based on the
average response of several sensors.
The cross-calibration factor recommended when using HCl (an acidic gas) to
span Rock Span HF sensors is approximately 1.3 ppm HF/ppm HCl. Thus, if
5 ppm HCl is used to span a 10 ppm HF sensor, the span should be set to 6.5
ppm HF. For conventional (non-Rock Solid) HF sensors the cross-calibration
factor is 1:1.
Cl2 (an oxidizing gas) may be used to span an HF sensor, but it is
recommended to "bump" test it by exposing the sensors briefly to
vinegar vapors to be sure its ability to respond to the acidic HF gas has
not been exhausted. The calibration factor for Cl2 is about 2.3 ppm HF/ppm
Cl2 for Rock Solid sensors. Thus, when 2 ppm Cl2 is used to span an HF
sensor, the reading should be adjusted to 4.6 ppm HF. For conventional (nonRock Solid) HF sensors the value is 2.5:1. Therefore 2 ppm Cl2 applied to a
conventional HF sensor should be spanned to 5 ppm.
Manual #087-0014D, 4/2008
31
M od el 4 6 0 0 Ga s PLUS® ( M B) Tr a n sm i t t er
I. Using a gas generator:
STEP 1 - Attach the delivery tube from the generator to a calibration
adapter. Use the delivery tube supplied by the manufacturer or
a length of Teflon® or Tygon-clad Teflon®. Do not apply to sensor
at this time.
STEP 2 - Start the generator, being sure the flow rate is set to 0.5 lpm and the
gas concentration is set to the desired value.
STEP 3 - Allow the gas to flow through the delivery tube and calibration
adapter to let them equilibrate with the gas before connecting to the
sensor. Depending on the local environment, this may take 5 to 15
minutes or longer.
STEP 4 - While waiting, check the sensor zero reading and zero it if
necessary.
STEP 5 - After sufficient time has passed for the gas delivery tube and
calibration adapter to equilibrate with the gas flowing through them,
attach the calibration adapter to the 4600 sensor end-cap (remove
the rain shield first, if there is one).
STEP 6 - After five minutes, adjust the span to agree with the concentration of
gas coming after the generator.
STEP 7 - Remove the calibration adapter, and re-install the rain shield if
necessary.
Note - Some generators1 don't have air pumps with enough power to overcome
the pressure drop of the porous diffuser plug in the calibration adapter. In this
case the diffuser must be removed prior to starting the process:
STEP 1 - With pliers or a 9/16" wrench, remove the barbed hose fitting from the
calibration adapter.
STEP 2 - Through the hole, push out the diffuser with a screwdriver or a pencil.
Put the plug in a pocket or other safe place.
STEP 3 - Replace the hose fitting and tighten.
STEP 4 - When the calibration process is finished, put the diffuser plug back
into its hole and press it until its face is flush with calibration
adapter's face.
II. Using calibration gas cylinders
STEP 1 - Attach a regulator capable of delivering 0.5 lpm gas to the cylinder.
STEP 2 - Connect the regulator output to a calibration adapter using a length of
Teflon® tubing or Tygon-clad Teflon®. Do not apply to the sensor at
this time.
STEP 3 - Be sure the porous diffuser plug is in place in its hole in the
calibration adapter.
STEP 4 - Allow the gas to flow through the delivery tube and calibration adapter
to let them equilibrate with the gas before connecting to the sensor.
Depending on the local environment, this may take 5 to 15 minutes
or longer.
STEP 5 - While waiting, check the sensor zero reading and zero it if
necessary.
1
32
ACD's (Advanced Calibration Designs) model 300 and EC Cal Cal-2000 do not have this problem.
You may suspect your generator is one that has a weak pump if the sensor's response is "zero"
or much lower than anticipated.
Manual #087-0014D, 4/2008
M od el 4 6 0 0 Ga s PLUS® ( M B) Tr a n sm i t t er
STEP 6 - After the delivery tube and adapter have equilibrated with the gas,
attach the adapter to the 4600 sensor end-cap (remove the rain
shield first, if there is one.)
STEP 7 - Continue the gas flow and after five minutes, adjust the span to agree
with cylinder label value.
STEP 8 - Shut off the gas, remove the calibration adapter from the end-cap,
and reinstall the rain shield if there is one.
Note - Sometimes regulators require time to adjust after changing from one gas
type to another. For example, a regulator that has been on an H2S cylinder will
have absorbed H2S, especially when it is brass. The sulfided interior will
destroy gasses such as Cl2 until enough time and gas have passed to "clean
out" the regulator. In extreme cases, it will probably be better to use a new
regulator and then reserve it exclusively for use with the particular gas (i.e.
chlorine).
Weekly Operational Response Checks
A sensor response test should be performed weekly to ensure
the transmitter continues to respond to the target gas. It is
recommended to briefly expose the transmitter to a dose of the calibration gas
used to span the instrument. A 5 to 10 second gas stream directed at the
base of the sensor should suffice in producing a response from the transmitter.
If response is slow (typical response time will be within 5 seconds), check the
tip of the sensor for either dirt buildup or condensation on the membrane. Both
can cause slower than normal operation. If an excessive dirt buildup is
present, the sensor is generally not repairable. If there is excessive moisture
present, the sensor may be removed to a dry area and permitted to dry.
Under such conditions, the cause of the excessive moisture should be
determined and prevented (condensing humidity, hose-downs, etc.)
Refer to the appendix for alternative methods of generating operational check
gases.
Adjusting the Loop Output Parameters
Adjusting the 4-20 mA Output
(COMM Menu - MA.04 and MA.20)
Once the transmitter is installed and wired to the current loop, the 4-20 mA
levels may be adjusted through the user interface to overcome line or receiver
resistance problems. In addition, the current loop may be forced to a level
between 1.00 and 20.0 mA for purposes of testing alarms back at the receiver.
In order to perform this adjustment, you must be able to monitor the current
loop at the receiving device.
1. This adjustment requires the loop current to be monitored at the
receiving device. Refer to the electrical connections drawings in
the installation section of this manual.
2. To prevent false alarms at the receiver, set the receiver channel
to alarm inhibit prior to making these adjustments.
Manual #087-0014D, 4/2008
33
M od el 4 6 0 0 Ga s PLUS® ( M B) Tr a n sm i t t er
To adjust the 4 and 20 mA output from RUN mode:
STEP 1 - Touch the magnet to the Up arrow key and observe "USER" in the
display.
STEP 2 - Touch the magnet to the Up arrow key until "COMM" appears in the
display.
STEP 3 - Touch the magnet to the S/ENT key and observe "MA.04" in the
display.
STEP 4 - Touch the magnet to the S/ENT key and observe the DAC value (in
hexadecimal) corresponding to an output current of 4.00 mA.
NOTE: Since the current loop has already been calibrated at the
factory, this value will be different than the default value. Hold the
magnet on the Up arrow key to increase the current loop output (or
the Down arrow key to decrease) until the receiver indicates exactly
4.00 mA. Touch the magnet to the S/ENT key and observe "SEt" on
the display. When finished, or if no changes are required, touch the
magnet to the Z/ESC key to return to the "MA.04" display.
STEP 5 - Touch the magnet to the Up arrow key and observe the display
changes to "MA.20".
STEP 6 - Touch the magnet to the S/ENT key and observe the DAC value (in
hexadecimal) corresponding to an output current of 20.0 mA. Hold
the magnet over either the Up or Down arrow keys until the receiver
indicates it is receiving exactly 20.0 mA., then touch the magnet to
the S/ENT key and observe "SEt" on the display. When finished, or
if no changes are required, touch the magnet to the Z/ESC key 3
times to return to RUN mode.
Setting Loop Fault and Inhibit Levels
(COMM Menu - MA.F and MA.I)
To indicate abnormal conditions, the transmitter may be programmed to output
a current loop level corresponding to either a fault or inhibit state. The "MA.F"
and "MA.I" parameters, found in the COMM menu, determine the actual
milliampere values which are output during fault and inhibit conditions,
respectively.
Testing the 4-20 mA Output (COMM Menu - MA.t)
The MA.t parameter is used to drive loop current to simulated alarm conditions
to test a receiver device. Any value between 1.00 and 20.0 mA can be
programmed into the transmitter. The "test" output will automatically shut off
when exiting the menu. If no keys are pressed the unit will return to run mode
in two minutes.
Optional Alarm Relays
The transmitter has 3 optional alarm relays: 2 concentration alarms and 1 fault
alarm. Active alarms are displayed on the LCD. The appearance of these
alarm indicators does not imply that the associated relay is also active,
since the relays are inactive during inhibit. When the INHIBIT indicator is
visible, alarm and fault conditions may be indicated, but their associated relays
are held in their normal states (note: fail safe relays will be held energized
during inhibit).
Alarms are inhibited automatically at power on (for 30 seconds), and by
34
Manual #087-0014D, 4/2008
M od el 4 6 0 0 Ga s PLUS® ( M B) Tr a n sm i t t er
touching the Z/ESC key briefly with the magnet. When the Z/ESC is used,
alarms are inhibited for 9 minutes. The period may be reprogrammed by
changing the value of the AL.IP parameter in the USER menu.
Changing Alarm Set-Up Parameters
Using the magnet, access the USER menu and select the desired alarm
parameter. Use the Up or Down arrow keys to increment or decrement the
value, then touch the magnet to the S/ENT key to store the reading (observe
"SEt" on the display) or the Z/ESC key to abort. Use the Z/ESC key to return
to the RUN mode.
Set Points and Reset Points
The transmitter has two concentration alarms that may be programmed as
either a rising or falling alarm.
Rising Alarm: Set point is at or above reset point.
The alarm activates when the gas concentration rises to the set point
value.
The alarm deactivates when the gas concentration falls to the reset
point value.
Falling Alarm: Set point is below reset point.
The alarm activates when the gas concentration falls to the set point
value.
The alarm deactivates when the gas concentration rises to the reset
point value.
Set and Reset Delays
A set delay prevents an alarm from activating until the alarm condition has
been above the setpoint for a certain amount of time. A reset delay prevents a
non-latching alarm from deactivating until the alarm condition has been below
the reset point for a certain amount of time.
Reset delays are often used to control ventilation fans (i.e., the fans are kept
on past the danger point to ensure that the hazardous condition is absent
throughout the area and not just around the transmitter). Set delays are
sometimes used to avoid "nuisance trips". The use of lengthy set delays is
strongly discouraged.
Latching / Non-Latching and Non-Fail- safe / Fail- safe
Operation
The relays can be used in latching and non-latching modes, and can be failsafe or non-fail-safe. In fail-safe operation, relays are normally energized and
de-energized upon alarm activation (in non-fail-safe operation the relays are
normally de-energized). In latching mode, alarm indicators must be manually
reset by touching any key with the magnet. Note that alarm indicators and
relays can only be reset if the measured concentration is at or below the
reset point (or above the reset point if programmed as a falling alarm).
Manual #087-0014D, 4/2008
35
M od el 4 6 0 0 Ga s PLUS® ( M B) Tr a n sm i t t er
Relay NO/NC Status
The relay's NO or NC configuration IS SPECIFIED WHEN ORDERING THE
TRANSMITTER.
Position describes the relay’s state when it is inactivated. Normally open (NO)
relays represent a break in the circuit; the circuit is completed when the relay
is activated. In contrast, with a normally closed (NC) relay the circuit is broken
when the relay is activated. Note that a relay’s position (open or closed) is
independent of its activation mechanism (energized or de-energized).
Alarm Concentration relays assume a non-fail-safe operation and the Fault
relay assumes fail-safe operation. Changing these modes will reverse the
normally open/normally closed status.
Damping Time Constant
The SR.dC parameter sets the time constant of the digital lag filter which the
software uses to smooth variations of the input signal. The parameter value
specifies the number of seconds required to reach 63% of its final value.
Multiplying the SR.dC value to 3 (3 time constants) will result in the number of
seconds required to reach 95% of final value.
36
Manual #087-0014D, 4/2008
M od el 4 6 0 0 Ga s PLUS® ( M B) Tr a n sm i t t er
Tr a n sm i t t er Secur i t y
Transmitter password protection is accessed through the LOCK Menu. The
4600 Gas Plus(MB) transmitter employs password protection as means of
prohibiting unauthorized access to calibrations and critical parameter settings.
When the lock is enabled (lock icon appears on display), parameters may be
viewed but not changed until the lock is disabled (no icon visible). The lock is
toggled on and off by simply entering the password at the LK.ON parameter
(default 000). This 3-digit password may be changed via the LK.PW field.
Once unlocked, the transmitter may be programmed to re-lock itself
automatically after a specified period.
Toggling Parameter Security On/Off
(LK.ON)
To toggle the state of the lock, scroll to the LK.ON parameter in the LOCK
Menu and touch the magnet to the S/ENT key. Observe the display changes
to 000. Hold the magnet on the Up arrow key until the display changes to the
stored password (000 by default) and touch the S/ENT key. Observe the
display shows "SEt" momentarily, and the lock icon appears (if enabling
security) or disappears (if disabling security). If the wrong password is
entered, "ERR" will appear on the display.
Ch a n g i n g t h e Pa ssw o r d ( LK .PW)
The password is located in the LOCK menu as the LK.PW parameter. When
the system is unlocked (no icon visible), the password may be viewed and
changed just like any other parameter. However, when the system is locked
the password is displayed as 000. Attempting to enter a new password will
result in a display of "ERR" instead of "SEt".
Au t o - Lo ck Ti m er ( LK .t M )
As an option, parameter security is automatically re-enabled (after being
toggled off) by specifying a nonzero value in the LK.tM parameter. The value
appearing in the LK.tM parameter is the number of minutes (1 to 90) which the
transmitter remains unlocked before automatically re-locking itself (the feature
is disabled when LK.tM=0). The time-out period begins at the moment the
transmitter is unlocked and will re-lock only after the period has expired and
the mode has returned to RUN mode (the transmitter will not self lock during
parameter editing). Note that the instrument always returns to RUN mode if no
keys have been activated for 2 minutes. Additionally, if the transmitter
experiences a hardware reset (i.e., power cycle) with a nonzero value
programmed in the LK.tM parameter, it will immediately enable the security.
Manual #087-0014D, 4/2008
37
M od el 4 6 0 0 Ga s PLUS® ( M B) Tr a n sm i t t er
I n st r um en t Pa r a m et er
Ch a n g e Ex a m p l e
The example below will permit you to practice using the interface while actually
setting the alarm 1 parameters.
1. With the instrument in RUN mode, place the magnet on the Up arrow key and
observe “USER” in the display. This is the user menu selection. Remove the
magnet before the next selection scrolls into the display. If another selection
does scroll in, repeat touching the Up arrow key until “USER” is finally
displayed.
2. Place the magnet on the S/ENT key and observe “A1.SP” on the display. This
is the alarm 1 set point selection. Remove the magnet.
3. Place the magnet on the S/ENT key again and observe “25.00” (this may be
different if already reprogrammed from the factory value). Remove the magnet.
4. Hold the magnet over the Down arrow key to decrement the value, or the Up
arrow key to increment the value as desired. When the desired value is
displayed, remove the magnet.
5. To save the new value, place the magnet over the S/ENT key and observe “SEt”
in the display. The new value is saved in user parameter memory and the user
parameter checksums are updated. If a parameter memory error is detected
while saving the new value, “ERR” will be displayed (and the appropriate fault
code will be displayed upon returning to RUN mode). Place the magnet over
the Z/ESC key to return to the “A1.SP” selection.
6. To abort changes to the old value, place the magnet over the Z/ESC key and
observe the display returns to the “A1.SP” selection.
7. Place the magnet momentarily over the Up arrow key and observe the display
changes to “A1.RP”. This is the alarm 1 reset point. Place the magnet over
the S/ENT key to display the reset point value. Use the magnet over the Up
and Down arrow keys to change to the desired value. Place the magnet over
the S/ENT key to save the new value and observe “SEt” in the display. If the
value cannot be saved in memory, “ERR” will be displayed. Place the magnet
over the Z/ESC key to return to “A1.RP” selection.
8. Momentarily touch the Up arrow key and observe “A1.Sd”. This is the alarm 1
set delay value in seconds. Use the same procedure detailed in steps 3-7 to
set the desired value, and select and set the remaining alarm parameters:
“A1.Rd” and "A1.OP" (reset delay).
38
Manual #087-0014D, 4/2008
M od el 4 6 0 0 Ga s PLUS® ( M B) Tr a n sm i t t er
Sen sor Sel f Test Op t i on
SST Operation
The Sensor Self Test (SST) option provides a means for automatically testing
the electrochemical gas sensor. This is equivalent to the traditional bump
testing of a sensor. Although not a calibration test, it does automatically
indicate when the sensor is no longer able to respond to a gas leak. This
powerful feature provides additional confidence in your gas detection system.
Contact your local SCOTT/ Instruments representative to ascertain which
sensors can be fitted with this option. The controls for starting and stopping
the Self Test function are found in the User Menu.
When the St.ON control is set to OFF, the sensor self test is immediately
stopped and future tests are disabled until the control is set to ON or NOW.
This also clears the self test fault.
When the St.ON control is set to ON, the sensor self test may occur twice
daily at the times specified by St.t1 and St.t2. The test will then be repeated
at intervals from every 1 to 60 days (St.dt).
When the St.ON control is set to NOW, the sensor self-test will occur
immediately and the control will return to its previous state – OFF or ON.
During Sensor Self Test:
1. Before turning on the gas generator, the instrument verifies that there are
no existing sensor faults and the existing gas concentration reading is
below 5%FS. If the concentration is at or above 5%FS, the instrument
waits up to 1 hour for the concentration to subside. If gas is still present
after 1 hour, the self test is aborted and the MAINT indicator is
displayed. The F.MNt parameter in the factory menu will be appended
with an appropriate maintenance code and will need to be set to 0 in
order to eliminate the MAINT indicator. Toggling power on and off to the
instrument will also clear the maintenance code (S5 on the CPU board).
The word “SELFTEST” scrolls in the display and the St.ON bit in the
Modbus® STS status register is set to 1 throughout the test.
2. Once the instrument has verified there is no gas present above 5%FS, it
turns on the gas generator and waits for the concentration to rise to 10
%FS or more. At this time:
a. Alarms are inhibited,
b. The current loop output is driven to the inhibit level (MA.I value in
the COMM menu),
c. The inhibit indicator appears in the display.
3. When the measured concentration reaches 10%FS, the word “PASS”
appears in display and the instrument enters a recovery period. If the
sensor output fails to rise to 10%FS or more, the FAULT indicator
appears. The test is repeated every 10 minutes until successful, or until
the St.ON control is set to OFF, or until power is switched off and back
to on. If the transmitter is in RUN mode, a fault code scrolls in the
display. Touching the magnet to the S/ENT key will cause the SELFTEST-FAIL message to then scroll in the display.The fault indication is
cleared by:
Manual #087-0014D, 4/2008
39
M od el 4 6 0 0 Ga s PLUS® ( M B) Tr a n sm i t t er
a. Successful completion of the next self-test (scheduled or manual),
b. Changing the St.ON control to OFF,
c. Toggling power to the instrument (S5 on the CPU board).
4. After successfully measuring a concentration of 10%FS or more, the
instrument turns off the gas generator and enters a recovery period while
maintaining the inhibit state. This state is maintained until the measured
concentration drops to 5%FS or below, but does not exceed the time
specified in seconds by the SR.Rt parameter (self-test recovery time).
Upon return to normal operation, alarm and current loop operation return
to normal and the St.ON bit in the transmitter status register is cleared.
Note that alarms may occur if recovery period expires and the gas
concentration has not subsided below the two alarm reset points. If this
should occur, increase the recovery time specified by St.Rt.
ESC
ENT
®
SERIES
4600MB
Figure 13 - Sensor Self Test Generator
40
Manual #087-0014D, 4/2008
M od el 4 6 0 0 Ga s PLUS® ( M B) Tr a n sm i t t er
Ser i a l
Communi cat i ons
Manual #087-0014D, 4/2008
41
M od el 4 6 0 0 Ga s PLUS® ( M B) Tr a n sm i t t er
Over vi ew
There are 2 serial communication protocols in the 4600 GasPlus(MB)
transmitter. The first protocol is an ASCII report line which is transmitted in
response to a poll from a master receiver, or may be transmitted automatically
at programmed time intervals. The content of the report line is configurable;
i.e., each field may specify date, time, temperature, concentration, alarm
status, or even specify a blank field for formatting a report for import into a
spreadsheet. Aside from parity and framing errors, ASCII protocol does not
explicitly provide a means for verifying transmitted message data. The
composition of this report is detailed in the Report Generation section later in
this manual.
The second protocol is Modbus® RTU in which a master device transmits
queries to the slave transmitter and reads back response messages. In
addition to framing and parity errors, Modbus® RTU protocol appends 2 Cyclic
Redundancy Check (CRC) bytes on the end of each message. These 2 bytes
are generated from the value and order of bits in the message and provide a
high degree of data integrity. Note that the transmitter does not support the
Modbus® ASCII protocol.
Each protocol is capable of using either the RS-232 or RS-485 electrical
interface. The RS-232 interface is designed for connecting only 2 devices over
relatively short distances (less than 50 feet at 9600 baud). This might be used
for transmitting timed ASCII reports to a serial printer or computer with a builtin RS-232 port.
The RS-485 interface is used for connecting a multi-drop network of up to 31
devices using Modbus® protocol. Since RS-485 is transmitted differentially
(each bit is determined by the differential voltage between 2 wires), transmitters
may be located at distances of up to 1500 meters from a master computer or
RTU operating at 38.4k baud. Note: All devices must be configured for the
same transmission rate (typically 9600).
Set t i n g Up Fo r Ser i a l
Com m un i ca t i on s
Wiring the 4600 transmitter for serial communication is not much different than
for analog transmission. However, slight differences exist depending on
whether RS-485 and RS-232 data transmission is used.
While RS-232 buses require no termination resistors, multi-drop RS-485 buses
must be terminated on both ends by a resistor that matches the characteristic
impedance of the transmission line, which is typically between 100 and 120
(the characteristic impedance should be provided in the cable’s technical
specifications). The transmitter CPU board contains a jumper selectable 120
termination resistor. This resistor is jumpered in or out by installing the
appropriate plug on J6 of the CPU board (see Figure 9 on page 18 for specific
connection details).
42
Manual #087-0014D, 4/2008
M od el 4 6 0 0 Ga s PLUS® ( M B) Tr a n sm i t t er
Note that serial communication may be used in conjunction with the 4-20 mA
current loop output. If the current loop output is not used, it must be properly
terminated inside the transmitter at TBI (see Figure 4 on page 12).
The 4600 GasPlus(MB) will typically use RS-485 with Modbus® protocol, and
RS-232 with ASCII protocol.
Once a device is powered and connected to the bus (see Electrical Installation
drawings), it needs to be configured for use with the master. All
communications parameters are contained within the COMM menu. Note that
these settings (except for SC.Ad instrument address parameter) must be the
same for all devices on the network (including the master).
The table below summarizes the characteristics of each data transmission
method.
Comparison of Data Transmission Methods
Data Format
Transmission type
Max. transmitting devices
Max. receiving devices
Max. line length
Max. transmission rate
4-20mA
RS-232C
RS-485
Analog
Current loop
1
1
n/a
n/a
Digital
Referred to ground
1
1
15m
38.4 kB/s
Digital
Differential
32*
32*
1,000m
90-500 kB/s
*The number of transmitting and receiving devices on an RS-485 bus can be
increased by the use of repeaters.
TRANSMITTER
TRANSMITTER
TRANSMITTER
TRANSMITTER
Bus Network Topology
RS- 485/ 232 Topol ogy
Because RS-485 (and RS-232) transmission uses 2 wires for communications,
instruments using this method are 4-wire devices (2 wires for power, 2 wires for
communications). Note that RS-485 cable, such as Belden 9841 and
Manhattan 3993, should be used instead of standard 18AWG instrumentation
cable.
RS-485 limits the number of slave devices to 32. This limit is driven by power
considerations and can be overcome through the use of repeaters (also called
extenders), each of which allows another 32 devices and 1,000m to be added
to the bus. Modbus® protocol limits the number of slave devices to 247.
Manual #087-0014D, 4/2008
43
M od el 4 6 0 0 Ga s PLUS® ( M B) Tr a n sm i t t er
M od b us® RTU Pr ot ocol
Modbus® RTU protocol is a binary master/slave protocol that can support the
transfer of data between a master and up to 247 slaves. The master initiates
every message with a query directed at a particular slave and looks for a
response from only that slave. The master can also broadcast a message to
all slaves in which case it does not expect any response. The format of the
query and the response are very similar and end with 2 CRC bytes. Although
the master and slave cannot correct data errors, the CRC bytes provide a high
level error detection. The Modbus® protocol also defines appropriate responses
when errors are detected.
Query and response messages start and end with a silent interval of at least
3.5 character times. The entire message must be transmitted as a continuous
byte stream. If a silent interval of more 1.5 characters occurs before
completion of the message, the receiving device flushes the incomplete
message and waits for the next message. Similarly, if a new message occurs
earlier than 3.5 character times following a previous message, the receiving
device will consider it a continuation of the previous message and a CRC error
will be generated.
The device address field appears in both the query and the response
messages. Valid device addresses are limited to the range of 1-247. The
function field also appears in both the query and response messages. The
function field specifies whether the master is reading or writing data to the
slave. The function field also specifies whether the data is addressed as a
single register, or a block of registers. The 4600 Gas Plus(MB) transmitter
supports Functions 1-8 and 15-19, which is the same as the Modicon 884
controller.
Transmitter data is organized into 16-bit registers, numbered 40001 to 49999,
and addressed at the protocol level as 0000 to 9998. Variables and
configuration parameters are permanently mapped to these registers and may
occupy 1 or more according to their data type. A complete register map
follows in Appendix 1 at the rear of this manual. More information on Modbus®
protocol may be obtained from Modicon, Inc.
44
Manual #087-0014D, 4/2008
M od el 4 6 0 0 Ga s PLUS® ( M B) Tr a n sm i t t er
Modbus® Applications
Modbus® application programs (applications) usually run on a DCS (Distributed
Control System), PLC (Programmable Logic Controller), or industrial computer.
Examples of applications running on industrial computers include Citect®,
Wonderware®, and FIX DMACS. In addition to the register number, an
application must have other information about the variables and configuration
parameters it needs to access (some applications may require the protocol
address, which is derived from the register number by subtracting 40001).
Typically, an application has an interface which builds a tag data base and is
referred to as ‘tagging’. Each record in the tag data base associates a
symbolic name with information about where to find the data (the slave device
and register number), the size of the data (how many registers to access), and
the range of the data (for run time integrity checking). An example of this is
shown below:
Tag Name
…symbolic name field used to identify this record
Slave Identifier …name of the slave device (determined by the slave
address)
Register Address …address of the first 16 bit register containing the
Data
Data Type
…INTEGER, LONG, REAL, STRING, etc.
Data Range
…minimum and maximum values of the data
In addition to the above, a tag record may also contain fields for proper scaling
and formatting of the data.
The table below illustrates a partial tag database used by Citect®.
NAME
TYPE
GAS_1
REAL
UNIT
EIT46MB1 40019
ADDR
RAW_ZERO RAW_FULL ENG_ZERO ENG_FULL ENG_UNITS FORMAT
0
100.0
0
100.0
PCT
### EU
TEMP_1
REAL
EIT46MB1 40021
0
100.0
0
100.0
DEG
### EU
GAS_2
REAL
EIT46MB2 40019
0
100.0
0
100.0
PCT
### EU
TEMP_2
REAL
EIT46MB2 40021
0
100.0
0
100.0
DEG
### EU
Since Modbus® registers are defined to be 16 bits wide, LONG and REAL data
types require 2 consecutive registers and STRING data types may require 1
register for every 2 characters. In most applications, the master software will
read the proper number of registers according to the data type. In addition, the
master software should provide a means for byte reversing these types to
accommodate 'big endian' and 'little endian' problems.
Modbus® drivers are usually supplied with industrial computer SCADA and MMI
programs such as Citect®, Wonderware®, and FIX DMACS. If you are
integrating the 4600 Gas Plus(MB) transmitter with a DCS or PLC system, it
may be important to know that the 4600 Gas Plus(MB) transmitter most
closely emulates the Modicon 884 PLC in that it supports Modbus® Functions
1-8 and 15-19.
Manual #087-0014D, 4/2008
45
M od el 4 6 0 0 Ga s PLUS® ( M B) Tr a n sm i t t er
Transmitter Registers
The table below lists the first 26 registers for the 4600 Gas Plus(MB)
transmitter. Register numbers 40019 to 40026 contain the most important data
that the transmitter produces. By structuring this data into consecutive
registers, applications may read the entire register block with 1 transaction.
This helps to increase the bandwidth of a network of transmitters by eliminating
extra messages if the data were noncontiguous.
Re g is t e r N u m b e r
Re g is t e r A d d r e s s
40001
0000
Func tion S elec t Regis ter
De s c r ip t io n
Su g g e s t e d T a g
FS R
40002
0001
P aram eter S elec t Regis ter
PSR
40003-40006
0002-0005
Charac ter Data Regis ters
40007-40010
0006-0009
Integer Data Regis ters
40019, 40020
0018, 0019
Gas Conc entration, Dec im al P oint
GA S , GA S _DP
40021, 40022
0020, 0021
Tem perature, Dec im al P oint
TM P , TM P _DP
40023
0022
Trans m itter S tatus
S TS
40024
0023
General Fault S tatus
GFS
40025
0024
S ens or Fault S tatus
S FS
40026
0025
Trans m itter Ty pe (= 4600)
TY P
CDR1 - CDR4
IDR1 - IDR4
A complete list of parameters can be found in the Parameter Reference section
of this manual.
Accessing Transmitter Data
The transmitter stores volatile information, such as computed concentration,
temperature, and alarm status in RAM. Configuration parameters, such as
alarm set points and current loop settings, are stored in nonvolatile EEPROM.
There are no restrictions on reading any transmitter variable or parameter,
providing you know the register number and data type. However, this is not the
case for configuration parameters. Since the nonvolatile memory is checked
before each series of calculations, a special procedure must be used to
change configuration parameters.
Important!: Do not write directly to the address of a parameter. Doing so will
result in a memory checksum fault.
Changing Configuration Parameters
To change a configuration parameter value you must have 1 more piece of
information - the parameter number. Parameter numbers provide an index into
an internal parameter table which describe the data type and range to the
functions that control the editing of parameters. These are the very same
routines that control editing through the display and magnetic keys. The
sequence for changing a parameter value is shown below.
1. Write the new value to the appropriate data register; IDR1 for integers or
CDR1 for characters.
2. Write the parameter number to the parameter select register, PSR.
3. Write the appropriate function code (command) to the function select
register, FSR.
4. Read the STS register to verify the RFF bit is 0 (no errors).
46
Manual #087-0014D, 4/2008
M od el 4 6 0 0 Ga s PLUS® ( M B) Tr a n sm i t t er
It is permissible to write all 3 registers at the same time; however, your
application must ensure that the FSR is not written before the other registers
have been set properly. Failure to do so may result with parameters being set
to unknown values resulting in a dangerous transmitter configuration (i.e.,
alarm set points too high). Always verify new parameter values either manually
or through the Modbus® interface. Character data must reside in the low byte
of the 16 bit register value with the upper byte all zeros. Function codes are
listed in Appendix 2.
Example
Read and Change a Parameter Value
Objective: Given a 10.0 PPM Chlorine Sensor:
1. Read the current value of the alarm 2 set point (default value=2.5), and
2. Change the alarm 2 set point value from the current value to 2.0.
How to Read the Current Value of the Alarm 2 Set Point
The alarm 2 set point is read as (2) 16-bit registers at 40283 and 40284. The
first register is a signed 16-bit integer representing the numeric digits of the
value. The second register is a READ ONLY value representing the number of
digits to the right of the decimal point: 0, 1, 2, or 3 (never attempt to change
any of the decimal point registers). If we tag (name) the first register as SP1
(40283) and tag the second register as SP1_DP (40284), we can convert the
alarm 2 set point to a real value. The following is an example written in BASIC
which converts the alarm 2 set point integer value into a single precision value.
Note that some SCADA and MMI languages mimic the BASIC programming
language. The principal difference is that SCADA/MMI programs maintain a
tag database which permit you to reference Modbus® registers using a tag
name such as "SP2".
'...BASIC language algorithm to convert SP2 from INTEGER to SINGLE. Two library functions
'are assumed to exist that read and write transmitter registers using Modbus® protocol.
'Their implementation is beyond the scope of this manual.
DIM SP2 AS INTEGER
DIM SP2_DP AS INTEGER
DIM SP2_REAL AS SINGLE.
SP2 = MB_Read_Reg (40283)
SP2_DP = MB_Read_Reg (40284)
SELECT CASE SP2_DP
CASE 0
SP2_REAL=SP2
CASE 1
SP2_REAL=SP2*0.1
CASE 2
SP2_REAL=SP2*0.01
CASE 3
SP2_REAL=SP2*0.001
CASE ELSE
PRINT "* * * SP2 Decimal Point Error
END SELECT
Manual #087-0014D, 4/2008
47
M od el 4 6 0 0 Ga s PLUS® ( M B) Tr a n sm i t t er
How to Change the Alarm 2 Set Point
Since parameter memory is continuously tested for integrity, parameter values
may NOT be written directly to parameter read addresses. Doing so will cause
a checksum fault on the very next scan. In addition, writing a parameter value
directly into memory provides no range of error checking as provided when
using the display and switches at the operator interface. This level of integrity
checking requires the parameter access registers. On the 4600 GasPlus(MB),
these registers are 40001 through 40010:
Register Address
40001
40002
Description
Function Select Register (FSR)
Parameter Select Register (PSR)
40003-40006
40007-40010
Character Data Registers (CRD1-CRD4)
Integer Data Registers (IDR1-IDR4)
Input Range
See Appendix 2
0-100 (see Parameter
Reference Guide)
- 128 to 127
-32768 to 32767
In our example, you will only need to change the numeric value contained in
Register 40283. This is accomplished in 3 steps that appear in the following
sequence:
STEP 1 - Since the data we are attempting to update is an integer, we start by
writing the new alarm value into IDR1 (40007). However, you must
always take care to compensate the new value for the decimal point.
In our example, the 10 PPM chlorine sensor forces the alarm set/
reset decimal points to 1 (1 decimal digit). Therefore, the value
written to IDR1 must be 20 to represent 2.0.
STEP 2 - The next step is to write the parameter number into the PSR
Register. The alarm 2 set point (A2.SP) parameter number is 9 as
listed in the Parameter Reference Guide.
STEP 3 - The last step is to write an appropriate command function value to
the FSR Register. Since the parameter data type we are attempting
to write is a 16-bit integer, the FSR value required is 2 (see "Write
16-Bit Integer Parameter).
The following example illustrates how this might appear in a BASIC language
program:
MB_Write_Reg (40007,20) ' comment: IDR1=20, since SP2_DP=1 this is 2.0
MB_Write_Reg (40002,9) ' comment: PSR=9, A2.SP is parameter #2
MB_Write_Reg (40001,2) ' comment: FSR=2, command to write 16-bit integer in IDR1
The decimal point register (40284) should never be written to, as it is read-only.
CAUTION! Do use the Modbus® Interface to change any of the alarm set/reset
decimal point registers. This information is critical to the operation of the
instrument.
Modbus ® is a regist ered t rademark of Modicon,Inc.
48
Manual #087-0014D, 4/2008
M od el 4 6 0 0 Ga s PLUS® ( M B) Tr a n sm i t t er
Re p o r t Ge n e r a t i o n
This Report function would typically be accessed in the field through the RS232 connection with the output going to a portable printer, datalogger, or PC.
Report generation is accomplished through the COMM Menu. Through the
user interface, you may program the 4600 GasPlus(MB) to generate one-line
reports at intervals ranging from once every second to once every 2 hours
(7200 seconds). Alternatively, you may set the instrument to transmit a report
in response to a poll. The format of this poll is: #nnn(CR), where # is the
ASCII (35 decimal) and nnn is the instrument address in ASCII decimal, and
(CR) is ASCII 13 decimal (carriage return).
Examples:
Poll instrument 2: #002(CR)
Poll instrument 100: #100(CR)
These reports contain the instrument ID (001-247) and up to 8 fields for data
such as date, time, temperature, gas concentration, and alarm status.
Additionally, the format of the 1 line report may be controlled for easy import
into word processing or spreadsheet programs such as Microsoft Word® and
Microsoft Excel®.
The data that is printed in each of the 8 fields is specified by selecting the
appropriate field label in the RP.F1 through RP.F8 parameters. RP parameters
are found in the COMM menu.
In addition to controlling the fields, you also have control over the delimiters
appearing between the fields and the termination characters appearing at the
end of the line. For these strings, you may specify up to 5 ASCII characters
(including spaces, commas, tabs, quotes, etc.). All you need to know are the
hexadecimal ASCII codes for each character in the string. If the delimiter or
termination string is less than 5 characters, you must enter 0 after the last
character. Characters appearing after the 0 will be ignored.
An example of the default report format is shown.
ID
(Date)
(Time)
001 9/23/97
14:30:05
(ID)
(F1)
(F2)
(°F)
76.0
(Conc )
(Status) (End of line)
0.01
0A04
(F4)
(F5)
(F6)
The report consists of the ID, date, time, temperature in Fahrenheit, gas
concentration, and the alarm/relay status. The delimiter string is a single
space which is defined as hexadecimal 20 (decimal 32), and the termination
string is the carriage return and line feed characters represented as
hexadecimal 0d (decimal 13), and hexadecimal 0A (decimal 10), respectively.
Manual #087-0014D, 4/2008
49
M od el 4 6 0 0 Ga s PLUS® ( M B) Tr a n sm i t t er
50
Manual #087-0014D, 4/2008
M od el 4 6 0 0 Ga s PLUS® ( M B) Tr a n sm i t t er
Pa r a m et er
Ref er en ce
Manual #087-0014D, 4/2008
51
M od el 4 6 0 0 Ga s PLUS® ( M B) Tr a n sm i t t er
Menus
Alarm and
Sensor
Parameters
Adjusts alarm
setpoints, relay
operation, and
various sensor
parameters such
as gas type and
display engineering
units.
Alarm Parameters:
Lock Functions
Used to secure
system
parameters from
tampering.
LK.ON
LK.PW
LK.tM
Communications
Functions
Factory
Functions
Adjusts
transmitter 4-20
mA out, serial
communications,
and report
generator
parameters.
Used by factory
for diagnostics
and adjustments.
Current Loop
F.RES
F.CAL
F.HtC
F.MNt
MA.20
F.ZMV
A2.Sd
MA.SF
F.SCF
A1.RP
A2.Rd
MA.F
F.SMV
A1.Sd
A2.OP
MA.I
F.tCF
A1.Rd
AF.NL
MA.t
F.LSd
A1.OP
AF.OP
A2.SP
AL.IP
RP.ON
F.SGC
A2.RP
AL.tO
RP.Pd
F.StC
RP.d1 thru RP.d5
F.tYP
RP.E1 thru RP.E5
F.RNG
RP.F1 thru RP.F8
F.dPG
SR.dC
St.t1
SR.tC
St.t2
SR.tF
St.Gt
Rt.dt
St.ON
St.Rt
Rt.YR
St.dt
Real Time Clock
F.LSt
F.GCU
F.SP1
F.SP2
F.MFG
F.SSN
F.096
F.CS1
F.CS2
F.CS3
F.LbF
Rt.tM
Serial Comm
52
F.tMR
A1.SP
Sensor Parameters:
A scrolling help
message appears for
each parameter in all
menus.
F.PWd
MA.04
Report Generator
Help Functions
SC.Ad
SC.Md
SC.bd
SC.OP
SC.dL
SC.P
SC.Id
SC.RS
F.LCd
SW.1d
Manual #087-0014D, 4/2008
M od el 4 6 0 0 Ga s PLUS® ( M B) Tr a n sm i t t er
Th e USER M en u
Adjusts alarm setpoints, relay operation, and various sensor parameters such
as gas type and display engineering units.
Displayed
As:
Description
Min
Max
Default
Value
USER MENU - Alarm Relay Parameters
A1.SP
Alarm 1 Set Point - At this concentration the
unit will turn on the AL1 display indicator and
activate the associated alarm relay. Value
must be equal or higher than A1.RP for
rising alarm; value must be lower than
A1.RP for oxygen (falling alarm),
(Sensor Dependent)
A1.RP
Alarm 1 Reset Point - At this concentration
the unit will turn off the AL1 display indicator
and deactivate the alarm's relay. Value
must be equal or lower than A1.SP for rising
alarm; value must be higher than A1.SP for
oxygen (falling alarm).
(Sensor Dependent)
A1.Sd
Alarm 1 Set Delay in seconds. Delays
activation of the alarm's display indicator
and the alarm's relay after the concentration
reaches to the alarm's set point value.
0
10
0
A1.Rd
Alarm 1 Reset Delay in seconds. Delays
deactivation of the alarm's display indicator
and the alarm's relay after the concentration
reaches the alarm's reset point value.
0
9999
0
A1.OP
Alarm 1 Options - Specifies options for the
alarm 1 indicator and relay.
NONE = Non-latching, non-failsafe
FSF = Non-latching, failsafe
LAT = Latching, non-failsafe
BOTH = Latching, fail-safe
Failsafe energizes the alarm relay in the nonalarm state and de-energizes it on alarm
(and power) failure. The latching option
requires that the alarm indicator be manually
reset and relatched, once the concentration
has fallen to (or below) the alarm's set point
value.
None
Both
None
A2.SP
Alarm 2 Set Point - See A1.SP for details.
0
9999
1
A2.RP
Alarm 2 Reset Point - See A1.RP for
details.
0
9999
1
A2.Sd
Alarm 2 Set Delay in seconds. See A1.Sd
for details.
0
10
1
A2.Rd
Alarm 2 Reset Delay in seconds. See
A1.Rd for details.
0
9999
10
A2.OP
Alarm 2 Options - Specifies options for the
alarm 2 indicator and relay. See A1.OP for
details.
None
Both
None
Manual #087-0014D, 4/2008
53
M od el 4 6 0 0 Ga s PLUS® ( M B) Tr a n sm i t t er
Displayed
As:
Description
Min
Max
Default
Value
USER MENU - Alarm Relay Parameters
54
AF.NL
Maximum Negative Drift Fault Alarm - At
or below this concentration the unit will
display the fault indicator, open the fault
relay, and output the programmed milliamp
fault level.
-999
9999
-10% FS
AF.OP
Fault Alarm Options NONE = Non-latching, non-failsafe
FSF = Non-latching, failsafe
LAT = Latching, non-failsafe
BOTH = Latching, failsafe
The failsafe option keeps the relay energized
in the non-alarm state and de-energizes it in
alarm (and power failure). The latching
option requires you to manually reset the
fault indicator and relatch once the fault has
cleared.
None
Both
FSF
AL.IP
Alarm Inhibit Period - Specifies the number
of minutes which the alarm inhibit period will
remain on before automatically timing out
and re-enabling alarm relays.
0
90
9
AL.tO
Alarm Test Override - Used to test each
alarm indicator and relay individually, or in
groups (regardless of the alarm inhibit state).
Activates alarm indicators and energizes nonfailsafe relays (de-energizes failsafe relays).
Note that this test has no affect if the alarm
is currently active and cannot be used to turn
off an alarm. The state is reset to 0 at
startup and is defined below:
0 - None
4 - Fault
1 - AL1
5 - AL1, Fault
2 - AL2
6 - AL2, Fault
3 - AL1, AL2
7 - AL1, AL2, Fault
NOTE: To prevent false alarms at the
receiver, set the receiver channel to alarm
inhibit prior to making these adjustments.
0
7
0
Manual #087-0014D, 4/2008
M od el 4 6 0 0 Ga s PLUS® ( M B) Tr a n sm i t t er
Displayed
As:
Description
Max
Default
Value
0
60
2
Min
User Menu - Sensor Parameters
SR.dC
Sensor Damping Constant - Specifies the
damping time constant in seconds. This is
the amount of time that it will take the unit to
reach 63% of its final value when suddenly
exposed to a known concentration of gas.
The time to reach 95% of final value may be
estimated by multiplying this setting by 3.
This period does not include the time
required to transport the gas to the sensor
chamber.
SR.tC
Sensor Temperature in °C (Read Only)
-500
750
N/A
SR.tF
Sensor Temperature in °F (Read Only)
-580
1670
N/A
St.ON
Sensor Self-Test Enable (applies to
instruments with the sensor self-test option)
OFF - Automatic self-test is disabled.
ON - Self test will occur at the times
specified by St.t1, St.t2 and will repeat after
the number of days specified by St.dt.
NOW - Self test will occur immediately and
return to its previous state (ON or OFF).
TEST - Factory use only.
Off
Test
Off
St.dt
Sensor Self-Test Days Between Tests
(applies to instruments with the sensor selftest option.) Specifies the number of days
between tests.
1
60
1
St.t1
Sensor Self-Test Time-of-Day 1 (applies to
instruments with the sensor self-test option).
Specifies the time of day (hh.mm) when a
sensor self-test sequence will occur. This
date may be before, after, or equal to the
St.t2 time. Note that the self-test will not
occur at this time if a self-test is already in
progress. Set equal to the St.t2 time if only
one self test is desired.
00.00
23.59
06.00
St.t2
Sensor Self-Test Time-of-Day 2 (applies to
instruments with the sensor self-test option).
Specifies the time of day (hh.mm) when a
sensor self-test sequence will occur. This
date may be before, after, or equal to the
St.t1 time. Note that the self-test will not
occur at this time if a self-test is already in
progress. Set equal to the St.t1 time if only
one self test is desired.
00.00
23.59
18.00
St.Gt
Sensor Self-Test Gas Exposure Time
(applies to instruments with the sensor selftest option). Specifies the maximum amount
of time in seconds which gas will be
delivered to the sensor in order to achieve a
10% full scale reading.
1
120
20
St.Rt
Sensor Self-Test Recovery Time (applies
to instruments with the sensor self-test
option). Specifies the maximum amount of
time in seconds which the instrument will
wait for readings to fall to 5% of full scale
after the test is completed.
10
300
20
Manual #087-0014D, 4/2008
55
M od el 4 6 0 0 Ga s PLUS® ( M B) Tr a n sm i t t er
Th e LOCK M en u
Accesses the transmitter's security features.
L OCK M EN U
56
Displayed
As:
Description
Min
Max
Default
Value
LK.ON
Lock On/Off (Password Entry Required)
- Entering the current password in this field
toggles the lock status from On to Off, or
from Off to On. The LCD lock icon is
visible to indicate the transmitter is locked.
Note that the transmitter can automatically
re-lock when a non-zero value is entered
under the LK.tM parameter.
0 (Off)
1 (On)
0 (Off)
LK.PW
Lock Password - The lock password is
visible for changing only when the lock
icon is not present on the LCD. The
master password is 251 and will open the
lock at any time.
000
999
000
LK.tM
Auto-Lock Time-Out - Specifies the
number of minutes after which the
transmitter will automatically re-lock. The
period begins from the moment of toggling
the lock off, and will not re-lock until
resuming operation in RUN mode (will not
auto-lock while reviewing or editing
parameters). The feature is completely
disabled by setting the parameter to 0.
0
90
0
Manual #087-0014D, 4/2008
M od el 4 6 0 0 Ga s PLUS® ( M B) Tr a n sm i t t er
Th e COM M M en u
Accesses the transmitter's loop current, report generator, and serial communication
parameters.
Displayed
As:
Description
Min
Max
Default
Value
COMM MENU - Loop Current Parameters
MA.04
4.00 mA Loop Cal Point - This value can be
adjusted to drive precisely 4.00mA to calibrate the
0% concentration level, which can help overcome
excessive wire/receiver loading. The value
presented is the hexadecimal value that is written
to the digital-to-analog converter (DAC).
NOTE: There is a 5 second delay between the time
the parameter is set and the time the output is
seen by the receiving device.
0000
(hex)
FFFF
(hex)
2AF8
(hex)
MA.20
20.0 mA Loop Cal Point - This value can be
adjusted to drive precisely 20.0 mA at the full scale
concentration level, which can help overcome
excessive wire/receiver loading. The value
presented is the hexadecimal value that is written
to the digital-to-analog converter (DAC).
NOTE: There is a 5 second delay between the time
the parameter is set and the time the output is
seen by the receiving device.
0000
(hex)
FFFF
(hex)
d4d0
(hex)
MA.SF
4-20 mA Scale Factor - Can be used to scale the
current loop output by a factor, effectively
increasing or decreasing the full scale value.
Normally should be left in the default value.
0.50
2.00
1.00
MA.F
4-20 mA Fault Level - Specifies the output in
milliamps when the transmitter detects a fault
condition.
1.500
4.000
1.500
MA.I
4-20 mA Inhibit Level - Specifies the output in
milliamps when the transmitter is placed into an
alarm inhibit condition.
1.500
20.00
3.100
MA.t
4-20 mA Test Level - Specifies the output in
milliamps which is forced onto the current loop for
test purposes (checking alarms at the receiver,
etc.).
0.000
24.00
2.000
Manual #087-0014D, 4/2008
57
M od el 4 6 0 0 Ga s PLUS® ( M B) Tr a n sm i t t er
Displayed
As:
Description
Min
Max
Default
Value
COMM MENU - Report Generator Parameters
RP.ON
None
Both
None
0
7200
1
RP.d1
thru
RP.d5
Report Delimiter String - These parameters
contain each character of the null terminated
delimiter string which is printed between fields of
the report line. The parameter value is the
hexadecimal ASCII code representing a single
character. RP.D1 contains the first character,
followed by RP.d2, RP.d3, etc. The null terminated
string may be up to 5 characters in length, ending
with 0.
Examples:
(space):
RP.d1=20, RP.d2 thru RP.d5=0
(comma):
RP.d1=2C, RP.d2 thru RP.d5=0
(tab):
RP.d1=09, RP.d2 thru RP.d5=0
(comma+space):
RP.d1=20, RP.d2=2C, RP.d3 thru RP.d5=0
0
255
RP.d1=20
RP.d2-d5= 00
RP.E1
thru
RP.E5
Report Line Termination String - These
parameters contain each character of the null
terminated delimiter string which is printed between
fields of the report line. The parameter value is the
hexadecimal ASCII code representing a single
character. RP.E1 contains the first character,
followed by RP.E2, RP.E3, etc. The null
terminated string may be up to 5 characters in
length., ending with 0.
Examples:
(carriage return):
RP.E1=0d, RP.E2 thru RP.E5=0
(carriage return+line feed): RP.E1=0d, RP.E2=0A,
RP.E3 thru RP.E5=0
0
255
RP.E1=0d
RP.E2=0A
RP.E3=00
RP.Pd
58
Report On/Off - Transmits an ASCII one line
report on the serial communication interface to a
printer, or to a host computer for data capture.
Settings are:
NONE - Reports disabled.
TIME - Automatic.
POLL - Must be prompted over serial
communication.
BOTH - Reports transmitted on timed interval or in
response to poll.
The report rate is determined by the RP.Pd
parameter and the format of the report line is
controlled by the RP.F1 thru RP.F8 parameters.
Field delimiters and line termination strings are
specified by the RP.d1 thru RP.d5 and RP.E1 thru
RP.F5 parameters.
Report Period - When reports are enabled
(RP.ON=ON), this parameter specifies the number
of seconds between transmissions.
Manual #087-0014D, 4/2008
M od el 4 6 0 0 Ga s PLUS® ( M B) Tr a n sm i t t er
Displayed
As:
Description
Min
Default
Value
Max
COMM MENU - Report Generator Parameters (con't.)
RP.F1
thru
RP.F8
Report Fields - Data may be printed in up to 8
fields in the form of a 1 line report. The data that is
printed in each of the 8 fields is specified by setting
an appropriate code in the RP.F1 - F8 parameters.
The table below lists each code and the data that is
printed when the code is used. Note that the first
field printed is always the device ID (SC.Id).
"SKIP" (blank) - Prints empty field.
MD - Date (mm/dd) USA format (w/o year).
Ex: 11/22
MDY - Date (mm/dd/yy) USA format (w/year).
Ex: 11/22/97
DM - Date (dd/mm) European format (w/o year).
Ex: 22/11
DMY - Date (dd/mm/yy) European format (w/year).
Ex: 22/11/975
T12H - Time 12 hr. format with AM/PM. Ex:
2:15:05 PM
T24H - Time 24 hr. Military format. Ex: 14:05:05
DEGC - Temperature (°C) 0.1 degree resolution.
Ex: 25.0
DEGF - Temperature (°F) 0.1 degree resolution.
Ex: 77.0
PCT - Gas (% FS).
SKIP
EOL
RP.F1=Mdy
RP.F2=t24H
RP.F3=dEGF
RP.F4=CONC
RP.F5=STAT
RP.F6=EOL
01.01
12.31
(set by factory)
1
99
99
00.00
23.59
(set by factory)
CONC - Gas (ppm, ppb, %v/v)
STAT - Alarms (4 digit hex).
SIGS - Sensor MV input, thermistor MV input.
EOL - End of Line.
Rt.dt
Real Time Clock (Date) - Used to set the internal
real time clock date. Format: MM.dd. Example:
08.14
Rt.YR
Real Time Clock (Year) - Used to set the intermal
real time clock year. A Note About Year 2000 Roll
Over - The transmitter’s is not controlled in any way
by the internal clock which is used only for date
recording during span adjustment and reports.
Only two digits are maintained for the year dates
which should not be reported over the serial
communication.
Rt.tM
Real Time Clock (Hour) - Used to set the internal
real time clock. Format HH.MM. Example: 09.30
Manual #087-0014D, 4/2008
59
M od el 4 6 0 0 Ga s PLUS® ( M B) Tr a n sm i t t er
Displayed
As:
Description
Min
Max
Default
Value
COMM MENU - Serial Communication
60
SC.Ad
(Device Address) - Specifies the address to which
the instrument will respond to queries. This field
also shows up in the first column printed by the
report generator.
1
247
1
SC.bd
Serial Communication Baud Rate - Specifies the
data communication baud rate:
110
4800
150
9600
300
19.2 k
600
31.2 k
1200 38.4 k
2400
110
38.4K
9600
SC.dL
Serial Communication Data Length - Specifies
the number of data bits transmitted in each byte.
7 BIT
8 BIT
7BIT
8BIT
8 BIT
SC.Id
Serial Communication Idle - Specifies the
number of idle characters (silent interval) that must
be seen before recognition of the end of message
(Modbus™ = 4). This can be used to adjust
query/response synchronization on noisy data
lines.
0
9999
4
SC.LO
Serial Communication Listen Only- Setting this
parameter to 1 forces the transmitter to listen for
and process Modbus™ queries (including
broadcast), but without generating a response.
OFF=listen and respond
ON=listen only
This parameter should normally be set to 0.
Off
On
Off
SC.Md
Serial Communication Mode - This parameter
specifies which communication protocol to use:
NONE = None
ASC = ASCII Report Generator.
MB =Modbus™ RTU.
None
MB
MB
Manual #087-0014D, 4/2008
M od el 4 6 0 0 Ga s PLUS® ( M B) Tr a n sm i t t er
Displayed
As:
Description
Min
Max
Default
Value
COMM MENU - Serial Communication (con't.)
SC.OP
Serial Communication Options - Only used in
ASCII mode over RS-232 interface, this parameter
controls whether the transmitter echoes every
character sent, and if it expands outbound carriage
returns to carriage return + line feed. SC.Md =
ASC, SC.RS = 232
NONE = no echo, no CR expansion
ECHO = echo, no CR expansion
CRLF = no echo, expand CR to CR/LF
BOTH = echo, expand CR to CR/LF
None
Both
None
SC.P
Serial Communication Parity Checking Specifies whether parity checking is performed and
generated.
NONE =None
ODD =Odd Parity
EVEN =Even Parity
None
Even
None
SC.RS
Serial Communication RS-232/485 Selection Specifies either RS-232 or RS-485 communication.
When choosing RS-232, verify the jumpers at JP1
on the power supply board are cut and jumpered as
shown in the electrical connections. Since RS-485
is the default, no modifications to JP1 are required.
232 = RS-232 Non-isolated
485 = RS-485 Non-isolated
485.I= RS-485 Isolated (currently not available)
232
485.1
485
SC.Rt
Serial Communication Retries - This parameter
is not currently used.
0
9999
10
SC.Sb
Serial Communication Stop Bits -Specifies either
1 or 2 stop bits.
1=1 bit
2=2 bits
1
2
1
SC.VF
Serial Communication Verify - When set to ON,
OFF, turns off CRC checking in Modbus™ RTU
protocol.
Off
On
On
Manual #087-0014D, 4/2008
61
M od el 4 6 0 0 Ga s PLUS® ( M B) Tr a n sm i t t er
Th e FACT M e n u
FACT parameters are rarely used under "field" conditions. Typically these
parameters are only used for troubleshooting and service issues.
Displayed
As:
Description
Factory Password Entry - Certain functions and
parameters contained in the FACT menu are protected by
a factory security password under the F.PWD. Each time
the factory password is entered, security is disabled for
period of 100 minutes (6000 seconds). Repeating the
entry of the factory password will restart the timer at 100
minutes. During this time, the functions/parameters may
F.PWD be executed/updated. When the timer expires at zero,
attempting to enter, execute, or modify values will result in
a display of "ERR'. Normal user security must be
disabled before the factory pasword is accepted. Enabling
or disabling factory security does not affect the display of
the lock icon. The amount of time (in seconds) remaining
until factory security is automatically re-enabled may be
viewed under the F.tMR parameter.
Min
Max
Default
Value
000
999
000
00.00
99.99
1
F.tMR
Factory Security Timer Status in Seconds.
F.CAL
Factory Calibration Function - This function is used at
the factory to calibrate the sensor millivolt input to 0.250
and 1.800 volts and should not be required in the field.
0
1
1
F.HtC
Factory High Temperature Calibration.
0
0
0
F.RES
Factory Reset Memory.
NONE = Resets the instrument.
USER = Resets the following parameters to their default
values: A1.SP, A1.RP, A1.Sd, A1.Rd, A1.OP, A2.SP,
A2.Sd, A2.Rd, A2.OP, AF.NL, AF.OP, AL.IP, AL.tO,
SR.dC, St.ON, St.Dt, St.t1, St.t2, St.Gt, St.Rt, LK.ON,
LK.OW, LK.tM, MA.SF, MA.F, MA.I, MA.t, RP.ON, RP.Pd,
RP.d1-5, RP.E1-5, RP.F1-8, SC.Ad, SC.bd, SC.dL, SC.Id,
SC.LO, SC.Md, SC.OP, SC.P, SC.RS, SC.Rt, SC.Sb,
SC.VF, F.LCd.
NONE
FACT
NONE
SNSR = Copies slow sensor memory into fast processor
memory and resets the following parameters to their
default values: A1.SP, A1.RP, A2.SP, A2.RP, AF.NL.
FACT = Resets the following parameters to their default
values: LK.PW, LK.tM.
NOTE 1: The input amplifier calibration is reset to default
Displaye
values. The amplifier should be recalibrated after this
d
reset. This calibration should be done only by factory
As:
authorized personnel.
NOTE 2: The current loop output calibration is reset to
default values. Both the 4mA and 20mA calibrations
should be performed after this reset. These calibrations
may be performed in the field and are detailed earlier in
this manual (see MA.04, MA.20).
62
Manual #087-0014D, 4/2008
M od el 4 6 0 0 Ga s PLUS® ( M B) Tr a n sm i t t er
Displayed
As:
Description
Min
Max
Default
Value
FACT MENU - Parameters (continued…)
F.MNt
Factory Maintenance - Displays the current value of the
system maintenance code. Codes may be cleared to 0 by
operator.
0 = No codes present.
1 = Calibration factor low (must recalibrate to clear) .
2 = Self-test aborted due to the presense of gas. Perform
self-test (St.ON+NOW) or reset F.MNt value to 0.
0
2
0
F.ZMV
Sensor Zero Millvolt Value - Nominal value: 250
0
2500
Varies by
Sensor
F.SCF
Sensor Span Calibration Factor - Nominal value: 1550
0
2500
Varies by
Sensor
F.SMV
Sensor Span Millivolt Value - Nominal value: 1800
0
2500
Varies by
Sensor
F.tCF
Sensor Temperature Compensation Factor - Nominal
value.
0
5000
Varies by
Sensor
F.LSd
Sensor Last Span Date - Nominal value.
01.01
12
Varies by
Sensor
F.LSt
Sensor Last Span Time - Nominal value.
00.00
23.59
Varies by
Sensor
0
9999
Varies by
Sensor
-407
750
Varies by
Sensor
F.SGC
Sensor Span Gas Concentration - Nominal value.
F.StC
Sensor Span Termperature in 0.1 °C - Nominal value:
250
F.tYP
Sensor Type (Model No.)
0
99
Varies by
Sensor
F.RNG
Sensor Full Scale Range - This value is used in
conjunction with F.dPG to specify the sensor full scale
range. To determine the sensor full scasle range, multiply
this value first by 10, then by the appropriate value shown
for F.dPG.
1
9999
Varies by
Sensor
F.dPG
Sensor Decimal Point in Gas Reading - Used to scaling
the gas concentration reading, alarm set/reset points,
negative drift limit, and span concentration during
calibration.
F.dPG multiply by:
0
1.0
1
0.1
2
0.01
3
0.001
0
3
Varies by
Sensor
Manual #087-0014D, 4/2008
63
M od el 4 6 0 0 Ga s PLUS® ( M B) Tr a n sm i t t er
Displayed
As:
Description
Min
Max
Default
Value
FACT MENU - Parameters (continued…)
64
F.GCU
Sensor Gas Concentration Units - ASCII character code
(in hexadecimal) corresponding to the gas units of
measure.
42 (hex) 4d (hex)
PPM = 4d
PPB = 42
PCT = 43
Varies by
Sensor
F.SP1
Sensor Default Set Point 1 Value (low alarm) - This
value is used in conjunction with F.dPG to specify the set
point 1 value (low priority alarm). To determine the exact
value, multiply by the appropriate scaler shown for F.dPG.
(Do not attempt to change this value.)
1
9999
Varies by
Sensor
F.SP2
Sensor Default Set Point 2 Value (high alarm) - This
value is used in conjunction with F.dPG to specify the set
point 2 value (high priority alarm). To determine the exact
value, multiply by the appropriate scaler shown for F.dPG.
(Do not attempt to change this value.)
1
9999
Varies by
Sensor
F.MFG
Sensor Manufacturing Code - For internal use by factory.
0
9999
Varies by
Sensor
F.SSN
Sensor Serial Number - For internal use by factory.
0
9999
Varies by
Sensor
F.096
Sensor Part Number - For internal use by factory.
0
9999
Varies by
Sensor
F.CS1
Sensor Memory Checksum 1 - Used for sensor memory
integrity.
(hex)
0000
(hex)
FFFF
Varies by
Sensor
F.CS2
Sensor Memory Checksum 2 - Used for sensor memory
integrity.
(hex)
0000
(hex)
FFFF
Varies by
Sensor
F.CS3
Sensor Memory Checksum 3 - Used for sensor memory
integrity.
0000
(hex)
FFFF
(hex)
Varies by
Sensor
F.LbF
Last Byte in File - Used for sensor memory integrity.
(hex) 00
(hex)
FF
Varies by
Sensor
F.LCd
LCD Contrast Setting.
0
100
Varies by
Sensor
SW.Id
Software Version Number (Read Only) - Used by
factory.
1.000
10.00
Varies by
Sensor
Manual #087-0014D, 4/2008
M od el 4 6 0 0 Ga s PLUS® ( M B) Tr a n sm i t t er
Tr ou b l esh oot i n g
Fault Codes and Error Messages
When the transmitter detects a fault, the FAULT indicator appears on the
display. The following also occurs, unless the transmitter is in inhibit mode
(INHIBIT also visible on the display).
1. The fault relay de-energizes (unless AF.OP has been reprogrammed for
non-fail-safe operation).
2. The current loop output is set to the programmed fault level (as set by
MA.F).
3. If alarms were active at the time of the fault, they are latched until the
fault is cleared, or the instrument is placed into inhibit mode.
4. New alarms are not recognized until the fault is corrected.
5. If the display is in RUN mode (not currently calibrating or editing setup
parameters), the following message scrolls on the display. "CODE x x
x x TOUCH THE ENTER KEY". Touching the magnet to the S/ENT
key will cause the display to sequentially scroll an error message for
each fault detected. Below is a list of error messages along with
possible corrective actions.
ERROR MESSAGE
ROM-FAULT
RAM-FAULT
USER-MEM
FACT-MEM
SENSOR-MEM
LOW-POWER
LCD-BUS
CLK-BUS
SENSOR MISSING
LOOP OPEN
SPI-BUS
CPU-EE
NEG-DRIFT
GAS-SIG-LO
GAS-SIG-HI
TMP-SIG-LO
TMP-SIG-HI
SELF-TEST-FAIL
POSSIBLE CORRECTIVE ACTION
Repair or replace CPU board.
Repair or replace CPU board.
Reset USER memory. Verify all parameter values and restore restore
required settings.
Reset FACT memory. Perform F.CAL. Calibrate current loop.
Replace sensor.
Verify +18 to +28 VDC input at TB1 of PS board. Isolate problem to
faulty board. Repair or replace board.
Display may be unreadable. Isolate problem to faulty board. Repair or
replace board.
Isolate problem to faulty board. Repair or replace board.
Re-tighten sensor housing cap. Check sensor connections to board.
Replace sensor or isolate problem to faulty board.
Check current loop connections (refer to electrical wiring diagrams).
Repair or replace CPU board.
Repair or replace CPU board.
Zero calibrate sensor.
Replace sensor or isolate to faulty board, then repair or replace board.
Retighten sensor housing cap.
Verify self-test plug connections. Repair or replace sensor or self-test
generator.
GAS-CAL-LOW
Replace sensor.
Required Procedures after Replacing Equipment
SENSOR
CPU Board
Power Supply Board
Display Board
Manual #087-0014D, 4/2008
Zero and span calibrate if necessary. If new sensor type, restore alarm
set/reset points and all other required parameter settings.
Perform F.CAL and recalibrate current loop output. Restore alarm
set/reset points and all other required parameter settings.
Perform F.CAL and recalibrate current loop output.
Adjust LCD contrast if necessary.
65
M od el 4 6 0 0 Ga s PLUS® ( M B) Tr a n sm i t t er
Tech n i ca l Sp eci f i ca t i on s*
Supply Voltage: 18 to 28 VDC
Operating Current
With Relays: 80 mA @ 18 VDC, 83 mA @ 24 VDC, 85 mA @ 30 VDC
Without Relays: 54 mA @ 18 VDC, 50 mA @ 25 VDC, 48 mA @ 30 VDC
(Note: Reduce by 24 mA if powering current loop separately.)
Repeatability: ± 2 % FS
Linearity: ± 2 % FS
Outputs: 4-20 mA current loop, RS-232 or RS-485 (jumper/software
selectable)
4-20 mA Loop Output: 1.0 to 24.0 milliampere actual range
Isolated/Non-Isolated; Current Source/Sink
Drives 950 of total load resistance @ 24 VDC (includes wiring)
Adjustable 4.00 and 20.0 output levels (to correct receivers)
Open current loop fault detection
Optional Relays: 2 SPST concentration relays and 1 SPST fail relay
Contacts rated at maximum of 5A @ 250 VAC or 30 VDC
(resistive load).
Contacts rated at maximum of 2A @ 250 VAC or 30 VDC
(inductive load).
Display/Indicators: LCD, 4 digits with decimal point, -999..9999
PPM, PPB, % V/V, °C, °F, AL1, AL2, FAULT, INHIBIT, MAINT
and LOCK
Magnetic Keys: 4 total: UP (+), DOWN (-), S/ENT (Span/Enter), Z/ESC (Zero/
Escape)
Communications: Modbus® RTU protocol and configurable ASCII report generator
Diagnostics: Missing sensor, current loop open (broken), electronic faults,
configuration memory faults
Operating Temperature: -40°C to +65°C (transmitter only, does not apply to sensor))
Humidity: 99%RH maximum, non-condensing (limited by transmitter LCD)
(electronic circuit boards protected by conformal coating)
Weight: 5 lbs (2.25 Kg)
Separated Sensor: May be remoted up to 50 feet from transmitter (optional).
Approvals: CSA (Certificate 1150551) - Class I, Zone 1, Group IIC;
Ex d ib [ib] IIC T6
Sensor Battery Life: Nine months (unpowered)
Warranties
Transmitter: 1 Year
Sensor: 1 Year
*Subject to change without notice.
Co n t a ct i n g
SCO TT H EA LTH & SA FETY
4320 Goldmine Road
Monroe, NC 28110
Scott Health & Safety may be contacted
Monday through Friday
8:30 AM to 5:00 PM EST.
Phone 800-247-7257 • FAX 1-704-291-8340
e-mail • [email protected]
66
Manual #087-0014D, 4/2008
M od el 4 6 0 0 Ga s PLUS® ( M B) Tr a n sm i t t er
Ap p en d i x 1
MODBUS® Re g i st e r Ad d r e ssi n g
REA D
O N LY
Register Address
Description
Suggested Tag
40001
Function select register
FSR
40002
Parameter select register
PSR
40003-40006
Character data registers
CDR1 - CDR4
40007-40010
Integer data registers
IDR1 - IDR4
40011-40014
Long data registers
LDR1 - LDR2
40015-40018
Real data registers
RDR1 - RDR2
40019
Gas concentration (read only)
GAS
40021
Temperature (read only)
TMP
40023
Transmitter status (read only)
STS
40024
General fault status (read only)
GFS
40025
Sensor faults status (read only)
SFS
40026
Transmitter Type (read only)
TYP
40027
Loop Drive PWM (read only)
Lp - PWM
Modbus® Register Data
The 4600 GasPlus(MB) transmitter implements the Modicon 884 PLC function
set except for Function 18 (used to program the PLC). Readings and alarm
information produced by the instrument are organized into 1 contiguous block
so that the master can retrieve this data in 1 poll, rather than using several
polls. This helps to increase the bandwidth of a network of transmitters. The
transmitter's setup registers (parameters) are not organized for efficiency, since
they should not need to be accessed on a regular interval.
Readings and Status Registers
REGISTER
ADDRESS
DESCRIPTION
SUGGESTED TAG
40019
INTEGER
GAS
Description - Gas concentration reading in PPM, PPB, or %V/V. This value
must be multiplied by the decimal point multiplier at register 40020 (GAS_DP).
The concentration units are indicated in STS register (see below). Range -999
to 9999.
40020
INTEGER
GAS_DP
Description - Decimal point multiplier for the gas concentration reading at
40018 (GAS). Range 0 to 3.
Manual #087-0014D, 4/2008
Value
Multiply by...
0
1
1
0.1
2
0.01
3
0.001
67
M od el 4 6 0 0 Ga s PLUS® ( M B) Tr a n sm i t t er
REGISTER
ADDRESS
DESCRIPTION
40021
INTEGER
SUGGESTED TAG
TMP
°
Description - Temperature reading on 0.1 C. Range - -400 to 750 (-40°C to
+75.0°C). Multiply this value by 0.1 before using.
40022
INTEGER
TMP_DP
Description - Decimal point multiplier for the temperature reading at 40021
(TMP). Fixed value of 1.
40023
UNSIGNED INTEGER
STS
Description - Transmitter status word. Range 0 to 65535.
High Byte
Low Byte
STON LPO
IHB
MNT
BIT 0
BIT 1
BIT 2
BIT 3
BIT 4
BIT 5
BIT 6
BIT 7
BITS 8,9,10
RL1
RL2
RLF
AL1
AL2
ALF
MNT
IHB
U0,1,2
BIT 11
BIT 12
BIT 13
BIT 14
ALO
ALF
RFF
AL2
LCK
AL2
U2
RLF
U1
RL2
U0
RL1
Alarm 1 relay status. 0=inactive, 1=active (see note below).
Alarm 2 relay status. 0=inactive, 1=active (see note below).
Fault relay status. 0=inactive, 1=active (see note below).
AL1 display indicator status. 0=off, 1=on.
AL2 display indicator status. 0=off, 1=on.
FAULT display indicator status. 0=off, 1=on.
MAINT display indicator status. 0=off, 1=on.
INHIB display indicator status. 0=off, 1=on.
Displayed units indicator status:
U2
U1
U0
Indicator
0
0
0
0
1
1
1
1
0
0
1
1
0
0
1
1
0
1
0
1
0
1
0
1
None
°F (Fahrenheit)
°C (Celsius)
<reserved>
%LEL (Lower Explosive limit)
%V/V (Percent Volume per Volume)
PPM (Parts Per Million)
PPB (Parts Per Billion)
LCK
RFF
ALO
LPO
BIT 15
Lock display indicator status. 0=off, 1=on.
Remote function fail indicator. 0=success, 1=failure.
Alarm override status. 0=normal, 1=alarms overridden for test.
Loop override status. 0=normal, 1=loop overridden for cal./
test.
STON Sensor self-test status. 0=inactive, 1=self test in progress.
40024
UNSIGNED INTEGER
GFS
Description - General fault status. Range 0 to 65535.
High Byte
Low Byte
BIT 0
BIT 1
BIT 2
BIT 3
BIT 4
68
ROM
RAM
UMEM
FMEM
EMEM
STON LPO
IHB
MNT
ALO
ALF
RFF
AL2
LCK
AL2
U2
RLF
U1
RL2
U0
RL1
ROM fault.
RAM fault.
User memory checksum fault.
Factory memory checksum fault.
External sensor shadow memory checksum fault.
Manual #087-0014D, 4/2008
M od el 4 6 0 0 Ga s PLUS® ( M B) Tr a n sm i t t er
REGISTER
ADDRESS
BIT 5
BIT 6
BIT 7
BIT 8
BIT 9
BIT 10
BIT 11
BIT 12
BIT 13
BIT 14
BIT 15
DESCRIPTION
PWR
LCD
IHB
EE24
LOOP
SPI
EE12
SNSR
NEG
0
OVR
40025
SUGGESTED TAG
Low voltage fault.
LCD 12C bus fault.
Clock 12C bus fault.
External sensor 12C bus fault.
Current loop open circuit fault.
Serial peripheral interface bus fault.
On chip EEPROM memory fault.
Sensor fault detected (see SFS below).
Concentration below negative drift limit.
Not used.
Alarm or loop override detected (see STS above).
UNSIGNED INTEGER
SFS
Description - Sensor status and faults. Range 0 to 512.
High Byte
(status):
Low Byte
(status):
0
0
0
0
0
0
0
0
STF
TMPHI TMPLO SENHI SENLO
BIT 0
BIT 1
BIT 2
BIT 3
BIT 4
BIT 5-7
BIT 8
SENLO
SENHI
TEMPLO
TMPHI
STF
BIT 9
LOOP
BIT 10-15
40027
NEW
0
NEW
SCFLO
Sensor signal input below 0.012v.
Sensor signal input above 2.488v.
Temperature signal input too low.
Temperature signal input too high.
Self-test failed to produce a sufficient signal input.
Not used - always 0.
New sensor detected, cleared automatically (not a
fault).
Span calibration factor low (sets MAINT indicator, not
a fault).
Not used - always 0.
UNSIGNED INTEGER
Lp -PWM
Description - 16 bit value representing PWM drive to loop circuit. Approximate
calibration is 65535 counts = 24mA.
Manual #087-0014D, 4/2008
69
M od el 4 6 0 0 Ga s PLUS® ( M B) Tr a n sm i t t er
70
Manual #087-0014D, 4/2008
M od el 4 6 0 0 Ga s PLUS® ( M B) Tr a n sm i t t er
Ap p en d i x 2
( FSR) Co m m a n d Fu n ct i o n s
Command functions are required whenever a value is to be written to
the instrument. All command values are direct to the Function Select
Register (FSR), located in address 40001. The FSR register recognizes
11 commands:
Command (1):
Write 8- Bit byte parameter
Validates and writes 8-bit byte parameters into nonvolatile parameter memory.
Updates the RFF bit in the STS register.
Sequence: CDR1={new value}, PSR={parameter#}, FSR=1
Command (2):
Write 16- Bit integer parameter
Validates and writes 16-bit integer parameters into nonvolatile parameter
memory. Updates the RFF bit in the STS register.
Sequence: IDR1={new value}, PSR={parameter#}, FSR=2
Command (10):
Alarm Test O verride
Turns on the alarm override mode and forces alarms to a specified state. Note
that the alarm relays programmed as FAIL-SAFE will be energized when the
alarm is OFF, and de-energized when the alarm is ON. Alarm override mode is
disabled by using command Function 11 (Reset Alarms). This command does
not affect the RFF bit in the STS register.
Register sequence (for forcing on/off more than one alarm at a time):
1.
CDR1={0-7 [see table below]}
2.
PSR=not used
3.
FSR=10
CDR1
0
1
2
3
4
5
6
7
AL1
OFF
ON
OFF
ON
OFF
ON
OFF
ON
AL2
OFF
OFF
ON
ON
OFF
OFF
ON
ON
FAULT
OFF
OFF
OFF
OFF
ON
ON
ON
ON
Application Note:
When implementing the Alarm Test command (10), be sure to include the
Alarm Reset command (11). For example, in a graphical user interface this
might mean creating a "test" and "reset" button for each alarm. (i.e., pushing
alarm 1 "test" button executes CDR1B0=1, FSR=10)
Manual #087-0014D, 4/2008
71
M od el 4 6 0 0 Ga s PLUS® ( M B) Tr a n sm i t t er
Command (11):
Reset Alarms
Turns off the alarm override mode and clears the specified latched alarms. Any
alarms currently forced on or off by command 10 will return to normal program
control. This command may also be used in normal operation to manually
reset latched alarm 1 or alarm 2, but only after alarm conditions have subsided.
This function does not affect the RFF bit in the STS register.
Register sequence:
1.
CDR1=0-4 (see table below)
2.
PSR=not used
3.
FSR=11
CDR1
0
1
2
3
AL1
No Change
Reset
No Change
Reset
AL2
No Change
No Change
Reset
Reset
See application note in Command 10.
Command (12):
Set/ Clear inhibit mode
Sequence: IDR1 = 1; FSR = 12 will force the instrument in Inhibit mode
IDR1 = 0; FSR = 12 will clear the instrument Inhibit mode
To set (or change) the Inhibit mode timeout period (AL.IP) perform the following:
IDR1 = desired period in minutes. Be careful, since there is no limit checking on the
value.
PSR = 16;
FSR = 2.
Example: Set the Inhibit period to timeout in 6 minutes. IDR1 = 6, PSR = 16, FSR = 2.
To verify, read location 40297 (refer to Appendix 3).
Command (20):
Zero- calibrate sensor
Sets the transmitter’s zero point. Does not use PSR or data registers. Care
must be taken to ensure that clean, zero-grade air is present at the sensor.
Updates the RFF bit in the STS register.
FSR=20
Command (21):
Span- calibr ate sensor
Apply gas to sensor.
IDR1=conc
FSR=21
Command (22):
Force Sensor Self -Test
IDR1=2
FSR=22
72
Manual #087-0014D, 4/2008
M od el 4 6 0 0 Ga s PLUS® ( M B) Tr a n sm i t t er
Command (30):
Update real- time clock date
Synchronizes instrument date to host date. Does not use PSR register.
Updates the RFF bit in the STS register.
Sequence:
CDR1=0-99 (2 digit year)
CDR2=1-12 (month)
CDR3=1-31 (day)
FSR=30
Command (31):
Update real- time clock time
Synchronizes instrument time (military time) to host time. Does not use the
PSR register. Updates the RFF bit in the STS register.
Sequence:
CDR1=0-23 (hours)
CDR2=1-59 (minutes)
CDR3=1-59 (seconds)
FSR=31
Command (40):
Toggle passw ord security on/ of f
Uses the password stored in IDR1 to toggle security on/off. Note that if the
password is incorrect, this function will not be successful. Updates both the
RFF and LCK bits in the STS register.
Sequence: FSR=40
Manual #087-0014D, 4/2008
73
M od el 4 6 0 0 Ga s PLUS® ( M B) Tr a n sm i t t er
74
Manual #087-0014D, 4/2008
M od el 4 6 0 0 Ga s PLUS® ( M B) Tr a n sm i t t er
Ap p en d i x 3
Modbus® Register Table
Label
Suggested Tag
Type
*
fsr
INT
Reg.
40001
Min
0 65535
Max
D-reg PSR FSR Comments
Function Selection Register
*
psr
INT
40002
0 65535
Parameter Selection Register
*
cdr1
INT
40003
0
255
Character Parameter Data
*
cdr2
INT
40004
0
255
Character Parameter Data
*
cdr3
INT
40005
0
255
Character Parameter Data
*
cdr4
INT
40006
0
255
Character Parameter Data
*
idr1
INT
40007 -32768 32767
Integer Parameter Data
*
idr2
INT
40008 -32768 32767
Integer Parameter Data
*
idr3
INT
40009 -32768 32767
Integer Parameter Data
*
idr4
INT
40010 -32768 32767
Integer Parameter Data
**
gas
INT
40019 -32768 32767
Computed Gas Concentration in Either PPM,PPB,or%V/V
**
gas_dp
INT
40020 0
**
tmp
INT
40021 -32768 32767
Gas Conc Multiplier: 0=1,1=0.1,2=0.01,3=0.001
Reported Temperature in oC
**
tmp_dp
INT
40022 0
2
Temperature Multiplier 0=1,1=0.1,2=0.01,3=0.001
**
status
UINT
40023 0
65535
System Indicator/Relay Status
**
sys_gen_faults
UINT
40024 0
65535
System Fault Status
**
sensor_faults
UINT
40025 0
65535
Sensor Fault Status
**
transmitter_type
UINT
40026 0
65535
Transmitter Type:4600 or 4688
(read before accessing other data)
A1.SP sp1
INT
40281 -32768 32767 idr1
4
Alarm Set Point 1 Value
2 (sensor dependent, use gas_dp multiplier)
A2.SP sp2
INT
40283 -32768 32767 idr1
9
Alarm Set Point 2 Value
2 (sensor dependent, use gas_dp multiplier)
A1.RP rp1
INT
40285 -32768 32767 idr1
5
Alarm Reset Point 1 Value
2 (sensor dependent, use gas_dp multiplier)
A2.RP rp2
INT
40287 -32768 32767 idr1
10
Alarm Reset Point 2 Value
2 (sensor dependent, use gas_dp multiplier)
A1.SD setdly1
UINT
40289 0
10
idr1
6
2 AL1 Delay on Set Option (in seconds)
A2.SD setdly2
UINT
40290 0
10
idr1
11
2 AL2 Delay on Set Option (in seconds)
A1.RD rstdly1
UINT
40292 0
9999
idr1
7
2 AL1 Delay on Reset Option (in seconds)
A2.RD rstdly2
UINT
40293 0
9999
idr1
12
2 AL2 Delay on Reset Option (in seconds)
AF.NL neglim
INT
40295 -32768 32767 idr1
14
2 Negative Drift Limit (sensor dependent)
AL.IP
alm_ihbpd
UINT
40297 0
90
idr1
16
2 Alarm Inhibit Period in Minutes
A1.OP alm1_opts
UINT
40298 0
3
idr1
8
2 AL1 Options: 0=None,1=Failsafe,2=Latching,3=Both
A2.OP alm2_opts
UINT
40299 0
3
idr1
13
2 AL2 Options: 0=None,1=Failsafe,2=Latching,3=Both
AF.OP almF_opts
UINT
40300 0
3
idr1
15
2 FAULT Options: 0=None,1=Failsafe,2=Latching,3=Both
2
*Used during parameter update only.
**Organized for efficient block read (read only).
Manual #087-0014D, 4/2008
75
M od el 4 6 0 0 Ga s PLUS® ( M B) Tr a n sm i t t er
Label
Max
D-reg PSR FSR Comments
SC.AD comm_addr
UINT
40301 1
247
idr1
59
2 Serial Comm Instrument Address
SC.BD comm_baud
UINT
40302 0
10
idr1
60
Serial Comm Baud:
2 10=38.4k,9=19.2k,8=14.4k,7=9600...0=110
SC.DL comm_data
UINT
40303 0
1
idr1
61
2 Serial Comm Data Length: 0=7,1=8
UINT
40305 0
9999
idr1
62
SC.LO comm_listen
UINT
40306 0
1
idr1
63
2 Serial Comm Number of Idles Between Messages
2 Serial Comm Listen Only: 0=Listen and Talk,1=Listen Only
SC.MD comm_mode
UINT
40307 0
2
idr1
64
TM
2 Serial Comm Mode: 0=None,1=ASCII,2=Modbus RTU
SC.OP comm_opts
UINT
40308 0
3
idr1
65
2 See Definitions Above
SC.ID
Suggested Tag
comm_idle
Reg.
Min
UINT
40309 0
2
idr1
66
2 Serial Comm Parity: 0=None, 1=Even, 2=Odd
SC.RS comm_eia
UINT
40310 0
2
idr1
67
2 Serial Comm Interface: 0=RS-232,1=RS-485
SC.RT comm_retries
UINT
40311 0
9999
idr1
68
2 Serial Comm Printer Busy Retries
SC.SB comm_stop
UINT
40312 1
2
idr1
69
2 Serial Comm Number of Stop Bits
SC.VF comm_verify
UINT
40313 0
1
idr1
70
RP.F1 rep_field1
INT
40314 0
13
idr1
48
2 Serial Comm Verify: 0=No LRC/CRC Verification,1=Normal
Field 1: 0:SKIP,1:MD,2:MDY,3:DM,4:DMY,5:T12H,6:T24H,
2 7:DEGF,8:DEGC,9:PCT,10:CONC,11:STAT,12:SIGS,13:EOL
RP.F2 rep_field2
INT
40315 0
13
idr1
49
Field 2: 0:SKIP,1:MD,2:MDY,3:DM,4:DMY,5:T12H,6:T24H,
2 7:DEGF,8:DEGC,9:PCT,10:CONC,11:STAT,12:SIGS,13:EOL
RP.F3 rep_field3
INT
40316 0
13
idr1
50
Field 3: 0:SKIP,1:MD,2:MDY,3:DM,4:DMY,5:T12H,6:T24H,
2 7:DEGF,8:DEGC,9:PCT,10:CONC,11:STAT,12:SIGS,13:EOL
RP.F4 rep_field4
INT
40317 0
13
idr1
51
Field 4: 0:SKIP,1:MD,2:MDY,3:DM,4:DMY,5:T12H,6:T24H,
2 7:DEGF,8:DEGC,9:PCT,10:CONC,11:STAT,12:SIGS,13:EOL
RP.F5 rep_field5
INT
40318 0
13
idr1
52
Field 5: 0:SKIP,1:MD,2:MDY,3:DM,4:DMY,5:T12H,6:T24H,
2 7:DEGF,8:DEGC,9:PCT,10:CONC,11:STAT,12:SIGS,13:EOL
RP.F6 rep_field6
INT
40319 0
13
idr1
53
Field 6: 0:SKIP,1:MD,2:MDY,3:DM,4:DMY,5:T12H,6:T24H,
2 7:DEGF,8:DEGC,9:PCT,10:CONC,11:STAT,12:SIGS,13:EOL
RP.F7 rep_field7
INT
40320 0
13
idr1
54
Field 7: 0:SKIP,1:MD,2:MDY,3:DM,4:DMY,5:T12H,6:T24H,
2 7:DEGF,8:DEGC,9:PCT,10:CONC,11:STAT,12:SIGS,13:EOL
RP.F8 rep_field8
INT
40321 0
13
idr1
55
Field 8: 0:SKIP,1:MD,2:MDY,3:DM,4:DMY,5:T12H,6:T24H,
2 7:DEGF,8:DEGC,9:PCT,10:CONC,11:STAT,12:SIGS,13:EOL
RP.D1 rep_delim_1
CHAR
40324 0
255
cdr1
38
1 1st Char of Field Delimiter String, 0 will terminate string
RP.D2 rep_delim_2
CHAR
40325 0
255
cdr1
39
1 2nd Char of Field Delimiter String, 0 will terminate string
RP.D3 rep_delim_3
CHAR
40325 0
255
cdr1
40
1 3rd Char of Field Delimiter String, 0 will terminate string
RP.D4 rep_delim_4
CHAR
40326 0
255
cdr1
41
1 4th Char of Field Delimiter String, 0 will terminate string
RP.D5 rep_delim_5
CHAR
40326 0
255
cdr1
42
1 5th char of field delimiter string, 0 will terminate string
RP.E1 rep_eol_1
CHAR
40327 0
255
cdr1
43
1 1st Char of End of Line String, 0 will terminate string
RP.E2 rep_eol_2
CHAR
40328 0
255
cdr1
44
1 2nd Char of End of Line String, 0 will terminate string
RP.E3 rep_eol_3
CHAR
40328 0
255
cdr1
45
1 3rd Char of End of Line String, 0 will terminate string
RP.E4 rep_eol_4
CHAR
40329 0
255
cdr1
46
1 4th Char of End of Line String, 0 will terminate string
RP.E5 rep_eol_5
CHAR
40329 0
255
cdr1
47
1 5th Char of End of Line String, 0 will terminate string
RP.PD rep_period
UINT
40330 0
7200
idr1
37
2 Seconds Between Reports when rep_mode=1 (TIME)
SC.P
comm_parity
Type
MA.I
inhibit_uA
INT
40349 1500
20000 idr1
34
2 uA Output During Alarm Inhibit Indication (mA*1000)
MA.T
test_uA
INT
40351 0
24000 idr1
35
uA Output During Test (must use special command to
2 override output)
UINT
40353 50
2000
32
Scale Factor Applied to the Loop Output in %
2 (50=0.50, 200=2.00)
MA.SF ma_scaler
76
idr1
Manual #087-0014D, 4/2008
M od el 4 6 0 0 Ga s PLUS® ( M B) Tr a n sm i t t er
Recor d You r Pa r a m et er s !
Parameter Label
Transmitter #
NOTES:
A1.SP
A1.RP
A1.Sd
A1.Rd
A1.OP
A2.SP
A2.RP
A2.Sd
A2.Rd
A2.OP
AF.NL
AF.OP
AL.IP
AL.tO
SR.dC
SR.dP
SR.dP
SR.tF
St.ON
St.dt
St.t1
St.t2
St.Gt
St.Rt
LK.ON
LK.PW
LK.TM
MA.04
MA.20
MA.SF
MA.F
MA.I
MA.t
RP.ON
RP.Pd
RP.d1-RP.d5
RP.E1-RP.E5
RP.F1-RP.F8
Rt.dt
Rt.YR
Rt.tM
Manual #087-0014D, 4/2008
77
M od el 4 6 0 0 Ga s PLUS® ( M B) Tr a n sm i t t er
Recor d Your Pa r a m et er s ! ( Con 't .)
NOTES:
Parameter Label
Transmitter #
SC.Ad
SC. Bd
SC.dL
SC.Id
SC.LO
SC.Md
SC.OP
SC.P
SC.RS
SC.Rt
SC.Sb
SC.VF
F.PWd
F.tMR
F.CAL
F.HtC
F.RES
F.MNt
F.ZMV
F.SCF
F.SMV
F.tCF
F.LSd
F.LSt
F.SGC
F.StC
F.Typ
F.RNG
F.dPG
F.GCU
F.SP1
F.SP2
F.MFG
F.SSN
F.096
F.CS1
F.CS2
F.CS2
F.LbF
F.LCd
SW.1d
78
Manual #087-0014D, 4/2008
M od el 4 6 0 0 Ga s PLUS® ( M B) Tr a n sm i t t er
Wa r r a n t y
The manufacturer Scott Health & Safety, warrants to the original purchaser
and/or ultimate customer of the manufacturer’s products, that if any part(s)
thereof (except for those listed below) proves to be defective in material or
workmanship within 18 months from the date of shipment or 12 months from
the date of start-up, whichever comes first. Such defective part(s) will be
repaired or replaced free of charge if shipped prepaid to the factory in a
package equal to (or) original container.
All products will be returned freight prepaid to user when determined by the
manufacturer that the part(s) failed due to defective materials or workmanship.
The seller assumes no liability for consequential damages of any kind, and the
buyer by acceptance of this equipment will assume all liability for the
consequences of its use or misuse by the buyer, its employees, or others. A
defect within the meaning of this warranty in any part of any piece of equipment
shall not, when such part is capable of being renewed, repaired, or replaced,
operate to condemn such piece of equipment.
This warranty does not cover consumable items, batteries, or wear items
subject to periodic replacement.
This warranty is in lieu of all other warranties (including without limiting the
generality of the foregoing warranties of merchantability and fitness for a
particular purpose), guarantees, obligations, or liabilities expressed or implied
by the seller or its representatives and by the statute or rule of law.
This warranty is void if the instrument has been subject to misuse or abuse, or
has not been operated in accordance with instructions, or if the serial number
has been removed.
SCOTT HEALTH & SAFETY MAKES NO OTHER WARRANTY EXPRESSED
OR IMPLIED EXCEPT AS STATED ABOVE.
St a t em en t of Yea r 2 0 0 0
Com p l i a n ce
The Model 4600 GasPlus(MB) accepts all dates in the years after 1999 as
valid dates. Its functionality, performance, and accuracy will not be affected as
a result of the run date or the dates being processed, irrespective of the
century. When maintenance is performed on the product and/or the product is
restarted after power has been removed, the system dates will remain correct
to the actual date even if this date is on or later than the 1 January 2000.
Caution: This instrument stores its year data as a value from 00 to 99 (2
digits). It is recommended that this data is not accessed via the
digital interface.
Manual #087-0014D, 4/2008
79
M od el 4 6 0 0 Ga s PLUS® ( M B) Tr a n sm i t t er
Sp a r e Pa r t s
Call 800-247-7257 or Your Local
Sales Representative
Sensors
Ammonia (NH3)
Model 85
8-Digit Prefix Suffix
# 096-1965 ....... (XXXX)
50 PPM ............ -0050
100 PPM ............ -0100*
150 PPM ............ -0150
250 PPM ............ -0250
500 PPM ............ -0500
___________________
Arsine (AsH3)
Model 65
8-Digit Prefix
Suffix
# 096-1953 ....... (XXXX)
1000 PPB .......... -1000*
3 PPM .......... -0003
10 PPM .......... -0010
___________________
Boron Trichloride (BCl3)
Order HCl sensor
___________________
Bromine (Br2)
Model 61
8-Digit Prefix
Suffix
# 096-1949 ....... (XXXX)
1 PPM ............. -0001*
3 PPM ............. -0003
5 PPM ............. -0005
10 PPM ............ -0010
15 PPM ............ -0015
25 PPM ............ -0025
30 PPM ............ -0030
50 PPM ............ -0050
100 PPM ............ -0100
___________________
Carbon Monoxide (CO)
Model 82
8-Digit Prefix
Suffix
# 096-1962 ....... (-XXXX)
50 PPM .......... -0050
100 PPM .......... -0100*
150 PPM .......... -0150
200 PPM .......... -0200
250 PPM .......... -0250
300 PPM .......... -0300
500 PPM .......... -0500
1000 PPM .......... -1000
___________________
Chlorine Oxidant (Cl2)
Model 52OX
8-Digit Prefix
Suffix
# 096-2003 ....... (-XXXX)
1 PPM ............. -0001
3 PPM ............. -0003
5 PPM ............. -0005*
10 PPM .............. -0010
80
Chlorine (Cl2)
Model 52
Standard % RH
8-Digit Prefix
Suffix
# 096-1945 ....... (-XXXX)
1 PPM ............ -0001
3 PPM ............ -0003
5 PPM ............ -0005*
10 PPM ............ -0010
15 PPM ............ -0015
25 PPM ............ -0025
30 PPM ............ -0030
50 PPM ............ -0050
100 PPM ............ -0100
200 PPM ............ -0200
___________________
Chlorine (Cl2)
Low Humidity (<35%)
Model 56
8-Digit Prefix
Suffix
# 096-2257 ....... (-XXXX)
1 PPM ............ -0001
3 PPM ............ -0003
5 PPM ............ -0005*
10 PPM ............ -0010
15 PPM ............ -0015
25 PPM ............ -0025
30 PPM ............ -0030
50 PPM ............ -0050
100 PPM ............ -0100
200 PPM ............ -0200
___________________
Chlorine Dioxide (ClO2)
Model 53
8-Digit Prefix
Suffix
# 096-1946 ...... (-XXXX)
1 PPM ............ -0001*
3 PPM ............ -0003
5 PPM ............ -0005
10 PPM ............ -0010
15 PPM ............ -0015
25 PPM ............ -0025
30 PPM ............ -0030
50 PPM ............ -0050
100 PPM ............ -0100
___________________
Dichlorosilane (SiH2Cl2)
Order HCl sensor
___________________
Diborane (B2H6)
Model 67
8-Digit Prefix
Suffix
# 096-1955 ....... (-XXXX)
1000 PPB .......... -1000*
2 PPM .......... -0002
10 PPM .......... -0010
__________________
Fluorine (F2)
Model 62
8-Digit Prefix
Suffix
# 096-1950 ....... (-XXXX)
1 PPM ............ -0001*
3 PPM ............ -0003
5 PPM ............ -0005
10 PPM ............ -0010
15 PPM ............ -0015
25 PPM ............ -0025
30 PPM ............ -0030
50 PPM ............ -0050
100 PPM ............ -0100
___________________
Germane (GeH4)
Model 69
8-Digit Prefix
Suffix
# 096-1957 ....... (-XXXX)
1000 PPB .......... -1000*
3 PPM .......... -0003
10 PPM .......... -0010
_________________
Hydrogen (H2)
Model 87
8-Digit Prefix
Suffix
# 096-1967 ....... (-XXXX)
1% .................. -0001
4% .................. -0004*
5% .................. -0005
10% .................. -0010
Hydrogen Chloride (HCl)
Low Humidity (<50%)
Model 54
8-Digit Prefix
Suffix
# 096-1947 ....... (-XXXX)
10 PPM ............ -0010
25 PPM ............ -0025*
50 PPM ............ -0050
100 PPM ............ -0100
___________________
Hydrogen Chloride (HCl)
High Humidity (>50%)
Model 71
8-Digit Prefix
Suffix
# 096-1958 ....... (-XXXX)
10 PPM ............ -0010
25 PPM ............ -0025*
50 PPM ............ -0050
100 PPM ............ -0100
___________________
Hydrogen Cyanide (HCN)
Model 64
8-Digit Prefix
Suffix
# 096-1952 ....... (-XXXX)
10 PPM ............ -0010
25 PPM ............ -0025*
30 PPM ............ -0030
50 PPM ............ -0050
100 PPM ............ -0100
___________________
Hydrogen Fluoride (HF)
Lo %RH (<75%)
Model 63
8-Digit Prefix
Suffix
# 096-1951 ...... (-XXXX)
10 PPM ............ -0010*
15 PPM ............ -0015
25 PPM ............ -0025
50 PPM ............ -0050
100 PPM ............ -0100
___________________
Hydrogen Fluoride (HF)
Hi %RH (>75%)
Model 70
8-Digit Prefix
Suffix
# 096-2185 ....... (-XXXX)
10 PPM ............ -0010*
25 PPM ............ -0025
50 PPM ............ -0050
100 PPM ............ -0100
____________________
Hydrogen Selenide (H2Se)
Model 89
8-Digit Prefix
Suffix
# 096-1968 ....... (-XXXX)
1000 PPB .......... -1000*
10 PPM .......... -0010
____________________
Hydrogen Sulfide (H2S)
High Humidity (>50%)
Model 81
8-Digit Prefix
Suffix
# 096-1961 ....... (-XXXX)
10 PPM ............ -0010
25 PPM ............ -0025
50 PPM ............ -0050*
100 PPM ............ -0100
200 PPM ............ -0200
____________________
Hydrogen Sulfide (H2S)
Low Hum (<50%) Model 72
8-Digit Prefix
Suffix
# 096-1959 ....... (-XXXX)
10 PPM ............ -0010
25 PPM ............ -0025
50 PPM ............ -0050*
100 PPM ............ -0100
200 PPM ............ -0200
Manual #087-0014D, 4/2008
M od el 4 6 0 0 Ga s PLUS® ( M B) Tr a n sm i t t er
Call 800-247-7257 or Your Local
Sa l e s Re p r e se n t a t i v e
Sensors
Methyl Hydrazine (MMH)
Model 35
8-Digit Prefix
Suffix
# 096-2423 ....... (-xxxx)
50 PPM .............. -0050
____________________
Methanol (CH3OH)
Model 59
8-Digit Prefix
Suffix
# 096-2148 ....... (-xxxx)
500 PPM ............ -0500
____________________
Methyl Iodide (CH3I)
Model 44
8-Digit Prefix
Suffix
# 096-2188 ....... (-xxxx)
25 PPM ......... -0025
1000 PPM .......... . -1000
____________________
Methylene
Chloride (CH2Cl2)
Model # 34(P)
8-Digit Prefix
Suffix
# 096-2189 ....... (-XXXX)
200 PPM ............ -0200
____________________
Methyl Mercaptan
(CH3SH) w/ Filter
Model 45
8-Digit Prefix
Suffix
# 096-2348 ....... (-xxxx)
5 PPM ................ -0005
____________________
Methyl Mercaptan
(CH3SH)
Model 46
8-Digit Prefix
Suffix
# 096-2348 ....... (-xxxx)
3 PPM ................ -0003
____________________
Nitric Oxide (NO)
Model 86
8-Digit Prefix
Suffix
# 096-1966 ...... (-XXXX)
25 PPM ............ -0025
50 PPM ............ -0050*
100 PPM ............ -0100
500 PPM ............ -0500
_____________________
Nitrogen Dioxide (NO2)
Model 84
8-Digit Prefix
Suffix
# 096-1964 ....... (-XXXX)
10 PPM ............ -0010*
25 PPM ............ -0025
50 PPM ............ -0050
100 PPM ............ -0100
250 PPM ............ -0250
Nitrogen Trifluoride(NF3)
Model 33P
8-Digit Prefix
Suffix
# 096-2099 ....... (-XXXX)
10 PPM .............. -0010*
20 PPM .............. -0020
_____________________
Ozone(O3)
Model 60
8-Digit Prefix
Suffix
# 096-1948 ....... (-XXXX)
1 PPM ............ -0001*
2 PPM ............ -0002
3 PPM ............ -0003
5 PPM ............ -0005
10 PPM ............ -0010
15 PPM ............ -0015
25 PPM ............ -0025
30 PPM ............ -0030
50 PPM ............ -0050
100 PPM ............ -0100
_____________________
Oxygen (O2)
Model 80
8-Digit Prefix
Suffix
# 096-1960 ....... (-XXXX)
10 % ................. -0010
25 % ................. -0025*
_____________________
Phosgene (COCl2)
Model 49
8-Digit Prefix
Suffix
# 096-2235 ....... (-xxxx)
1 PPM ................ -0001
____________________
Phosgene (COCl2) w/Filter
Model 50
8-Digit Prefix
Suffix
# 096-2235 ....... (-xxxx)
2 PPM ................ -0002
____________________
Phosphine (PH3)
Model 66
8-Digit Prefix
Suffix
# 096-1954 ....... (-XXXX)
1000 PPB .......... -1000*
3 PPM .......... -0003
10 PPM .......... -0010
_____________________
Silane (SiH4)
Model 68
8-Digit Prefix
Suffix
# 096-1956 ....... (-XXXX)
1000 PPB .......... -1000
10 PPM .......... -0010*
_____________________
Manual #087-0014D, 4/2008
Sulfur Dioxide (SO2)
Model 83
8-Digit Prefix
Suffix
# 096-1963 ....... (-XXXX)
10 PPM .............. -0010*
15 PPM .............. -0015
25 PPM .............. -0025
50 PPM .............. -0050
100 PPM ............ -0100
200 PPM ............ -0200
500 PPM ............ -0500
___________________
Sulfur Dioxide (SO2)
Low Humidity Model 75
8-Digit Prefix
Suffix
# 096-2359 ....... (-XXXX)
10 PPM .............. -0010*
15 PPM .............. -0015
25 PPM .............. -0025
50 PPM .............. -0050
100 PPM ............ -0100
200 PPM ............ -0200
500 PPM ............ -0500
___________________
TEOS
Model 58
8-Digit Prefix
Suffix
# 096-2381 ....... (-XXXX)
50 PPM .............. -0050
___________________
Vinyl Chloride Monomer
(VCM)
Model 73
Part Number
# 096-2404
20 PPM
___________________
Vinyl Chloride Monomer
(VCM)
Model 73
Part Number
# 096-2441
1000 PPM
___________________
81
M od el 4 6 0 0 Ga s PLUS® ( M B) Tr a n sm i t t er
Call 800-247-7257 or Your Local
Sales Representative
Rock Sol i d Sen sor s
Bromine (Br2)
Low Humidity
Model 98
8-Digit Prefix .. Suffix
# 096-2366 ....... (-XXXX)
1 PPM ............. -0001*
3 PPM ............ -0003
5 PPM ............ -0005
10 PPM ............ -0010
15 PPM ............ -0015
20 PPM ............ -0020
25 PPM ............ -0025
30 PPM ............ -0030
___________________
R.S. Chlorine Dioxide (ClO2)
Low Humidity
Model 57
8-Digit Prefix .. Suffix
# 096-2283 ....... (-XXXX)
1 PPM ............. -0001*
3 PPM ............ -0003
5 PPM ............ -0005
10 PPM ............ -0010
15 PPM ............ -0015
20 PPM ............ -0020
25 PPM ............ -0025
30 PPM ............ -0030
___________________
R.S. Hydrogen Chloride
(HCl) Low Humidity
Model 92
8-Digit Prefix .. Suffix
# 096-2332 ....... (-XXXX)
1 PPM ............. -0001
3 PPM ............ -0003
5 PPM ............ -0005
10 PPM ............ -0010
15 PPM ............ -0015
20 PPM ............ -0020
25 PPM ............ -0025*
30 PPM ............ -0030
___________________
R.S. Ozone (O3)
Low Humidity
Model 76
8-Digit Prefix .. Suffix
# 096-2377 ....... (-XXXX)
1 PPM ............. -0001*
3 PPM ............ -0003
5 PPM ............ -0005
10 PPM ............ -0010
15 PPM ............ -0015
20 PPM ............ -0020
25 PPM ............ -0025
30 PPM ............ -0030
___________________
R.S. Bromine (Br2)
High Humidity
Model 99
8-Digit Prefix .. Suffix
# 096-2367 ...... (-XXXX)
1 PPM ............ -0001*
3 PPM ............ -0003
5 PPM ............ -0005
10 PPM ............ -0010
15 PPM ............ -0015
20 PPM ............ -0020
25 PPM ............ -0025
30 PPM ............ -0030
___________________
R.S. Chlorine Dioxide (ClO2)
High Humidity
Model 78
8-Digit Prefix .. Suffix
# 096-2315 ...... (-XXXX)
1 PPM ............ -0001*
3 PPM ............ -0003
5 PPM ............ -0005
10 PPM ............ -0010
15 PPM ............ -0015
20 PPM ............ -0020
25 PPM ............ -0025
30 PPM ............ -0030
___________________
R.S. Hydrogen Chloride
(HCl) High Humidity
Model 93
8-Digit Prefix .. Suffix
# 096-2333 ...... (-XXXX)
1 PPM ............ -0001
3 PPM ............ -0003
5 PPM ............ -0005
10 PPM ............ -0010
15 PPM ............ -0015
20 PPM ............ -0020
25 PPM ............ -0025*
30 PPM ............ -0030
___________________
R.S. Ozone (O3)
High Humidity
Model 77
8-Digit Prefix .. Suffix
# 096-2378 ...... (-XXXX)
1 PPM ............ -0001*
3 PPM ............ -0003
5 PPM ............ -0005
10 PPM ............ -0010
15 PPM ............ -0015
20 PPM ............ -0020
25 PPM ............ -0025
30 PPM ............ -0030
___________________
R.S. Chlorine (Cl2)
Model 22
Low Humidity
8-Digit Prefix .. Suffix
# 096-2247 ....... (-XXXX)
1 PPM ............. -0001
3 PPM ............ -0003
5 PPM ............ -0005*
10 PPM ............ -0010
15 PPM ............ -0015
20 PPM ............ -0020
25 PPM ............ -0025
30 PPM ............ -0030
__________________
R.S. Hydrogen Bromide
(HBr) Low Humidity
Model 94
8-Digit Prefix .. Suffix
# 096-2334 ....... (-XXXX)
1 PPM ............. -0001
3 PPM ............ -0003
5 PPM ............ -0005*
10 PPM ............ -0010
15 PPM ............ -0015
20 PPM ............ -0020
25 PPM ............ -0025
30 PPM ............ -0030
__________________
R.S. Hydrogen Fluoride (HF)
R.S. Sulfur Dioxide (SO2)
Low Humidity
Low Humidity
Model 90
Model 96
8-Digit Prefix .. Suffix
8-Digit Prefix .. Suffix
# 096-2330 ....... (-XXXX)
# 096-2336 ....... (-XXXX)
1 PPM ............. -0001
1 PPM ............. -0001
3 PPM ............ -0003
3 PPM ............ -0003
5 PPM ............ -0005
5 PPM ............ -0005
10 PPM ............ -0010*
10 PPM ............ -0010*
15 PPM ............ -0015
15 PPM ............ -0015
20 PPM ............ -0020
20 PPM ............ -0020
25 PPM ............ -0025
25 PPM ............ -0025
30 PPM ............ -0030
30 PPM ............ -0030
__________________
__________________
R.S. Chlorine (Cl2)
Model 24
High Humidity
8-Digit Prefix .. Suffix
# 096-2295 ....... (-XXXX)
1 PPM ............. -0001
3 PPM ............ -0003
5 PPM ............ -0005*
10 PPM ............ -0010
15 PPM ............ -0015
20 PPM ............ -0020
25 PPM ............ -0025
30 PPM ............ -0030
R.S. Hydrogen Bromide
(HBr) High Humidity
Model 95
8-Digit Prefix .. Suffix
# 096-2335 ....... (-XXXX)
1 PPM ............. -0001
3 PPM ............ -0003
5 PPM ............ -0005*
10 PPM ............ -0010
15 PPM ............ -0015
20 PPM ............ -0020
25 PPM ............ -0025
30 PPM ............ -0030
R.S. Hydrogen Fluoride (HF)
R.S. Sulfur Dioxide (SO2)
High Humidity
High Humidity
Model 91
Model 97
8-Digit Prefix .. Suffix
8-Digit Prefix .. Suffix
# 096-2331 ....... (-XXXX)
# 096-2337 ....... (-XXXX)
1 PPM ............. -0001
1 PPM ............. -0001
3 PPM ............ -0003
3 PPM ............ -0003
5 PPM ............ -0005
5 PPM ............ -0005
10 PPM ............ -0010*
10 PPM ............ -0010*
15 PPM ............ -0015
15 PPM ............ -0015
20 PPM ............ -0020
20 PPM ............ -0020
25 PPM ............ -0025
25 PPM ............ -0025
30 PPM ............ -0030
30 PPM ............ -0030
82
Manual #087-0014D, 4/2008
M od el 4 6 0 0 Ga s PLUS® ( M B) Tr a n sm i t t er
Miscellaneous
Part #
096-2149
096-2118-6/8
096-2118-F
093-0097
096-2065
077-0127
077-0120
096-1943
096-1981
096-2466
096-2213
073-0165
073-0210
096-2249
096-2202
096-2203
096-2204
096-2249-1
096-2249-2
096-2249-3
096-2249-4
096-2248
096-2151
096-2104
096-2141
096-2146
Description
Separated sensor housing w/
6 feet of cable, no junction box.
For Duct Mount Adaptors
6-8" Curved Duct Mount Adaptor
Flat Duct Mount Adaptor
Elastomeric Connector w/ O-Ring
Heater Assembly
("P" models only)
Pump Assembly
("P" models only)Scott Health & Safety
Scott Health & Safety Magnetic
Screwdriver
Sensor Rain Shield/Calibration
Adaptor (uses S.S. End Cap
073-0165)
S.S. Sensor Housing-3/4" NPT
(w/ window - does not include
end cap)
S.S. Sensor Housing-1-1/4" NPT
w/ window (does not include
endcap) - CSA Approved
S.S. Sensor Housing-1-1/4" NPT
w/o window (for condensing
humidity applications)
S.S. End Cap
S.S. End Cap (Rock Solid)
Power Supply Board (MB)
(w/o relays)
J-Box w/ Terminal Board only
J-Box P.C.B. Assembly
Spare J-Box Assembly
(1-1/4" Fitting w/ 50 Ft. cable)
Power Supply Board (MB)
(all relays normally open)
Power Supply Board (MB)
(all relays normally closed)
Power Supply Board (MB)
(alarm relays normally open/
fault relay normally closed)
Power Supply Board (MB)
(alarm relays normally closed/
fault relay normally open)
CPU Board with Relays
Display Board
Dust Filter (H2S & CO only)
(Bag of Qty. 10)
H2S Filter for HCN, NH3 & Hydride
Sensors
(5) Condensing Humidity Membranes
(for Humishield H2S only)
Manual #087-0014D, 4/2008
1/4 Turn Calibration
Accessories
Part #
074-0305
074-0344
074-0345
096-2101
096-2102
096-2105
096-2140
096-2142
096-2273
096-2276
096-2278
096-2352
096-2387
Description
¼ Turn (Teflon) Rain Shield
¼ Turn Sensor Self Test End Cap
Assembly
¼ Turn Sensor Self Test End Cap
Assembly (Rock Solid)
¼ Turn Calibration Plug Assembly
(w/(1) ¼" NPT x 3/16" O.D. Barb
Fitting)
¼ Turn Flowcell Assembly
(w/(2) 1/8" NPT x 3/16 O.D." Barb
Fitting)
¼ Turn Sensor End Cap Assembly
¼ Turn Hydride Sensor End Cap
Assembly w/ IPA Filter (096-2103)
Condensing Humidity End Cap
¼ Turn Sensor End Cap Assembly
(Rock Solid)
Condensing Humidity End Cap
(Rock Solid)
¼ Turn Calibration Plug Assembly
(Rock Solid) w/(1) ¼" NPT x 3/16"
O.D. Barb Fitting
¼ Turn Methyl Mercaptan Sensor
(4645) End Cap Assembly w/
Hydrogen Sulfide Getter Filter
(096-2323)
¼ Turn Phosgene Sensor (4650)
End Cap Assembly w/ Hydrogen
Cyanide Getter Filter (096-2386)
83
M od el 4 6 0 0 Ga s PLUS® ( M B) Tr a n sm i t t er
Index
C
Symbols
20.0 mA Loop Cal Point 57
4-20 mA Fault Level 57
4-20 mA Inhibit Level 57
4-20 mA Scale Factor 57
4-20 mA Test Level 57
4.00 mA Loop Cal Point 57
A
A1.OP 53
A1.Rd 53
A1.RP 53
A1.Sd 53
A1.SP 53
A2.OP 53
A2.Rd 53
A2.RP 53
A2.Sd 53
A2.SP 53
Accessibility, transmitter 7
Addresses, Modbus® 67
AF.NL 54
AF.OP 54
AL.IP 54
AL.tO 54
Alarm
acknowledging 25
indicators 1
latched 25
options 34
reset delay 35
reset point 35
set point 35
setup parameter
changing 36
test operation 75-77
wiring 15
Alarm Inhibit
automatic 34
period 34, 35
programming 34
Alphanumeric Display 1
ASCII characters 42
Auto-Lock Time-Out, security 37
B
Baud Rate. See Serial Communication.
84
Calibration 26
Circuit Breakers
UL/EN requirements 8
COMM Menu 58
Communication
connections 19
mode 60
options 61
Conduit seals 7
Contacting Scott Health & Safety 66
Current Loop Connections 11-13
Current Sinking Mode
defined 9
Current Sourcing Mode
defined 9
D
Damping constant. See Sensor
Parameters.
Data Access Register, Modbus® 67
Data Length. See Serial Communication.
Data Types, Modbus® 67
Decimal Precision. See Sensor
Parameters. See also Sensor Decimal
Precision.
Delays. See "Set" or "Reset" delay
Delimiter string 58
Digital Communications. See Serial
Communications.
Down key 24
E
Electromagnetic fields 7
Engineering units. See Sensor
Concentration Units.
Error Message
Table 65
F
F.CAL 62
F.CS1 64
F.CS2 64
F.CS3 64
F.dPG 63
F.GCU 64
F.HtC 62
F.LbF 64
F.LCd 64
F.LSd 63
F.LSt 63
Manual #087-0014D, 4/2008
M od el 4 6 0 0 Ga s PLUS® ( M B) Tr a n sm i t t er
F
J
F.MFG 64
F.MNt 63
F.PWd 62
F.RES 62
F.RNG 63
F.SCF 63
F.SGC 63
F.SMV 63
F.SP1 64
F.SP2 64
F.SSN 64
F.StC 63
F.tCF 63
F.tMR 62
F.tYP 63
F.ZMV 63
F.096 64
FACT Menu 62
Factory Defaults
reset 62
resetting 62
Fail-safe relay 34
Fault Code 65
FAULT Indicator 39
Fields, controlling the 51
Flowcell
using 21
FSR register 71
Junction Box
Mounting 8
Electrical Installation 18
G
Gas concentration units 1
Gas density 7
Gas interference 4
Gas number. See Sensor Gas Number.
Gas response 4
Gas sources 7
H
Hazardous conditions 35
HF Sensors 31
I
Inhibit 25
Installation, Transmitter. See Transmitter.
Installation
Instrument Dimensions 10
Isolated Loop Power 9
Manual #087-0014D, 4/2008
K
no entries
L
Latching relay 35
LCD
display 24-25
LK.ON 56
LK.PW 56
LK.tM 56
Lock. See Security Indicator.
Lock Menu 56
Lock On/Off, security 37
Lock Password 37
M
MA.04 33, 57
MA.20 33, 57
MA.F 34, 57
MA.I 34, 57
MA.t 34, 57
MAINT indicator 39
Master Device, configuring 42
Maximum loop-voltage drop 8
Maximum Wire Length 8
Methyl Iodide Sensor 31
Minimum operating voltage 8
Minimum output voltage 8
Modbus®
Address 67
Data Access Register 67
Data Access Register Descriptions 67
data types 67
drivers 67
Function Descriptions 67
protocol 44
Register Table 75
Using 44
N
Navigation, instrument 24
Non-Fail-safe relay 36
Non-Isolated Loop Power 9
Non-Latching relay 35
85
M od el 4 6 0 0 Ga s PLUS® ( M B) Tr a n sm i t t er
O
S
Orientation, transmitter 7
Output
inhibiting 25
SC.P 61
SC.RS 61
SC.Rt 61
SC.Sb 61
SC.VF 61
Security indicator 1
Selecting gas type 5
Sensor
HF 31
Methyl Iodide 31
Sensor Parameters
Concentration Units 64
Damping Constant 55
Decimal Precision 63
Serial Number 64
Temperature 63
Temperature Units 55
Type 63
Sensor Self Test 39
operation 39
Serial Communication
Address 60
Baud Rate 60
Data Length 60
Idle 60
Listen Only 60
Mode 60
Options 61
Parity Checking 61
Retries 61
RS-232/485 Selection 61
Stop Bits 61
Verify 61
Serial Communications 41
setting up 42
Set Delay 35. See also A1.Sd or A2.Sd.
Software Version 64
Span Calibration 29
SR.dC 55
SR.tC 55
SR.tF 55
St.ON 55
St.dt 55
St.t1 55
St.t2 55
St.Gt 55
St.Rt 55
Stop Bits 61
SW.ID 64
P
Parity Checking 61
Q
no entries
R
Rain shield 5
Real Time Clock
(Date) 59
(Hour) 59
(Year) 59
registers, Modbus® 67
Report Delimiter String 58
Report Fields 59
Report Line Termination String 58
Report On/Off 58
Report Period 58
Reset Delay 34
RP.d1-RP.d5 58
RP.E1-RP.E5 58
RP.F1-RP.F8 59
RP.ON 58
RP.Pd 58
RS-232 42
Connections 19
setting up 43
wiring 16
RS-485 42
Connections 19
setting up 43
RS-485 selection 42
RS-232 selection 42
Rt.dt 59
Rt.YR 59
Rt.tM 59
RUN Mode 24
S
SC.Ad 60
SC.bR 60
SC.dL 60
SC.Id 60
SC.LO 60
SC.Md 60
SC.OP 60
86
Manual #087-0014D, 4/2008
M od el 4 6 0 0 Ga s PLUS® ( M B) Tr a n sm i t t er
T
Tagging Data Elements, configuring 45
Technical Specifications 66
Temperature 7
Temperature Units, sensor 55
Termination characters 58
Termination string 58
Transmitter Installation 10
Accessibility 7
Ambient Temperature 7
bold sunlight 7
Conduit 7
electromagnetic fields 7
Gas Density 7
Gas Sources 7
Orientation 7
Transmitter Security 36
Transmitter Status Register 67
Type gas. See Sensor Parameters.
U
UL requirements, compliance 8
UP key 24
USER Menu 53
V
Vapor Density. See Gas Density.
Vibration 7
W
Warranty 79
Water 7
Wire size 8
Wiring 7
X
no entries
Y
Year 2000 Compliance 79
Z
Zero calibration 28
Frequency 26
Manual #087-0014D, 4/2008
87
M od el 4 6 0 0 Ga s PLUS® ( M B) Tr a n sm i t t er
88
Manual #087-0014D, 4/2008