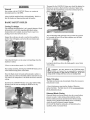
1
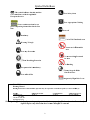
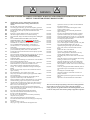
CE807R-B¹ SERIES ROTARY RESCUE SAW
Owner’s Manual
PO BOX 846
3855 23RD STREET
BAKER CITY, OR 97814
US/ CANADA PHONE: 1.800.433.3716
INTERNATIONAL (+) 1.541.524.9999
EMAIL: [email protected]
WEB: www.cuttersedge.com
INTRODUCTION
BEFORE YOU BEGIN: To correctly use the CE807R-B¹ Series CUTTERS EDGE FIRE RESCUE ROTARY SAW do
not start working without first carefully reading this manual. You will find explanations concerning the operation of the
various parts plus instructions for necessary checks and relative maintenance.
WARNINGS AND CAUTIONS IN THIS MANUAL MUST BE UNDERSTOOD AND FOLLOWED! FAILURE
TO OBEY WARNINGS MAY RESULT IN SERIOUS INJURY OR DEATH. IT IS YOUR RESPONSIBLITY to
make sure persons who use this cut-off style rescue saw, have read and understand this manual.
NOTE: Illustrations and specifications in this manual may vary according to Country requirements and are subject to
change without notice by the manufacturer.
TABLE OF CONTENTS
SYMBOL DEFINITIONS
2
SAFETY WARNINGS-DOS AND DO NOTS
3
BASIC ILLUSTRATION
4
SAFETY INSTRUCTIONS
5
STARTING AND STOPPING THE ENGINE
7
KICKBACK GENERAL RULES
8
CUTTING
9
RECOMMENDED BLADES
10
ASSEMBLY
11
FUEL HANDLING
12
GENERAL MAINTENANCE INSTRUCTIONS
DAILY MAINTENANCE
WEEKLY MAINTENANCE
MONTHLY MAINTENANCE
DETAILED SAW CLEANING
17
TECHNICAL DATA
18
1 Symbo
ol Definittions
CE
Thiis symbol ind
dicates that the
t machine
Wear Safety shoess
is in confformance witth the applicaable
European
n directive.
Wearr Appropriatte Clothing
Please read
d instructionss for use
prior to operating
o
thee machine forr the first
time.
Motor off
Manda
atory
Usse in Well Veentilated areaa
Warniing Triangle
Doo not use in Flammable
F
Arrea
Wear Eye
E Protectioon
No Non-working
N
g Personnel
In Area
A
Wea
ar Breathingg Protection
No Smoking
S
Ear prrotection is mandatory.
m
Alwaays keep the Blade
Guaards in Place
Wear a Hard Hat
Dangeerously High
h Noise Levell
WAR
RNING
Heariing Hazard
Durin
ng normal use of this machin
ne, Operator may be exposed to a noise level
l
equal to, or above 85 dB
d (A)
MODE
EL
PRE
ESSURE LEVE
EL
POWER LEVEL
L
VIBRATION
N LEVEL
CE807R
R14A (14”)
M/s² Idling
11.0 (SX
X-11.7 (DX) m/s²
Rated Spindle
S
Speed)
102 dB (A)
111 dB (A)
10.1 (SX)-12.00 (DX)
Warrning: Verif
ify that all sa
afety warnin
ng and operaation labels are properlyy affixed to the unit andd are clearlyy
legiblee. Replace an
ny labels thaat have becoome damageed or removeed.
2 WARNINGS
WARNING: FAILURE TO COMPLY WITH THESE WARNINGS AND OPERATING INSTRUCTIONS COULD
RESULT IN DEATH OR SERIOUS BODILY INJURY.
DO
DO
DO
DO
DO
DO
DO
DO
DO
DO
DO
DO
DO
DO
DO
DO
DO
DO
DO
DO
DO
DO
DO
DO
DO
DO
DO
DO
DO
DO
DO
DO
DO
read this entire operator’s manual before operating this
machine and understand all warnings, instructions, and
controls.
keep all guards in place and in good condition.
wear safety approved hearing, eye, head and respiratory protection.
read and understand the symbol definitions contained in this manual.
keep all parts of your body away from the blade and all other
moving parts.
know how to stop the machine quickly in case of emergency.
shut off the engine and allow it to cool before refueling.
inspect the blade, flanges and shafts for damage before installing the
blade.
use CUTTERS EDGE Diamond Blades, BLACK STAR
DIAMOND BLADE or BLACK LIGHTNING DIAMOND
BLADE. Specifically rated with a maximum operating speed of
5400 RPM on 14” (350mm) or 6200 RPM on 12” (300mm).
use CUTTERS EDGE Diamond blades marked with a 1”
(25.4mm) hole for a 1” (25.4mm) flange, or a 20mm hole for a
20mm flange.
use Cutters Edge diamond blades marked for use with gasolinepowered, hand-held, portable, abrasive cut-off machines.
read all safety materials and instructions that accompany any blade
used with this saw.
inspect each blade carefully before using it. If there are any signs of
damage or unusual wear, DO NOT USE THE BLADE.
verify the blade arbor hole matches the machine spindle before
mounting the blade.
make sure the blade and flanges are clean and free of dirt and debris
before mounting the blade on the saw.
use the correct blade for the type of work being done. Check with
blade manufacturer if you do not know if blade is correct.
always hold the machine with both hands when the engine is
running. Use a firm grip with thumbs and fingers encircling the
handles.
keep all parts of the body away from the cut-off blades when the
engine is running.
keep the handles dry, clean, and free of oil or fuel.
always carry the machine with the engine stopped and the muffler
away from the body.
use caution and follow the instructions when loading the saw.
operate this machine only in well ventilated areas.
instruct bystanders on where to stand while the saw is in operation.
establish a training program for all operators of this machine.
clear the work area of unnecessary people. Never allow anyone to
stand in front of or behind the blade while the engine is running.
Do use caution when handling fuel!
move the machine at least 10 feet away from the fueling point
before starting the engine and make sure the gas cap and the fuel cap
on the saw are properly tightened.
use caution when lifting and transporting the machine.
always check for buried electrical cables before sawing.
If unsure, contact the local utilities.
have all service, other than items in this manual, performed by
competent service personnel.
always tie down the Rotary Saw when transporting.
use caution and follow instructions when setting up or transporting
the machine.
clean the saw after every use.
always give a copy of this manual to the equipment user.
DO NOT
DO NOT
DO NOT
DO NOT
DO NOT
DO NOT
DO NOT
DO NOT
DO NOT
DO NOT
DO NOT
DO NOT
DO NOT
DO NOT
DO NOT
DO NOT
DO NOT
DO NOT
DO NOT
DO NOT
DO NOT
DO NOT
DO NOT
DO NOT
DO NOT
Operate this saw unless you have read and understand
this operators manual.
Operate this saw without the blade guard, or other
protective guards in place
stand behind or in front of the blade path while the
engine is running.
leave this saw unattended while the engine is running.
operate this machine when you are tired or fatigued.
use abrasive blades that are less the 1/8” (3.17mm) thick.
exceed maximum blade speed shown for each blade size.
use damaged equipment or blades.
try to stop a moving blade with your hand.
use an abrasive blade that has been dropped.
not use Carbide tipped or toothed type blade of any kind.
use segmented diamond blades unless they are
specifically designed for high speed, hand-held saws.
place 1 inch (25.4mm) arbor hole blades on 20mm
flanges.
grind on the side of a cut-off blade.
cock, jam, or wedge the blade in the cut.
operate a cutting machine if the blade does not stop
rotating when the throttle trigger is released.
start cutting until you have a clear work area and secure
footing.
allow other people to be near the machine when starting,
refueling, or when the saw is operating.
operate the machine in the vicinity of anything that is
flammable. Sparks could cause a fire or an explosion.
allow bystanders or animals in the work area while using
a cut-off saw.
touch a dry cutting diamond blade immediately after use.
These blades require several minutes to cool after each
cut.
use damaged or worn blade flanges.
operate this machine in an enclosed area unless it is
properly ventilated.
allow blade exposure for the guard to be more than 180
degrees.
operate this saw without both hands on the handles.
..............................................................................................................................
This saw has been designed specifically for Fire Rescue cutting applications.
Do not modify or use this saw for any purpose other than Fire Rescue
cutting. If you have any questions relative to its intended application, do not
use the saw until you have been advised regarding an application in question.
3 SAF
FETY IN
NSTRUCTION
NS
Machine’s safetyy equipment
Muffller
Neverr use a machinee with a faulty muffler.
Regullarly check thatt the muffler iss securely attacched to the
machiine. Check muuffler screws.
This section
s
describbes the machinee’s safety equippment, its
purpoose and how chhecks and main
ntenance shouldd be carried ouut
to enssure that it opeerates correctly
y. See “Basic Illustration” onn
the Cutters Edge CE
E807R-B¹ Series section to loocate where thiis
m
equippment is positiooned on your machine.
f
every machine
m
is thooroughly testedd.
Beforre leaving our factory,
Folloow these instrucctions strictly and
a your machhine will give
you loong service in all operating conditions.
c
N
use a CE8
807R-B¹ Rotary
WARNING! Never
saw that has faaulty safety equipm
ment!
C
Carry
out the insp
pection, maintena
ance and
service routiness listed in this secttion.
Throtttle trigger locckout
The thhrottle trigger lockout
l
must be depressed beefore the
throttlle trigger can be
b activated.
Vibrration damp
ping system
m
T
Throttle
trigger lockout
Checcking the Bllade Guard
mping units for cracks or
Reguularly check thee vibration dam
deforrmation.
hat the blade guard is fitted
WARNING! Always check th
k that the
correctly beffore starting the machine. Check
cutting blade is fitteed correctly and
d does not show
w signs of
d cutting blade can cause person
nal injury.
damaage. A damaged
See instructions
i
under the heading “A
Assembly”
The guuard is fitted abbove the cuttinng blade and is designed to
prevennt parts of the blade
b
or cutting fragments froom being
thrownn toward the user.
u
Checkk that the guardd is complete and
a without anyy cracks or
deform
mities.
u
are securrely attached too
Makee sure the vibraation damping units
the enngine unit and handle unit.
O -Stop Swittch
On/ Off
Start the engine andd make sure thee engine stops when
w
you movve
a
the sttop switch to thhe stop setting. Switch will automatically
returnn to the ON position when relleased.
king, maintain
ning and serviicing the mach
hine’s safety
Check
equipment
GEN
NERAL SAF
FETY PREC
CAUTIONS
S
Transsport and storrage
B¹ Rotary saw in
i a lockable arrea so that it is
Store the CE807R-B
out off reach of childdren and unauthhorized persons.
5 Fuel Safety
(Refueling/Fuel mixture/Storage)
WARNING! Take care when handling fuel.
Keep in mind, the risk of fire, explosion and
inhaling fumes.
WARNING! This section describes basic safety
directions for using a CE807 Rotary Rescue Saw.
This information is never a substitute for professional
skills and experience. If you get into a situation where
you feel unsafe, stop and seek expert advice. Contact
your dealer, service agent or an experienced rescue saw
user. DO NOT attempt any task that you feel unsure
of!
BASIC SAFETY RULES
Never refuel the CE807R-B¹ Rotary saw while the engine is
running.
Make sure there is plenty of ventilation when refueling or
mixing fuel (gasoline and 2-cycle oil)
Look around you:
To ensure that people, animals or objects cannot affect your
control of the CE807R-B¹ Rotary saw.
To make sure that none of the above come into contact with the
cutting blade. Move the CE807R-B¹ Rotary saw at least 10 ft (3m) from the
refueling point before starting it.
Use extreme caution when using the CE807R-B¹ Rotary saw in
bad weather, such as dense fog rain, strong wind, intense cold,
etc. Working in bad weather is tiring and can lead to dangerous
conditions, i.e., slippery surfaces.
Never start the CE807R-B¹ ROTARY Saw.......
Never start to work with the CE807R-B¹ Rotary saw before the
working area is clear and you have a firm foothold. Look out
for any obstacles with unexpected movement. Ensure when
cutting that no material can become loose and fall, causing
operator injury. Use caution when working on sloping ground.
-If you have spilled fuel on it. Wipe off the spillage and allow
remaining fuel to evaporate
-If you have spilled fuel on yourself or your clothes, change
your clothes. Wash any part of your body that has come in
contact with fuel. Use soap and water.
Make sure that clothing and parts of the body stay clear of the
cutting equipment when it is rotating.
-If the machine is leaking fuel. Check regularly for leaks from
the fuel cap and fuel lines.
Maintain a safe distance from the cutting equipment when it is
rotating.
Store and transport the CE807R-B¹ Rotary saw and fuel so that
there is no risk of leakage or fumes coming in contact with
spark or open flames, for example, from electrical machinery,
electric motors, electrical relays/switches or boilers.
The guard for the cutting equipment must always be on when
the machine is running.
Ensure that the working area is sufficiently illuminated to
create a safe working environment.
Always store fuel in an approved container designed for that
purpose.
Do not move the CE807R-B¹ Rotary saw when the cutting
equipment is rotating.
When storing the CE807R-B¹ Rotary saw for long periods the
fuel tank should be emptied. Contact your local gas station to
find out where to dispose of excess fuel.
Always ensure you have a safe and stable working position.
Make sure that no pipes or electrical cables are routed in the
area to be cut.
Ask yourself...”IS WHAT I’M ABOUT TO DO SAFE?”
6 Starrting and Stopping
Startting
Grip the
t front handlee with your rigght hand. Put your
y
right foot
on thee lower sectionn of the rear hanndle pressing thhe machine
againsst the ground. Never wrap th
he starter corrd around
your hand.
h
WARNING! Note the followin
ng before startingg:
DO NOT starrt the CE807R-B¹ Rotary saw witthout the belt
guard in place. The clutch could come loosse and cause
person
nal injury. Always move the macchine away from the refueling
area before
b
starting. Ensure
E
that you and the machinee have a good
workin
ng stance and th
hat the cutting bllade can rotate freely.
f
Keep
peoplee and animals weell away from th
he working area.. The cutting
blade rotates when th
he engine is startted. Make sure it can rotate
freely..
Usingg the D handle, slowly pull ouut the cord withh your left handd
until you
y feel some resistance,
r
thenn quickly and powerfully
p
pull
the coord until the enggine attempts to
t start (pops). Push in the
chokee lever and pulll the D handle again
a
until the engine starts.
Starrting a COL
LD engine
*Notee: The ON/OF
FF switch is alw
ways in the ON
N or START
positiion.
ke: Pull choke lever out until it stops.
Chok
TION! Do not pull the starterr cord all the way
w out and do
CAUT
not lett go of the startter handle wheen the cord is fully
fu extended.
This can
c damage thee machine.
Whenn the engine staarts, quickly apply full throttlee to
autom
matically disenggage fast idle. Allow the saw
w to idle for a
minute or two to achhieve operatingg temperature. The saw can
b used at full RPM.
R
then be
Decompression vallve: Push in the decompression valve (A) too
reducce the pressure in the cylinderr and assist witth starting the
saw. The
T decompression valve sho
ould always bee used when
startinng. The valve automatically returns to its innitial position
whenn the machine starts.
s
A
Throttle triggger
Startt throttle lock:: Wrap your haand around the rear handle,
this engages
e
the throottle trigger safety lockout (C
C), allowing thee
throtttle trigger (A) to
t be depressed
d. Once the thrrottle trigger
(A) iss depressed, puush the throttle lock (B) to locck the throttle
triggeer in half throtttle position. Release the throttle trigger (A))
and thhen the throttlee lock (B). Thee trigger is now
w locked in thee
half thhrottle positionn. Once the saaw starts, press the throttle
triggeer to disengagee the lock.
A
B
Startting a WAR
RM engine
Use thhe same starting procedure ass for a cold enggine but
withouut pulling the choke
c
lever outt.
Stopp
ping
The enngine is stoppeed by switchingg the ignition off
o using the
stop sw
witch.
C
7 an happen veryy suddenly and
d
WARNING! Kickback ca
nd cutting blade back at the user..
violently...kiicking the saw an
If th
his happens when
n the cutting bla
ade is moving itt can cause veryy
serioous, even fatal in
njuries. It is viital you understaand what causess
kickb
back and that yoou can avoid it by
y taking care and using the rightt
work
king technique.
Cutting Blades
c
injury to th
he
WARNING! A cutting blade may break and cause
N
use a cuttingg blade for any otther purpose than
n
operator. Never
that which
w
it was inten
nded for.
Kick
kback Geneeral Rules...
Whaat is kickbacck?
The word
w
kickback is used to desccribe the suddeen reaction thatt
causees the saw and cutting blade to
t be thrown baack toward the
operaator when the upper
u
quadrant of the blade, known
k
as the
kickbback zone, toucches an object.
WARNING! Cutting plasticss with a diamond blade can cause
hen the material being
b
cut melts an
nd then sticks to
kickback wh
the bllade.
How
w to Avoid Kickback
K
Never start to cut with
w the upper quadrant
q
of the blade, also
wn as the kickbaack zone.
know
Geneeral
m grip with botth hands. Hold
Alwaays hold the maachine in a firm
it so that
t the thumbss and fingers grip
g around the handles.
Maintain good balannce and a firm hold.
mum rpm.
Alwaays cut at maxim
Standd at a comfortabble distance fro
om the work piece.
Take care when inseerting the blade into an existiing cut.
Be alert to movement of the work piece or anythhing that could
causee the cut to closse and pinch/biind the blade.
Cuttinng blades are avvailable in variious designs annd material
compoosition. The CE
E807R-B¹ Seriies saw is desiggned to
speciffically run vacuuum brazed diaamond blades.
Wateer Cooling
NEVER use the
t side of the bllade to make a
WARNING!
cut: it will alm
most certainly be damaged, break and can cause
severre injury. Alwayss use the cutting section.
s
Do not
n pull the CE8077R-B¹ Rotary saw
w to one side, thiss can cause the
bladee to jam or break
k and could causee serious injury.
Water cooliing, which is ussed when cutting
WARNING!
concrete, coools the blade and increases its servvice life while also
reduccing the formation of dust. Disadvvantages include difficulties
d
at verry
low temperatures,
t
th
he risk of damaaging floors and other structuraal
elemeents, and the risk of ice and slippin
ng.
Pull in
Pull in
i occurs whenn the disc’s low
wer section sudddenly stops or
whenn the cut closes. (To avoid, seee the heading
“Pincching/Blade rottation”, below.)
Pincching/Blade rotation
d-held, high
h speed macchines
Hand
Pinchhing/binding occcurs when thee cut in the matterial closes,
causinng a sudden deecrease in blade rotation Thiss can lead to the
saw being
b
pulled doown suddenly and
a very powerrfully, possiblyy
causinng injury.
Our cuutting blades are
a manufactureed for high speeed, portable
powerr cutters. If blaades from other manufacturerrs are used,
ensuree that the bladees conform to all
a regulations and demands
that appply to this typpe of rotary saw
w.
How
w to avoid biinding
Suppoort the work piiece in such a way
w that the cuut remains openn
during the cutting operation and when
w
the cut is finished.
8 Looseen the three arm
m nuts.
M
MAINTEN
NANCE
Tenssioning the drive belt
WARNING! Never use the CE807R-B¹ Rotaryy Saw
de guard over thee cutting blade.
without a blad
b by turning the tensioner nut
n
Releasse tension on belt
counteerclockwise.
A
B
C
d
belt is fullly enclosed an
nd well protecteed from dust
The drive
and dirt.
d
When tenssioning the driv
ve belt, slightlyy loosen the
three arm nuts (B) holding
h
the cuttting head and belt
b guard.
o tensioner nu
ut (C). For coldd belt
Placee scrench tool on
tensiooning, make ann approximate ¾”
¾ gap betweeen the belt
guardd and the arm (A). For warm belt tensioningg, make an
approoximate 1” gapp between the belt
b guard and the
t arm (A).
Then tighten the arm
m nuts (B) whiile holding the cutting head.
Remove 3 arm nuts.
Remove belt from frront of pulley.
Remove wheel guardd assembly.
Remove the lower arrm support scrrew.
d
belt
Repllacing the drive
Looseen guard adjustment knob (A
A).
Remoove 2 Allen scrrews from the belt
b cover (B).
Remoove belt cover.
Remove 2 lock nuts on arm.
A
B
13 Remoove arm.
Usingg an 8mm sockket wrench or nut
n driver, remoove belt guard..
Fuel Filter
The fuuel filter is locaated inside the fuel tank.
b protected froom contaminattion when
The fuuel tank must be
fillingg. This reducess the risk of opperating disturbbances caused
by bloockage of the fuel
fu filter.
m be replacedd with a new
The fiilter cannot be cleaned and must
filter if
i it becomes clogged. The filter
f
should bee changed at
least once
o
per year..
Air Filters
F
- Cleaning
Replaace the drive beelt.
Assem
mble in the revverse order as set
s out for dism
mantling.
Checkk that the bladee guard over th
he cutting bladee is not cracked
or dam
maged. Replacce when damag
ged.
The aiir filters must be
b regularly cleeaned to removve dust and dirrt
in ordder to avoid:
-Carbuuretor malfuncctions
-Startiing problems
-Loss of engine pow
wer
t engine parts
-Unneecessary wear to
-Excessive fuel conssumption
mful exhaust em
missions
-Harm
Drivve belt, pulleey and clutcch
Never start the engiine when the drrive belt, pulleyy and clutch arre
removved for mainteenance.
move the filter cover, loosen the nut (A), annd then the twoo
To rem
screws on the air filtter cover (B). This
T filter shouuld be checked
weeklly and replacedd if necessary.
Do not starrt the CE807R-B
B¹ without the
WARNING!
m or cutting head
d fitted; the clutcch could come
cutting arm
loosee and cause personal injury.
Carb
buretor
The carburetor
c
goveerns the enginee speed via the throttle. Air
and fuel
fu are mixed in
i the carbureto
or.
The CE807R-B¹
C
Rootary Rescue Saaw has been deesigned and
manuufactured to speecifications thaat reduce harmfful emissions.
Afterr the engine hass used 8-10 tan
nks of fuel, the engine will bee
T ensure that it continues too run at peak
considered run-in. To
performance, and too minimize harrmful exhaust emissions
e
afterr
the ruun-in period, assk your dealer//service workshhop to adjust
your carburetor.
B
A
m consists of an oil tack foam filter (A), a
The aiir filter system
K&N gauze filter (B
B), nylon mesh filter (C), and air
(
The foam
m filter is easilyy accessible
entrainnment baffles (D).
under the filter cover (A).
Carb
buretor Vallve Needles
c
is eqquipped with fiixed needles too ensure the
The carburetor
machhine always recceives the correect mixture of fuel
f and air.
Whenn the engine laccks power or accelerates
a
poorly, do the
follow
wing:
A
D
BC
g
filtering effect,
e
the filterr must be
In ordder to obtain a good
replacced regularly orr cleaned and oiled.
o
Use the K&N filter
chargeer kit included with each saw
w, part #CE5050.
a clean or reeplace if necesssary.
Checkk the air filter and
If thiss does not helpp, contact an au
uthorized servicce center.
Idle Speed Adju
ustment
Remove the foam fillter (A). Wash the filter well in tepid soapy
water.. After cleaninng, rinse the filtter well in cleaan water.
Squeeeze out any exccess water and allow the filterr to air dry.
Clean air entrainmennt baffles (D).
a
of the
t idle speed T
Fine adjustment
Adjusst the idle speeed using the T screw.
s
When an
a adjustment is
necesssary, first turnn the screw clocckwise until the blade starts to
t
rotatee. Then turn thhe screw counteer-clockwise until
u
the blade
stops rotating. A correctly adjusted idle speed is set when the
w
hesitatiion.
enginne accelerates without
Recom
mmended idle speed: 2700rp
pm
E!! Do not usee compressed air
a to dry the filters;
NOTE
damaage to the filterrs can occur.
14 Placee the foam filterr in a plastic baag and coat with filter oil.
Kneaad the plastic baag to distributee the oil. Squeeeze the excess
oil ouut of the filter inside
i
the plasttic bag before fitting
f
the filterr
to thee machine. Nevver use commo
on engine oil; this
t oil will
drain through the fillter quickly and collect in thee bottom of thee
housiing.
Cleaning
Remove starter coveer with an 8mm
m socket wrencch or nut driverr.
Looseen the screws thhat hold the staarter against the crankcase
and reemove the startter.
n
mesh air filter is accesssible under the K&N filter.
The nylon
This filter
f
must be replaced/cleane
r
ed when the enngine’s power
dropss. The filter is cleaned
c
by tapp
ping it to disloddge loose dirt.
Note that the filter must
m not be waashed.
NOTE
E!! Do not usee compressed air
a to dry the fillter; damage too
the filter can occur.
A filter that haas been in use for
f a long time cannot be
An Air
cleaned completely.. The filter must therefore be replaced with a
o at regular intervals.
i
A daamaged air filteer must alwayss
new one
be repplaced.
NOTE
E!! It is recom
mmended thatt any repairs to
t the starter
assem
mbly be perforrmed by an au
uthorized Cuttters Edge
servicce center.
K&N
N gauze air filter maintenance
Sparrk Plug
Pre-ccleaning: Tap the filter elemeent to dislodgee any loose dirtt,
and thhen gently brussh with a soft bristle
b
brush.
S
K&N fillter cleaner libeerally onto the
Sprayy on cleaner: Spray
filter media and let soak for 10 miinutes.
w low pressuure tap water,
Rinsee off: Rinse thee filter media with
rinsinng from the cleean side to the dirty
d
side.
ke off excess water and dry
Dryinng Hints: Afteer rinsing, shak
naturaally. The use of
o cleaning or drying
d
methodds will damage
the filter and void thhe K&N air filtter warranty.
A
Oilingg: Re-oil by sppraying K&N filter oil along each pleat
holdinng nozzle abouut 3” away. DO
O NOT spray in
i a circular
motioon. Let air filteer stand for 20 minutes and ree-spray any
visiblle missed areass.
The sppark plug (A) condition
c
is inffluenced by:
Incorrrect carburetor adjustment
a filter.
Reinsstall the K&N air
o
Incorrrect fuel mixturre (too much oil)
ORTANT INF
FORMATION—
—Poor mainteenance of the
IMPO
air fillters will causee carbon build
d-up on the spaark plug and
abnorrmal wear to engine
e
parts.
A dirtty air filter
Thesee factors cause deposits on thee spark plug electrodes,
whichh may result in operating probblems and startting
difficuulties.
Starrter
w on power, diffficult to start or
o runs poorly
If the machine is low
at idlee speed: alwayss check the spaark plug first beefore taking
any fuurther action. If
I the spark pluug is dirty, cleaan it and check
that thhe electrode gaap is .020 inch (0.5mm).
(
The spark plug
shouldd be replaced after
a
about a month in operatiion or earlier iff
necesssary.
u in the starter
WARNING! When the recoil spring is wound up
u
tension and
d can cause injuryy if not properly
housing it is under
handleed.
Alwayys be careful when
n changing the reecoil spring or thee starter cord.
Alwayys wear protectivee goggles.
TION! Alwayys use the recoommended spaark plug type!!
CAUT
Use off the wrong sp
park plug can damage the
piston
n/cylinder.
15 Coolling System
m
Mufffler Spark Arrestor
A
Scrreen
It is im
mportant to keeep the spark arrrestor screen (A
A) free from
debriss. Remove the two screws hoolding the exhaaust port cover
(B) to inspect the spark arrestor scrreen.
To keeep the working temperature as low as possible the
machhine is equippedd with a coolin
ng system.
A
c
system
m consists of:
The cooling
11. Air intake on the starter
2 Air guide plate
2.
p
3 Fins on thee flywheel
3.
4 Cooling finns on the cylinder
4.
5 Cylinder coover
5.
Cleann the cooling syystem with a brush once a weeek, more oftenn
in dem
manding condiitions. A dirty or blocked coooling system
resultts in the machinne overheating
g which causes damage to thee
pistonn and cylinder..
B
m
is designed to reduce the
t noise level and to direct
The muffler
the exxhaust gases aw
way from the opperator. The exhaust
e
gases
are hoot and can contain sparks, whhich may cause fire if directedd
againsst dry, combusttible material. Inspect the sppark arrestor
screenn periodically and
a remove anyy debris build-up.
Neverr use a machinee with a defective muffler.
16 General Maintenance Instructions
Below you will find some general maintenance instructions. These are general guidelines. Maintenance of the saw is encouraged
after each use. If you have more questions, contact your local authorized service center.
DAILY MAINTENANCE
1
2
3
4
5
6
7
8
Check that the components of the throttle control work smoothly (throttle control and throttle trigger lock)
Check the tension and condition of the drive belt.
Check the condition of the blade and the drive gear.
Check the condition of the blade guard.
Check the starter and clean the outside of the starter unit’s air intake.
Check the starter cord and D handle for wear or damage.
Check that all nuts and screws are tight.
Check that the stop switch functions correctly.
WEEKLY MAINTENANCE
9
10
11
12
13
14
15
16
Check, clean or replace the main foam filter.
Check that the handles and vibration damping elements are not damaged.
Clean the spark plug. Check that the electrode gap is 0.020 inch (0.5 mm)
Clean the fins on the flywheels. Check the starter and the recoil spring.
Clean the cooling fins on the cylinder.
Check that the muffler is securely attached and not damaged.
Check that the spark arrestor is free from debris build-up.
Check the operation of the carburetor.
MONTHLY MAINTENANCE
17
18
19
20
21
22
Check the K&N gauze filter.
Check the clutch center, drive gear, and clutch spring for wear.
Clean the outside of the carburetor.
Check fuel hose for cracks or other damage, change if necessary.
Clean the inside of the fuel tank.
Check all wires and connections.
DETAILED SAW CLEANING
1. Wipe down the saw after every use.
2. Clean out any build up inside of the blade guard by removing the blade guard. (Refer to blade removal section).
3. To thoroughly clean the inside of the saw you will need to:
(NOTE: As the saw is being disassembled, check for broken or worn parts)
a) Remove the front cover, air filter cover, and air filters. (Refer to air filter removal section).
b) Remove the three 4mm Allen screws that hold the cylinder cover in place. Remove the cylinder cover, taking care not to
lose the O-Ring located under the cover.
c) Remove the retaining nut that holds the stop switch in place and push the stop switch back into the case.
d) Remove the cylinder cover, making sure you work the stop switch out of the cove before completely removing the
cylinder cover.
e) Remove the starter by loosening the 4 screws that hold the starter cover in place.0
f) Remove the plastic air deflector, use care when handling the wires that are attached to it. (Check wires for damage or wear)
g)Remove the cutter arm. (Refer to Removing and Inspecting the belt section)
4. Clean the powerhead and cooling fins with solvent. A putty knife or similar tool may be used to remove stubborn debris.
NOTE: Do not allow solvent to enter the carburetor or muffler when cleaning.
5. Compressed air may be used to dry the saw or you may allow it to air dry naturally.
6. Once the saw is dry, it can be reassembled in reverse order.
7. Test-run the saw after reassembly.
17 TECHNICAL DATA
Engine Type
Displacement
Bore x Stroke
Maximum Engine Speed
Max Idling Speed
Power
Max Torque
Fuel Consumption
Type of Ignition
Spark Plug
Momentary Contact On/Off Switch
Large Grip Starter Rope Handle
Carburetor
Fuel Mix Ratio
Fuel Tank Capacity
Decompression valve
Air Filtration System
4 Stages….
Full Wrap Handle
Anti-Vibration Mounts
Dimensions
Dry Weight Without Blade
Weight With Blade and Fuel
Arbor Size
Power-to-Weight Ratio
Max Spindle Speed
Cutting Arm
Max Cutting Depth w/ 12” Blade
Max Cutting Depth w/ 14” Blade
2-cycle Vertical Cylinder, Air cooled
80.7 cc
2.05 in. x 1.50 in.
10,000 rpm േ200 rpm
2,500 rpmെ3,000 rpm
5.1 HP (3.7 kW) (9,500 rpm)
6,000 rpm
11.993 oz.
CDI Digital
Champion CJ8Y
Always “ON” position
“D” shape opening for Fire Gloves
Walbro WJ 104
100:1 Cutters Edge or 50:1 Petroleum base
27.05 fl. Oz
Yes
1st Stage
2nd Stage
3rd Stage
barrier)
4th Stage
Air Entrainment Configuration
Foam element (w/oil tack barrier)
High Performance K & N Filter (w/oil tack
Dense Porosity Nylon
Rubber Coated for all Position Cutting
6-Rubber
31.5 in x 8.66 in. x 15.75
12” Saw—26.80 lbs (12.15 kg); 14” Saw—27.20 lbs (12.33 kg)
12” Saw - 30.45 lbs (13.81 kg); 14” Saw – 31.75 lbs (14.40 kg)
1 in. and .79 in.
0.203
5,100 rpm
Reversible
4 in. (101.6mm)
5 in. (127mm)
18