1
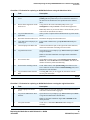
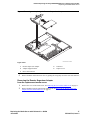
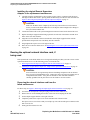
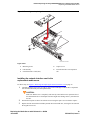
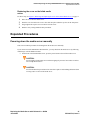
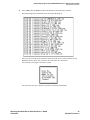
Job Aid Replacing the Avaya S8500 Media Server—Release 2.0 and Later
Required Equipment
Job Aid
Replacing the Avaya S8500
Media Server—Release 2.0 and
Later
This job aid describes the steps required to replace an Avaya S8500 Media Server running Release 2.0
and later of Communication Manager. You should replace the media server only to correct a problem,
such as a functional failure of the motherboard, the hard drive, or other components.
The hard drive in the replacement media server comes blank. If you are using this blank hard drive, you
must install the software from the CD-ROM that the customer received from an earlier installation of
Release 2.x software. The software CD-ROM contains the Linux operating system and the appropriate
release of Avaya Communication Manager.
If the hard drive in the failed media server is good, you can replace the blank hard drive in the
replacement media server with the old hard drive.
Required Equipment
Verify that you have the following equipment and tools on site:
•
•
•
•
•
•
•
Replacement S8500 Media Server
CD-ROM with the software load (from the customer) if not reusing the hard drive
Ethernet crossover cable for direct connection of your laptop to the media servers
Flat-head screwdriver
Cross-point (Phillips) screwdriver
Electrostatic wrist ground strap and mat
Paper clip
Pre-site tasks
Before you go on site, verify that the following tasks are done.
• Ask the customer for the Product ID for the media server being replaced. If the customer does not
have it, run the Automatic Registration Tool (ART) to obtain the Product ID number and port
number (customer dial-up) for the replacement media server.
• If the customer is using SNMP for alarming, you will need to get the IP addresses and community
names from the customer because the SNMP programming is not saved after the replacement.
Replacing the Media Server with Release 2.0—S8500
June 2004
1
555-245-762, Issue 2
Job Aid Replacing the Avaya S8500 Media Server—Release 2.0 and Later
Media server considerations
• If using the blank hard drive that comes with the media server, verify that you have the correct
software and software update (patch). You must install the software on the replacement media
server, and you may need to install a software update (patch).
• If using the blank hard drive that comes with the media server, verify that you have the current
license and Avaya authentication files to install on the replacement media server. Go to the
Remote Feature Activation (RFA) Web site to get them (http://rfa.avaya.com).
• Verify that the customer has a recent backup of all the system and translation files. This is critical
if the hard drive is not functional.
• Verify with the customer that you have access permissions to backup and restore the data from the
network server.
Checklist 1. Pre-site tasks for replacing an S8500 Media Server
9
Task
Description
1
Obtain CD with the correct
software release
Retrieve from the customer a CD containing Release 2.x of
Communication Manager.
2
Get software update (patch), if
appropriate
The Communication Manager software update (patch) file may be
available on the CD. Otherwise, download it to your laptop from
the Avaya Support Web site (http//www.avaya.com/support).
Select Software & Firmware Downloads > S8700 Media
Server > Software Download.
3
Get all configuration information
for the media server, for example,
IP addresses, server name, DNS
information, and so forth
Media server considerations
If the hard drive in the failed media server is good, go to Table 2, Initial tasks for replacing an S8500
Media Server reusing the original hard drive, on page 3.
If the hard drive is not functional, make sure the customer has a recent backup of the system files and
translations that you can restore after you have replaced the hard drive. If not, the media server needs to
be reconfigured and translations input as if it were a new installation. See Installing and Configuring the
Avaya S8500 Media Server (03-300143) for detailed procedures. Additionally, some illustrations of
software installation and configuration information appear later in this document.
2
555-245-762, Issue 2
Replacing the Media Server with Release 2.0—S8500
June 2004
Job Aid Replacing the Avaya S8500 Media Server—Release 2.0 and Later
Media server considerations
Except where noted in the following checklist, see Upgrading Software and Firmware— Avaya S8500
Media Server (555-245-111) on the Avaya S8300, S8500, and S8700 Media Server Library CD-ROM,
555-233-825, Issue 1, for details on the tasks.
Checklist 2. Initial tasks for replacing an S8500 Media Server reusing the original hard drive
9
Task
Description
1
Log onto Maintenance Web
Interface
Connect a crossover cable to the services port on the back of the
media server. Open a browser on your laptop. Type 192.11.13.6
and press Enter to log onto the Maintenance Web Interface as
craft or dadmin.
2
Determine the software release
and any software updates
(patches)
Under Server, click Software Version. Note the software release
and any installed software updates (patches).
3
Determine if the customer has a
recent backup of data
On the Maintenance Web Interface under Data Backup/Restore,
select Backup Logs to search for recent backup files. Check for
the types of data and dates. Verify that there is a recent,
successful backup of the system files and translations.
4
Record alarms and verify hard
drive functionality
Under Alarms, click Current Alarms. Note alarms on the media
server not related to the hard drive.
In the Server alarms section, check the Source Listing column for
a HARD DISK entry. If it is there, then the hard drive is failing
and cannot be reused.
5
Back up the system files
If the customer does not have a recent backup, you must back up
the files so they can be restored later. Under Data
Backup/Restore, click Backup Now.
Select "Server and System Files," "Security Files,""Avaya Call
Processing (ACP) Translations," and "Save ACP translations
prior to backup."
Select the backup method normally used.
Click Start Backup to begin the back up process.
6
Record the OSSI numbers (used
when the system dials out to
report alarms)
If the customer does not have these numbers, open a Telnet
session by typing telnet and press Enter.
Type almenable and press Enter.
Record the numbers.
Type exit and press Enter to close Telnet session.
7
Suppress alarm origination
Use telnet to access the Linux command line. Type almsuppress
-t 120 and press Enter to suppress alarms for the duration of the
replacement process. (Maximum time is 2 hours.)
8
Unplug the media server
Unplug the power cord from the back of the media server.
9
Unplug the RSA
Unplug the power cord from the RSA.
10
Disconnect the modem
Disconnect the modem from the RS-232 port on the RSA.
1 of 2
Replacing the Media Server with Release 2.0—S8500
June 2004
3
555-245-762, Issue 2
Job Aid Replacing the Avaya S8500 Media Server—Release 2.0 and Later
Tasks to replace an S8500 Media Server
Checklist 2. Initial tasks for replacing an S8500 Media Server reusing the original hard drive
9
Task
Description
11
Disconnect the LAN connection
from the RSA
Disconnect and label the LAN connection (if used) from the
Ethernet port on the RSA.
12
Disconnect the cable from the
dual NIC (if used)
Disconnect and label the cable from the Ethernet port on the dual
NIC (if used).
13
Disconnect the crossover cable
Disconnect the crossover cable from the services port on the back
of the media server.
2 of 2
Tasks to replace an S8500 Media Server
Checklist 3. Tasks for replacing an S8500 Media Server
9
1
Task
Description
Shut down the media server
If the hard drive is functional, under Server, click Shutdown This
Server then unclick Restart Server after Shutdown. Press the powercontrol button on the front of the server. The internal fan shuts off.
Caution: Do not unplug a functioning server without stopping all
processes first. Failure to do this corrupts the hard drive. This is
especially important if reusing the hard drive.
Caution: Do not hold down the power button for more than a split
second. Holding the button down too long causes the media server to
reboot.
2
Unplug the media server
Once the media server is completely shut down, unplug the power
cords from the media server and RSA.
Caution: Do not unplug a functioning server without stopping all
processes first. Failure to do this corrupts the hard drive. This is
especially important if reusing the hard drive.
Disconnect and label the LAN connections from the Ethernet ports
on the RSA and dual NIC (if used)
Disconnect all attached devices, including the laptop, both modems,
and the external flashcard reader (if used).
3
Remove the media server from
the rack
See Removing the S8500 Media Server from the rack on page 12
4
Remove the cover of the media
server
See Removing the cover of the media server on page 13.
1 of 2
4
555-245-762, Issue 2
Replacing the Media Server with Release 2.0—S8500
June 2004
Job Aid Replacing the Avaya S8500 Media Server—Release 2.0 and Later
Determining if a hard drive is functional
Checklist 3. Tasks for replacing an S8500 Media Server
9
5
Task
Description
Replace components in the
replacement media server
You need to replace the RSA in the replacement media server with
the original one from the failed media server. See Reusing the
Remote Supervisor Adapter on page 16
If the failed media server has the optional dual NIC, you must move
it to the replacement media server. See Reusing the optional network
interface card, if being used on page 18.
If the hard drive in the failed media server is good, you must replace
the one in the replacement media server with the original one from
the failed media server. See Reusing the hard drive on page 14.
6
Replace the cover of the
replacement media server
See Replacing the cover on the replacement media server on page
20.
7
Install the replacement media
server into the rack
See Installing the replacement media server in the rack on page 20
8
Note: Skip this step if reusing the
original hard drive.
Use an end on the paper clip to push the button to open the CDROM drawer. Place the Communication Manager CD in the drawer
and close it.
Insert the software CD in the
CD-ROM drive of the media
server, if using the blank hard
drive
9
Power up the media server.
The software CD contains boot software that the media server
automatically accesses when you power up the media server.
Plug the power cords into the media server and RSA. Press the
power-control button on the front of the media server.
Note: Wait at least 3 minutes for the media server to complete its
power up. Watch the power-on LED on the media server.
10
Reconnect attached devices
Reconnect the LAN connections to the Ethernet ports on the RSA
and dual NIC (if used).
Reconnect all attached devices, including the laptop, both modems,
and the external flashcard reader (if used).
11
Note: Skip this step if using a
new hard drive.
Test the hard drive by logging
onto the Maintenance Web
Interface.
Connect a crossover cable to the services port on the back of the
media server. Open a browser on your laptop. Type 192.11.13.6 and
press Enter to log onto the Maintenance Web Interface as craft or
dadmin. Log in as craft or dadmin.
Under Server, click Status Summary and note the information
concerning the hard drive.
2 of 2
Determining if a hard drive is functional
There are occasions when the defective media server may have a functional hard drive. To determine if
the hard drive in the defective media server is functional:
Replacing the Media Server with Release 2.0—S8500
June 2004
5
555-245-762, Issue 2
Job Aid Replacing the Avaya S8500 Media Server—Release 2.0 and Later
Determining if a hard drive is functional
1
On the defective media server, connect the laptop cross-over cable to the Ethernet RJ45 port on
the RSA card (see Figure 1, Connector panel on the Remote Supervisor Adapter, on page 6 for
locations of the connectors and components of the RSA).
Figure 1: Connector panel on the Remote Supervisor Adapter
1
2
3
4
5
6
h3msrsap LAO 071503
Figure notes
2
1
Clip
4
ASM RS-485 RJ14 connector
2
External power-supply connector
5
Serial connector
3
Power and error LEDs
6
Ethernet RJ45 connector
Open a web browser to the RSA card and in the Address field, type 192.11.13.6 and press Enter.
The system displays the Enter Network Password window.
3
In the Enter Network Password window, in the User Name field, type craft and in the Password
field, type the current password obtained during training and press Enter.
The system displays the Welcome window.
4
5
On the Welcome window, click Continue.
On the navigation pane, click Event Log.
6
555-245-762, Issue 2
Replacing the Media Server with Release 2.0—S8500
June 2004
Job Aid Replacing the Avaya S8500 Media Server—Release 2.0 and Later
Final tasks
6
On the Event Log window, look for red boxes in the Sev(everity) column. This indicates
problems that need attention. A fatal server failure should be near the top of the Event Log.
If there is no mention of a hard drive failure, you can presume the hard drive is operational and
can be moved to the replacement media server.
7
Remove the defective media server. See Removing the S8500 Media Server from the rack on page
12.
8
Remove the hard drive from the defective media server. See Removing the hard drive from the
failed media server on page 14.
9
Remove the hard drive from the replacement media server. See Removing the hard drive from the
replacement media server on page 15.
10
Install the hard drive from the replacement media server. See Installing the original hard drive in
the replacement media server on page 16.
11
Install the replacement media server. See Installing the replacement media server in the rack on
page 20.
12
13
14
15
Connect the laptop cross-over cable to the Ethernet RJ45 port on the RSA card.
On the media server, press Power and wait for the operating system to come up.
Open a web browser to the RSA card and in the Address field, type 192.11.13.6 and press Enter.
In the Enter Network Password window, in the User Name field, type craft and in the Password
field, type the default password and press Enter.
This RSA card is new to the S8500 Media Server and has not been configured for the customer.
16
17
18
On the Welcome window, click Continue.
On the navigation pane, click System Health.
On the System Health Summary section, monitor the Server State field until it changes to "OS
booted." Verify "Server is operating normally" is green.
Periodically refresh the screen by clicking System Health on the navigation pane.
If the "Server is operating normally" changes from green to red before the Server State field says
"OS booted," click Event Log.
Final tasks
If you are reusing the old hard drive, follow the procedure in Final tasks for replacing an S8500 Media
Server reusing the original hard drive on page 11.
If not reusing the old hard drive, you must install the Linux operating system and Avaya Communication
Manager on the blank hard drive, then restore the backed up system files to the media server. Follow the
procedure in Final tasks for replacing an S8500 Media Server using the blank hard drive on page 8
NOTE:
If at any time you cannot log into the media server or RSA card, clear the ARP cache.
Replacing the Media Server with Release 2.0—S8500
June 2004
7
555-245-762, Issue 2
Job Aid Replacing the Avaya S8500 Media Server—Release 2.0 and Later
Final tasks
Checklist 4. Final tasks for replacing an S8500 Media Server using the blank hard drive
9
Task
Description
1
Disconnect the RJ45 cable
Disconnect the Ethernet RJ45 crossover cable from the Services
port on the media server.
2
Clear ARP cache on laptop if you
cannot log in
From a DOS command line, type arp -d 192.11.13.6 and press
Enter.
3
Connect laptop to the RSA card
Connect to the Ethernet port (to the right of the serial connector)
on the back of the RSA card using a crossover cable.
4
Log into the RSA card
Open a browser on your laptop. Type 192.11.13.6 and press Enter
to log into the RSA.
Note: Use the initial installation craft login and the initial RSA
password.
5
Set a timeout value
On the RSA welcome screen, on the Inactive session timeout
value field, select no timeout and click Continue. This allows 60
minutes of use before disconnecting.
6
Set the loader watchdog timeout
Under ASM Control, click System Settings. Scroll down to the
Server Timeouts section, and in the Loader watchdog field, select
disabled and click Save.
7
Log off the RSA
Click Log Off.
8
Move the RSA LAN cable
Disconnect the Ethernet RJ45 cable from the RSA Ethernet port.
9
Connect laptop to the media
server
Connect a crossover cable to the services port on the back of the
media server and wait about 3 minutes from the time you boot up
the server before trying to access the information on the CD.
10
Clear ARP cache on laptop
From a DOS command line, type arp -d 192.11.13.6 and press
Enter.
11
Set Telnet parameters (if
necessary)
Use telnet to access the Linux command line. Type telnet
192.11.13.6 and press Enter.
Type unset crlf and press Enter.
Type display and press Enter to verify that message says
Sending only CR
Type exit and press Enter to close Telnet session.
12
Install Communication Manager
You must install the software from the CD. For procedure details,
see Installing the software on page 22.
13
Log onto the Maintenance Web
Interface
Open a browser on your laptop. Type 192.11.13.6 and press Enter
to log onto the Maintenance Web Interface. Log in as craft or
dadmin.
Note: Use the initial installation login craft and the initial
password.
14
Set alarm suppression on the
media server
Using Telnet on the Linux command prompt screen, type
almsuppress -y and press Enter to enable alarm suppression.
1 of 4
8
555-245-762, Issue 2
Replacing the Media Server with Release 2.0—S8500
June 2004
Job Aid Replacing the Avaya S8500 Media Server—Release 2.0 and Later
Final tasks
Checklist 4. Final tasks for replacing an S8500 Media Server using the blank hard drive
9
Task
Description
15
Check software version on the
Maintenance Web page
Under Server, click Software Version to verify that the hard drive
has the current release of Communication Manager.
16
Copy files to the media server
Copy the license and Avaya authentication files and the software
update (patch) file, if any, to the media server.
Under Miscellaneous, click Download Files.
Browse to select the file for downloading and click Download.
17
Configure the network
parameters and verify
connectivity (optional)
You must readminister the Ethernet port connecting to the
customer’s network.
Under Server Configuration, click Configure Server and click
Continue.
Click Continue through the pages until you get to the Specify how
you want to use this wizard page. Select "Configure individual
services" and click Continue.
Fill in the correct IP address, Gateway, and Subnet mask (or use
the default addresses) for the Ethernet port (Eth0) and select
AUTOSENSE for the speed and click Change. Close the window.
Under Diagnostics, click Ping. Type the IP address of the server
where the files are backed up and click Execute Ping to verify that
you can access the customer’s network.
18
Restore the system files and
translations
Under Servers, click Software Version. Note the Release String
data.
Under Data Backup/Restore, click View/Restore Data.
Caution: Do not restore files if they are from a software load
different from the load now running on the media server; for
example, if the software load of the backed-up files was S8x0002.0-00.0.219.0 and the media server is now running load S8x0002.0-00.0.219.1.
Match the Release String data from the Software Version page
with the listing provided.
For procedure details, see Restoring the system files on page 25.
If there were no backup files,
configure the media server
See Installing and Configuring the Avaya S8500 Media Server, 03300143.
19
Verify date and time
Under Server, click Server Date/Time. Make changes as
necessary.
20
Install software update (patch), if
any
You may need to install a software update (patch). For procedure
details, see Installing post-upgrade update (patch) files (if any) on
page 24.
Note: Skip this procedure if there is no software update (patch) file
to install.
2 of 4
Replacing the Media Server with Release 2.0—S8500
June 2004
9
555-245-762, Issue 2
Job Aid Replacing the Avaya S8500 Media Server—Release 2.0 and Later
Final tasks
Checklist 4. Final tasks for replacing an S8500 Media Server using the blank hard drive
9
Task
Description
21
Verify that the update (patch) is
installed
Under Server, click Software Version to verify the software
update (patch) versions.
22
Verify media server
configuration
For procedure details, see Verify media server configuration on
page 26
Note: If there was no backup file to restore, you need to
reconfigure the media server. Get the configuration data from the
customer.
23
Install the license and Avaya
authentication files
Under Security, click License File and select "Install the license I
previously downloaded" and click Submit.
Click Avaya Authentication and click Submit.
24
Copy translations
Using a SAT screen, type reset system 4 to copy translations to
disk.
25
Log in from the SAT
Type telnet 192.11.13.6 50.23 and press Enter.
26
Check the translations
Using the SAT screen, type list configuration all and press Enter
and check that all the hardware displays.
27
Test the hard drive by logging
onto the Maintenance Web
Interface
Connect a crossover cable to the services port on the back of the
media server. Open a browser on your laptop. Type 192.11.13.6
and press Enter to log onto the Maintenance Web Interface as
craft or dadmin.
Under Server, click Status Summary and note the information
concerning the hard drive.
28
Ping the connections on the
media server
Under Diagnostics, click Ping. Ensure that all connections, IPSI
boards, and all administered connections respond.
29
Resolve alarms on the media
server
Under Alarms, click Current Alarms. Compare these against the
recorded alarms from Checklist 2, step 4. Clear any alarms that
appear.
Using a SAT screen, type display alarms and press Enter.
For instructions on resolving alarms, see Maintenance Alarms
Reference, 555-245-102.
30
Check the health of the media
server
Using a SAT screen, type list ipserver-interface and status
health. Check that all connections are working correctly.
31
Save translations
Using a SAT screen, type save translation and press Enter to
back them up.
32
Administer backup schedule on
the media server
Under Data Backup/Restore, click Schedule Backup to
readminister the media server’s backup schedule.
33
Back up files on the media server
Under Data Backup/Restore, click Backup Now.
Click Start Backup to begin the back up process.
3 of 4
10
555-245-762, Issue 2
Replacing the Media Server with Release 2.0—S8500
June 2004
Job Aid Replacing the Avaya S8500 Media Server—Release 2.0 and Later
Final tasks
Checklist 4. Final tasks for replacing an S8500 Media Server using the blank hard drive
9
Task
Description
34
Set the Product ID on the media
server
Type productid -p product_id and press Enter, where
product_id is the product ID you received from the customer or
the ART tool. It should be the same product ID as the old hard
drive.
35
Release alarm suppression on the
media server
Using telnet on the Linux command prompt screen, type
almsuppress -n and press Enter to release alarm suppression.
Note: Only do this if you want to release it before the time you set
earlier runs out (maximum of 2 hours)
36
Log off all administration
applications
When you have completed all the administration, log off the media
server.
37
Disconnect from the media server
Disconnect the laptop from the media server.
38
Clear ARP cache on laptop if you
cannot log in
From a DOS command line, type arp -d 192.11.13.6 and press
Enter.
39
Connect laptop to the RSA card
Connect to the Ethernet port (to the right of the serial connector)
on the back of the RSA card using a crossover cable.
40
Log into the RSA card
Open a browser on your laptop. Type 192.11.13.6 and press Enter
to log into the RSA.
Note: Use the initial installation craft login and the initial RSA
password.
41
Set a timeout value
On the RSA welcome screen, on the Inactive session timeout
value field, select no timeout and click Continue. This allows 60
minutes of inactivity before disconnecting.
42
Set the loader watchdog timeout
Under ASM Control, click System Settings. Scroll down to the
Server Timeouts section, and in the Loader watchdog field, select
5.0 (minutes) and click Save.
43
Log off and disconnect from the
RSA
Click Log Off. Once you are logged off, disconnect from the
services port on the RSA.
4 of 4
Checklist 5. Final tasks for replacing an S8500 Media Server reusing the original hard drive
9
Task
Description
1
Connect laptop to the media
server
Connect to the services port on the back of the media server and
wait about 3 minutes before logging in.
2
Log onto the Maintenance Web
Interface
Open a browser on your laptop. Type 192.11.13.6 and press Enter
to log onto the Maintenance Web Interface.
Note: Use the initial installation login craft or dadmin and the
initial password.
3
Verify date and time
Under Server, click Server Date/Time. Make changes as
necessary.
1 of 2
Replacing the Media Server with Release 2.0—S8500
June 2004
11
555-245-762, Issue 2
Job Aid Replacing the Avaya S8500 Media Server—Release 2.0 and Later
Replacing the S8500 Media Server
Checklist 5. Final tasks for replacing an S8500 Media Server reusing the original hard drive
9
Task
Description
4
Ping the connections on the
media server
Under Diagnostics, click Ping. Ensure that all administered
connections respond.
5
Resolve alarms on the media
server
Under Alarms, click Current Alarms. Compare these against the
recorded alarms from Checklist 3, step 2. Clear any alarms that
appear.
Using a SAT screen, type display alarms and press Enter.
For instructions on resolving alarms, see Maintenance Alarms
Reference, 555-245-102.
6
Check the health of the media
server
Using a SAT screen, type list ipserver-interface and status
health. Check that all connections are working correctly.
7
Set the Product ID on the media
server
Type productid -p product_id and press Enter, where
product_id is the product ID you received from the customer or
the ART tool. It should be the same product ID as the old hard
drive.
8
Release alarm suppression on the
media server
Using telnet on the Linux command prompt screen, type
almsuppress -n and press Enter to release alarm suppression.
Note: Only do this if you want to release it before the time you set
earlier runs out (maximum of 2 hours)
9
Log off all administration
applications
When you have completed all the administration, log off the media
server.
2 of 2
Replacing the S8500 Media Server
When replacing a failed S8500 Media server, there may be several components that can be reused. These
include the hard drive, Remote Supervisor Adapter (RSA), and Network interface card (NIC), if being
used. If these components are serviceable, we recommend that you remove them from the failed media
server and install them in the replacement media server. For specific removing and replacing information
see
• Reusing the hard drive on page 14
• Reusing the Remote Supervisor Adapter on page 16
• Reusing the optional network interface card, if being used on page 18
Removing the S8500 Media Server from the
rack
1
Pull the media server forward so the server rails expand and the retaining clips on the rails click
into place.
2
Using the cross-point (Phillips) screwdriver, remove the media server from the slide rails in the
rack.
12
555-245-762, Issue 2
Replacing the Media Server with Release 2.0—S8500
June 2004
Job Aid Replacing the Avaya S8500 Media Server—Release 2.0 and Later
Replacing the S8500 Media Server
Removing the cover of the media server
For these steps see Figure 2, Removing and replacing the cover on the S8500 Media Server, on page 13.
1
2
3
Set the media server down on a flat surface with an electrostatic mat.
4
Lift the cover straight up and remove it from the media server.
Loosen the two captive screws on the back of the media server that hold the top in place.
Slide the media server cover back from the front panel until the cover’s tabs are released from the
top slot of the front panel.
Figure 2: Removing and replacing the cover on the S8500 Media Server
1
dis
c
h3mscaps LAO 070103
Figure notes
1
Captive screws on media server holding cover in place
Replacing the Media Server with Release 2.0—S8500
June 2004
13
555-245-762, Issue 2
Job Aid Replacing the Avaya S8500 Media Server—Release 2.0 and Later
Replacing the S8500 Media Server
Reusing the hard drive
If the hard drive in the failed media server is still good, then you want to reuse it in the replacement media
server. Use the following process to switch the hard drives.
• Removing the hard drive from the failed media server on page 14
• Removing the hard drive from the replacement media server on page 15
• Installing the original hard drive in the replacement media server on page 16
CAUTION:
Wear an anti-static wrist ground strap whenever handling components such as the hard
drive of an Avaya S8500 Media Server. Connect the strap to an approved ground, such as
an unpainted metal surface. Also, place the hard drive on an anti-static mat that is
similarly grounded. Do not place the new or the old drive on a bare surface.
Removing the hard drive from the failed
media server
For these steps, see Figure 3, Removing and replacing the drive cage, on page 15.
1
2
Locate the drive cage in the left-hand corner of the front of the media server.
3
4
Push the ribbon cable back out of the way.
5
6
7
8
Loosen the captive screw next to the drive cage.
Use the two black pull handles on the ribbon cables to unplug the data connectors from the back
of the CD-ROM and hard drive.
Unplug the two power connectors from the back of the CD-ROM drive and the hard drive. You
must release the power connector on the CD-ROM drive by gently bending the side spring clip
holding it in place.
Slide the drive cage toward the back of the media server to clear the retaining hooks.
Place the drive cage on the antistatic mat.
Remove the four screws (two on each side) securing the hard drive in the drive cage and remove
the hard drive.
14
555-245-762, Issue 2
Replacing the Media Server with Release 2.0—S8500
June 2004
Job Aid Replacing the Avaya S8500 Media Server—Release 2.0 and Later
Replacing the S8500 Media Server
Figure 3: Removing and replacing the drive cage
6
dis
8
4
c
6
7
6
3
2
1
5
h3msdrv3 KLC 020204
Figure notes
1
Drive bay housing drive cage
5
Tabs
2
Ribbon cable attached to hard drive
6
3
Power cable connected to the CD-ROM drive
Screws holding hard drive in drive
cage
4
Captive screw holding drive cage
7
Hard drive
8
Drive cage
Removing the hard drive from the
replacement media server
1
Remove the cover from the replacement media server. See Removing the hard drive from the
failed media server on page 14.
2
Remove the hard drive from the replacement media server. See Removing the hard drive from the
failed media server on page 14.
Replacing the Media Server with Release 2.0—S8500
June 2004
15
555-245-762, Issue 2
Job Aid Replacing the Avaya S8500 Media Server—Release 2.0 and Later
Replacing the S8500 Media Server
Installing the original hard drive in the
replacement media server
For these steps, see Figure 3, Removing and replacing the drive cage, on page 15.
1
Insert the original hard drive into the drive cage so that the connectors are in the same direction as
the CD-ROM connectors and the screw holes are aligned.
2
3
4
5
Reinsert the 4 screws (2 on each side) to attach the hard drive to the drive cage.
6
Make sure the drive cage is secure and that the cables are not bunched or blocking the fan unit.
Reattach the flat ribbon cable (in 2 places) to the hard drive and CD-ROM drive.
Reattach the 2 power cables to the hard drive and CD-ROM drive.
Slide the drive cage into place in the media server, making sure that it fits securely into the
retaining hooks and finger-tighten the captive screw.
Reusing the Remote Supervisor Adapter
If the RSA card in the failed media server is still good, then you want to reuse it in the replacement media
server. Use the following process to switch the RSAs.
• Removing the Remote Supervisor Adapter from the failed media server on page 16
• Removing the Remote Supervisor Adapter from the replacement media server on page 17
• Installing the original Remote Supervisor Adapter in the replacement media server on page 18
CAUTION:
Wear an anti-static wrist ground strap whenever handling components such as the hard
drive of an Avaya S8500 Media Server. Connect the strap to an approved ground, such as
an unpainted metal surface. Also, place the hard drive on an anti-static mat that is
similarly grounded. Do not place the new or the old drive on a bare surface.
Removing the Remote Supervisor Adapter
from the failed media server
1
2
Remove the cover of the media server. See Removing the cover of the media server on page 13.
Remove one side of the ribbon cable from the system-management connector on the system board
(CN-12) and the other side from the system-management connector on the RSA.
NOTE:
The RSA card resides in PCI-X slot 1 located under the adapter support bracket. Remove
the adapter support bracket and the riser connector together.
3
4
Loosen the captive screw located to the right of the slot labeled PCI 1.
The riser connector must be removed by pulling straight up on the adapter support bracket. Place
one finger under the screw on the far end of the riser connector and one finger under the adapter
support bracket near the captive screw and pull straight up, as shown in Figure 4, Removing and
replacing the Remote Supervisor Adapter, on page 17.
16
555-245-762, Issue 2
Replacing the Media Server with Release 2.0—S8500
June 2004
Job Aid Replacing the Avaya S8500 Media Server—Release 2.0 and Later
Replacing the S8500 Media Server
Figure 4: Removing and replacing the Remote Supervisor Adapter
3
2
1
4
10
020 12
0- 7 -,
24
0 -, 3,0A
1,5A, 50
, 50/60
/60 Hz
Hz
PC
PC
I
1
I2
13
3M
Hz/
64
5
Bi
t, 10
0M
Hz/
64
Bi
t
LIN
K
TX
/R
X
LIN
K
TX
/R
1
X
2
h3msrrsa LAO 071803
Figure notes
5
1
Remote Supervisor Adapter
4
Connector
2
Adapter support bracket
5
Captive screw
3
Riser card connector
Remove the RSA card from PCI-X slot 1 by pulling the card gently out of the riser card connector.
Removing the Remote Supervisor Adapter
from the replacement media server
1
2
Remove the cover of the media server. See Removing the cover of the media server on page 13.
Remove the RSA from the replacement media server. See Removing the Remote Supervisor
Adapter from the failed media server on page 16
Replacing the Media Server with Release 2.0—S8500
June 2004
17
555-245-762, Issue 2
Job Aid Replacing the Avaya S8500 Media Server—Release 2.0 and Later
Replacing the S8500 Media Server
Installing the original Remote Supervisor
Adapter in the replacement media server
1
Carefully grasp the original RSA by the top edges or upper corners, component side facing up,
and align it with the PCI-X slot 1 opening. Press the RSA firmly into the riser card connector. See
Figure 4, Removing and replacing the Remote Supervisor Adapter, on page 17.
CAUTION:
Make sure the RSA card is completely and correctly seated in the riser card connector
before you turn on the S8500 Media Server. Incomplete insertion might cause damage to
the system board or RSA card.
2
3
Connect the ribbon cable to the system-management connector located on the back of the card.
4
Align the riser card with the connector and the tabs on the adapter support bracket with the
provided holes and press the riser card firmly into the connector.
5
6
Finger-tighten the captive screw to the right of the slot.
Replace the adapter support bracket lining up the tabs on each side of the bracket and the screw
holes on the riser card connector.
Place the cover onto the media server. See Replacing the cover on the replacement media server
on page 20.
Reusing the optional network interface card, if
being used
If the optional NIC in the failed media server is being used and still good, then you want to reuse it in the
replacement media server. Use the following process to switch the NIC.
• Removing the Remote Supervisor Adapter from the failed media server on page 16
• Installing the original Remote Supervisor Adapter in the replacement media server on page 18
CAUTION:
Wear an anti-static wrist ground strap whenever handling components such as the hard
drive of an Avaya S8500 Media Server. Connect the strap to an approved ground, such as
an unpainted metal surface. Also, place the hard drive on an anti-static mat that is
similarly grounded. Do not place the new or the old drive on a bare surface.
Removing the network interface card from the
failed media server
For these steps, see Figure 5, Removing and replacing the network interface card, on page 19.
1
2
3
4
Locate the fan slot adjacent to the power plug on the rear of the media server.
Remove the two screws holding the fan unit. You do not need to unplug the fan unit.
Set the adapter-support bracket to the right of the fan.
Completely unscrew the captive screw on the left-hand side of the PCI-2 slot.
The captive screw is now loose so that you can flip it up. You will need this space to maneuver the
NIC out of its slot.
5
Firmly pull the card out of its slot.
18
555-245-762, Issue 2
Replacing the Media Server with Release 2.0—S8500
June 2004
Job Aid Replacing the Avaya S8500 Media Server—Release 2.0 and Later
Replacing the S8500 Media Server
Figure 5: Removing and replacing the network interface card
3
5
4
10
0
20 -12
0-2 7 -,
40 3,0
-,
1,5A, 5
A, 0/6
50 0 H
/60 z
Hz
2
PC
I2
1
PC
I
1
13
3M
Hz
/64
Bit
,1
00
MH
z/6
4B
it
h3ms2nic KLC 031004
Figure notes
1
Mounting screws
4
Captive screw
2
Fan assembly
5
3
Network Interface Card (NIC)
Network Interface Card expansion
slot
Installing the network interface card in the
replacement media server
For these steps, see Figure 5, Removing and replacing the network interface card, on page 19.
1
Carefully grasp the NIC by the top edge or upper corners and align it with the PCI-2 expansion
slot. Press the NIC firmly into the expansion slot.
CAUTION:
Make sure that the NIC is completely and correctly seated in the PCI-2 expansion slot of
the S8500 Media Server. Incomplete insertion might cause damage to the system board or
the NIC.
2
3
Position the faceplate so that it fits in the PCI-2 slot using the captive screw to hold it in place.
Replace the fan unit with the fan blades pointed down toward the NIC, securing the fan unit with
the original two screws.
Replacing the Media Server with Release 2.0—S8500
June 2004
19
555-245-762, Issue 2
Job Aid Replacing the Avaya S8500 Media Server—Release 2.0 and Later
Replacing the S8500 Media Server
Replacing the cover on the replacement media
server
For these steps, see Figure 2, Removing and replacing the cover on the S8500 Media Server, on page 13.
1
2
3
Place the cover onto the media server.
Slide the cover forward so the covers’ tabs slide into place under the top slots of the front panel.
Finger-tighten the captive screws on the back of the server.
Installing the replacement media server in the
rack
1
2
3
Install the media server onto the slide rails in the rack.
Push back into place.
Return to step 8 in Tasks for replacing an S8500 Media Server on page 4 to continue with the
listed tasks.
See Quick Start for Hardware Installation: Avaya S8500 Media Server for information on installing the
S8500 Media Server in the rack and reconnecting all the cables.
Preparing the failed media server for shipment
Installing the new hard drive in the failed
media server
1
Insert the new hard drive from the replacement media server into the drive cage so that the
connectors are in the same direction as the CD-ROM connectors and the screws holes are aligned.
2
3
4
5
Reinsert the four screws (two on each side) to attach the hard drive to the drive cage.
6
Make sure the drive cage is secure and that the cables are not bunched or blocking the fan unit.
Reattach the flat ribbon cable (in two places) to the hard drive and CD-ROM drive.
Reattach the two power cables to the hard drive and CD-ROM drive.
Slide the drive cage into place making sure that it fits securely into the retaining hooks and fingertighten the captive screw.
CAUTION:
Be sure the ribbon cable is pushed completely inside the media server and is not bunched,
pinched, or caught between the top of the hard drive and the hard drive slot.
20
555-245-762, Issue 2
Replacing the Media Server with Release 2.0—S8500
June 2004
Job Aid Replacing the Avaya S8500 Media Server—Release 2.0 and Later
Expanded Procedures
Replacing the cover on the failed media
server
For these steps, see Figure 2, Removing and replacing the cover on the S8500 Media Server, on page 13.
1
2
3
4
Place the cover onto the media server.
Slide the cover forward so the covers’ tabs slide into place under the top slots of the front panel.
Finger-tighten the captive screws on the back of the server.
Return to Avaya using standard return procedures.
Expanded Procedures
Powering down the media server manually
This section contains procedures for shutting down the media server manually.
If you cannot access the Maintenance Web Interface, you may shut down the media server by following
manual steps with the shutdown button:
• On the front of the S8500 Media Server, press the power button to shut off the media server.
CAUTION:
Do not unplug a functioning server without stopping all processes first. Failure to do this
will corrupt the hard drive.
CAUTION:
Do not hold down the power button for more than a split second. Holding the button down
too long causes a reboot of the media server.
Replacing the Media Server with Release 2.0—S8500
June 2004
21
555-245-762, Issue 2
Job Aid Replacing the Avaya S8500 Media Server—Release 2.0 and Later
Expanded Procedures
Installing the software
NOTE:
Use a telnet session to access the information on the CD.
1
Type telnet 192.11.13.6 and press Enter to view the first screen.
NOTE:
To navigate on these screens, use the arrow keys to move to an option, then press the space
bar to select the option. Press Enter to submit the screen.
2
Select Install, make sure <OK> is highlighted, and press Enter.
The following screen is optional; it only shows if there is something on the hard drive.
3
Select <Yes> and press Enter.
22
555-245-762, Issue 2
Replacing the Media Server with Release 2.0—S8500
June 2004
Job Aid Replacing the Avaya S8500 Media Server—Release 2.0 and Later
Expanded Procedures
4
Select <OK> and press Enter to partition the hard drive and reformat the partitions.
The program begins the installation process and reports the progress.
These processes can take up to 20 minutes. When the media server is ready to reboot, the CDROM drive drawer opens. You can remove the CD from the drive at this time.
The following screen appears for about 5 seconds.
The reboot may take up to 3 minutes. The telnet session drops automatically.
Replacing the Media Server with Release 2.0—S8500
June 2004
23
555-245-762, Issue 2
Job Aid Replacing the Avaya S8500 Media Server—Release 2.0 and Later
Expanded Procedures
Installing post-upgrade update (patch) files (if
any)
NOTE:
Skip this procedure if there is no Communication Manager software update (patch) file to
install.
This software update (patch) may or may not be call preserving.
Use the browser to load the necessary updates (patches).
1
2
3
4
5
6
Open a browser on your laptop.
In the Address field, type http://avaya.support.com and press Enter.
Under the Technical Database listing (on the left side), click Communications Systems.
Under Communications Systems, scroll down and click S8500 Media Server.
Click on the software release loaded on the media server.
In the Software Downloads section, click on the desired software release.
A new window appears with a description of available updates and links to download them.
Now use a telnet session to install the software update (patch).
1
Click Start > Run to open the Run dialog box.
2
Type telnet 192.11.13.6 and press Enter.
3
Log in as craft.
4
Type cd /var/home/ftp/pub and press Enter to access the pub directory.
5
At the prompt, type ls -ltr and press Enter to list files in the pub directory.
The media server displays a list of files in the FTP directory. Verify that the directory contains the
Communication Manager .tar.gz file you have uploaded.
6
Type sudo update_unpack and press Enter.
The system lists all updates.
7
Type update_show and press Enter to list Communication Manager files to verify the new
software update (patch) file was unpacked.
8
Type sudo update_activate update, where update is the release or issue number of
the latest software update (patch) file. (For example, 00.0.219.0-xxxx. Do not use the .tar.gz
extension at the end of the file name). Press Enter.
The media server may reboot (reset system 4). If it reboots, it also may display the message
/opt/ecs/sbin/drestart 2 4 command failed.
Ignore this message. You must wait until the restart/reset completes before entering additional
commands.
The media server displays a message that the software update (patch) was applied.
9
10
Type update_show again and press Enter to verify the new software update (patch) file was
activated.
Type exit and press Enter to close the Telnet session.
24
555-245-762, Issue 2
Replacing the Media Server with Release 2.0—S8500
June 2004
Job Aid Replacing the Avaya S8500 Media Server—Release 2.0 and Later
Expanded Procedures
Restoring the system files
1
Under Data Backup/Restore, click View/Restore Data.
2
Select FTP and fill in the User Name, Password, Host Name (must use the host IP address),
and Directory fields where the files were backed up.
3
Click View.
Replacing the Media Server with Release 2.0—S8500
June 2004
25
555-245-762, Issue 2
Job Aid Replacing the Avaya S8500 Media Server—Release 2.0 and Later
Expanded Procedures
4
5
Select the correct file (the most recent is at the top) and click Restore.
Click Status to view the Restore status. When the restoration is complete, the message Restore
is finished displays.
Verify media server configuration
1
2
Under Server Configuration, click Configure Server to start the configure server process.
3
4
Select "Configure all services using the wizard."
Click Continue through the Review Notices to get to the Select Method for Configuring Server
page.
Click Continue through all the screens to verify that the configuration is complete and correct.
NOTE:
You may need to reset the port speeds for the Ethernet interfaces.
NOTE:
You do not need to fill in the static routes for Release 2.0 and later.
5
When you click through all the pages, click Continue on the Update System screen. The Update
System screen displays each configuration task as it completes.
When done, the screen displays "All configuration information was entered."
6
Click Close Window to close the Configure Server wizard.
26
555-245-762, Issue 2
Replacing the Media Server with Release 2.0—S8500
June 2004