1
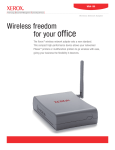
How To Set up and Configure the WNA-100 Wireless Network Adapter
Section 1: Set up and Connect the Adapter to a Computer, Then Configure the Computer to
Communicate With the Adapter
Before the adapter can be connected to a printer, it must be connected to a computer so that it can be configured
to function on a wireless network. The adapter must be configured from the adapter's web interface using an
Internet browser. After the adapter has been connected to the computer, the computer's TCP/IP settings must be
configured to communicate with the adapter.
To set up the adapter:
1. Connect the antenna to the adapter.
2. Connect the power supply cord to the adapter, and then plug the power unit into the wall outlet.
Note: Only use the power supply provided with the adapter.
3. Connect one end of the supplied Ethernet crossover cable to the Ethernet port on the adapter.
4. Connect the other end of the crossover cable to the Ethernet port on the computer that will be used to
configure the adapter using an Internet browser.
Note: The adapter is not intended for use on a switch or hub. The adapter must be connected directly to
the computer using the Ethernet crossover cable.
5. Make sure the computer is configured to use an IP address of 169.254.x.x, where the x characters
represent a decimal number between 0 - 254. For example, 169.254.111.113. If necessary, contact the
network System Administrator.
6. Open an Internet browser window.
7. Enter the IP address of the adapter in the Address field, and then press [Enter] on the keyboard. The
adapter's home page (Status window) will be displayed.
Note: The factory default IP address of the adapter is 169.254.111.111.
Note: If the adapter's home page is not displayed, make sure to disable any browser proxy settings that
have been configured. The proxy settings can be enabled again after the adapter has been configured. If
necessary, contact the network System Administrator.
Section 2: Configure the Wireless Settings
To configure the wireless settings for the adapter, the following information must be known about the wireless
router that is set up on the network the WNA-100 is to going to be attached to. This information is unique to
each network. If necessary, contact the network System Administrator or the manufacturer of the wireless
router to obtain this information or refer to the wireless router’s user guide. Without the network configuration
for the wireless router, the WNA-100 cannot be configured correctly for a wireless Ethernet connection.
•
(Frequency) Band (for example: 802.11b or 802.11b-g)
•
Network Type (AD-HOC or Infrastructure)
Note: If AD-HOC is the network type, the Channel must also be obtained. The Channel will be a
number between 1 and 11.
•
Network Name (Secure Socket Identification - SSID) (name of the wireless network)
Note: By default, the SSID name from the factory is set to “Wireless Network Adapter”. This needs to
be changed to the name of the wireless network that the WNA100 is being attached to. If this is not
changed to the correct wireless network name (the name is case sensitive), the wireless adapter will not
configure correctly to the network.
•
Encryption type (for example: WEP 64-bit, WEP 128-bit, or WPA)
Note: Depending on the Encryption type, other information such as the WEP Key or the WPA PreShared Key must also be obtained.
•
Authentication type (for example: Open System, Shared Key, or PSK)
To configure the wireless settings:
1. After the above information has been obtained, click on any of the links under the Wireless
Configuration folder on the left side of the adapter's web interface. The Login Required window will be
displayed.
2. Enter the configuration password, and then click on the [Login] button. The Wireless Configuration
window will be displayed.
Note: The factory default configuration password is word access (in lower case).
3. Depending on the information obtained, enter the required settings in the WEP, WPA, or EAP Settings
section. For example, if the wireless router uses WEP 64 bit encryption, enter the required information
in the WEP section. The following is an example of settings that need to be configured for the WNA100 to connect to a wireless router.
Note: For additional information about the various wireless settings displayed on the adapter's web
interface, click on the [Help] button at the top, right of the web browser window.
Section 3: Configure the TCP/IP Settings for the Wireless Router Management
Note: This solution requires knowledge of the TCP/IP addressing scheme for wireless network that the WNA100 is being installed to and may require the assistance of a network System Administrator.
1. Click on any of the links under the TCP/IP Configuration folder on the left of the adapter's web
interface. The TCP/IP Settings window will be displayed.
2. Select [OFF] from the BOOTP/DHCP pull-down menu.
3. Enter an IP address, network mask (also known as subnet mask), and default router in the fields
provided under the TCP/IP Settings section.
IP Address: Enter an IP address for the adapter, that is valid for the network, in the format of
x.x.x.x, where the x characters represent a decimal number from 0 - 255. For example:
192.168.0.105
Network Mask: Enter a network mask for the adapter, that is valid for the network, in the format of
x.x.x.x, where x characters represent a decimal number from 0 - 255. For example:
255.255.255.0
Default Router: Enter the IP address of the router (Gateway) that the adapter uses to communicate
with the network in the format of x.x.x.x, where the x character represents a decimal number
from 0 - 255. For example: 192.168.0.100
4. If necessary, configure any other settings displayed on the TCP/IP settings window.
Note: For additional information about the various settings, click on the [Help] button at the top, right
of the web browser window.
Section 4: Configure the Wireless Adapter Administrative Utility Settings
1. Click on any of the links under the Administrative Utility Settings folder on the left side of the adapter's
web interface. The Administrative Utilities window will be displayed.
2. Click on the [Change] button in the Configuration Interface section.
3. Select [Wireless] from the pull-down menu and click [Submit].
Note: Setting the default configuration interface to wireless will allow access to the adapter's web
interface after the adapter has been connected to the printer.
4. If necessary, configure any other administrative settings.
Note: For additional information about the various administrative settings, click on the [Help] button at
the top, right of the window.
Section 5: Reset the Adapter to Save All Settings, Then Connect the Adapter to the Printer
1. Click on the [Restart] button in the Reset section on the Administrative Utilities window, and then click
on [Confirm] to reset the adapter so that all configuration settings will be saved.
Note: Do not click the [Reset] button next to Reset to Factory Defaults. This will cause all changes to
be reset and they will need to be re-entered. This is only to be used if the wireless device needs to be
reset to factory defaults.
2. Disconnect the Ethernet crossover cable from the computer, and then connect the cable to the printer's
Ethernet port. A Configuration Page will be printed.
Note: The adapter can be attached to the printer by using the Mounting Kit that was shipped with the
adapter.
Caution! Do not attach the Wireless Adapter to the printer in a way that covers up the printer’s air
vents. Damage to the printer can result by blocking the printer’s air vents.