1
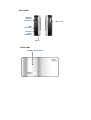
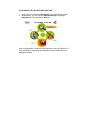
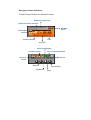
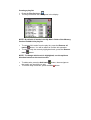
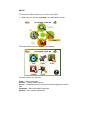
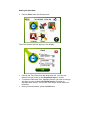
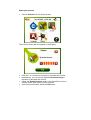
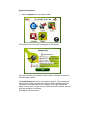
Nav-Cam 7500 User Guide Congratulations on your purchase of the Nav-Cam 7500. Not only can you use your Nav-Cam 7500 as an in-car navigation system, you can also use it as an MP3 player and a photo album viewer. Please read through the following manual carefully in order to use your Nav-Cam 7500 correctly. Contents Nav-Cam 7500 User Guide .................................................................. 1 Contents......................................................................................................3 DESCRIPTION OF BUTTONS, ETC................................................ 4 ACCESSING THE NAVIGATOR FUNCTION................................. 6 MP3 PLAYER ...................................................................................... 7 Mp3 player button definitions..................................................................8 Playing music .............................................................................................9 Adjusting the volume ................................................................................9 Changing the order of tracks ...................................................................9 Repeating tracks ........................................................................................9 Creating a play list ..................................................................................10 PHOTO ALBUM................................................................................ 11 Viewing photos.........................................................................................12 Using the slideshow .................................................................................14 SETUP................................................................................................ 15 Setting the time/date................................................................................16 Setting the volume ...................................................................................17 Screen options ..........................................................................................18 Calibrating the touch screen ..................................................................18 Adjusting the brightness .........................................................................18 Setting the Idle Time ...............................................................................20 Choosing the language ............................................................................21 System Information.................................................................................22 DOWNLOADING FILES TO THE MEMORY CARD ................... 23 CARE AND MAINTENACE............................................................. 24 TROUBLESHOOTER ....................................................................... 25 Terms and Conditions………………………………..………...……24 DESCRIPTION OF BUTTONS, ETC. FRONT VIEW Main Menu Navigator Directional /OK keys Zoom in Zoom out Touch screen GPS signal indicator Power indicator TOP VIEW Headphone/Socket SD card slot BOTTOM VIEW Software reset button Hardware reset switch SIDE VIEWS External antenna connector on/off USB connector External power connector Stylus BACK VIEW Foldable GPS Antenna ACCESSING THE NAVIGATOR FUNCTION Switch the unit on and tap Navigator in the Main Menu screen. Alternatively, you can use the directional keys to highlight Navigator and then press the OK key. After the application loads the main Navigator menu will appear. For more information regarding the Navigator function please see the Navigator Manual. MP3 PLAYER Playing music on your Nav-Cam 7500 couldn’t be easier. Switch the unit on and tap MP3 in the Main Menu screen. Alternatively, you can use the directional keys to highlight MP3 and then press the OK key. The MP3 screen will now appear in the display: NOTE: Music must be loaded to the SD memory card from your computer. See the section entitled DOWNLOADING FILES TO THE MEMORY CARD for more information. Mp3 player button definitions The MP3 Player Buttons are defined as follows: Distance through track Sequence/random indicator Exit MP3 player Linear/repeat indicator Time Volume indicator Song title Select linear/repeat Increase volume Select sequence/random Decrease volume Play list Rewind Play/Pause Fast forward Stop Playing music While on the MP3 screen, press the Play button to begin listening to music. To pause music, press the Pause button . To stop listening to music, press the Stop button . To skip to the next track, press the Fast forward button . To go to the beginning of the current track or skip back to the previous track, press the Rewind button . Adjusting the volume To adjust the volume, press the Increase volume volume or Decrease buttons. Changing the order of tracks To choose between playing tracks in sequential order or random order, press the Select sequence/random button. The current order is indicated in the top left-hand side of the screen. NOTE: The appearance of the Select sequence/random button changes depending on the current mode. Repeating tracks To choose between repeating tracks or not, press the Select linear/repeat button. The current mode is indicated in the top lefthand side of the screen. NOTE: The appearance of the Select linear/repeat button changes depending on the current mode. Creating a play list Press the Play list button The Play list screen will now appear in the display NOTE: By default, all tracks in the My Music folder of the Memory Card are added to the play list. To remove ALL tracks from the play list, press the Remove all tracks button. You will be asked to confirm this operation. To remove only the currently highlighted track, press the Remove track button. NOTE: To change which track is highlighted, use the up/down direction buttons or the touch screen. To add tracks, press the Add track button, then navigate to the track/s you would like to add. To exit the Play list screen, press the Exit button. PHOTO ALBUM You can view individual photos or slideshows on your Nav-Cam 7500. Switch the unit on and tap Photo Album in the Main Menu screen. Alternatively, you can use the directional keys to highlight Photo Album and then press the OK key. The Photo Album screen will now appear in the display: Viewing photos If you cannot see photo thumbnails, but instead see folders (as in the above image), then you can click these to access their contents (as in the image below). You can also scroll up or down to search up or down the list of folders or photos. . If you need to move back up a level, click the back button Once you can see photos, you can click on one to display it full size (see below). You will see several options at the bottom of the screen, which are defined as follows: - Go to previous photo - Go to next photo - Zoom in (You can also use the zoom in key) - Zoom out (You can also use the zoom out key) - View photo at default rotation - View photo at 90° (clockwise) rotation - View photo at 90° (anticlockwise) rotation - Exit screen Using the slideshow Make sure you can see photo thumbnails by using the steps outlined in Accessing Photos . The slideshow will start. Press the Slideshow button To stop the slideshow, click anywhere on the screen. NOTE: Photos must be loaded to the SD memory card from your computer. See the section entitled DOWNLOADING FILES TO THE MEMORY CARD for more information. SETUP To access the Setup feature on your Nav-Cam 7500: Switch the unit on and tap Setup in the Main Menu screen. The Setup screen will now appear in the display: From this screen you can set: Clock – Set the time/date Volume – Set the default volume Screen – Calibrate the touch screen and adjust brightness and idle time. Language – Select the default language System – View system information Setting the time/date Choose Clock from the Setup screen. The Clock screen will now appear in the display: Choose the Time Zone from the drop-down list. You can use either the touch screen or the directional keys to do this. To enter the Date and Time, highlight the item you wish to change and then use the up/down directional keys to increase or decrease their values. The current Time is also shown above for reference. Once you have finished, press the OK button. Setting the volume Choose Volume from the Setup screen. The Volume screen will now appear in the display: Click the + or – buttons to increase or decrease the volume. Alternatively, you can use the right/left directional keys to increase or decrease the volume. Check the Enable Keytone option if you would like to hear a clicking sound each time you press a button. Once you have finished, press the OK button. Screen options Choose Screen from the Setup screen. The Screen will now appear in the display: Calibrating the touch screen Click Calibration. The Calibration screen will now appear in the display. You will be asked to go through a number of simple steps to calibrate the screen. Adjusting the brightness To adjust the brightness, click the + or – buttons Alternatively, you can use the right/left directional keys to highlight Brightness, and then to increase or decrease the brightness. Once you have finished, press the OK button. Setting the Idle Time The idle time feature will automatically switch off the display following a period of inactivity. For example if an idle time of 10 minutes is chosen, the display will switch off if no buttons are pressed during that time. Use the directional keys to highlight idle time or click it on the touch screen. Use the right/left directional keys to choose a suitable idle time. When you are happy with all the Screen settings click OK. NOTE: If you do not wish to use the idle time feature, choose “off”. NOTE: The idle time feature is only activated when running on battery power. Choosing the language Choose Language from the Setup screen. The Language screen will now appear in the display: Click the right/left arrow buttons or use the right/left directional keys to choose a language from the list. Once you have finished, press the OK button. System Information Choose System from the Setup screen. The System Info screen will now appear in the display: Here you can see your device’s serial number, firmware version and GPS firmware version. The GPS Always On option is checked by default. This will keep the GPS module running and the blue signal indicator blinking when the navigator is launched and after it is closed. If you de-selected this option it will require a longer time to initialize the GPS module the next time the navigator is launched. Click OK to exit this screen. DOWNLOADING FILES TO THE MEMORY CARD There are two ways to add music and photo files to the Memory Card. If your PC has a card reader attached, you can simply remove the Memory Card from the Nav-Cam unit and insert it into your card reader. Then using Windows on your PC go to ‘My Computer’. This is usually accessed from the ‘Start’ menu or the desktop. Double click on the ‘Removable drive’ that relates to your card reader. You will see My Music and My Photos folders. You can copy and paste or drag-and-drop any music or photos into these folders from your computer hard drive or CD-ROM. If your computer does not have a card reader you can still add photos and music files to your Memory Card by connecting the Nav-Cam via USB to your PC. You need to have Microsoft Active Sync (supplied on CD) installed first. Simply connect the USB cable from the Nav-Cam to a spare USB port on your computer. Turn the Nav-Cam on. Active Sync will detect your Nav-Cam device and will prompt you to select a method of synchronising, you can select ‘Guest mode’. You will now have Active sync running. You can click on the ‘Explore’ button. This shows you the data stored on the Nav-Cam. If you double click on the folder named ‘Memory Card’ you will see My Music and My Photos folders. You can copy and paste or drag-anddrop any music or photos into these folders from your computer hard drive or CD-ROM. NOTE: For more information about using ActiveSync, please see ActiveSync’s Help file. CARE AND MAINTENACE Keep away from extremely hot, cold or humid conditions. Do not allow the Nav-Cam 7500 to get wet. Avoid shocks or vibrations. Only use the supplied stylus with the touch screen. Do not open your Nav-Cam 7500. Any attempts to open this device will void the warranty. Wipe the touch screen only with a lint-free cloth, slightly dampened, while the device is switched off. Do not place objects on top of the Nav-Cam 7500. TROUBLESHOOTER 1. Nav-Cam 7500 will not switch on. • Make sure that the battery is properly charged. • Make sure the hardware reset switch has not been moved. 2. Bad reception. • Unfold the foldable antenna. • Use an external antenna. 3. New Memory Card doesn’t work or files have been deleted from my original Memory Card. • Format card (only if new), then copy and paste files/folders from within the Memory Card folder on the Nav-Cam 7500 CD to your Memory Card. 4. Screen frozen, or Nav-Cam 7500 is behaving strangely • Do a soft reset. To do a soft reset, insert a thin object into the software reset button. • If this does not solve the problem, then do a hardware reset. To do a hardware reset, slide the hardware reset switch to the opposite position, then return it to its original position. 5. I have a problem with the navigator software. • For all Navigator related questions, please refer to the specific Navigator software manual. 6. I cannot play my music on the Nav-Cam 7500. • Make sure that all music is MP3, WMA, or WAV format. 7. My music appears to be playing, but I cannot hear it. • Ensure that the volume is not set to zero. • Make sure that the track plays correctly on your computer. 8. I cannot see my photos. • Make sure that your images are jpg or bmp format. Terms and Conditions for Nav-Cam 7500 1 year Return to Base Warranty Contact details for warranty cover; Email: [email protected] Tel: 0905 020 0101 9am to 5.25pm Monday to Saturday (Calls charged at 25p per minute) Web: www.nav-cam.com 1. Cover provided under this Contract: (a) An unlimited number of requests for hardware service to the unit during normal working hours of 9.00 a.m. to 5.00 p.m., Monday to Friday inclusive, excluding public and bank holidays. Work performed outside normal working hours, software problems, or customer initiated malfunction will be liable to a charge. (b) The free replacement or repair of any part of the equipment hardware in the equipment schedule that has failed during normal use. Parts may be exchanged on a like for like basis. (c) The Company may inspect, adjust, repair or replace the equipment or any part of it as it considers necessary or advisable. (d) Unless otherwise agreed specifically in writing by the Company in relation to any particular item, the Company has no responsibility under this Contract in relation of any of the following items, namely: (i) Software, storage media, data retrieval. (ii) Building, wiring or telephone instruments where relevant. (iii) External services outside the control of the Company. (iv) Consumable items as specified by the equipment manufacturer/distributor. (v) Repair or alteration of equipment by unauthorised 3rd parties. 2. Period of Agreement: Where the customer is in breach of any of its obligations under this or any other agreement between the parties, without prejudice to the Suppliers other remedies (including the right to terminate this agreement on a continuing or further breach) the Supplier may suspend the provision of its services. 3. Assignment: The Company shall be entitled to transfer or assign all or any of its rights in this agreement and to perform any of its obligations through nominated sub-contractors. In particular monitors may be supported by the manufacturer or their agents. 4. Customer undertakes: (a) To carry out routine day-to-day preventative maintenance as may be recommended under the Customer operating instructions supplied with this equipment. (b) To permit no alteration to apparatus or wiring except by Agreement with the Company and work to be carried out in accordance with approved procedures. (c) To notify the Company in writing in the event that the Equipment is to be relocated. (d) Responsibility for adequate back-up of all data since its protection or recovery forms no part of the agreement. (e) Responsibility for costs incurred for the safe and insured return of the equipment. (Collection of the equipment can be arranged for a charge by Evesham Technology if required) 5. Liabilities: The Company, its servants and/or agents shall not be liable for injury, losses or damage whatsoever unless it is caused by the wilful default of the Company, its servants and/or agents in respect of death or injury unless it is caused by the negligence of the Company, its servants and/or agents. In any event the Company shall not be liable for any losses, damage or delay whatsoever arising from any cause outside the control of the Company, its servants and/or agents. 6. Virus Infection: The number of computer viruses in circulation is increasing. A number of these may result in loss of data or damage to the system hardware. The Customer is responsible for preventing virus infection of their equipment. Work carried out by the Company caused by virus/spyware or malware infection will be chargable. 7. Force Majeure: Neither party shall be liable for any failure to perform its obligations hereunder as such failure arises from any Act of God, War, Strike, Lockout or other labour dispute, Riot, Civil Commotion, Fire, Flood, Drought, Legislation or other causes (whether of the foregoing classes or not) beyond the control of the party concerned. 8. This agreement shall be governed and interpreted according to English Law