1
8gslsl
ffiltlSrtrrrrrtr
-l
o d 6 6 6 6 6 d 6 6i6--o*C=
OO€--
@
R-9251R-925RDS
RUDIO /UIOEO
BECEIUEB
Introduction
UNPA(KII{G
AlIDIIISTAIIAIION
Congratutations on Your Purchase!
Your new highfidelityreceiveris designedto deliver
maximumenjoymentand years of troublefree service.
Pleasetake a few momentsto read this manual
thoroughly.lt will explainthe teaturesand operationol
your unitand helpensurea troublefree installation.
Pleaseunpackyour unitcarefully.We recommendthat
you save the cartonand packingmaterial.They wiltbe
helpfulif you ever needto moveyour unitand may be
requiredif you ever need to return it tor service.Your unit
is designedto be placed in a horizontalpositionand il is
importantto allow at least two inches ol space behind
your unitfor adequatevenlilationand cabling
convenience.
To avoid early damage, never place the unil near
radiators,in front of heatingvents, in direcl sunlight,or in
excessivelyhumid or dusty locations.Connectyour
complementarycomponentsas illustraledIn the following
seclion.
FISK OF ELECTAE SHCICK
OO NOT OPEN
Caution regarding placemenl
A
(Except for U.S.A and Canada)
,/l\
To maintainproperventilation,
be sure / I \
to leave aspace around the unit (from l:\,
the largestouterdimensionsincludingprojetions)
equalto, or greaterthan,shownbelow.
Lett and right panels:5 Cm
RearDanel:10 Cm
ToDoanel:20 Cm
A
CAUTION: TO REDUCETHE RISK OF
ELECTRICSHOCK,DO NOT
FEMOVECOVER(ORBACK).
NO USER.SEBVICEABLE
PABTS
INSIDE.
REFEBSERVICING
TO
OUALIFIED
SERVICE
PERSONNEL.
This symbol is inlendedto alert the user to the
presenceol uninsulated"dangerousvoltage"
within the producl'senclosurelhat may be of
sutficientmagnitudeto constitutea risk of
electric shock to Dersons.
This symbol is inlendedto alert the user to the
presenceol importantoperatingand
maintenance(servicing)instructionsin the
literatureaccompanyingthe appliance.
To reducethe riskof fireor electricshock.do nol exoose
thisapplianceto rainor moisture.
Caution : Do not block ventilation openlngs or stack
other equlpment on the top.
z
READ
IHISBTFORE
YOUR
OPTRATIIIG
UNII
FOR U.S.A.ANDCANADA
120v FOn OTHERCOUNTRTES
Unitsshipped
to theU.S.A.andCanadaare
designedfor operationon 120V AC only.
Safetyprecaution
withuseof a polarizedAC plug.
However,someproductsmaybe suppliedwitha
plug.
nonpolarized
CAUTTON: Topreventelectricshock,matchwide
bladeof plug to wide slot,fully insen.
ATTENnON : Pourevitet leschoc electriques,
introduirela lamela plug laee de la borne
corrcspondantede la priseet poussrejusqu'autond.
110V/2mV
Unitsshippedto countriesotherthanthe above
countriesare equippedwithan AC voltageselector
switchon the rearpanel.Reterto the tollowing
paragraph
for the propersettingof thisswitch.
AC VOLTAGESELECTION
Thisunitoperateson 110-220V AC.TheAC voltage
selectorswitcheson the rearDanelare setto the
voltagethatprevailsin the areato whichthe unitis
shipped.Beforeconnecting
the powercordto your
AC outlet,makesurethatthe settingpositionof
theseswitchesmatchyourlinevoltage.lf not,they
mustbe set to yourvoltagein accordance
withthe
followingdirection.
FORAUSTRALIAANDEUFOPE..220 V23O VE4OV
AC voltage selectorswitches
Unitsshippedto Auslraliaare designedfor operation
on 240V AC only.
To ensuresafeoperation,
the three-pinplug
suppliedmustbe insertedonlyintoa standardthreepin powerpointwhichis effectively
earthedthrough
the normalhousehold
wiring.Extension
cordsused
withthe equipmentmustbe three-core
andbe
correctlywiredto provideconnection
to earth.
lmpropereltensioncordsare a majorcauseof
fatalities.Thelactthatthe equipment
operates
satisfactorily
doesnot implythatthe powerpointis
earthedandthatthe installation
is completely
safe.
Foryoursafety,if in anydoubtaboutthe etfective
earthingot the powerpoint,consulta qualified
electrician.
PAN.EUROPEAN
VOLTAGE
UNIFIED
All unitsare suitablsfor useon supplies220-240V
AC.
AC 220 V
110V
Moveswitchleversto matchyourlinevoltagewitha
smallscrewdriver
or otherDointedtool.
SystemConnections
. Do not connect the receiver to the wall AC outlel when plugging and unplugging connectioncords.
' Be sure to connectthe white plugs to the L (lcfi) and the red plugs to the R (right)jacks when making connections.
. Change the position of the FM indoor antenna until you get the best reception of your favorite FM stations.
. A ?5 Q outdoor FM antenna may be used to further improve the reception.
Disconnect the indoor amenna before replacing it with the ourdoor one.
' Place the AM loop altenna as far as possible from the receiver, TV set, spea]er cords and the AC input cord and set it to a
direction for the b€st reception.
. lf the receptionis poor with the AM loop antenna,an AM outdoor antennacan be used wirh the AM looD antenna.
. Make connectionsfirmly and conecdy. If not, it can causeloss of sound,noise or damageto the receivei.
' If the electricity fails or the AC input cord is lefi unpluggedfor about 2 weeks,the memorizedcontentswill be all clearcd.
So you should memorize them again.
I CONNECTING
ANTENNAS
FI'
_i!!l
r=r 5ii1
BtiSlilm
./l
fEsl
|p*n
V
! CONNECTING
AUDIOCOMPONENTS
TV oraddliral vilo dnporErn
' TtE TAPE2 [,nilITOR PIAY/REC tdc n|av abo be corhe*d b
t€ UNE OUTIN u€ d an cdirtei q4tb €q-€Izer.
' Tl€ TV/AUX
i* rmy eEobecrrn@d b anaddtiinal
vile comporHn$Jdrasa de TVtJr€rora vih (E(
fEt
A
tl
V
I CONNECTING
DIGITALINPUTS
. A digitalinpul should b€ connectedto the componentssuch
as LD play€ror DVD, elc. capabl€ol ouFrrtingDolbyAC-3,
PCM or HF tormatdigitalsignals
. For details,reler lo lhe operalinginslrudionsoflhe
componenlconnecled-
CONNECTING
SYSTEMCONTROL
S)l5t6rn
cantol
cord
. Never shorl circuillho + and - soeakercords
. B€ sure to connsct sp€ak€rs finirly and conoclly
accordinglo lhe channel(letl and right)and lhe polarity
. Conn€cl lh|s jack to the OlGl L|NKj6ck ol the exlemal
SherwoodcomDonentthat uses the DlGl LINK ll or lll remole
. Be sure to use lhe sDeakerswilh the imoedanc€ol over
8r).
. Alwaysconnectbolh r€ar sp€akers.
. For installingthe sp€ak€rs,r€l€r to "Speak€rplacsmsnt'
on page 13
I MAIN lN connections
r AC INPUTCORD
Plug this cord into a wallAC outlet
. Whena separate
preamplifrer
|s usedlorfrontchannets,
jackslo thepreamplit€randconnecttheJront
connectthese
speakerc
to thisreceiver
lorFsl
I PREOUTconnections
T SWITCHED
ACOUTLET
Fronlspeakers
.This outletis swilchedon and off by
the STANDBYbuttonon the lront
panelor lhe POWERbuttonon the
remotecontrol (Maximumtotal
capacityis 100W)
Power amplifier
fSlandby mod€- switchedAC outletotl -l
LPoweron mode- switchedAC outleton J
Cenlerspeaker subwooler
Poweramplifier
Rearspeakers
Use thesejacks il you wanl to listen at even highervolume levels
Connectthe PRE OUT jacks to rhe poweredspeakersor the power amptiti€rs
connectodlo speakersresp€clively.
To emphasizeth€ deep bass sounds,connecta subwoofer.
When you do not use the ftont MAIN lN and PRE O|JTjacks,alwaysconnecl these
jacks with the suppliedjumper plugs.
Front Panel Controls
BIIIGEEUTTOMNDICAIOR
VIDEO
UEELSBUTTON
BECORD
EUTTON
MOiIITOR
BIJTTON
SELECTOB
/ INDEX
Xl'lOB
VOLUME
CONTROT
KNOB
6ee$
ffisss88888e
HEADPHONE
JACX
NUMEBIC
EUTTONS
SPEArcA
ott/ilFFswtTcH
OIGITAI INPUT
SEL.ECT
EUTTOX
DOtSYDTGTTAL(
C-3)
BUTTON
MOOE
EUTTON
SUFROUND
OFFBUTTON
SUBROUND
FBONI/REAF
AUXSELECT
EUTTON
FFONT
AUXINDICATON
SUBWooFER
LEVEL
UP/DOIVN
SI'TTOIIS
EAr r€E CONTROT
KXOB
CENTEB
TEVE!UP/DOIVI,I
BUTTONS
TBEBLE
CoI{TROIKNOB
MOOE
SPEAKEB
BUTTON
REARLEVELUPDOW\8fiONS
XI1OB
EASSCONTROL
MOOE
BLIrION
MEMOFY/
ENIEFSUTTCTT,I
CII.iEMA
EASSBUTTON
EUTTOII
BUTTON
OIBECT
TlJl{lNGUP/DOwllEUTIoN
BDSoNLY)
RDS
BLrnoirs(R-925
tol
tul€rlo'Addllional
tuncton
Tunor
Only'onpag€
18
R.925
RDS
I AUX/VIDEO
INPUTJACKS
INPUT.
INFOMATIONS,
€lc
FREOUENCY.PRESET.
VOLUME
LEVELOPERATING
' TheAUX,TIDEOiacksmayb€ alsoconneclodto an
addilronalvideocomponentsuchas a c€mcordor,a video
dgckor a vdeo gameplayer,elc,
-
DlGl LINKlll SystemRemotecontrols
. You can remotely control not only this receiverbut also Sherwoodcompatible componentsbearing rhe DIGI LINK ll or
lll logo.
. For systemremote control opemtion, first make the DIGI LINK connections.
PRESETSCANBUTTON
SYSIEM DISPLAY BUTTON
I CD PLAYERSECTION
DISC(CDcharEer onv) - firr dirc selecton
> -lo begin play
r - tor pausirE p|ay
! - lo slcrpplay or tc' clgar a pr€Gm
E , B - lor skiryng bad(\t€d or toM'drd
REPEATA < > B - to play a sp€ciftcpassag€
rep€atedly
INTRO SCAN - to peview eadr tsackonly
lor 10 sec
INPUTSELECTOR
BUTTONS
h tr€ sranfry nrode,rrtronp@ssing
a inpul
s€leclorhrtlon,[re uni is fum€donaulomatiirfu
ard fE cbsiredinDutsourceis select€d-
NUMERIC BUTTONS- lor selectingpresel stalio.ls
or entedngfr€qu€ncydircc{y in tuner nlode
For s€lectng a track or a disc in CD rnode
When seleclinga disc, s€leclcfisc M (1-5) wff n 2
sec afler pr€ssingfie DISC txrttonI TAPE DECK SECTION
DECKSELECTOFA, B - tor s€l€ctngdeck A or I
- to t€gin torw'ad or reveF€ side phyback
-, r - lo{ pausing phyback or rc€odng
. - to slop playbaci or.€codng
lo \Nindtato€reverseo. torwad
-, - . - lor ccording
I EQUAUZERSECTION
SURROUND
i'ODE BUTION
DELAYT1MEBUTTON
MASTER
VOLUME,CENTER
LEVET,REAR
LEVEL/SUBW@FERLEVELUPiDOWN
(A/v)BUTTONS
PRESET - lor selecringequaiEer pattom.
USEB - tor adiusling eqralizer paltem as cl€sircd.
FILE- tors€leclingdesircdequalzerpattemn
or6s€lor in theuserrnode
DISPLAY
€qualizer
disphy
- torsel€c1tng
T.MON - tor nrcnitonngf|€ sound ol recoding or
dayback m tap€ d€ck
MUTEBUTTON
. In the DICI LINK lll remote control system,if pressingPLAY,etc. on CD player or rapedeck, CD or TAPE 2 MONITOR
is selectedautomatically withoul selectingthe input sourceand then PLAY,etc. slarts.
In this case,tolisren ro TAPE I, switch off the TAPE 2 MONITOR and select rhe TAPE l.
Notes:
. Some functions for CD player, tape deck or equalizer may not be available.
. For details about functions, refer to the operatinginstructionsofeach component.
t
ebr*4
L'
5
-
ffri'.,:i4ii4f
::
do66oddd- 6- b-
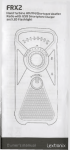
. Usethe remolecontrolunitwithina rangeof about7
meters(23leet)andanglesof up to 30 degrE€s
aimingof lhe remotesensor.
1. Removethe cover.
2. Loadtwo batteriesm atchingthe polarity
2 x 1.5V
R 6/ SUM-3/M
. Removethe batterieswhentheyare not used
fora longtime.
. Do notusethe rechargeable
batteries(Ni-Cd
tvpe).
fl
Operations
6l
"t"""n"
oesired
inPut
source
ir,'
. The STANDBY indicator lights up. This meansthat
the receiver is not disconnectedfrom the AC mains
and a small amount of current is retainedto support
the memorizedcontentsand operation readiness.
. To switch the power off, push the POWER switch
again.
. Then the power is cut off and the STANDBY
indicator goes off.
5ffi
t-r
t-r
. Each time the INPUT SELECTOMNDEX knob is
rotated,the input sourcechangesas follows I
PHoNo * TUNER- CD PLAYER TAPE I *l
T
(frequencydisplayr
|L.
I
AUVTV * VCRI * LD PLAYER - DVD J
. When the TAPE 2 MONITOR burronis serto on so
that -TAPE 2M" indicator lights up, other inputs
ln the standbymode, tum the power on.
can not be heard from the speakers.
To listen to a input sourceother than TAPE 2
MONITOR, be sure to set the TAPE 2 MONITOR
button to off.
56ffi
E
E
E
E
t-r
. Each time the STANDBY button on the receveror
the POWER button on the remote cont.ol is pressed,
the receiver is tumed on to enter the operatingmode
or off to enter the standbymode
. ln the standbymode, if the INPUT SELECTOR
button is pressedon the remote confol, the receiver
is tumed on automatically and the desiredinput is
selected.
TAPE 2 MONITOR function
You can connecteither a tape deck or a graphic
equalizer to the receiver'sTAPE 2 MONITOR jacks.
Only when you listen to the componentconnectedto
thesejacks, ser the TAPE 2 MONITOR burton ro on
If you connecta 3-headtape deck, you can listen to the
sound being recordeddufing recording,not the source
sound,
For funher details,refer to the operatinginstructions
of the componentconnected-
WhentheAUXTVis selectedas inputsource
O'*"'n^'':6t::""
. Selectthefront AUX/VIDEO or therearTV/AUX.
b
n
lh
. Then soundcan be heard from the speakers
connectedto the speakerterminals.
. When using the headphonefor private listening,
pressthe SPEAKER swirch again to switch the
speakersoff.
U
If thetiont AUX/VIDEO is selected,
theFRONT
AUX indicatorlightsup.
E
WhenCD,DVD,LDPor AUVTVis
selectedas input source
Adjust the stereobalancebetween the left and
the.ightchannels.
BALANCE
. Selectthe digital (or the analog) input connectedas
desired
. Each time this button is pressed,
the correspondinginput is
selectedas follows;
Tnthe nomal stereoor a
surroundmodeolherlhan lhe
Dolby DIGITAL(AC-3) mode.
f-;;r*--.l
| ^*' I
lk
( l
\J
OPTICAL-+ COAXIAL ) ANA LOG ---t
I
-- In the Dolby DIGITAL(AC-3) mode:Not available for CD
Adjust the subwooferlevel.
-
Jh
U
(RF:LDPonly) -r OPIICAL r COAXIAL -l
. When the selectedoptical or coaxial digital input is not
- connected,the selectedDIGITAL INPUT indicator is
flickering, meaning no sound.(Ref€r to "Select the
desiredsunound mode" on page 13)
. When DVD, LDP or AUX/TV is selectedand the
Dolby DIGITAI-(AC-3) mode is selected,regardlessof
the input sourceselected,the Dolby DIGITAL(AC-3)
program sourceson the componentconnectedto the
selecteddigital input can be heard.
. It is adjustableonly when the subwoofer is connected
and the subwooferis set to "YES". (Refer to
'Adjusting the speakersetting" on page 14 )
To enjoytheimpressive
basssound.
o
t\
component
for playback.
Operatetheselected
. Whenplayingbacktheprogramsources
with thesufioundsound,referto
-Enjoyingsurroundsounds"on page13.
Adjust the (overall) volume.
U
Pressit again to cancel.
To mute the sound.
The "MUTE" is flickering.
To resumethe previous sound level, pressit again.
Adjust the tone (bass and treble)
BASS
To listen with the headphones.
TREBLE
/.)
I.U
Note : Extreme settingsat high volume may damage
your speakers.
' Ensurethat the SPEAKER ON/OFF switch is set to off.
suRRoultD
soul{Ds
. The R-925/R-925RDS
incorporatesa sophislicatedDigitalSignalProcessorthat allowsyou to createthe
optimumsoundqualityandthe soundatmosphere
in yourroom.
Surroundmodes
Thisreceiverhas7 ditferentsurroundmodesto allowyouto enjoysurroundsoundwiththevarious
program
DOLBYDIGITAL(AC-3),
DOLBYPROLOGIC,DOLBY3 STEREO,
sources:
THEATER,
HALL.STADIUM.CHURCH.
DOLBYDICITAL(AC-3)
: Allowsyouto enjoyupto 5.1channels
ofdigitalsunound
soundfromDolby
program
DIGITAL(AC-3)
bearing
ttre"EH'
sources
trademark
suchaslaserdiscs.
Dolby DIGITAI,(AC-3) provides even better sound qualiry, improved dynamic range
and great senseofdirection, comparedwith the conventionalDolby surround.Now,you
are able to enjoy real movies in your home.
DOLBY PRO LOGIC : This receiver incorporatesthe Dolby Pro Logic SurroundDecodcr which has the same
functions for playback as movie theatersand gives a theater- like experiencein your home,
naturally reproducingthe audio soundfield. Use with Dolby Pro Logic program sources
" trademarksuch as video cassettetapesor laser discs.
bearing the 'El6rrrmpl
DOLBY 3 STEREO I Combining the .ear sp€akersignal with ihat of the fmnt speakersallows you lo enjoy a
regeneratedsound field which has comparativelymore presenceand a more expansive
feeling from the 3 front channels(front L,front R and center speakers)than thar of ordinary
"
stereoregeneration.Use with Dolby program sourcesbearing the " tEldry.r,Eml
lrademark.
THEATER : This mode provides the effect of being in a movie theaterwhen watching a movie sourcesthat have a
stereosound track
HALL : This mode provides the ambienceof a concert hall for classicalmusic sourcessuch as orchestral,chamber
music or an instrumentalsolo.
STADIUM : This mode provides the expansivesound field. For music sourceslike a rock concen, you will feel as
if you were actually at the live concert.For spons programssuch as a baseballgame, you can enjoy a
powerful sound,thus obtaining lhe tlue stadium effect.
CHURCH: This mode provides the ambienceof a church for baroque,slring orchestraland choral group music.
Delaytlme
The sound heard in a place such as a concen hall or a movie theaterconsistsof the direcl sound that reachesour
ears directly from the soundsourceand the reflected sound that is indirectly reflected off from walls, floor and
ceilling. The reflected sound reachesour ears slightly later than the direcl sound.The delay time is the time
difference betweenthe direct sound and the reflected sound.The optimum delay time will be different accordingro
the room size and the acousticproperties.It is recommendedthat you try different times to obtain the best effecr.
. It is adjustablein the Dolby DIGITAL(AC-3) and the Dolby Pro Logic modesonly.
. Manufacturedunder licence from Dolby LaboratoriesLicensing Corporation.
"Dolby" ,"AC-3", " PRO LOGIC" and the double-D symbol are trademarksof Dolby Laborato.iesLicensing
Corporation.Copyright 1992Dolby Laboratories,Inc. All rights reserved.
Speakerplacement
To obtain the bestsuround soundeffect in you! home,placethe
speakeNasfollows;
. Front speakers: Placeeachftont speakerabout lm (,1O")from the
TV set.
. Celrterspeaker: Placethe centerspeakereitheraboveor below the
TV setto assuregood visualizationof center
channelprogram.
. Rearspeakers: Placethe rcar speakersapproximatelylm abovethe
ear level of a seatedlisteneron the direct left and
rigbt of themor slightly behind.
. Subwoofer: Regoduc€spowerful deepbasssounds.Placea
poweredsubwooferanywherein the front asdesired.
. The ideal suround systemneedsall the speakeNlisted above.
However,if you don't havea centerspeaker,a subwooferor rear
speakers,selectthe bestpossiblesuround modewith the available
speakers.
Note: To avoid interference$,ith the TV picMe, useonly magnetically
shieldedcent€randliont speake$.
EilJoYmG
SURnoUilD
SoUI{DS
. Surroundsoundetfectwillnotwoft properlyif the signalpassesthrougha graphicequalizer.
Ploasersfsrto yoursqualizeroperatinginstructions
for guidanceon switchingotf (or defeating)
the equalizer.
seler:thedesired
surround
mode.
lll
I
When selectinga surroundmodeother thanthe
Dolby DIGITAI,(AC-3)mode.
When selectingfte Dloby DIGITAI,(AC-3)mode.
t*l
Ts,,€,o--.l
t* l
Jh
U
. The Dolby DIGITAI,(AC-3) modeis availablefor the
input sourcessuchasDVD, LDP and ADOTV only.
. To enjoy the Dolby DIGIIAI,(AC-3), be surethai the
programsourceto be playedbackis the Dolby
DIGITAL(AC-3) progam sourceand the conespordirg
digital input is selected.Ifnot, no soundwill be heard.
. WhenLDP is selected,RF canbe a.lsoselectedamong
the digita.linputsin the Dolby DIGITAI.(AC-3)mode
only.(Referto "When CD, DVD, LDP or AU)CTV is
selectedasinput source"on pageI I .)
n
lh
U
. Eachtime the SURROUNDMODE buttonis pressed
the surroundmodechangesasfollows,
tf DI0nAI-(AC-3)--J
tE ProLo$c-+m 3Sterco--+fiEATER
P
L (OFF) <- CHURCH e STADIUM e HALL (J I
"( )":Remotecontsolonly.
I Whencancelingthe suEoundmodefor normal stereo
oDeratiotr.
E
b
Adiusting the speakersettings
Selectthe desiredsubwoofer mode.
. Adjustingtheseningof thecenterspeakerandthe
subwooferconnected.
Pressthe SPEAKERMODE buttonfor morc
than2 seconds
to enterthecenterspeaker
mode.
SPEAKER
MODE
I
n
J\
U
SPEAXEF
MOOE
n
-tl
J\
\J
. In theTHEATER.HALL. STADIUM.CHURCHor
noamalstereomode.it will becomethesubwoofer
modedirectly.
Selectthe desiredcenter sDeakermode.
. Each time this button is pressed,thesubwoofer
mode changesand flickers as follows;
f_l
YES : Whenusinga subwoofer.
NO : Whennot usinga subwoofer.
Memorize the desiredsubwoofermode
while it flickers.
SPE{EF
IIODE
E
r]
MEMO
/ ENTEE
tl
o
. Each time this button is pressed,the centerspeakermode
chansesand flickers as follows:
U
/\
,lh
LARCE I When using a relatively large centerspeaker.
SMALL : When r-rsinga relatively small center sp€aker.
L-
NONE : Whennot usinga centerspeaker.
If the subwooferdisplay goes off, repeatagain from
the above steD2.
. In the Dolby 3 Stereomode, the NONE mode can not b€
selected.
Memorize the desiredcenter speakermode
while it flickers.
Checkingthe speakersettlng
MEMO
/ Et'tTER
on
J\
\-/
. The desiredcenter speakermode is memorizedand
then it becomesthe subwoofer mode.
. lf the center speakerdisplay goesoff, repeatagain
from the above step 2.
SPEAXER
MOOE
n
-tlh\
U
Each time this button is pressedbriefly, the setting
of the centerspeal<eror the subwooferis displayed.
I
In Dolby DIGITAL(AC-3), DolbyPro
Logic or Dolby 3 Stercomode
Check the delav time to be adiusted.
hess the TEST TONE buttonto adjustrhe
volumelevel of eachsDeaker.
. Test tonewill be heardform eachspeakerfor 2
seconds
eachasfollows;
FRONTL{ENIER-FRONT
R-REARR-REAIL ,StE I
- . The testtone will be heardfrom the subwooferonly
when subwooferis setto "YES" in the Dolby
DIGITAVAC-3) mode.
. Test toneis not heardfrom rear speakersin Dolby 3
Stereomode.
. Test toneis not heardfrom centerspeakerwhenthe
centerspeakersettingis adjustedto the NONE
mode.
Adjustthevolumelevelsof thespeakers
until theyall soundequallyloud.
Thedelaytimewill be displayedfor 5 seconds.
In Dolby DIGITAI,(AC-3) rnode,the conesponding
delay time will ti flickering.
Thecenterdelaytimecanbe adjustable
only in
Dolby DIGITAL(AC-3) mode.
The reardelaytime canbe adjustableonly in Dolby
DIGITAI-(AC-3)andDolby Pro l-ogic modes.
Adjustthedelayrime.
. Each time this button is pressed, the delay time
cha[ges in regular intervals.
. If the delay time disappears, start from the step l0
agaln
Memorizethedelaytime.
0
. The rear L andR volumelevelsare adjusted
rcpse.tively during the testtonefunction andall
togetherwhile enjoying surroundsounds.
Cancel the test tone function.
. In Dolby Pro Logic mode,the
reardelay time can be
memolizedwithoutpressing
theDELAY TIME button.
In Dolby DIGITAI(AC-3) mode,repeat
the abovestepsI I and 12 to adjustthe rear
delaytime.
In THEATER,HALL,STADIUMor
CHUBCHMode
Adjustthevolumelevelof the
rear speakersrelative to that of
the front sp€akers.
BROADOSTS
TISTTNII{G
TORADIO
. Manualtuningis usefulwhenyou alreadyknow the
frequencyof the desiredtransmitter
PressTUNING - or + repeatedlyuntil the
dght frequencyhas been reached.
Select the deslredband
6
n
i\
U
BAND
unt"t t"quencv
direct
tunins
mode
'n"
16l
FREOUENCY
. Each time this button is pressed,the band ts
changedto FM or AM
. When pressingthe BAND button without
selectingthe TUNER, the tuner will be selected
automatically and operate.
PressTUNING - or + for more than 0.5
second.
Enter the ftequencywithin 7 secondstbr
eachdigit.
.FM89.15MHz:
O O-O
O
. F M 1 0 0 . 1 5M H z : O - O - O - O
.AM576kHz:
O-O-O
. AM l6llkHz r g-g-g-9
. Then AUTO appearson the display. The tuner will
now searchuntil a station of sufficient strengthhas
been found. The drsplay shows the tuned
frequencyand "TUNED".
. If the station found is not the desiredone, simply
repeatthis operation
. Weak
are \kippedduringautoluning
'rations
. In FM band, If "l" rs pressedon the first drght,
"l0" is entered.
. With the numeric button on the remote control, you
can also enter the frequency.
. In eachdigit, rf it elapses7 seconds,
pressthe
FREQUENCY DIRECT button again to enter the
frequency.
Presettingradlo statlons
. You canstoreup to 30 preferredstationsin the
memory.
Tune in the desiredstation witb auto or
manual tuning, etc.
Listenlngto FM stereo broadcasts
. whilc lislening to FM broadcasts.
o
n
In\
\t
PresstheMEMORY/ENTERbutton.
o
n
J\
\-/
. "MEMORY" is flickering for 5 seconds.
Entera presetnumber(l-30).
Examples)
. For"3" :
. For" l5" :
o
theFM mode
' Eachtime thisbuftonis pressed,
changesasfollows;
mode: "ST" lightsup -l
[' Stereo
.Monomode: "ST" goesoff <J
. WhenFM stereobroadcastsarepoor becauseof weak
broadcasrsignals,selccttheFM monomodeto reduce
the noise. then FM broadcastsa.e reDroducedin
monauml sound
Scanningpreset statlons in sequence
o-o
. The stationhasnow beenstoredin thememory
. A storedfrequencyis erasedfrom thememoryby
storinganotherfrequencyin irsplace.
. lf "MEMORY" goesoff, pressthe
MEMORY/ENTERbuttonagainto entera preset
numbef.
. Thereceiverwill startscanningthestationsin the
presetsequence
andeachstationis receivedfor 5
seconds.
Tunlng to preset stations
Pressthe desiredDresernumber.
At thedesiredsrarion,pressrhisbutton
agalnto stoPscanning.
I MEMORY BACKUP FUNCTION
When pressingthe numeric buttons on the front
panel without sclecringthe TUNER, the tuner will be
selectedautomaticallyand the presetstationwill be
tuned in.
The following items, set before the receiver is tumed off,
arc memorized.
lf the electdcity fails or rhe AC input cord is
disconnectedfor about 2 weeks,they are all cleared.
So you should memorizethem again.
. INPUT SELECTdR settings
. VCR I RECORD senings
. Surround mode senings
. Presetstations
. Video labels.etc.
Additional Function for R-925RDSTunerOnly
(Iill onlyl
tlSTEl{|l{G
T0RDS
BROADCASTS
RDS(RadioDataSyslem)is a methodfor sendinginformation
signalstogetherwiththe transmitter
signals.Your
tuneris capableof translating
thesesignalsand puttinglhe information
on the display.Thesecodescontainthe
followinginformations
.Programservicename(Ps),A list of ProgramTypes(PTY),TratficAnnouncement(TA),
RadioText(RT).
ClockTime(CT),
. Use this function to automatically searchand
receive the stationsofferine RDS services.
In theFM mode,selecttheRDSsearchmode.
r-
n
Jn\
\J
. Eachtime rhisbunonis pressed,
thesearchmode
changes
asfollows;
. The tunerautomatically
searches
for statrons
broadcasting
thetraffic program.
. "NO TRAFFIC"is displayedif thesignalis too weak
or thereareno stationsbroadcasting
therraffic
program.
. When'TP SEARCH"is nordisplayedrepeatagain
from theabovestepl.
SEARCH-TPSEARCH-PTYSEARCH--OFF-1
L
-RDS
. Use this funcrion to automatically searchand reccive
the stationsbroadcastingthe desiredprogram type.
In the FM mode. select the PTY searchmooe.
. "PfY SEARCH" is disDlaved.
. The tuner automatically searchesstationsoffering
RDS servicesand lhe stationname is displayed.
. If the stationfound is not the desiredone, pressthe
TUNIG - or + again while the RDS indicator is
flickering.
. If no other RDS station is found, "NO RDS" is
displayed.
. When "RDS SEARCH" is not displayed,repeat
again ftom the above step L
. Use this functron to automatically searchand receive
the stationsbroadcastingthe traffic program.
While displaying"PIY SEARCH",selectthe
desiredprogramtype.
n
J\
U
. Eachlime thisbuttonis presscd,
oneof 17diffcren!
(NEWS,AFFAIRS,
typesof programsis selected.
INFORMATION,SPORT,EDUCATION,
DRAMA, CULTURE,SCIENCE,VARIED, POP
MUSIC,ROCKMUSIC,M,O,R,MUSIC.LIGHT
MUSIC,SERIOUSMUSIC,OTHERMUSIC,
ALARM, UNDEFINED)
. When"PTY SEARCH"is nol displayed,
repeat
againfrom theabovestepl.
In the FM mode, select the TP searchmode.
n
lh
U
. The tuner automatically searches
a stationoffering PIY services.
. Ifno station is found, "NO PROGRAM" is displayed.
EONPTY(EON: Enhanced
Other
Networks
information)
EONTA
Use this function to automatically searchand receive
the traffic announcementwhile listening to traffic
program.
Use this function to automaticallysearchand receive
the desiredprogram type while listening to a RDS
station.
In the TP mode.
In the RDS mode.
J\
U
h
U
Traffrc program is displayed and the TA indicator
lights up.
If the presetstation broadcastingtraffic announcement
is found, it will be tuned in while listening to traffic
program.
Program type is displayedand the PfY indicator is
flickering.
If the station stopsbroadcastingtraffic announcement,
the tuner will find other stationsrepeatedly.
If no station is found, the previous traffic program
station will be tuned in.
Pressthe EON TA button to cancel the EON TA
mocle.
While the PTY indicator is flickering,
the desiredp.ogram type.
DISPLAY
In the FM mode.
:
,lh
rl
I r]\
U
U
lf one of the presetslalions is broadcastinglhe
selectedprogram type, it will be tuned in while
listening to a RDS station.
If the station stopsbroadcastingthe selectedprogram
type, the tuner will find other stationsrepeatedly.
lf no stationis found, the previous RDS stationwill
be tuned in.
When the PTY indicator goes off, repeatagain from
the above step l.
Pressthe EON PTY button to cancel the EON PTY
mode.
. Each time this button is pressed,the display mode
changesas follows;
f--_-l
tP'o'u''l fP'ffi]
nane
, lr'equency
l- servci
(P s r II
I
ll
rype I
t P rv r|
k"-f.l tEd'-l
rime-l ren I
{ c ll lrq n l
I
. If thesignalsaretooweakor no RDSserviceis
available."NO NAME DATA". "NO PIY DATA"
"NO TIME DATA" oT"NO IEXT DATA" will be
disolaved.
AUDIO
RTCORDIl{G
The digital signalsfrom optical,coaxial or RF digital input can be heard but cannot be recorded
Recordingwith TAPE2 MONITOR
Recordingwith TAPE1
Selectthe desiredinput as recording source
exceptfor TAPE 2 MONITOR
Selectthe desiredinput as recording source
exceDtfor TAPE1 and TAPE 2 MONITOR.
r
l-1
r-] tr-] tl. Be surethattheTAPE2 MONITORindicatorsoesoff.
Set the TAPE 2 MONITOR button to on
t'*t"""'ding ontheTAPEl '
O
'|-'
O*-'--i"':--:-:
t'* *-'oin8ontherAPE2MoNIroR'
Gt
Staflela)'on
rhedesired
input.
@
. When the TAPE I is selectedas recording source,
dubbing will stan from TAPE I to TAPE 2
MONITOR.
. It is not possibleto dub from TAPE 2 MONITOR to
TAPE I.
. For tape 2 monitor function, refer to -TAPE 2
MONITOR function" on page 10.
RECORDII{G
WITH
VCRI
The digital signalsfrom oplical, coaxial or RF digital input can be heard bul cannot be recorded.
Dubbingfrom video componentsto VCR1
Listeningto other audio inputs during
Example)Whendubbingfrom LD playerto VCR I
SelectLDP as program soucehing
Example)Wlen listeningto CD duringdubbingfrom
LDP tOVCR I.
SelectCD as the program sourcebeing
enjoyed.
/
*:
r^
z"---'\
\-/
or
' r l ,E
PBOGBAMSOURCEbeingenjoyed.
SelectLDP as recording source.
t"*'.too asrecordiog
source'
O
. Eachtime thisbuttonis pressed,
therecording
sourcechanges
asfollows;
l+
DVD+ LDP+ AUx
-
SOURCE
I
:.:__:-..
o
the
LDP.
tt* *-'oins onthevcR I
Ot,*o^r.n
@
tt"nott'nthecDP'
the
LDP.
"n
Ot""r^,
. The audio and video signalsfrom LDP will be
dubbedonto the lape in VCR I and you can enjoy
LDP on the TV set and from the sDeakers.
@
The audioandvideosignalsfrom LDP will be
dubb€dontothetapein VCR I andyou canlisten
to CD.
Enioyingothervideoinputsduringdubbing
Example) When enjoying DVD on the TV set and from
the speakersduring dubbing from LDP to
VCR I,
Example) When dubbing and enjoying LD video signal
SelectDVD as the Proglam sourcebelng
enJoyed.
recording
"o'
n
J\
\J
'""
vcil
ifc
\
-'i+-. --- I
#.
\
\
Ii
't, +t
|
tllll/,/
-ttt
,--t', t--i i: il
vcRI
onrhe
*'o'oins
Gt
SelectCD as audio sourcewithin 5
seconds.
Ot'*o'^"ntheLDP'
t""oot"ntheDvD
G,
. Theaudioandvideosignalsfrom LDP will be
dubbedontothetapein VCR I andyoucanenJoy
DVD.
l fl l l l /,/
-r--L
g
Tl
-Li
tr-'L i--it,'E l,-il-
oTHER
tultctol{S
Compressingthe dynamlcrange
(Dolby DIGITAL(AC-3)
mode only)
. This function compressesthe dynamicrangeof
previouslyspecifiedpafts of the Dolby
DIGITAL(AC-3)soundhack(withextremelyhigh
volume) to minimize the differencein volume
betweenthe specifiedandnon-specifiedparts.
This makesit easyto hearall of the soundtrack
whenwatchingmoviesat nightat low levels.
*o*'
rl
,l\
\__.t
t-
. Then the DYNAMIC RANGE indicatorlights up.
. Prcssagainto cancel.
. In someDolby DIGITAL(AC-3)softwares,
this
functionmav not be used.
Operatingthe sleep timer
. The sleep timer allows the systemto continue to operate
for a specified period of time before automatically
shuning off.
. To set the rcceiver to automatically tum off after the
specified pe.iod of time.
. Eachtime thisbuttonis prcssed,
thesleeptimechanges
asfollows;
_1
Upit
:
Minutes
I
I
-10_J20__J30;60_+90__-loFF
. Whenthe sleep
timeis selected,
all displaypanelsof
Sherwood
components
connected
by theDIGILINK lll
aredi-rnlylit.
Checkingthe brightnessof the
fluorescentdisplays
. Eachtime this buttonis pressed,
the brightnessof all fluorescent
displaysof Sherwood
componentsconnectedby rhe
DIGI LINK III changestogether
asfollows;
ON--+ dirn----, OFF_I
. In the display OFF mode,-when anybutton is prcssed,
the receiverswitchesto the disolavON mode.
Repeatthe steps3 and .1to memorizethe
rest of up to 8 characters.
Enteringvideolabels
. It can be operatedonly on video input sourcessuch
as DVD, LDP, VCR I and AUX/TV.
Rectifyingor clearing a video label
Selectthe desiredvideo lnput sourceto
enter its label
Selectthe desiredvideo input sourceto be
rectified or cleared.
PresstheVIDEO LABELS
buttonfor more than2
seconos.
Repeatthe steps2-5 in "Entering video
labels" procedure.
I -. .._
. To clear a video label, make a blank on each digit.
then the video label is clearedand its video inDut
sourcewill be disolaved.
Selectthe firsl characlerof the video label
Checkingthe video components
connected
. Use this function to check the video components
connectedro DVD, LDP. VCR I and AUVTV jacks
eacn.
. During play on the video components,pressthe
VIDEO LABELS and the VCR I RECORD butlons
simultaneously.
. Each time the INPUT SELECTOMNDEX knob is
rohted, the characterswhich can be selectedare total
45 as follows ;
26Cap ital
L€ ue rs:ABC DEFG HI J KLM N O PQ RS
TUVW XYZ
l0 Arab icNu ne rals:| 234567890
Ma rks: ' ( ) . + ,
9 Sp ecial
/\
Memorize it within
+
6 seconds.
If the MEMORY/ENTER button is pressedfor more
than 2 secondson rhe character,a dot( . ) wrll appear
by the character.
lf the MEMORY/ENTER button is pressedwithout
selectingthe desiredcharacter,the digit will be blank.
If 6 secondselapses,repeatagain from the step 2.
. The respectiveinput sourceor its label scrolls on lhe
display and you can check its video and audio
contentsin tum as follows;
DVD
LD PLAYER+ VCR |
AUyJTVFRONT+
AU)OTV REAR
. During recording,do not check the video
componentsconnected.
n
Troubleshooting Guide
If a fault occurs,run throughthe table belowbeforc taking your receiverfor repar.
If the fauh persists,anemptto solveit by switchingthe receiveroff andon again. lf this fails to rcsolvethe situation,
consultyour dealer.Underno circumstancesshouldyou repairthe rereiver yourselfasthis will invalidatetbe guar-anlee!
PROBLEM
POSSIBLECAUSE
No power
The AC inputcordis disconnected.
Poorconneclion
al AC wall outletor the
outletis inactive.
No sound
The speaker cords are disconnected.
The mastervolume is adjustedtoo low.
The MUTE bufton is pressed to ON.
SpeakeNare not switchedon.
The digital input is nol selectedconectly
Incorrect selectionof input source.
Incofiect conncctions between the
components.
No sound from the rear
sp€al(ers
No soundfrom the center
speaker
Stationscalnot be reccived
REMEDY
. Connectcordsecurely.
. Checktheoutletusinga lampor another
appliance.
Checkthespeaker
connections.
Adjustthemastervolume.
Pressthe MUTE bunon to cancelthe
mutingeffect.
Pressthe SPEAKERON/OFFswirch to
oN.
Selectthedigitalinputcorrectly.
Sele{tthedesiredinputsourcecorreatly.
Makeconnections
conectly.
Sunound mode is switched off.
Master volume and rear level are too
low.
Monau.al sourceis used.
Dolby 3 Stereomode is selected.
Selecta surroundmode.
Adjustmastervolumeandrearlevel.
Dolby DIGITAI-(AC-3),Dolby Prot glc
or Dolby 3 Ster€omodeis not selected.
Mastervolumeandcenterlevelaretoo
low.
Select the desircd suEound mode.
No antenna is connected.
The desiredstation frequencyis not
tuned in.
Antenna is in wrong position.
Connectan antenna.
Tunein thedesiredstationfTequency.
Selecta stereoor surroundsource.
Selectthedesiredsunoundmode.
Adjust mastervolume and rear level.
Moveantennaandretryturning.
. An inconectshtion frequencyhasbeen
memorized.
. Tbe memorizedstationsare cleared.
. Memorizethe correctstationfrequency.
Poor FM reception
. No antennais connected.
. The antennais not positionedfor the
bestre.eption.
. connect an alltenna.
. Changethe position of the antenna.
Continuous
hissingnoise
during FM reception,
especiallywhena stereo
broadcast
is received.
. Wea-ksignals.
. Changethe position of the antenna.
. Install an otudoor antenna,
Cnotinuous
or intermittent
hissingnoiseduringAM
reception,
especially
at night.
. Noise is causedby motors, fluorescent
lanps or lightning, etc.
. Keepthe receiveraway from noisesources.
. Install an outdoor AM antenna.
Remoteconfol unit d@s not
op€.ate.
Batteriesare not loadedor exhausted.
The remote sensor is obstructed.
Other systemcomtrnnentsdo
not reactto remoteconrol
commands.
. DIGI LINK conne.tions are not made
properly.
Preset stations cannot Lle
received
. Memorizethestationsagain.
. Replacethe batteries.
. Removetheobstacle.
. MakeproperDIGI LINK connections.
Specifications
T
AMPLIFIER
SECTION
. Poweroutput,stereo
mode,8 Q, THD 0.I%,2OHz-2OkH2.........
. Totalharmonicdistortion,8O, 100W, I kH2......
. Intermodulation
distortion
6OHz:1 kJJz=4.1SMPTE,8 ,100W .
. Inputsensitivity,47 kO
....2 x 100W
...............
O.O2
7o
. Signalto noiseratio,IHF 'A'weighted
. Frequency
response
Line(CD,TAPE,VIDEO),l0 Hz-100kHz
. Outputlevel
+ 0 dB,-3 dB
.......
. Surroundmode.onlv channeldriven
Frontpoweroutput,8 O. I kH2....................
Centerpoweroutput.8 Q. I kH2.............
2xl 0OW
T DIGITAL AUDIOSECTION
. Sarnpling
frequency.......
. Digitalinputlevel,75 Q
32,44.r,48
kHz
T FM TUMER SECTION
. 50 dB quietingsensitivity,mono/stereo
..
15j,38.2 dBf
. Totalharmonic
distortion,65
dBf,l kHz,mono/stereo......
...............
O.l5lO.25%
. Caprure
ratio......................
. IF rejectionratio
I
...........................
1.25dB
120dB
AM TT]I\ER SECTION
. Signalto noiseratio
. Selectivity...
..........._...._...........
30dB
T GENERAL
. Powersupply,........
.Po w er c ons um pt i o n ........
.,
. Switched AC outlet
. Dimensions
fW x H x D)
. Weight(NeD
...'
l0O W max.
440x 140x 380mm(17-3l8x 5-U2x l5 inches)
15.5kg(34.2lbs)
Note:Designandspecifications
aresubjectto changewithoutnoticefor improvements.
Addendum
The Supplementabout the titled 'When CD, DVD, LDP or
AUX/TV is selectedas input source"on page11
When listening to a LD in the normal stereomode and the other surroundmodesexcept
for the Dolby DIGITAL (AC-3). the Dolby Pro Logic and the Dolby 3 Stereomodes,there
can be noise or deterioratedsoundbecauseof a wide variety of the signal encoding
formats.
In this case,we recommendyou to changeto "OPTICAL" , "COAXIAI" or "ANALOG"
until soundis better.
'Lorsque vous 6coutezune sourcesur I'entr6e LD en mode st6r6onormal ou dansun
quelquonquemode surround(except6Dolby Digital AC-3, Dolby Pro-Logic et Dobly 3
st6r6o),la qualitd de son peut 6tre mauvaise,"charg6e"de bruit de fond et distordue.Ce
ph6nomEneest d0 au codagedu signal.
Dans ce cas, nous vous conseillonsde sdlectionnerle mode le moins bruyant parmi
OPTICAL. COAXIAL ou ANALOG."
(Seitel0)
. WennSie eineLaseDiscnicht in Dobly Digital (AC-3), Dolby SunoundPrologicoder
Dolby 3-Stereowiedergeben,sondernstattdessenSTEREO-oderelne der iibrigen
wiihlen, kann es aufgrundder komplexen Codierungenzu
Surround-Betriebsarten
Nebengeriiuschenoder Verzemrngenkommen.
VersuchenSie in diesemFalle, die Signaleingiingezu wechseln-2.B."OPTICAL",
"COAXIAL" oder "ANALOG". Dadurch kijnnen die geschildertenEffekte meist beseitist
werden.
Quando ascoltateun LD (laserdisc)nel modo stereonomaleo in altri modi surroundcon
I'eccezionedel Dolby Digital (AC-3), Dolby Pro Logic e Dolby 3 stereopud appariredel
rumore o della distorsionea causadella grandevarietirdei formati di codifica del segnale.
In questocasovi raccomandiamodi cambiarein "OPTICAL". "COAXIAL" o
"ANALOG" finchd non otteneteun mislioramento del suono.
5807-04001-001-0
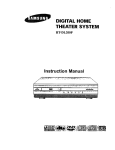
DIGITALINPUTS
I CONNECTING
I CONNECTING
SPEAKERS
.A digilalinpul should be connectedlo the componentssuch
as LD playeror DVD, etc capable0t ouhuting DolbyAC-3,
PCM or FF lomat digitalsignals.
.When makinqlhe COAXIAL DIGITALconnection,be sure to
use a 75o COAXIALcord, not a conventionalAUDIO cord.
. For details,refer to the operatinginstruclionsof the
componentconnected.
CONNECTINGSYSTEM CONTROL
wilh DIGILINKllor lll
@fim
ca.d
. Connecl thisiack to the DlGl L|NKjackol lh€ oxlernal
Sherwoodcorhponenlthat uses lhe DlGl LINK llor lllremote
control syst€m.
. Never shorl circuitthe + and - soeakercords
. Be surc to connecl speakersfirmlyand correctly
accordingto lhe chann€l (lett and right) and th€ polarity
{+ and -).
. Be sure to use lhe sD€akerswith th€ imo€danceolover
8cr.
. Alwaysconnectboth rear speakers.
. For Installingthe speakors,rel€r to "Spsakerplac€msnt"
on page 13.
Gshenrnood
V
nrevrrcAsTlE
R-925/R-925RDS
fluD|0/ut0E0
RECT
TUER
Noter Design and sp-
5707{4670{010
(9@7019041)