1
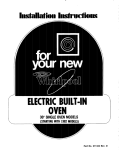
ELECTRIC
BUILT-IN
OVEN
24” SINGLE CAVITY MODELS
‘.._~~
(STARTING
\
WITH 1982 MODELS)
Part No. 311435 Rev. D
SUPPORT
JUNCTION
SEENOTE
1
SURFA
BOX:
’
*FOR
A 36”
OPEN
OVEN
DOOR
HEIGHT
FIGURE 1 --ROUGH-IN DIMENSIONS
DO NOT INSTALL THIS OVEN IN A BASE
CABINET WITH A COUNTERTOP ABOVE IT.
1. CARPENTRY
NOTE: Wire sizes and connections must conform with the
fuse size and rate of the appliance in accordance with the
National Electrical Code and local codes and ordinances.
Do not use an extension cord.
Refer to Figure 1 for the dimensions of the oven and the
space necessary to receive the oven. The oven support
surface may be solid plywood or similar material but the
contact surface must be level from side to side and from
front to rear. This surface is 2%” below the open door
height.
B. The appliance should be connected to the fused disconnect (or circuit breaker) box through flexible armored or
non-metallic sheathed cable. The flexible armored cable
extending from the appliance should be connected directly
to the junction box. The junction box should be located
as shown in Figure 1 so that as much slack as possible
remains in the cable between the.box and the appliance
so that it can be moved if servicing is ever necessary.
NOTE 1: The oven support surface must be flush with the
bottom of the cabinet cut out.
WARNING:
TO AVOID DAMAGE TO
AND/OR POOR BAKE PERFORMANCE,
BLOCK OVEN VENT.
CABINET
DO NOT
C. A suitable strain relief must be provided to attach the
flexible armored cable to the junction box.
D. Electrical Connection.
2. ELECTRICAL REQUIREMENTS
IMPORTANT: OBSERVE AU GOVERNING CODES
AND OflDlNANCES
I
SAVE THESE INSTRUCTIONS FOR THE LOCAL
ELECTRICAL INSPECTOR’S USE
It is the personal responsibility and obligation of the
customer to contact a qualified installer to assure that the
electrical installation is adequate and is in conformance
with the National Electrical Code and local code
ordinances.
I
Electrical ground is required on this appliance.
This appliance is equipped with copper lead wires. If the
connection is made to aluminum house wiring, use only special
connectors which are approved for joining copper and
aluminum wires, in accordance with the National Electrical
Code and local codes and ordinances.
A. A three-wire or four-wire single phase 120/240 volt 60Hz
AC only electrical supply (or threewire or four-wire 120/206
volt if specified on nameplate) is required on a separate
crrcuit fused on both sides of the line (time-delay fuse or
circuit breaker is recommended). Do NOT fuse neutral. The
fuse size must not exceed the circuit rating of the appliance
specified on the nameplate.
This appliance is manufactured with a white neutral power
supply wire and a frame-connected green ground wire.
2
If local codes permit connection of the frame grounding conductor to the neutral (white wire), connect the
green and white wire from the supply cable of the
appliance together and to the neutral (white) wire in
the junction box. Connect the remaining wires from
the supply cable. matching the colors, to the wires in
the junction box.
If local codes DO NOT permit frame grounding to the
neutral,
separate
the white and green wires that
extend out of the end of the supply cable of the
appliance.
Connect the white wire from the supply
cable to the neutral wire In the junction box.
Connect the black and red wire from the supply cable.
matching the colors, to the corresponding
wires in the
lunchon box. The green wire MUST now be used to
ground the appliance In accordance wtth local electrical codes
Connect
the green ground
wire to a
grounded cold water plpe*or to the grounded lead in
the service panel Do not ground to a gas supply pipe.
DC not connect
to electrlcal
power supply until
IS
permanently
grounded.
Connect
the
appliance
ground wire before turning on the power See ffgure
2
GROUNOEO COLD
WATER PIPE
(REMOVE PAINT, ETC.)
COPPER
GROUND WIRE
3. INSTALLATION
NOTE:
Before installing the oven in the cutout, it may be helpful
to remove
the oven door. See details
below.
Insert appliance into cut-out. Screws are provided for
fastening the front frame of the appliance to the cabinet.
The mounting
holes
in the front
frame
of
appliance may be used as a template to locate the appliance mounting screw holes.
CAUTION: For your personal safety, and to minimize
potential personal injury, this oven must be securely
fastened to the cabinet, using the four screws that are
provided.
Use caution when mounting oven in cutout so you do
not overtighten screws and cause porcelain chippage
or puncture oven cavity.
TO REMOVE OVEN
View a
View b
Open door fully.
Swing the 2 clips located on door in front of hinges so they
cross over the hinge slots (View a).
Close the oven door slowly until you feel it stop.
Lift up slightly allowing the bottom of the door to swing out.
(View b) Note that the top of the door must be tilted toward
the oven at this point to allow hing arms to swing free. if
appliance is so located that you cannot grasp both sides
of door you may grasp the door by handle (View c) and
follow same procedure outlined above.
TO REPLACE OVEN DOOR
GROUND CLAMP
(MUST BE TIGHT
ON PIPE)
FIGURE 2
*Cold water pipe must have metal continuity to electrical
ground and not be Interrupted by plastic, rubber or other
electrically
insulating connectors (including water meter
or pcimp) without adding a jumper wire at these connections.
CAU rlON - If connecting to a four-wire electrical system
(MOBILE HOME) the appliance
frame MUST NOT be
connected to the neutral wire of the four-wire electrical
system. Separate the white and green wires that extend
out Jf the end of the supply cable of the appliance
Connect the white, red and black wires from the supply
cable, matching the colors, to the corresponding
wires in
the IunctIon box. Connect the green wire from the supply
cable to the ground wire In the )unctlon box.
1. Grasp door by sides (View b) or by handle and align hinge
arms on door with TOP of slot in oven sides.
2. Tilt top of door toward the oven (View b) and allow door
to “ride” into position. A slight lifting and inward pressure
toward the bottom of the door will make sure it seats properly. (View d).
3. Open door fully and swing the clips away from the slots
(View a).
DOOR
ADJUSTMENT
(IF NEEDED)
4.
Open oven door and loosen the upper adjustrng
(seeview
e) on the srde that needs adjustment.
Close
oven
Adjust
door
door
Fietlghten
Open
screw.
oven
Close oven
alignment
loosen
dnd
up and down
the lower
door
door
and
lower
adjusting
CAUTION:
Do not touch the element&
be hot and you may get burned.
screw
Preheat ~ Turn selector
switch to PREHEAT
and set
the thermostat
to 350’
BAKE
temperature.
The
bottom
oven element
should
become
red and the
indicator
light should glow. The upper oven element
should become hot but NOT become red.
screw.
retrghren
double
the
check
upper
for
adjusting
proper
They may
THERMOSTAT
screw.
as needed.
adjustrng
and
the
CHECKING
Turn
selector
switch
to BROIL
Broil
thermostat
to a high temperature
position.
element
should
become cherry-red
and the
light should glow.
door
FRONT
FRAME
and set
The top
indicator
Bake
Turn selector switch to BAKE and set thermostat to 350°. The bottom
element should become red
and the indicator
light should glow.
1
B.
CLOCK
Refer to the Use and Care Guide
the clock.
ADJUSTING
C.
ROTISSERIE
1,
Positron
2.
Insert
oven.
3.
Rotation
OVEN DOOR
(if optional
starts upon
Insertion
for malntainlng
the quality
originally
built
4
WHIRLPOOL
Part No. 311435 Rev. D
CORPORATION
BENTON
HARBOR,
rack
of spit bar.
In the event your WHIRLPOOL
appliance
should need service, call the dealer from whom
you purchased
the app,,ance or a WHIRLPOOL
franchised
TECH-CARE”
serwcecompany.
He 1s I” the Yellow Pages of your telephone
directory
listed under “Appliances-Households
Major
Serwce and Repair.”
You can also obtain his name and number by dialmg, free, withln
@ Service (6OOl 253.1301.
When
rhe conrinenral
United States the Whirlpool
COOL-LINE
calling
from Mlchlgan,
dial (800) 632~2243,
from Alaska or Hawaii, dial (800) 253-l 121.
&al jut as you normally
dial long distance. A special operator
will fell you the name and
number of your nearest Whirlpool
TECH-CARE
sew~cc outlet. During normal working
hours,
WhIrlpool
consultants
at this same number will also answer any questions about operating
or
malnta!mng
your appliance not covered in your Use and Care Guide.
service
of
of spit bar into hole in the back of the
View e
Learn the benefits of using TECH-CARE
into your WHIRLPOOL
appliance.
operation
kit has been installed)
the spit bar on special
the point
for proper
MICHIGAN
49022