1
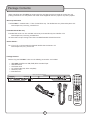
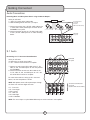
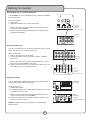
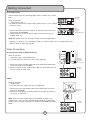
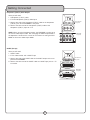
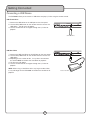
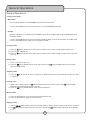
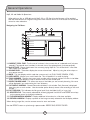
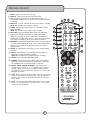
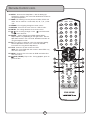
'
Multi-Format USB/DVD/CD+G Karaoke Player
s
���
r
����
e
���
���
n
�����
w
�����
m
��
a
�
�
��
��
��
��
���
�
�
��
��
��
��
��
��
���
��
��
���
���
���
�
���
��
��
��
��
DVX-668K
o
�����
��
��
�
n
�
��
��
���
�
���
��
��
�
��
���
��
���
��
��
��
���
�
��
�
���
u
���
�
�
�
�
��
��
��
���
�
���
��
�
���
�
�
�
��
�
��
��
���
��
��
�
�
��
�
a
�
��
��
���
��
�
���
l
R
THE SINGER'S ULTIMATE CHOICE
TM
��������
������������������������������������������������
Table of Contents
Safety Instructions ........................................ 3
FCC Information ........................................... 4
Welcome .................................................... 5
Features and Specifications ........................... 6
Getting Started ............................................ 7
Warranty Information .................................... 7
Package Contents ........................................ 7
Getting Connected ........................................ 8
Audio Connections ........................................ 8
Video Connections ...................................... 10
USB Device Connection ............................... 12
General Operations ..................................... 13
DVD Operations ......................................... 17
Mp3, AVI and Media File Operations .............. 18
Descriptions and Functions .......................... 18
Front Panel ............................................... 18
Rear Panel ................................................ 19
Remote Control ......................................... 20
Setup Menu .............................................. 24
General Setup Menu ................................... 24
Audio Setup Menu ...................................... 24
Video Setup Menu ...................................... 26
Password Setup Menu ................................ 26
Troubleshooting ......................................... 27
2
�������������������
�������
�������������
CAUTION: To reduce the risk of electric shock,
do not remove cover (or back). No
user-serviceable parts inside. Only refer
servicing to qualified service personnel.
��������������������������������
The lightning flash & arrowhead
symbol, within an equilateral triangle,
is intended to alert you to the
presence of danger.
The exclamation point within an
equilateral triangle is intended to alert
you to the presence of important
operating and servicing instructions.
�������
To reduce the risk of fire or electric shock, do
not expose this unit to rain or moisture.
�������������� - The appliance should be situated so its
location does not interfere with its proper ventilation. For
example, the appliance should not be situated on a bed,
sofa, rug, or similar surface that may block the
ventilation slots.
������� - The appliance should be situated away from
heat sources such as radiators, heat registers,
stoves, or other appliances (including amplifiers)
that produce heat.
����������������� - The appliance should be
connected to a power supply only of the type described
in the operating instructions or as marked on the
appliance.
����������������������������� - Precautions should be
taken so that the grounding or polarization means of
an appliance is not defeated.
������������������������� - Power-supply cords
should be routed so that they are not likely to be walked
on or pinched by items placed upon or against them,
paying particular attention to cords at plugs,
convenience receptacles, and the point where they exit
from the appliance.
������������ - Unplug this unit from the wall outlet
before cleaning. Do not use liquid cleaners or
aerosol cleaners. Use a damp cloth for cleaning.
��������������� - An outdoor antenna should be
located away from power lines.
�������������������� - All the safety and operating
instructions should be read before the appliance is
operated.
������������������ - The power cord of the appliance
should be unplugged from the outlet when left unused
for a long period of time.
���������������������� - The safety and operating
instructions should be retained for future reference.
��������������������������� - Care should be taken so
that objects do not fall and liquids are not spilled into the
enclosure through openings.
���������������� - All warnings on the appliance and in
the operating instructions should be adhered to.
���������������������� - All operating and use
instructions should be followed.
�������������� - Do not use attachments not
recommended by the product manufacturer as they may
cause hazards.
��������������������� - Do not use this unit near water.
For example, near a bathtub or in a wet basement and
the like.
������������������� - The appliance should be used
only with a cart or stand that is recommended by the
manufacturer.
���� An appliance and cart combination
should be moved with care. Quick stops,
excessive force, and uneven surfaces may
cause an overturn.
���������������������������� - The appliance should
be serviced by qualified service personnel when:
A.
B.
C.
D.
The power supply cord or plug has been damaged; or
Objects have fallen into the appliance; or
The appliance has been exposed to rain; or
The appliance does not appear to operate normally
or exhibits a marked change in performance; or
E. The appliance has been dropped, or the enclosure
damaged.
������������� - The user should not attempt to service
the appliance beyond that described in the operating
instructions. All other servicing should be referred to
qualified service personnel.
������
To CATV system installer's (U.S.A.): This reminder is
provided to call the CATV system installer's attention to
Article 820-40 of the NEC that provides guidelines for
proper grounding and, in particular, specifies that the
cable ground shall be connected as close to the point of
cable entry as practical.
������������������������
�� �������������������������������������
�������This product, when installed as indicated in the
instructions contained in this manual, meets FCC
requirements. Modifications not expressly approved by
Vocopro may void your authority, granted by the FCC,
to use this product.
������������� When connecting this product to
accessories and/or another product use only high
quality shielded cables. Cable(s) supplied with this
product MUST be used. Follow all installation
instructions. Failure to follow instructions could void
your FCC authorization to use this product in the
U.S.A.
�������� This product has been tested and found to
comply with the requirements listed in FCC
Regulations, Part 15 for Class "B" digital devices.
Compliance with these requirements provides a
reasonable level of assurances that your use of this
product in a residential environment will not result in
harmful interference with other electronic devices. This
equipment generates/uses radio frequencies and, if
not installed and used according to the instructions
found in the owner's manual, may cause interference
harmful to the operation of other electronic devices.
Compliance with FCC regulations does not guarantee
that interference will not occur in all installations. If this
product is found to be the source of interference,
which can be determined by turning the unit "Off" and
"On", please try to eliminate the problem by using one
of the following measures:
Relocate either this product or the device that is being
affected by the interference.
Use power outlets that are on different branch (circuit
breaker or fuse) circuits or install AC line filter(s).
In the case of radio or TV interference,
relocate/reorient the antenna. If the antenna lead-in is
300-ohm ribbon lead, change the lead-in to coaxial
type cable.
If these corrective measures do not produce
satisfactory results, please contact your local retailer
authorized to distribute Vocopro products. If you can
not locate the appropriate retailer, please contact
Vocopro, 1728 Curtiss Court, La Verne, CA 91750.
�������
The apparatus is not disconnected from the AC power
source so long as it is connected to the wall outlet,
even if the apparatus itself is turned off. To fully insure
that the apparatus is indeed fully void of residual power,
leave unit disconnected from the AC outlet for at least
fifteen seconds.
���������
������������������������������������
�� To ensure the finest performance, please read this
manual carefully. Keep it in a safe place for future
reference.
�� Install your unit in a cool, dry, clean place - away from
windows, heat sources, and too much vibration, dust,
moisture or cold. Avoid sources of hum (transformers, v
motors). To prevent fire or electrical shock, do not expose
to rain and water.
�� Do not operate the unit upside-down.
�� Never open the cabinet. If a foreign object drops into
the set, contact your dealer.
�� Place the unit in a location with adequate air
circulation. Do not interfere with its proper ventilation; this
will cause the internal temperature to rise and may result
in a failure.
�� Do not use force on switches, knobs or cords. When
moving the unit, first turn the unit off. Then gently
disconnect the power plug and the cords connecting to
other equipment. Never pull the cord itself.
�� Do not attempt to clean the unit with chemical solvents:
this might damage the finish. Use a clean, dry cloth.
�� Be sure to read the "Troubleshooting" section on
common operating errors before concluding that your unit
is faulty.
�� This unit consumes a fair amount of power even when
the power switch is turned off. We recommend that you
unplug the power cord from the wall outlet if the unit is not
going to be used for a long time. This will save electricity
and help prevent fire hazards. To disconnect the cord,
pull it out by grasping the plug. Never pull the cord itself.
��� To prevent lightning damage, pull out the power cord
and remove the antenna cable during an electrical storm.
��� The general digital signals may interfere with other
equipment such as tuners or receivers. Move the system
farther away from such equipment if interference is
observed.
�����
Please�check the copyright laws in your country
before recording from records, compact discs,
radio, etc. Recording of copyrighted material may
infringe copyright laws.
�������������������������������������
Be sure to position the voltage selector to match the
voltage of your local power lines before installing the
unit.
110V
Welcome
And Thank you for purchasing the DVX-668K from VocoPro, your ultimate choice in
Karaoke entertainment! With years of experience in the music entertainment business,
VocoPro is a leading manufacturer of Karaoke equipment, and has been providing
patrons of bars, churches, schools, clubs and individual consumers the opportunity to
sound like a star with full-scale club models, in-home systems and mobile units. All our
products offer solid performance and sound reliability, and to reinforce our commitment
to customer satisfaction, we have customer service and technical support professionals
ready to assist you with your needs. We have provided some contact information for
you below.
VocoPro
1728 Curtiss Court
La Verne, CA 91750
Toll Free: 800-678-5348
TEL: 909-593-8893
FAX: 909-593-8890
VocoPro Company Email Directory
Customer Service & General Information
[email protected]
Tech Support
[email protected]
Remember Our Website
Be sure to visit the VocoPro website www.vocopro.com for the latest information on
new products, packages and promos. And while you're there don't forget to check out
our Club VocoPro for Karaoke news and events, chat rooms, club directories and even
a KJ Service directory!
We look forward to hearing you sound like a PRO, with VocoPro, your ultimate choice in
Karaoke entertainment.
FOR YOUR RECORDS
Please record the model number and serial number below, for easy reference, in case of loss or theft. These
numbers are located on the rear panel of the unit. Space is also provided for other relevant information
Model Number
Serial Number
Date of Purchase
Place of Purchase
Features and Specifications
The DVX-668K multi-format disc player from VocoPro is packed with features and
full compatibility with the most popular media formats. Play CD+G discs for Karaoke
performances, listen to your favorite CDs and Mp3s, view a slideshow of your digital
photographs or watch movies on DVD or in DivX format.
The USB connection on the front panel allows you to play your digital files from a
USB thumb-drive.
Connect to your audio system via 5.1 surround sound or digital audio through
optical or coaxial outputs.
The DVX-668K is a valuable asset to a performance setup or home entertainment
center, providing plenty of versatility and playback options for any application.
Features
• Multi-Format Disc Player Reads DVD, CD, CD+G, Mp3, And DivX
• USB Playback
• 2 Microphone ¼” Input Channels With Volume Control
• 5.1 Channel Digital Surround Sound
• Digital Echo To Give Your Vocals A Professional Sound
• ±16 Step Digital Key Control
• Full-Function Remote Control
• PAL/NTSC Compatible For Worldwide Use
• LED Display
Connections:
Audio Outputs:
• 5.1 Channel Surround Sound RCA
• L/R Stereo RCA
• Digital Coaxial
• Digital Optical
Video Outputs:
• RCA Video
• S-VIDEO
• Component (Y,Pb,Pr)
• SCART
Specifications
Resolution ............................................................... 500 Lines
Video S/N Ratio ....................................................... 56 dB
Frequency Response ................................................. fs 96 kHz: 20 Hz - 20 kHz: +/- 1dB
Audio S/N Ratio ....................................................... 90 dB
Dynamic Range ........................................................ 90 dB
Distortion ................................................................ <0.01%
D/A Converter ......................................................... 96 kHz/24 bit
Video Output ............................................................ 1Vp-p(75Ω)
S-Video Output.......................................................... 1Vp-p(75Ω) C:0.3P-P(75Ω)
Audio Output ............................................................ 2.0V
Digital Audio Output ................................................... Coaxial,Optical
AC-3 ....................................................................... 5.1 Channel Output
Power Voltage .......................................................... 120V/60Hz
Power Consumption .................................................. 15W
Dimensions .............................................................. 17” x 1.3” x 7.8”
Weight .................................................................... 7 lbs
*Some burned CDs and DVDs may not play properly on the DVX-668K. If this is the case, try using a
different brand of disc or a different disc-burning program.
6
Package Contents
When unpacking your DVX-668K we recommend that you keep the original receipt or invoice, box and
packing materials in case the product ever needs to be shipped for warranty repair or any other purpose.
Warranty Information
The DVX-668K is covered under a 1-Year Limited Warranty. For detailed warranty information please visit
www.vocopro.com/warranty_standard.html
Extended Limited Warranty
Extended Warranties are also available and can be purchased directly from VocoPro. Visit
www.vocopro.com/warranty_extended.html
for information and purchasing of our Silver and Gold Extended Limited Warranties.
Service Centers
For a list of U.S. and International Authorized VocoPro Service Centers visit
www.vocopro.com/frm_service.html
Package Contents
Before using the DVX-668K make sure the following accessories are included:
•
•
•
•
•
•
1
1
1
1
1
2
DVX-668K Multi-Format USB/DVD/CD+G Karaoke Player
Remote Control
AC Power Cord
A/V RCA Cable (red, white and yellow)
Warranty Card
AAA Batteries
������������������������������������������������
��������
�����
�����
����
�����
�������
���
�����
������
���
�
�
�
��������
�
�
�
�����
�
�
�
�������
�
����
����
���
�����
�����
�����
���
���
����
�����
������
����
�����
������
�����
���
����
���
����
����
����
�
����
�
�������������������
��������
7
Getting Connected
Audio Connections
Recording Music and Microphone Vocals using the Stereo Outputs
What you will need:
• 1 RCA L/R (red & white) audio cable
�����
• Audio Recording Device with RCA L/R inputs
����������
�
�
�����
�����
�����
�
�
1. Connect one end of the L/R RCA audio cable to the
L and R (red & white) RCA Output channels on the � � � � � ����������
DVX-668K’s rear panel.
2. Connect the other end of the L/R RCA audio cable
to the L/R RCA audio inputs on an audio recording
device.
��
���
��
�
��
���
��
�
����
������ �
����������������
���������
����������
���������
�������������������
������ � � � � �����������
�
�����
������� �����
���������
����������
�����
�������
����������
�������
5.1 Audio
Connecting to a 5.1 Surround Sound Receiver
What you will need:
• 6 RCA-style surround sound cables
• A 5.1 surround sound receiver or amplifier
1. Connect an end of each RCA cable to the FL, FR,
CEN, SL, SR, and SUB outputs on the rear panel of
the DVX-668K.
2. Connect the other end of each RCA cable to the
FL, FR, CEN, SL, SR, and SUB inputs on a 5.1 CH.
Surround Sound receiver or amplifier.
��
���
��
�
��
���
��
�
���������
����������
�������
FL - Front Left
FR - Front Right
CEN - Center
SL - Side Left
SR - Side Right
SUB - Subwoofer
�����
•
•
•
•
•
•
�����������
NOTE: Microphone vocals will only be output through
the Front Left and Front Right Channels.
�����
For more information on setting up 5.1 Surround
Sound, see the “Setup Menu” section.
�����
�����
�����
�����
�����
�����
�����
������
NOTE: The actual inputs may be labeled differently on certain receivers and amplifiers.
8
�����������������������
����������
�������������������������
Getting Connected
Connecting Directly to a Powered Subwoofer
The DVX-668K can be connected directly to a powered subwoofer
with an RCA input.
R
What you will need:
• 1 RCA cable
• A powered subwoofer with an RCA audio input
L
�����
���������
���������
�������� �������
�����������
������������
����
�����
�����
+
+
-
-
+
���������
����������
��������
����������������
1. Connect one end of the RCA cable to the SUB output on the
rear panel of the DVX-668K.
2. Connect the other end of the RCA cable to the RCA input on
the powered subwoofer.
��
���
��
�
��
���
��
�
���������
����������
�
�����
������� �����
Stereo RCA (Mixed Out)
Use the L and R outputs for connecting audio from the disc player
(DVD, CD, VCD, etc) to a stereo input device.
What you will need:
• 1 RCA L/R (red & white) audio cable
• 1 audio input device (mixer, amp, power speaker, recording
device, etc.)
��
���
��
�
��
���
��
�
�
�����
������� �����
1. Connect one end of the L/R RCA audio cable to the L and R
RCA jacks on the DVX-668K’s rear panel.
2. Connect the other end of the L/R RCA audio cable to the L/R
RCA audio inputs on an audio input device.
�����
���������
����������
�������
�
�
��������
�����
��
���
���
���
�������
�����������
�����
����������
���������
����������������
Digital Optical Audio
Use the Digital Optical Audio output for connecting digital audio to
a device with a Digital Optical Audio input.
�����
��������
�����������������������
������������
�����������������������������������
What you will need:
• 1 Digital Optical cable
• An audio input device with a Digital Optical Audio input jack such
as a digital receiver or mixer
1. Connect one end of the Optical cable to the OPTICAL output
jack on the rear panel of the DVX-668K.
2. Connect the other end of the Optical cable to an Optical input
jack on a receiver, mixer, etc.
NOTE: Microphone vocals are not output through the Digital
Optical Output..
9
�������
�������
���������
����������
��������������������������������������
���������������������������������������������
�����������������������������������������������������
�������������������������������������������
�������������������������������������
�������������������������������������
�������������������������������������
�����������������������������������������
���������������������������������������
����������������
�����
����������
��������
�����������������
Getting Connected
Coaxial Digital Audio
Use the Coaxial output for connecting digital audio to a device with a coaxial
input.
�
�
�����
���������
����������
�����
�����������������������
What you will need:
• 1 Digital Coaxial cable **
• An audio input device with a Digital Coaxial audio input jack such as a digital
receiver or mixer
�����������������������������������
�
������� �����
�������
�������
�������������������������������������
�������������������������������������
�������������������������������������
�����������������������������������������
���������������������������������������
����������������
�����
����������
���������
����������������
1. Connect one end of the Coaxial cable to the COAXIAL output jack on the
rear panel of the DVX-668K.
2. Connect the other end of the Coaxial cable to a Coaxial input jack on a
receiver, mixer, etc.
NOTE: Microphone vocals are not output through the Coaxial Digital Output.
** Although it is alright to use standard RCA cables, it is recommended that you use Digital RCA audio
cables for optimum digital signal quality.
Video Connections
Connecting Video Using the RCA Video Output
What you will need:
• 1 RCA video cable (usually labeled yellow)
• A TV, video monitor or video mixer with an RCA video input
1. Connect one end of the RCA video cable to the yellow RCA VIDEO output
on the rear panel of the DVX-668K.
2. Connect the other end of the RCA video cable to an RCA video input jack
on a TV, monitor or video mixer.
�������
����������
��������
�������������
�
�����
��������
����������
�����
�����������������������������������
������� �����
�������
�������
�������������������������������������
�������������������������������������
�������������������������������������
�����������������������������������������
���������������������������������������
����������������
S-Video
What you will need:
• 1 S-Video Cable
• A TV, video monitor or video mixer with an S-Video input
1. Connect one end of the S-Video cable to the S-Video output on the rear
panel of the DVX-668K.
2. Connect the other end of the S-Video cable to an S-Video input jack on a
TV, monitor or video mixer.
NOTE: When using the S-Video output, the DVX-668K must be set to
S-VIDEO output. See “Changing the Video Output Mode” in the Operations
section of this manual for instructions on setting the DVX-668K to S-VIDEO
Mode.
��������������
����������
�
�����
���������
����������
�����
�����������������������������������
������� �����
10
�������
�������
�������������������������������������
�������������������������������������
�������������������������������������
�����������������������������������������
���������������������������������������
����������������
Getting Connected
Component (Y,Pb,Pr) Video Outputs
What you will need:
• 1 Component (Y, Pb,Pr) cable
• A TV with Component (Y,Pb,Pr) video inputs
��������������
����������
1. Connect one end of the Component (Y,Pb,Pr) cable to the Component
(Y,Pb,Pr) jacks on the DVX-668K’s rear panel.
2. Connect the other end of the Component (Y,Pb,Pr) cable to the
Component (Y,Pb,Pr) inputs on a TV.
NOTE: When using the Component output, the DVX-668K must be set to
the correct video output mode. See “Changing the Video Output Mode” in
the Operations section of this manual for instructions on setting the DVX668K to the correct video output Mode.
�
�
�
�
����� �����
�����
������� �����
���������
����������
�����
�������
�������
SCART (Europe)
What you will need:
• 1 SCART cable
• A TV or video monitor with a SCART input
1. Connect one end of the SCART cable to the SCART output on the rear
panel of the DVX-668K.
2. Connect the other end of the SCART cable to a SCART input jack on a TV
or monitor.
��������������
����������
�����
��������
����������
11
Getting Connected
Connecting a USB Device
The DVX-668K allows you to connect a USB device and play A/V files using the remote control.
USB Thumb Drive
1. Connect the USB device to the USB port on the front panel.
2. Use the DVD/USB button on the remote control to access the
USB device. The file menu will appear.
3. Use the remote control to navigate through the A/V files for
playback.
������������������������������������������������
��������
���
�����
�����
�����
���
���
����
��������
���������������
USB Hard Drive
������������������������������������������������
��������
1. Connect the USB Hard Drive to the USB port on the front panel.
2. Use the DVD/USB button on the remote control to access the
USB device.
3. Depending on the number of files, it may take a few moments
for the DVX-668K to initialize the Hard Drive for playback.
4. The file menu will appear.
5. Use the remote control to navigate through the A/V files for
playback.
NOTE: When using a Hard Drive with a very large number of files,
it may take longer for the DVX-688K to initialize the Hard Drive for
playback.
12
���
�����
�����
�����
���
���
����
��������
�������������������
General Operations
General Operations
Turning on the Power
Main Power
The main power button for the DVX-668K is located on the front panel.
1. Press the POWER button on the front panel to turn the DVX-668K ON and OFF.
Standby
Once the main power is turned ON, the DVX-668K can be set to standby mode using the POWER button on
the remote control.
1. Press the POWER button on the remote control while the player is ON to set the player to standby mode.
2. Press the POWER button again to turn the player back ON.
Inserting a Disc
1. Press the
(EJECT) button on the front panel or EJECT on the remote control to open the disc tray.
2. Insert the disc label-side-up.
3. Press the
(EJECT) button on the front panel or EJECT on the remote control a second time to close the
disc tray.
Playing a Disc
1. Insert a disc into the disc tray.
2. Press the
(PLAY/PAUSE) button on the front panel or the
control to begin playing.
(PLAY/PAUSE) button on the remote
Stopping a Disc
1. Press the
(STOP) button on the front panel or the STOP button on the remote control to stop a disc while
it is playing.
Pausing a Disc
1. While a disc is playing press the
(PLAY/PAUSE) button on the front panel or the
button on the remote control to pause the disc.
2. Press the
(PLAY/PAUSE) button again to resume playback.
(PLAY/PAUSE)
Muting a Disc
1. Press the MUTE button on the remote control to silence the disc.
2. Press the MUTE button again to un-mute the disc.
Skipping Tracks
1. Use the
(PREV/NEXT) buttons on the front panel or remote control to skip from one track to another.
2. The
(NEXT) button skips forwards to the next track and the
(PREV) button skips back to the previous
track.
13
General Operations
Scanning through Tracks (CD, VCD, DVD and USB only)
1. Use the
buttons on the remote control to scan through tracks.
2. The
button scans forwards through the current track and the
backwards through the current track.
Adjusting the Disc Music Volume
1. Use the VOL+ and VOL- buttons on the remote control to adjust the volume.
2. The VOL+ button raises the volume and the VOL- button lowers it.
Using Direct Track Access
The Direct Track Access buttons are the number buttons on the remote control. These allow you to jump
directly to a track or chapter (DVD) by entering its number. When using Direct Track Access on the remote
control, type the two digit equivalent of the number.
example
To jump directly to track 9
1. Press 0 then 9.
2. Track 9 will begin playing.
Jumping to a Specific Time on a track (CD, VCD and DVD only)
1. Press the TIME button on the remote control until “Track Go To” is selected.
2. Use the number buttons to enter the time in minutes and seconds.
3. The disc will play at that time.
example
To jump directly to 1:45
1. Press TIME on the remote control twice to select “Track Go To”.
2. Press 0, 1, 4, then 5.
3. The track will begin playing at 1:45 minutes into the track.
Jumping to a Specific Time on a disc (CD, VCD and DVD only)
1. Press the TIME button on the remote control until “Disc Go To” is selected.
2. Use the number buttons to enter the time in minutes and seconds.
3. The disc will play at that time.
example
To jump directly to 21:38
1. Press TIME on the remote control three times to select “Disc Go To”.
2. Press 2, 1, 3, then 8.
3. The track will begin playing at 21:38 minutes into the DISC.
14
General Operations
Programming a Custom Track Order
The DVX-668K allows you to create a custom playlist of up to 20 tracks using the PROGRAM button on the
remote control.
1. If there is a disc in the DVX-668K, make sure it is stopped.
2. Press the PROG button on the remote control to access the Program menu. The Program menu will appear
on the TV screen.
3. Enter a track number using the number buttons on the remote control.
4. Continue this until your playlist is complete.
example
To create a playlist in the following order:
1.
2.
3.
4.
Track
Track
Track
Track
14
7
3
1
1.
2.
3.
4.
5.
6.
7.
Press the PROG button to enter Program mode
Press 1 then 4
Press 0 then 7
Press 0 then 3
Press 0 then 1
Use the arrow keys to make changes if needed.
Use the arrow keys to highlight PLAY and press the ENTER button on the remote control to begin playing
in this order.
8. Press STOP to exit the programmed playlist.
Clearing a track in Program Mode
Highlight the last track and press the CLEAR button on the remote control to erase the last programmed track.
Using Digital Key Control
Digital Key Control allows you to change the musical key of disc music to fit any singer’s vocal range. The Digital
Key Control buttons are located on the remote control.
- Lowers the musical key
- Resets the musical key back to the original or natural key
- Raises the musical key
Setting Repeat Options
Press the REPEAT button on the remote control to cycle through the available Repeat options
•
•
•
•
•
TRACK: Repeats the same song continuously
ALL: Repeats the entire disc after it has played through
REPEAT OFF: All Repeat options are off
CHAPTER (DVD only): Repeats the current chapter on a DVD disc
TITLE (DVD only): Repeats the current title on a DVD disc
15
General Operations
Switching Between PAL and NTSC Video Modes
The DVX-668K is defaulted to NTSC. Use the N/P button on the remote control to switch between PAL and
NTSC.
1. If there is a disc in the DVX-668K, make sure it is stopped.
2. Press the N/P button on the remote control.
NTSC: North America
PAL: Europe and Asia
Changing the Video Output Mode
The DVX-668K has different video output channels: RGB, YUV, P-SCAN, S-Video. The DVX-668K must be set
to the correct video output mode when using these output channels.
To cycle through the different video output modes:
1. If there is a disc in the DVX-668K, make sure it is stopped.
2. Press the V-MODE button on the remote control.
Looping a Section of Disc using the A--B Button (CD, VCD, DVD and USB)
1. Press the A--B button on the remote control to set the starting point of the loop.
2. Press the A--B button again to set the ending point of the loop and to begin the loop.
3. Press the A--B button a third time to cancel the loop and resume normal playback.
Using the Digital Equalizer (EQ)
The DVX-668K has five preset equalizer settings.
1. Press the SETUP button on the remote control to open the SETUP menu.
2. Select > Audio Setup Page > Equalizer > EQ type.
3. To change the EQ settings, choose one of the following modes: None, Rock, Pop, Live, Dance, Techno,
Classic, or Soft.
4. Press the ENTER button to confirm your setting.
Playing One Frame at a Time with the Step Function
The Step function allows you to view one frame at a time on DVDs and VCDs.
NOTE: The Step function does not work on CD+Gs.
1. Press the STEP button to enter Step mode and pause the current frame.
2. Press it again to jump to the next frame.
3. Press PLAY to resume normal playback.
16
General Operations
Playing Forwards and Reverse in Slow Motion
You can play a disc forward or reverse at 1/2, 1/4, 1/8 and 1/16 the normal speed.
1. Press the SLOW button on the remote control to cycle through the Slow Motion options.
2. Press the PLAY button to return to normal playback.
Switching Between DISC and USB
You can choose either DISC or USB media as a playback option.
1. Use the DVD/USB button on the remote control to access the DVD/MEDIA menu.
2. Use the arrow buttons on the remote control to highlight DVD to play a disc or MEDIA to access the
USB port.
3. Press the ENTER button on the remote control to select the highlighted option.
DVD Operations
Accessing the DVD Menu
Use the MENU button on the remote control to access the main menu on a DVD. Use the arrow buttons on
the remote control to navigate through the main menu and the ENTER button to make selections.
Accessing the Title Screen
Each section on a DVD such as the movie, special features, etc. has its own title screen. Use the TITLE button
on the remote control to access the title screen for the current section.
Turning on Subtitles
Use the SUBTITLE button on the remote control to cycle through the available subtitle languages on a DVD.
NOTE: The available subtitles vary from each DVD and some may not have any at all.
Changing the Angle View
Use the ANGLE button on the remote control to view multiple angles on a DVD with multiple angles available.
NOTE: Not all discs have multiple angles available.
Accessing Additional Dubbed Languages
Some DVDs have multiple languages dubbed over the original language for speakers of other languages. Use
the AUDIO button on the remote control to cycle through these languages on DVDs with multiple languages
available.
17
General Operations
Mp3, AVI and Media file Operations
When playing a disc or USB device with Mp3, AVI or JPG files in it, the file menu will be enabled.
Use the arrow buttons to navigate through this menu and the ENTER or PLAY button on the remote
control to make selections.
Navigating the File Menu:
�
�
�
�
�
�
��������������������������
�������
�
�
�
��
���������
���������
���������
���������
���������
���������
���������
��
��
1. CURRENT/TOTAL TIME - The first set of numbers is the current time of a selected track (minutes:
seconds). The second set of numbers is the total time of the selected track (minutes:seconds).
2. Mp3 BIT RATE - Shows the bitrate of the currently playing Mp3 file. This will be blank if a file other
than a Mp3 file is selected.
3. VOLUME LEVEL - These bars display the current volume level. Adjust by using the volume keys on
your remote control.
4. MODE - This icon displays which mode the current track is in (PLAY, PAUSE, SEARCH, STOP).
5. LEVEL METER - Monitor your track’s levels live. This will be blank if no audio is playing.
6. TRACK NUMBER - Displays the current track number within the total number of tracks in the folder.
Press TIME on the remote to jump to another track with the number pad.
7. PARENT FOLDER NAME - This shows the name of the folder you are currently browsing. No name
will be displayed if you are browsing the “root” directory.
8. FILE DISPLAY WINDOW - Browse files and sub-folders in this window. Each file name is displayed
here along with a track number. Use the number pad to directly access a file according to the track
number.
9. FILE TYPE ICON - This indicates the file type of each file in the folder (mp3, avi, mpg, jpg)
10. SELECTED FILE - The currently selected file will be highlighted. Use the UP and DOWN arrow keys
on the remote control to change the selection.
11. FILE INFORMATION WINDOW - Displays additional information for a file when available.
12. PREVIEW WINDOW - Displays a preview of the image currently selected in the file display window.
When viewing image files, use the remote control to zoom and rotate.
Use the REPEAT button to cycle through repeat modes: REPEAT ONE, REPEAT FOLDER
18
Front Panel
Front Panel
��
�� ��
��
� �� �� ��
��
������������������������������������������������
��������
���
�����
�����
�
���
���
�����
�
�
�
����
�
�
�
�
1.
2.
3.
4.
5.
MAIN POWER Button - Turns the power on and off.
MIC 1 ¼” Input - Connect microphones here using ¼” microphone cables.
MIC 2 ¼” Input - Connect microphones here using ¼” microphone cables.
MIC Volume Control - Turn clockwise to raise the microphone volume and counter-clockwise to lower it.
ECHO Level Control - For adjusting the amount of Echo that is present in the microphone vocals. Turn
clockwise to raise the Echo level and counter-clockwise to lower it.
6. USB Input - Connect a USB media storage device here for A/V file playback.
7. REMOTE SENSOR - Receives the remote control signal. For best results, aim the remote control directly at
this sensor.
8. DISPLAY - Displays the player’s operating status.
9. STOP
Button - Stops a disc that is playing.
10. L/R Button - Turns multiplexing on and off, allowing you to remove vocals from a multiplex-enabled CD+G.
11. REVERSE
- Scan backwards through a track on a CD or DVD.
- Scan forward through a track on a CD or DVD.
12. FORWARD
13. DISC TRAY - Insert discs here.
14. EJECT
Button - Opens and closes the disc tray.
Button - Plays a disc that is stopped or paused and pauses a disc that is playing.
15. PLAY/PAUSE
16. PREV
Button - Press PREV to jump to the previous track.
17. NEXT
Button - Press NEXT to jump to the next track.
19
Rear Panel
Rear Panel
�
��
���
�
��
�
�
�
�����
�
�����
��������
�����������������������
������������
�����������������������������������
��
���
��
�
������� �����
�������
� � �
�������
�������������������������������������
�������������������������������������
�������������������������������������
�����������������������������������������
���������������������������������������
����������������
�
����������������������
�������������������������������
����������������������
��������������������������������������
���������������������������������������������
�����������������������������������������������������
�������������������������������������������
���������
�������������������������������������������������
����������������������������������������������
����������������
�����
����������������������������������
�������������������������������������
�
1. 5.1 SURROUND SOUND OUTPUT JACKS - For connecting to a 5.1 CH. surround sound system.
FL -Front Left
FR - Front Right
SUB - Subwoofer
SL -Side Left
SR - Side Right
CEN -Center
2. L/R STEREO OUTPUT - Connect to a mixer, amp, or TV audio inputs using an RCA cable to output the audio
signal.
3. COMPONENT (Y,Pb,Pr) VIDEO OUTPUT - Connect video to a TV with Component (Y,Pb,Pr) video inputs using
Component (Y,Pb,Pr) cables.
4. DIGITAL COAXIAL OUTPUT - Connect to a sound system with digital Coaxial audio input using a digital audio
cable.
5. VIDEO OUTPUT (RCA) - Connect to a TV/Video monitor using an RCA video cable.
6. S-VIDEO OUTPUT - Connect to a TV/Video monitor with an S-Video input jack using an S-Video cable.
7. DIGITAL OPTICAL AUDIO OUTPUT - Connect to a sound system with an Optical audio input using a digital
audio cable.
8. SCART - For signal output using a SCART cable (Europe).
9. POWER INPUT - Connect the power cord (included) here.
NOTE: Make sure the power cord is firmly connected to the Power Input before turning the player on.
20
Remote Control
1. EJECT - Opens and closes the disc tray.
2. DISPLAY - Enable the onscreen track information.
3. N/P - Switches between PAL and NTSC video modes. To
change video modes press the N/P button until desired mode
is selected.
4. SUBTITLE - Turns on subtitles for DVDs with subtitles available.
NOTE: Not all DVDs have subtitles available.
5. ANGLE - For viewing multiple angles on a DVD with multiple
angles available.
NOTE: Not all DVDs have multiple angles available.
6. DVD/USB - Switches between DISC mode and USB mode.
7. L/R - Cycles through the different multiplex CD+G output
modes for canceling the vocals: MONO-LEFT, MONO-RIGHT,
STEREO. See the Operations section in this manual for detailed
instructions on canceling vocals on multiplex CD+G discs.
8. PROGRAM - Opens the Program Menu which lets you program
a custom playlist order of up to 16 tracks. See the Operations
section in this manual for detailed instructions on using the
Program Menu.
9. CLEAR - Erases numbers entered into a menu without closing
the menu.
10. AUDIO - Cycles between the available audio languages on
DVDs with multiple languages available.
NOTE: Not all DVDs have multiple languages available.
�
�
�
��
�����
�����
����
�����
�������
���
�����
������
���
�
�
�
��������
�
�
�
�����
�
�
�
�������
�
����
����
��
�
��
�
�
�
�
13. DIRECT TRACK ACCESS (NUMBER) - For use whenever
number input is necessary. i.e. Jumping directly to tracks/
chapters, programming tracks in program mode, parental
password, etc. See the Operations section in this manual for
detailed instructions.
14. TIME - Opens up the GO TO menu which allows you to jump to
a certain time on DVDs, VCDs and CDs. See the Operations
section in this manual for detailed instructions on using the
GO TO option.
15. VIEW - Use this to enable SCAN mode, which cycles through
the first six seconds of each track on the disc. Press again
to resume normal playback.
�����
������
����
�����
������
�����
���
����
���
����
����
����
�
����
�
�������������������
��������
21
��
�
11. POWER - Turns Standby mode ON and OFF.
12. V-MODE - Cycles through the available video output modes:
RGB, YUV, P-SCAN. To change the video output mode press
the V-MODE button until desired mode is selected.
��
��
Remote Control cont.
16. SETUP - Accesses the Setup Menu. See the Setting Up
Preferences section in this manual for detailed instructions on
using the Setup Menu.
17. ZOOM - For zooming in on the picture on DVDs, CD+Gs and
VCDs. You can zoom to a scale of 2X, 3X, 4X, 1/2, 1/3 or
1/4.
18. ARROW - For navigating through on-screen menus.
19. RETURN - Accesses the main menu on a VCD 2.0 disc.
20. ENTER - For making selections in on-screen menus.
21.
and
- For scanning through a track.
scans forwards.
����
�����
�������
���
�����
������
���
�
�
�
��������
�
�
�
�����
�
�
�
�������
�
����
����
scans backwards
22. REPEAT - Cycles through the available repeat options.
Repeat options vary depending on the type of disc. See the
Operations section in this manual for detailed instructions on
using the Repeat function.
23. A-B - For setting a section on a disc for continuous looping.
See the Operations section in this manual for detailed
instructions on using the A-B loop feature.
24. TITLE - Accesses the title screen on a DVD.
NOTE: For use on DVDs with title screens. Some DVDs may
not have a title screen.
��
�����
25. MENU - Accesses the main menu on DVDs and other discs
with main menus.
26.
�����
�����
(PLAY/PAUSE) - Plays a disc. During playback, press to
pause the disc.
������
��
��
�����
����
��
��
��
������
�����
��
��
��
���
����
��
��
���
����
����
����
�
����
�
�������������������
��������
22
��
Remote Control cont.
27.
(NEXT/PREV) - Press
(PREV) to jump to the
previous track and
(NEXT) to jump to the next track.
28. SLOW - Cycles through available Slow-motion Reverse and
Slow-motion Forward options. See the Operations section in
this manual for using the slow-motion function.
29. STEP - For viewing one frame at a time on video discs. See
the Operations section in this manual for detailed instructions
on using the Step function.
30. STOP - Stops the disc or media.
31. MUTE - Mutes all disc music and movie audio.
32. VOL+ & VOL- - Adjusts the master music volume.
33. Digital Key Control - Adjusts the musical key to fit a singer’s
vocal range.
Press (FLAT) to lower the key.
Press
(SHARP) to raise the key.
Press
(NATURAL) to return back to the original key.
�����
�����
����
�����
�������
���
�����
������
���
�
�
�
��������
�
�
�
�����
�
�
�
�������
�
����
����
�����
������
����
�����
������
�����
���
����
����
���
��
��
����
��
����
��
��
����
��
�
��
�
��
��
�������������������
��������
23
Setup Menu
The Setup Menu can be accessed by pressing the SETUP button on the remote control and allows you to
change the DVX-668K’s system settings. Use the arrow keys to select each page tab at the top of the screen.
GENERAL SETUP PAGE
1. Tv Display - Select one of these choices to match your television or viewing preferences:
Normal/PS - For viewing a 4:3 or “Pan and Scan” image format on your standard TV.
Normal/LB - View a widescreen image on your standard TV.
Wide - This setting is for viewing the output on a widescreen TV.
Wide Squeeze - Format a 4:3 or “Pan and Scan” image for a widescreen TV.
2. Angle Mark - Set the angle for compatible DVD discs.
3. OSD Lang - Change the on screen display language: English, French, German, Spanish, Dutch.
4. Captions - Enable on screen captions during movie playback (works with compatible DVD discs).
5. Screen Saver - Screen saver is used to protect your TV/video monitor when the player is idle for
a significant period of time.
6. Last Memory - When this mode is enabled, the DVX-668K will store the point that your disc was
stopped, and return to that point when the disc is resumed. The disc can be removed from the
player and the LAST MEMORY function will still play from the last point.
AUDIO SETUP PAGE
1. Speaker Setup
DownMix
Lt/Rt - Sound output is divided with the Left coming out of the Left speaker and the
Right coming out of the Right speaker.
Stereo - Sound output is in Stereo Mode.
V SURR- Use stereo output to create a virtual 5.1 surround sound effect.
5.1 CH - Use when you have a complete 5.1 speaker setup connected to the DVX668K.
Front Speaker
Large - If you have front speakers capable of low frequency output.
Small - If you have front speakers that are not capable of low frequency output.
Center Speaker
Large - If you have a center speaker capable of low frequency output.
Small - If you have a center speaker that is not capable of low frequency output.
Rear Speaker
Large - If you have rear speakers capable of low frequency output.
Small - If you have rear speakers that are not capable of low frequency output.
Subwoofer - Turn the subwoofer output on or off.
2. SPDIF Setup
Spdif Output
Spdif/Raw - When using digital output to connect to an amplifier with Dolby decoding,
select this option.
Spdif/Pcm - When using digital output for stereo playback.
Lpcm OUT - Choose the LPCM sampling rate for digital output, 46K or 96K.
24
Setup Menu cont.
3. Dolby Digital Setup
Dual Mono - Select the speaker output. It is usually recommended that you stay in STEREO
mode for best results.
Stereo - Outputs audio in stereo.
L-Mono - Plays the Left side only through both Left and Right speaker outputs on a
Multiplex disc.
R-Mono - Plays the Right side only through both the Left and Right speaker outputs on a
Multiplex disc.
Mix-Mono - Plays virtual stereo with Left and Right Mono coming out of the Left and
Right speaker outputs.
Dynamic - Setting the compression allows you to play music at a lower volume without losing
the original quality of the sound. Great for late night use.
Full - Full-volume cinematic sound.
3/4 - Low compression.
1/2 - Medium compression for general use.
1/4 - High compression for quieter (late night) use.
OFF - No Compression.
4. Channel Delay - Use the arrow keys to set the delay for each channel, Center, Subwoofer, Left or
Right. Press ENTER to confirm settings and exit.
5. Equalizer - Set the EQ levels to presets to best suit your audio type:
EQ - Rock, Pop, Live, Dance, Techno, Classic, Soft.
Bass Boost - Increase the low end of your audio output.
Super Bass - Maximize the low end of your output.
Treble Boost - Increase the high end of your audio output.
6. 3D Processing - Choose your processing setting for your DVX-668K to best suit your complete
home theater system setup and arrangement.
Pro Logic II - Create a surround sound effect for your stereo audio.
Pro Logic II - Enable or disable Dolby Pro Logic II or set to AUTO.
Mode - Set the mode to best match your audio type: Music, Movie, Pro Logic, Auto.
Panorama - Enable or disable the output of audio to the left and right surround
speakers.
Dimension - Change the amount of sound in the rear speakers.
Center Width - Adjust how much of the left and right channel form the center channel.
Reverb Mode - Set the reverb levels to one of these preset modes to duplicate the echo effect
of each space: Concert, Living Room, Hall, Bathroom, Cave, Arena, Church
7. HDCD - Change the filter settings for HDCD discs to adjust sound quality.
25
Setup Menu cont.
VIDEO SETUP PAGE
1. Component - Select the type of output you are using to connect the DVX-668K to your TV
system: S-video, Yuv and RGB.
2. TV mode - Change the video output to progressive scan or interlaced.
3. Quality - Adjust the appearance of the video to suit your TV, monitor or application.
Sharpness - Set the level of sharpness of your on-screen image: High, Medium and Low.
Brightness - Increase or decrease the brightness of your on-screen image.
Contrast - Adjust the contrast of your on-screen image.
Gamma - Set a gamma level for the video output: High, Medium and Low.
Hue - Adjust the hue variance of the on-screen image.
Saturation - Increase or decrease the saturation of the on-screen image.
Luma Delay - Adjust the luma settings of your image.
PASSWORD SETUP PAGE
1. Password Mode - Enable or disable the password mode to protect parental settings.
2. Password - Change the password. The default password is 136900.
26
Troubleshooting
There is no power
• Make sure the power cord is firmly connected to the back of
the DVX-668K and to the power outlet
• If using a power strip/surge-protector, make sure that it is
plugged in and switched on
There is no sound
• Make sure everything is connected firmly and properly
• Make sure there are no defective cables
• Make sure all of your components are turned on
• Make sure all of the components (amp, mixer, TV, etc.) are set
to the proper inputs
• Make sure the audio settings in the setup menu are set to
match your connections
No picture
• Make sure everything is connected firmly and properly
• Make sure there are no defective cables
• Make sure all of your components are turned on
• Make sure all of the components (amp, mixer, TV, etc.) are set
to the proper inputs
• Make sure the TV or monitor is working correctly
• Make sure the DVX-668K is set to the correct video output
mode using the V-MODE button on the remote control
The disc does not play
• Make sure the disc is inserted correctly (label-side up)
• Make sure the disc is clean and not scratched
• If using a CD/DVD R/RW, try using a different brand as some
brands might not be compatible
• Clean the CD lens using a CD lens cleaner
Remote control does not work
• Make sure the batteries are inserted, inserted correctly, and
not out of power
• Point the remote control directly at the remote sensor on the
machine
• Move closer to the machine
• If trying to turn the unit ON with the remote, make sure the
power button on the front panel is pressed in
The picture is unclear
• Make sure the disc is not dirty or damaged
• Make sure that the TV TYPE (N/P button on the remote) is
set correctly:
NTSC: In North America
PAL: In Europe and Asia
• Try restarting the DVX-668K
NOUSB error when attempting to playback off of a USB Drive
• Turn off the DVX-668K, remove the USB Drive, reconnect and
turn the DVX-668K back on
27
�
��
����������������������������
DVX-668K Manual © VocoPro 2008
V 1.0
www.vocopro.com