1
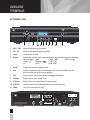
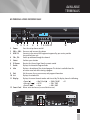
USER GUIDE
—
DIGITAL TV
HD TERMINAL
4642
HD PERSONAL VIDEO
RECORDER 8642
ILL-GDA-ENP-001-1011
IN THISIN
GUIDE
THIS GUIDE
IMPORTANT RULES FOR SAFE OPERATION......................................................................................................................................... 4
AVAILABLE TERMINALS ........................................................................................................................................................................ 5
REMOTE CONTROL ............................................................................................................................................................................... 8
CONNECTIONS .................................................................................................................................................................................... 10
CONNECTION NO. 1: CONNECTS YOUR TERMINAL (HD OR HD PVR) TO AN HD TV .............................................................................. 10
CONNECTION NO. 2: CONNECTS YOUR TERMINAL (HD OR HD PVR) TO AN HD TV AND A DVD READER/RECORDER............................ 11
CONNECTION NO. 3: CONNECTS YOUR TERMINAL (HD OR HD PVR) TO A SURVEILLANCE CAMERA.................................................... 12
ILLICO ON DEMAND ........................................................................................................................................................................... 13
ORDERING A MOVIE OR A SHOW....................................................................................................................................................... 13
TO RESUME WATCHING ..................................................................................................................................................................... 13
ACTIVATING PARENTAL CONTROL ..................................................................................................................................................... 13
INTERACTIVE PROGRAM GUIDE ....................................................................................................................................................... 14
PARENTAL CONTROL .......................................................................................................................................................................... 16
TO BLOCK VIEWING TIMES................................................................................................................................................................. 16
TO BLOCK CHANNELS........................................................................................................................................................................ 16
TO BLOCK TYPES OF PROGRAMS ....................................................................................................................................................... 16
ACTIVATING PARENTAL CONTROL ..................................................................................................................................................... 16
ADJUSTING THE VOLUME................................................................................................................................................................... 17
AUDIO SIGNAL EMITTED BY YOUR TERMINAL ...................................................................................................................................... 17
SETTING LEVELS FOR BETTER SOUND QUALITY .................................................................................................................................... 17
PAY-PER-VIEW...................................................................................................................................................................................... 18
PARENTAL CONTROL ......................................................................................................................................................................... 18
PERSONAL VIDEO RECORDER............................................................................................................................................................ 19
LIVE TV CONTROL: HOW TO CONTROL A LIVE PROGRAM THAT YOU ARE WATCHING ............................................................................. 20
HOW TO RECORD AND STORE A PROGRAM ....................................................................................................................................... 21
SAVE TIME ......................................................................................................................................................................................... 24
HOW TO DELETE A RECORDED PROGRAM OR A SCHEDULED RECORDING ......................................................................................... 25
PICTURE-IN-PICTURE (PIP) – HOW TO WATCH TWO PROGRAMS AT ONCE ......................................................................................... 25
RECORDING CAPACITY....................................................................................................................................................................... 26
SETTINGS ............................................................................................................................................................................................. 27
FREQUENTLY ASKED QUESTIONS ...................................................................................................................................................... 28
TERMINAL ......................................................................................................................................................................................... 28
FUNCTIONS ....................................................................................................................................................................................... 28
PERIPHERALS .................................................................................................................................................................................... 28
REMOTE CONTROL ............................................................................................................................................................................ 28
SOUND AND IMAGE .......................................................................................................................................................................... 29
SURVEILLANCE CAMERA .................................................................................................................................................................. 29
FRONT PANEL DISPLAY ...................................................................................................................................................................... 30
PAY-PER-VIEW AND PIN ..................................................................................................................................................................... 30
LIST OF CODES .................................................................................................................................................................................... 31
CUSTOMER SERVICE ........................................................................................................................................................................... 34
HIGH-DEFINITION SETUP ................................................................................................................................................................... 35
SETUP................................................................................................................................................................................................ 35
CONNECTORS.................................................................................................................................................................................... 35
SETUP WIZARD .................................................................................................................................................................................... 36
INTRODUCING THE SETUP WIZARD ......................................................................................................................... .......................... 36
PICTURE FORMATS ............................................................................................................................................................................ 36
SETTING UP YOUR HD TERMINAL WITH THE SETUP WIZARD ............................................................................................................... 40
CLOSED-CAPTIONING ........................................................................................................................................................................ 47
FREQUENTLY ASKED QUESTIONS ...................................................................................................................................................... 48
3
IMPORTANT RULES
FOR SAFE OPERATION
Carefully read through these rules for safe operation before hooking up the terminal.
PLACEMENT AND VENTILATION
The unit has openings for ventilation that protect it from overheating.
• Avoid obstructing these openings, and do not place other equipment, including televisions, lamps, books or any other object, on
the unit. Do not place it in an enclosure such as a bookcase or equipment rack, unless the installation provides proper ventilation.
• Do not place the unit on a bed, sofa, rug or similar surface, or over a radiator or heat register.
• Place the unit on a stable surface able to support its size and weight.
ACCESSORIES AND CLEANING
Do not use accessories with this equipment unless recommended by your cable service provider. Do not open the cover of the unit.
Unplug the unit and clean it with a damp cloth. Do not use a liquid or aerosol cleaner, or a magnetic/static cleaning device.
OBJECT AND LIQUID ENTRY
Do not expose the unit to moisture, or spill liquids on or near it. Do not place the unit on a wet surface. Never push objects of any kind
into the unit’s openings, as they may touch dangerous voltage points or cause short-circuits that could result in a fire or electric shock.
POWER SOURCES
A label on the unit indicates the correct power source for this equipment. Operate the unit only from an electrical outlet that has
the voltage and frequency indicated on the label. Do not overload electrical outlets or extension cords, as this can result in a risk
of fire or electric shock.
POWER CORD PROTECTION
Arrange all power cords so that people cannot walk on the cords or place objects on or against the cords, as this may damage them.
Pay particular attention to cords that are at plugs, at electrical outlets, connected to accessories, and at the places where the cords
exit the unit.
GROUNDING
The terminal has a two-prong plug. Properly ground the unit by inserting the plug into a grounded electrical, two-socket outlet.
If the plug is polarized, it has one wide prong and one narrow prong. This plug fits only one way.
Caution! To prevent electric shock, match wide blade of plug to wide slot, then fully insert. If you are unable to insert this plug fully
into the outlet, contact an electrician to replace your obsolete outlet.
SERVICING
The terminal has a standard warranty of three years. Opening the case will void your warranty. Refer all servicing to a qualified
Vidéotron technician. Contact your cable service provider for instructions. Service should be referred to a Vidéotron technician when any
of the following occurs:
• There is damage to the power cord or plug.
• Liquid enters the unit, or there is exposure to rain or water.
• A heavy object falls on the unit, or you drop the unit or damage the cabinet.
• Operation is not normal (the instructions in this guide describe the proper operation).
• The unit exhibits a distinct change in performance.
Extended Warranty
For greater peace of mind, Vidéotron offers you the possibility of extending the warranty for an additional two years. Customers
who want this extended warranty must apply for it within 30 days of the service activation date. The unit purchased will then
be covered for a total of five years following the activation date.
4
AVAILABLE
AVAILABLE
TERMINALS
ILLICO TERMINALS
THE TERMINALS OFFER THE SAME
HIGH-PERFORMANCE CAPABILITIES,
INCLUDING:
• an exceptional HD image that supports resolutions of up
to 1080i and is able to support a resolution of 1080p,
• Dolby Digital™ 5.1 surround sound adapted for home
theatre systems,
• a complete Interactive Program Guide providing an
overview of the programming for the next days,
• the ability to block access to specific times, channels or
TV programs with the Parental Control feature,
• access to interactive TV, as well as a multitude of
advanced features and services,
• access to Video On Demand, where available.
5
AVAILABLE
ILLICO TERMINALS
TERMINALS
HD TERMINAL 4642
Explorer 4642HD
CH+
VOL-
VOL+
SELECT
POWER
CHGUIDE
1
3
INFO
EXIT
SETTINGS
42 5 6 7 8
9
10
11
1
VOL +, VOL - Increases and decreases the volume
2
CH+, CH -
Scrolls up and down through the channels
3
Select
Confirms your selection
4
Display
Displays the current channel number and time of day. The display shows the following:
• Record (
) • Auto
• 1080i / 1080P
• MoCA Link ( )
• Power ( )
• Message (
) • 720i / 720P
• 5.1
• HDTV
• 480i / 480P
5
Guide
Displays the Interactive Program Guide
6
Info
Displays a description of the selected program. This button is available from the
on-screen guide and while viewing a program
7
Exit
Exits the menus, the on-screen guide, and program information
8
Settings
Provides access to the Settings menu
9
IR Sensor
Receives the infrared signal from the remote control
10 USB Port
Connects to the external USB equipment (reserved for future use)
11 Power
Turns the set-top box on and off
CAUTION
S
D
CATV CONVERTER
MADE IN MEXICO
STB SN:
MCARD SN: PXCPRPSLV
eCM MAC:
V
L
R
DIGITAL
AUDIO
OUT
SABPQTMNWW
RISK OF ELECTRIC SHOCK
DO NOT OPEN
AVIS: RISQUE DE CHOC
ETHERNET
ÉLECTRIQUE NE PAS OUVRIR
IR
H
D
01CEA05D679
120 V ~
60Hz 3A
L
MCARD MAC: 00 1BD73E17D9
R
1394
MULTI-STREAM CABLE CARD
THIS DEVICE IS INTENDED TO BE ATTACHED TO A RECEIVER THAT
IS NOT USED TO RECEIVE OVER-THE-AIR-BROADCAST SIGNALS.
CONNECTION OF THIS DEVICE IN ANY OTHER FASHION MAY CAUSE
HARMFUL INTERFERENCE TO RADIO COMMUNICATIONS AND IS IN
VIOLATION OF THE FCC RULES, PART 15.
6
Y
CABLE
IN
CABLE
OUT
Pb
120V~
60Hz 50W
Pr
OPTICAL
AUDIO OUT
S-VIDEO
OUT
USB
LISTED 36MW
VIDEO PRODUCT
AVAILABLE
AVAILABLE
TERMINALS
ILLICO TERMINALS
HD PERSONAL VIDEO RECORDER 8642
Explorer 8642HD
CH+
VOL-
VOL+
POWER
SELECT
CH-
GUIDE
INFO
EXIT
LIST
L AUDIO IN R
1
1
2
3
2
3
4
5
VIDEO IN
7 8 9 10 11
6
12
4
Power
Turns the set-top box on and off
VOL +, VOL - Decreases and increases the volume
USB 2.0
Connects to the external USB equipment approved by your service provider
(reserved for future use).
CH+, CH Scrolls up and down through the channels
5
6
7
8
Select
IR Sensor
Guide
Info
9 Exit
10 List
11 Display
12 Smart Card
Confirms your selection
Receives the infrared signal from the remote control
Displays the Interactive Program Guide
Displays a description of the selected program. This button is available from the
on-screen menu and while viewing a program
Exit the menus, the on-screen menu, and program information
Displays the recorded list
Displays the current channel number and time of day. The display shows the following:
• Power ( )
• MoCA Link ( ) • 1080i / 1080P
• 5.1
• Message (
) • HDTV
• 720i / 720P
• Record (
)
• Auto
• 480i / 480P
Allows smart card access (reserved for future use)
OUTPUT
STB SN: SABPQBQGD
VIDEO
Y
DIGITAL
AUDIO
CAUTION
OPTICAL
AUDIO
OUT
RISK OF ELECTRIC SHOCK
DO NOT OPEN
AVIS: RISQUE DE CHOC ÉLECTRIQUE
NE PAS OUVRIR
eCM MAC: 001AC3F4F757
THIS DEVICE IS INTENDED TO BE ATTACHED
MCARD SN: PXCPRPSLV
TO A RECEIVER THAT IS NOT USED TO
RECEIVE OVER-THE-AIR BROADCAST
SIGNALS. CONNECTION OF THIS DEVICE
MCARD MAC: 00 1BD73E17D9
IN ANY OTHER FASHION MAY CAUSE
HARMFUL INTERFERENCE TO RADIO
COMMUNICATIONS AND IS IN VIOLATION
CABLE
OF THE FCCMULTI-STREAM
RULES, PART 15.
SCIENTIFIC-ATLANTA, INC.
L
Pb
L
IR
120 VAC
60Hz 4.2A
500W
STB RF MAC: 001AC3F$F756
CABLE OUT
R
CARD
CABLE IN
Pr
R
USB 2.0
CATV CONVERTER
MADE IN MEXICO
S-VIDEO
OUT
eSATA
120V~
60Hz 80W
1394
ETHERNET
LISTED 14H1
VIDEO PRODUCT
7
REMOTE CONTROL
CONTROLS
REMOTE CONTROL RT-U63P-15
For best results, we recommend reading the next page to correctly program
your remote control in conjunction with your TV set.
The remote control requires two AA alkaline batteries. A diagram inside the compartment of the
remote control indicates proper battery placement. Replace as needed, when the indicator light becomes
dim or no longer illuminates.
8
REMOTE
REMOTE
CONTROL
CONTROLS
PROGRAMMING THE RT-U63P-15 REMOTE CONTROL
For more information, see the Programming and operating instructions manual that came with your terminal.
QUICK PROGRAMMING
This method allows you to program the remote control without using codes. Instead, the remote control automatically
searches for the correct code that operates your device.
When using this method, there are several important points to remember:
• The order in which you program your electronic devices is not important.
• There may be several codes that turn your electronic devices on/off (or perform other functions). Once you lock in a
code, be sure to check the available functions for that device (e.g. TV (Vol +/-, Mute), TV Input (Video Source
button), VCR (Play, Stop, etc.), DVD (Play, Stop,etc.), AUDIO (Vol +/-, Mute)) to see if they are operating.
• While the remote is searching for the correct setup code(s) for your electronic devices, it is possible that other
(previously programmed) devices may turn on/off. If this occurs, continue pressing the CH + or CH - buttons until
you find the correct code for the device you are programming.
• It may take several minutes for the remote to find the correct code that turns your device off (or performs another
selected function). During this time, the POWER/MODE buttons will light up in fast rotation (i.e. CBL > TV >
VIDEO > AUDIO ).
PROGRAMMING YOUR REMOTE CONTROL USING THE CH + OR CH - BUTTONS
1. Turn on all the electronic devices (TV, VCR, DVD, AUDIO) you want to program the remote to operate.
2. Press SELECT then MUTE together until the CBL/TV/VCR/AUDIO buttons light up in a slow rotation.
3. Press and hold the CH + button until one device turns off. While you are pressing the CH + button, the
CBL/TV/VCR/AUDIO buttons will light up in fast rotation. As soon as one device turns off, release the CH + button.
4. Press MUTE. If the device that turned off:
a. Turns back on, press SELECT to lock in this code. The CBL/TV/VCR/AUDIO buttons will blink 3 times
and go out.
b. Does not turn back on, press CH - repeatedly until that device turns back on. Each time you press the
CH - button, the CBL/TV/VCR/AUDIO buttons will light up once in a reverse fast rotation.
5. Once you have found a code that turns the device on/off, press SELECT to lock in this code. The CBL/TV/VCR/AUDIO
buttons will blink 3 times and go out.
6. Repeat steps 2 to 5 above for each of the remaining electronic devices you wish to program the remote to operate.
9
CONNECTIONS
CONNECTION NO. 1: CONNECTS YOUR TERMINAL (HD OR HD PVR) TO AN HD TV
THIS CONNECTION WILL ALLOW YOU TO:
A. Watch the channel or service of your choice (in HD, when available),
B. Record programs on the hard drive while they are playing, allowing the use of the Live TV
control functions (in HD, when available),
C. Watch a program previously recorded on the hard drive (in HD, when available),
D. Record a show from one channel on the hard drive while watching another channel
(in HD, when available),
E. Record two shows from two different channels on the hard drive while watching a third previously
recorded program (in HD, when available),
F. Program your PVR to record one program or two programs simultaneously while you're away
(in HD, when available).
HD TV
Wall-mounted
cable outlet
HD TERMINAL
or HD PVR
Notes:
• The best possible connection with the cables supplied is illustrated by the solid lines. The dotted lines
represent viable options.
• Although the rear of the terminal depends on the model (sockets in different positions), the connection
is done in the same way.
• You should turn the terminal volume all the way up and adjust the volume on the TV to your taste.
For explanations, see the “Volume adjustment” section on page 17.
10
CONNECTIONS
CONNECTIONS
CONNECTION NO. 2: CONNECTS YOUR TERMINAL (HD OR HD PVR) TO AN HD TV AND
A DVD READER/RECORDER
THIS CONNECTION WILL ALLOW YOU TO:
A. Watch the channel or service of your choice (in HD, when available),
B. Record programs on the hard drive while they are playing, allowing the use of the Live TV
control functions (in HD, when available),
C. Watch a program previously recorded on the hard drive (in HD, when available),
D. Record a show from one channel on the hard drive while watching another channel (in HD, when available),
E. Record two different shows from two different channels on the hard drive while watching a third
previously recorded channel (in HD, when available),
F. Program your PVR to record one program or two programs simultaneously while you're away
(in HD, when available),
G. Transfer the contents of your hard drive onto a DVD for archiving,
H. View the contents of a DVD.
Notes:
• The best possible connection with the cables supplied is illustrated by the solid lines. The dotted lines
represent viable options.
• Although the rear of the terminal depends on the model (sockets in different positions), the connection is
done in the same way.
• You should turn the terminal volume all the way up and adjust the volume on the TV to your taste.
For explanations, see the “Volume adjustment” section on page 17.
11
CONNECTIONS
CONNECTION NO. 3: CONNECTS YOUR TERMINAL (HD OR HD PVR) TO A
SURVEILLANCE CAMERA
ALL OF THE TERMINALS ALLOW VIEWING OF IMAGES TRANSMITTED BY YOUR BUILDING'S
SURVEILLANCE CAMERAS.
• On any terminal simply tune your receiver to channel 950.
• You will need to add a splitter and connect it as follows (see diagram below).
THIS CONNECTION WILL ALLOW YOU TO:
• Watch the channel or service of your choice
• Watch the images transmitted by the surveillance camera
Wall-mounted
cable outlet
HD TERMINAL OR HD PVR
Notes:
• The best possible connection with the cables supplied is illustrated by the solid lines. The dotted lines
represent viable options.
• Although the rear of the terminal depends on the model (sockets in different positions), the connection
is done in the same way.
• You should turn the terminal volume all the way up and adjust the volume on the TV to your taste.
For explanations, see the “Volume adjustment” section on page 17.
12
ILLICO
TITRE
ONPRINCIPAL
DEMAND
illico On Demand is your first source for movies, shows, popular TV series, comedy shows and more. illico On Demand offers
you the greatest selection of bilingual content, available whenever you want it. You will find:
• Over 6,000 regularly updated titles, including more than 2,000 free titles
• The most recent box-office hits
• The latest movies, as soon as they are released on DVD
The features available while watching a movie or a TV show on illico On Demand are the same as on your DVD reader.
1. Pause
4. Stop
2. Play
5. Fast-forward
3. Rewind
ORDERING A MOVIE OR A TV SHOW
1.
2.
3.
4.
Press 900 or tune in to channel 900.
Choose a category or a subcategory and a title and press SELECT after each choice.
Press SELECT to order the movie, enter your PIN and press SELECT. The default PIN is 0000.
Press PLAY to confirm the order and start the movie. To cancel the order at this point, press C.
Once past this step, the movie rental cannot be cancelled.
TO RESUME VIEWING
1.
2.
3.
4.
In the illico On Demand menu, on channel 900, select Resume Viewing and press SELECT.
Choose the title and press SELECT; the movie will start where you left off.
To watch the movie from the beginning, press REWIND.
To exit illico on Demand, press EXIT.
The time indicated next to a title shows the time remaining on your rental. You may also resume viewing the film
or TV show you've paused on illicoweb.tv (if you have Videotron's Internet service) or on illico mobile (if you have
a 3G mobile phone from Videotron).
ACTIVATING PARENTAL CONTROL
TO BLOCK OUT MOVIES BASED ON THEIR TYPE
1.
2.
3.
4.
Press SETTINGS twice.
Select BLOCK: RATING and press SELECT.
Enter your parental PIN (the default PIN is 0000) and follow the instructions on the screen.
You can block one or more type of movie ratings to avoid unpleasant surprises.
13
INTERACTIVE
PROGRAM GUIDE
Press the GUIDE button and the Interactive Program Guide (IPG) displays the list of upcoming programs for the
next days. These programs can be sorted by channel, theme or title.
Current channel
Current program
Title and broadcast
time of selected program
Browse by channel,
theme, title
Program titles and
upcoming schedule
Browsing instructions
Displayed
schedule date
FOR INFORMATION ON THE PROGRAM
1. When the guide is on-screen, use the arrows (
2. Press the INFO button for more information.
) to select the desired program.
HOW TO BROWSE BY THEME
1. When the guide is on-screen, press , choose Theme, then press SELECT.
2. Press the
arrow, choose a theme and press SELECT.
3. Use the and arrows to move through the titles.
HOW TO BROWSE BY CHANNEL
1. Press GUIDE; the program you are watching is highlighted.
2. Use the and arrows to move through the channels, and the
14
and
arrows to move through the time slots.
INTERACTIVE
PROGRAM GUIDE
HOW TO BROWSE BY TITLE
1. When the guide is on-screen, press , choose Title, then press SELECT.
2. Press the , choose the first letter of the program in question and press SELECT.
3. Use the and arrows to move through the titles.
• To tune the selected program in the current time slot, highlight it and press SELECT.
• To view the schedule for the next days, press , highlight the date for the available day, then press
SELECT.
At any time, you can press the INFO button twice for more information on the selected program.
After browsing through the IPG, press
to go back to where you started.
HOW TO SCHEDULE A REMINDER
1. Press GUIDE, highlight a program and press SELECT.
2. Highlight Set a Reminder and press SELECT; the chosen title is now in green.
15
PARENTAL CONTROL
With the parental control feature, you can block:
1. Certain viewing times
2. Specific channels
3. Some types of programs
All you need is your PIN!
TO BLOCK VIEWING TIMES
1. Press SETTINGS twice, select BLOCK: TIME NEW and press SELECT.
2. Determine blocked times by following the instructions on-screen.
TO BLOCK CHANNELS
1. Press SETTINGS twice, select BLOCK: CHANNELS and press SELECT.
2. Determine blocked channels by following the instructions on-screen.
TO BLOCK TYPES OF PROGRAMS
1. Press SETTINGS twice, select BLOCK: RATINGS and press SELECT.
2. Determine blocked types of programs by following the instructions on-screen.
ACTIVATING PARENTAL CONTROL
Once you have determined the channels, times and types of programs to be blocked, you need to activate the
parental control feature by following the steps below:
1. Press SETTINGS twice, select BLOCK: PIN, choose the ENABLE feature and press SELECT.
2. Press
and enter your PIN.
TO DEACTIVATE THIS FEATURE, FOLLOW THE INSTRUCTIONS BELOW:
1. Press SETTINGS twice, select BLOCK: PIN, choose DISABLE and press SELECT.
2. Press
and enter your PIN to disable (or change) the feature.
3. At this step, you can also change your PIN by selecting CHANGE.
You can also unblock access to a blocked channel by tuning it in and following the instructions on the screen.
Note: Your default PIN is 0000.
16
ADJUSTING
THE VOLUME
AUDIO SIGNAL EMITTED BY YOUR TERMINAL
By adjusting the volume on your TV, you determine the loudness of the sound coming from your speakers. With your
terminal, however, the VOLUME feature adjusts the power of the audio signal coming from your terminal. This
signal then enters your TV or audio system at the programmed level. This is why it is important to keep the power
of the audio signal coming from your terminal at maximum level.
SETTING FOR BETTER SOUND QUALITY
There are three main settings.
To access the general settings menu, press SETTINGS twice on your remote control. Once in the GENERAL
SETTINGS menu, follow the instructions below:
A. In the menu on the left, select AUDIO: DIGITAL OUT using the and arrows. Go to the right and select:
• HDMI, if you want to use your HDMI cable as your Audio and Video output
• DOLBY DIGITAL, if you prefer to use a digital ouput (other than HDMI)
• OTHER, if you choose to use an analog audio output.
Press
to confirm your selection.
B. In the menu on the left, select AUDIO: RANGE using the and arrows. Go to the right and, using the arrows
again, select NARROW. Press
to confirm your selection.
C. In the menu on the left, select AUDIO: VOLUME CTRL using the and arrows. Go to the right and, using the
arrows again, select FIXED. Press
to confirm your selection.
Naturally, for impeccable sound quality, your TV or home theatre speakers have to be in good condition. Also, be
sure to use top-quality speaker wires. In addition, if your home theatre has an AC-3 input, we recommend you use it
because the terminal is AC-3 enabled. If you are watching a program in this format, you will get superior quality
sound, provided your equipment has been set accordingly.
17
PAY-PER-VIEW
Indigo and Viewer’s Choice feature uninterrupted films and special events that can be ordered at any time using
the IPG. Charges for these programs will appear on your next month’s bill.
• Channel 300 is the preview channel for Indigo, and 350, for Viewer’s Choice. Watch these channels for an
overview of current and upcoming films.
HOW TO ORDER A FILM OR EVENT
• Press GUIDE and browse through the 300 series channels, or 350 for HD, to see the featured titles. Highlight
the title that interests you, press SELECT and follow the on-screen instructions.
or
• Tune in to the channel broadcasting the film and follow the on-screen instructions.
HOW TO CANCEL A FILM OR EVENT
• Press SETTINGS twice to call up the General Settings screen. Select PPV: Purchases. Press SELECT and
enter your PIN. Choose the film or event you wish to cancel. Press SELECT to cancel, then
to confirm
cancellation.
PPV PIN: To order a film or event, you must enter a PIN. The default PIN is 0000. We recommend that you
change your PIN upon placing your first order. To do so, you need only enter a new 4-digit PIN when the PIN
window appears on-screen.
If you forgot your PIN, contact Customer Technical Support (see page 34).
PARENTAL CONTROL
Parental control is accessed through the Pay-per-View feature (TALC). Consult the relevant section on page 16 for
further details.
18
PERSONAL VIDEO
RECORDER
To use the personal video recorder (PVR) function, you must have a terminal with a hard drive and a record function
connected to the TV from which you want to record or program your recording.
When you press one of these keys, a status bar is momentarily displayed at the bottom of the screen to show
you the progress of playback and broadcast of the program you are watching.
Red/Green division
indicates the time you
tuned in to the channel
Red, indicates the missed
portion of the program
Pause status bar
Title of program
Triangle indicates your current
position in the program
Green area indicates
stored programming
Clear area indicates portion
of program not yet broadcast
Actual time slot of program
Note: The program stored in the memory buffer is erased as soon as you change channels or switch off
the PVR. To save a program, you have to record it and save it on the hard drive.
19
PERSONAL
VIDEO RECORDER
LIVE TV CONTROL: HOW TO CONTROL A LIVE PROGRAM
The PVR stores the programming being broadcast on the channel you are watching in a memory buffer. This lets
you pause and rewind the action (even with a live broadcast), and resume watching the program in real time.
Pauses the program you are watching for a maximum of one hour.
After one hour, playback resumes from the point where you paused the program.
Resumes playback of a paused program.
Rewind: press once, twice, three or four times to slow down or speed up the
rewind speed.
Fast-forward: press once, twice, three or four times to slow down or speed
up the fast-forward speed.
Returns you to live programming.
Instantly replays the last 8 seconds of the program you are watching.
Skips the program or movie you are watching 30 seconds forward (for future use).
Make sure the CBL mode key is activated, because it controls the PVR features.
To see whether the key is activated or not, press the INFO key: if the CBL key’s LED lights up, that means the
key is activated. If it doesn’t, press the CBL key.
20
PERSONAL
VIDEO RECORDER
HOW TO RECORD AND STORE A PROGRAM
There are three ways to record a program:
• Record a program while you watch it
• Record a program from the Program Guide
• Manually record all programs in a single time slot
RECORD A PROGRAM WHILE WATCHING IT
If you have been tuned in to a program since it started, you can press the
and the entire program will be recorded.
key at any time during the broadcast
1. Press .
2. When the Confirm Recording screen is displayed, press the
key to record and store the program.
The RECORD indicator on the front panel lights up for a few seconds after you confirm the recording.
To record more than one episode of a program and modify the save time, press the
key.
key rather than the SELECT
If you are watching television and recording two programs at the same time, you must be either tuned in
to one of the programs you are recording, or watching a program you have already recorded.
21
PERSONAL
VIDEO RECORDER
RECORD A PROGRAM FROM THE PROGRAM GUIDE
With this type of recording, you decide in advance what programs to record, so you’ll never miss them.
1. Press the GUIDE key; the title of the program in progress is highlighted.
2. Highlight a program title and press .
3. Press the
key to confirm recording. The title of the recorded program is highlighted in red in the program
guide.
4. Press the GUIDE again to return to the program in progress.
You can record programs blocked by the Parental Control feature, but you will need to enter your PIN first
to watch them.
MANUALLY RECORD ALL PROGRAMS IN A SINGLE TIME SLOT
To manually record all programs in a specific time slot:
1.
2.
3.
4.
Press the
key, then press
Preferences.
Highlight Schedule a New Manual Recording, then press SELECT .
Highlight the channel, the recording start and end times, and the save time, then press
Press EXIT to return to the program in progress.
RECORDING OPTIONS
The recording options let you:
• Schedule, in a single step, recording of all episodes of your favourite program.
• Change the default save time.
• Modify the recording start and end times.
22
.
PERSONAL
VIDEO RECORDER
CHANGE START AND END TIMES
1. Select hour using or , then select minutes using
2. Do the same for each column.
3. To confirm your settings, press .
.
If you would rather enter the time manually, you must enter the four digits requested, even if you are only changing
the minutes value, otherwise the change will not be programmed.
PLAY BACK A RECORDED PROGRAM
1. Press the
key, highlight a program title, and press SELECT.
2. Highlight an option and press SELECT.
3. To return to a program in progress without watching a recorded program in its entirety, press , then EXIT,
and tune in to the desired channel.
4. To return to a program in progress after watching a recorded program in its entirety, press EXIT and tune in
to the desired channel.
If you stop watching a recorded program to watch a live program, when you return to the recorded
program, it will resume playing where you left off. If you want to watch it again from the beginning,
press , select Play from beginning and press SELECT.
23
PERSONAL
VIDEO RECORDER
BLOCK A PROGRAM
If you have recorded a program that was not subject to Parental Control, but decide to block access to it later:
1. Press the
key, highlight a program title, and press SELECT.
2. Highlight Block and press SELECT.
3. Enter your parental PIN and press ; a small red padlock appears in the upper left window of the screen,
confirming that the title has been blocked.
4. To view the program, you must enter your parental PIN.
SORT PROGRAM TITLES
To make it easier to access recorded programs, you can sort them by alphabetical order or by date and time
recorded. To change from one setting to the other:
1. Press the
key, then press
Preferences.
2. Choose the desired sorting method and press SELECT.
SAVE TIME
DEFAULT SAVE TIME
1. Press the
key, then press
Preferences.
2. Highlight Change Save Time and press SELECT.
The save time is the period during which a recorded program will be stored on the terminal’s hard drive.
period has expired, the program will be erased automatically.
CHANGE THE SAVE TIME FOR A PROGRAM YOU HAVE ALREADY RECORDED
1. Press the
key, highlight a program title, and press SELECT.
2. Highlight Change Save Time, and press .
3. Highlight a time and press SELECT.
4. Press the EXIT key to return to the program in progress.
CHANGE THE SAVE TIME FOR A SCHEDULED RECORDING
1. Press the
key followed by , then highlight a program title, and press SELECT.
2. Highlight the SAVE column, select a period, and press SELECT.
3. Press the EXIT key to return to the program in progress.
24
PERSONAL
VIDEO RECORDER
PERSONAL
VIDEO RECORDER
HOW TO DELETE A RECORDED PROGRAM OR A SCHEDULED RECORDING
DELETE A PROGRAM FROM THE LIST OF RECORDED PROGRAMS
1. Press the
key, highlight a program title, and press SELECT.
2. Highlight Erase, then press
to confirm.
DELETE OR MODIFY A SCHEDULED RECORDING
1. Press the
key, then press .
2. Highlight a program title and press SELECT.
3. Press
to delete the program, then press
or
Modify program, then press .
to confirm.
DELETE A RECORDING IN PROGRESS
1. Tune in to the channel broadcasting the program being recorded and press the
2. Highlight Stop and Erase, then press SELECT.
key.
PICTURE-IN-PICTURE (PIP) – HOW TO WATCH TWO PROGRAMS AT ONCE
The keys near the bottom of the remote control are used to control the PIP feature, which lets you view two
programs at the same time.
• Press
; a second screen (the PIP screen) appears superimposed on the main screen.
• Press
to change the channel in the PIP screen.
• Press
• Press
to swap the program in the PIP screen to the main screen, and vice versa.
to move the PIP screen to a different corner of the main screen.
25
RECORDING
CAPACITY
Digital TV channels broadcast variable amounts of data, depending on the type of program being aired. For
instance, there may be times when a sports specialty channel broadcasts a larger quantity of data than channels
whose lineups are primarily made up of talk shows or soap operas. Sports programs generally involve much
more movement, and more data are therefore required to reproduce the images on your screen. The number
of recording hours available to you therefore varies according to the types of programs you record.
HDTV (high-definition television) channels need to transmit 2 to 2.5 times more data than standard channels
to reproduce a higher quality image on your screen. Your PVR HD is equipped with a high-capacity hard drive
(500 gigabytes) that lets you record up to 55 hours of high-definition content, or up to 280 hours of
standard-definition content.
26
SETTINGS
QUICK SETTINGS
The Quick Settings screen displays the most frequently used functions and settings:
•
•
•
•
•
•
•
•
Add a channel to (or remove it from) your Favourites list
Turn Parental Control ON/OFF
Start recording
Set Sleep Timer
Set SAP (Second Audio Program) language
Switch Caption OFF/ON or ON with mute
Block or unblock the current channel
Set Picture Size
HOW TO DISPLAY QUICK SETTINGS
1. Press the SETTINGS key once to display the Quick Settings screen, highlight an option, and press SELECT
to modify it.
2. Press the EXIT key to leave Quick Settings and return to the current channel.
For more information on the options available in Quick Settings, press the SETTINGS key twice to display
the General Settings screen, highlight an option, and press the INFO key.
GENERAL SETTINGS
The General Settings screen lets you customize the terminal’s display features and set the timers.
• Press the SETTINGS key twice, highlight an option, and press the INFO key to see what the option does.
Options
Audio: Digital Out
Audio: Range
Audio: Volume Ctrl
Block: Channels
Block: PIN
Block: Rating
Block: Time New
CC: Background
CC: Characters
CC: Options
CC: Source
Display: Power Off
Display: Power On
Language: Audio
Language: Keyboard
Options
Language: Screen
Purchase: PIN PPV: Purchases
Set: A-C Outlet
Set: Color Scheme
Set: Output Chan
Set: VCR Commander
Timer: All
Timer: Rewind New
Timer: Sleep
Timer: Turn Off
Timer: VCR New
Timer: Wake-Up
Viewer: Favourites
Viewer: Power On
27
FREQUENTLY
ASKED QUESTIONS
TERMINAL
My terminal feels hot, is this normal?
Yes, because the electronic components inside generate a lot of heat. To prevent overheating, avoid blocking the
air vents on the top and sides and do not place the terminal in enclosed furniture.
Can I leave my terminal on all the time?
Yes, but we recommend turning it off after use.
FUNCTIONS
Does the terminal support the Second Audio Program (SAP) function?
Yes. The terminal can convert SAP even though very few programs are designed to support this function.
Does the terminal show support closed-captioned programs?
Yes, if a closed-captioning decoder is connected to the TV. The terminal relays the information but does not decode it.
PERIPHERALS
Can I use a DVD player or DVD recorder with the terminal?
Yes, because the two devices work independently of each other.
Is the VCR+ function on the VCR of any use with the terminal?
No, this function is only used to record the analog signal.
What connects to the USB port and what is it for?
USB is a computer standard. The port is used to connect peripheral devices: keyboard, mouse, scanner, printer,
diskette storage drive. At this time, the USB port on the terminal is not operational but it will be in the near future.
REMOTE CONTROL
Can I turn on my TV and the terminal at the same time?
Yes, but if your TV is an older model, you will have to:
•
•
•
•
28
Connect the TV to the CA output on the back of the terminal.
Press the SETTINGS button twice on the terminal’s keyboard or remote control.
Select Settings: CA output and press SELECT.
Select “Avec le terminal” (with the terminal), press SELECT and SETTINGS.
FREQUENTLY
ASKED QUESTIONS
SOUND AND IMAGE
Poor picture reception
In most cases, simply re-initializing the terminal re-establishes the service. To re-initialize, you need to turn off the
terminal, disconnect it from the wall outlet, and then reconnect it. Wait 5 minutes, restart the terminal and tune in
to a channel. If the problem persists, please contact Technical Support.
What gets connected to the S-VIDEO output and what is it for?
It is used to connect a VCR or TV equipped with an S-VIDEO input. This connector separates colours and brightness,
which enhances image quality. You need to purchase a cable in order to use it.
Can I take advantage of AC-3 technology with the terminal?
Yes, but you need an AC-3 decoder. This decoder is usually built into newer, sound systems or home theatre
systems. The terminal relays the information (Digital Audio Out connector) but does not decode it.
SURVEILLANCE CAMERA
In analog mode, I used to have access to my building's surveillance camera. Is this still possible?
Yes, but you will have to use a splitter in your connection to access the analog signal and tune in to channel 950.
29
FREQUENTLY
ASKED QUESTIONS
FRONT PANEL DISPLAY
Can I change the time shown on the front of the terminal?
No, the time shown reflects the terminal’s internal clock. However, depending on the screen language setting,
it can be displayed in the 24-hour system (French) or the 12-hour system (English).
Modifying the time format displayed on the front of the terminal
• Press the SETTINGS button twice on the remote control or wireless keyboard.
• Select Language: Screen and press SELECT.
• Select English or Spanish for the 12-hour format and French for the 24-hour format, and then press SELECT
and SETTINGS.
PAY-PER-VIEW AND PIN
I ordered an Indigo movie and the terminal asked me to enter a 4-digit PIN. What is it for?
This PIN is a security feature. Only individuals who know the PIN can order a movie or an event. All subscribers
have the default PIN 0000; it is a good idea to change the PIN regularly.
Ordering a movie with Viewer’s Choice
1. Tune in to Channel 350 (VCC trailers) and press Guide on the keyboard or remote control.
2. Select a time slot and scroll the movies broadcast during this period.
3. Select a title and press SELECT twice.
4. Press B and enter your PIN. The default PIN is 0000.
Note: You can order movies up to 4 hours in advance and events up to 7 days in advance.
Forgot your PIN?
If you have never changed your PIN, enter 0000, which is the default PIN. If you have already changed it, you will
have to contact Customer Service.
The telephone numbers for Customer Service and Customer Technical Support are listed on page 34.
30
LIST OF CODES
REMOTE CONTROL SETUP CODES
TV
Acer – 454, 782
Admiral – 026, 027, 028, 029, 054,
211, 213, 408
Advent – 047, 072, 094, 425, 447, 463
Aventura – 047
Aiko – 015, 051, 391
Aiwa – 214, 417
Akai – 020, 053, 462, 473, 522,
524,547, 572, 586
Alleron – 211, 395
Amark – 023, 215
Amstrad – 157
Amtron – 168, 400
Anam – 044, 168, 217, 218, 219, 220,
221, 222, 223, 400, 403
AOC – 053, 073, 108, 384, 573, 587
Apex – 030, 038, 427, 599,
Astar – 462
Audiovox – 168, 191, 220, 400, 465, 659
Belcor – 073
Bell & Howell – 211, 213, 355, 388, 736
Ben Q – 454, 820
Bradford – 168, 400
Brillian – 792
Broksonic – 165, 167, 423, 434, 809
Brokwood – 073
Candle – 068,073,091,108,385,573,587
Carver – 072, 405, 729
Celebrity – 020
Centurion - 095, 107, 108
Citizen – 015, 023, 051, 068, 073,
091, 108, 168, 211, 213, 233, 355,
385, 388, 391, 400, 573, 587, 741
Coby – 558
Colortyme – 730
Concerto – 073, 095, 108, 573, 587
Contec/Cony – 039, 147, 168, 233,
400, 732
Coronado – 023
Craig – 168, 217, 218, 220, 223, 400, 786
Crosley– 072, 405, 598, 729
Crown – 023
Curtis Mathes – 016, 023, 031, 054,
072, 073, 107, 108, 211, 213, 355,
388, 405, 573, 587, 606, 729, 735,
741, 759, 777
CXC – 168, 400
Daewoo – 051, 068, 073, 095, 158,
159, 189, 191, 194, 196, 197, 198,
200, 202, 204, 205, 206, 207, 209,
737, 741, 793
Daytek – 583, 833, 834
Daytron – 023, 073, 095, 107, 108,
573, 587, 741
Dimensia – 759
Dell – 072, 094
Diamond Vision – 563
Dumont – 049, 073, 108, 573, 587
Duraband – 157
Dynex – 167, 415, 424, 567, 577
Electroband – 020
Electrohome – 020, 044, 073, 095,
108, 403, 573, 587, 739
Elektra – 353
Element – 459, 587
Emerson – 016, 021, 023, 031, 053,
064, 073, 100, 103, 108, 139, 158,
159, 164, 165, 166, 167, 168, 169,
189, 191, 211, 233, 355, 387, 392,
395, 400, 401, 402, 403, 408, 415,
424, 456, 507, 567, 573, 577, 590,
587, 731, 734, 736, 741, 743, 744,
745, 746, 748, 750, 751, 754, 757,
760, 761, 764, 786
Envision – 073, 095, 108, 573, 587
ESA – 454, 456, 538
Fisher – 104, 355, 356, 388, 736
Fijitsu – 211, 395, 460, 469, 560, 779, 813
Funai – 047, 048, 157, 168, 211, 395, 400
Futuretech – 168, 400
Getaway – 426, 533
GE – 015, 018, 042, 044, 045, 049, 054,
055, 068, 069, 070, 073, 090, 092,
095, 101, 102, 103, 108, 211, 213,
389, 390, 396, 397, 403, 406, 407,
573, 587, 739, 742, 755, 759, 806
Gibraltar – 023, 048, 049, 053, 068, 073,
090, 095, 107, 108, 233, 360, 361,
573, 587
Go Video – 443, 562
Goldstar – 023, 053, 068, 073, 090,
107, 108, 233, 360, 361, 424, 567,
577, 587, 823, 825
Gradiente – 104
Grundig – 233
Grunpy – 023, 047, 073, 095, 108,
233, 360, 361, 384, 573, 587
Haier – 020, 053, 073, 095, 108, 427,
519, 573, 587, 596
Hallmark – 073, 095, 108, 573, 587
Harvard – 168, 400
Hi-Sense – 072
Hitachi – 023, 039, 068, 073, 095,
096, 097, 098, 099, 100, 108, 233,
393, 573, 587, 732, 750, 753, 756,
787, 796, 801, 803, 808, 814, 815,
817, 819, 821
HP – 072
Hyundai – 453
iLO – 458, 524, 577, 586, 602
IMA – 168, 400
Infinity – 072, 406, 729
Initial – 470
Inkal – 364
Insignia – 167, 415, 424, 450, 456,
461, 462, 523, 524, 567, 577, 586
JBL – 072, 405, 729
JC Penney – 023, 038, 039, 045, 053, 068,
073, 091, 092, 095, 102, 108, 355, 631,
384, 385, 389, 390, 573, 587, 739, 741,
742, 755, 759, 767, 795
JCH – 020
Jensen – 062, 073, 108, 461, 573, 587
JVC – 039, 045, 104, 105, 106, 233,
396, 397, 410, 589, 728, 732, 742,
753, 763, 766
Kawasho – 020, 073, 095, 108, 573, 587
Kenwood – 073, 095, 108, 573, 587
Kloss Novabeam – 071, 168, 400, 404
KMC – 023
Konka – 065, 445, 589
Kosch – 462
KTV – 023, 053, 064, 168, 233, 366,
400, 741, 770
Kurazai – 211, 213
Legend – 169
LG – 023, 053, 068, 073, 090, 107,
108, 233, 360, 361, 384, 424, 567,
577, 587
Lodgenet – 211, 213
Logik – 211, 213
Luxman – 068, 073, 095, 108, 573, 587
LXI – 024, 026, 027, 028, 029, 038,
055, 069, 070, 072, 157, 355, 388,
405, 725, 729, 736, 755, 759, 773
MAG – 459
Magnavox – 023, 044, 068, 071, 072,
073, 089, 090, 091, 092, 093, 094,
095, 108, 134, 233, 385, 387, 390,
397, 398, 403, 404, 405, 419, 423,
426, 456, 463, 470, 472, 523, 533,
549, 594, 595, 729, 740, 783, 810
Majestic – 211, 213
Marantz – 053, 072, 073, 097, 098, 107,
108, 109, 405, 573, 587, 729, 778
Matsui – 582, 583, 585
Maxent – 428, 533, 534
McIntosh - 555
Megatron – 215
Memorex – 090, 211, 213, 355, 384,
388, 405, 423, 459, 736
MGA – 053, 068, 073, 090, 095, 104, 107,
108, 109, 110, 216, 384, 394, 394, 398,
399, 417, 573, 587, 739, 790
Mitsubishi – 053, 068, 073, 090, 095,
104, 107, 108, 109, 110, 216, 384,
394, 395, 398, 399, 417, 573, 587,
739, 790
Midland – 023, 045, 049, 396, 741,
742, 755
Mintek – 470
Montgomery Ward – 022, 023, 026,
027, 028, 029, 053, 071, 072, 108,
211, 213
Motorola – 026, 027, 028, 029, 044, 403
MTC – 073, 108, 384, 573, 587
Multitech – 168, 400
Multivision – 738
NAD – 023, 773, 787
NEC – 028, 029, 044, 068, 073, 090, 108,
200, 384, 403, 464, 573, 587, 730
Net TV – 426, 822
Nikko – 015, 051, 391
Nordcent – 455, 472
NuVision – 831, 832
NTC – 015, 051, 391
Olevia – 073, 108, 519, 541, 587
Onwa – 168, 400
Optimus – 787
Optonica – 022, 026, 027, 028, 029
Orion – 019, 159, 160, 161, 162, 163,
382, 423, 424, 558, 577
Panasonic – 042, 043, 044, 045, 046, 403,
419, 423, 429, 631, 742, 771, 829
Philco – 023, 044, 053, 068, 071, 072,
073, 091, 093, 095, 108, 233, 384, 385,
403, 404, 405, 463, 573, 587, 729
Philips – 023, 044, 068, 071, 072,
073, 089, 090, 091, 092, 093, 094,
095, 108, 134, 233, 385, 387, 390,
397, 398, 403, 404, 405, 419, 423,
426, 456, 463, 470, 472, 523, 533,
549, 594, 595, 729, 740, 783, 810
Pilot – 023, 073, 094, 108, 233, 573,
587, 741
Pioneer – 019, 073, 100, 108, 111,
144, 383, 551, 573, 587, 597, 747,
750, 780, 785, 787, 789, 826
Planar – 474
Plasmasync – 778
Polaroid – 384, 394, 459, 465, 805,
811
Portland – 015, 023, 051, 068, 073,
108, 384, 391, 573, 587, 741
Prima – 072, 837
Prism– 045, 742
Proscan – 055, 070, 073, 726, 755, 759
Proton – 073, 090, 108, 233, 371,
372, 467, 573, 587, 749
Protron – 457, 467
Proview – 459
Pulsar – 049, 073, 108, 573, 587
Quasar – 043, 044, 045, 046, 403,
742, 752, 770, 771
31
LIST OF CODES
Radio Shack – 022, 023, 046, 069,
073, 108, 168, 233, 355, 388, 400,
573, 587, 736, 741, 759
RCA – 042, 044, 052, 053, 054, 055,
068, 069, 070, 073, 095, 100, 108,
191, 384, 403, 408, 416, 573, 587,
631, 725, 750, 755, 758, 759, 762,
765, 768, 769, 791
Realistic – 022, 023, 046, 069, 166, 168,
233, 355, 388, 400, 736, 741, 759
Runco – 049, 525
Sampo – 023, 073, 090, 108, 426,
533, 573, 587, 741, 818
Samsung – 015, 016, 017, 023, 031,
073, 090, 095, 107, 108, 134, 147,
151, 153, 233, 384, 386, 411, 426,
508, 533, 573, 577, 587, 741, 757,
772, 788, 794, 800, 802
Sansui – 169, 392, 415, 423, 424, 812
Sanyo – 073, 104, 108, 353, 355, 356,
376, 377, 377, 388, 573, 587, 735,
736, 775
Sceptre – 468
Scott – 073, 090, 108, 168, 211, 233,
395, 400, 561, 573, 587, 743
Sears – 023, 029, 030, 031, 038, 039, 068,
072, 095, 104, 157, 211, 213, 353, 355,
356, 388, 395, 405, 573, 729, 732, 738,
755, 759, 763, 773, 792
Sharp – 016, 022, 023, 024, 025, 026,
027, 028, 029, 073, 108, 233, 393,
395, 409, 573, 587, 741, 745, 751,
779, 797
Shogun – 073, 108, 573, 587
Signature – 023, 026, 027, 028, 029,
108, 211, 213
Simpson - 091, 385
Sony – 014, 020, 021, 050, 095, 178,
540, 774, 804, 824, 827, 828, 830
Soundesign – 073, 091, 108, 168, 211,
385, 395, 400, 573, 587, 601
Soyo – 562, 601
Squareview – 157
SSS – 073, 108, 168, 400, 573, 587
Starlite – 168, 400
Sunbrite TV – 587
Superscan – 419, 423
Supre-Macy – 380
Suprema – 020
SVA – 592
Sylvania – 047, 068, 071, 072, 073,
090, 091, 092, 093, 095, 107, 108,
157, 158, 385, 404, 405, 419, 423,
456, 466, 507, 573, 587, 590, 595,
729, 823
Symphonic – 047, 157, 168, 400, 456,
595, 761
Tandy – 026, 027, 028, 029
Tatung – 044, 403, 446
Technics – 045, 742
Techwood – 045, 068, 073, 573, 742
Teknika – 023, 068, 072, 091, 108,
168, 213, 463, 587, 729, 732, 741
Telerent – 023, 213
Tera – 381
Tevion – 065, 414
Thomson – 608, 798
TMK – 068, 073, 090, 108, 573, 587
Toshiba – 022, 030, 031, 038, 039,
092, 355, 388, 423, 571, 736, 755,
773, 778, 781, 799, 807
Totevision – 233, 741
Trutech – 095, 408
Universal – 068, 102, 389, 390
Venturer – 073
Victor – 106, 763
Vidikron – 072, 105, 729
Vidtech – 068, 073, 108, 384, 573, 587
ViewSonic – 426, 428, 455, 468, 472,
513, 515, 527, 528, 529, 530, 531,
532, 533, 534, 535, 536, 537, 538,
539, 729, 816
Viore – 031, 599, 601, 602, 837, 840
Visco – 589
Vision Quest – 459, 729
Vizio – 053, 062, 073, 095, 108, 454,
538, 561, 573
Wards – 022, 068, 071, 072, 073, 090,
091, 093, 095, 102, 108, 211, 213,
384, 385, 389, 390, 395, 404, 405,
573, 587, 729, 743, 759, 761, 784
Westinghouse – 020, 458, 463
White Westinghouse – 191,211,408,449
XR-1000 – 213
Yamaha – 068, 073, 108, 384, 573, 587
York – 090, 108
Zenith – 047, 048, 049, 050, 051, 073,
095, 097, 108, 191, 213, 391, 405,
406, 408, 434, 567, 573, 577, 587
Hitachi – 078, 132, 462
Instant Replay – 086, 472
JC Penney – 078, 086, 132, 172, 238,
291, 329, 331, 462, 472
JCL – 086, 472
JVC – 120, 128, 238, 243, 247, 250,
253, 291, 486
Kenwood – 120, 128, 132, 238, 243,
247, 291, 486
LG – 247, 291, 331
Lloyd – 132
Logik – 367
LXI – 132, 331
Magnavox – 086, 132, 183, 247, 472, 552
Marantz – 086,172, 183, 238, 247,
291, 472
Marta – 331
Matsui – 368
Memorex – 086, 132, 172, 238, 326,
331, 363, 369, 370, 604
Mitsubishi – 078, 120, 128, 255, 258
Montgomery Ward – 066, 170, 173, 373
MTC – 132, 172
Multitech – 132, 172, 367
NEC – 120, 128, 238, 243, 247, 269,
291, 374, 375, 486
ON – 291
Orion – 322, 326, 327, 328, 329, 330, 604
Panasonic – 086, 112, 117, 430, 472,
477, 482
Pentax – 078, 462
Philco – 086, 132, 183, 552
Philips – 086, 132,183, 247, 472, 552
Pioneer – 078, 120, 128, 263, 462, 486
Portland – 345
Proscan – 066, 170, 174
Quartz – 238, 378
Quasar – 112, 086, 477
Radio Shack – 066, 081, 086, 172,
238, 331, 363
RCA – 066, 078, 086, 141, 170, 172,
173, 174, 352, 462, 472
Realistic – 033, 066, 081, 086, 132,
238, 331, 363, 453
Samsung – 033, 172, 269, 271, 275,
276, 278, 510
Sansui – 120, 128, 326, 367, 379,
486, 604
Sanyo – 172,238, 346, 357, 363
Scott – 033, 132, 258, 329, 332, 367,
429, 491
Sears – 035, 066, 078, 081, 086, 238,
331, 363, 434, 462, 496
Sharp – 066, 075, 453, 458
Shintom – 058, 078, 367
Signature – 066, 170, 173, 373
Sony – 056, 058, 060, 439, 443, 448,
501, 505, 553
Soundesign – 132
Sylvania – 086, 132, 141, 183, 258,
322, 324, 420, 472
Symphonic – 132
Tandy – 132, 238
Tashiko – 331
Tatung – 243
Teac – 132, 243
Technics – 086, 331, 472
Teknika – 086, 132, 331, 359
Thomas – 132
TMK – 172, 338
Toshiba – 033, 035, 078, 081, 258,
429, 434, 462, 467,491, 496, 604
Totevision – 172, 331
Unitech – 172
Vector Research – 033, 291
Video Concepts – 033, 132, 291
Wards – 033, 066, 078, 086, 132, 172,
247, 331, 363, 453
XR–367
Yamaha – 132, 238, 243, 247, 291
Zenith – 058, 120, 122, 128, 132, 435, 486
VCR
Admiral – 066, 075, 453, 458
Aiwa – 132
Akai – 058, 269, 275, 336, 351, 352, 354
Audio Dynamics – 243, 291
Bell & Howell – 238, 357
Brocksonic – 132, 329, 333, 337, 339,
358, 359, 434
Canon – 086, 170, 362
Citizen – 033, 172, 247, 331, 429, 491
Colortyme – 291
Craig – 172, 331, 363
Curtis Mathes – 066, 086, 112, 172,
174, 247, 291, 472
Daewoo – 033, 342, 343, 344, 345,
346, 347, 429, 491
Daytron – 345, 365
DBX – 243, 291
DELL – 263
Dynatech – 132
Emerson – 033, 086, 132, 258, 326, 327,
329, 331, 332, 333, 334, 335, 336, 337,
338, 339, 340, 341, 352, 472
Fisher – 035, 081, 238, 357, 363, 434,
467, 496
Funai – 132
GE – 066, 086, 170, 172, 174, 472
Go Video – 172, 348, 349, 350
Goldstar – 247, 291, 331
32
LIST OF CODES
AUDIO
ADC – 318
Adcom – 325
Aiwa – 176, 301, 518, 521, 633, 634,
668, 669, 671
Akai – 142, 249, 261
Bose – 302, 440, 644, 672
Carver – 155, 176, 180, 518, 668, 669
Crown – 154
Daewoo – 501
Denon – 262, 273, 307, 660, 661,
703, 704, 715
Emerson – 673
Everquest – 136
Fisher – 063, 180, 230, 274
Fostgate Audionics – 305
GE – 674
Goldstar (LG) – 036, 308
Harman Kardon – 130, 257, 305, 306,
315, 669, 716
Hitachi – 240, 690
Jensen – 140, 517, 520, 666, 667,
JVC – 114, 241, 297, 691
Kenwood – 063, 131, 137, 176, 274,
277, 282, 289, 299, 309, 444, 692
Koss – 717, 718
Krol – 176
LG (Goldstar) – 036, 308
Linn – 518, 668, 669
Luxman – 281
Magnavox (Philips) – 037, 080, 084,
119, 184, 296, 433, 502, 503, 504,
518, 668, 669, 670
Marantz – 282, 283, 284, 285, 516,
517, 518, 520, 666, 668, 669, 670
McIntosh – 557
Mission – 176
Mistubishi – 245, 249, 664, 693
NAD – 182, 231, 286, 290
Nakamichi – 264, 319, 694
NEC – 235, 695
NSM – 176
Onkyo – 126, 171, 300, 304, 543, 579,
662, 663, 696
Optimus – 142, 229, 321
Panasonic – 032, 074, 184, 266, 267,
280, 437, 438, 441, 512, 638, 639,
640, 641, 642, 643
Parasound – 323, 632
Philips (Magnavox) – 037, 080, 084,
119, 184, 296, 433, 502, 503, 504,
518, 668, 669, 670, 718
Pioneer – 116, 123, 127, 137, 251,
298, 309, 697, 719
Quasar – 032, 184
Radio Shack – 186, 190, 229, 266,
267, 279,289
RCA – 037, 119, 137, 295, 309, 439, 698
Realistic – 226, 268
Rotel – 310, 700
SAE – 176
Samsung – 492, 546, 841
Samsui – 283, 518, 668, 669
Sanyo – 137, 190, 195, 230, 309
Scientific Atlanta – 312
Scott – 186, 272
Sears – 699
Sharp – 288, 289, 294
Sherwood – 229, 267, 505, 506, 700
Sony – 041, 057, 067, 232, 287, 292,
293, 442, 610, 611, 612, 635, 636,
720, 835, 836
Soundesign – 083, 148, 239, 242, 265,
311, 320
SSI – 313
STS – 318
Sylvania – 084
Taekwang – 142
Teac – 186, 314, 316, 701
Technics – 032, 184, 208, 317, 512, 643
Toshiba – 290, 682
Victor – 114, 241
Wards – 063, 114, 241, 518, 669
Yamaha – 145, 254, 280, 303, 521,
542, 579, 630, 637, 702
Zenith – 036, 083, 088, 148, 239, 265
Expressvu – 709
GE – 150, 152, 156, 175, 511
GPX – 627
GOI – 709
Go Video – 129, 486, 652
Goldstar (LG) – 129, 133, 135, 179,
260, 568, 569
Gradiente – 212, 234, 581, 614
Harmon Kardon – 256, 259
Haier – 600
Hitachi – 149, 212
HTS – 709
Hughes Network System – 708
Humax – 708
iLo – 588
Insigna – 482, 588, 665
JVC – 177, 179, 475, 476, 477, 478,
653, 709, 711
Kenwood – 228, 628, 677
KLH – 248, 252
Konka – 619, 620, 628
Koss – 234, 581, 614
Lasonic – 152, 156, 656, 678
LiteOn – 499, 500
LG (Goldstar) – 129, 133, 135, 179,
260, 568, 569
Magnavox – 138, 143, 146, 234, 270,
484, 550, 564, 581, 593, 605, 609,
614, 679, 683, 706, 707, 708
Marantz – 270
Matsui – 234, 580, 581, 614
MacIntosh – 554, 556
Memorex – 629, 839
Mintek – 432
Mitsubishi – 181, 185, 485
NAD – 129, 135, 246, 483, 486, 568,
569, 650, 724
Nakamichi – 645
Norcent – 514
Onkyo – 085, 244, 687, 689
Orion – 603
Panasonic – 115, 118, 121, 124, 201,
431, 448, 570, 646, 682, 684, 713,
431, 448, 570
Philips – 138, 143, 146, 234, 270,
484, 550, 564, 581, 593, 605, 609,
614, 679, 683, 706, 707, 708
Pioneer – 125, 187, 188, 597,
615,647, 705
Polaroid – 497
Prima – 838
Proceed – 236
Proscan – 727
Protron – 488
Qwestar – 234, 581, 614, 648
RCA – 152, 156, 658, 678, 708
Replay TV – 422, 710, 713
Samsung – 192, 212, 224, 225, 487,
493, 509, 545, 559, 576, 652
Sanyo – 549, 654
Scientific-Atlanta – 565, 574, 575,
675, 676
Sears – 559
Sharp – 034, 076, 077, 079, 565, 574, 575
Sonic Blue – 713
Sony – 040, 059, 061, 152, 156, 436,
479, 480, 481, 578, 610, 678, 680,
712, 714, 721, 722
Sylvania – 421, 484,591, 605
Symphonic 484
Techwood – 246, 650
Thomson – 156, 237, 608
Tivo – 418, 706, 708, 712, 721, 722
Toshiba – 082, 085, 087, 113, 544,
607, 609, 616, 655, 683, 687, 723
Viewmage – 511
Yamaha – 121, 124, 201, 210, 448,
570, 679
Yamakawa – 181, 485
Zenith – 129, 133, 135, 483, 724
DVD
Aiwa – 495, 617, 618, 685 Akai – 548,
584, 588
Alpine – 621
Apex – 227, 609, 621, 657, 683
Apex Digital – 193, 227, 489, 681
Audiovox – 659
Axion – 491
B144 – 146
BOSE – 651
Clarion – 622
Classic – 623
Coby – 688
Curtis – 842
CyberHome – 490, 496, 498
Daewoo – 494, 624
Denon – 124, 201, 203, 448, 570,
625, 626, 686
Diamond Vision – 566
DirecTV – 708
Dish Network – 711
Dish Network System – 709
Dishpro – 709
DVD-Video – 199, 484, 488
Dyne – 482
ECA – 156
Echostar – 709, 711
Emerson – 129, 135, 482, 483, 486,
526, 568, 569, 591, 605, 724
33
CUSTOMER SERVICE
CUSTOMER SERVICE
For more information on our packages or to change your subscription, please get in touch with Customer Service.
Our agents are available between 7:30 a.m. and 10:00 p.m. Monday through Friday, between 8 a.m. and 6 p.m. on
Saturday and Sunday between 9 a.m and 5:30 p.m.
Montréal
Québec City
Saguenay
Outaouais
Elsewhere in Quebec
514-281-1711
418-847-4410
418-545-1114
819-771-7715
1-88-VIDEOTRON
CUSTOMER TECHNICAL SUPPORT
For problems of a technical nature, please contact Customer Technical Support. Our technicians are available
24 hours a day, seven days a week.
Montréal
Québec City
Saguenay
Outaouais
Elsewhere in Quebec
514-841-2611
418-842-2611
418-543-4611
819-771-2611
1-88-VIDEOTRON
Visit our Website: videotron.com
34
HIGH-DEFINITION
SETUP
FOR HD CONTENT, TUNE INTO CHANNELS 600 AND UP.
SETUP
Refer to the appropriate section in order to configure your terminal. The settings you choose on your HD terminal
will directly influence the picture quality you obtain. To configure them, follow the instructions in the Setup Wizard
section on the following page.
If you use DVI or a HDMI cables to connect your HD terminal to your TV, no further configuration is normally
required. With this type of connector, the two devices automatically determine the optimal image resolution.
CONNECTORS
Three types of connector are available for HDTV: HDMI, DVI cable (on some models only) and Component
input. You must use one of these two connector types to obtain an image when viewing channels broadcast
in high definition. They are recommended for SD content as well, in order to minimize the number of motion
artifacts.
35
INTRODUCTION
TITRE PRINCIPAL
SETUP
WIZARD
INTRODUCING THE SETUP WIZARD
WHAT IS THE SETUP WIZARD?
The HDTV Setup Wizard is an on-screen program that helps you set up your high-definition terminal to receive
the best picture quality that the HDTV supports.
BEFORE YOU BEGIN
Before you begin to set up your HD terminal, you may want to have available the user’s guide that came with
your HDTV for reference.
IS IT NECESSARY TO USE THE SETUP WIZARD?
Yes. Whether you have used the component (Y, Pb and Pr), DVI or HDMI connectors to link your HDTV to the HD
terminal, the Setup Wizard will provide your system with the necessary flexibility to ensure that you obtain the best
picture quality you can get at all times.
Notes:
• The analog Y, Pb, Pr ports become inactive when the
HDTV is connected to the DVI or HDMI port.
• If the HDTV is connected to the DVI or HDMI port on the
back of the set-top and you see this alert message on
the screen, it means that the HDTV and the set-top are
not compatible. If this occurs, reconnect the set-top to
the Y, Pb, Pr ports on the set-top.
PICTURE FORMATS
WHAT IS THE DIFFERENCE BETWEEN A STANDARD SCREEN AND A WIDE SCREEN?
The type of screen your HDTV has (wide screen or standard screen) determines how the set-top displays programs
on the screen. The picture format for an HDTV is a combination of aspect ratio and screen resolution and is
different for standard-screen and wide-screen HDTVs.
WHAT IS AN ASPECT RATIO?
An aspect ratio is the ratio of the width to the height of the TV screen. The aspect ratios differ because the
television industry manufactures both standard-screen and wide-screen HDTVs to appeal to consumer viewing
preferences.
36
SETUP WIZARD
A standard-screen HDTV
has a 4:3 aspect ratio. The screen is
4 units wide for every 3 units tall.
A wide-screen HDTV is one-third wider
than a standard-screen HDTV. The screen
is 16 units wide for every 9 units tall.
4
16
3
Aspect Ratio: 4:3
Screen Resolution:
480p or 480i fill the screen
9
Aspect Ratio: 16:9
Screen Resolution:
720p or 1080i fill the screen
WHAT IS THE SCREEN RESOLUTION?
The screen resolution indicates the amount of detail that the picture displays. Resolution is identified by the number
of display lines on the screen. The techniques that an HDTV uses to “paint” the picture on the screen are referred
to as progressive and interlaced.
For example, a resolution of 1080i indicates that the screen shows 1080 lines in an interlaced display, and 480p
means that the screen shows 480 lines in a progressive display.
Note: The screen resolution (1080i, 480p, etc.) is sometimes referred to as the scan rate. The terms are
interchangeable.
With the progressive method, every pixel
on the screen is refreshed simultaneously.
The interlaced method involves refreshing pixels in
alternation – first the odd lines and then the even lines.
37
SETUP WIZARD
HOW DO I KNOW WHICH PICTURE FORMAT TO CHOOSE?
The type of screen your HDTV has determines how the set-top displays programs on the screen. The following
examples show how programs will look when the picture format is set to Normal mode (not Stretch or Zoom
modes).
Standard-screen HDTVs
38
On a wide-screen HDTV,
these picture formats:
Automatically display in this manner:
480p or 480i standard
Full-screen format
720p or 1080i wide
Letterbox format
SETUP WIZARD
Wide-Screen HDTVs
On a wide-screen HDTV,
these picture formats:
Automatically display in this manner:
480p or 480i standard
Pillarbox format
720p or 1080i wide
Full-screen format
39
SETUP WIZARD
SETTING UP YOUR HD TERMINAL WITH THE SETUP WIZARD
BEFORE YOU BEGIN TO SET UP YOUR HD TERMINAL USING THE SETUP WIZARD,
THERE ARE TWO THINGS YOU NEED TO DO:
• Download the latest information to the set-top. (You only need to do this for the initial setup. After the initial
set up,
programming information is downloaded to the set-top automatically on a regular basis.)
• Prepare the set-top to send picture formats that your HDTV supports.
Download the latest programming information to the set-top
Assuming that you have linked your HDTV to the HD terminal using either the component (Y, Pb, Pr), DVI or HDMI
connectors, complete the following steps to download latest software, programming, and service information to
the set-top. (Be sure you have made a note of which video input port the set-top is connected to on the HDTV. For
example: Video input port 6.)
Note: You only need to do this for the initial setup.
1. Plug the set-top and the TV into an AC power source.
2. Do not turn on the set-top or TV yet.
3. Wait until you see one of the following displays on the front of the set-top:
• Current time
• Four dashes (– – – –)
Important: If the display shows activity on the set-top, it means that the operating system of the
terminal is being updated: this process may take several minutes. When the update is complete,
the front panel displays the current time or four dashes (––––).
4. STOP! Before you turn on the TV or the set-top, you should have read the information in the Picture Formats
section, earlier in this guide.
40
SETUP WIZARD
Prepare the set-top to send picture formats that your HDTV supports
If your HDTV displays a black screen when you turn it on, the set-top may be sending a picture format that your
HDTV does not support. Prepare the set-top to send all picture formats that your HDTV supports. Later, while
watching TV, you will be able to toggle among the different settings to select the format that provides the best
picture quality for the program you are watching.
Complete these steps to prepare the set-top to deliver programming in the picture format settings that your HDTV
supports.
Important: Before you start, read these instructions carefully. When you get to step 5, you have
20 seconds to begin selecting picture format settings. After 20 seconds, the set-top is no longer in
the Picture Format mode. If this occurs, repeat this process, starting at step 2.
1.
2.
3.
4.
Refer to the user guide that came with your HDTV to find the picture formats that your HDTV supports.
If the set-top is turned off, press the POWER key to turn it on.
On the front of the set-top, press and hold the SELECT button until the message light blinks.
Then, press the VOL– key to indicate that you want to select a picture format setting. The LED display shows
HdSr to indicate that the set-top is in the Picture Format mode for HDTV settings.
5. In the following table, find each of the picture formats that your HDTV supports. Then, press the corresponding
buttons on the front panel of the set-top.
Note: If 1080i is one of the settings that your HDTV supports, we suggest you select it last. Then, when you
turn on the TV to use the Setup Wizard, the picture format will be 1080i.
To select this
picture format:
Press this button
on the front panel:
The set-top
briefly displays:
And then
briefly displays:
480i
720p
480p
1080i
CH+
VOL–
CH–
VOL+
480i
720p
480p
1080
SEt
SEt
SEt
SEt
41
SETUP WIZARD
IS THERE MORE THAN ONE SETUP OPTION?
Yes. The Setup Wizard provides two options for selecting your screen type:
• If you choose the Easy option, the Setup Wizard automatically sets up the HDTV to receive programming
in 1080i and 480i formats.
• If you choose the Advanced option, you can toggle through all the picture formats and select the formats
that look best on the HDTV screen.
Note: Use the ,
and
keys on the remote control to navigate through the Setup Wizard menus
and options. You may want to have available the user guide that came with your HDTV for reference.
HOW DO I START THE SETUP WIZARD?
1. Make sure that the set-top
is off and the HDTV is on.
2. Press the GUIDE and INFO keys at
the same time.
42
SETUP WIZARD
1. Press
to start the setup.
2. Choose one of the following options:
• To choose the Easy Setup option,
press ; then, go to the Easy Setup
Instructions on page 61.
• To choose the Advanced Setup option,
press ; then go to the Advanced Setup
Instructions, on page 62.
43
SETUP WIZARD
EASY SETUP INSTRUCTIONS
1. Press
or
you have.
to select the type of TV screen
2. Press POWER to begin watching TV.
Notes:
• If you pressed , the setup is complete.
The TV is set to receive programming in 1080i
and 480i formats.
• If you pressed , proceed to next page.
44
SETUP WIZARD
ADVANCED SETUP INSTRUCTIONS
1. Press
or
you have.
to select the type of TV screen
2. Press
to see how various formats look
on your TV screen.
45
SETUP WIZARD
3. Press SELECT to toggle between the Save and
Remove options, or press
to see how the
next format looks on your TV screen.
Important: If you see a black screen, press
again to view the next screen. Do not press SELECT.
The black screen means that your TV does not support
that particular format, so you do not want to select it.
4. After saving the picture formats, press EXIT.
The setup is complete.
5. Press POWER to begin watching TV.
46
SETUP WIZARD
CLOSED-CAPTIONING
WHAT IS CLOSED-CAPTIONING?
Closed-captioning is text on the TV screen related to the programming being viewed. What you see is an
abbreviated version of the actors’ dialogue and indications of important background sounds. For sporting events,
closed-captioning provides realtime play-by-play descriptions from the announcers. Closed-captioning is provided
for those requiring assistance understanding and enjoying sound.
Closed-captioning sources for digital programming
• Digital 1 is the primary caption source.
• Digital 2 is the suggested choice for alternate languages.
• Digital 3 through Digital 6 are undefined at this time.
CHOOSE A CLOSED-CAPTIONING SOURCE
1.
2.
3.
4.
Press SETTINGS twice to access the General Settings menu.
Scroll to CC: Source.
Press to access the STD (analog) and digital source options.
Scroll through the options and select the recommended source: Digital 1.
TURN CLOSED-CAPTIONING ON AND OFF
You can turn closed-captioning on and off at any time through the Quick Settings menu.
1. Press SETTINGS to access the Quick Settings menu while watching TV.
2. Turn caption on or off.
3. If you chose the Fixed setting for the audio volume:
A. Scroll to Caption Off/On.
B. Press to access the options.
C. Scroll through the options and press SELECT to set your choice.
4. If you chose the Variable setting for the audio volume:
A. Scroll to Caption Off/On/On with Mute.
B. Press to access the options.
C. Scroll through the options and press SELECT to set your choice.
47
FREQUENTLY
ASKED QUESTIONS
WHAT IS HDTV? WHAT ADVANTAGES DOES IT HAVE OVER STANDARD DIGITAL TV ?
HDTV, or high-definition television, is a next-generation standard for digital television that gives you an image
with superior resolution. Standard televisions display approximately 210,000 pixels, compared to over 2 million
for top-end HDTV – a tenfold increase over traditional TV. Plus, HDTV enhances the home theatre experience by
allowing for wider screens with aspect ratios of 16:9. Among other things, this can preserve a film’s original
letterbox format.
IF I DON’T HAVE AN HDTV, WILL AN HD TERMINAL GIVE ME A SHARPER IMAGE?
No. Vidéotron’s HD terminals are perfectly backward compatible with traditional TV, but to take advantage
of the higher resolution offered by HD broadcasts, your television must be physically capable of displaying the
necessary number of pixels – and must be equipped with connectors that can carry this type of signal
(Component/DVI/HDMI input).
TECHNICALLY, WHAT’S THE DIFFERENCE BETWEEN HDTV AND TRADITIONAL ANALOG SDTV?
There are several technical differences between standard, NTSC-format television and HDTV. (Technology varies
widely even among HDTVs: CRT, LCD, Plasma, DLP, etc.)
TVs project programs onto their screens in the form of tiny picture elements, or pixels: 480 lines of pixels make
up the picture on a standard analog TV. In comparison, HDTV images use 720 or 1080 lines, which results in
much sharper detail and general picture resolution.
This also lets the image be “painted” in different ways. On an SDTV, the screen is painted using interlaced
scanning, meaning that each of the 30 images appearing on-screen each second is made up of two half-images:
one each for the odd and even lines. HDTV can use either interlaced or progressive scanning (the latter changes
the entire image from the first to last line up to 60 times a second).
The two HDTV formats:
720p
1080i
720 lines of horizontal resolution and progressive scan
1080 lines of horizontal resolution and interlaced scan
WHICH IS BETTER, 720P OR 1080I? HOW DO THESE COMPARE WITH DVDS OR THE TRADITIONAL
DIGITAL TERMINAL FORMAT?
Progressive scan provides superior results compared to interlaced scan, the main difference being that interlaced
scan’s alternating lines are more readily visible to the naked eye.
While a 720p image contains fewer pixels than a 1080i image, it also can be refreshed more quickly, making it
the better choice for programs featuring a lot of movement, such as sports broadcasts.
To compare: both SDTV and DVD images use 480 horizontal lines with interlaced scan (480i). So-called progressive
scan DVD players provide images in 480p format, resulting in better picture quality.
48
FREQUENTLY
ASKED QUESTIONS
WHAT’S THE RESOLUTION ON VIDÉOTRON’S HD CHANNELS?
CAN I CHOOSE THE RESOLUTION OF THE SIGNAL I RECEIVE?
Television stations decide which format a program will be broadcast in – although this doesn’t mean all of a
station’s programs will necessarily be broadcast in the same format.
It’s important to make the distinction between the image resolution you receive from a station, and the format
your television displays it in. For example: if a station broadcasts a program at 480i and you have a 1080i TV,
it will convert the image to a uniform 1080 on-screen lines by filling in the missing pixels. The program’s “real”
resolution, however, stays unchanged at 480i.
I’VE NOTICED SEVERAL CAPTIONING OPTIONS IN MY HD TERMINAL’S GENERAL SETTINGS,
SUCH AS FONT SIZE AND COLOUR. WHY ARE MY CAPTIONS ALWAYS IN BLACK AND WHITE?
Make sure the Captioning Options in your General Settings are set to Personalized. Custom font size and colour are
only available for programs broadcast using the new digital captioning standard, EIA-708B. Programs broadcast
using the old captioning standard, 608, do support captions, but only in black and white. A program’s captioning
standard is decided by the television station.
WHAT DOES AN HDTV’S “NATIVE FORMAT” REFER TO?
As you know, digital television programs can be broadcast in a variety of formats (480i, 480p, 720p, 1080i, etc.)
– but TVs are designed and built to display images in only one of these formats. This format is the TV’s native
format. This is why HDTVs must be equipped to convert the formats of the programs they receive.
HDTVs are often classified according to their native formats. Today’s models are designed to display images
at either 720p or 1080i. If an LCD TV with a native format of 720p receives a signal from a television station
at 480i, it converts it to its native format: 720p. To do this, it “fills in” the incoming image’s missing pixels,
bringing it up to its display capacity. The resulting image will always be in the same format: your TV’s native format.
49
NOTES
50