1
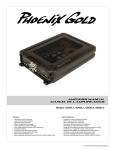
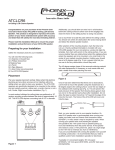
MONOBLOCK AMPLIFIER
OWNER’S MANUAL
FOR MODELS:
RSd300.1
RSd600.1
Congratulations on your purchase of high quality Phoenix Gold
audio electronics. At Phoenix Gold our highest concern is musical
reproduction. We appreciate that you chose our product. Through
years of engineering expertise, hand craftsmanship and critical testing
procedures, we have created a wide range of products to give your
system all the clarity and richness you deserve.
Great product and competent installations are only one piece of the
puzzle when it comes to your system. Make sure that your install is
using only the best installation accessories. Phoenix Gold manufactures
everything from RCA cables and speaker wire to power/ground cable
and battery connectors. With proper installation and accessories your
system will sound the best that it can.
Please read your warranty and retain your receipt and original carton for
possible future use.
For more information about Phoenix Gold electronics, speakers and
accessories please visit www.phoenixgold.com
RSd AMPLIFIERS
MONOBLOCK OWNER’S MANUAL
WARRANTY
LIMITED WARRANTY ELECTRONICS (USA)
Phoenix Gold warrants this product to be free of defects in materials
and workmanship for a period of one (1) year from the original date of
purchase.
This warranty is not transferable and applies only to the original purchaser
from an authorized Phoenix Gold dealer. Should service be necessary under
this warranty for any reason due to manufacturing defect or malfunction,
Phoenix Gold will (at its discretion), repair or replace the defective product
with new or remanufactured product at no charge. Damage caused by
the following is not covered under warranty: accident, misuse, abuse,
product modification or neglect, failure to follow installation instructions,
unauthorized repair attempts, misrepresentations by the seller. This
warranty does not cover incidental or consequential damages and does
not cover the cost of removing or reinstalling the unit(s). Cosmetic damage
due to accident or normal wear and tear is not covered under warranty.
WARRANTY IS VOID IF THE PRODUCT’S SERIAL NUMBER HAS BEEN REMOVED OR DEFACED.
Any applicable implied warranties are limited in duration to the period
of the express warranty as provided herein beginning with the date of the
original purchase at retail, and no warranties, whether express or implied,
shall apply to this product thereafter. Some states do not allow limitations
on implied warranties, therefore these exclusions may not apply to you.
This warranty gives you specific legal rights, and you may also have other
rights which vary from state to state.
IF YOU NEED SERVICE ON YOUR PHOENIX GOLD PRODUCT:
All warranty returns should be sent to Phoenix Gold’s Product Service
Facility freight-prepaid through an authorized Phoenix Gold dealer and
must be accompanied by proof of purchase (a copy of the original sales
receipt). Direct returns from consumers or non-authorized dealers will
require a Return Authorization number from Phoenix Gold in advance of
any shipment to the product service facility. Units returned to Phoenix Gold
without an RA number may be subject to refusal or delays.
Warranty expiration on products returned without proof of purchase
will be determined from the manufacturing date code. Coverage may
be invalidated as this date is previous to purchase date. Non-defective
items received will be returned freight-collect. Customer is responsible for
shipping charges and insurance in sending the product to Phoenix Gold.
Freight damage on returns is not covered under warranty.
FOR SERVICE INFORMATION IN THE U.S.A. PLEASE CALL:
Phoenix Gold customer service: (503) 286-9300
during normal business hours (8:30 AM – 5:00 PM Pacific Standard Time)
PHOENIX GOLD INTERNATIONAL, INC
9300 North Decatur St. Portland, OR 97203
(do not send product for repair to this address)
INTERNATIONAL WARRANTIES:
Products purchased outside the United States of America are covered only
by that country’s distributor and not by Phoenix Gold International, Inc.
Use the following area provided to record your serial
number and date of purchase.
Serial Number
Date of Purchase
________________________
________________________
Phoenix Gold International, Inc. • 9300 North Decatur St. Portland, OR 97203 • 503.286.9300 • www.phoenixgold.com
RSd AMPLIFIERS
MONOBLOCK OWNER’S MANUAL
SPECIFICATIONS:
RSd 300.1
MONOBLOCK CLASS A/B POWER AMPLIFIER
FEATURES:
CEA-2006 Compliant Amplifier Power Standard
BUILT-IN ELECTRONIC CROSSOVER
Monoblock: 18dB per octave electronic crossover for lowpass and an 18dB per octave subsonic filter.
Frequency Response . .
Effective Damping Factor
Maximum Input . . . .
Maximum Sensitivity . .
.
.
.
.
.
.
.
.
.
.
.
.
.
.
.
.
.
.
.
.
.
.
.
.
10Hz to 300Hz
6.39 @ 4 ohms
11.8V at clipping
200mV at clipping
Power Output . . . . . . . . . .
Bass Boost . . . . . . . . . . .
Low Pass Filter Frequency Response .
Subsonic Filter Frequency Response .
Dimensions (L x W x H): . . . . . .
.
.
.
.
.
360W RMS @ 2 Ohms, 100Hz and 1% THD+N
+18dB @ 45Hz
30 to 300Hz Lowpass, 18dB per octave
5 to 55Hz Highpass, 18dB per octave
12 7/8” x 11 3/16” x 2 3/8”
Ratings other than CEA-2006
RSd 600.1
MONOBLOCK CLASS D POWER AMPLIFIER
CEA-2006 Compliant Amplifier Power Standard
Power Output
. . . .
Signal to Noise Ratio . .
Frequency Response . .
Effective Damping Factor
Maximum Input . . . .
Maximum Sensitivity . .
.
.
.
.
.
.
.
.
.
.
.
.
.
.
.
.
.
.
.
.
.
.
.
.
.
.
.
.
.
.
.
.
.
.
.
.
400W RMS @ 4 ohms and 1% THD+N
82 dBA (reference: 1W output @ 4 ohms)
10Hz to 300Hz
6.39 @ 4 ohms
10V at clipping
200mV at clipping
Power Output . . . . . . . . . .
Bass Boost . . . . . . . . . . .
Low Pass Filter Frequency Response .
Subsonic Filter Frequency Response .
Dimensions (L x W x H): . . . . . .
.
.
.
.
.
650W RMS @ 2 ohms, 100Hz and 1% THD+N
+18dB @ 45Hz
30 to 265Hz Lowpass, 18dB per octave
5 to 55Hz Highpass, 18dB per octave
16 7/8” x 11 3/16” x 2 3/8”
Ratings other than CEA-2006
Due to continual product improvement, all specifications subject to change without notice.
ON BOARD PROTECTION
The on-board protection circuitry monitors abnormal
conditions such as voltage spikes, short circuit and over
thermal limits. When any of these conditions exist, the
protection circuit will shut down the amplifier and light up the
protection indicator to identify the problem. Once the problem
is resolved, the amplifier will return to normal operation
automatically.
HIGH SPEED HIGH CURRENT MOSFET SWITCHING
POWER SUPPLY
High current MOSFET transistors are used in the power
supply section to minimize internal heat and maximize
reliability.
HIGH CURRENT/HIGH VOLTAGE FULLY
COMPLEMENTARY OUTPUT STAGE
Complementary output stage audio circuitry has been a
standard in high end home amplifier design. Phoenix Gold is
one of the very few car audio manufacturers to incorporate
this design approach into a mobile audio amplifier.
LINE OUTPUTS
The amplifiers full-range line outputs can be used to feed
signals to another amplifier for future expansion or for setting
up a more sophisticated system.
WIDE RANGE INPUT SENSITIVITY ADJUSTMENT
The input sensitivity level of this amplifier can be easily varied
from as low as 200 mV to as high as 8.0 volts by adjusting the
control on the Input Panel.
MULTI-FUNCTION PROTECTION INDICATOR
When the red protect indicator lights up it signifies a high
operating temperature is detected and the amplifier is
temporarily shut down to allow for a cooling period. As soon
as the temperature returns to a safe level, the amplifier will
restart and resume normal operation. This indicator also lights
up when the amplifier detects either an over-current situation,
shorted speaker outputs or a DC offset at the outputs.
Turn off the amplifier; double-check all inputs and speaker
connections to make sure there is no short or inappropriate
input. If all connections are in order, turn on the amplifier to
resume operation.
VARIABLE BASS BOOST
The bass boost will increase the output centered at 45Hz from
0 to 18dB
Phoenix Gold International, Inc. • 9300 North Decatur St. Portland, OR 97203 • 503.286.9300 • www.phoenixgold.com
RSd AMPLIFIERS
MONOBLOCK OWNER’S MANUAL
CONTROLS, INDICATORS, AND TERMINALS:
RCA INPUT
1. AUX OUTPUT (RCA)
This output is full range and can be used to connect to another amplifier for
system expansion.
2. LINE LEVEL INPUT (RCA)
To be connected to RCA pre-amp outputs from a source unit (i.e., radio,
tape deck or CD player).
CONTROLS
3. REMOTE LOW PASS LEVEL CONTROL (LPL - SOLD SEPERATELY)
This port is for connecting the optional LPL Remote Lowpass Level Control
knob allowing up to 20dB of volume adjustment.
4. INPUT SENSITIVITY LEVEL CONTROL (SENS)
The input sensitivity level can be varied from 200 mV to 8.0 volts depending
on the output voltage of the source unit (refer to sub-section titled INPUT
SENSITIVITY ADJUSTMENT).
5. SUBSONIC FILTER
This is a filter to remove unwanted low frequencies that may cause damage
to the speaker or are inaudible. When this is used properly it will allow the
amplifier to run more effectively.
6. FREQUENCY SELECTOR (FREQ)
Allows variable adjustment from 40 to 400Hz
7. VARIABLE BASS BOOST
The bass boost will increase the output centered at 45Hz from 0 to 18dB
Phoenix Gold International, Inc. • 9300 North Decatur St. Portland, OR 97203 • 503.286.9300 • www.phoenixgold.com
RSd AMPLIFIERS
MONOBLOCK OWNER’S MANUAL
��
��
�
POWER INPUT
8. GROUND INPUT TERMINAL (B-)
To be wired to the vehicle’s chassis for ground.
10. POWER INPUT TERMINAL (B+)
To be connected to the positive terminal of the vehicle’s battery or other
constant +12 V source. Remember to fuse at 12+ source.
9. REMOTE TURN-ON INPUT TERMINAL (R)
To be connected to the remote control wire or power antenna lead of the
source unit for remote ON/OFF.
���
���
���
�������
SPEAKER OUTPUT AND FUSING
11. AMP FUSE
Protects the amplifier. If a replacement is necessary, use the same size and
type indicated on the end panel. Never use a fuse with a higher amp rating.
12. PROTECT LED
Red light: Amplifier is in protection - Overheated (will resume play on its
own), Low voltage, Shorted terminal
No light: Amplifier is functional (when power is on)
13. RMD PORT (RMD - SOLD SEPERATELY)
This connection allows for connection of our remote voltage display
(optional), so that you can monitor the applied voltage at the amplifier in real
time.
14. LEFT/RIGHT SPEAKER OUTPUT TERMINAL
Used to connect the amplifier to speakers. The minimum suggested speaker
wire size is 16 gauge for stereo mode and 14 gauge if the amplifier is going to
be used in mono/bridged operation.
Note: “Power On” is indicated when the badge/logo on top of the amplifier
lights up blue
Phoenix Gold International, Inc. • 9300 North Decatur St. Portland, OR 97203 • 503.286.9300 • www.phoenixgold.com
RSd AMPLIFIERS
MONOBLOCK OWNER’S MANUAL
INSTALLATION
Note: Verify that your vehicle does not have a positive ground electrical system,
this is very rare. A positive ground system is the reverse of most standard
vehicles in that the + battery terminal is connected to the vehicle chassis and is
typically found in some older European vehicles. If you have any questions do
not proceed until you have verified this. If it is a positive ground electrical system
please contact your dealer for assistance.
Caution: Please follow all the installation recommendations and instructions
in this manual. Installation in any manner not outlined in the manual will
void your warranty and may possibly cause damage to the vehicle and/or
the amplifier.
Warning: The battery ground should remain DISCONNECTED at all stages
of installation.
LOCATION/MOUNTING
When selecting a location to mount your amplifier, please keep in mind that
electronics are sensitive to vibration, moisture, and heat. Make sure the amplifier
is mounted in an area with ample ventilation and is not exposed to moisture or
external heat. For proper cooling, it is recommended to mount the amplifier
horizontal or vertical but not upside-down. Automobiles have a certain level
of normal vibration and we have designed the product with this in mind, but
excessive vibration may cause damage over time. Using the amplifier for a
template, mark the mounting holes in your selected area while following the
preceding guidelines. Verify that you are not going to damage sensitive vehicle
systems by drilling where you have selected (look for gas tank, wires, etc…).
Remove the amplifier and pre-drill the locations for size screws/bolts that you
have selected that fit the amplifier and your installation purposes, permanently
mount the amplifier to selected location.
INPUT CONNECTIONS
Connect RCA input jacks of the Amplifier to the output of the Source Unit (i.e.
Radio, Cassette player or CD player).
SPEAKER CONNECTIONS
When connecting the Amplifier to the Speaker, use heavy gauge speaker cable
for these connections (14AWG recommended minimum).
We recommend that the minimum total impedance of the speaker load is no
less than 2 ohm. The amplifier has 2 each (+) terminals and 2 each (-) terminals.
These terminals are duplicates, meaning you can use any combination of + and
– connections for a single speaker (Model 300.1 only). Connect the positive
(+) speaker output of the amplifier to the positive (+) terminal of the speaker.
Connect the negative (-) speaker output of the amplifier to the negative (-)
terminal of the speaker.
Figure 4: Single Woofer Connection
CAUTION: ANY DEVIATION FROM THE ABOVE SPEAKER CONNECTION
MAY CAUSE SERIOUS DAMAGE TO THE AMPLIFIER AND/OR SPEAKERS.
PLEASE DOUBLE CHECK THE CONNECTION BEFORE TURNING THE
SYSTEM ON.
Figure 3. Typical System connection
Note: It is best to mount the amplifier to some form of insulating surface, such
as MDF, so that the chassis of the amplifier does not come in contact with the
vehicle chassis (if a single screw makes contact with both the amplifier and
vehicle chassis, it is the same as no insulator). This will lessen the possibility of
any ground related noises and will shield minor amounts of radiated noises.
Figure 3. Typical System Connection
Battery
Figure 4: Single Woofer Connection
Alternator
�
Head Unit
Fuse
Remote Lead
Head Unit
Subwoofer
Phoenix Gold International, Inc. • 9300 North Decatur St. Portland, OR 97203 • 503.286.9300 • www.phoenixgold.com
RSd AMPLIFIERS
MONOBLOCK OWNER’S MANUAL
ADJUSTMENTS
CROSSOVER FREQUENCY SELECTION
Fully variable crossover from 25 to 250Hz. Adjust this setting according to your
speakers specification or to your particular preference.
Figure 6: Crossover and Frequency Selection
INPUT SENSITIVITY ADJUSTMENT
The Input Sensitivity Control is located on the Input Panel. The objective of
the input sensitivity adjustment is to match the output of the source unit with
the input of the amplifier (it is not a volume control). The output voltage of
individual source units can vary. For example, some source units have an
output of 200 mV others have 4 Volts or more. Adjusting this control requires
some experimenting. Basically you want all the gain at the beginning of the
system, NOT at the end (amplifier). Turn your source unit volume UP and keep
your amplifier gains at the minimum possible settings. This will give you the
best sound and signal-to-noise ratio.
Figure 7: Input Sensitivity Control
NOTE: Turning the input gain up does not indicate more power, but increases
the possibility of noise. The input gain control is not a volume control. The
function of the gain is to match the voltage that the amplifier is looking for, to
the voltage that the source unit is supplying
1. Turn the Input Sensitivity Control all the way down (counter clockwise).
2. Set the volume control of the source unit to approximately 3/4 of its
maximum output.
3. Turn the balance control of the source unit to its center position.
4. Set the tone (bass/treble) controls to flat (zero).
5. Play a song (original recording) with wide dynamic range
6. To locate the optimum input sensitivity setting, turn the Input Sensitivity
Control clockwise until audio distortion starts to develop. Turn the sensitivity
control counter clockwise slightly until you no longer hear distortion.
7. If you constantly switch between sources (CD/tape and radio), you will need
further adjustment since radio output level differs from that of CD or tape. In
this case, you need to locate a balanced sensitivity setting which is best for
both the output level of radio and that of CD or tape.
CONNECTING AMPLIFIER POWER WIRE TO THE BATTERY (B+)
Power cables are as important as battery capacity. Use no less than an 8AWG
(8 gauge) power cable, while 4 gauge would be optimum for most applications.
YOU CAN NEVER HAVE TOO BIG OF A POWER/GROUND WIRE! Run the
power cable through the interior of the vehicle (Avoid moving parts: seat rails,
steering column, etc…) connecting one end to the amplifiers (+) terminal and
connecting the other end to a proper sized fuse link within 18 inches of the
positive post on the battery. If possible do not run the power cable together
with the audio cables as it could possibly cause radiated noise in your audio
system. It is recommended to run audio cables on one side of your car and
power cables on the other.
Recommended Cable Size
Distance
Total RMS
Power
4 ft.
8 ft.
12 ft.
16 ft.
20 ft.
100W
8 ga.
8 ga.
8 ga.
8 ga.
4 ga.
200W
8 ga.
8 ga.
8 ga.
4 ga.
4 ga.
400W
8 ga.
8 ga.
4 ga.
4 ga.
4 ga.
600W
8 ga.
4 ga.
4 ga.
4 ga.
4 ga.
800W
4 ga.
4 ga.
4 ga.
2 ga.
2 ga.
1000W
4 ga.
4 ga.
2 ga.
2 ga.
2 ga.
1400W
4 ga.
2 ga.
2 ga.
2 ga.
2 ga.
Note: The proper size primary fuse/circuit breaker (located within 18 inches of
the battery) may vary depending on your system design but should not exceed
50% of the main batteries’ amp hour rating. Using a larger value circuit breaker
or fuse value means that you have NO protection. DO NOT over fuse! Fuses on
the amplifier and at the battery DO NOT protect the amplifier, they protect the
car.
CONNECTING AMPLIFIER GROUND WIRE (B-)
It is recommended to run a ground wire directly to the battery as you
would do with the positive cable, to avoid any voltage losses and possible
ground related noises. You can use the vehicle chassis, and if you chose to
do this find a solid ground point (Frame, Strut Tower, Reinforced area near seat/
seatbelt) and remove the paint to reveal bare metal. Attach the ground wire to
the chosen ground source and connect the other end of the ground wire to the
GND terminal of the amplifier.
Note: The ground wire should be the same gauge cable as the power cable
running from the positive post of the battery to the amplifier.
TERMINALS AND CONNECTORS
Proper size terminals and/or connectors are required to ensure a safe and
secure electrical connection and conduction.
Figure 5: Crossover Frequency Selection
CONNECT THE AMPLIFIER REMOTE LEAD (R)
Connect the remote “R” terminal of the amplifier to the remote output lead of
the source unit so that the amplifier will turn on and off with the source unit. If
the source unit does not provide a remote output, connect to the source units’
switched 12+ volt source.
RECONNECT THE BATTERY GROUND TO THE VEHICLE CHASSIS
Double check all the previous installation steps, in particular, the wiring and
component connection. If everything is in order, complete the installation by
reconnecting the battery ground to the vehicle chassis.
Both the high-pass and the lowpass section offer a fully variable
crossover from 40 to 400Hz. Adjust
this setting according to your
speaker component specifications or
to your particular preference.
Figure 6: Input Sensitivity Control
The Input Sensitivity Control is located on the Input Panel.
The objective of the input sensitivity adjustment is to
match the output of the source unit with the input of the
amplifier (it is not a volume control). The output voltage of
individual source units can vary.
Phoenix Gold International, Inc. • 9300 North Decatur St. Portland, OR 97203 • 503.286.9300 • www.phoenixgold.com
RSd AMPLIFIERS
2 CHANNEL OWNER’S MANUAL
TROUBLE-SHOOTING
SYMPTOM: POSSIBLE CAUSE
No power: Check voltage at amplifier with a DMM (volt meter), B+ and REM
(with source unit on) the voltage should register between 12.2V-14.6V when
using the attached ground lead of the amplifier. Check fuse at amplifier and at
the battery. Use a meter to verify connection from one end of the fuse to the
other, breaks may not always be visible. If fuse is blown, check the power wire
and also the amplifier for a short. If the short is in the power wire, repair it. If
the short is in the amplifier itself, see your Phoenix Gold dealer. If no short is
present replace the fuse.
Power without sound: Turn the amplifier off and check all input and output
signal cables and power connections. Check the speakers for shorts with
a DMM (volt meter) or by connecting them to another audio source. After
making sure everything is normal, turn the amplifier on again.
Power without sound and status LED is lit red: The continuous red light of
the power indicator signals a high internal operating temperature, which results
in the amplifier switching off temporarily. When the amplifier cools down to a
safe level, the amp will automatically restart. The continuous red light of the
power indicator can also indicate a shorted speaker lead or battery voltage
that is either too high or too low for proper operation.
No sound from one side: Check balance control. Check speaker connections.
Check signal input connection.
Phoenix Gold International, Inc.
9300 North Decatur St.
Portland, OR 97203
503.286.9300
www.phoenixgold.com
Very low output: Check your source unit’s fader control. Check the amplifier’s
Input Sensitivity Level.
Frequent automatic amplifier shut down: This indicates that the amplifier is
operating at a continually undesirable high internal temperature. High operating
temperature can be caused by inadequate ventilation: Refer to the sub-section
titled LOCATION for better amplifier location. High operating temperature can
also be caused by an excessively low impedance load. For instance below
2 ohms stereo or 4 ohms bridged. Check for bad speakers or bad passive
crossover components. If all else fails, try rewiring the entire system. High
operating temperature can be caused by an incorrect input sensitivity level,
refer to sub-section titled INPUT SENSITIVITY ADJUSTMENT.
“Motor Boating” - the power indicator going off repeatedly when the
audio system is on: Check the amplifier’s connection to the battery. Check
battery voltage. If low, recharge or replace battery. Check all ground
connections.
Whining noise when engine is running: Reroute power cable from battery to
source unit directly (include fuse), bypassing the battery terminal in the fuse
box. Check power connections to be sure they are clean. Check the battery
ground making sure the battery terminals and chassis ground are clean. Run
a ground wire from the source unit to the ground point of the amplifier and
remove old source ground.
CAUTION: Do not disconnect the Power Amplifier’s ground when the
system is on. This could damage the amplifier.
RSd Monoblock Owner’s Manual 9.05 #8100.0319A