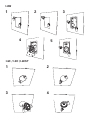
1
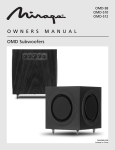
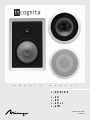
o
w
n
e
r
s
m
a
n
u
a
l
i-SERIES
i
i
i
i
-
6
8
6
6
C
C
Cst
W
PRINTED IN CHINA
7AI//M-I68
owners manual
IMPORTANT SAFETY
INSTRUCTIONS READ CAREFULLY !
void of wall studs or bracing, in the location for the cut-out. Adequate depth for the speaker to
fit flush to the wall or ceiling surface is important. If you are unsure about the contents of the
wall in which you wish to mount the speakers, simply drill a small hole and using a metal
clothing hanger, insert the end of the hanger into the wall and twist it to feel for any debris or
wall studs.
2) Once you have determined the final mounting position, use the supplied template and mark the
cut-out on the wall or ceiling, depending on the model purchased. To mark the cut-out size,
simply trace an outline of the supplied template, found in the box, with a pencil.
3) Using the appropriate wall cutting tool, accurately cut the hole in the wall material, based on
the appropriate cut-out dimension.
4) Install speaker cable(s) from the receiver or amplifier to the inside of the wall or ceiling, and
leave enough slack in the wire so it can hang out from the hole. Using the appropriate wire is
essential, as your local municipality may have certain wiring codes that must be maintained.
NOTE: To connect the i-6Cst you will need to run both the left and right speaker cables to
one single hole as this speaker has stereo input connectors.
Read Instructions: All safety and operating instructions should be read before the product is
operated.
Retain instructions: Safety and operating instructions should be retained for future reference.
Heed Warnings: All warnings on the product & operation instructions should be adhered to.
Follow Instructions: All operating and use instructions should be followed.
Cleaning: Unplug the product from the wall before cleaning. Do not use aerosol or liquid
cleaners, just a damp cloth.
Damage Requiring Service: The product should be serviced by qualified personnel when:
A. The appliance does not appear to operate normally or exhibits a marked
change in performance; or
B. Product has been dropped, or damaged.
C. If the product does not operate normally by following the operating instructions.
5)
Connect the speaker wire from the positive (RED +) terminal on the receiver to the positive
(RED+) terminal on the speaker. Connect the negative (BLACK-) terminal on the receiver to the
negative (BLACK-) terminal on the speaker. To connect the wire to the speaker, completely push
the appropriate terminal in, and insert the wire through the hole that appears on the terminal.
Release the terminal and the internal springs will hold the wire in place. Repeat for the other
terminal.
NOTE: If you inadvertently reverse one of the connections (i.e, red to black), you will notice a
severe lack of bass from your system. This is called wiring the system “Out of Phase”. If this
occurs, check the wiring and re-connect as necessary.
INTRODUCTION
Congratulations on your purchase of Mirage Speaker Systems products! Proprietary technology
and high quality manufacturing will allow you to enjoy the most natural and accurate music
reproduction for many years. The advice offered in this manual is aimed at helping you
maximize and maintain peak performance, and therefore, your listening satisfaction. Please
take the time to read all of the instructions contained in this manual to make certain your
system is properly installed and functioning correctly.
NOTE: To connect the i-6Cst you must repeat the connection procedure for both left and right
channels on one i-6Cst speaker. This speaker has dual input terminals providing sound for
both the left and right channels of your amplifier or receiver.
BREAK-IN PERIOD
We strongly advise that you resist the temptation to play your Mirage Speaker Systems speakers
to their full capabilities until they have been properly broken in. This process should last
approximately 50 to 100 hours of music playback. This can be easily be done by putting your
compact disc player on Repeat mode, while playing a CD with a wide dynamic range at average
room volume listening levels.
6)
Insert the entire speaker into the hole, and using a Philips screwdriver, tighten the screws
attached to the dog clamps until firm. DO NOT OVERTIGHTEN
In Wall Models: (i-6W)
7)
AMPLIFIER REQUIREMENTS
All Mirage speakers are designed to be extremely efficient. All models are designed to be 8 ohm
compatible allowing playback on almost any amplifier or receiver on the market. Most amplifiers
with a power rating of 20-100 watts per channel will effectively operate your Mirage speakers.
Warning: If an amplifier or receiver is over-driven, the resulting distortion is actually many
times greater than its rated power. Over-driven amplifier distortion is called “Clipping”,
easily identified by its fuzzy, distorted sound, and can damage any speaker. The volume
control of most amplifiers and receivers is a logarithmic type, which means that full power
may be reached with the volume control set at as little as the halfway point. Operating the
loudness, treble, or bass controls increases power output well beyond rated levels. The
warranty on your speakers is therefore void if the voice coils are burned or damaged as a
result of overpowering or clipping.
NOTE: Before installing the i-6W, set the two position switch on the rear of the speaker to
either the 0 dB or the +3db position. The zero position maintains a flat, even frequency
response, while the +3db position will increase the sound output to the tweeter. The +3dB
position is to be used in rooms with excessive sound absorption material such as thick carpet,
drapes, couches, etc.
8) The i-6W speaker installs in two stages. First remove the speaker from the bezel, by removing
the 6 screws found on the front of the speaker. Once the screws are removed, separate the
bezel from the baffle.
9) Insert the speaker bezel into the hole, and using a Philips screwdriver, tighten the screws
attached to the dog clamps until firm. DO NOT OVERTIGHTEN
10) Once the bezel is installed, install the speaker into the mounting bezel and using a Philips
screwdriver, tighten the screws until firm. DO NOT OVERTIGHTEN
PAINTING THE BEZEL AND GRILLE
LIMITED WARRANTY POLICY
If you wish, you can paint the speaker bezel and grille to match the décor and design of your
home.
WARRANTY FOR UNITED STATES AND CANADA (see back cover)
1)
For the in wall model, simply separate the bezel from the speaker baffle and paint the bezel,
before you install the speaker portion. The grille is easily separated and can be painted on its
own.
2) For the in ceiling models, use the wall template as a paint mask. Carefully cut the marked line
on the template to create a template that fits inside the bezel, designed to help facilitate
painting. Insert the paint mask, paint the bezel, and then remove the mask when the paint is
dry.
NOTE: If you paint the speaker grilles, ensure that the holes are still open allowing sound to
come through. If any holes become filled with paint, find a small sharp tool and carefully
remove the paint before completing the installation.
Warranty Outside of The United States and Canada:
Product warranties may be legislated differently from one country to another. Ask your local
dealer for details of the LIMITED WARRANTY applicable in your country.
NOTE: Please retain the carton and packing material for your Mirage Speaker Systems
products to protect them in the event of a move or if they need to be shipped to a service
center. Product received damaged by a service center that has been shipped by the end user
in other than the original packaging will be repaired, refurbished and properly packaged for
return shipment at the end user's expense.
INSTALLATION INSTRUCTIONS
FINE TUNING THE SPEAKERS
NOTE: If you are unable to install the speakers yourself , please contact an authorized
installation contractor, or your authorized Mirage Speaker Systems retailer.
To fine tune the speakers, you can adjust the angle of the tweeter slightly to direct the sound
towards the seating positions. This option is offered in order to compensate for poor mounting
locations.
Caution: Turn off all power in your audio/video system before proceeding with your
installation. Not doing so could result in potential damage to the system.
To install the speakers follow these easy steps:
1)
In Ceiling Models: (i-6C, i-8C, i-6Cst)
Decide the placement for your speakers. Advanced planning in regards to the placement of your
speakers is critical. It is imperative that the wall or ceiling cavity be free from debris, moisture,
wall insulation, and any material that is easily combustible. The mounting location must also be
2
Caution: Be extremely careful when adjusting the tweeter as it is very easy to touch the
tweeter, and cause permanent damage which is not covered under the manufacturers
warranty. Do not touch the tweeter in any way.
We sincerely hope you enjoy your new speakers for a lifetime!
I-6W
2
1
3
4
5
I-6C / I-8C /I-6CST
1
2
3
4
WARRANTY
GARANTIE
Limited Warranty Policy
in the United States and Canada
Garantie aux
États-Unis et au Canada
MIRAGE® warrants this product to the retail purchaser
against any failure resulting from original manufacturing
defects in work-manship or materials.
La société MIRAGE® garantit cet appareil contre toute
défectuosité attribuable aux pièces d’origine et à la
main-d’oeuvre.
The warranty is in effect for a period of:
1) for the Speaker Section, five (5) years, and
2) for the Subwoofer, one (1) year,
Cette garantie est valide pendant une période de :
1) cinq (5) ans sur la section haut-parleurs ;
2) un (1) an sur la sous-grave
from date of purchase by the original owner from an
authorized MIRAGE® dealer, and is valid only if the original
dated bill of sale is presented when service is required.
à partir de la date d’achat auprès d’un revendeur
MIRAGE® agréé ; la garantie ne sera honorée que sur
présentation d’une pièce justificative de la date d’achat.
The warranty does not cover damage caused during
shipment, by accident, misuse, abuse, neglect,
unauthorized product modification, failure to follow the
instructions outlined in the owner’s manual, failure to
perform routine maintenance, damage resulting from
unauthorized repairs or claims based upon
misrepresentations of the warranty by the seller.
La garantie ne couvre aucun dommage subi pendant le
transport ou imputable à un accident, à une utilisation
impropre ou abusive, à la négligence, à une modification
non autorisée, à la non-observance des instructions
décrites dans le manuel de l’utilisateur ou des directives
d’entretien, ni aucun dommage subi par suite de
réparations non autorisées ou de réclamations fondées sur
une mauvaise interprétation des conditions de la présente
garantie par le revendeur.
Warranty Service
If you require service for your MIRAGE® speaker(s) at any
time during the warranty period, please contact:
1) the dealer from whom you purchased the product(s),
2) MIRAGE® NATIONAL SERVICE, 203 Eggert Road,
Buffalo, N.Y. 14215 Tel: 716-896-9801 or
3) MIRAGE®, a division of Audio Products International
Corp., 3641 McNicoll Avenue, Toronto, Ontario, Canada,
M1X 1G5,
Tel: 416-321-1800.
4) Additional service centers can be found by checking the
MIRAGE® website: www.miragespeakers.com or, by calling
either of the above numbers.
You will be responsible for transporting the speakers in
adequate packaging to protect them from damage in
transit and for the shipping costs to an authorized
MIRAGE® service center or to MIRAGE®. If the product is
returned for repair to MIRAGE® in Toronto or Buffalo, the
costs of the return shipment to you will be paid by
MIRAGE®, provided the repairs concerned fall within the
Limited Warranty. The MIRAGE® Warranty is limited to
repair or replacement of MIRAGE® products. It does not
cover any incidental or consequential damage of any kind.
If the provisions in any advertisement, packing cartons or
literature differ from those specified in this warranty, the
terms of the Limited Warranty prevail.
Service sous garantie
Dans l’éventualité où une réparation deviendrait nécessaire
pendant la période de couverture de la garantie,
communiquez avec :
1) le revendeur auprès de qui l’appareil a été acheté,
2) MIRAGE® National Service, 203, Eggert Road, Buffalo,
N.Y. 14215, tél. : 716-896-9801 ou
3) MIRAGE®, 3641, avenue McNicoll, Toronto (Ontario),
Canada, M1X 1G5, tél. : 416-321-1800.
4) Pour connaître l’adresse de tous nos centres de service,
consultez le site Web de MIRAGE® à
www.miragespeakers.com ou composez l’un des numéros
indiqués plus haut.
Le propriétaire de l’appareil est responsable de son
emballage et de tous frais d’expédition à un centre de
service MIRAGE® agréé ou à MIRAGE®. Si l’appareil est
expédié à MIRAGE® à Toronto ou à Buffalo aux fins de
réparation, les frais de réexpédition seront assumés par
MIRAGE® à la condition que les réparations effectuées
soient couvertes par la garantie. La garantie est limitée à
la réparation ou au remplacement des appareils fabriqués
et distribués par MIRAGE®. Elle ne couvre aucun
dommage indirect ou consécutif de quelque nature que ce
soit. Si les conditions accompagnant toute publicité,
emballage ou documentation divergent de celles de la
présente garantie, les conditions de la présente garantie
prévaudront.