1
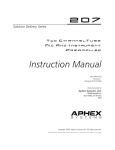
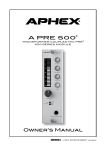
Telephone Paging Amplifiers
MODELS TPU-35B, TPU-60B, TPU-100B
INSTALLATION & OPERATING INSTRUCTIONS
Description
Unpacking
Congratulations on your purchase of a BOGEN TPU-B Series
Telephone Paging Amplifier. The TPU-B Series represents the
continuing evolution of the popular TPU-Series Telephone Paging
Amplifiers. The amplifiers supply the full range of features
already found in the TPU Series, and incorporate exciting new
features that further define the state-of-the-art of telephone
paging.
The amplifier was carefully checked before leaving the factory;
inspect the shipping container and unit closely for improper handling. If the unit has been damaged, make an immediate claim to
the distributor from whom it was purchased. If the unit was
shipped directly to you, save all packaging material, notify the
carrier immediately and place a claim.
WARNING
The feature set of the TPU-B Series amplifiers includes:
• Three Models/Power Levels Available: TPU-35B/35 Watts,
TPU-60B/60 Watts, and TPU-100B/100 Watts.
• Inputs for 600-ohm balanced telephone line, LO-Z balanced
microphone, and background music source.
• Choice of outputs: 16-ohm, 25VCT, 25V, or 70V outputs,
balanced or unbalanced.
• Choice of RCA jack or screw terminals for Music source
(unbalanced).
• Volume controls for Tel channel, MIC, Music and Ringer.
• Ringer circuit activated by contact closure or 90V ring
signal.
• Variable music mute with adjustable Mute level control.
• Signal-activated paging channel with VOX sensitivity and ALC
adjustments.
• Aphex® Aural Exciter Circuit with on/off switch and effect
adjustment.
• Bridging jacks supplied to double number of inputs and
outputs.
• Output (RCA jack) to line-matching tranformer (WMT-1A).
The following installation instructions are for use by
qualified service personnel only. To avoid an electric
shock hazard, do not perform any functions requiring
removal of the cover of the amplifier unless you are
qualified to do so. To prevent fire or shock hazard, do
not expose this unit to rain or moisture.
Power and Grounding
The AC line cord has a three-prong plug which must be plugged
into a three-wire grounded outlet. It is important to ground the
amplifier. If necessary, have an electrician ensure that the outlet
is grounded. The POWER LED illuminates when power is
applied to the unit.
Installation
The frequency response on the paging or microphone channels
is +/-1dB from 70Hz to 15KHz. Distortion is less than 1% from
80Hz to 15KHz. Hum and noise, from 20Hz to 20KHz is -70dB
or better on the music and page channels and -55dB or better
on the microphone channel. Bass response is adjustable +/-9dB
at 100Hz. Treble response is adjustable +/-9dB at 10KHz (both
+/-2dB).
The TPU-Series is designed for surface wall mounting. When
mounting the unit, avoid proximity to heat sources. Allow space
for terminal wiring, access to controls, and adequate air flow for
heat dissipation. Amplifiers are heavy; where possible, secure
the unit to wall studs or a suitable back brace. Use self-fastening or molly-type hardware on hollow sheet rock type walls.
The amplifier operates from a 120V AC source and is protected
by a circuit breaker, electronic overload protection and by resettable thermostat.
Four #6 x 3/4” screws are provided with the unit to mount to
solid wall stock. Hold the amplifier to the wall and trace the
inside edge of the top keyhole mounting holes. Set the amplifier
down and locate the top two screws in position (13-1/2” apart).
Secure them to the wall, allowing the screw heads to protrude
1/8” to 1/4”. Fit the chassis over the screw heads and position
the bottom two screws. Complete the mounting of the amplifier by tightening all screws securely.
CAUTION
Connect only to PBX system incorporating isolation from
telecom network.
ATTENTION
Raccorder seulement a un systeme PBX independant du
reseau de telecommunication.
2
RINGER TONE
Input Connections
As shipped, a steady ringing tone will be heard as long as the dry
contacts remain closed. To produce a pulse tone, it is necessary
to remove the cover and place the jumper located at J1 in the
P (Off) position.
The TPU-B Input connections and Aphex On/Off switch are
housed in the Input Connections Bay, accessible by removing the
left cover panel on the front of the amplifier. Loosen the hold
down screws on the panel and slide the panel up to remove. A
knockout is provided on the panel to admit wiring. Be sure to
replace the cover and secure the hold down screws after making connections.
WARNING
This procedure requires removal of the amplifier cover.
To avoid an electric shock hazard, do not perform this
procedure unless you are qualified to do so.
APHEX®
The Aphex® Aural Exciter circuit is controlled by the on/off
switch located in the input connections bay. When the switch is
in the on position, the harmonics that are usually lost in the
amplification process are regenerated and added to the audio
signal. This results in increased presence and clarity, increased
intelligibility, greater perceived loudness (without adding extra
power) and reduced listener fatigue.
Figure 1. TPU Input Connections Bay
TEL
BRIDGING JACKS
A balanced isolating transformer input for a telephone line is
provided. A 600-ohm telephone line may be connected to the
TEL terminals. If two-conductor shielded wire is used, connect
the shield to the adjacent GND (ground) terminal, which is to
the left of the TEL terminals.
Two TPU amplifiers may be bridged together to double the number of inputs and outputs. Connect a single-conductor shielded
cable, terminated in an RCA phono plug at each end, between
the BRIDGING jacks of the two amplifiers. The cable should not
be more than 20 feet in length.
MIC BAL & MUSIC MUTE
A low-impedance balanced microphone can be connected to the
screw terminals marked MIC BAL. Use two-conductor shielded
wire and connect the shield to the adjacent GND terminal.
Connect the MUSIC MUTE terminals to the switch on the
microphone for microphone muting of the music channel.
Output Connections
Output connections are housed in the connections bay, accessible by removing the right hand cover panel on the front of the
amplifier. Loosen the hold down screws on the panel and slide
the panel up to remove. Knockouts are provided on the panel
to admit wiring. Be sure to replace the cover and secure the
hold down screws after making connections.
MUSIC IN
A wide range of HI-Z background music sources can be connected to the TPU amplifier. Connect the source to either the
MUSIC RCA jack or MUSIC IN screw terminals.
TEL RING & CONTACT RING
The night ringer can be activated either by a 90V ring signal or
from a dry contact closure.
To activate the night ringer using the ring signal, connect the signal to the TEL RING terminals.
To activate the night ringer using contact closure, connect a pair
of normally-open dry contacts (customer-supplied and installed
in the telephone system) to the CONTACT RING terminal and
adjacent GND terminal.
Figure 2. TPU Output Connections Bay
3
Speakers
Controls
Speaker systems can be connected directly to the speaker output terminals. The amplifier provides outputs at 16-ohm, 25VCT,
25V, and 70V, and is shipped for use with unbalanced systems.
Connect one lead to the terminal corresponding to the impedance of the speaker system and the other to the COM and GND
terminals on the output terminal strip.
APHEX®
The APHEX® control on the front panel adjusts the mix of the
Aphex effect with the audio signal. Clockwise rotation of the
control maximizes the effect. Counterclockwise rotation minimizes the effect.
For balanced systems, remove the link between COM and GND.
To turn the Aphex circuit on or off, use the slide switch located
in the connections bay (See INPUT CONNECTIONS).
Additional Power Amplifier
Treble & Bass
An external power amplifier can be used with the TPU amplifier.
You must modify the output circuitry of the telephone amplifier
by adding a resistor network, as illustrated below. Connect a
patch cord to the high-level/high-impedance input of the booster amplifier.
The BASS control provides +/-9dB of boost and cut at 100Hz.
The TREBLE control provides +/-9dB of boost and cut at 10KHz.
Rotate controls clockwise to boost and counterclockwise to
cut.
TEL INPUT
VOX (Voice-Operated) SENS
The VOX SENSitivity control should be set so that only the
desired signal is above the threshold level, while noise or
unwanted signal is below it. When an input signal (such as
voice) is detected, the music channel will be muted. To
adjust the sensitivity of this circuit:
WMT-1A
1. Rotate the control fully clockwise. While making a page
announcement and talking at a low level, the sound should
not be choppy nor missing parts of words. If it is choppy, or
if intelligibility is poor, rotate the control counterclockwise
to the point where the sound is clear and crisp (but not to
the maximum counterclockwise position).
Connect a Bogen WMT-1A accessory to the RCA jack labeled
WMT-1A in order to feed a 600-ohm telephone line, LO-Z input
or balanced Mic input of another amplifier. Refer to the instructions furnished with the WMT-1A accessory for full information.
2. If the background music shuts down when no page
is in progress, rotate the control clockwise until the
music is restored.
Operation
Power
VARIABLE MUSIC MUTE
Plug the amplifier line cord into a suitable outlet. The POWER
LED will illuminate once power is applied to the amplifier. The
unit remains in a power standby condition after power is applied.
The MUSIC MUTE control adjusts the mute level of the
background music when using the telephone paging channel.
This control differs from the MUSIC MUTE terminals which
mute background music during a microphone page (See
Input Connections). The fully counterclockwise position
results in maximum muting. The fully clockwise position
results in minimum muting.
PEAK LEVEL
The PEAK LEVEL LED will illuminate if the amplifier is driven
into clipping. Adjust the output level of MIC VOLUME, PAGE
VOLUME, MUSIC VOLUME, or RINGER VOLUME if the PEAK
LEVEL LED remains ON.
RINGER VOLUME
Adjust to the desired level - clockwise to increase, counterclockwise to decrease the level.
4
MUSIC VOLUME
Maintenance
The MUSIC VOLUME control adjusts the volume of background
music. Rotate the control counterclockwise to decrease the
level. Rotate the control clockwise to increase the level.
CAUTION
There are no user-serviceable parts within the amplifier.
Have all internal servicing performed by a qualified technician. The warranty may become void if repairs are performed by anyone other than the Bogen Factory Service
Department.
MIC VOLUME
The MIC VOLUME control adjusts the microphone level. Rotate
the control counterclockwise to decrease the level. Rotate the
control clockwise to increase the level.
Circuit Breaker
TEL VOLUME
If the circuit breaker trips, the POWER LED will go out and
there will be no output. Unplug the AC line cord. Remove the
cover of the output connections bay and press the red Circuit
Breaker button to reset it. Replace the cover and plug the line
cord back into the outlet. If the breaker trips again, have the
trouble investigated by qualified personnel.
This control adjusts the telephone paging level. It does not affect
the microphone level. Rotate the control counterclockwise to
decrease the level. Rotate the control clockwise to increase the
level.
ALC
Thermal Protection
The telephone paging channel has an ALC circuit that maintains
constant output level regardless of input variations in the varying voice levels of persons using the system. The ALC is factory
set and adjustments are not normally required. If ALC is
required, set the ALC control using the directions below.
If the thermal protection activates, there will be no audio output but the POWER LED will remain on. Wait approximately five
minutes for the amplifier to cool. If the amplifier overheats again,
investigate the cause of the over-temperature condition. This
may be due to improper connections at the output terminals or
excessive environmental heat due to inadequate ventilation.
1. Turn off the ALC by rotating the control fully counterclockwise.
Bogen Service
2. Set the TEL VOLUME control to the highest level likely to
be required. Hold a telephone handset in a normal position
and speak softly yet distinctly into the mouthpiece. Adjust the
TEL VOLUME control to the desired output level.
3. Speak in a loud voice directly into the handset mouthpiece
while rotating the ALC control clockwise to the point where
the output of the amplifier is reduced to the same level as that
obtained in Step 2.
To vary the overall volume without disturbing the ALC adjustment, use the TEL VOLUME control.
5
The TPU amplifier is covered by a 2-year warranty. If you
encounter difficulty with your TPU amplifier, please do not hesitate to ask our advice or assistance. Information can be
obtained by calling our Application Engineering Department or
Factory Service Department at (201) 934-8500.
If you are shipping the unit for a warranty repair, pack it in the
original shipping container or similar container and send the unit,
fully insured and prepaid, via any responsible carrier. Include a
letter stating the problem and proof of purchase showing the
purchase date. The amplifier will be promptly repaired and
returned to you freight prepaid while in warranty.
50 Spring Street, Ramsey, NJ 07446 (201) 934-8500
54-9213-01
0809