1
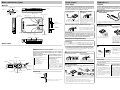
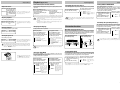
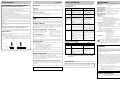
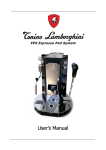
IMPORTANT SAFEGUARDS
Introduction
Unpacking
Caution : Read this page carefully to ensure safe operation.
INSTRUCTION MANUAL
Unpack the unit carefully and make sure that all accessories are put aside so they
will not be lost.
Examine the unit for any possibility of shipping damage. If your unit is damaged or
fails to operate, notify your dealer immediately. If your unit was shipped to you
directly, notify the shipping company without delay. Only the consignee (the
person or company receiving the unit) can file a claim against the carrier for
shipping damage.
We recommend that you retain the original carton and packing materials for use
should you transport or ship the unit in the future.
KENWOOD CORPORATION
Keep this manual handy for future reference.
PORTABLE MINIDISC PLAYER
DMC-K3
Safety precautions
1. Power sources — The unit should be connected to a power supply only
of the type described in the operating instructions or as marked on the
appliance.
2. Power-cord protection — Power-supply cords should be routed so that
they are not likely to be walked on or pinched by items placed upon or
against them, pay particular attention to cords at plugs, convenience
receptacles, and the point where they exit from the unit.
3. Enclosure removal — Never remove the enclosure. If the internal parts
are touched accidentally, a serious electric shock might occur.
4. Drop — Do not drop the unit or apply strong shock to it. (Damage due to
dropping the unit is not covered by the warranty.)
5. Ventilation — Avoid hindering the ventilation of the unit by covering it
with a cloth, etc.
6. Abnormal smell — If an abnormal smell or smoke is detected, immediately turn the power OFF and pull out the power cord. Contact your dealer
or nearest service center.
7. Heat — Avoid placing the unit under direct sunlight or near a source of
heat such as heating equipment. Particularly, never leave it in an automobile or on the dashboard.
8. Temperature — The unit may not function properly if used at extremely
low, or freezing temperatures. The ideal ambient temperature is above
+5°C (41°F).
9. Water and moisture — The unit should not be used near water — for
example, near a bathtub, washbowl, kitchen sink, laundry tub, in a wet
basement, or near a swimming pool, etc.
10. Dust and moisture — Avoid places where is dusty or where the humidity
is high.
11. Vibrations — Avoid placing the unit on an unstable place such as a shelf
or in a place subject to vibrations.
12. Magnetic fields — Keep the unit away from sources of magnetic fields
such as TV sets, speaker systems, radios, motorized toys or magnetized
objects.
13. Cleaning — Do not use volatile solvents such as alcohol, paint thinner,
gasoline, or benzine, etc. to clean the cabinet. Use a clean dry cloth.
14. Nonuse periods — The power cord of the unit should be unplugged from
the outlet when left unused for a long period of time.
15. Damage requiring service — The unit should be serviced by qualified
service personnel when:
A. The power-supply cord or the plug has been damaged.
B. Objects have fallen, or liquid has been spilled into the unit.
C. The unit has been exposed to rain.
D. The unit does not appear to operate normally or exhibits a marked
change in performance.
E. The unit has been dropped, or the enclosure damaged.
16. Servicing — The user should not attempt to service the unit beyond that
described in the operating instructions. All other servicing should be
referred to qualified service personnel.
WARNING: TO PREVENT FIRE OR ELECTRIC
SHOCK, DO NOT EXPOSE THIS APPLIANCE TO RAIN OR MOISTURE.
17. CAUTION — TO PREVENT ELECTRIC SHOCK DO NOT USE THE
AC PLUG WITH AN EXTENSION CORD, RECEPTACLE OR OTHER
OUTLET UNLESS THE BLADES CAN BE FULLY INSERTED TO PREVENT
BLADE EXPOSURE.
Before applying power
Caution : Read this page carefully to ensure safe operation.
Accessories
Check that the following accessories are present.
Units are designed for operation as follows.
AC adaptor (1)
Remote control unit (1)
Stereo headphone (1)
Carrying case (1)
Rechargeable battery NB-150 (1)
U.S. A.and Canada ............................................ AC 120 V only
U.K. and Europe ................................................ AC 230 V only
B60-4092-00 00 JA
Please read all of the safety and operating instructions before operating this unit.
For best results, follow all warnings placed on the unit and adhere to the operating
and use instructions. These safety and operating instructions should be retained
for future reference.
(K, T) AP 9811
We
Want You
LISTENING
For A Lifetime
Selecting fine audio equipment such as the unit you’ve just purchased is only the start
of your musical enjoyment. Now it’s time to consider how you can maximize the fun and
excitement your equipment offers. This manufacturer and the Electronic Industries
Association’s Consumer Electronics Group want you to get the most out of your
equipment by playing it at a safe level. One that lets the sound come through loud and
clear without annoying blaring or distortion — and, most importantly, without affecting
your sensitive hearing.
Sound can be deceiving. Over time your hearing “comfort level” adapts to higher
volumes of sound. So what sounds “normal” can actually be loud and harmful to your
hearing. Guard against this by setting your equipment at a safe level BEFORE your
hearing adapts.
To establish a safe level:
÷ Start your volume control at a low setting.
÷ Slowly increase the sound until you can hear it comfortably and clearly, and without
distortion.
Once you have established a comfortable sound level:
÷ Set the dial and leave it there.
Taking a minute to do this now will help to prevent hearing damage or loss in the future.
After all, we want you listening for a lifetime.
We Want You Listening For A Lifetime
Used wisely, your new sound equipment will provide a lifetime of fun and enjoyment.
Since hearing damage from loud noise is often undetectable until it is too late, this
manufacturer and the Electronic Industries Association’s Consumer Electronics Group
recommend you avoid prolonged exposure to excessive noise. This list of sound levels
is included for your protection.
Decibel
Level Example
30
40
50
60
70
80
Quiet library, soft whispers
Living room, refrigerator, bedroom away from traffic
Light traffic, normal conversation, quiet office
Air conditioner at 20 feet, sewing machine
Vacuum cleaner, hair dryer, noisy restaurant
Average city traffic, garbage disposals, alarm clock at two feet.
THE FOLLOWING NOISES CAN BE DANGEROUS UNDER CONSTANT
EXPOSURE
90
100
120
140
180
Subway, motorcycle, truck traffic, lawn mower
Garbage truck, chain saw, pneumatic drill
Rock band concert in front of speakers, thunderclap
Gunshot blast, jet plane
Rocket launching pad
Information courtesy of the Deafness Research Foundation.
For the U.S.A.
CAUTION:
Use of controls or adjustments or performance of procedures other than
those specified herein may result in hazardous radiation exposure.
In compliance with Federal Regulations, following are reproductions of labels
on, or inside the product relating to laser product safety.
For your records
Record the serial number, found on the back panel of
the unit, in the spaces designated on the warranty
card, and in the space provided below. Refer to the
model and serial numbers whenever you call upon
your dealer for information or service on this product.
Model
Serial Number
CLASS 1
LASER PRODUCT
The marking is located on the bottom
panel and says that the component uses
laser beams that have been classified as
Class 1. It means that the unit is utilizing
laser beams that are of a weaker class.
There is no danger of hazardous radiation
outside the unit.
For rechargeable battery
WARNING
÷ Use specified charger only.
÷ Do not disassemble or mutilate, cause burns.
÷ Do not incinerate or heat, may cause burns, burst or release toxic materiais.
÷ Do not short circuit may cause burns.
÷ Keep away from children.
------------------------------------------KENWOOD CORPORATION
2967-3, ISHIKAWA-CHO,
HACHIOJI-SHI,
TOKYO, JAPAN
KENWOOD CORP. CERTIFIES THIS
EQUIPMENT CONFORMS TO DHHS
REGULATIONS NO. 21 CFR 1040.10,
CHAPTER 1, SUBCHAPTER J.
-----------------------
Rechargeable Nickel Metal Hydride Battery .......... NB-150S (1 piece)
Car battery adaptor ................................................... DC-C70
Car cassette adaptor ................................................. CAC-2
The marking of products using lasers
(Except for some areas).
-----------------------
Separately sold option part
------------------------------------------Location: Bottom Panel
DMC-K3(EN) 1
Playback (Basics)
Names and functions of parts
Power sources
Main Unit
Power Supply
Playback
The specially provided rechargeable battery, commercially sold AA alkaline battery, the specially provided AC adaptor, the special car battery adaptor, and other power sources can be used for this unit. Use
the power supply that suits the application of the unit.
Cancel the HOLD function with the HOLD switch and then operate
the keys. When the HOLD function is engaged, the unit will not respond to operation of the keys. For details, refer to “Avoiding Faulty
Operation (HOLD).”
Using the AC adaptor
1 Connect the remote control
When Using the Rechargeable Battery
To household outlet
1V
PHO
NES
DC IN jack
(Extemal power jack)
LCD
HOLD
ª
·
OPEN
÷ Insert the AA alkaline battery making
sure the positive (ª) and negative
(·) poles are correctly aligned.
HOLD
PHONES jack
÷ Headphones may differ depending on the country or sales region.
÷ Commercially sold headphones with stereo mini plugs ( 3.5mm) can also
be used.
2 Inserting a recorded MD.
When Using Commercially Sold AA Alkaline Battery (LR6)
PORTABLE MD PLAYER DMC-K3
ME +
LU
– VO
KENWOOD CORPORATION MADE IN JAPAN
BATTERY ( L6 .R6 .AA .AM3 ) 1 . 5V
NI - MH BATTERY
1 . 2V
÷ AC adaptors may differ depending on the country or sales region.
PHONES
IN
DC IN 4 - 5. 1V
To DC IN jack
HOLD
÷ Insert the battery making sure
the positive (ª) and negative
(·) poles are correctly aligned.
÷ When using the battery for the
first time, charge the battery
before using it.
N
OPE
PORTABLE MD PLAYER DMC-K3
BLE MD PLAYER DMC-K3
1
-K
C
M
D
R
E
Y
A
L
P
D
M
E
L
B
A
T
R
O
LD
HO
P
5.
O
4-
H
IN
OPEN
DC
P
6 (Play/pause) key
4 (Skip down) key
S
Hand strap
attaching hole
E
Track number indicator
and headphone.
ª
·
N
¢ (Skip up) key
1V
Battery
indicator
5.
HOLD
4-
Play indicator
IN
Disc Holder
DC
HOLD indicator
1 Open the disc holder.
LD
HO
DC
IN
2 Insert the MD and close the disc
holder by hand.
4-
5.
1V
DC
IN
PHO
HO
4-
5.
LD
1V
NES
Battery cover
For use in a car
5 (Volume up) key
∞ (Volume down) key
HOLD switch
N
OPE
OPEN slider
NES
N
OPE
Please use the separately sold car battery adaptor (DC-C70) and car cassette adaptor (CAC-2) for listening connected to a car stereo system.
Never connect the unit to the external input terminal (AUX input terminal etc.) of a car stereo system, as this will cause malfunctions.
7 (Stop/off) key
Charge key
PHO
OPEN
÷ Do not force the disc holder
open,for this will damage it.
Charging the rechargeable battery
OPEN
HOLD
HOLD Function
Cancel the HOLD function with the HOLD switch and then operate the keys.
When the HOLD function is engaged, the unit will not respond to operation
of the keys. For details, refer to “Avoiding Faulty Operation (HOLD).”
Remote Control
The specially provided rechargeable battery is not fully charged. When using
it for the first time, charge the battery according to the following procedure.
Use this key to set playback-related features and other convenient
functions. Please also read “Playback (Application)” and “Convenient
functions” for details.
+ (Volume up) key
¢ (Skip up) key
^
MODE
MODE key
7 (Stop/off) key
Charge key
MODE
1 Set the rechargeable battery in place.
1 Open the battery cover.
When the MODE key is held depressed for more than 2 seconds:
1
2
PORTABLE MD PLAYER DMC-K3
The mode changes each time the
MODE key is pressed.
1 AUTO PLAY
2 AUTO POWER SAVE
3 Operating tone (Beep)
4 Original display
÷ To change one of the above setups after returning to the original
display, restart from the step of
pressing and holding the MODE
key for more than 2 seconds.
2 Insert the rehargeable battery
and close the cover.
ª
·
HOLD
1 Fast forward/fast reverse
(search)
2 Changing the display mode
3 Play Mode
4 Changing the tone
(BASS BOOST)
5 Original display
HOLD switch
÷ Charge the battery with the power to the unit turned off. (The battery is
not charged while the unit is in operation.)
PORTABLE MD PLAYER DMC-K3
The mode changes each time the
MODE key is pressed.
÷ Insert the rechargeable battery making sure the positive (ª) and negative (·) poles are correctly aligned.
1 Slide the battery cover up.
2 Open the battery cover.
2 Charge the battery.
1 Connect the specially provided 2 Press the 7 key twice in succesAC adaptor.
sion.
Main unit
Charging check
Charging start
To household outlet
LCD
PHONES jack
1
-K
C
M
D
Remote control
O
R
T
A
B
L
E
M
D
P
L
A
Y
E
R
Using the Clip
DC
IN
4-
5.
After 15 sec.
LD
HO
1V
PHO
NES
N
OPE
MODE
6 (Play/pause) key
C
C
4 (Skip down) key
P
– (Volume down) key
Check
Press and release.
Charge
To DC IN jack
(The indication goes out after charging.)
Clip
HOLD
÷ Clip the remote control unit to the
edge of your bag or pocket.
3 Start playback.
Main unit
÷ Power comes on and playback
starts from the first track.
÷ “NO TITLE” will be displayed
when the MD has no track titles on
it.
÷ After the last track is over, playback will stop.
Remote control
HOLD
MODE key (Only by remote control operation)
÷ Press the center of the MD until
the disc is locked into place.
÷ When the unit has been set to “AP
on” (Auto Play mode), the unit
automatically turns on and starts
playing the MD by closing the disc
holder. For details, refer to “Setting AUTO PLAY”.
Skip Function
Using the 4 key and ¢ key, you can skip to the start of the track
you want to listen to.
Skip Up Function
Skip Down Function
¢: Track number increases
4: Track number decreases
÷ Each time the ¢ key is pressed
during playback, the operation will
skip to and playback the subsequent track.
÷ Pressing and holding the ¢ key
changes the displayed track numbers continuously. (except during
Random Playback)
÷ When the 4 key is pressed while
playback is in progress, operation
will skip to the start of the track
currently being played back, and
playback will resume from there.
÷ Pressing and holding the 4 key
changes the displayed track numbers continuously. (except during
Random Playback)
÷ If the battery indicator is not displayed though the battery is correctly set
up for recharging, the battery life may be expired. In this case, replace the
battery with new one.
÷ The time needed to charge the battery fully is about 3 hours.
÷ A fully charged battery can be used for about 9 hours. (Playing time may
differ slightly depending on the environment the unit is used in.)
DMC-K3(EN) 2
Playback (Basics)
Adjust the volume
Main unit : Adjust the volume with
the 5 (volume up)/∞
(volume down) keys.
Remote control: Adjust the volume with the + (volume
up) / – (volume down)
keys.
Playback (Application)
÷ Volume level indicator (0 to 30).
(The volume level is displayed on
the remote control.)
Changing the tone (BASS BOOST)
Setting AUTO POWER SAVE
Operate the key while playback is in progress. (only by remote control
operation)
Press during playback or stop status. (only by remote control operation)
Press during playback or stop status.
Normally, the unit is set to “PS on” mode to conserve the battery.
When using the unit in a place where it is subject to vibration or impact,
set “PS off” mode before operating the unit.
(only by remote control operation)
Press during playback status.
÷ Each time the key is pressed, pause
and playback modes are changed
over.
1. In fast forward mode, stop status is engaged when the end of the
last track is reached.
2. In reverse mode, playback starts when the start of the first track is
reached.
3. Depending on recording conditions, sound interruptions may occur
during a fast forward/reverse operation.
Changing the display
Press during playback or pause status.
(only by remote control operation)
Main unit :
Press the 7 key.
Remote control : Press the 7 key.
During stop status
During playback status
1 Press the MODE key twice.
2 Press the 4 or ¢ key.
1 Press the MODE key twice.
2 Press the 4 or ¢ key.
The mode changes each time the
4 or ¢ key is pressed.
The mode changes each time the
4 or ¢ key is pressed.
Main unit:
Press the 7 key. ÷ The power will automatically turn off
if the unit is not operated for about 3
Remote control : Press the 7 key.
minutes after it has stopped.
1
2
3
4
Track titles or disc names are not displayed if they are not recorded on
the disc.
5.
1V
PHO
NES
N
OPE
OPEN
The play mode changes each time
the 4 or ¢ key is pressed.
1 “PS on” : power conservation mode.
2 “PS off” : skip guard mode.
Activating the operating tone (Beep)
The operating tones (beep) which are produced every time one of the
keys listed below are pressed can be activated or canceled (deactivated).
(only by remote control operation)
When you are operating the unit on a train or when you are carrying it
with the power off, this function allows you to prevent faulty operation
due to accidental key operation. (Both the main unit and remote control
should be carried with the HOLD function engaged.)
Activating HOLD status for
main unit keys only
1 When the MODE key is held
depressed for more than 2
seconds.
2 Press the MODE key twice.
3 Press the 4 or ¢ key.
Activating HOLD status for
remote control keys only
To HOLD
Note
OPEN
1 “BP on” : A single beep is produced. (and the operating tones are
activated)
2 “BP off” : Two beeps are produced. (and the operating tones are
deactivated)
The operating tone's status - activated (BP on) or deactivated (BP off)
- will be stored in memory even when the power is turned off.
HOLD
HOLD
To release
The play mode changes each time
the 4 or ¢ key is pressed.
HOLD
To HOLD
To release
Setting AUTO PLAY
LD
HO
4-
1 When the MODE key is held
depressed for more than 2
seconds.
2 Press the MODE key once.
3 Press the 4 or ¢ key.
HOLD
1 Title of track being played.
2 Number of track currently
being played.
3 Elapsed time of track currently being played.
4 “UU KENWOODUU ” logo
display.
Selecting Play Mode
IN
When the bass is boosted, raising the volume excessively will result
in sound distortion. If this happens, either lower the bass level or the
volume level.
HOLD
Note
Disc name.
Total number of tracks.
Total playing time.
“KENWOOD” logo display.
Note
Avoiding faulty operation (HOLD)
Removing the MD
DC
1 “BASS 0” : Cancel.
2 “BASS 1” : Bass is boosted
slightly.
3 “BASS 2” : Bass is boosted
more.
HOLD
When playback is started again, it will start from the start of the track that
was being played back when playback was stopped. (Playback will start
from the first track if the MD has been removed from the unit.) This is
called the “RESUME” function.
The mode changes each time the
4 or ¢ key is pressed.
Convenient functions
Stopping playback
Press during stop status.
1 Press the MODE key 4 times.
2 Press the 4 or ¢ key.
For forward search:
For reverse search:
keep pressing the ¢ key durkeep pressing the 4 key during playback.
ing playback.
÷ When you lift your finger off the key, normal playback will be resumed.
Notes
Turning the power off
Convenient functions
Fast forward / fast reverse (SEARCH)
1 Press the MODE key once.
2 Press and hold down either the 4 key or the ¢ key.
To pause playback
Main unit :Press the 6 key.
Remote control : Press the 38
key.
Playback (Application)
÷ After the power is turned off, slide
the OPEN slider in the direction of
the arrow and remove the MD.
Press during playback or stop status. (Random mode cannot be
engaged while playback is in progress.)
(only by remote control operation)
During stop status
During playback status
1 Press the MODE key 3 times.
2 Press the 4 or ¢ key.
1 Press the MODE key 3 times.
2 Press the 4 or ¢ key.
The mode changes each time the
4 or ¢ key is pressed.
The mode changes each time the
4 or ¢ key is pressed.
1 “p
pOFF”: Released.
pONE”: The track being
2 “p
played will be
played repeatedly.
pALL”: All tracks of the disc
3 “p
will be played repeatedly.
4 “RANDOM”: Random playback mode.
1 “p
pOFF”: Released.
pONE”: The track being
2 “p
played will be
played repeatedly.
pALL”: All tracks of the
3 “p
disc will be played
repeatedly.
By switching the Auto Play function, power can automatically be turned
on and playback from the first track started by simply inserting a MD and
closing the disc holder. (only by remote control operation)
1 When the MODE key is held
depressed for more than 2
seconds.
2 Press the 4 or ¢ key.
The play mode changes each time
the 4 or ¢ key is pressed.
1 “AP on” : Auto Play mode.
2 “AP off” : Auto Play canceled.
÷ While “AP on” is set, inserting a MD automatically turns power on and
starts playback even when the unit is set to the “HOLD” status.
DMC-K3(EN) 3
For pleasant use
For pleasant use
Cautions regarding use of rechargeable battery
Simple care
During battery charging or use of the unit, the battery may become
warm. This is normal and does not indicate a malfunction.
When dirty
÷ Wipe with a dry, soft cloth.If the unit is very dirty, moisten the cloth slightly
and wipe off the dirt. Afterwards, make sure you wipe the unit dry with
a dry cloth.
Taking care of plugs etc.
Remote control
LoBATT
Symptom
Unit fails to
turn ON.
1. Do not use chemicals like benzine, thinner, etc., as they can cause
deterioration and discoloration.
2. Do not apply oil to the unit, for this will cause it to malfunction.
The unit does
not respond
to key operation.
Notes
Handling of Mini Disc
Since the MD is in a cartridge, it can be handled without worrying about dirt
or fingerprints. But soiling, warping, or other damage to the cartridge will
result in faulty operation. Take the following precautions to ensure that you
will always be able to enjoy the music on your MDs.
Care and Maintenance
÷ Using a dry cloth, wipe dirt or dust
off the cartridge at regular intervals.
Storage Location
÷ Do not store MDs in direct
sunlight or in hot locations such
as car interiors or in humid locations.
÷ Do not leave MDs on a beach
or other location where sand
or dirt can enter the cartridge.
Affixing the Label
Main unit
System ........................... Mini disc digital audio system
Read method ................. Noncontact optical reading system (semiconductor laser)
Sampling frequency ...... 44.1 kHz
Audio compression ....... ATRAC (Adaptive Transform Acoustic Coding)
Number of channels ...... 2 channels
Frequency response ...... 20 Hz to 20,000 Hz (± 3 dB)
Wow & flutter ................ Less than unmeasurable limit (± 0.001 %
W.PEAK)
Input/Output terminal .. Remote control/Phones jack
Rated power output ...... 7 mW+7 mW
Power source
DC IN jack (4–5.1V)
: Specially provided AC adaptor
: Car battery adaptor (sold separately, DC-C70)
DC 1.5V : Commercially sold AA alkaline battery (LR-6) × 1
DC 1.2V : Specially provided rechargeable battery (NB-150) × 1
(Charging time : About 3 hours)
Battery life (Fully charge, with “PS on” setting ON)
Specially provided rechargeable battery (NB-150) × 1 ......... Approx. 9 hours
Commercially sold AA alkaline battery (LR-6) × 1 ............... Approx. 10 hours
÷ At 0.5mW+0.5mW output (16 Ω load ).
÷ Standard value during continuous use/charging in an temperature of
25˚C.
÷ Time of use may vary depending on battery maker, battery type, use
environment, and temperatute.
÷ Time will be shorter when “PS off” Mode is set.
Dimensions (not including protruding parts)
W :99.9 mm (3-15/16”)
H :17.5 mm (11/16”)
D :75 mm (2-15/16”)
Weight (Net) ............ 120 g (4.23 oz.)
not including the accessory rechargeable batter
145 g (5.11 oz.)
including the accessory rechargeable battery
1. KENWOOD follows a policy of continuous advancements in development. For reason specifications may be changed without notice.
Notes
2. The full performance may not be exhibited in an extremely cold
location (under a water-freezing temperature).
There is no
sound.
÷ Do not open the shutter and directly touch the MD. Forcing the
shutter open will damage it.
For handy reference, the remaining battery life is indicated on the display
while the unit is in operation.
÷ When the remaining battery power drops, the battery indicator on the
main unit display blinks and the LCD display on the remote control unit is
reversed. If the unit continues to be used after this condition, the remote
control unit LCD shows “LoBATT” and the power is turned off automatically.
If you think the unit is not operating properly, check the symptoms
before requesting service.
÷ Always keep the plugs of headphones etc. clean. Dirtyplugs can cause
noise or failure of remote control operation.
Do Not Touch the MD Directly
Battery indicator
Specifications
Troubleshooting
(Rechargeable Nickel Metal Hydride Battery NB -150)
÷ Do not use any battery other than the specially provided rechargeable
battery. Use of another battery will damage the unit.
÷ The battery is a rechargeable Nickel Metal Hydride battery. Because of
the properties of this battery, it must be recharged at least once every 2
months, even if it is not used.
÷ The battery can be recharged about 500 times.
÷ If the battery is repeatedly recharged before its charge is completely used
up, the battery service time may gradually decrease. This is due to the
properties of the battery and does not indicate a malfunction. Allow the
battery to be used up completely and then charge it fully. If this procedure
is repeated several times, the rechargeable battery will display its proper
performance.
÷ Replace the rechargeable battery with a new one when its service time
is short even after it has been charged. (Use the separately sold NB-150S
battery.)
÷ A small amount of power is used even when the unit is turned OFF. If the
unit is not used for a long time, therefore, remove the battery and store
it in a safe place.
In case of difficulty
÷ When affixing a label on the cartridge, take the following precautions and
affix it properly.
1 Properly affix the label in its prescribed place.
2 Do not affix a label over another label.
3 Avoid air bubbles and turned-back corners.
÷ If the label is not properly affixed, it may get stuffed into the cartridge,
making it impossible to remove the disc.
÷ If the label is not properly affixed, peel it off carefully and affix it properly.
Caution on condensation
Condensation (of dew) may occur inside the unit when there is a great
difference in temperature between this unit and the outside.
This unit may not function properly if condensation occurs. In this case, leave
the unit for a few hours with the power left ON, and restart the operation after
the condensation has dried up.
Be specially cautious against condensation in a following circumstance:
When this unit is carried from a place to another across a large difference in
temperature, when the humidity in the room where this unit is installed
increases, etc.
US and foreign patents licensed from Dolby Laboratories.
Sound skips.
Cause
÷ The disc holder is not securely
closed.
÷ The battery is depleted.
÷ HOLD status is engaged.
÷ The volume is at minimum
level.
÷ The remote control or headphones are disconnected.
÷ HOLD status is engaged.
÷ The battery is depleted.
÷ The remote control or headphone plug is not securely inserted.
÷ The disc holder is not securely
closed.
÷ The disc is scratched or damaged or the recording is not
good.
÷ The unit is in a place where
there is excessive vibration.
Remedy
÷ Close disc holder securely.
÷ Charge the battery.
÷ Deactivate HOLD status.
÷ Increase the volume.
÷ Insert plug securely.
÷ Deactivate HOLD status.
÷ Charge the battery.
÷ Insert plug securely.
÷ Close disc holder securely.
÷ Replace the MD.
÷ Move the unit to a place
where there is little vibration or set to “PS off”.
÷ Use the special rechargeable battery (NB-150)
÷ Wait until the unit has
cooled to normal temperature.
÷ Use the accessory AC
adaptor.
Battery does ÷ You are using commercial rechargeable battery.
not charge.
÷ The unit has become hot because of exposure to direct
sunlight etc.
÷ You are using another AC
adaptor than the accessory
adaptor.
÷ The AC adaptors has become ÷ Connect the AC adaptor
disconnected.
securely.
Meaning of display messages
Message
“noDISC”
“BLANK ”
“ERROR ”
Meaning
Action
÷ Insert a MD into the unit.
÷ There is no MD in the unit.
÷ Nothing is recorded on this ÷ Replace the disc with a
MD.
prerecorded MD when
playing it back.
÷ The *UTOC contents are ÷ Replace the MD.
faulty.
÷ The disc is scratched or dam- ÷ Replace the MD.
aged, so playback is not possible.
*UTOC: A recordable MD has an area for recording so-called UTOC
(User's Table of Contents) data. The UTOC contains number
of tracks, playing time, written data, and other rewritable
information.
Resetting the unit
This system uses a microcomputer so it may malfunction due to external
noise or interference. In such a case, unplug the power cord and remove the
batteries, then plug the power cord again and insert the batteries again.
For the U.S.A.
FCC WARNING:
This equipment may generate or use radio frequency energy. Changes or
modifications to this equipment may cause harmful interference unless the
modifications are expressly approved in the instruction manual. The user
could lose the authority to operate this equipment if an unauthorized change
or modification is made.
NOTE:
This equipment has been tested and found to comply with the limits for a
Class B digital device, pursuant to Part 15 of the FCC Rules. These limits are
designed to provide reasonable protection against harmful interference in a
residential installation. This equipment may cause harmful interference to
radio communications, if it is not installed and used in accordance with the
instructions. However, there is no guarantee that interference will not occur
in a particular installation. If this equipment does cause harmful interference
to radio or television reception, which can be determined by turning the
equipment off and on, the user is encouraged to try to correct the interference by one or more of the following measures:
—
—
—
—
Reorient or relocate the receiving antenna.
Increase the separation between the equipment and receiver.
Connect the equipment into an outlet on a circuit different from that
to which the receiver is connected.
Consult the dealer or an experienced radio/TV technician for help.
For CANADA
Canadian IC Compliance Notice
NOTICE : This Class B digital apparatus meets all requirements of the
Canadian interference-Caussig Equipment Regulations.
DMC-K3(EN) 4