1
®
ELECTRIC
Ui LT-I
OVE
HORNO
:
........
i
Models, Modelos 790. 4045_',-"
-'-
Sears Roebuck
www.sears.com
and Co., Hoffman
Color number, nL_mero de color
Estates,
IL 60179 U.S.A.
PIN 318205132 Rev. A (0805)
Table of Contents
Wall Oven Warranty .......................................................
2
Product Record ..............................................................
2
Serial Plate Location ......................................................
2
IMPORTANT SAFETY INSTRUCTIONS ....................... 3-4
Wall Oven Features ........................................................
5
Oven Vent and Racks .....................................................
6
Air Circulation in the Oven ............................................
6
Control Pad Features .....................................................
7
Setting the Oven Controls ........................................
8=13
Self=Cleaning ...........................................................
14-15
General Care & Cleaning ........................................
16-17
Adjusting the Oven Temperature ................................ 18
Before You Call ........................................................
18-19
Notes .............................................................................
20
Protection Agreements ................................................
Sears Service ................................................................
21
22
Please carefully read and save these instructions
This Use & Care Manual contains general operating instructions for your appliance and feature information for several
models. Your product may not have all the described features. The graphics shown are representative. The graphics on
your appliance may not look exactly like those shown. Common sense and caution must be practiced when installing,
operating and maintaining any appliance.
Kenmore Warranty
When installed, operated and maintained according to all instructions supplied with the product, if this appliance fails due to a defect
in material and workmanship within one year from the date of purchase, call 1-800-4-MY-HOME® to arrange for free repair.
This warranty applies for only 90 days from the date of purchase if this appliance is ever used for other than private family
purposes.
This warranty covers only defects in material and workmanship. Sears will NOT pay for:
1. Cracks in a ceramic glass cooktop that are not a result of thermal shock.
2. Stains and scratches on a ceramic glass cooktop resulting from accident or improper operation or maintenance.
3. Expendable items that can wear out from normal use, including but not limited to filters, belts, light bulbs, and bags.
4. A service technician to instruct the user in correct product installation, operation or maintenance.
5. A service technician to clean or maintain this product.
6. Damage to or failure of this product if it is not installed, operated or maintained according to the all instructions
supplied with the product.
7. Damage to or failure of this product resulting from accident, abuse, misuse or use for other than its intended purpose.
8. Damage to or failure of this product caused by the use of detergents, cleaners, chemicals or utensils other than those
recommended in all instructions supplied with the product.
9. Damage to or failure of parts or systems resulting from unauthorized modifications made to this product.
Disclaimer of implied warranties; limitation of remedies
Customer's sole and exclusive remedy under this limited warranty shall be product repair as provided herein. Implied
warranties, including warranties of merchantability or fitness for a particular purpose, are limited to one year or the
shortest period allowed by law. Sears shall not be liable for incidental or consequential damages. Some states and
provinces do not allow the exclusion or limitation of incidental or consequential damages, or limitation on the duration of
implied warranties of merchantability or fitness, so these exclusions or limitations may not apply to you.
This warranty applies only while this appliance is used in the United States or Canada.
This warranty gives you specific legal rights, and you may also have other rights which vary from state to state.
Sears, Roebuck and Co., Hoffman Estates, IL 60179 - Sears Canada Inc., Toronto, Ontario, Canada M5B 2B8
Product Record
In this space below, record the date of purchase, model
and serial number of your product. You will find the model
and serial number printed on the serial plate.
790.
Model No.
Serial No.
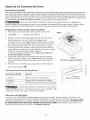
Serial Plate
Location
You will find the model and
serial number printed on the
serial plate. The serial plate
is located along the interior
side trim and visible when
Date of purchase
the oven door is opened.
Save these instructions and your sales receipt for future
reference.
Remember to record the
serial number for future
reference.
Printed in United States
important Safety instructions
Read all instructions
before using this appliance.
Save these instructions for future reference.
This manual contains important safety symbols and instructions. Please pay attention to these symbols and follow all
instructions given.
This symbol will help alert you to situations that may cause serious bodily harm, death or property damage.
This symbol will help alert you to situations that may cause bodily injury or property damage.
• Remove all tape and packaging before using the
appliance. Destroy the carton and plastic bags after
unpacking the appliance. Never allow children to play
with packaging material.
• Proper Installation. Be sure your appliance is
properly installed and grounded by a qualified
technician in accordance with National Electrical
Code ANSI/NFPA No.70 (USA) or CSA C22.1, PART 1
(Canada)=latest edition and local code requirements.
install only per installation instructions provided in the
literature package for this appliance.
Sears Parts & Repair is the recommended repair service
for this appliance. Know how to disconnect the electrical
power to the appliance at the circuit breaker or fuse box in
case of an emergency.
Electronic
controllers can be damaged
by cold temperatures. When you use your appliance
for the first time, or if it has not been used for a long
period of time, make sure that it has been exposed to a
temperature above 0°C/32°F for at least 3 hours before
connecting it to the power supply.
• User Servicing. Do not repair or replace any part of
the appliance unless specifically recommended in
the manuals. All other servicing should be done only by
a qualified technician to reduce the risk of personal injury
and damage to the appliance.
• Never modify or alter the construction
of an
appliance by removing panels, wire covers or any
other part of the product.
• Remove the oven door from any unused appliance if
it is to be stored or discarded.
_ens
can tip.
• injury to persons could result.
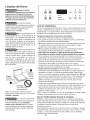
• Install mounting
brackets
packed
with the wall oven.
• See Installation instructions.
To reduce the risk of tipping, the wall
oven must be secured by properly
installed mounting brackets provided
with the wall oven. Refer to the
Installation instructions for proper
mounting bracket installation.
Stepping, leaning, sitting or pulling
down on the door of this appliance can result in
serious injuries and may also cause damage to the
appliance. Do not allow children to climb or play around
the appliance.
• Storage on Appliance. Flammable materials should
not be stored in the oven. This includes paper,
plastic and cloth items, such as cookbooks,
plasticware and towels, as well as flammable liquids.
Do not store explosives, such as aerosol cans, on or
near the appliance. Flammable materials may explode
and result in fire or property damage.
Do not use the oven for storage.
Do not store items of interest to
children in the cabinets above an appliance. Children
climbing on the appliance to reach items could be
seriously injured.
• Do not leave children alone. Children should not
be left alone or unattended in the area where an
appliance is in use. They should never be allowed to
sit or stand on any part of the appliance.
• DO NOT TOUCH BAKE AND BROiLiNG ELEMENTS
OR AREAS NEAR THESE ELEMENTS. Baking and
broiling elements may be hot even though they are dark
in color. Areas near elements may become hot enough
to cause burns. During and after use, do not touch, or
let clothing or other flammable materials touch these
areas until they have had sufficient time to cool.
• Wear Proper Apparel. Loose=fitting or hanging
garments should never be worn while using the
appliance. Do not let clothing or other flammable
materials contact hot surfaces.
Never use your appliance
or heating the room.
for warming
• Do Not Use Water or Flour on Grease Fires.
Smother the fire with a pan lid, or use baking soda,
a dry chemical or foam=type extinguisher.
• When heating fat or grease, watch it closely.
Fat or
grease may catch fire if allowed to become too hot.
• Use Only Dry Potholders. Moist or damp
potholders on hot surfaces may result in burns
from steam. Do not let the potholders touch hot
heating surface units. Do not use a towel or other
bulky cloth instead of a potholder.
important Safety instructions
• Do Not Heat Unopened Food Containers. Buildup of
pressure may cause the container to burst and
result in injury.
IMPORTANT--Do
not attempt to operate the appliance
during a power failure. If power fails, always turn off the
appliance. If the appliance is not turned off and the power
resumes, it will begin to operate again. Once the power
resumes, reset the clock and oven function.
iMPORTANT iNSTRUCTiONS
YOUR OVEN
FOR CLEANING
• Clean the appliance regularly to keep all parts free of
grease that could catch fire. Exhaust fan ventilation
hoods and grease filters should be kept clean. Do not
allow grease to accumulate. Greasy deposits in the fan
could catch fire. Refer to the hood manufacturer's
instructions for cleaning.
FOR USING
SELF-CLEANING
• Use Care When Opening an Oven DooriStand
to the
side of the appliance when opening the door of a hot
oven. Let hot air or steam escape before you remove or
replace food in the oven.
• Keep Oven Vent Ducts Unobstructed. The wall oven is
vented at the upper control panel or at the center trim
depending of the model. Touching the surfaces in this
area when the wall oven is operating may cause severe
burns. Also, do not place plastic or heat-sensitive items
near the oven vent. These items could melt or ignite.
= Placement of Oven Racks. Always place oven racks in
desired location while oven is cool. Remove all utensils
from the rack before removing rack. If rack must be
moved while oven is hot, use extreme caution. Use pot
holders and grasp the rack with both hands to reposition.
Do not let pot holders contact the hot oven element or
interior of the oven.
= Do not use your broiler pan without its insert. Broiler
pan and grid allow dripping fat to drain and be kept away
from the high heat of the broiler.
= Do not cover broiler grid or oven bottom with
aluminum foil. Exposed fat and grease could ignite.
= Do not touch a hot oven light bulb with a damp cloth.
Doing so could cause the bulb to break. Disconnect the
appliance or shut off the power to the appliance before
removing and replacing the bulb.
• Protective liners--Do not use aluminum foil to line the
oven bottom. Only use aluminum foil as recommended
this manual. Improper installation of these liners may
result in risk of electric shock, or fire.
iMPORTANT iNSTRUCTiONS
YOUR OVEN
in
OVEN MODELS
• Clean in the self=cleaning cycle only the parts of the
appliance listed in this Owner's Guide. Before using the
self-cleaning cycle of the appliance, remove all utensils
stored in the appliance.
• Do not clean the oven door gasket. The door gasket is
essential for a good seal. Care should be taken not to rub,
damage or move the gasket.
• Do not use oven cleaners. No oven cleaner or oven liner
protective coating of any kind should be used in or around
any part of the appliance
The health of some birds is extremely
sensitive to the fumes given off during the self-clean cycle
of any wall oven. Move birds to another well ventilated
room.
IMPORTANT
SAFETY
NOTICE
The California Safe Drinking Water and Toxic Enforcement
Act requires the Governor of California to publish a list of
substances known to the state to cause cancer, birth
defects or other productive harm, and requires businesses
to warn customers of potential exposure to such
substances.
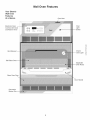
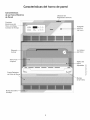
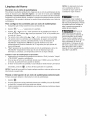
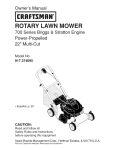
Wall Oven Features
Your Electric
Wall Oven
Features
At a Glance
Oven Vent
Electronic Oven
Controls with Clock
and Kitchen Timer
Oven
Light
Interior
Broil Element
i
iiil
................
Oven Light
...........
ii.......
Self-Clean
Adjustable
Racks
Glass Oven Door
Door Handle
Decorative
Bottom Trim --
\
\
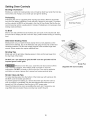
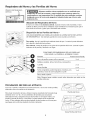
Oven Vent and Racks
Oven Vent Location
Some models are equipped with a blower which runs in baking and
self=cleaning mode to keep all internal components at a cool temperature. The
blower may keep running even ifthe oven has been turned off, until the components
have cooled down.
Oven Vent Location
j
.........
@
The oven is vented through the upper trim. When the oven is on, warm air is released
through the vent. This venting is necessary for proper air circulation in the oven and good
baking results.
Arranging
Oven
Racks
ALWAYS ARRANGE OVEN RACKS WHEN THE OVEN IS COOL (PRIOR TO
OPERATING THE OVEN). Always use oven mitts when using the oven.
To remove an oven rack, pull the rack forward until it stops. Lift up front of rack and slide
out.
To replace an oven rack, fit the rack onto the guides on the oven walls. Tilt the front of
the rack upward and slide the rack back into place.
Rack
RECOMMENDED
RACK POSITIONS
BROILING & BAKING
positions
Food
FOR
Rack position
Broiling meats, chicken or fish
3 or 4
Cookies, cakes, pies, biscuits & muffins
1 rack
Multiple racks
2 or 3
2& 4
Frozen pies, angel food cake, yeast, bread,
casseroles, small cuts of meat or poultry
1 or 2
Turkey, roast or ham
1
Note: Always use caution when removing food.
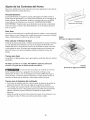
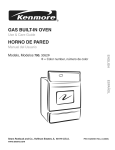
Air Circulation
in the Oven
If using 1 rack, place in center of oven. If using multiple racks, stagger
cookware as shown.
For best air circulation and baking results allow
cookware for proper air circulation and be sure
touch each other, the oven door, sides or back
must circulate around the pans and cookware
reach around the food.
2-4" (5-10 cm) around the
pans and cookware do not
of the oven cavity. The hot air
in the oven for even heat to
1 Oven Rack
Multiple Oven Racks
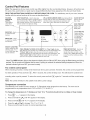
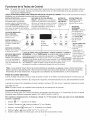
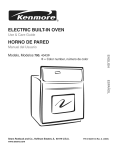
Control Pad Features
Note: The appearance of your oven control may differ slightly from the one illustrated below. However, all functions are
the same. Also, push buttons or pads may be shaped differently than those appearing in this Use and Care Guide•
READ THE INSTRUCTIONS CAREFULLY BEFORE USING THE OVEN.
familiar with the various functions of the oven as described below•
FEATURE
INDICATOR
LIGHTS--
STOP CLEAR PAD-- Used to clear any
function previously entered except the time of
day and minute timer. Press STOP CLEAR to
stop cooking. Also the STOP CLEAR pad is
used to activate oven I_ckout setting.
\
These light to
show which
feature is in use.
For satisfactory use of your oven, become
UP and DOWN ARROWS PADS Used along with the
function pads to select oven temperature, cook time,
start time (when programming an automatic start
time), time of day, clean time and minute timer.
CLOCK SET PAD
Used to set the
time of day.
COOK TIME PAD
Used to enter the
length of the
baking time.
®
STOP TIME PAD
Used to set the
BAKE PAD--Used
to select the bake
function.
®
®
Q Oven
BROIL PAD-- Used
to select the variable
broil function.
•
®
Q Preheat
desired stop time
for baking. May
be used with
COOK TIME to
program a
delayed bake
cycle,
Q Doer Locked
/
SELECT CLEAN PAD
Used to select the Self-
Cleaning cycle. A 2 or
3 hours Self-Clean time
may be selected.
I
\
OVEN, PREHEAT & DOOR LOCK LIGHTS* The "Oven" light will glow
each time the oven unit turns on to maintain the set oven temperature. The
"Preheat"
light will glow when the oven is first set to operate, or if the
desired temperature is reset higher than the actual oven temperature. The
"Door Locked" light will flash until the door locks when the self-clean
cycle is in use. It glows constantly after the door locks.
TIMER SET/OFF PAD Used to set
or cancel the minute timer. The
minute timer does not start or stop
cooking. Also, TIMER SET/OFF Pad
is used to set the Continuous Bake
Featu re.
*Note: The OVEN indicator light on the electronic display wi!l turn ON and OFF when using the Bake feature and during
preheati This is normal and indicates that the oven is cycling t0 maintain the selected baking temperaturel Whe n the
preheat indicator light turns OFF, your oven is ready.
For a silent control
panel
When choosing a function, a beep will be heard each time a pad is pressed. If desired, the control can be programmed
for silent operation• Press and hold
_,_,_After 7 seconds, the control will beep once. This will block the controls from
sounding when a pad is pressed• To return the sound, press and hold' _,,_ again for 7 seconds until the control beeps
once.
Note: The control will return to the audible mode after a power outage.
Temperature
conversion
The electronic oven control is set to operate in °F (Fahrenheit) when shipped from the factory. The oven can be
programmed for any temperature from 170°F to 550°F (77°C to 287°C).
To change the temperature
to °C (Celsius)
or from °C to °F (control
1
Press
"-- --" appears in the display.
2.
Press and hold the A
3.
Press and hold _il
4.
5.
Press the A
or V
to change °Fto °C or °C to °F.
Press any control pad to return to normal operating mode.
until "HI" appears in the display.
until °F or
oC
appears in the display.
should
not be in a Bake or Clean mode):
.............
...............
""'
..................
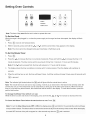
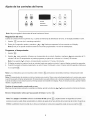
Setting Oven Controls
0
F:_ 3 sec
....................................
'qi '
® Oven
®
o
O Preheat
Stop
Time
®OoerLocked
Note: The time 0f day must first be Setin order t0 operate the oven:
To Set the Clock
When the range is first plugged in, or when the power supply to the range has been interrupted, the display will flash
"12:00".
1.
Press
once (do not hold pad down).
2.
Within 5 seconds, press and hold the A
or V
until the correct time of day appears in the display.
Note: The clock cannot be changed during any timed bake or Self-Clean cycle.
To Set the Minute Timer:
1
•
2.
Press
;Timer
Set/Off
•
Press the A
to increase the time in one minute increments• Press and hold the _to
increase the time in 10
minute increments• The timer can be set for any amount of time from 1 minute to 11 hours and 59 minutes•
Note: If the V
3.
pad is pressed first, the timer will advance to 11 hours and 59 minutes•
The display shows the timer countdown in minutes until 1 minute remains• Then the display will countdown in
seconds•
4.
When the set time has run out, the timer will beep 3 times, it will then continue to beep 3 times every 60 seconds until
T,mo, is pressed.
Set/0ff
Note: The indicator light located above the 'T,
mo,_so,0e
pad will glow while the minute timer is active.
Note: The minute timer does not start or stop cooking. It serves as an extra timer in the kitchen that will beep when the
set time has run out. The minute timer can be used alone or during any of the other oven functions. When the minute
timer is in use with any other function, the minute timer will be shown in the display. To view other functions, press the
pad for that function.
To Change the Minute Timer while it is in use:
While the timer is active and shows in the display, press and hold the _
To Cancel the Minute Timer before the set time has run out: Press
Note:T0
turn the time of day display OFF or ON in the disPlaY press
or V
to increase or decrease the time.
Set/0fl
and h01d fOr ! 5 Seconds (the c0ntr01 will beep
once) and then release_ This feature does not remove the set time of day from the memory of the control, When the display
iS turned OFF the time of day will re,appear for a few seconds anY t!me the IIQ
8
pad iStouche&
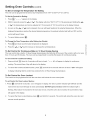
Setting Oven Controls
(cont'd)
To Set or Change
for Baking
the Temperature
The oven can be programmed to bake at any temperature
To Set the Controls
for Baking:
1
Press _.
2.
Within 5 seconds, press the ,/_
or V,
3.
from 170°F to 550°F (77°C to 287°C).
"
"' appears in the display.
the temperature
As soon as the A
The display will show "350°F (177°C)." By pressing and holding the A
can then be adjusted in 5°F increments (1°C if the control is set to display Celsius).
or V
displayed temperature
or V.
pad is released, the oven will begin heating to the selected temperature.
When the
reaches the desired baking temperature, the preheat indicator light will turn OFF and the
control will beep 3 times.
4.
To cancel baking, press
To Change the Oven Temperature
1
Press _
2.
Press the _
after Baking has Started:
and make sure the bake temperature
or V
To Set Control
is displayed,
pad to increase or decrease the set temperature•
for Continuous
Bake or 12 Hour Energy
Saving
The oven control has a built-in 12 Hour Energy Saving feature that will shut off the oven if the control is left on for more
than 11 hours and 5g minutes. The oven can be programmed to override this feature for continuous baking.
To set control
1
•
Press
for continuous
and hold
Set/Off
baking:
down for 5 seconds
until tone is heard, "
--
--
hr" will appear in display for continuous
cooking. The current time of day will return to the display.
2.
To cancel the Continuous Bake function, press T.,O,,o,_0,,
and hold for 5 seconds until tone is heard. "12hr" will appear
in display indicating that the control has returned to the 12 Hour Energy Saving feature.
To Set Control
for Oven
Lockout
The control can be programmed to lock the oven door and lockout the oven control pads.
To set Control for Oven Lockout feature:
1. Press
and hold for 3 seconds. "Loc" will appear in display, the "Door Locked" indicator light will flash and the
motor driven door lock will begin to close automatically.
DO NOT open oven door while the indicator light is
flashing. Allow about 15 seconds for the oven door to lock. Once the oven door is locked, the current time of day
will appear in the display.
2.
To cancel the Oven Lockout feature, press
resume normal operation.
and hold for 3 seconds. The control will unlock the oven door and
::::::::::
.......
Setting Oven Controls
To Set the Timed
(cont'd)
Bake and Delay Start Features
The c00,T,
oo COOK TiME and _'°"T,,,o
STOP TiME pads operate the features that will turn the oven ON and OFF at the times
you select in advance. The oven can be programmed to start immediately and shut off automatically
begin baking at a later time with a delayed start time (Delay Start).
Note:
(Timed Bake) or to
During Timed Bake the preheat indicator light Will not fUnctionl
To Program the Oven to Begin Baking
Immediately
and To Shut Off Automatically
1.
Be sure that the clock shows the correct time of day.
2.
Place the food in the oven.
3.
Press B_:_.
4.
Within 5 seconds, press the j_,
or V.
(Timed Bake):
The display will show "350°F (177°C)." By holding the j_,
or V,
the
or V,
the
temperature can then be adjusted in 5°F increments (1°C if the control is set to display Celsius).
5.
Press 'c00,
...... . "0:00" will flash in the display (HR:MIN).
6.
Press the ,/_
7.
The oven will turn ON and begin heating.
or V
until the desired baking time appears in the display.
To Program Oven for a Delayed Start Time and to Shut-Off
1.
Be sure that the clock shows the correct time of day.
2.
Place the food in the oven.
3.
Press
4.
Within 5 seconds, press the j_,
or V.
Automatically
(Delayed Start Bake):
The display will show "350°F (177°C)." By holding the j_,
temperature can then be adjusted in 5°F increments (1°C if the control is set to display Celsius).
5.
Press ..... . "0:00" will flash in the display (HR:MIN).
6.
Press the ,_
7.
Press
8.
Press the A
9.
Once the controls are set, the control calculates the time when baking will stop in order to start at the time you have
or V
until the desired baking time appears.
_,_. The earliest possible start time will appear in the display.
or V
until the desired start time appears in the display.
set.
10. The oven will turn ON at the delayed start time and begin heating.
When the Set Bake Time Runs Out:
a. "END" will appear in the display window and the oven will shut-off automatically.
b.
The control will beep 3 times every 60 seconds until .... ....is pressed.
To Change the Oven Temperature or Bake Time after Baking
1. Press the function pad you want to change.
2. Press the A
or V
to adjust the setting.
has Started:
Use caution with the Timed Bake and Delayed Start features. Foods that can easily spoil such as milk,
eggs, fish, meat or poultry, should be chilled in the refrigerator first. Even when chilled, they should not stand in the oven
for more than 1 hour before cooking begins, and should be removed promptly when cooking is completed.
10
Setting Oven Controls
Oven
Baking
For best cooking results, heat the oven before baking cookies, breads, cakes, pies or pastries, etc. There is no need to
preheat the oven for roasting meat or baking casseroles.
The cooking times and temperatures
needed to bake a product may vary slightly from your previously owned appliance.
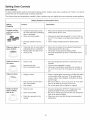
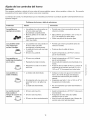
Baking Problems and Solutions
Baking
Problems
Cookies and bis=
cuits burn on the
bottom.
Causes
•
•
Cakes too dark on
top or bottom.
•
•
Cakes not done in
the center.
Cakes not JeveJ.
Chart
Corrections
Cookies and biscuits put into
the oven before the preheating
time is completed.
Oven rack overcrowded.
•
Dark pan absorbs heat too
fast.
•
Cakes put into the oven before
preheating time is completed.
Rack position too high or low.
Oven too hot.
Allow oven to preheat to the selected temperature
before placing food in oven.
Choose pan sizes that will permit 5.1 cm to 10.2 cm
(2" to 4") of air space on all sides when placed in the
ove n.
Use a medium-weight aluminum baking sheet.
Allow oven to preheat to the selected temperature
before placing food in the oven.
Use proper rack position for baking needs.
Set oven temperature 25°F/12°C lower than recommended.
Oven too hot.
Set oven temperature 25°F/12°C lower than recommended.
•
•
Incorrect pan size.
Pan not centered in oven.
Use pan size suggested in recipe.
Use proper rack position and place pan so there is
5.1 cm to 10.2 cm (2" to 4") of space on all sides of
pan.
•
Range not level.
Place a marked glass measuring cup filled with water
on the center of the oven rack. If the water level is
uneven, refer to the installation instructions for leveling the range.
Be sure to allow 5.1 cm to 10.2 cm (2" to 4") of clearance on all sides of each pan in the oven.
Do not use pans that are dented or warped.
Pan too close to oven wall or
rack overcrowded.
•
Pan warped.
Foods not done
Oven too cool.
when cooking
time is up.
Oven overcrowded.
•
Oven door opened too frequently.
•
•
11
Set oven temperature 25°F/12°C higher than suggested and bake for the recommended time.
Be sure to remove all pans from the oven except the
ones to be used for baking.
Open oven door only after shortest recommended
baking time.
iiil
................
...........
ii.......
Setting Oven Controls
Broiling
information
Broiling is a method of cooking tender cuts of meat by direct heat under the broil element of the oven. Always use a broiler pan and grid for broiling.
Preheating
Preheating the oven is suggested when searing rare steaks. (Remove all utensils
from the oven before preheating. Foods will stick if placed on hot metal.) To preheat,
set the control(s) to BROIL as instructed in this Use & Care Guide. Wait for the element to become red-hot, usually about 2 minutes. Preheating is not necessary when
broiling meats weGdone.
Broil Stop Position
/
/
To Broil
Broil on one side until the food is browned; turn and cook on the second side. Season and serve. Always pull rack out to the "stop" position before turning or removing
food.
Determine
Broiling
Grid
Times
Broiling times vary, so watch the food closely. Time not only depends on the
distance from element, but on the thickness and aging of meat, fat content and
doneness preferred. The first side usually requires a few minutes longer than
second. Frozen meats also require additional time.
Broiling
Tips
Broiler pan and its grid allow dripping grease to drain and be kept away from
the high heat of the broiler.
DO NOT use a pan without its grid. DO NOT cover the grid with foil. The
exposed grease could ignite.
Broiler Pan
Should an oven fire occur, close the oven door and turn off the
oven. If the fire continues, throw baking soda on the fire or use a fire
extinguisher. DO NOT put water or flour on the fire. Flour may be explosive
and water can cause a grease fire to spread and cause personal injury.
Broiler
Clean-Up
Tips
To make cleaning easier, line the bottom of the broiler pan with aluminum foil.
DO NOT cover the broiler grid with foil.
To prevent grease from baking on, remove the broiler pan from the oven as
soon as cooking is completed. Use hot pads because the broiler pan is extremely hot. Pour off grease. Soak the pan in HOT, soapy water.
Clean the broiler pan as soon as possible after each use. If necessary, use
soap-filled steel wool pads. Heavy scouring may scratch the grid.
12
(Supplied
with some models)
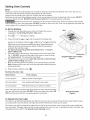
Setting Oven Controls
Broil
Broiling is a method of cooking tender cuts of meat by direct heat under the broil element of the oven. Be sure you
center the broiler pan directly under the broil element for best results.
Arrange oven rack while oven is still cool. Position the rack as needed.
Broiler pan and its insert allow dripping grease to drain and be kept away from the high heat of the broiler. DO NOT
use a pan without its insert. DO NOT cover the insert with foil. The exposed grease could ignite.
Should an oven fire occur, close the oven door and turn off the oven. If the fire continues, throw baking
soda on the fire or use a fire extinguisher. DO NOT put water or flour on the fire. Flour may be explosive and water can
cause a grease fire to spread and cause personal injury.
To Set for Broiling:
1.
,
3.
Arrange the oven rack while oven is still cool. Position the rack as
suggested in the Broil Rack Position Table below.
Press
"---
"will appear in display.
Press and hold the A
or V
until the desired broil setting level
appears in the display. Press the A
4.
5.
6.
7.
8.
Grid
for HI broil or the V
for LO broil.
Most foods may be broiled at the HI broil setting. Select the LO broil
setting to avoid excess browning or drying of foods that should be
cooked to the well-done stage.
For optimum browning, preheat broil element for 3 =4 minutes
before adding food.
Place the insert on the broil pan, then place the food on the insert (See
Fig. 1). DO NOT use the broil pan without the insert or cover the insert
with aluminum foil. The exposed fat could ignite.
Place the pan on the oven rack. Open the oven door to the broil stop
position when broiling (See Fig 2).
Broil on one side until food is browned. Turn and broil food on 2nd side.
Note: Always pull the oven rack out to the stop position before turning or
removing the food.
(Supplied
with some models)
Figure 1
When broiling is finished, press
Broil Rack Position Table
Rack Position
Food category
1st rack position
Medium steaks & hamburgers
2nd rack position
Fish, medium-well
3rd rack position
Well-done foods such as chicken & lobster
steaks & pork chops
Note: The broiler pan and the insert allows grease to drain and be kept away
from the high heat of the broiler. DO NOT use the pan without the insert. DO
NOT cover the insert with foil; the exposed grease could ignite.
To Operate
Broil Stop Position
Figure 2
the Oven Light
The interior oven light will automatically turn ON when the oven door is opened. Press the Oven Light Switch located
on control panel to turn the interior oven light ON and OFF whenever the oven door is closed.
The interior oven light is located at the upper left rear wall of the oven interior and is covered with a glass shield held
by a wire holder. The glass shield must be in place whenever the oven is in use. To change the interior oven light, see
"Changing the Oven Light" in the General Care & Cleaning section.
13
Self=Cleaning
During the self=cleaning
cycle, the outside of the oven can
become very hot to the touch. DO NOT
leave small children unattended near
the appliance.
•
_l 3 see
,0v0,,
®
Q Preheat
ii
ii ,
Timer
;: Set/Off
• Door Locked
The health of some birds is
extremely sensitive to the fumes given off
during the self-clean cycle of any wall
oven. Move birds to another well ventilated
room.
DO NOT line the oven
wails, racks, bottom or any other part of
the appliance with aluminum foil. Doing so
will destroy heat distribution, produce poor
baking results and cause permanent
damage to the interior (aluminum foil will
melt to the interior surface of the oven).
DO NOT force the oven
door open. This can damage the automatic
door locking system. Use caution when
opening the door after the Self-Cleaning
cycle is completed. The oven may still be
VERY HOT.
DO Hand
Clean Frame
DO Hand
Clean Door
DO NOT Hand Clean
Oven Door Gasket
Note: See additional cleaning information
for the oven door in the General Care &
Cleaning section.
The oven bake and broil
elements may appear to have cooled after
they have been turned OFF. The
elements may still be hot and burns may
occur if these elements are touched
before they have cooled sufficiently.
What to Expect
during
Self-Cleaning
,
Stop
33me
...................................
Oven
A Self-Cleaning oven cleans itself with high temperatures (well above
cooking temperatures) which eliminate soils completely or reduces them to
a fine powdered ash you can wipe away with a damp cloth.
Adhere to the following cleaning precautions:
•
Allow the oven to cool before cleaning.
•
Wear rubber gloves when cleaning any exterior parts of the oven
manually.
•
DO NOT clean the oven door gasket. The woven material of the oven
door gasket is essential for a good seal. Care should be taken not to
rub, damage or remove the gasket.
DO NOT use any cleaning materials on the oven door gasket. Doing
so could cause damage.
Remove all utensils and any aluminum foil from the oven. These
items cannot withstand high cleaning temperatures.
•
Oven racks may be removed or left in the oven during the self-clean
cycle for cleaning. If the racks are cleaned in the self-clean cycle, their
color will turn slightly blue and the finish will be dull. After the self-clean
cycle is completed and the oven has cooled, rub the sides of the racks
with wax paper or a cloth containing a small amount of baby oil or
salad oil (this will make the racks glide easier into the rack positions).
•
Remove any excessive spillovers in the oven cavity before starting
the Self-Cleaning cycle. To clean, use hot, soapy water and a cloth.
Large spillovers can cause heavy smoke or fire when subjected to high
temperatures. DO NOT allow food spills with a high sugar or acid
content (such as milk, tomatoes, sauerkraut, fruit juices or pie filling) to
remain on the surface as they may leave a dull spot even after
cleaning.
,, Clean any soil from the oven frame, the door liner outside the oven
door gasket and the small area at the front center of the oven bottom.
These areas heat sufficiently to burn soil on. Clean with soap and
water.
NOTE: Prior to setting the Self-Clean cycle, any spills remaining on the
oven bottom should be removed.
Some models have an exposed Bake element in the lower oven cavity. On
these models the bake element is designed to be tilted up using your hand
from the front of the bake element. This will allow easier access to the oven
bottom for cleaning. Be careful not to raise the element more than 4 or 5
inches from the resting position.
Cleaning
While the oven is in operation, the oven heats to temperatures much higher than those used in normal cooking. Sounds of
metal expansion and contraction are normal. Odor is also normal as the food soil is being removed. Smoke may appear
through the oven vent.
If heavy spillovers are not wiped up before cleaning, they may flame and cause more smoke and odor than usual. This is
normal and safe and should not cause alarm. If available, use an exhaust fan during the self-cleaning cycle.
14
Self-Cleaning
(cont'd)
Starting
the Select Self-Clean
Cycle
For satisfactory results, use a 2 hour Self-Clean cycle for light soils and a 3 hour
cycle for average to heavy soils. NOTE: The kitchen area should be well
ventilated using an open window, ventitlation fan or exhaust hood during the 1st
Self-Clean cycle. This will help eliminate the normal odors associated with the 1st
Self-Clean cycle.
To Set the Controls
for a Self-Clean
1.
Be sure the clock shows the correct
2.
Press
3.
Press
V
.
Clean
ml
"------
the A
appears
Cycle
in the display for a 3 hour cycle, or press
until "2:00" appears in the display for a 2 hour cycle.
As soon as A
or V
burns use care when opening the
oven door after the Self-Cleaning
cycle. Stand to the side of the oven
when opening the door to allow hot
air or steam to escape.
DO NOT force the
time of day.
in the display.
until "3:00" appears
To avoid possible
oven door open. This can damage
the automatic door locking system.
Use caution and avoid possible
burns when opening the door after
the Self-Cleaning
cycle has
completed. The oven may still be
VERY HOT.
is released, "CLn" appears in the display.
5.
As soon as the controls are set, the motor driven lock will begin to close
automatically and the "Door locked" indicator light will flash. DO NOT open
the oven door while the light is flashing (it takes about 15 seconds for the
oven door to lock).
6.
The "Door locked" indicator light will glow until the Self-Cleaning cycle is
iiil
................
complete or cancelled and the oven temperature
has cooled.
...........
ii.......
When the Self-Clean
1.
2.
3.
Cycle is Completed:
The time of day or "End" will appear in the display window and the "Clean"
and "Door locked" light will continue to glow.
Once the oven has cooled down for about 1 HOUR and the "LOCK" light has
gone out, the oven door can be opened.
If "End" is in the display and the Select Clean indicator light remains ON,
press
The time of day will appear in the display.
NOTE: When the oven is cool, wipe away any residue or powdered ash with a
damp cloth or paper towel.
Stopping
or Interrupting
a Select
Self-Cleaning
Cycle
if it becomes necessary to stop or interrupt a Self-Cleaning cycle:
1.
Press _.
2.
Once the oven has cooled down for about 1 HOUR and the "Door locked"
3.
light has gone out, the oven door can be opened.
Restart the Self-Clean cycle once all conditions have been corrected.
15
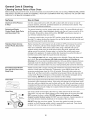
General Care & Cleaning
Cleaning Various Parts of Your Oven
Before cleaning any part of the oven, be sure all controls are turned OFF and the oven is COOL. REMOVE SPILLOVERS
AND HEAVY SOILING AS SOON AS POSSIBLE. REGULAR CLEANINGS NOW WILL REDUCE THE EXTENT AND
DIFFICULTY OF MAJOR CLEANING LATER.
Surfaces
How to Clean
Aluminum (Trim Pieces)
& Vinyl
Use hot, soapy water and a cloth. Dry with a clean cloth. Do not scour or use allpurpose cleaners, ammonia, powdered cleaners or commercial oven cleaner. They
can scratch and discolor aluminum.
Painted and Plastic
For general cleaning, use hot, soapy water and a cloth. For more difficult soils and
built-up grease, apply a liquid detergent directly onto the soil. Leave on soil for 30 to
60 minutes. Rinse with a damp cloth and dry. DO NOT use abrasive cleaners on
any of these materials; they can scratch.
Control Panel, Body Parts,
and Decorative Trim
To remove control knobs, turn to the OFF position; grasp firmly and pull straight off
the shaft. To replace knobs after cleaning, line up the flat sides of both the knob and
the shaft; then push the knob into place.
Stainless Steel, Chrome
Control Panel, Decorative
Trim
Before cleaning the controlpanel, turn all controls to OFF and remove the control
knobs. To remove, pull each knob straight off the shaft. Clean using hot, soapy
water and a dishcloth. Rinse with a clean water using a dishcloth. Be sure to
squeeze excess water from the cloth before wiping the panel; especially when
wiping around the controls. Excess water in or around the controls may cause
damage to the appliance.To replace knobs after cleaning, line up the flat sides of
both the knob and the shaft; then push the knob into place.
Clean stainless steel with hot, soapy water and a dishcloth. Rinse with clean water
and a cloth. Do not use cleaners with high concentrations
of chlorides or
chlorines. Do not use harsh scrubbing cleaners. Only use kitchen cleaners that are
especially made for cleaning stainless steel. Always be sure to rinse the cleaners
from the surface as bluish stains may occur during heating that cannot be removed.
Porcelain Enamel Broiler
Pan and Grid, Door Liner,
Body Parts
Gentle scouring with a soapy scouring pad will remove most spots. Rinse with a 1:1
solution of clear water and ammonia. If necessary, cover difficult spots with an
ammonia-soaked paper towel for 30 to 40 minutes. Rinse with clean water and a
damp cloth, and then scrub with a soap-filled scouring pad. Rinse and wipe dry with
a clean cloth. Remove all cleaners or the porcelain may become damaged during
future heating. DO NOT use spray oven cleaners on the cooktop.
Oven Rack
Oven racks may be removed or left in the oven during the self-clean cycle for cleaning.
If removed, follow instructions above. If the racks are cleaned in the self-clean cycle,
their color will turn slightly blue and the finish will be dull. After the self-clean cycle is
completed and the oven has cooled, rub the sides of the racks with wax paper or a cloth
containing a small amount of baby oil or salad oil (this will make the racks glide easier
into the rack positions).
Oven Door
Use soap & water to thoroughly clean the top, sides and front of the oven door.
Rinse well. You may use a glass cleaner on the outside glass of the oven door. DO
NOT immerse the door in water. DO NOT spray or allow water or the glass
cleaner to enter the door vents. DO NOT use oven cleaners, cleaning powders or
any harsh abrasive cleaning materials on the outside of the oven door.
DO Hand
Clean Frame
DO Hand
Clean Door
Oven Door
DO NOT clean the oven door gasket. The oven door gasket is made of a woven
material, on Self-Cleaning models, which is essential for a good seal. Care should
be taken not to rub, damage or remove this gasket.
Gasket
16
General Care & Cleaning
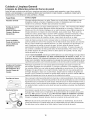
Hinge
suppor
e lever hook
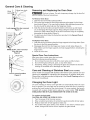
Removing
and Replacing
the Oven Door
The door is heavy. For safe, temporary storage, lay the door flat
with the inside of the door facing down.
To Remove Oven Door:
Lock engaged for door removal
Figure 1
1. Open the door to the fully opened position.
2. Pull up the lock located on both hinge supports and engage it in the hinge
lever hooks (Figure 1). You may have to apply a little downward pressure on
the door to pull the locks fully over the hinge lever hooks.
3. Grab the door by the sides and pull the bottom of the door up and toward
you to disengage the hinge supports. Keep pulling the bottom of the door
toward you while rotating the top of the door toward the range to completely
disengage the hinge levers (Figure 2).
4. To clean oven door, follow the instructions provided in the General Care &
Cleaning table.
To Replace Oven Door:
1. Grab the door by the sides; place the hinge supports in the hinge slots. Open
the door to the fully opened position.
2. Disengage the lock from the hinge lever hooks on both sides (Figure 3).
'
Note: Make sure the hinge supports are fully engaged before unlocking the
HINGE SLOT =Door removed
from the oven
Figure 2
Hinge lever
hinge levers.
........
ii
3. Close the oven door.
Special
:,:
Door Care Instructions
Most oven doors contain glass that can break.
Read the following recommendations:
1. Do not close the oven door until all the oven racks are fully in place.
2. Do not hit the glass with pots, pans, or any other object.
3. Scratching, hitting, jarring or stressing the glass may weaken its structure
causing an increased risk of breakage at a later time.
Care and Cleaning
Lock in normal position
Figure 3
Changing
/
of Stainless
Steel (somemodels)
Some models are equipped with stainless steel exterior parts. Special care and
cleaning are required for maintaining the appearance of stainless steel parts.
Please refer to the table provided at beginning of the Care & Cleaning section in
this Use & Care Manual.
the Oven
Light
On some models an interior oven light will turn automatically when the oven
door is opened. The oven light may be turned on when the door is closed by
pushing the knob located on the control panel. On some models, the lamp is
covered with a glass shield held in place by a wire holder. THE GLASS
SHIELD MUST BE IN PLACE WHENEVER THE OVEN IS IN USE.
To replace the light bulb:
CAUTION: BE SURE THE OVEN IS COOL.
1. Turn the power off at the main source.
2. Wear a leather-faced glove for protection against possible broken glass.
3. Replace bulb with 40-watt appliance bulb only.
4. For models with glass shield, press holder on one side to release glass
shield, change bulb and be sure to replace the glass shield.
17
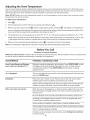
Adjusting the Oven Temperature
Your new oven has been factory calibrated and tested to ensure an accurate baking temperature. For the first few uses,
follow your recipe times and temperature recommendations carefully. If you feel your oven is too hot or too cool from your
baking experience, the oven temperature may be adjusted to your liking, see instructions below.
Note: DO NOT adjust your oven temperature
because they may not be accurate.
based on oven thermometers,
such as those found in grocery stores
To Adjust Oven Temperature:
1
2.
Press _
Set the temperature to 550°F (287°C) by pressing and holding the j_.
3.
Within 2 seconds, press and hold
until the 2 digit display appears. Release _.
The display now indicates the
amount of degrees offset between the original factory temperature setting and the current temperature setting. If the
oven control has the original factory calibration, the display will read "0."
4.
Thetemperaturecann_wbeadjustedup_rd_wn35°F(17°C)_in5°Fstepsbypressingandh_ldingthe
A
or V.
Adjust until the desired amount of offset appears in the display• When lowering the oven temperature, a minus sign
(-) will appear before the number to indicate that the oven will be cooler by the displayed amount of degrees•
5.
When you have made the desired adjustment,
Note: Oven temperature adjustments
press :_::
to go back to the time of day display•
made will not change the Self-Cleaning feature temperature.
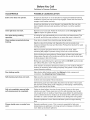
Before You Call
Solutions
to Common Problems
Before you call for service, review this list. It may save you time and expense. The list includes common occurrences that
are not the result of defective workmanship or materials in this appliance•
OCCURRENCE
POSSIBLE
CAUSE/SOLUTION
Oven Control Beeps and Displays
any F code error (example F11).
Electronic control has detected a fault condition. Press STOP/CLEAR to clear
the display and stop the beeping. Reprogram the oven. If a fault reoccurs,
record the fault number• Press STOP/CLEAR and call Sears or another
qualified servicer•
=dr=is displayed.
The door was left open and controls set for self-cleaning cycle. Close the door
and push CANCEL pad.
Installation.
Place oven rack in center of oven. Place a level on the oven rack. Contact
installing agent if rack and cabinet cutout flooring are not level•
Kitchen cabinet misalignment may make oven appear to be not level. Be sure
cabinets are square and level• Contact cabinet maker to correct problem•
Entire oven does not operate.
When the oven is first plugged in, or when the power supply to the oven has
been interrupted, the display will flash• The oven cannot be programmed until
the clock is set.
Be sure electrical cord is securely connected into the electrical junction box.
Cord/plug is not installed and/or connected• Cord is not supplied with oven.
Contact Sears or another qualified servicer•
Service wiring not complete• Contact Sears or another qualified servicer•
Power outage• Check house lights to be sure. Call your local electric company•
Short in cord/plug. Replace cord/plug.
Controls are not set properly• See instructions under Setting Oven Controls
to set the controls•
18
Before You Call
Solutions
to Common
Problems
OCCURRENCE
POSSIBLE
CAUSE/SOLUTION
Entire oven does not operate.
House fuse has blown or circuit breaker has tripped immediately following
installation. House fuse may not be fully engaged. Check fuse and screw or
engage circuit breaker securely.
House fuse has blown or circuit breaker has tripped after the oven has
been installed and previously operating. Call Sears or another qualified
servicer.
Oven light does not work.
Burned-out or loose bulb. Follow the instructions under Changing
Light to replace or tighten the bulb.
Fan noise during cooking
operation,
A cooling fan may automatically turn on and off to cool internal parts. This
is normal, and the fan may continue to run even after oven is turned off.
Oven smokes excessively
broiling.
during
Oven
Oven door is closed. Door should be open during broiling.
Meat too close to the broiler unit. Reposition the rack to provide more
clearance between the meat and the broiler. Preheat broil element for quick
searing operation.
Meat not properly prepared. Remove excess fat from meat. Slash
remaining fatty edges to prevent curling, but do not cut into the lean.
Grid on broiler pan wrong side-up. Grease does not drain into broiler pan.
Always place the grid on the broiler pan with the ribs up and the slots down
to allow grease to drip into the pan.
Broiler pan used without grid or grid cover with foil. DO NOT use the broiler
pan without the grid or cover the grid with foil.
Oven needs to be cleaned. Grease has built up on oven surfaces. Regular
cleaning is necessary when broiling frequently. Old grease or food spatters
cause excessive smoking.
Poor baking results.
Many factors affect baking results. See Baking for hints, causes and
corrections. See Adjusting Oven Temperature.
Self=cleaning
Make sure the oven door is closed.
cycle does not work.
Controls not set properly. Follow instructions.
Self-cleaning cycle was interrupted. Stop time must be set 2-4 hours past
the start time. Follow steps under "Stopping or Interrupting a Self-Cleaning
Cycle"" in this Use & Care Guide.
Soil not completely removed after
self=cleaning cycle is completed.
Failure to clean bottom, from top of oven, frame of oven or door area
outside oven seal. These areas are not in the self-cleaning area, but get
not enough to burn on residue. Clean these areas before the self-cleaning
cycle is started. Burned on residue can be cleaned with a stiff nylon brush
and water or a nylon scrubber. Be careful not to damage the oven gasket.
Excessive spillovers in oven. Set the self-clean cycle for longer cleaning
time.
Flames inside oven or smoke from
vent.
Excessive spillovers in oven. This is normal, especially for high oven
temperatures, pie spillovers or for large amounts of grease on bottom of
oven. Wipe up excessive spillovers.
19
iiil
................
...........
ii.......
Notes
20
PROTECTION AGREEMENTS
Master Protection Agreements
Acuerdos
Congratulations
on making a smart purchase. Your new
Kenmore®product
is designed and manufactured for years of
Enhorabuena por haber hecho una compra intetigente. Su nuevo producto
Kenmore®esta diseSado y fabricado para brindarle aSos de funcionamiento
fiable. Pero, como cualquier producto, puede necesitar mantenimiento
preventivo o reparaciones peri6dicas. Es por eso que tener un Acuerdo maestro
de protecci6n podria ahorrarle dinero y molestias.
dependable
operation.
But like all products,
it may require
preventive maintenance or repair from time to time. That's when
having a Master Protection Agreement can save you money
and aggravation.
The Master Protection Agreement also helps extend the life of
your new product. Here's what the Agreement* includes:
[]
no functional
protection.
[]
Expert
the product warranty.
failure excluded
service calls
and nationwide
often as you want us, whenever
[]
Piezas y mano de obra necesarias para contribuir a mantener el
funcionamiento adecuado de los productos utilizados en condiciones
normales de uso, no s61o en caso de defectos de los productos. Nuestra
cobertura va mucho mbs allb que la garantia del producto.
No se
aplican deducibles ni exclusiones por fallas del funcionamiento: es decir,
verdadera proteccibn.
[]
Servicio t_cnico por expertos (mas de 10000 t_cnicos autorizados
de
Sears), Io cual significa que quien repare o realice el mantenimiento de su
producto sera un profesional de confianza.
[]
Servicio t_cnico a escala nacional y n_mero ilimitado de Ilamadas de
solicitud de servicio t_cnico: se puede poner en contacto con nosotros
cuantas veces Io desee y cuando Io desee.
[]
Garantia <,sin sorpresas,,:
se reemplaza el producto cubierto por el
acuerdo si ocurren cuatro o mas fallas del producto en un periodo de 12
meses.
[]
Reemplazo del producto: en caso de que no se pueda reparar el
producto cubierto por el acuerdo.
[]
Revisibn anual preventiva de mantenimiento
del producto:
solicitarla en cualquier momento, sin costo alguno.
[]
Rbpida asistencia telefbnica,
la cual denominamos Solucibn rbpida: es
decir, asistencia telef6nica a traves de cualquiera de nuestros
representantes de Sears, sobre cualquiera de nuestros productos. Piense
en nosotros como en un <<manual parlante del usuario>,.
[]
Proteccibn contra fallas el_ctricas,
de la corriente electrica.
[]
$250 al aSo para cubrir cualquier posible deterioro de alimentos
haya tenido que desechar debido a una falla mecanica de cualquiera
nuestros refrigeradores o congeladores cubiertos por este acuerdo.
[]
Devolucibn de gastos de alquiler de electrodom_sticos
si la reparaci6n
de su producto asegurado toma masque el tiempo prometido.
[]
10% de descuento
aplicable tanto a los costos del servicio de reparaci6n,
como de las piezas instaladas relacionadas que no hayan quedado
cubiertos por este acuerdo.
- real
service by a force of more than 10,000 authorized
Unlimited
,,No-lemon,,
guarantee-
you
service, as
you want us.
replacement
of your covered
product if four or more product failures occur within twelve
months.
[]
Product replacement
fixed.
[]
Annual
Preventive
if your covered product can't be
Maintenance
Check at your request -
no extra charge.
[]
Fast help by phone
- we call it Rapid Resolution
-
phone support from a Sears representative
Think of us as a ,4alking owner's manuab.
on all products.
[]
Power surge protection
power fluctuations.
damage due to
[]
$250 Food Loss
against electrical
Protection
annually for any food
spoilage that is the result of mechanical
covered refrigerator or freeoer.
[]
Rental reimbursement
failure of any
if repair of your covered
product
takes longer than promised.
[]
10% discount
off the regular
price of any non-covered
repair service and related installed
parts.
Once you purchase the Agreement, a simple phone call is all
that it takes for you to schedule service. You can call anytime
day or night, or schedule a service appointment
online.
The Master Protection Agreement is a risk free purchase. If you
cancel for any reason during the product warranty period, we
will provide a full refund. Or, a prorated refund anytime after the
product warranty period expires. Purchase your Master
Protection
Agreement
today!
Some limitations and exclusions apply. For prices and
additional information in the U.S.A. call 1-800-827-6655.
* Coverage in Canada varies on some items. For full details
call Sears Canada at 1-800-361-6665.
Sears Installation Service
For Sears professional installation of home appliances, garage
door openers, water heaters, and other major home items, in
the U.S.A. or Canada call 1-800-4-MY-HOME
®.
la durabilidad
[]
No deductibles,
from coverage
Sears service technicians,
which means someone
can trust will be working on your product.
[]
El Acuerdo maestro de protecci6n tambien sirve para prolongar
de su nuevo producto. El acuerdo* incluye Io siguiente:
Parts and labor needed to help keep products operating
properly under normal use, not just defects. Our coverage
goes well beyond
maestros de proteccibn
puede
contra daSos debidos a fluctuaciones
que
de
Una vez que haya realizado el pago de este acuerdo, bastara una simple
Ilamada telef6nica para concertar una visita de servicio. Puede Ilamar a
cualquier hora del dia o de la noche, o bien concertar una visita de servicio por
Internet.
La adquisici6n del Acuerdo maestro de protecci6n es una inversi6n exenta de
riesgos. Si por cualquier motivo decide cancelar dicho acuerdo durante el
periodo de garantia del producto, le haremos un reintegro total del valor. O bien
un importe proporcional si cancela el acuerdo en cualquier otro momento
posterior al vencimiento del periodo de garantia del producto, iAdquiera hoy
mismo su Acuerdo maestro de protecci6n!
Algunas
limitaciones
precios e informacibn
y exclusiones
adicional,
podrian aplicarse.
Ilame al 1-800-827-6655
Para solicitar
(en los EE.UU.).
* La cobertura en Canadb varia en el caso de algunos articulos. Para
obtener detalles completos al respecto, Ilame al 1-800-361-6665 de Sears
de Canadb.
Servicio
de instalaci6n
de Sears
Para solicitar la instalacidn por profesionales
de Sears de electrodomesticos,
abridores de puertas de garaje, calentadores de agua y otros articulos de uso
prioritario en el hogar, Ilame al 1-800-4-MY-HOME
en los EE.UU. o CanadA.
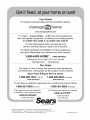
Your Home
For expert troubleshooting
and home solutions advice:
www.managemyhome.com
For repair - in your home - of all major brand appliances,
lawn and garden equipment, or heating and cooling systems,
no matter who made it, no matter who sold it!
For the replacement parts, accessories and
owner's manuals that you need to do-it-yourself.
For Sears professional installation of home appliances
and items like garage door openers and water heaters.
1-800-4-MY-HOME ® (1-800-469-4663)
Call anytime,
day or night (U.S.A. and Canada)
www.sears.com
www.sears.ca
Our Home
For repair of carry-in items like vacuums, lawn equipment,
and electronics, call anytime for the location of your nearest
Sears Parts & Repair Service Center
1-800-488-1222
(U,S,A,)
1-800-469-4663
www.sears.com
To purchase a protection
1-800-827-6655
agreement
on a product serviced
by Sears:
1-800-361-6665
(Canada)
Au Canada pour service
en fran(_ais:
(U.S.A.)
Para pedir servicio de reparacidn
a domicilio, y para ordenar piezas:
1-888-SU-HOGAR
® Registered
Trademark
/ TMTrademark
1-800-LE-FOYER
®
/ SM Service
(Canada)
www.sears.ca
Mc
(1-800-533-6937)
www.sears.ca
Mark of Sears
Brands,
® Marca Registrada / TMMarca de Fabrica / SM Marca de Servicio de Sears
MC Marque de commerce / MD Marque depos6e de Sears Brands, LLC
LLC
Brands,
LLC
© Sears Brands, LLC
®
ELECTRIC
OVE
E
Models, Modelos 790. 4045_',_"
.,_ = Color number, nL_mero de color
Sears Roebuck
www.sears.com
and Co., Hoffman
Estates,
IL 60179 U.S.A.
P/N 318205132 Rev. A (0805)
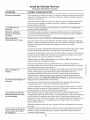
Tabla de materias
Garantia del homo de pared .........................................
2
Registro del Producto ....................................................
2
Ubicaci6n de la placa de serie ......................................
2
INSTRUCCIONES IMPORTANTES DE SEGURIDAD .... 3=4
Caracteristicas del homo de pared .............................. 5
Respirado del homo y las parrillas del homo ............. 6
Circulaci6n del Aire en el Homo ................................... 6
Fonciones de las Teclas de Control .............................. 7
Leer con detenimiento
Reglaje del reloj ..............................................................
8
Ajuste de los Controles del Homo ........................... 9=13
Limpie:,a del Homo .................................................
14=15
Cuidado y Limpieza General .................................. 16=17
Ajuste de la temperatura del homo ............................ 18
Antes de Solicitar Servicio ..................................... 18=19
Notas .............................................................................
20
ACUERDOS DE PROTECCION .................................... 21
Servicio Sears ...............................................................
22
y guardar estas instrucciones
Este Manual de Uso y Mantenimiento contiene instrucciones generales de operaci6n para su electrodomestico e
informaci6n sobre las funciones para los diversos modelos. Su producto puede no tener todas las funciones descritas. Los
grAficos que se incluyen son s61o representativos. Los grAficos de su electrodomestico pueden no ser identicos a los que
se muestran. Se debe usar el sentido comQn y ser cauteloso cuado se instala, usa y mantiene cualquier dispositivo.
Garant_a de electrodom_sticos
Kenmore
Siesta cubierta, cuando se instala y se utiliza de acuerdo con las instrucciones de instalaci6n y la guia de uso y cuidado, falla debido a
defectos de material y mano de obra durante el primer aRoa partir de la fecha de compra, Ilame al 1-800-4-MY-HOME® para hacer
arreglos para que sea reparada gratuitamente.
Si este electrodom_stico se utiliza para otros fines que no sean el uso familiar privado, esta garantia rige Qnicamente durante 90 dias a
partir de la fecha de compra.
Esta garanga cubre _nicamente defectos de material y de fabricaci6n. Sears NO pagar_:
1. Grietas en la cubierta de vidrio cerAmico que no sean resultado de choque termico.
2. Manchas y rayas en la cubierta de vidrio cerAmico causadas por mal mantenimiento segQn todas las instrucciones proporcionadas
con el producto.
3. Componentes desechables que pueden gastarse debido al uso habitual, incluyendo, y sin limitarse a los filtros, las correas, las
lamparas y las bolsas.
4. T_cnicos de servicio que instrwan al usuario en la manera adecuada de instalar, utilizar o mantener el producto.
5. Un tecnico que limpie o realice el mantenimiento de este producto.
6. Da_os o fallas de este producto si el mismo no fue instalado, utilizado o mantenido de acuerdo con todas las instrucciones
proporcionadas con el producto.
7. DaSos o fallas en el producto que sean el resultado de accidentes, abuso, mal uso u otra clase de uso que no sea el apropiado.
8. DaSos o fallas en el producto causados por el uso de detergentes, limpiadores, productos quimicos o elementos que no sean los
recomendados en las instrucciones provistas con el producto.
9. Da5os o fallas de las piezas o sistemas como resultado de modificaciones no autorizadas hechas al producto.
Renuncia de responsabilidades de garangas impl_citas;limitaci6n de acciones legales
El _nico y exclusivo resarcimiento para el cliente en virtud de esta garantia limitada serA la reparaci6n del producto seg_n Io indicado
en el presente documento. Las garantias implicitas, incluyendo garantias de aptitud para la venta o idoneidad para un fin en particular,
estan limitadas a un aSo o al perfodo mas corto permitido por la ley.Sears no se responsabiliza por da5os incidentales o
consecuentes. AIgunos estados y provincias no permiten la exclusi6n o limitaci6n de daSos incidentales o consecuentes o las
limitaciones de duraci6n de las garantias implicitas de comercializaci6n o aptitud, por Io que estas exclusiones o limitaciones pueden
no aplicarse en su caso.
Esta garantia se aplica Qnicamentemientras este producto se use dentro de los Estados Unidos y CanadA.
Esta garantia le otorga derechos legales especfficos. Usted puede tener ademAs otros derechos que varian de un estado a otro.
Sears, Roebuck and Co., Hoffman Estates, IL 50179 =Sears Canada Inc.,Toronto, Ontario, Canad_ M5B 2B8
Registro
del Producto
EncontrarA el modelo y el nOmero de serie impresos en la
placa de serie. AsegQrese de tomar nota del nQmero de
serie para futura referencia.
No. de Modelo 790.
No. de Serie
Fecha de Compra
Conserve estas instrucciones y su recibo de compra para
referencia futura.
Impreso en los Estados Unidos
Ubicaci6n
de la
placa de serie
Encontrara el nOmero de
serie y modelo impresos en la
placa de serie, que estA
ubicada en el borde lateral
interior, y se puede ver
cuando se abre la puerta.
Recuerde registrar el nQmero
de serie para referencia
futura.
Instrucciones Importantes de Seguridad
Lea todas las instrucciones
Guarde estas instrucciones
antes de utilizar el aparato
para futura consultaci6n
Este manual contiene s[mbolos e instrucciones de seguridad importantes. Preste mucha atenci6n a estos s[mbolos y siga
todas las instrucciones.
Este s[mbolo le advertirA sobre situaciones que pueden causar lesiones corporales graves,
muerte o daRos materiales.
Este s[mbolo le advertirA sobre situaciones que pueden causar lesiones corporales o daSos materiales.
• Retire toda cinta adhesiva y empaquetado
antes de
usar la estufa. Destruya el cart6n y las bolsas de
plastico despues de haber desenvuelto la estufa. No
permita que los ni5os juegen con el material de
empaquetado.
• Instalaci6n correcta =Aseg_rese que su artefacto
est_ correctamente instalado y puesto a tierra por
un electricista calificado, en conformidad con el
National Fuel Gas Code ANSI Z223.1 - _ltima
edici6n y con el National Electrical Code ANSI/
NFPA No. 70 (USA) o CSA C22.1, PART 1 (Canada)=
_ltima edici6n y requirimientos
de codigos locales.
Instale solamente en conformidad con las instrucciones
de instalaci6n provistas en el paquete de literatura que
viene con esta estufa.
Solicite de su distribuidor de recomendarle a un tecnico
calificado y una agencia de reparaci6n autorizada.
Solicite de su distribuidor de recomendarle a un tecnico
calificado y una agencia de reparaci6n autorizada.
AsegOrese de saber como desconectar el corriente a la
estufa al cortaciruitos o la caja de fusibles, en caso de
emergencia.
Los controles el_ctricos pueden ser
da_ados con fr[as temperaturas.
Cuando utilice su
estufa pot la primera vez, o si no ha sido utilizada pot
mucho tiempo aseg_rese que no haya sido
expuestas a temperaturas
m_s altas que 0°C/32°F por
m_s de 3 horas antes de conectar su estufa al
suministro el_ctrico.
Servicio al usuario= No repare o remplace ninguna
pieza de su aparato a menos que se Io
recomiende los manuales especificamente.
Culaquier typo de servicio debe ser hecho por un
tecnico calificado. Esto reducirA el riesgo de heridas
personales o de daSos al aparato.
No modifique ni altere la construcci6n de un
electrodom_stico extrayendo paneles, cubiertas
de cables u otras partes del producto.
Retire la puerta del homo del homo inutilizada si
esta va ser almacenada o destru[da.
Pisar, recostarse,
sentarse o
empujar hacia abajo la puerta de este
electrodom_stico
puede causar lesiones graves y
tambi_n da_ar el aparato. No permita que los niSos se
suban al electrodomestico o jueguen cerca de el.
Almacenamiento sobre o dentro del aparato= Los
materiales inflamables no deber[an ser
almacenados ni en un homo, ni sobre la unidad.
Esto incluye el papel, el plastico y la ropa como: libros
de cocina, recipientes de plastico o toallas, as[ como
I[quidos inflamables. No almacene explosivos como
latas de aeros61 sobre o dentro del aparato. Los
materiles inflamables pueden explotar y ocasionar
fuego o daSos a la propiedad.
No use el homo para
almacenamiento.
No alamacene objetos de interns
para los niSos en los armarios que est&n sobre la
cocina. El niSo que trata de subir sobre el homo para
alcanzarlos podr[a lastimarse..
• Todos los hornos de pared pueden
inclinarse.
• Heridas a las personas pueden
• Instale los soportes de montaje que
vienen
ocurrir. con el homo.
• Yea las instrucciones de instalaci6n.
Para reducir el riesgo de inclinaci6n,
el homo debe ser asegurado con la instalaci6n de
los soportes de montaje que vienen con la estufa.
Consulte las instrucciones de instalaci6n para
una buena instalaci6n.
No deje a los niSos solos= Los niSos no deben set
dejados solos o sin atenci6n donde el aparato
est_ funcionando.
No les permita sentarse o pararse
sobre niguna parte del aparato.
NO TOCAR LOS ELEMENTOS PARA HORNEAR Y
ASAR, NI LAS AREAS CERCANAS A ESTOS
ELEMENTOS. Los elementos para hornear y asar
pueden estar calientes aunque su color sea oscuro.
Las Areas cercanas a dichos elementos pueden
calentarse Io suficiente como para producir
quemaduras. Durante y despues del uso, no tocar ni
dejar que la vestimenta u otros materiales inflamables
entren en contacto con estas Areas hasta que haya
transcurrido fiempo suficiente para que se enfr[en.
Instrucciones Irnportantes de Seguridad
• Use una vestimenta apropiada= No use ropa que es
suelta u holgada cuando utilice el aparato. No ponga
la ropa u otros materiales inflamables en contacto con
las areas calientes.
Nunca utilice su aparato
calentar o entibiar
para
la pieza.
• No utilice agua o harina para apagar un fuegoApague el fuego con la tapa de una sart_n o use
soda c_ustica, un quimico seco o un extinguidor
en
aeros61.
• Cuando caliente substancias grasosas, tenga
cuidado. Puede ocasionar un fuego si es calentado por
mucho fiempo.
• Utilice unicamente los soportes para recipientes que
est_n secos= Los soportes que est_n h_medos o
mojados puden ocasionar quemaduras a causa del
vapor. No permita que los soportes esten en contacto
con los elementos calientes. No utilice una toalla o un
papel para remplazar al soporte.
No caliente recipientes de comida que est_n
cerrados= La presi6n al interior de estos puede
hacerlos explotar y ocasionar heridas.
IMPORTANTE-
No trate de utilizar el homo durante
corte de electricidad. Si no
estufa. Si no apaga el horno
restablecida, el homo puede
comida que deja sin cuidado
deteriorarse.
un
hay electricidad, apaga su
y que la electricidad es
seguir funcionando. La
puede quemarse o
INSTRUCCIONES
INIPORTANTES
UTILIZAR SU HORNO
PARA
• Tenga cuidado cuando abra la puerta del homo. Parese
al lado de la estufa cuando abra la puerta de un horno
caliente. Permita que el humo y el vapor se escapen antes
de retirar o de colocar comida en el homo.
• Mantenga el conducto de ventilaci6n del homo sin
obstrucci6n.
El homo de pared se ventila a trav_s de la
moldura central. Tocar estas areas cuando el homo est&
encendido puede ocasionar graves quemaduras. No
coloque objetos de pl&stico o sensibles al calor cerca del
conducto de ventilaci6n. Estos pueden derretirse o
encenderse.
, Colocaci6n de las rejillas del homo (si equipada).
Siempre coloque las rejillas del homo en la posici6n
deseada cuando el homo este frios. Si la rejilla debe ser
desplazada cuando el homo este funcionando tenga
bastante cuidado. Utilice unos soportes para recipientes y
coja la rejilla con ambas manos hasta recolocarla. No
permita que estos soportes esten en contacto con los
elementos calientes del homo. Retire todo utensilio de la
rejilla antes de moverla.
• No utilice su cubeta parrilla sin su accesorio. La
cubeta parrilla y su accesorio permiten que la grasa
gotee y este lejos del calor de la parrilla.
• No cubra el accesorio de la parrilla con pelicula de
aluminio. La grasa que queda fuera podria encenderse.
No toque la bombilla de luz caliente con una tela
mojada. Esto puede romper la bombilla. Antes de retirar
o remplazar la bombilla desconecte el aparato o corte el
suministro electrico.
Revestimientos protectores -- No usar hojas de
aluminio para cubrir la parte inferior. Usar hojas de
aluminio s61o en los casos recomendados en este
manual. La instalaci6n incorrecta de estos
revestimientos puede producir riesgo de choque
electrico o incendio.
INIPORTANTES
INSTRU¢CIONES
LIMPIAR SU CO¢INA.
PARA
• Limpie el homo regularmente para mantener todas
las partes sin grasa que puede encenderse y causar
un incendio. La cubierta del escape de ventilaci6n y los
filtros de grasa deben estar limpios. No permita que la
grasa se acumule en la cubierta o en el filtro. Los
dep6sitos grasosos pueden encenderse y causar un
incendio. Cuando caliente comida bajo la cubierta,
encienda el ventilador. Consulte las instrucciones del
fabricante para la limpieza.
HORNO
CON AUTO-LIMPIEZA
• Limpie en el ciclo de auto=lirnpieza unicamente las
partes que est_n en la lista del Manual del usuario.
Antes de auto-limpiar el homo, retire todos utensilios o
comida del homo.
• No limpie las ernpaquetaduras
del homo= Las
empaquetaduras del homo son importantes para un
buen sellado. Tenga cuidado de no frotar, da_ar o
desplazar las empaquetaduras.
• No utilice lirnpiadores de homo- Ning0n limpiador de
homo comercial o de capa protectora de ninguna clase
debe ser utilizada en en homo.
La salud de algunos p_jaros est_ muy
sensitiva a los humos que proveen del ciclo de auto=
limpieza de cualquier cocina. Desplace los p_jaros en
otra habitaci6n bien ventilada.
ADVERTENCIA
DE SEGURIDAD
IMPORTANTE
El California Safe Drinking Water y Toxic Enforcement Act
requiere al Gobierno de California de publicar una lista de
sustancias conocidas por el estado como causa de
cancer, defectos de nacimiento u otros da_os
reproductivos, y requiere que se avisen los usuarios sobre
la exposici6n eventual a sustancias.
Caracteristicas
Caracteristicas
de su Homo Electrico
de Pared
del homo de pared
Ubicaci6n del
Respiradero del Homo
Controles
Eiectr6nicos del
Horno con Reloj y
Contador de Tiempo
Apagador
de la luz
del horno
Luz interior
Homo
Elemento -de Asar
Homo Auto -Limpieza
--
Rejillas del
Horno
Adjustables i:" '
Puerta Delantera
de Vidrio del Horno
Manijas
de la Puerta
Banda decorativa
de abajo
Respiradero del Homo y las Parrillas del Homo
Ubicaci6n del Respiradero
del Homo
AIgunos modelos vienen equipado con un ventilador que
trabaja bajo el ciclo de horneado y auto-limpieza
para mantener todos los
componentes a una temperatura fria. Es posible que este ventilador continue
trabajando aun si el horno este apagada y trabajara hasta que el homo este
totalmente fria.
Ubicaci6n
del Respiradero
del Homo
El horno se ventila en la moldura central. Cuando el homo estA encendido, el aire
caliente se libera a traves de la ventilaci6n. Esta ventilaci6n es necesaria para que el
aire circule en el homo y para que el horneado sea correcto.
Disposici6n
de las Parrillas
del Homo =
COLOQUE SIEMPRE LAS PARRILLAS CUANDO EL HORNO ESTE FR!O (ANTES
DE ENCENDERLO). Use siempre guantes de cocina cuando use el homo.
Para quitar, tire de la parrilla hacia adelante hasta el tope. Levante la parte delantera
de la parrilla y deslicela hacia afuera.
Para colocar, inserte la parrilla en las guias de las paredes del homo. Levante la parte
delantera de la parrilla y deslicela a su lugar.
POSICIONES RECOMENDADAS DE LAS PARRILLAS
PARA ASAR A LA PARRILLA, HORNEAR Y ASAR
Alimento
Posici6n de la Parrilla
Asar a la parrilla carnes, polio o pescado
3o 4
Galletas, pasteles, tartas, bizcochos y panquecitos
1 parrilla
2o 3
Varias Parrillas
2o 4
Tartas congeladas, pastel esponjoso, levadura, pan,
caserolas, trozos de came pequeRos o polio
1o 2
Pavo, asado o jam6n
1
Nota: Siempre tenga cuidado cuando retire alimentos que esten en las
parrillas inferiores.
Circulaci6n
del Aire en el Homo
Si se usa 1 parrilla, col6quela en el centro del homo. Si se usan varias parrillas,
alternelas como se muestra en la ilustraci6n.
Para mejor circulaci6n del aire y obtener mejores resultados del horneado deje
alrededor de 2" a 4" (5 a 10 cm) alrededor del utensilio para circulaci6n
adecuada del aire y asegQrese de que las fuentes no se toquen entre si, no
toquen la puerta del homo, ni los lados o la parte trasera de la cavidad del
horno. El aire caliente debe circular alrededor de las fuentes en el homo para
que Ilegue calor uniforme alrededor de todo el alimento.
1 Parrilla del Horno
Varias Parrillas del Homo
Funciones de la Teclas de Control
Nota:
LEER
El aspecto del control de su homo puede diferir levemente
del que se ilustra mAs abajo. Sin embargo, todas las
funciones son iguales. AdemAs, las botoneras
pueden tenor una forma diferente de las que aparecen en esta
Gufa de Uso y Mantenimiento.
LAS INSTRUCClONES
CON ATENClON
ANTES DE UTILIZAR
EL HORNO. Para un buen uso del homo hay que
familiarizar
con las diferentes funciones
BOTON STOP/CLEAR-Utilizado
para borrar todas las funciones
precedentemente programadas
excepto la fecha y el temporizador,
Apretar STOP/CLEAR para interrumpir
la cocci6n. Este bot6n tambi6n se usa
para activar la regulaci6n del cierrke de
la puerta del homo.
i
LUCES DE INDICACI6N_
DE LA FUNCION-Estas luces indican la
func 6n en uso
del homo indicadas abajo.
BOTONES DE FLECHA ARRIBA Y
ABAJO-Utilizados junto a los botones
funci6n para seleccionar la temperatura
del homo, el tiempo de cocci6n, el tiempo
de encendido (cuando se programa un
encendido automAtico), hora, borrar el
programa del teml
BOTON DE
REGULAClON
DEL RELOJ-Utilizado para
programar la
hora.
BOTON TIEMPO DE
COCCl6N-Utilizado
para programar la
duraci6n de la cocci6n.
BOTON DE
ENCENDIDO
_- _
DIFERIDO-Utilizado
para
programar
hora de inicio delala
\
k
\_3s_c
\
....
_
cocci6n. Puede usarse
con 'COOK TIME'
para programar un
ciclo de cocci6n
diferido.
.... ..... '
BOTON PARRILLA-..
.
Utihzado para seleccionar
la funci6n variable de la
•
•
_li_
• 0yen
@ Preheat
_
parrilla.
•
V
BOTON TIMER SET/
OFF -- Utilizado
Deer Locked
uBOiTztdNo
DE C7 ClT_cOi
oN_aa
r_
la funcidn de coccidn.
_L
UCES DE HORNO, PRECALENTAMIENTO,
PUERTA CERRADA Y CUBIERTA
BLOQUEADA* -- La luz 'OVEN' (Homo) se enciende cada vez que el homo se
enciende para mantener la temperatura programada. La luz 'PREHEAT'
(Precalentamiento)
se encender_, cuando el homo se programa o si la temperatura
deseada es mas alta que las del homo en aquel momento. La luz 'DOOR LOCKED'
(Puerta Cerrada) se encenderb, cuando el homo se cierra o abre o durante el ciclo
de autolimpieza o cuando se activa el modo de cierre de la puerta. La luz
permanecerA encendida constantemente despu_s del cierre de la puerta.
BOTON DE SELECCION
DE AUTOLIMPIEZA-Utilizado para seleccionar
el ciclo de autolimpieza.
Se puede seleccionar un
ciclo de autolimpieza de 2
o 3 horas.
temporizador
no se
pone en marcha o
para la cocci6n. Este
bot6n tambi6n se
utiliza para programar la funci6n
Cocci6n Continua.
*Nora: La luz incadora !ioven,! (H0rno)en el panel indicador Se encederA y se apagarA al usar la funci6n de hornear
(Bake) y durante el precalientamient0:Est0
es normal e indica que el h0rn0 est_ haciend0 su ciclo para mantener
temperatura de hornear selecionada! AI apagarse la luz indicadora de precalientamiento; sU homo estarA listol
Panel de control
Cuando
silencioso
se eNge una funci6n,
se oir_ un beep al apretar
un bot6n. Si se desea,
se puede programar
seasilencioso.
Apretary
mantener,i,.0
:.Despues
de7segundos,
elmando
har beep
Slop
al apretar
los mandos.
haga beep una vez.
Nota: El mando volverA
Conversi6n
Para restablecer
a la modaNdad
el sonido,
sueno
apretar
despues
y mantener
: !_!_,otra vez por 7 segundos,
de una interrupci6n
el mando
para que
vez.Estodeshabitarelsonido
hasta que el mando
de corriente.
de la temperatura
El homo se entrega para con el mando electr6nico
programado
para funcionar
en °F (Fahrenheit),
programar
sobre cualquier temperatura
desde 170°F a 550°F (de 65°C a 287°C).
Para cambiar
la temperatura
Cocci6n
o Limpieza):
"
i!:::
de °C (Celsius)
" aparece
o desde
°C a °F (el mando
1
Apretar
2.
Apretar
y mantener
el A
3.
Apretar
y mantener
_
4.
5.
Apretar
Apretar
el A
o A
para cambiar de °F a °C o de °C a °F.
cualquier bot6n de mando para volver al modo de funcionamiento
no tiene
en el display.
hasta que aparece
'HI'
hasta que °F o °C aparecen
en el display•
en el display•
normal•
que estar
El homo se puede
en las modalidades
Ajuste de los controles del homo
i
¸......
ili
® Oven
®
Q Preheat
Set/Off
•
®
.......................................
Timer
..............................
Stop
Deer Lacked
Time
.......................................................................
Nota: Hay que regular la h0ra antes de hacer funci0nar el homo:
RegulaciCn
del reloj
Cuando se conecta el homo la primera vez, o cuando se interrumpe la alimentaciCn al homo, en el display destellarA '12:00'.
1.
Apretar
una vez (no Io mantenga oprimido).
2.
Dentro de 5 segundos, apretar y mantener
A
o V
hasta que aparezca la hora correcta en el display•
Nota:EI reloj no se puede cambiar durante las cocciones programadas o el ciclo de autolimpieza.
Programar
1
•
2.
Apretar
el temporizador:
Timer
Set/0ff.
Apretar A
para aumentar
el tiempo con incrementos de un minute. Apretar y mantener Apara
minutes a la vez. El temporizador
.
4.
aumentar de 10
se puede programar per plazos de 1 minutes a 11 horas y 5g minutes.
Nota: Sise aprieta V
primero, el temporizador avanzar& a 11 horas y 5g minutos.
E! display muestra la cuenta al reves en minutos hasta que quede un minuto. Luego el display contar& los segundos.
Cuando ha pasado el tiempo programado, se oir&n 3 beep. Continuar& a sonar 3 veces cada 60 segundos hasta que
no se apriete T'_ :.
Nota: La luz indicadora que se encuentra sabre el botCn T,,o,,5o,,0,
permanecer& encendida mientras el temporizador
este
activado.
Nota: El tempofizador de minutos no inicia o termina una cocciCn. Sirve coma extra temporizador en la cocina que suena
cuando ha pasado el tiempo programado. El tempofizador se puede utilizar solo o durante cualquiera de las arras funciones.
Cuando se utiliza con las arras funciones, el temporizador ser& visible en el display• Para vet arras funciones, apretar el botCn
relativa a aquella funciCn.
Cambiar el temporizador
cuando est_ en usa:
Mientras el temporizador est& activo y visible en el display, apretary mantener j_,o
Borrar el temporizador
Nota:
antes que haya pasado el tiempo:
Para apagar o eric°rider
para aumentar o disminuir eltiempo.
Apretar T..o,
exhibicCn de la hora del alia optima
sanarA Una vez ) y suelte: Esta caracteristica
v
Set/0ff.
y Sujete durante 15 Segundos (el control
no elimi_a el ajuste de la h0ra eel d[ade la memoria del cCntr0L cuand0 se
APAGA la e×hibiciCnde la h0ra eel era, la h0ra se m0strarA p0r unes p0Cos segune0s cada vez que Se optima
Ajuste de los Controles del Homo
Prograrnar
o cambiar
la ternperatura
de cocci6n
El homo se puede programar para cocer a cualquier temperatura
Regular
los mandos para cooer:
1
Apretar _
2.
Dentro de 5 segundos, apretar A
V,
entre 170°F y 550°F (77°C y 287°C).
"
la temperatura
" aparece en el display•
o V.
El display mostrarA "350°F (177°C). ' Apretando y manteniendo A
o
se podrA regular con incrementos de 5°F (1°C si el control estA programado para mostrar
grados Celsius) a la vez.
3.
En cuanto se suelta j%.
o V,
el homo empieza a calentarse hasta la temperatura seleccionada.
Cuando la
temperatura visualizada alcanza la temperatura de cocci6n deseada, la luz indicadora de precalentamiento
se
APAGARA y el mando harA beep 3 veces•
4.
Para cancelar la cocci6n, apretar
Cambiar la temperatura
1
Apretar #_y
2.
Apretar _
Regular
del homo cuando la cocci6n ya ha empezado:
asegurarse de que la temperatura de cocci6n este visualizada.
o V,
para aumentar o disminuir la temperatura programada.
el rnando para cocci6n
continua
o ahorro
de energia
de 12 horas
El mando del homo tiene una caracteristica de Ahorro de energia de 12 que apagara el homo si se deja el homo encendido
por mAs de 11 horas y 59 minutos. El homo se puede programar para ignorar estA caracteristicas para obtener una cocci6n
continua.
Regular el mando para una cocci6n continua:
1
•
Apretar y mantener Timer!
por 5 segundos hasta oir un sonido, aparecerA "
Set/Off
--
--
hr" en el display para una cocci6n
continua. En el display aparecerA otra vez la hora.
•
Para borrar la funci6n de Cocci6n Continua, apretar _#_y
mantener por 5 segundos hasta oir un sonido. AparecerA
"12h" en el display para indicar que el mando ha restablecido la caracteristica
Regular
Ahorro de energia de 12 horas.
el rnando para el cierre del homo
El mando se se puede programar para cerrar la puerta del homo y desactivar los mandos del homo.
Regular el mando para la caracteristica
1.
Apretar
de cierre del homo:
y mantener por 3 segundos. Aparecer_ "Loc" en el display, la luz que indica "Puerta cerrada" destellar_ y el
cierre motorizado de la puerta se cerrar_ autom_ticamente NO abrir la puerta del homo mientras la luz de indicaci6n
destella. La puerta se cierra en unos 15 segundos. Una vez cerrada la puerta del homo, en el display aparecer_ la hora.
2.
Para borrar la caracteristica de cierre del homo, apretar
del homo y volver_ a su funcionamiento
normal.
mantener por 3 segundos. El mando abrir_ la puerta
Ajuste de los Controles del Horno
Para regular
las funciones
de cocci6n
Los mandos _CookT,,,o
TIEMPO DE COCCION y
programada
y encendido
diferido
st0,,T,
........ENCENDIDO DIFERIDO mandan la cocci6n programada para
ENCENDER o APAGAR el homo a los momentos precedentemente programados. E[ homo se puede programar para
[niciar inmediatamente y apagarse autom&ticamente ('Timed Bake') o para iniciar la cocci6n en un momento posterior
con un tiempo de encendido diferido (Delay Start).
h0rnead0 €_0n0metrad0 (Timed
nof unci0nar_
Para programar el homo para que inicie a cocer inmediatamente
(Cocci6n programada):
1. Asegurarse de que el reloj muestre la hora correcta.
2. Colocar la comida en el homo.
y se apague autom&ticamente
,
4.
,
6.
7.
Dentro de 5 segundos, apretar A o V. El display mostrar& "350°F (177°C)." Apretando y manteniendo A o V,
la temperatura se podr& regular con incrementos de 5°F (1°C si el control est& programado para mostrar grados
Celsius) a la vez.
Apretar
ig_Cook _i_
T,mo. '0:00' destellar_ en el display (HR:MIN).
Apretar _ o V para aumentar el tiempo en intervalos de 5 minutos.
El homo se ENCIENDE e inicia a calentarse.
Regular el homo para un inicio posterior y apagamiento
1. Asegurarse de que el reloj muestre la hora correcta.
2. Colocar la comida en el homo.
autom&tico
Encendido
diferido
(Delayed Start Bake):
,
4.
Dentro de 5 segundos, apretar _ o V. El display mostrar& "350°F (177°C). '' Manteniendo apretado _ o V, la
temperatura puede ser regulada con incrementos de 5°F (1°C si el control est& programado para mostrar grados
Celsius) a la vez.
5.
Apretar
6.
Apretar _
7.
Apretar
Cook"0:00"
,,,,o
destellar& en el display (HR:MIN).
oV
hasta que el fiempo de cocci6n deseado no aparece en el display.
T,,,,o
,. En el visor aparecer& el tiempo de inicio m&s temprano posible.
Stop
8.
9.
Apretar A o V hasta que el tiempo de parada deseado no aparece en el display.
Una vez regulados los mandos, el mando calcula cuando terminar& la cocci6n a fin de iniciar a la hora que se ha
programado.
10. El homo se encender& a la hora de inicio programada y comenzar& a calentarse.
Cuando termina el tiempo de cocci6n programado:
1. AparecerA "END" en la ventana del display y el homo se apagarA automAticamente.
2.
El mando har& beep 3 veces cada 25 segundos hasta que no se apriete
Para cambiar la temperatura del homo despu_s que ha iniciado la cocci6n:
1. Apretar el bot6n funci6n que se desea cambiar.
2. Apretar _. o V para regular la programaci6n.
Tenga cuidado con las caracteristicas de cocci6n programada y encendido diferido. Las comidas que
se estropean fb.cilmente tales como la leche, los huevos, el pescado, las carnes o la came de ave deben estar
refrigeradas antes de la cocci6n. Sin embargo, incluso si se ban refrigerado, estos alimentos no deberian estar en le
homo por m&s de 1 hora antes de empezar la cocci6n y deberian ser removidos del homo inmediatamente despues de
terminar la cocci6n.
10
Ajuste de los controles del homo
Horneado
Para mejores resultados, caliente el horno antes de hornear galletas, panes, tortas, pasteles o dulces, etc. No necesita
precalentar el homo para rostizar la came o para cocer caserolas.
Los tiempos de cocido y las temperaturas que se necesitan para hornear un producto pueden variar lijeramente de sus
aparatos antiguos.
Problemas de horneo y tabla de soluciones
Problemas
Causas
Las galletas se
queman por encima
e
Los pasteles est_n
muy negros por
encima o debajo.
•
Los pasteles no
est_n bien horneados
en el centro.
Los pasteles no
est_n nivelados,
Correcci6n
Las galletas ban sido puestas en
el homo antes que halla
precalentado completamente.
Muchas galletas en la rejilla del
homo.
El recipiente oscuro absorbe el
calor muy r_pido.
Permita que el horno precaliente antes de
colocar la comida.
Los pasteles ban sido puestas en
el homo antes que halla
precalentado completamente.
La rejilla del homo estA muy baja
o muy alta.
El homo muy caliente.
Permita que el horno precaliente antes de
colocar la comida.
Elija sartenes que permitan 5.1cm a 10.2 cm
(2"-4") de espacio por todos lados.
Utilice una pelicula de aluminio lijera.
•
Posicione bien la rejilla del homo.
•
Ajuste la temperatura a 25°F/12°C menos
que Io recomendado.
El homo muy caliente.
Ajuste la temperatura a 25°F/12°C menos
que Io recomendado.
Use la talla del recipiente recomendada en la
receta.
Recipiente de talla incorrecta.
Recipiente no estA en el centro
del homo.
Posicione bien la rejilla del homo y coloque el
recipiente de tal manera que halla 5.1cm a
10.2 cm (2"'4") de espacio por todos lados.
La estufa estA desnivelada.
Coloque un vaso con agua en el centro del
homo. Si el nivel del agua est_ desigual,
consulte las instrucciones para nivelar el
aparato.
Aseg[Jrese que halla 5.1cm a 10.2 cm (2"'4")
de espacio por todos lados.
El recipiente estA muy cerca a la
pared del homo o la rejilla muy
Ilena.
La rejilla estA desnivelada.
No use recipientes que estAn desnivelados o
edentados.
La comida no est_
lista cuando el
El homo estA muy frio.
Ajuste la temperatura a 25°F/12°C mAsque Io
recomendado.
tiempo de cocci6n se
El homo estA muy Ileno.
AsegQrese de retirar todas las rejilllas
excepto las que va usar.
Abra el homo solo despues que el tiempo de
cocci6n mc4scorto halla terminado.
termina.
El homo se abre constantemente.
11
•
Ajuste de los Controles del Horno
Asar es un metodo para cocer cortes finos de came aplicando el calor directo
debajo del elemento asador del homo.
Precalentarniento
El precalentamiento es sugerido cuando grille pedazos de biftec (retire la
parilla antes de precalentar. La comida puede adherirse si es colocada en el
metal caliente). Para precalentar, ajuste los controles del homo en BROIL
como indica en la minuterfa o en la secci6n "CONTROL DEL HORNO
ELECTRONICO". Espere hasta que el elemento se ponga rojo, usualmente
esto toma hasta 2 minutos. El precalentamiento no es necesario para bien
asar las carnes.
Posici6n de
Detenci6n de Parrilla /
j.J
Para Asar
Asar por un lado hasta que la comida halla dorado; volteee y cosa la segunda
parte. Sazone y sirva. Siempre tire la rejilla hacia afuera a la posici6n "parada"
hasta el borde antes de voltear o de retirar la comida.
Para calcular
el tiempo
Rejilla
(Provisto en algunos
modeJos)
de Asar
El tiempo de Asar puede variar, verifque constantemente la comida. El tiempo
no solo depende de la distancia a la cual se encuentra del elemento pero
tambi_n del grosor y del corte de la came, del contenido en grasa y de cuan
cocida desee su came. El primer lado necesita siempre unos minutos mas
que el otro lado. Las carnes congeladas tambien necesitan mucho mAs
tiempo.
Trucos para Asar
La parrilla y su rejilla permiten que la grasa gotee y este lejos del calor intenso
del Asador.
NO USE la parrilla sin su rejilla. NO CUBRA la rejilia de pelicula de
aluminio, La grasa que se queda puede encenderse.
Parrilla
(Provisto en algunos
En caso de que se produzca un incendio en el homo,
cierre la puerta del homo y ap_.guelo. Si el incendio continQa, arroje
bicarbonato de soda o use un extinguidor de incendios. NO arroje agua o
harina al fuego. La harina puede ser explosiva y el agua puede causar un
incendio de grasa que se extienda y cause alguna lesi6n personal.
Trucos para la limpieza
del rostizador
= Para hacer la limpieza m_s f_cil, cubra la parte de abajo de la parrilla de
pel[cula de aluminio. NO cubra la rejilla de la parrilla con aluminio.
Para eviatar que la grasa se grille, retire la parrilla del homo tan pronto
como termine de coser. Use guantes porque la parrilla estA sumamente
caliente. Deseche la grasa. Remoje el recipiente en agua caliente
jabonosa.
Limpie la parrilla tan pronto como termine de usarla. Si es necesario, use
esponjas de metal. Si frota muy fuerte puede daRar la rejilla.
12
modelos)
Ajuste de los Controles del Horno
Broil (Asar a la parrilla)
Asar es un metodo para cocinar cortes tiernos de came por medio del calor directo debajo del elemento para asar del horno.
Para obtener los mejores resultados, verificar que la asadera este centrada directamente debajo del elemento para asar.
Colocar la parrilla del homo mientras el homo estA frio. Colocar la parrilla en la posici6n deseada.La asadera y el elemento
intemo permiten drenar la grasa que gotea y asi mantenerla alejada del gran calor del asador. NO use su asadera sin el
inserto. NO cubra el inserto con papel de aluminio.
La grasa expuesta se puede incendiar.
En caso de que se produzca un incendio en el homo, cierre la puerta del homo y ap_.guelo. Si el
incendio continQa, arroje bicarbonato de soda o use un extinguidor de incendios. NO arroje agua o harina al fuego. La harina
puede set explosiva y el agua puede causar un incendio de grasa que se extienda y cause alguna lesi6n personal.
Prograrnaci6n
1.
.
3.
4.
5.
6.
7.
del homo
para asar a la parrilla:
Prepare el montaje de las rejillas mientras que el homo esta frio.
Apretar 2
Rejilla
"-- -- --"' aparecer& en el indicador.
Mantener pulsada la tecla A
oV
hasta que el nivel de asado
deseado aparezca en el visor. Pulsar la tecla A
para HI
(temperatura alta) o la tecla VPara
LO. La mayoria de las comidas
se pueden asar con la temperatura HI. Seleccionar LO para evitar que
las comidas que deben cocinarse a punto se quemen o se sequen.
Coloque el inserto en la asadera. Luego coloque el alimento sobre el
inserto. NO use la asadera sin el inserto. NO cubra el inserto con papel
de aluminio. La grasa expuesta puede incendiarse.
Coloque la asadera en la rejilla del homo. Abrir la puerta del homo
cuando est_ asando a la parrilla.
Primero ase un lado hasta que el alimento este dorado; de vuelta y
cocine el otro lado. Sazone y sirva. Nota: Siempre tire de la parrilla
hacia afuera hasta que Ilegue al tope antes de dar vuelta o sacar el
alimento.
Parrilla
(Provisto
en algunos
modelos)
Para cancelar la caracter[stica asar a la parrilla o si ha terminado de
asar a la parrilla oprima
Tabla de posiciones de las parrillas para asar
Posici6n de la Parrilla
Alimento
la. posici6n
Biftecs casi crudos y hamburguesas
2a. posici6n
Pescado, biftecs a medio asar y chuletas
3a. posici6n
Alimentos bien cocidos tal como polio y langosta
Posici6n de /
Detenci6n de Parrilla /
En caso de que se produzca un incendio en el homo, cierre la
puerta y APAGUE el homo. Si continQa el incendio, use un extinguidor. NO
arroje agua o harina en las llamas; la harina puede explotar.
Para usar la luz del homo
La luz del homo se ENCIENDE automAticamente cuando se abra la puerta. Puede encender la luz del homo aQn
cuando la puerta estA cerrada usando el interruptor Iocalizado en el control del homo elecr6nico. En algunos modelos,
la IAmpara esta cubierta con un protector de vidrio que queda fijo mediante una brida para cables. EL PROTECTOR
DE VIDRIO DEBE ESTAR INSTALADO SIEMPRE QUE SE USA EL HORNO. Para cambiar la luz del homo, vea
"Cambio de la luz del homo" en la secci6n de Cuidado y limpieza.
13
Limpieza del Homo
O
Durante el ciclo de
autolimpieza la parte exterior de la estufa se
calienta mucho. NO deje a los ni_os sin
vigilancia cerca del electrodom_stico pues
se pueden quemar si tocan las superficies
calientes de la puerta del homo.
_
3 see
i
i¢_,_ i
® Oven
. r0,,0o,
•
Door Locked
Los vapores emitidos
durante el ciclo de autolimpieza de cualquier
estufa pueden afectar la salud de algunos
p_.jaros. Cambie los p_.jaros a otra
habitaci6n bien venfilada.
NO coloque papel de aluminio
en las paredes del homo, en las parrillas, en la
parte inferior ni en cualquier otra parte de la
estufa pues podria afectar la distribuci6n del
calor, dar malos resultados en el horneado y
causar daRo permanente al interior del homo (el
papel de aluminio se puede derretir en la
superficie interior del homo).
NO fuerce la puerta del horno
para abrirla. Esto puede daRar el sistema de
cierre automatico de la puerta. Tenga mucho
cuidado cuando abra la puerta despues de
que se haya completado
un ciclo de
autolimpieza. Col6quese al lado del homo
cuando abra la puerta para dejar salir el aire o
vapor caliente. El homo puede todavia estar
MUY CALIENTE.
-Limpie
[a puerta
manualmente
Limpie el
armaz6n
manual
mente
No limpie
manualmente
empaquetadura
Nota: Ver informaci6n adiciona! sobre la
limpieza de la puerta del homo en la secci6n
Cuidado y limpieza.
¢iclo
de Autolimpieza
Un homo autolimpiante se limpia por si mismo a altas temperaturas, Io que
elimina completamente la suciedad o la reduce a una ceniza fina que se
puede limpiar con un paso h0medo. Estas temperaturas son bastante m_s
elevadas que las temperaturas de cocci6n normales.
Respete las siguientes precaueiones de limpieza:
,, Deje enfriar el homo para efectuar la limpieza previa.
,, Use guantes de goma cuando haga la limpieza previa y cuando limpie
los residuos despues del ciclo de autolimpieza.
,, NO limpie la junta de la puerta del homo. El material tejido de la junta
de la puerta del homo es esencial para un buen sellado. Tenga
cuidado de no frotar, daRar o sacar la junta.
,, NO use agentes de limpieza para homo o revestimientos protectores
en las piezas del homo autolimpiante o alrededor de elias.
• Retire todos los utensilios y el papel de aluminio que pueda haber.
Estos objetos no pueden resistir las aitas temperaturas de la limpieza.
• No es necesario retirar las parrillas del homo durante un ciclo de
autolimpieza. Si se limpian las parrillas en el ciclo de autolimpieza su
color se volvera ligeramente azul y el acabado se puede opacar.
Despues de que se haya terminado el ciclo y enfriado el homo, frote
los bordes de las parrillas con papel de cera o con un paho
impregnado con aceite de bebe o aceite de cocina (esto har_ que las
parrillas se deslicen m_s f_.cilmente a su lugar).
,, Limpie todos los derrames de la cavidad del homo antes de
comenzar el ciclo de autolimpieza. Para limpiar, use agua caliente con
detergente y un paso. Los derrames grandes pueden causar humo
denso o un incendio cuando se exponen a altas temperaturas. NO deje
que queden en la superficie del homo derrames con alto contenido de
az0car o _cido (tales como leche, tomates, chucrut, jugo de frutas o
rellenos de tartas), pues pueden dejar una mancha opaca incluso
despues de la limpieza.
,, Limpie toda la suciedad del marco del homo, del revestimiento de la
puerta fuera de la junta de la puerta del homo y del _rea peque_a en la
parte delantera central de la parte inferior del homo. Estas _reas se
calientan Io suficiente como para quemar la suciedad acumulada.
Limpie con jab6n y agua.
NOTA: Antes de comenzar el ciclo de Autolimpieza, se debe limpiar
cualquier derrame que haya en la parte inferior del homo.
Qu_ se Puede Esperar
Los elementos de hornear
y de asar pueden parecer frios despues de
haberse APAGADO. Los elementos
pueden estar calientes todavia y puede
sufrir quemaduras si toca estos elementos
antes de haber tenido el fiempo suficiente
para enfriarse.
Durante
la Limpieza
Mientras el horno estb. en funcionamiento, se calienta a temperaturas
mucho m_s altas que las de cocci6n normal. Los ruidos de expansi6n y
contracci6n del metal son normales. Tambien es normal el olor mientras
se elimina el resto de comida. Puede salir humo a traves de la
ventilaci6n del homo.
Si las salpicaduras grandes no se eliminan antes de la limpieza, pueden
prenderse fuego y causar mas humo y olor que Io usual. Esto es normal
y seguro, y no es para alarmarse. De ser posible, usar un ventilador
durante el ciclo de autolimpieza.
14
Limpieza del Homo
Duraci6n
de un ciclo de autolimpieza
Para obtener resultados satisfactorios, haga uso de un ciclo de autolimpieza de dos
horas de duraci6n para manchas ligeras o un ciclo de 3 horas para manchas
promedio y manchas dificiles. NOTA: El Area de la cocina debe estar bien ventilada
empleando una ventana abierta, ventilador o campana de escape durante el ciclo de
autolimpieza. Esto ayudar& a eliminar los malos olores relacionados con el ciclo de
autolimpieza:
Para configurar
los controles
para un ciclo de autolimpieza:
1.
Aseg0rese que el reloj muestre la hora correcta del dia.
2.
Apretar soc,0°,oot
.....
3.
Apretar A
o V
una vez. "3:00" aparecer& en la pantalla para indicar un
ciclo de 3 horas. Presione V
hasta que aparezca "2:00" en la pantalla para
un ciclo de 2 horas.
4.
5.
Tan pronto como suite estos A
o V,
,,CLn_ aparecer& en la pantalla.
Tan pronto como los controles son configurados, el seguro accionado del
motor empezar& a cerrarse autom&ticamente y la luz del indicador de
"BLOQUEO" resplandecer&. NO abra la puerta mientras la luz estb.
relampagueando (demora alrededor de 15 segundos para que puerta del
homo se bloquee).
"CLn" aparecer& en la pantalla durante el ciclo de autolimpieza y la luz de
"BLOQUEO" resplandecer& hasta que el ciclo de limpieza haya sido
terminado o cancelado, y la temperatura del homo se haya enfriado.
6.
aparecer& en la pantalla.
Cuando el ciclo de autolimpieza ha terminado:
1. Aparecer_ en la ventana de la pantalla la hora del dia o "End" y la luz de "Limpio"
y "BLOQUEO" seguir_n centelleando.
2. Una vez que el homo se ha enfriado durante casi 1 HORA y la luz de "RELOJ"
se ha ido, la puerta del homo puede ser abierta.
3. Si "End" se encuentra en pantalla y la luz indicadora "Select Clean" permanece
encendida, presione
La hora del dia aparecer_ en la pantalla.
NOTA: Cuando el homo este frio, limpie cualquier residuo o ceniza en polvo con una
tela h0meda o papel toalla.
Parada o interrupci6n
de un ciclo de autolimpieza
seleccionado
Si fuera necesario detener o interrumpir un ciclo de autolimpieza:
1.
Apretar
2.
Unavezqueelhornosehayaenfriadodurantecasil
HORAylaluzde"BLOQUE"
se haya ido, la puerta del homo puede ser abierta.
Vuelva a iniciar el ciclo de autolimpieza una vez que todas las condiciones hayan
sido corregidas.
3.
15
NOTA: Un eliminador de humo
en la ventilaci6n del homo
convierte la mayor parte de la
suciedad en vapor incoloro.
Para evitar
quemaduras, tener cuidado al
abrir la puerta del horno despues
del Ciclo de Autolimpieza. Parase
al costado del homo cuando se
abre la puerta para permitir la
salida del aire caliente.
NO fuerce la
puerta del homo para abrirla.
Esto puede daSar el sistema de
cierre automAtico de la puerta.
Tenga mucho cuidado cuando
abra la puerta despues de que se
haya completado un ciclo de
autolimpieza. Col6quese al lado
del homo cuando abra la puerta
para dejar salir el aire o vapor
caliente. El homo puede todavia
estar MUY CALIENTE.
Cuidado y Limpieza General
Limpieza
de diferentes
partes del home de pared
Antes de limpiar cualquier parte del homo, aseg_rese que todos los controles estb.n apagados y que el horno este fria.
RETIRE LOS DERRAMES Y LAS MANCHAS DIFfCILES TAN PRONTO COMO PUEDA. LA LIMPIEZA CONSTANTE
DISMINUIRA EL ESFUERZO DE UNA LIMPIEZA A FONDO.
Superficies
Como
Limpiar
Aluminio & Vinilo
Use agua caliente jabonosa y un paRo. Seque con un paRo limpio. No restregar ni usar
limpiadores multiuso, amonfaco, limpiadores en polvo ni limpiadores para horno que se
venden en los comercios. Pueden rayar y decolorar el aluminio.
Perillas de Control
Esmaltadas y
Pl_sticas, Piezas del
Cuerpo y Molduras
Decorativas
Para limpieza general, use agua caliente jabonosa y un pa5o. Para manchas mas diffciles
ygrasa acumulada, aplique detergente Ifquido directamente en la mancha. D_jelo en la
mancha por 30 a 60 minutos. Enjuague con un pa5o hQmedo y seque. NO use agentes de
limpieza abrasivos en ninguno de estos materiales, pues pueden rayar. Para sacar las
perillas de control, gffelas hasta la posici6n 'OFF' (apagado); t6melas firmemente y firelas
derecho hacia fuera del eje. Para volver a colocar las perillas despu_s de la limpieza,
alinee los lados pianos de la perilla y del eje; luego inserte la perilla en su lugar.
Acero Inoxidable,
Panel de Control de
Cromo, Molduras
Decorativas
Antes de limpiar el panel de control, coloque todos los controles en la posici6n 'OFF' y
quite las perillas de control. Para sacarlas, tire de elias derecho hacia afuera para sacarlas
del eje. Limpie usando agua caliente jabonosa y un paRo. Enjuague con agua limpia y un
paRo. AsegL_rese de estrujar el exceso de agua del paRo antes de limpiar el panel;
especialmente cuando est_ limpiando alrededor de los controles. El exceso de agua en
los controles o alrededor de ellos puede daRar el electrodom_stico. Para volver a colocar
las perillas despu_s de la limpieza, alinee los lados pianos de la perilla y del eje; luego
inserte la perilla en su lugar.
Limpie el acero inoxidable usando agua caliente jabonosa y un paso. Enjuague con agua limpia
y un paso. No use limpiadores con altas concentraciones de cloruros o cloro. No use
limpiadores _.speros. Use solamente limpiadores que han sido especialmente dise_ados para
limpiar acero inoxidable. Siempre asegQrese de enjuagar bien para quitar los limpiadores de las
superficies pues pueden ocurrir manchas azuladas con el calor las cuales no pueden ser quitadas.
Asadera de Porcelana
Esmaltada e Inserto,
Revestimiento de la
Puerta, Piezas del
Cuerpo
Restriegue suavemente con una esponja jabonosa de fregar para sacar la mayorfa de
las manchas. Enjuague con una soiuci6n 1:1 de agua y amonfaco. Si es necesario, cubra
las manchas diffciles con una toalla de papel impregnada en amonfaco pot 30 a 40 minutos.
Enjuague con agua limpia y con un paRo hQmedo y luego frote con una esponja jabonosa
de fregar. Enjuague y seque con un paRo limpio. Saque todos los residuos de agentes de
limpieza o de Io contrario la porcelana se puede daRar cuando se vuelva a calentar. NO use
agentes de limpieza para horno en aerosol en la cubierta de la estufa.
Parrillas del homo
No es necesario retirar las parrillas del horno durante un ciclo de autolimpieza. Si se retiran, siga
las instrucciones arriba, si se limpian las parrillas en el ciclo de autolimpieza su color se volver_.
ligeramente azul y el acabado se puede opacar. Despu_s de que se haya terminado el ciclo y
enfriado el homo, frote los bordes de las parrillas con papel de cera o con un paRo impregnado
con aceite de beb_ o aceite de cocina (esto har_. que las parrillas se deslicen m_.s f_.cilmente
a su lugar).
Puerta del homo
Para limpiar la puerta del homo, limpie con agua caliente jabonosa y un paRo limpio.
Enjuague bien. Puede usar un limpiavidrios en la parte exterior de la ventana de la puerta
del horno. NO sumerja la puerta en agua. NO rocfe las rejillas de ventilaci6n o permita
que el limpiavidrios
entre en elias. NO use productos de limpieza de hornos, polvos de
limpieza o cualquier limpiador abrasivo fuerte en el exterior de la puerta del homo.
NO limpie la junta de la puerta del horno. En los modelos con autolimpieza, la junta de la
puerta est,. hecha de un material tejido que es indispensable para que selle correctamente.
Se debe tener mucho cuidado de no frotar, daRar ni sacar la junta de la puerta.
DE LA PUERTA
16
Cuidado
y Limpieza General
Para retirar o remplazar
la puerta del homo
La puerta es pesada. Para guardarla temporalmente de manera
segura, deposite la puerta horizontalmente, con el lado interior dirigido hacia abajo.
Agujero para la bisagra
puerta quitada deJ homo
Figura 1
Para retirar [a puerta del homo:
1. Abra la puerta completamente.
2. Tire el cierre situado en cada una de las bisagras de ambos [ados y col6quelo
en las palancas de las bisagras (Figura 1). Tendr& que aplicar una pequefia
presi6n hacia abajo sobre [a puerta para poder retirar el cierre de sus ganchos.
3. Tome la puerta de cada lado, tire la base de la puerta para arriba y hacia Ud.
para desalojarla de sus soportes. Siga tirando la base de la puerta hacia Ud, y
haciendo un movimiento de rotaci6n de [a parte superior hacia la cocina para
desalojar completamente de [as bisagras (Figura 2).
4. Para limpiar la puerta del homo, siga las instrucciones proporcionadas en la
tabla Cuidado y Limpieza General.
Para remplazar la puerta del homo:
1. Tome la puerta por los lados; coloque los soportes sobre las ranuras de las
bisagras. Abra la puerta completamente.
2. Desaloje el cierre de la palanca de las bisagras de ambos lados (Figura 3).
Nora: AsegOrese que los soportes de las bisagras esten completamente en
posici6n antes de liberar las palancas de las bisagras.
3. Cierre la puerta del homo.
Cierre en posici6n enganchada,
para sacar la puerta
Figura 2
Instrucciones
Cuidado
Cierre en posici6n normal
Figura 3
especiales
del cuidado de la puerta
La mayorfa de las puertas tienen vidrio que puede romperse. Siga las siguientes
recomendaciones:
1. No cierre la puerta del homo hasta que todas las parrillas esten en su lugar.
2. No golpee el vidrio con utensilios u otros objetos.
3. Si se raya, golpea, sacude o presiona el vidrio, el mismo se puede debilitar y se
puede aumentar el riesgo de romperse mAs adelante.
y Limpieza del Acero Ino×idable
(algunosmodelos):
AIgunos modelos est&n equipados con piezas exteriores de acero inoxidable. Se
requiere cuidado y limpieza especial para mantener la apariencia de las piezas de Z:
acero inoxidable. Pot favor consulte la tabla provista al comienzo de la secci6n
Cuidado y Limpieza General de este Manual del Usuario.
!::
......
Cambio de la luz del homo
La luz del horno se ENCIENDE automAticamente cuando se abra la puerta. Puede
encender la luz del homo aQn cuando la puerta estA cerrada usando el interruptor
Iocalizado en el control del homo elecr6nico. En algunos modelos, la IAmpara estA
cubierta con un protector de vidrio que queda fijo mediante una brida para cables.
EL PROTECTOR DE VIDRIO DEBE ESTAR INSTALADO SIEMPRE QUE SE USA
EL HORNO.
Cambio de la luz del homo:
PRECAUCION:
1.
2.
3.
4.
VERIFICAR
QUE EL HORNO EST¢ FRIO.
Desconecte el suministro electrico en la fuente principal
Usar un guante de cuero para protecci6n contra posibles vidrios rotos.
Reemplace el foco por un foco nuevo para artefactos de 40 watts.
Para los modelos que tienen protector de vidrio, presionar el sosten para
liberar el protector de vidrio, cambiar el foco de luz y volver a colocar el
protector de vidrio.
17
Ajuste de la temperatura
del homo
El control del homo ha sido fijado de manera precisa en f_brica. Sin embargo, esta configuraci6n puede diferir de su
homo anterior, de manera que sus horas de receta pueden no darle los resultados que espera. Si cree que el homo
est& cocinando demasiado caNente o demasiado fifo para sus horas de recetas, puede ajustar el control de manera
que el homo cocine m&s caNente o m&s fifo que la temperatura visualizada.
Para ajustar
la temperatura
del homo:
,
2.
Fije la temperatura
3.
Durante dos segundos, mantenga presionado _
4.
pantalla ahora indica la cantidad de grados desviados entre la configuraci6n de temperatura original de f&brica y
la configuraci6n de temperatura actual. Si el control del homo posee la calibraci6n de f&brica original, la pantaNa
lecturar& "0."
Ahora la temperatura puede ser ajustada en m&s o menos de 35°F (19°C), en pasos de 5°F presionando y
sosteniendo A
o V.
Ajuste hasta que aparezca en pantaNa la cantidad deseado de desviaci6n. AI disminuir
la temperatura del homo, aparecer& un signo de menos (-) delante del nQmero para indicar que el homo estar&
m&s fifo segQn la cantidad de grados mostrada.
5.
Cuando ha reaNzado el ajuste deseado, presione
en 550°F (287°C) manteniendo presionado la tecla A.
Nora: Los ajustes de la temperatura
hasta que aparezca la pantaNa con dos dfgitos. Suelte
La
para regresar a la pantalla de la hora del dfa.
del homo no afectan la temperatura del ciclo de autolimpieza.
Antes de Solicitar
Soluciones
Servicio
de Problemas Comunes
Consulte la lista siguiente antes de solicitarservicio.
Puede ahorrarle tiempo y dinero. La Nsta incluye los incidentes m_s
comunes que no son originados por la fabricaci6n o materiales defectuosos de este electrodomestico.
SITUACI6N
POSIBLE
El control
del horno emite
se_ales sonoras y el indicador
visual
muestra
cualquier
c6digo 'F' (por ejemplo, 'F11 ')
El control electr6nico ha detectado una anomalfa. Pulse CLEAR para borrar la
pantaNa y parar el sonido. Reprograme el homo. Si la anomalfa se repite, tome
nota del nQmero de anomalfa. Pulse CLEAR y consulte un servicio autorizado.
Se visualiza
La puerta qued6 abierta y los controles estan definidos para el ciclo de autolimpieza.
Cerrar la puerta y pulsar las teclas CANCELAR superior e inferior del homo.
- dr -.
Instalaci6n.
CAUSA/SOLUCION
Colocar la parrilla en el centro del homo. Colocar la parrilla del homo a nivel. Si la
parrilla y la superficie inferior del gabinete no estan niveladas, comunicarse con el
instalador.
Armarios de la cocina mal aNneados que pueden dar la impresi6n de que la estufa
estb. desnivelada. AsegQrese de que los armarios esten derechos y que haya
suficiente espacio Iibre entre la base de los armarios y la estufa.
El horno no funciona.
Cuando el homo se enchufa por primera vez o cuando se interrumpe la
aNmentaci6n de energfa, el visor destellar&. El homo no se puede programar hasta
que se configure el reloj.
Verificar que el cable de alimentaci6n estb. bien conectado al tomacorrientes.
El cable/enchufe no estb. instalado y/o conectado. El homo no tiene el cable. Comunicarse con el distribuidor, con el instalador o con el servicio tecnico autorizado.
El cableado no est,:5,completo. Comunicarse con el distribuidor, con el instalador o
con el servicio tecnico autorizado.
Corte de energfa. Verificar las luces de la casa para asegurarse.
compaRfa de electricidad local.
Llamar a la
Cortocircuito en el cable/enchufe. Cambiar el cable/enchufe.
Los controles no estb.n bien definidos. Ver las instrucciones en Configurar
Controles del Homo y seguir las instrucciones.
18
los
Antes de Solicitar Servicio
Soluciones de Problemas Comunes
SITUACI6N
POSIBLE
CAUSA/SOLUCI6N
El horno no funciona.
Se ha quemado un fusible de la casa o el disyuntor salt6 de inmediato despues de la
instalaci6n. El fusible puede no estar bien conectado. Verificar el fusible y activar el
disyuntor correctamente.
Se ha quemado un fusible de la casa o el disyuntor salt6 de inmediato despues de
que el homo fue instalado y estaba funcionando. Llamar a un representante de
servicio tecnico autorizado.
La luz del homo no
funciona.
Coloque o ajuste la bombilla. Vea "Cambio de la luz del homo" en el Manual del
usuario para las instrucciones.
Ruido del ventilador
durante la funci6n de
cucinado.
El ventilador puede encenderse o apagarse automAticamente para enfriar algunos
componentes del electrodomestico. Es normal que el ventilador continue trabajando
ann cuando el homo este apagado.
El homo produce
demasiado vapor al asar.
Aseg_rese que el homo esta abierto a la Posici6n de parar el asado.
Las carnes estAn muy cerca del elemento del asador.Vuelva a colocar la rejilla para
obtener un espacio suficiente entre las carnes y el elemento. PrecaNente el elemento
del asador. Precaliente el elemento del asador para cocinar con la griNa
incandecente.
La carne no se cuece correctamente. Eliminar el exceso de grasa de la carne. Cortar
la grasa sobrante para evitar que se enrolle, pero no cortar la parte magra.
La rejilla en la parrilla tiene el lado incorrecto hacia arriba y la grasa no esta goteando.
Siempre coloque la rejilla sobre la parrilla con las varillas hacia arriba y las ranuras
hacia abajo para que la grasa gotee en el recipiente.
Asadera usada sin rejilla o rejilla cubierta con una lamina. NO usar la asadera sin la
rejilla o cubrirla con un papel de aluminio.
Grasa se ha acumulado sobre la superficie del homo. La Iimpieza frecuente es
necesaria cuando asa constantemente. Grasa que se queda inpregnada o manchas
de comida pueden causar vapor excesivo.
Malos resultados al
hornear,
Muchos factores afectan el horneo. AsegQrese que la rejilla estA en buen lugar. Centre la
comida y deje espacio para permitir al aire de circular. Precaliente el homo a la
temperatura deseada antes de colocar la comida. Trate de ajustar las temperaturas
recomendadas y el tiempo de borneo de sus recetas. Si cree que el homo estA muy
caliente o muy frfo, vea "Ajuste de la temperatura del homo" en el Manual del usuario.
El ciclo de auto=limpieza no
funciona.
Asegurar que la puerta del homo este cerrada.
Los controles no estan programados adecuadamente. Siga las instrucciones en
"Limpieza del homo" en "Gufa de control del homo electr6nico".
El ciclo de Iimpieza fue interrumpido. El tiempo de termino debe ser de 3 a 4 horas
despues de haber comenzado. Siga las etapas en "Para parar o interrumpir el ciclo
de auto-Iimpieza" en "Gufa de control del homo electr6nico".
Las manchas
no han sido
retiradas despues del ciclo
de auto=limpieza.
No ha Nmpiado la base, la parte superior, el cadre o la puerta al exterior de la
empaquetadura del horno. Estas areas no son Iimpiadas por el ciclo de auto-Nmpieza,
pero se caNentan Io suficiente para crear residuos. Limpie estas partes antes de
comenzar un nuevo ciclo de auto-Iimpieza. Los resfduos pueden ser Iimpiados con un
paso de nylon y agua o con una esponja de nylon. Tenga cuidado de no daSar la
empaquetadura del homo.
Derrames excesivos dentro del homo. Ajuste el ciclo de auto Iimpieza por un fiempo
mAs largo.
Llamas desde el interior del
homo o vapor de la rejilla
de ventilaci6n.
Derrames excesivos dentro del homo. Esto es normal, especialmente para los de
pasteles o grasas en la base del homo. Limpie los derrames excesivos antes de
comenzar la auto-Iimpieza.
19
Notas
20
ACUERDOS DE PROTECCION
Master Protection Agreements
Congratulations
Acuerdos
on making a smart purchase.
Enhorabuena
Your new
Kenmord _ product is designed and manufactured for years of
dependable operation. But like all products, it may require
preventive
maintenance
or repair from time to time. That's when
having a Master Protection
and aggravation.
The Master Protection
Agreement
Agreement
can save you money
also helps extend the life of
your new product. Here's what the Agreement*
[]
includes:
Parts and labor needed to help keep products
properly under
El Acuerdo maestro de protecci6n tambien sirve para prolongar
de su nuevo producto. El acuerdo* incluye Io siguiente:
Piezas y mano de obra necesarias para contribuir a mantener el
funcionamiento adecuado de los productos utilizados en condiciones
normales de uso, no s61o en caso de defectos de los productos. Nuestra
cobertura va mucho mbs allb que la garantia del producto.
No se
aplican deducibles ni exclusiones por fallas del funcionamiento: es decir,
verdadera proteccibn.
[]
Servicio t_cnico por expertos (mas de 10000 t_cnicos autorizados
de
Sears), Io cual significa que quien repare o realice el mantenimiento de su
producto sera un profesional de confianza.
[]
Servicio t_cnico a escala nacional y n_mero ilimitado de Ilamadas de
solicitud de servicio t_cnico: se puede poner en contacto con nosotros
cuantas veces Io desee y cuando Io desee.
[]
Garantia <,sin sorpresas,,:
se reemplaza el producto cubierto por el
acuerdo si ocurren cuatro o mas fallas del producto en un periodo de 12
meses.
[]
Reemplazo del producto: en caso de que no se pueda reparar el
producto cubierto por el acuerdo.
[]
Revisibn anual preventiva de mantenimiento
del producto:
solicitarla en cualquier momento, sin costo alguno.
[]
Rbpida asistencia telefbnica,
la cual denominamos Solucibn rbpida: es
decir, asistencia telef6nica a traves de cualquiera de nuestros
representantes de Sears, sobre cualquiera de nuestros productos. Piense
en nosotros como en un <<manual parlante del usuario>,.
[]
Proteccibn
contra fallas el_ctricas,
de la corriente electrica.
[]
$250 al aSo para cubrir cualquier posible deterioro de alimentos
haya tenido que desechar debido a una falla mecanica de cualquiera
nuestros refrigeradores o congeladores cubiertos por este acuerdo.
[]
Devolucibn de gastos de alquiler de electrodom_sticos
si la reparaci6n
de su producto asegurado toma ma.s que el tiempo prometido.
[]
10% de descuento
aplicable tanto a los costos del servicio de reparaci6n,
como de las piezas instaladas relacionadas que no hayan quedado
cubiertos por este acuerdo.
operating
Expert service by a force of more than 10,000 authorized
Sears service technicians,
which means someone you
can trust will be working on your product.
[]
Unlimited
service calls
and nationwide
often as you want us, whenever
[]
,,No-lemon,,
guarantee-
service, as
you want us.
replacement
of your covered
product if four or more product failures occur within twelve
months.
[]
Product replacement
fixed.
[]
Annual Preventive
no extra charge.
Maintenance
[]
Fast help by phone
- we call it Rapid Resolution
if your covered product can't be
Check at your request -
phone support from a Sears representative
Think of us as a ,4alking owner's
[]
Power surge
protection
[]
$250 Food Loss
-
on all products.
manual_>.
against electrical
damage due to
power fluctuations.
Protection
annually for any food
spoilage that is the result of mechanical
covered
[]
[]
refrigerator
failure of any
product
10% discount
off the regular price of any non-covered
repair service and related installed parts.
the Agreement,
a simple phone call is all
that it takes for you to schedule service. You can call anytime
day or night, or schedule a service appointment online.
The Master Protection
Agreement
is a risk free purchase.
Protection
period expires. Purchase
Agreement
your Master
today!
Some limitations and exclusions apply. For prices and
additional information in the U.S.A. call 1-800-827-6655.
* Coverage in Canada varies on some items. For full details
call Sears Canada at 1-800-361-6665.
Sears Installation Service
For Sears professional
contra daSos debidos a fluctuaciones
que
de
installation
of home appliances,
Una vez que haya realizado el pago de este acuerdo, bastara una simple
Ilamada telef6nica para concertar una visita de servicio. Puede Ilamar a
uier hora del dia o de la noche, o bien concertar una visita de servicio por
Internet.
If you
cancel for any reason during the product warranty period, we
will provide a full refund. Or, a prorated refund anytime after the
product warranty
puede
or freefler.
Rental reimbursement
if repair of your covered
takes longer than promised.
Once you purchase
la durabilidad
[]
normal use, not just defects. Our coverage
protection.
por haber hecho una compra inteligente. Su nuevo producto
Kenmore®esta dise_ado y fabricado para brindarle a_os de funcionamiento
liable. Pero, como cualquier producto, puede necesitar mantenimiento
preventivo o reparaciones peri6dicas. Es por eso que tener un Acuerdo maestro
de protecci6n podria ahorrarle dinero y molestias.
goes well beyond the product warranty. No deductibles,
no functional failure excluded from coverage - real
[]
maestros de protecci6n
garage
door openers, water heaters, and other major home items, in
the U.S.A. or Canada call 1-800-4-MY-HOME
®.
La adquisici6n del Acuerdo maestro de protecci6n es una inversi6n exenta de
riesgos. Si por cualquier motivo decide cancelar dicho acuerdo durante el
periodo de garantia del producto, le haremos un reintegro total del valor. O bien
un importe proporcional si cancela el acuerdo en cualquier otro momento
)osterior al vencimiento del periodo de garantia del producto, iAdquiera hoy
mlsmo su Acuerdo maestro de protecci6n!
Y exclusiones podrian aplicarse. Parasolicitar
Algunas
limitaciones
preclos e informacibn adicional, Ilame al 1-800-827-6655 (en los EE.UU.).
* La cobertura en Canadb varia en el caso de algunos articulos. Para
obtener detalles completos al respecto, Ilame al 1-800-361-6665 de Sears
de Canadb.
Servicio de instalacibn
de Sears
Para solicitar la instalacidn por profesionales
de Sears de electrodomesticos,
abridores de puertas de garaje, calentadores de agua y otros articulos de uso
_rioritario en el hogar, Ilame al 1-800-4-MY-HOME
en los EE.UU. o CanadA.
21
;:_""'_
Your Home
For expert troubleshooting
and home solutions advice:
www.managemyhome.com
For repair - in your home - of all major brand appliances,
lawn and garden equipment, or heating and cooling systems,
no matter who made it, no matter who sold it!
For the replacement parts, accessories and
owner's manuals that you need to do-it-yourself.
For Sears professional installation of home appliances
and items like garage door openers and water heaters.
1-800-4-MY-HOME
Call anytime,
® (1-800-469-4663)
day or night (U.S.A. and Canada)
www.sears.com
www.sears.ca
Our Home
For repair of carry-in items like vacuums, lawn equipment,
and electronics, call anytime for the location of your nearest
Sears Parts & Repair Service Center
1-800-488-1222
(U.S.A.)
1-800-469-4663
www.sears.com
To purchase a protection
1-800-827-6655
agreement
on a product serviced
by Sears:
1-800-361-6665
(Canada)
(U.S.A.)
Para pedir servicio de reparacidn
a domicilio, y para ordenar piezas:
1-888-SU-HOGAR
(Canada)
www.sears.ca
Au Canada
pour service en fran(_ais:
1-800-LE-FOYER
®
Mc
(1-800-533-6937)
(1-888-784-6427)
® Registered
Trademark
/ TMTrademark
/ SMService
Mark of Sears
® Marca Registrada / TM Marca de Fabrica / SM Marca de Servicio
MC Marque de commerce / MD Marque depos6e de Sears Brands,
Brands,
de Sears
LLC
LLC
Brands,
LLC
© Sears Brands, LLC